Recent projects need to use some effects of beauty, so I began to contact opencv computer vision library. I found a simple and free introductory video "opencv 4 # quick start video 30 lectures" in Tencent class. After watching the video, I initially had a clear concept and basic usage of OpenCV #. The next step is to start some preliminary contact with beauty. A simple test} effect is written below. The specific functions include brightness, contrast, thin face, big eyes, whitening and skin grinding. However, in fact, there are still many problems for project use and more optimization is needed.
1. Image creation function slider
void BeautyCam::initMainImgUI()
{
	namedWindow("BeautyCam", WINDOW_AUTOSIZE);
	string path = "6.jpg";
	m_MainImg =imread(path);
	imshow("src", m_MainImg);

	//68 points of face data detected
	m_vecFaceData = dectectFace68(path);

	int max_value = 100;
	int con_value = 100;
	int lignhtnesss = 50;
	int contrast = 2;
	int bigeyeval = 0;
	int faceval = 0;
	int beautyval = 0;
	createTrackbar("brightness", "BeautyCam", &lignhtnesss, max_value, on_lightness, (void*)(&m_MainImg));
	createTrackbar("contrast ratio", "BeautyCam", &contrast, max_value, on_contrast, (void*)(&m_MainImg));
	createTrackbar("Big eyes", "BeautyCam", &bigeyeval, 60, on_BigEye, (void*)(&m_MainImg));
	createTrackbar("Thin face", "BeautyCam", &faceval, 70, on_thinFace, (void*)(&m_MainImg));
	createTrackbar("Beauty", "BeautyCam", &beautyval, 200, on_beautyFace, (void*)(&m_MainImg));

	on_lightness(50, (void*)(&m_MainImg));
	imshow("BeautyCam", m_MainImg);
}
This code is the initialization program for creating scroll bars, mainly the use of createTrackbar function:
Prototype:
CV_ Exports int createtrackbar (const string & trackbarname, / / scroll bar name
Const string & winname, / / which window the scroll bar acts on, / / window name
int* value, int count, / / initial value of slider and maximum value of scroll bar
TrackbarCallback onChange = 0, / / callback function = slider value change
void* userdata = 0); // User data created by the user to the callback function
Here is the need to define the relevant callback function. The prototype is: void (*TrackbarCallback)(int pos, void* userdata);
Therefore, you only need to create the same function. The change of the slider will trigger the callback function and transfer the change of the pos value of the formal parameter.
For example:
    //Contrast adjustment
	static void on_contrast(int b, void*userdata);
	//Brightness adjustment
	static void on_lightness(int b, void*userdata);
	//Eye adjustment
	static void on_BigEye(int b, void*userdata);
	//Thin face effect
	static void on_thinFace(int b, void*userdata);
	//Beauty effect
	static void on_beautyFace(int b, void*userdata);
2. Implementation of callback function contrast adjustment
void BeautyCam::on_contrast(int b, void*userdata)
{
	Mat img = *((Mat *)userdata);
	Mat m = Mat::zeros(img.size(), img.type());
	Mat dst = Mat::zeros(img.size(), img.type());
	m = Scalar(b, b, b);
	double con = b / 100.0;
	addWeighted(img, con, m, 0, 0, dst);
	imshow("BeautyCam", dst);
}
addWeighted() function is a function to fuse two pictures of the same size and type;
Prototypes: CVS_ EXPORTS_ W void addweighted (inputarray SRC1, / / first input image
double alpha, / / the weight of the first element
InputArray src2, / / second input image
double beta, / / second element weight
double gamma, / / Figure 1 and Figure 2 , the value added after the sum
OutputArray dst, / / output image
int dtype = -1);
3. Implementation of callback function {brightness adjustment
void BeautyCam::on_lightness(int b, void*userdata)
{
	Mat img = *((Mat *)userdata);
	Mat m = Mat::zeros(img.size(), img.type());
	Mat dst = Mat::zeros(img.size(), img.type());
	m = Scalar(b, b, b);
	addWeighted(img, 1.0, m, 0, b, dst);
	imshow("BeautyCam", dst);
}
As above, the contrast and brightness can be directly realized with an addWeighted , and the brightness and contrast can be set at the same time (the difference is expanding), which is mainly to adjust the beta , and alpha parameters of addWeighted , at the same time.
4. Face data detection
To achieve the effect of big eyes or thin face, the first is to detect the face and extract feature points. Generally, 68 points are commonly used, as follows:

Here, the data of 68 characteristic points is obtained by calling the third-party library dlib:
std::vector<std::vector<Point2f>> BeautyCam::dectectFace68(const string &path)
{
	std::vector<std::vector<Point2f>>  rets;
	//Load picture path
	array2d<rgb_pixel> img;
	load_image(img, path.c_str());
	//Define face detector
	frontal_face_detector detector = get_frontal_face_detector();
	std::vector<dlib::rectangle> dets = detector(img);

	for (auto var : dets)
	{
		//Key point detector
		shape_predictor sp;
		deserialize("shape_predictor_68_face_landmarks.dat") >> sp;
		//Define shape object to save 68 key points detected
		full_object_detection shape = sp(img, var);
		//Storage file
		ofstream out("face_detector.txt");
		//Read keys into container
		std::vector<Point2f> points_vec;
		for (int i = 0; i < shape.num_parts(); ++i)
		{
			auto a = shape.part(i);
			out << a.x() << " " << a.y() << " ";
			Point2f ff(a.x(), a.y());
			points_vec.push_back(ff);
		}
		rets.push_back(points_vec);
	}
	cout << "End of face detection:" <<dets.size()<<"Face data"<< endl;
	return rets;
}
5. Image translation deformation algorithm
The next problem is the image local deformation algorithm. The specific principle is that the thin face uses the image local translation deformation, and the enlarged eye is the image local scaling deformation.
Image local translation deformation formula:

To tell you the truth, I can't understand this formula. It seems to be combined with the Interactive Image Warping algorithm. During the process of checking this article, I found that all English can only say one sentence. I can't understand it at all, let alone how the formula was derived. I gave up and read this formula directly according to the boss's code.
reference resources: https://blog.csdn.net/grafx/article/details/70232797 Thin face and enlarged eyes of image processing algorithm
Image local scaling formula (big eye):
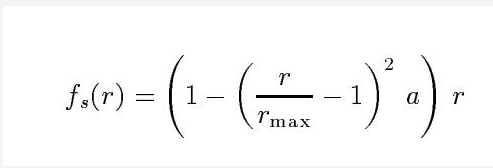
reference resources: https://www.freesion.com/article/40151105562/ Thin face and big eye algorithm
Baidu didn't find some thin face and big eye test examples written in c + +. Some posted codes are relatively simple and the parameters are a little difficult to understand, but python has relevant examples (the principle is the same), so it encapsulates the interfaces that c + + can use through python code.
Thin face and big eye mainly refer to the function interfaces encapsulated in the following two Blogs:
reference resources: https://www.cnblogs.com/ckAng/p/10978078.html python+opencv+dlib thin face effect
reference resources: https://www.freesion.com/article/40151105562/ Thin face and big eye algorithm
6. Callback function {big eye effect adjustment
void BeautyCam::on_BigEye(int b, void*userdata)
{
	Mat src = *((Mat *)userdata);
	Mat dst = src.clone();
	for (auto points_vec : m_pIntance->m_vecFaceData)
	{
		Point2f left_landmark = points_vec[38];
		Point2f	left_landmark_down = points_vec[27];

		Point2f	right_landmark = points_vec[44];
		Point2f	right_landmark_down = points_vec[27];

		Point2f	endPt = points_vec[30];

		//#Calculate the distance from the 4th point to the 6th point as the distance
		/*float r_left = sqrt(
			(left_landmark.x - left_landmark_down.x) * (left_landmark.x - left_landmark_down.x) +
			(left_landmark.y - left_landmark_down.y) * (left_landmark.y - left_landmark_down.y));
		cout << "Left eye distance: "< r_left;*/
		float r_left = b;

		//	#Calculate the distance from the 14th point to the 16th point as the distance
		//float	r_right = sqrt(
		//	(right_landmark.x - right_landmark_down.x) * (right_landmark.x - right_landmark_down.x) +
		//	(right_landmark.y - right_landmark_down.y) * (right_landmark.y - right_landmark_down.y));
		//Cout < < right eye distance: < < R_ right;
		float r_right = b;
		//	#Thin left
		m_pIntance->LocalTranslationWarp_Eye(src, dst, left_landmark.x, left_landmark.y, endPt.x, endPt.y, r_left);
		//	#Thin right
		m_pIntance->LocalTranslationWarp_Eye(src, dst, right_landmark.x, right_landmark.y, endPt.x, endPt.y, r_right);

	}
	imshow("BeautyCam", dst);
}
For the enlargement of the eye, it is mainly to locally zoom the image at four feature points 38, 27, 44, 30. You can also try to find appropriate points by yourself. The points are not unique.
This is used as a slider adjustment, so set the distance between the left eye and the right eye to the slider value, but this is problematic because not all eyes are the same size. Therefore, the sliding bar value can be added or subtracted directly according to the calculated distance (where the code is annotated).
For example: r_right = (coefficient) * r_right + b r_left = (coefficient) * r_left+ b needs to adjust the appropriate coefficient by itself
Code implementation of image local scaling algorithm:
void BeautyCam::LocalTranslationWarp_Eye(Mat &img, Mat &dst, int warpX, int warpY, int endX, int endY, float radius)
{
	//Translation distance
	float ddradius = radius * radius;
	//Calculate | M-C | 2
	size_t mc = (endX - warpX)*(endX - warpX) + (endY - warpY)*(endY - warpY);
	//Calculate the number of high and wide channels of the image
	int height = img.rows;
	int width = img.cols;
	int chan = img.channels();

	auto Abs = [&](float f) {
		return f > 0 ? f : -f;
	};

	for (int i = 0; i < width; i++)
	{
		for (int j = 0; j < height; j++)
		{
			// #Calculate whether the point is within the range of the deformation circle
			//#In the first step of optimization, the direct judgment will be in the matrix box of (startX, startY)
			if ((Abs(i - warpX) > radius) && (Abs(j - warpY) > radius))
				continue;

			float distance = (i - warpX)*(i - warpX) + (j - warpY)*(j - warpY);
			if (distance < ddradius)
			{
				float rnorm = sqrt(distance) / radius;
				float ratio = 1 - (rnorm - 1)*(rnorm - 1)*0.5;
				//Map original location
				float UX = warpX + ratio * (i - warpX);
				float UY = warpY + ratio * (j - warpY);

				//The value of UX UY is obtained according to bilinear interpolation
				BilinearInsert(img, dst, UX, UY, i, j);
			}
		}
	}
}
The bilinear interpolation algorithm is used, so I also checked the principle of bilinear interpolation algorithm. Here, I just perform bilinear interpolation for each pixel separately as follows:
void BeautyCam::BilinearInsert(Mat &src, Mat &dst, float ux, float uy, int i, int j)
{
	auto Abs = [&](float f) {
		return f > 0 ? f : -f;
	};

	int c = src.channels();
	if (c == 3)
	{
		//Floating point coordinates of stored images
		CvPoint2D32f uv;
		CvPoint3D32f f1;
		CvPoint3D32f f2;

		//Take integer
		int iu = (int)ux;
		int iv = (int)uy;
		uv.x = iu + 1;
		uv.y = iv + 1;

		//The actual width of the pixel row of step image is calculated in three channels (0, 1, 2)
		f1.x = ((uchar*)(src.data + src.step*iv))[iu * 3] * (1 - Abs(uv.x - iu)) + \
			((uchar*)(src.data + src.step*iv))[(iu + 1) * 3] * (uv.x - iu);
		f1.y = ((uchar*)(src.data + src.step*iv))[iu * 3 + 1] * (1 - Abs(uv.x - iu)) + \
			((uchar*)(src.data + src.step*iv))[(iu + 1) * 3 + 1] * (uv.x - iu);
		f1.z = ((uchar*)(src.data + src.step*iv))[iu * 3 + 2] * (1 - Abs(uv.x - iu)) + \
			((uchar*)(src.data + src.step*iv))[(iu + 1) * 3 + 2] * (uv.x - iu);


		f2.x = ((uchar*)(src.data + src.step*(iv + 1)))[iu * 3] * (1 - Abs(uv.x - iu)) + \
			((uchar*)(src.data + src.step*(iv + 1)))[(iu + 1) * 3] * (uv.x - iu);
		f2.y = ((uchar*)(src.data + src.step*(iv + 1)))[iu * 3 + 1] * (1 - Abs(uv.x - iu)) + \
			((uchar*)(src.data + src.step*(iv + 1)))[(iu + 1) * 3 + 1] * (uv.x - iu);
		f2.z = ((uchar*)(src.data + src.step*(iv + 1)))[iu * 3 + 2] * (1 - Abs(uv.x - iu)) + \
			((uchar*)(src.data + src.step*(iv + 1)))[(iu + 1) * 3 + 2] * (uv.x - iu);

		((uchar*)(dst.data + dst.step*j))[i * 3] = f1.x*(1 - Abs(uv.y - iv)) + f2.x*(Abs(uv.y - iv));  //Assign values to three channels
		((uchar*)(dst.data + dst.step*j))[i * 3 + 1] = f1.y*(1 - Abs(uv.y - iv)) + f2.y*(Abs(uv.y - iv));
		((uchar*)(dst.data + dst.step*j))[i * 3 + 2] = f1.z*(1 - Abs(uv.y - iv)) + f2.z*(Abs(uv.y - iv));

	}
}
The whole big eye effect is completed.
7. Callback function {face slimming effect adjustment
void BeautyCam::on_thinFace(int b, void*userdata)
{
	Mat src = *(Mat *)userdata;
	Mat dst = src.clone();
	for (auto points_vec : m_pIntance->m_vecFaceData)
	{
		Point2f endPt = points_vec[34];
		for (int i = 3; i < 15; i = i + 2)
		{
			Point2f start_landmark = points_vec[i];
			Point2f end_landmark = points_vec[i + 2];

			//Calculate the thin face distance (calculate the distance between two adjacent points)
			/*float dis = sqrt(
				(start_landmark.x - end_landmark.x) * (start_landmark.x - end_landmark.x) +
				(start_landmark.y - end_landmark.y) * (start_landmark.y - end_landmark.y));*/
			float dis = b;
			dst = m_pIntance->LocalTranslationWarp_Face(dst, start_landmark.x, start_landmark.y, endPt.x, endPt.y, dis);
		}
	}
	imshow("BeautyCam", dst);
}
Here, there is no choice to select the specified feature points to calculate the distance. I directly use the slider value as the thin face distance. Specifically, several points can be taken according to the above 68 feature points to calculate the thin face distance.
Code implementation of image local translation algorithm:
	Mat dst = img.clone();
	//Translation distance
	float ddradius = radius * radius;
	//Calculate | M-C | 2
	size_t mc = (endX - warpX)*(endX - warpX) + (endY - warpY)*(endY - warpY);
	//Calculate the number of image channels wide
	int height = img.rows;
	int width = img.cols;
	int chan = img.channels();

	auto Abs = [&](float f) {
		return f > 0 ? f : -f;
	};

	for (int i = 0; i < width; i++)
	{
		for (int j = 0; j < height; j++)
		{
			// #Calculate whether the point is within the range of the deformation circle
			//#In the first step of optimization, the direct judgment will be in the matrix box of (startX, startY)
			if ((Abs(i - warpX) > radius) && (Abs(j - warpY) > radius))
				continue;

			float distance = (i - warpX)*(i - warpX) + (j - warpY)*(j - warpY);
			if (distance < ddradius)
			{
				//#Calculate the original coordinates of (i, j) coordinates
				//#The part in the square sign on the right of the calculation formula
				float ratio = (ddradius - distance) / (ddradius - distance + mc);
				ratio *= ratio;

				//Map original location
				float UX = i - ratio * (endX - warpX);
				float UY = j - ratio * (endY - warpY);

				//The value of UX UY is obtained according to bilinear interpolation
				BilinearInsert(img, dst, UX, UY, i, j);
				//Change the current value
			}
		}
	}

	return dst;

}
The above two translation and scaling algorithms are mainly encapsulated according to python code. The overall effect is OK, but they still need to be continuously optimized and changed.
8. Callback function beauty grinding algorithm
The principle is to use opencv's own face training data to obtain face matrix data, and implement bilateral filtering and Gaussian blur;
Formula of beauty grinding algorithm:

The code implementation is as follows:
void BeautyCam::on_beautyFace(int b, void*userdata)
{
	Mat src = *(Mat *)userdata;
	Mat img = src.clone();
	double scale = 1.3;

	CascadeClassifier cascade = m_pIntance->loadCascadeClassifier("./haarcascade_frontalface_alt.xml");//Face training data
	CascadeClassifier netcascade = m_pIntance->loadCascadeClassifier("./haarcascade_eye_tree_eyeglasses.xml");//Human eye training data
	if (cascade.empty() || netcascade.empty())
		return;
	m_pIntance->detectAndDraw(img, cascade, scale,b);
	if (m_pIntance->isDetected == false)
	{
		cout << "enter" << endl;
		Mat dst;

		int value1 = 3, value2 = 1;

		int dx = value1 * 5;    //One of the bilateral filtering parameters
		//double fc = value1 * 12.5; // One of the bilateral filtering parameters
		double fc = b;
		int p = 50;//transparency
		Mat temp1, temp2, temp3, temp4;

		//The original layer image is filtered bilaterally, and the results are stored in temp1 layer
		bilateralFilter(img, temp1, dx, fc, fc);

		//Subtract the image of the original drawing layer from the temp1 layer and store the result in the temp2 layer
		temp2 = (temp1 - img + 128);

		//Gaussian blur
		GaussianBlur(temp2, temp3, Size(2 * value2 - 1, 2 * value2 - 1), 0, 0);

		//With the original layer image as the base color and the temp3 layer as the mixing color, the two layers are mixed by linear light to obtain the layer temp4
		temp4 = img + 2 * temp3 - 255;

		//Considering the opacity, the result of the previous step is corrected to obtain the final image dst
		dst = (img*(100 - p) + temp4 * p) / 100;
		dst.copyTo(img);
	}
	imshow("BeautyCam", img);
}
The beauty effect is mainly adjusted by bilateral filtering parameters.
void BeautyCam::detectAndDraw(Mat& img, CascadeClassifier& cascade,  double scale, int val)
{
	std::vector<Rect> faces;
	const static Scalar colors[] = { CV_RGB(0,0,255),
		CV_RGB(0,128,255),
		CV_RGB(0,255,255),
		CV_RGB(0,255,0),
		CV_RGB(255,128,0),
		CV_RGB(255,255,0),
		CV_RGB(255,0,0),
		CV_RGB(255,0,255) };//Use different colors to represent different faces
	//Reduce the picture to speed up the detection
	Mat gray, smallImg(cvRound(img.rows / scale), cvRound(img.cols / scale), CV_8UC1);
	//Because haar like features are used, they are all based on gray images, which should be converted into gray images here
	cvtColor(img, gray, CV_BGR2GRAY);
	resize(gray, smallImg, smallImg.size(), 0, 0, INTER_LINEAR);//Reduce the size to 1/scale and use linear interpolation
	equalizeHist(smallImg, smallImg);//histogram equalization
	cascade.detectMultiScale(smallImg, //Image represents the input image to be detected
		faces,//The detected objects are represented by the face sequence
		1.1, //Callfactor represents the proportion of each reduction in image size
		2, //minNeighbors indicates that each target must be detected at least three times before it is considered a real target (because the surrounding pixels and different window sizes can detect faces),
		0 | CASCADE_SCALE_IMAGE ,//minSize is the minimum size of the target
		Size(30, 30)); //minSize is the maximum size of the target
	int i = 0;
	//Traverse the detected rectangle
	for (std::vector<Rect>::const_iterator r = faces.begin(); r != faces.end(); r++, i++)
	{
		isDetected = true;
		Mat smallImgROI;
		std::vector<Rect> nestedObjects;
		Point center, left, right;
		Scalar color = colors[i % 8];
		int radius;
		center.x = cvRound((r->x + r->width*0.5)*scale);//Restore to original size
		center.y = cvRound((r->y + r->height*0.5)*scale);
		radius = cvRound((r->width + r->height)*0.25*scale);

		left.x = center.x - radius;
		left.y = cvRound(center.y - radius * 1.3);

		if (left.y < 0)
		{
			left.y = 0;
		}
		right.x = center.x + radius;
		right.y = cvRound(center.y + radius * 1.3);

		if (right.y > img.rows)
		{
			right.y = img.rows;
		}
		/*Principle algorithm
		Skin beautifying and skin grinding algorithm
		Dest =(Src * (100 - Opacity) + (Src + 2 * GuassBlur(EPFFilter(Src) - Src + 128) - 256) * Opacity) /100 ;
		*/
		//Face frame for painting recognition
		//rectangle(img, left, right, Scalar(255, 0, 0));
		Mat roi = img(Range(left.y, right.y), Range(left.x, right.x));

		Mat dst;
		int value1 = 3, value2 = 1;

		int dx = value1 * 5;    //One of the bilateral filtering parameters
		//double fc = value1 * 12.5; // One of the bilateral filtering parameters
		double fc = val;//Change value
		int p = 50;//transparency
		Mat temp1, temp2, temp3, temp4;

		//Bilateral filtering input image output image diameter range of each pixel field sigma of color space filter sigma of coordinate space filter
		bilateralFilter(roi, temp1, dx, fc, fc);
		temp2 = (temp1 - roi + 128);
		//Gaussian blur
		GaussianBlur(temp2, temp3, Size(2 * value2 - 1, 2 * value2 - 1), 0, 0);
		temp4 = roi + 2 * temp3 - 255;
		dst = (roi*(100 - p) + temp4 * p) / 100;
		dst.copyTo(roi);
	}
}
At this point, the simple function of whitening and dermabrasion is realized.
reference resources: https://blog.csdn.net/zhangqipu000/article/details/53260647 opencv Whitening Face Detection
The overall effect is only a simple realization. If it is to be applied to the project, there are still many problems, which need continuous optimization and algorithm change. As a simple demo of learning opencv recently, to consolidate the knowledge points.