📑 Content of this article: This article is enough for the back-end personnel of the front and back-end asynchronous request Library of Axios~
📘 Article column: Front end knowledge (knowledge points to be mastered at the back end)
🎬 Last updated: January 29, 2022 This article is enough for the back-end personnel of the front and back-end asynchronous request Library of Axios~
🙊 Personal profile: a Junior Program ape who is studying in a two-year college. In line with paying attention to foundation, clock in algorithm and sharing technology, as a blogger who summarizes personal experience, although he may be lazy sometimes, he will stick to it. If you like blog very much, it is suggested to look at the following line ~ (crazy hint QwQ)
🌇 give the thumbs-up 👍 Collection ⭐ Leaving a message. 📝 One key three connection care program ape, start with you and me
📑 Asynchronous request library for front-end and back-end interaction of Axios
💖 0. Write in front
Xiaofu recently started the front-end and back-end separation project, because many technologies have been learned before. It's OK to quickly summarize and re consolidate the technologies learned before without mastering them too deeply. After all, we are Java engineers specializing in back-end technology, but the construction of the project needs not only the back-end logic, but also the front-end page integration, Intermediate data transmission, back-end API interface logic, etc. are all important, so as to complete and complete a project. The project is not a necessity. As a school recruitment interview, it is more about computer network, operating system, data structure and algorithm, design mode, database and other related knowledge, but keep improving, One or two overall projects will be more or less completed, which will certainly bring great harvest. In order to have an impression when reviewing the front-end knowledge in the future, this article is about the front-end and back-end information interaction asynchronous request Library of Axios. Don't say much. Let's read the article~
When I first learned it, I learned it from the video of the big guy with bad programming. When I brush it for the second time, I can see the official website with much more ease~
🎁 1. axios asynchronous request Technology
Introduction to axios
A library function of asynchronous request in axios front-end is similar to JQuery ajax technology
ajax is used to initiate asynchronous requests to the back-end services on the page, and render the response data of the back-end services to the page.
Since Ajax can separate the front and back ends, why change to axios?
- JQuery recommends Ajax, which is actually a tool for asynchronous request and reception of front and back-end data encapsulated by some API s of jQuery.
- We may use the Vue framework when we do the front-end and back-end separation project. Vue recommends that we use axios, which is lighter, smaller and more flexible.
Summary: the asynchronous request is also initiated through the front-end page. After the request, the page does not move. After the response, it will refresh and render the local content of the page.
axios sends asynchronous requests to the front-end system in Vue. It is an interactive messenger connecting the front-end and back-end~
It is not the official class library of Vue. The third-party asynchronous request processing library recommends axios in Vue
Official Learning address of axios
Official Learning address of domestic domain name
Chinese official website
axios Chinese website | axios API Chinese document | axios (axios JS. Com)
Official definition: axios is a concise, easy-to-use and efficient Http library
=====>In short, it is used to send Http asynchronous request library
🎁 2. What is the difference between axios and the previous asynchronous request library
Before learning, we should first understand several major features of axios and compare them with JQuery and Ajax we have learned before. In this way, we can not only quickly understand the underlying implementation of front and rear page data interaction, but also deepen and consolidate the technology.
Several features given on the official website
- Create XMLHttpRequests from the browser
- From node JS create http request
- support Promise API
- Intercept requests and responses
- Convert request data and response data
- Cancel request
- Automatically convert JSON data
- Client support defense XSRF
Is there something we are familiar with, XMLHttpRequests? This is something we saw when we first learned Ajax. The asynchronous request operation of AJAX is implemented based on the attributes and methods in the object XMLHttpRequests~
🎁3,HelloAxios
Go to the official website to download the core asynchronous request library
Enter the page and save as: Axios min.js
Through npm
$ npm install axios
Introducing asynchronous request library into html file
<script src="js/axios.min.js"></script>
HelloAxios sends asynchronous requests
🚀 1. GET request
Take a small one 🌰:
axios.get('/user?ID=201901094106&username=Alascanfu')
    .then(function (resp) {//Processing after the request is successfully responded to
        console.log(resp);
    }).catch(function (error) {//Response processing after request failure
        console.log(error);
    })
The above code represents a series of steps when we want to send a GET request to the server after we introduce axios, an asynchronous request class library
- axios.get(url): request the url address through GET.
- .then(function(resp)){...}: This is a chain programming format. When we send a request to the back end, the back end will return the request, which is generally a response
- .catch(function(error)){...}: This is chained programming code that is executed only when the request is wrong. We can also understand that this thing is try catch in Java
axios can send RESTful requests
Such as POST \ DELETE \ PUT \ GET, etc
Quickly build a SpringBoot program and write the corresponding Controller for testing
@RestController
@CrossOrigin//Used to solve cross domain problems
public class HelloAxiosController {
@GetMapping("/helloAxios")
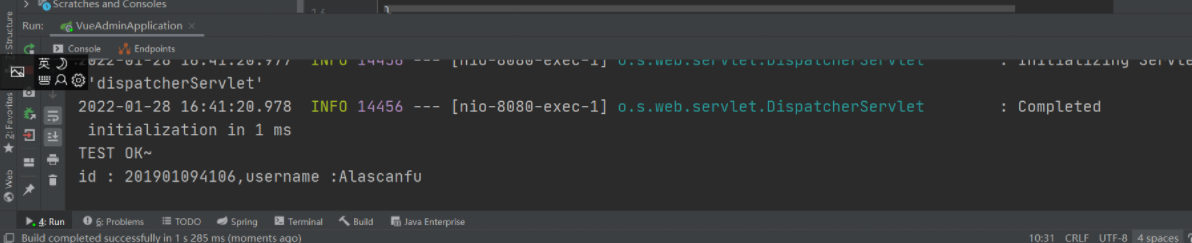
public String helloAxios(){
System.out.println("TEST OK~");
return "hello ~ Axios";
}
}
Modify the access url of the front end and test it
<script>
    axios.get('http://localhost:8080/helloAxios?id=201901094106&username=Alascanfu')
    .then(function (resp) {
        console.log(resp);
        console.log(resp.data);
    }).catch(function (error) {
        console.log(error);
    })
</script>
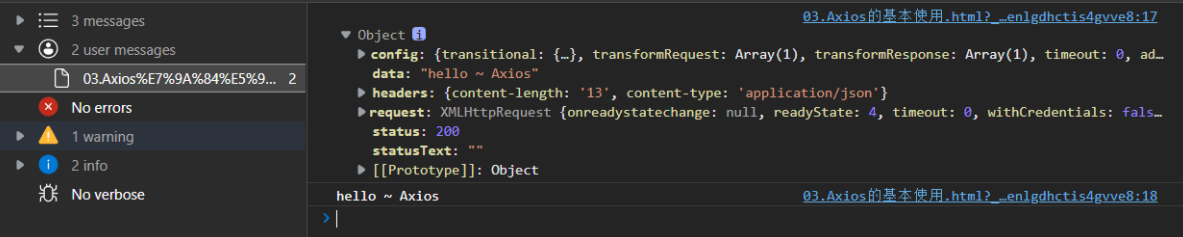
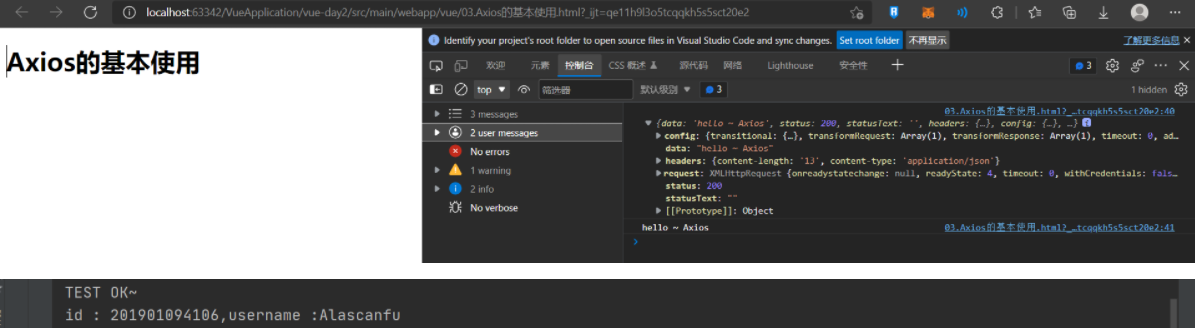
If the test is successful, the data we obtained through the response will be printed~
The returned status code is 200, and the data is hello~ Axios
The back-end structure directory is shown in the figure:

When our back-end wants to obtain data from the front-end, we can control the acquisition through @ RequestParam of spring MVC layer
@RestController
@CrossOrigin//Used to solve cross domain problems
public class HelloAxiosController {
    @GetMapping("/helloAxios")
    public String helloAxios(@RequestParam Long id , @RequestParam String username){
        System.out.println("TEST OK~");
        return "hello ~ Axios";
    }
}
Modify our control layer code to read the corresponding parameters and output them on the console.
When you visit the front-end page of Axios, you will send a request to the back-end with parameter id and username. The back-end can obtain the corresponding parameters through @ RequestParam
🚀 2. POST request
axios.post('http://localhost:8080/helloAxios',{
   id: 201901094106,
   username: "Alascanfu"
}).then(function (resp) {
   console.log(resp);
   console.log(resp.data);
}).catch(function (error) {
   console.log(error)
})
The only difference between post requests is that there should be one more parameter in the post method, which is the JSON data passed to the back end.
Because it is a post method request, we also need to rewrite the code of our Controller layer.
@PostMapping("/helloAxiosPost")
public String postHelloAxios(@RequestBody User user){
     System.out.println(user);
     System.out.println("TEST OK~");
     return "hello ~ Axios POST!";
}
@Request receives the JSON data from the front end and assigns it to the User object.
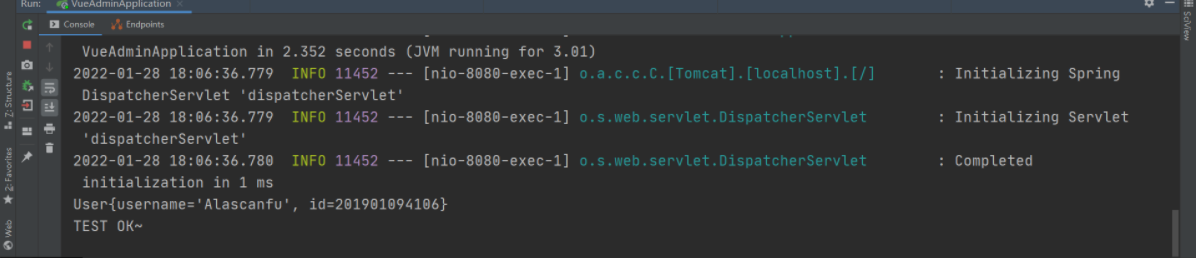
When we visit the axios interface, the back end will print out the data from the post request.
User.java
public class User {
    private String username ;
    private Long id;

    public User() {
    }

    public User(String username, Long id) {
        this.username = username;
        this.id = id;
    }

    public String getUsername() {
        return username;
    }

    public void setUsername(String username) {
        this.username = username;
    }

    public Long getId() {
        return id;
    }

    public void setId(Long id) {
        this.id = id;
    }

    @Override
    public String toString() {
        return "User{" +
            "username='" + username + '\'' +
            ", id=" + id +
            '}';
    }
}
The above has included the more common GET and POST methods. The essence of other methods is basically the same, and the rest depends on self understanding.
🎁 4. Create a configuration object for axios
🚀1,axios API
The request can be created by passing the relevant configuration to axios
// Send POST request
axios({
  method: 'post',
  url: '/user/201901094106',
  data: {
    firstName: 'Fu',
    lastName: 'JiaWei'
  }
});
🚀 2. Request configuration
This is the request configuration intercepted from the official website
{
   // `URL ` is the server URL for the request
  url: '/user',

  // `Method ` is the method used when creating the request
  method: 'get', // default

  // `baseURL 'will be automatically added before' URL ', unless' URL' is an absolute URL.
  // It can set a 'baseURL' to facilitate the delivery of relative URL s for axios instance methods
  baseURL: 'https://some-domain.com/api/',

  // `transformRequest ` allows you to modify the request data before sending it to the server
  // It can only be used in the request methods of 'PUT', 'POST' and 'PATCH'
  // The function in the following array must return a string, or ArrayBuffer, or Stream
  transformRequest: [function (data, headers) {
    // Arbitrary conversion of data
    return data;
  }],

  // `transformResponse ` it is allowed to modify the response data before passing it to then/catch
  transformResponse: [function (data) {
    // Arbitrary conversion of data
    return data;
  }],

  // `headers ` is the custom request header to be sent
  headers: {'X-Requested-With': 'XMLHttpRequest'},

  // `params ` is the URL parameter to be sent with the request
  // Must be a plain object or URLSearchParams object
  params: {
    ID: 12345
  },

   // `paramsSerializer ` is a function responsible for 'params' serialization
  // (e.g. https://www.npmjs.com/package/qs, http://api.jquery.com/jquery.param/)
  paramsSerializer: function(params) {
    return Qs.stringify(params, {arrayFormat: 'brackets'})
  },

  // `Data ` is the data sent as the request body
  // Only applicable to these request methods' put ',' post ', and' PATCH '
  // When 'transformRequest' is not set, it must be one of the following types:
  // - string, plain object, ArrayBuffer, ArrayBufferView, URLSearchParams
  // -Browser specific: FormData, File, Blob
  // -Node exclusive: Stream
  data: {
    firstName: 'Fred'
  },

  // `Timeout ` specifies the number of milliseconds the request times out (0 means no timeout)
  // If the call cost exceeds the 'timeout', the request will be interrupted
  timeout: 1000,

   // `withCredentials ` indicates whether credentials are required for cross domain requests
  withCredentials: false, // default

  // `adapter ` allows custom processing of requests to make testing easier
  // Return a promise and apply a valid response (see [response docs] (#response API))
  adapter: function (config) {
    /* ... */
  },

 // `auth ` indicates that HTTP basic authentication should be used and credentials should be provided
  // This will set an 'Authorization' header, overwriting any existing custom 'Authorization' header set with 'headers'
  auth: {
    username: 'janedoe',
    password: 's00pers3cret'
  },

   // `responseType ` indicates the data type of the server response. It can be 'arraybuffer', 'blob', 'document', 'json', 'text', 'stream'
  responseType: 'json', // default

  // `responseEncoding` indicates encoding to use for decoding responses
  // Note: Ignored for `responseType` of 'stream' or client-side requests
  responseEncoding: 'utf8', // default

   // `Xsrfcookie name ` is the name of the cookie used as the value of xsrf token
  xsrfCookieName: 'XSRF-TOKEN', // default

  // `xsrfHeaderName` is the name of the http header that carries the xsrf token value
  xsrfHeaderName: 'X-XSRF-TOKEN', // default

   // `onUploadProgress ` allows processing progress events for uploads
  onUploadProgress: function (progressEvent) {
    // Do whatever you want with the native progress event
  },

  // `onDownloadProgress ` allows processing progress events for downloads
  onDownloadProgress: function (progressEvent) {
    // Handling of native progress events
  },

   // `maxContentLength ` defines the maximum size of the allowed response content
  maxContentLength: 2000,

  // `validateStatus ` defines whether the status code for a given HTTP response is resolve or reject promise. If 'validateStatus' returns' true' (or set to 'null' or 'undefined'), promise will be resolved; Otherwise, promise will be rejecte d
  validateStatus: function (status) {
    return status >= 200 && status < 300; // default
  },

  // `maxRedirects ` is defined in node The maximum number of redirects of follow in JS
  // If set to 0, no redirection will follow
  maxRedirects: 5, // default

  // `socketPath` defines a UNIX Socket to be used in node.js.
  // e.g. '/var/run/docker.sock' to send requests to the docker daemon.
  // Only either `socketPath` or `proxy` can be specified.
  // If both are specified, `socketPath` is used.
  socketPath: null, // default

  // `httpAgent 'and' httpsAgent 'are on node JS is used to define the custom proxy used when executing http and https. Allow options to be configured like this:
  // `keepAlive ` is not enabled by default
  httpAgent: new http.Agent({ keepAlive: true }),
  httpsAgent: new https.Agent({ keepAlive: true }),

  // 'proxy' defines the host name and port of the proxy server
  // `auth ` indicates that HTTP basic authentication should be used for connection proxy and provide credentials
  // This will set a 'proxy authorization' header, overwriting the existing custom 'proxy authorization' header set by using 'header'.
  proxy: {
    host: '127.0.0.1',
    port: 9000,
    auth: {
      username: 'mikeymike',
      password: 'rapunz3l'
    }
  },

  // `cancelToken ` specifies the cancel token used to cancel the request
  // (see the Cancellation section later for more information)
  cancelToken: new CancelToken(function (cancel) {
  })
}
Simple request configuration operations:
Create an instance according to the configuration and make a request according to the configuration instance.
var instance = axios.create ({
    baseURL: "http://localhost:8080/"
});

instance.get("/helloAxios?id=201901094106&username=Alascanfu")
   .then(function (resp) {
        console.log(resp);
        console.log(resp.data);
   }).catch(function (error){
console.log(error);
})
Test access = = = = >
Common request configuration:
var instance = axios.create({
    baseURL: "http://localhost:8080/",
    timeout: 5000,
    proxy: {
    host: '127.0.0.1',
    port: 8081,
    auth: {
      username: 'Alascanfu',
      password: '123456'
    }
  }
})
To put it bluntly, this common request configuration instance is to help us simplify the configured instance object.
🎁 5. axios interceptor
Interceptor: interceptor
Function: it is used to reduce the common parameters of axios, respond to the public processing and hand it over to the interceptor for processing, so as to reduce the code redundancy when axios sends requests.
Test data on the official website
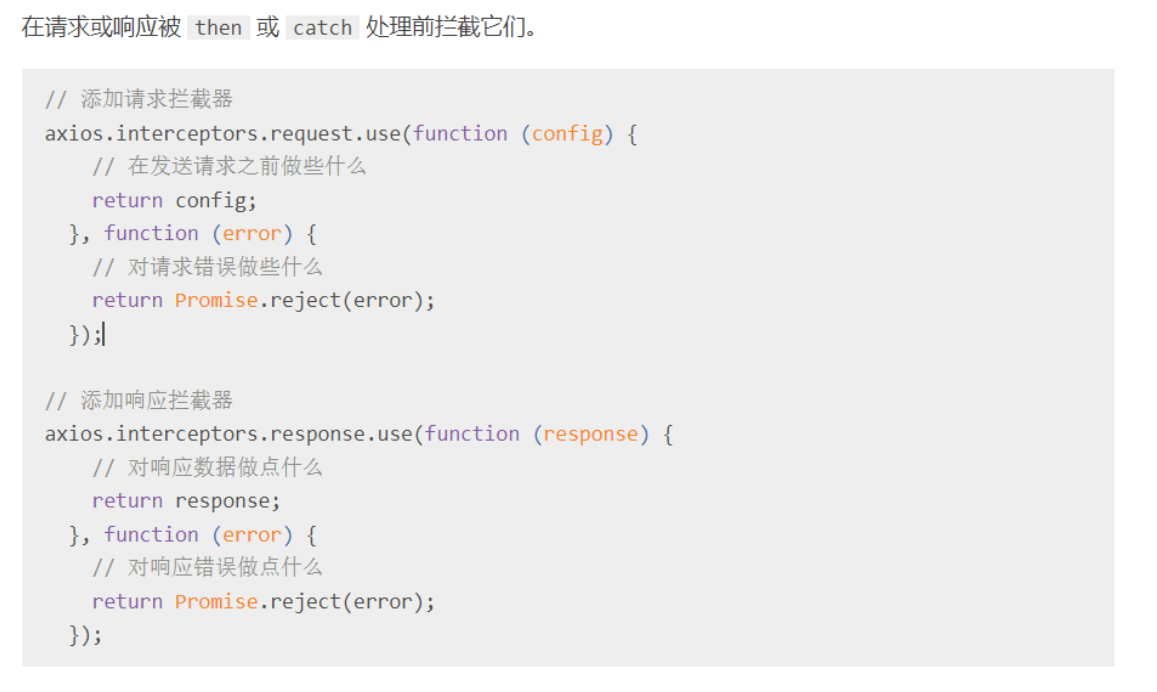
🚀 1. Request interceptor
Take a practical case to explain:
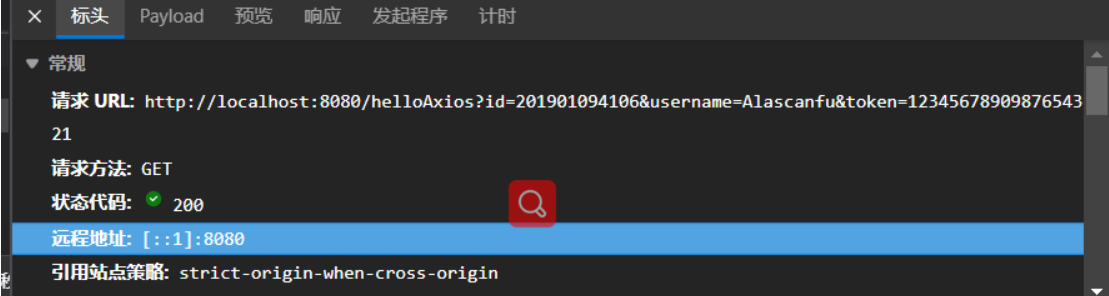
When we build a front-end and back-end separation project, the data transmitted from the front end to the back end will be subject to information authentication. We often see a string of requests with token=xxxxx behind an address. How is this realized?
<script>
    var instance = axios.create({
        baseURL: "http://localhost:8080/"
    });


    instance.interceptors.request.use(function (config) {
        console.log(config);
        if (config.url.indexOf("?") === -1)config.url+="?token=1234567890987654321";
        else config.url+="&token=1234567890987654321";
        return config;
    }, function (error) {
        console.log(error);
        return Promise.reject(error);
    })

    instance.get("/helloAxios?id=201901094106&username=Alascanfu")
        .then(function (resp) {
            console.log(resp);
            console.log(resp.data);
        }).catch(function (error) {
        console.log(error);
    })
</script>
Conduct the request test. After the test, if there are no parameters in the current settings, add the original url? The token parameter. If there are any parameters, they should be directly incorporated into the token parameter
The following parameters are object attributes that can be modified by the config configuration class. We can configure them independently according to these attributes, so as to add additional request interceptors for our requests before they really access the processor, and then send them to the back end of the server.

🚀 2. Response interceptor
As the name suggests, we can understand that it is an interceptor that needs to be passed when the server returns data to the front end, but we generally do not make any modification to the information returned by the database, but only judge whether the status code meets the required 200, correct access and other operations to replace the error display in catch.
instance.interceptors.response.use(function (resp) {
        console.log(config);
        if (resp.status == 200)return resp;
 		else {
            alert("Server error!");
        }
        return resp;
    }
💖 6. Summary
As Vue's external asynchronous request library, axios has its own characteristics, and the previous characteristics have also been described. In fact, the key point of axios is that it can easily solve the above problems by mastering various request methods called during asynchronous requests and learning how to use the browser's DEBUG, Of course, when transmitting data, there will be a lot of cross knowledge errors at the front and back ends. I think if we extract them separately, everyone will certainly modify them, but together, we will examine the thinking ability of program apes. I think it's important to master the global configuration object in axios and the two interceptors in axios. Just learn how to use and solve the actual development of the project~