From the official website of vue3, we can use Vue cli to build projects and vite to build projects, because vite will be executed a little faster, so here we talk about using vite to build projects and some problems we encounter
Step 1: create a project
- Commands for creating projects
yarn create vite-app vite-demo
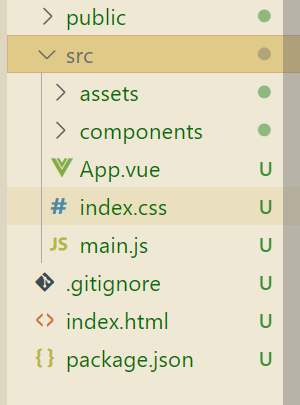
After creation, you can see the deconstruction of the project folder as follows
You can see that there are no vue routes in it. Of course, the official website gives us a way to make a simple route jump. This can be referred to by the official website. We use vue router here
Installing Vue router
Installation command
yarn add vue-router@4 --save
use
Create the router folder in the project file and create the index in the folder JS file code is as follows
import { createRouter, createWebHashHistory }  from 'vue-router'
// console.log(createRouter);
import Home from '../views/Home.vue'
const routes = [
    { path: '/', component: Home },
]

  // 3. Create a routing instance and pass the 'routes' configuration
  // You can enter more configurations here, but we are here
  // Keep it simple for the time being
const router = createRouter({
    // 4. The implementation of history mode is provided internally. For simplicity, we use the hash pattern here.
    history: createWebHashHistory(),
    routes, // `Routes: abbreviation for routes'
})

export default router
Next, in main Introducing routing into JS
import { createApp } from 'vue'
import App from './App.vue'
import router from './router'
createApp(App).use(router).mount('#app')
Note that you need to write route view in the appropriate page, which I wrote here in app In Vue file
Add it down to install element plus and introduce it on demand
Installation command
	yarn add element-plus --save  // Installation command
	Because it needs to be imported on demand, it is also necessary to install the corresponding babel The plug-in installation commands are as follows
	Here, because we use vite Use of integration tools vue-cli Scaffolding can be checked on the official website
	yarn add vite-plugin-style-import -D
	Because I use it here scss So I installed it sass and sass-loader The command is as follows
	yarn add sass sass-loader -D
After installation
Add vite. In the root directory of the project config. JS file
The code is as follows
import { defineConfig } from 'vite'
import vue from '@vitejs/plugin-vue'
import styleImport from 'vite-plugin-style-import'

export default defineConfig({
  plugins: [
    vue(),
    styleImport({
      libs: [
        {
          libraryName: 'element-plus',
          esModule: true,
          ensureStyleFile: true,
          resolveStyle: (name) => {
            return `element-plus/packages/theme-chalk/src/${name}.scss`;
          },
          resolveComponent: (name) => {
            return `element-plus/lib/${name}`;
          },
        }
      ]
    })
  ]
})
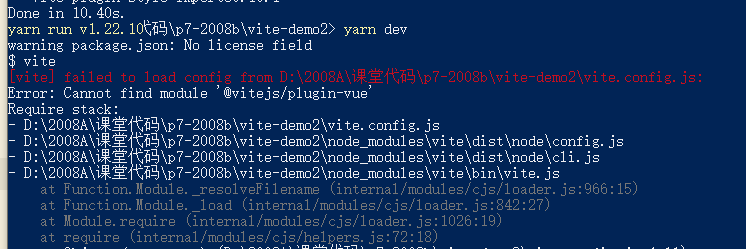
According to the instructions of element, we have created the project, but at this time, we will find that the startup project reports an error, and the error prompt is as follows

This error occurs because @ vitejs / plugin Vue has not been installed yet. You can install it here. If you are interested, you can check it on npm
Installation command
yarn add @vitejs/plugin-vue --save
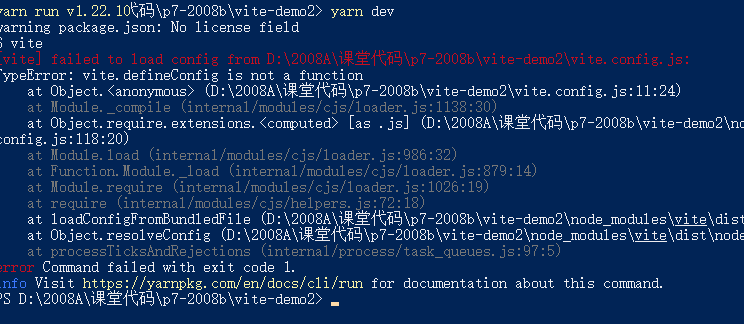
After installation, start the project again. The error is found as follows

It is suggested that defineConfig is not a function. After checking, it is found that there is no such method in vite. Why? Later, it is found that it is due to the problem of the installed vite version, and the vite version needs to be upgraded
The installation commands are as follows
yarn add vite@2.3.7 --save
Start the project again after the installation is completed. The project is started successfully
But there is another problem. The element style doesn't work. Why
After some inspection, the problem is found in vite config. JS
import { defineConfig } from 'vite'
import vue from '@vitejs/plugin-vue'
import styleImport from 'vite-plugin-style-import'

export default defineConfig({
  plugins: [
    vue(),
    styleImport({
      libs: [
        {
          libraryName: 'element-plus',
          esModule: true,
          ensureStyleFile: true,
          resolveStyle: (name) => { // The name cannot be used directly here, because the component files of element start with el - but the style file does not, so the imported style file cannot be parsed normally. Here, just add a sentence of code
           name = name.slice(3)

            return `element-plus/packages/theme-chalk/src/${name}.scss`;
          },
          resolveComponent: (name) => {
            return `element-plus/lib/${name}`;
          },
        }
      ]
    })
  ]
})
So far, the first wave of demining has been completed. Let's encourage you