After reading this tutorial, you can learn the following knowledge points:
-
Split components according to business requirements
-
Knowledge of reusable components
-
How child components receive data from parent components - in the last issue, we learned how to transfer data from parent components to child components
-
Can use useState hook for state management
-
Using classes in JavaScript
-
Using useHistory hook function
-
Use history Push() completes the redirection of the page
Note: useState corresponds to the state in the class based component. It is a very powerful hook function
Previous review
The first in a series [ten thousand words long text] rewrite and learn to become an online front-end project using React. The I code is complete and operable, and the steps are explained in detail In, we mainly completed the encapsulation of Header and Footer:

In the previous article Still worrying about no projects? Take you hand in hand from 0 to rewrite with React to learn online II In, the dynamic implementation of banner and the following high-quality recommendation are completed:
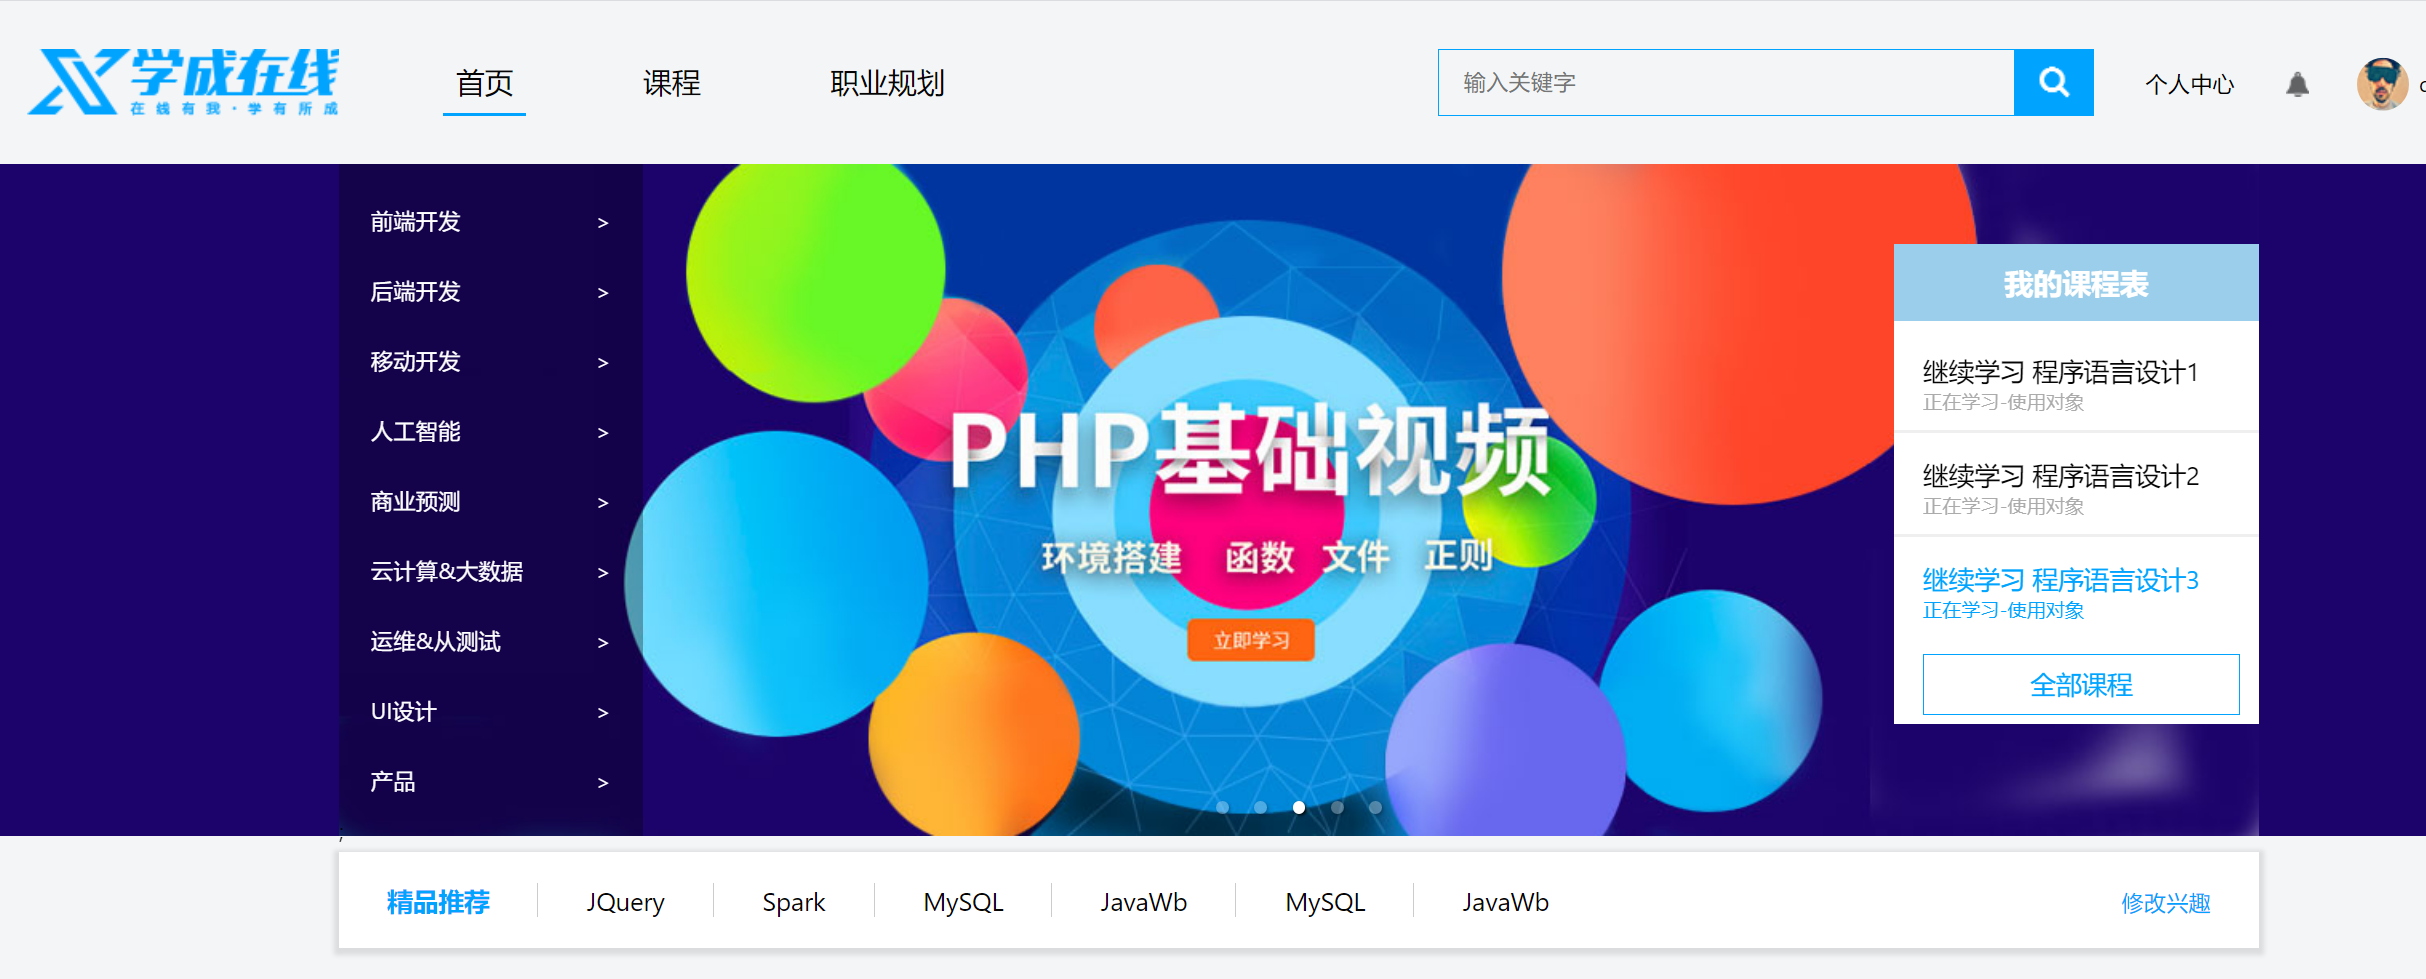
Content in the episode I don't know how to show the function / project after writing it? Take you to Git Pages and deploy your own project to impress the interviewer How to use GitHub to deploy your own project is described in. The online browsing address of this project is here: https://goldenaarcher.com/xczx-react/#/.
Here, the whole page has been completed by 40%. As long as three or four components are modularized, almost all the remaining contents of the home page can be generated dynamically.
Conduct business analysis
Before starting the specific implementation, we should still analyze the business to see how to achieve the maximum effect of code reuse.
First, let's take a look at the remaining modules that have not been implemented:
-
A boutique recommendation

-
One area recommendation

-
One area recommendation

-
A course recommendation

-
A course recommendation

-
Recommended by a mentor

It can be seen that the overall structure is actually very similar, which is the expression of a header + content, and the style of all headers is basically the same, but only the content.
Split it. The format of the header is like this:
Leftmost title + popular click in the middle + rightmost view more
So the first step is to encapsulate the header.
In fact, the content area can also be reasonably divided into three modules:
-
Boutique recommendation and course recommendation
In fact, it can be seen here that the content areas in boutique recommendation and course recommendation are the same in terms of structure - they are all courses in rows
Therefore, the two contents can be combined into the same module, so that they can render a given course
contrast:
Boutique recommendation Course recommendation -
Domain recommendation
The structure of the two fields is the same, which is divided into:
- banner on the left
- banner above
- A series of course recommendations
Since the layout of this block will be different from that of boutique / course recommendation, separate one module
-
Tutor recommendation
This module is the most different from other modules and naturally needs to be separated
The purpose of this issue is:
- Complete the encapsulation of sub header
- Complete the basic implementation of high-quality recommendation and course recommendation
Content implementation
Only one module is completed this time:
You will find that the rendering is really finished soon.
Implementation of subHeader
I put all the three subheaders together. Through this comparison, we can see how similar the structure is and how reusable it can be:

After all, the subHeader is actually divided into three parts: the title on the far left, the option in the middle, and the view on the right.
Implementation infrastructure
First, create a new component, which needs to explicitly receive three values:
-
The leftmost title must be
It is named subHeaderName here
-
Middle selection, optional
It's called midConent here
-
View more on the right, optional
It's called checkMore, which means to view more
Code implementation:
import React from 'react';

const SubHeader = (props) => {
  const { subHeaderName, midConent, checkMore } = props;

  return (
    <div className="flex space-between">
      <div>{subHeaderName}</div>
      <div>{midConent.map((val) => val)}</div>
      <div>{checkMore}</div>
    </div>
  );
};

export default SubHeader;
What is props
props here is used to receive data from the parent component. In the previous round of broadcast, we talked about how the parent component transmits data to the child component, and here we talk about how the child component receives data from the parent component.
How to transfer data from parent component to child component:
const settings = {
  data: 'test',
}

<Child {...settings} />
These attributes passed from the parent component to the child component will eventually be compressed into an object by React. By convention, this object is called props, which is also used above.
The method of getting data from props is also very simple. Just like getting properties from general objects, use props directly Data, or deconstruct the data as above:
// using props directly
alert(props.data);

// using object destruct
const { data } = props;
alert(data);
Try rendering
After adding a little CSS, make a test data to see the rendering effect.
First pass some false data from the parent component:
const Home = () => {
  return (
    // Omit others
    <div className="homepage-main">
      <SubHeader
        subHeaderName="Introduction to programming"
        midConent={[123]}
        checkMore={'true'}
      />
    </div>
  );
};

It seems that the effect is good. Now what needs to be designed is the data type passed in.
Design data type
It is known that the sub header will accept three data types: subHeaderName, midConent, and checkMore.
-
subHeaderName is a pure string, which is also the simplest.
-
The final decision of midConent is an array of objects:
[ { title: 'Hot', url: '/#' }, { title: 'primary', url: '/#' }, { title: 'intermediate', url: '/#' }, { title: 'senior', url: '/#' }, ]; -
checkMore is a separate object:
{
  title: 'View all',
  url: '/#',
};
In fact, in order to save trouble, it's not impossible to write < a href = '/ # > some titles < / a > alone. If it's troublesome, you can also write them directly.
This is a problem that everyone has different coding styles and habits. For me, extracting these constants will be much more convenient once I need to modify or clean up the data. After all, in real projects, if the background data is not ready, in most cases, we should prepare the pseudo data ourselves, rather than using the data transmitted from the background for development after the background development is completed.
‼️ Therefore, be sure to communicate with your background in advance about what the data structure looks like. It's best to have documents. If you don't have documents, you must leave e-mail or wechat chat records as evidence to prevent being dumped.
Modify the implementation method and re render the sub header
The middle content area will still use the classic structure of UL > Li > A, and use arr.map() to traverse.
import React from 'react';

const SubHeader = (props) => {
  const { subHeaderName, midConent, checkMore } = props;

  const getMidContent = () => {
    return (
      <ul className="flex">
        {midConent.map((val) => (
          <li key={val.title}>
            <a href={val.url}>{val.title}</a>
          </li>
        ))}
      </ul>
    );
  };

  return (
    <div className="sub-header flex space-between flex-center">
      <h3>{subHeaderName}</h3>
      {getMidContent()}
      <div>
        <a href={checkMore.url}>{checkMore.title}</a>
      </div>
    </div>
  );
};
At this step, the sub header implementation is still the last step away - select the highlighted implementation.
The following is the static implementation effect:

Use useState to highlight the selected object
The highlighted logic is not complicated to implement. The specific steps are as follows:
- You need a variable to save the currently selected option, which defaults to popular
- When the click event occurs, you need to replace the selected option
The implementation of this part requires the help of a hook function of React: setState. The existence of setState is to replace the state attribute in the class based component.
The syntax is:
It is recommended to use const in ES6
const [property, propertyHandler] = useState(defaultValue);
among
-
Property is the variable name of the property
-
propertyHandler is a function used to update the status when an event occurs
This function is just an identifier. It is not responsible for dealing with other logic, but only responsible for updating the value passed in
-
The value passed in the useState is the default value
-
Call propertyHandler in the event function that needs to update the state.
Taking this business scenario as an example, the code of the initial value is as follows;
const [activeTitle, setTitle] = useState(midConent[0].title);

// Click event
function clickHandler(e, val) {
  // Prevent new page opening and/or redirection
  e.preventDefault();
  // Update status
  setTitle(val);
}
-
activeTitle defines the currently selected option that needs to be highlighted
-
setTitle is a function that sets the current highlight option when a label is clicked
It accepts a value and replaces activeTitle directly
-
useState is set to the default value, which in this case is popular - the title of the first option
Click event clickHandler will return each a tag. After the a tag is clicked by the mouse, this state will be triggered to update the currently highlighted tag.
Dynamic effect after implementation:

At this step, the implementation of the title is completed.
The complete JSX code is as follows:
-
SubHeader
import React, { useState } from 'react'; import PropTypes from 'prop-types'; const SubHeader = (props) => { // =================New part=================== const [activeTitle, setTitle] = useState(midConent[0].title); function clickHandler(e, val) { e.preventDefault(); setTitle(val); } // =================New part=================== const getMidContent = () => { return ( <ul className="flex"> {midConent.map((val) => { const { title } = val; return ( <li key={title}> <a href={val.url} onClick={(e) => clickHandler(e, title)} className={activeTitle === title ? 'selected' : null} > {title} </a> </li> ); })} </ul> ); }; }; export default SubHeader; -
Home
const Home = () => {
  return (
    <div className="homepage relative">
      <HomeBanner />
      <div className="container">
        <FieldSuggestion />
        <div className="homepage-main">
          <SubHeader
            subHeaderName="Introduction to programming"
            midConent={subHeaderOl}
            checkMore={checkMore}
          />
        </div>
      </div>
    </div>
  );
};
Implementation of high-quality recommendation and course recommendation
The title has been realized, and the rest is a row of courses:

Obviously, the structure of each course is the same:
- Course pictures
- Course title
- Course description
- New course (subtitle in the upper right corner)
- Popular courses (subtitle in the upper right corner)
Then, in the first step, you can encapsulate the individual courses, and then cycle through all the course lists to get a row of course schedules.
Encapsulate course components
This is the CourseItem component designed in common before.
According to the course structure listed above, the course component needs to obtain the following attributes:
- id, the content not shown above, exists here as an identifier
- Title, the title, that is, the course name
- img, course picture
- People studying, how many people are studying, belongs to the content of the course description
- courseLevel, primary, intermediate and advanced, also belongs to the content of the course description
- isNew or isHot, or because only one is displayed in the PSD design, but I was lazy and didn't do the specific inspection
Curriculum subject
Not considering isNew or isHot for the time being, implement the main structure first:
import React from 'react';

const CourseItem = (props) => {
  const { peopleStudying, courseLevel, id, title, img, isNew, isHot } = props;

  return (
    <div className="course-item">
      <img src={img} />
      <h4>{title}</h4>
      <p className="course-info">
        <span className="course-level">{courseLevel}</span>· {peopleStudying}
        People are learning
      </p>
    </div>
  );
};

export default CourseItem;
Then put false data:
import php from '../asset/img/courses/php.png';

class Course {
  // Stealing laziness, the number of students and grades are dead
  // You can also pass it to the constructor, but it's the same on PSD. I just
  peopleStudying = 1125;
  courseLevel = 'senior';
  constructor(id, title, img, isNew = false, isHot = false) {
    this.id = id;
    this.title = title;
    this.img = img;
    this.isNew = isNew;
    this.isHot = isHot;
  }
}

const coursePhp = new Course(1, 'test', php, false, true);

// course list for home page
export const courseSuggestion1 = [coursePhp];
And CSS:
.course-item {
  width: 228px;
  height: 270px;
  background-color: #fff;
  margin: 0 15px 15px 0;
}
.course-img {
  width: 100%;
}
.course-item h4 {
  margin: 20px;
  font-size: 14px;
  color: #050505;
  font-weight: 400;
}
.course-info {
  margin: 0 20px;
  font-size: 12px;
  color: #999;
}
.course-level {
  color: #ff2c2d;
}
In this way, the effect has been:

Complete implementation course
The two pictures pulled down before the introduction are lazy here, and the exclusivity is not checked - that is, only isNew or isHot can exist, but not both.
If there is a need in formal development, this inspection must be done.
Then use the ternary expression to check whether isNew and isHot are true. If so, render the corresponding component. If not, render null.
Because the effects of the two icons are completely consistent, I continue to draw a function to implement icon:
import React from 'react';
import './courseItem.css';
import hotLabel from '../../asset/img/courses/hot.png';
import newLabel from '../../asset/img/courses/new.png';

const getLabelImg = (img, label) => {
  return <img src={img} alt={label} class={label} />;
};

const CourseItem = (props) => {
  const { peopleStudying, courseLevel, id, title, img, isNew, isHot } = props;

  const isNewCourse = isNew
    ? getLabelImg(newLabel, 'new-course absolute')
    : null;
  const isHotCourse = isHot
    ? getLabelImg(hotLabel, 'hot-course absolute')
    : null;

  return (
    <div className="course-item relative">
      <img src={img} alt={title} className="course-img" />
      <h4>{title}</h4>
      <p className="course-info">
        <span className="course-level">{courseLevel}</span>· {peopleStudying}
        People are learning
      </p>
      {isNewCourse}
      {isHotCourse}
    </div>
  );
};

export default CourseItem;
Effect achieved:

That's what I mean.
Add data for course list
Manually copying and pasting one by one is a waste of time, so the next step is to encapsulate pseudo data.
The main purpose here is to create a course class, which can quickly instantiate the course and create several false data:
import php from '../asset/img/courses/php.png';
import andriod from '../asset/img/courses/andriod.png';
import angular from '../asset/img/courses/angular.png';
import androidHybrid from '../asset/img/courses/andriod-hybrid.png';

class Course {
  // Stealing laziness, the number of students and grades are dead
  // You can also pass it to the constructor, but it's the same on PSD. I just
  peopleStudying = 1125;
  courseLevel = 'senior';
  constructor(id, title, img, isNew = false, isHot = false) {
    this.id = id;
    this.title = title;
    this.img = img;
    this.isNew = isNew;
    this.isHot = isHot;
  }
}

const coursePhp = new Course(
  1,
  'Think PHP 5.0 Blog system actual combat project drill',
  php,
  false,
  true
);
const courseAndriod = new Course(
  2,
  'Android Detailed explanation of network picture loading framework',
  andriod,
  true
);
const courseAngular = new Course(
  3,
  'Angular 2 Latest framework+Mainstream technology+Project practice',
  angular
);
const courseAndroidHybrid = new Course(
  4,
  'Android Hybrid APP Development practice H5+Native!',
  androidHybrid
);
const courseAndroidHybrid2 = new Course(
  5,
  'Android Hybrid APP Development practice H5+Native!',
  androidHybrid
);

// course list for home page
export const courseSuggestion1 = [
  coursePhp,
  courseAndriod,
  courseAngular,
  courseAndroidHybrid,
  courseAndroidHybrid2,
];
The first set of pseudo data will be realized. Next, this list will be introduced into the CourseSuggestion to cycle through all courses:
import React from 'react';
import SubHeader from '../subHeader';
import { subHeaderOl, checkMore } from '../../../constants/home';
import { courseSuggestion1 } from '../../../constants/courseList';
import CourseItem from '../../../common/courseItem';

// Render the course list without other content modules
const CourseSuggestion = (props) => {
  return (
    <div>
      <SubHeader
        subHeaderName="Introduction to programming"
        midConent={subHeaderOl}
        checkMore={checkMore}
      />
      <div className="flex">
        {courseSuggestion1.map((course) => (
          <CourseItem {...course} key={course.id} />
        ))}
      </div>
    </div>
  );
};

export default CourseSuggestion;
The results are as follows:

Except for CSS, it tastes right.
useHistory is a hook function provided by react router DOM, which can be used to instantiate a history object to realize page redirection.
The usage is as follows:
// Reference hook function
import { useHistory } from 'react-router-dom';

// Instantiate a history object
const history = useHistory();
// Complete the redirection by pushing the url into history
history.push(url);
So finally, add history to each course list Push (URL / courseid) completes the redirection. In this way, when the user clicks a separate course list, he will be redirected to the corresponding course page:
Of course, the course page has not been implemented, so what you see is blank.
The newly added course item code is as follows:
// newly added
import { useHistory } from 'react-router-dom';

const CourseItem = (props) => {
  // ===========Add===============
  const history = useHistory();

  const redirectToCourseDetail = () => {
    history.push(`${COURSES}/${id}`);
  };
  // ===========Add===============

  return (
    // ===============Modification================
    <div className="course-item relative" onClick={redirectToCourseDetail}>
      {/* ===============Modification================ */}
      <img src={img} alt={title} className="course-img" />
      <h4>{title}</h4>
      <p className="course-info">
        <span className="course-level">{courseLevel}</span> · {peopleStudying}
        People are learning
      </p>
      {isNewCourse}
      {isHotCourse}
    </div>
  );
};

export default CourseItem;
Source code
The source code is still packaged and uploaded: Xuecheng Online - react-part3 Or you can directly go to my github and pull: xczx-react.
summary
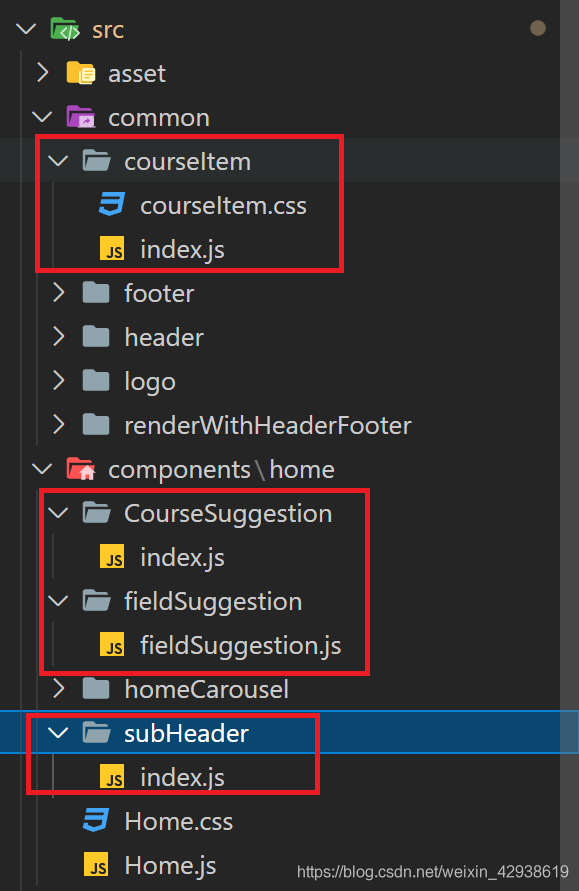
The modules implemented this time are the following modules drawn by the red line:
Through this part of study, I believe you should be able to master the following knowledge points:
-
Split components according to business requirements
It has been split step by step
-
Knowledge of reusable components
Is it convenient to loop through the course?
-
How do child components accept data from parent components
It is suggested to review with the last father and son
-
Can use useState hook for state management
-
Using classes in JavaScript
-
Use the useHistory hook function with history Push() completes the redirection of the page
Here's a challenge for you:
The encapsulation has been implemented. Can you complete the following two modules independently?