Recommended reading:
MySQL master-slave replication Mainstream Architecture Model
Based on Binlog, we can copy one MySQL server or multiple MySQL servers, depending on what we want to achieve. The mainstream system architecture has the following ways:
1. One master and one slave / one master and many slave
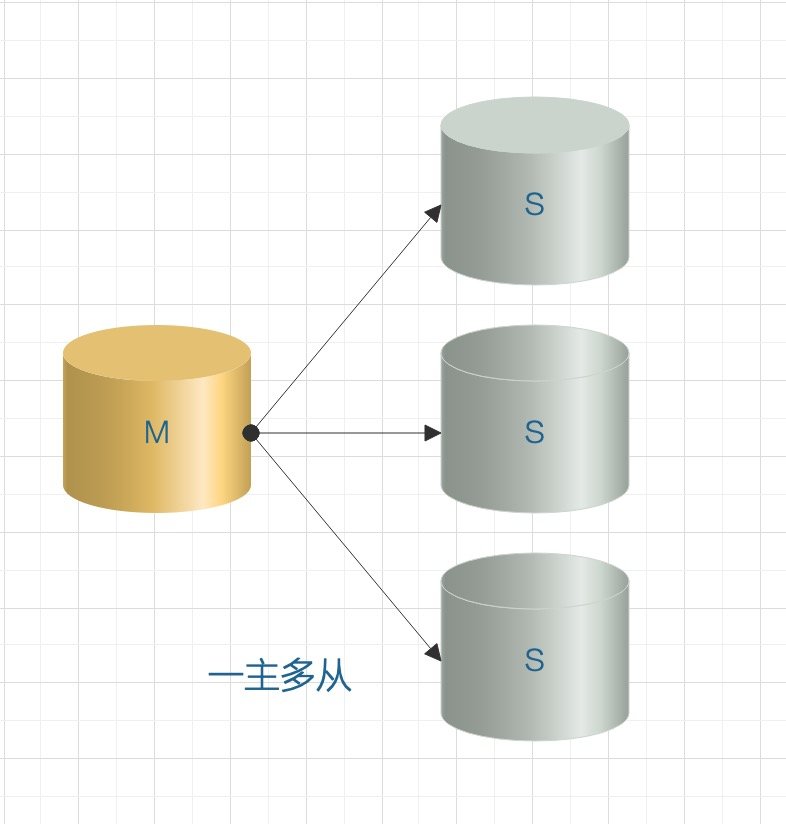
One master-slave and one master-slave are the most common master-slave architecture. This architecture can be used to realize master-slave configuration or read-write separation.
If it is a Master-Slave mode, when the Slave increases to a certain number, the load of the Slave on the Master and the network bandwidth will become a serious problem.
2. Multiple masters and one slave
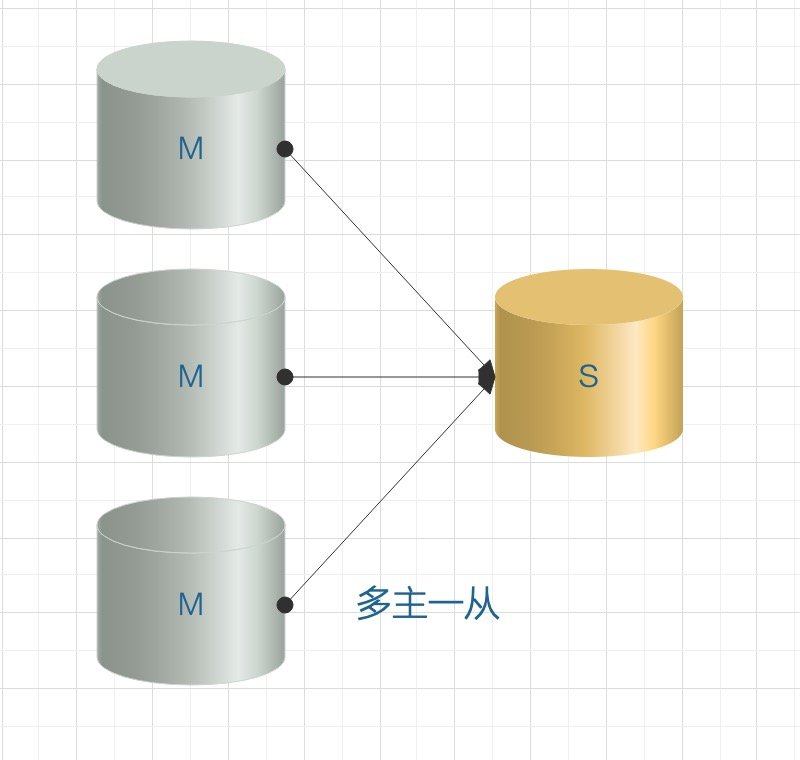
MySQL 5.7 starts to support the mode of multiple master and one slave, and backs up the data of multiple databases to one database for storage.
3. Dual master replication
Theoretically, it is the same as the master-slave, but two MySQL servers are the slave of each other. If either party changes, it will copy the other party's data to its own database. Dual master architecture is applicable to business scenarios with high writing pressure or scenarios where DBA maintenance requires master-slave switching. The dual master architecture avoids the trouble of repeatedly building slave libraries. (the process that the master and slave authorize each other to connect, read each other's binlog log and update it to the local database; as long as the other party's data changes, they will change accordingly)
4. Cascade replication
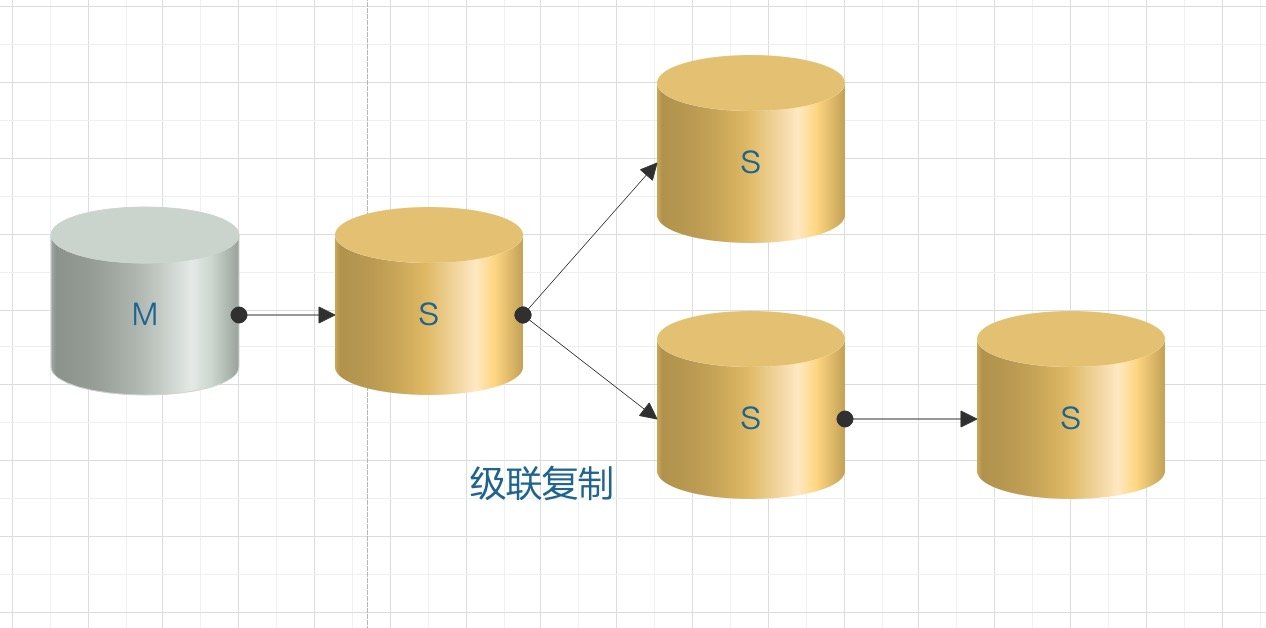
In cascade mode, there are many slave nodes involved, so if they are connected to the master, the pressure on the master server is certainly not small. Therefore, some slave nodes are connected to the slave nodes of its upper level. This relieves the pressure on the primary server.
Cascaded replication solves the pressure of multiple slave database replication on the master database in a master-slave scenario, and the disadvantage is that the data synchronization delay is relatively large.
MySQL master-slave replication principle
MySQL master-slave replication involves three threads:
A thread on the primary node: log dump thread
Two threads will be generated from the Library: one I/O thread and one SQL thread
As shown in the figure below:
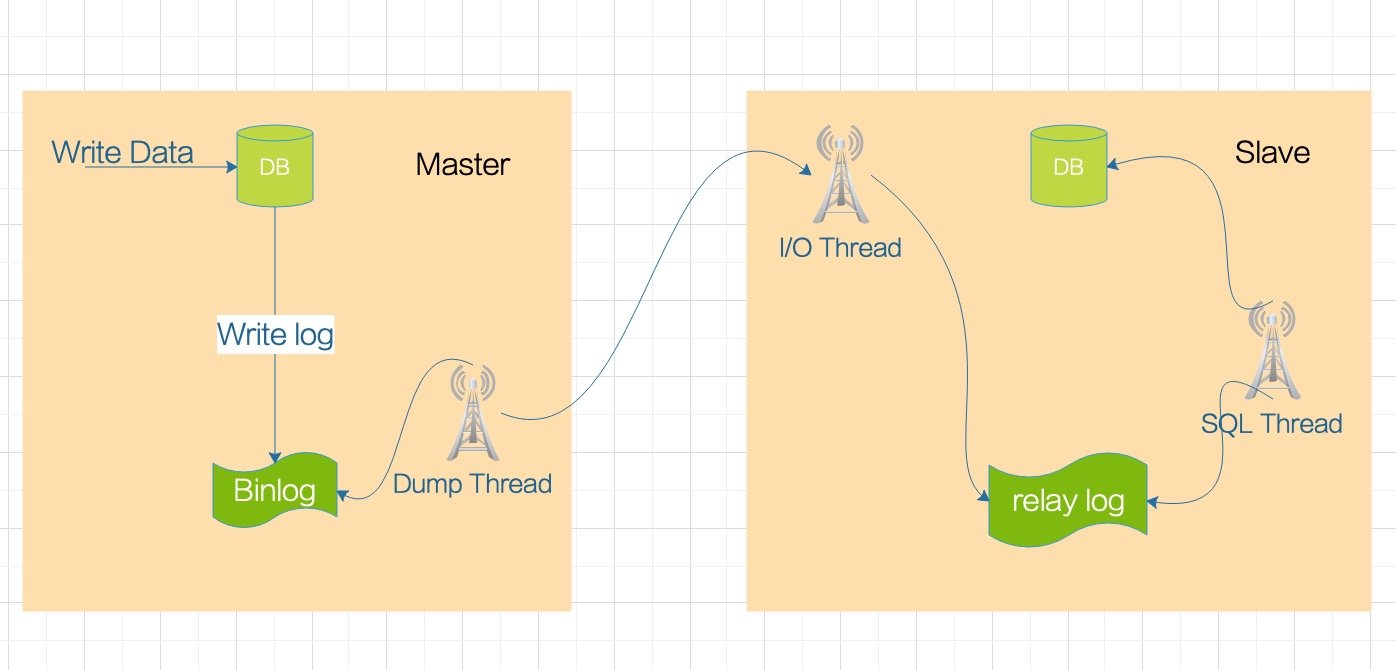
The master library will generate a log dump thread to transfer Binlog data to the I/O thread of the slave library.
The I/O thread of the slave library will request the Binlog of the master library and write the obtained Binlog to the local relay log file.
SQL thread will read the logs in the relay log file and parse them into SQL statements for execution one by one.
Master node log dump thread
When the slave node connects to the master node, the master node will create a log dump thread for it to send and read the contents of Binlog. When reading the operations in the Binlog, the log dump thread will lock the Binlog on the primary node; The lock is released when the read is completed and sent to the slave node. The master node will create a log dump thread for each of its slave nodes.
Slave node I/O thread
After executing the start slave command on the slave node, the slave node will create an I/O thread to connect to the master node and request the updated Binlog in the master library. After receiving the update from the log dump process of the master node, the I/O thread saves it in the local relay log.
relay log
A new concept of log is extended here. When MySQL performs master-slave replication or master-slave replication, the corresponding relay log will be generated under the server to be replicated.
How is the relay log generated?
The slave I/O thread reads the Binlog log of the master server, parses it into various Events, and records it in the local file of the slave server. This file is called relay log. Then, the SQL thread will read the contents of the relay log and apply it to the slave server, so as to keep the data of the slave server and the master server consistent. The relay log acts as a buffer so that the master does not have to wait for the slave execution to complete before sending the next event.
Query related parameters of relay log:
mysql>  show variables like '%relay%';
+---------------------------+------------------------------------------------------------+
| Variable_name             | Value                                                      |
+---------------------------+------------------------------------------------------------+
| max_relay_log_size        | 0                                                          |
| relay_log                 | yangyuedeMacBook-Pro-relay-bin                             |
| relay_log_basename        | /usr/local/mysql/data/yangyuedeMacBook-Pro-relay-bin       |
| relay_log_index           | /usr/local/mysql/data/yangyuedeMacBook-Pro-relay-bin.index |
| relay_log_info_file       | relay-log.info                                             |
| relay_log_info_repository | TABLE                                                      |
| relay_log_purge           | ON                                                         |
| relay_log_recovery        | OFF                                                        |
| relay_log_space_limit     | 0                                                          |
| sync_relay_log            | 10000                                                      |
| sync_relay_log_info       | 10000                                                      |
+---------------------------+------------------------------------------------------------+
11 rows in set (0.03 sec)
max_relay_log_size
Mark the maximum allowed value of relay log. If the value is 0, the default value is max_binlog_size(1G); Max if not 0_ relay_log_ Size is the largest relay_log file size.
relay_log_purge
Whether to automatically clear the relay log when it is no longer needed. The default value is 1 (enabled).
relay_log_recovery
When the slave goes down from the database, if the relay log is damaged, resulting in some relay logs not being processed, all unexecuted relay logs will be automatically discarded and the logs will be obtained from the master again, so as to ensure the integrity of the relay log. By default, this function is turned off and will be relayed_ log_ When the value of recovery is set to 1, the function can be enabled on the Slave Slave library. It is recommended to enable it.
relay_log_space_limit
To prevent the relay log from filling the disk, set the maximum limit of the relay log here. However, this setting exists the situation that the main database crashes and the relay logs of the slave database are incomplete. It is not recommended to use it as a last resort.
sync_relay_log
This parameter is the same as {sync in binlog_ Binlog has the same function. When it is set to 1, every time the slave I/O thread receives the binlog log sent by the master, it will write it to the system buffer, and then brush it into the relay log of the relay log. This is the safest, because when you crash, you will lose at most one transaction, but it will cause a lot of I/O to the disk.
When it is set to 0, it is not immediately brushed into the relay log, but the operating system decides when to write. Although the security is reduced, a large number of disk I/O operations are reduced. The default value is 0, which can be dynamically modified. It is recommended to use the default value.
sync_relay_log_info
When it is set to 1, every time the slave I/O thread receives the Binlog sent by the master, it will write it to the system buffer and then flush it into the relay log Info, this is the safest, because when you crash, you will lose at most one transaction, but it will cause a lot of I/O to the disk. When it is set to 0, it does not immediately enter the relay log Info, but the operating system decides when to write. Although the security is reduced, a large number of disk I/O operations are reduced. The default value is 0, which can be dynamically modified. It is recommended to use the default value.
SQL thread from node
The SQL thread is responsible for reading the content in the relay log, parsing it into specific operations and executing them, and finally ensuring the consistency of master-slave data.
For each master-slave connection, these three processes are required to complete. When the master node has multiple slave nodes, the master node will create a log dump process for each currently connected slave node, and each slave node has its own I/O process and SQL process.
The slave node uses two threads to divide the update and execution from the master database into independent tasks, so that the performance of read operation will not be reduced when executing the synchronous data task. For example, if the slave node is not running, the I/O process can quickly obtain updates from the master node, even though the SQL process has not been executed. If the slave node service is stopped before the SQL process is executed, at least the I/O process has pulled the latest changes from the master node and saved in the local relay log. When the service is up again, the data synchronization can be completed.
To implement replication, you must first open the Binlog function on the Master side, otherwise it cannot be realized.
Because the whole replication process is actually that Slave obtains the log from the Master, and then performs various operations recorded in the log in full order on itself. As shown in the figure below:
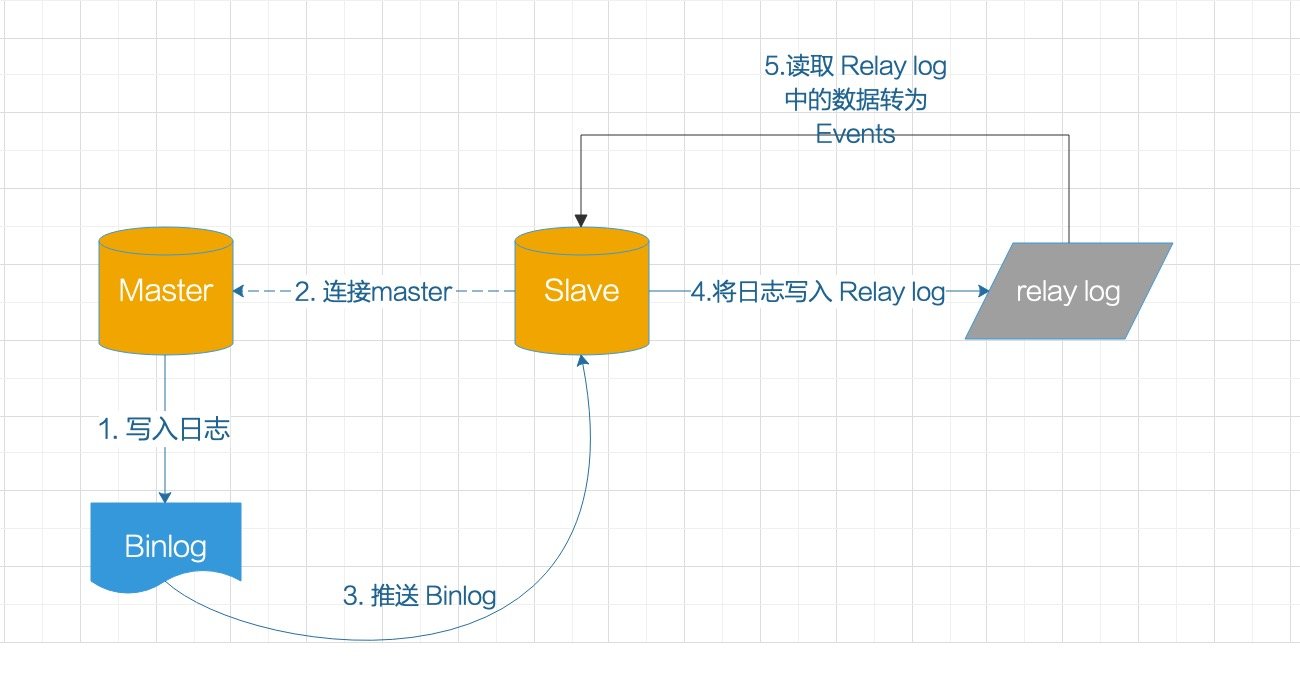
Basic process of replication
- Execute the "sart slave" command on the slave node to turn on the master-slave replication switch and start the master-slave replication. Connect from the I/O process on the node to the master node and request the log content from the specified location of the specified log file (or from the first log).
- After receiving the I/O request from the slave node, the master node reads the log information after the specified location of the specified log according to the request information through the I/O process responsible for replication (log Dump Thread) and returns it to the slave node. In addition to the information contained in the log, the returned information also includes the Binlog file and Binlog position of the information returned this time.
- After receiving the log content, log file and location point sent by the Master node from the I/O process of the node, update the received log content to the end of the local relay log file (MySQL relay bin. XXX), and save the read Binlog file name and location to the Master info file, In order to clearly tell the Master when reading the next time: "I need to start from which Binlog and which location. Please send me the log content later".
- After the SQL thread of Slave detects the newly added content in the relay log, it will parse the content of the relay log into SQL statements that can be executed, and then execute them in the order of parsing in this database and in the {relay log Record the file name and location point of the current application relay log in info.
Introduction to MySQL master-slave replication mode based on Binlog
MySQL master-slave replication is} asynchronous by default. All MySQL additions, deletions and modifications will be recorded in the Binlog. When the slave node connects to the master, it will actively obtain the latest Binlog file from the master. Store the Binlog in the local relay log, and then update the content of the relay log.
Asynchronous mode
The asynchronous mode is shown in the following figure:
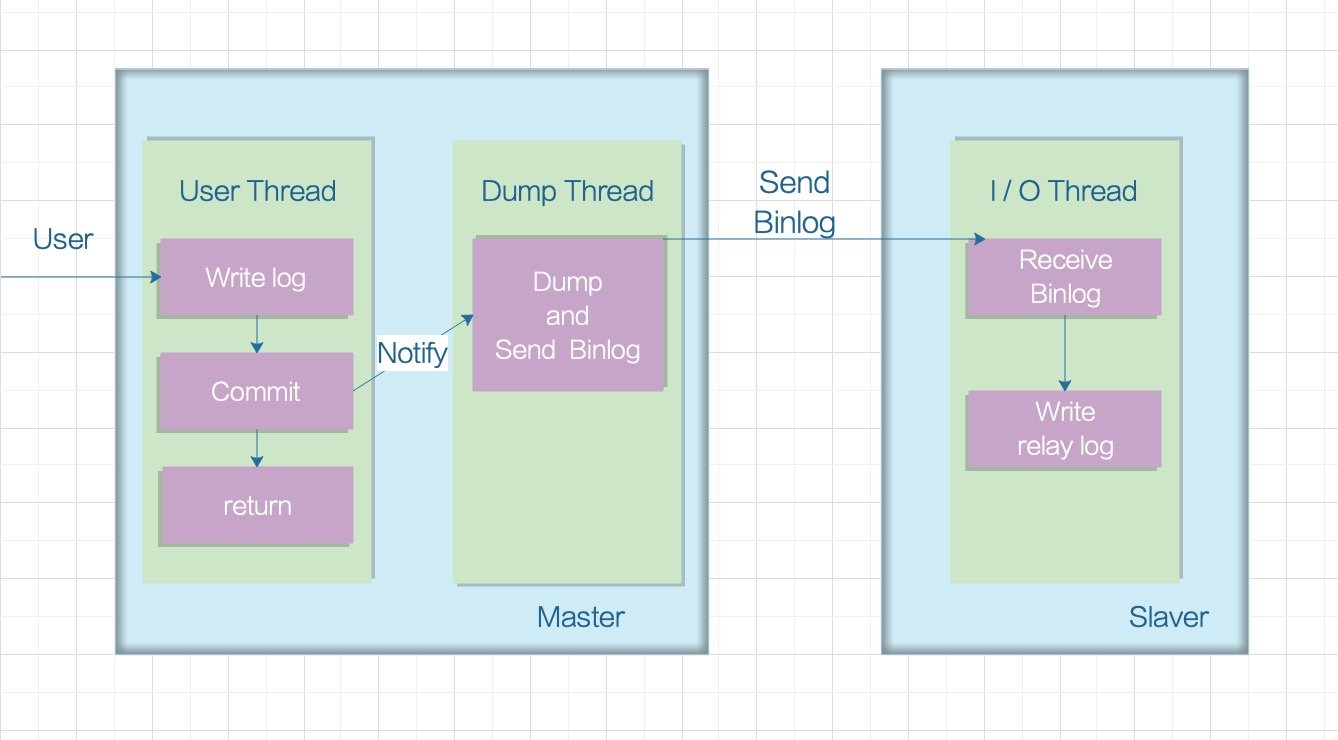
In this mode, the master node will not actively push data to the slave node. The master database will immediately return the results to the client after executing the transactions submitted by the client. It does not care whether the slave database has received and processed them. In this way, there will be a problem. If the master node crashes, the transactions submitted by the master node may not be transmitted to the slave node. If at this time, Forcibly promoting the slave to the master may result in incomplete data on the new master node.
Semi sync mode
Between asynchronous replication and full synchronous replication, the master database does not return to the client immediately after executing the transaction submitted by the client, but waits for at least one slave database to receive and write to the relay log before returning the success information to the client (it can only ensure that the Binlog of the master database is transmitted to at least one slave node), Otherwise, you need to wait until the timeout, and then switch to asynchronous mode before submitting.
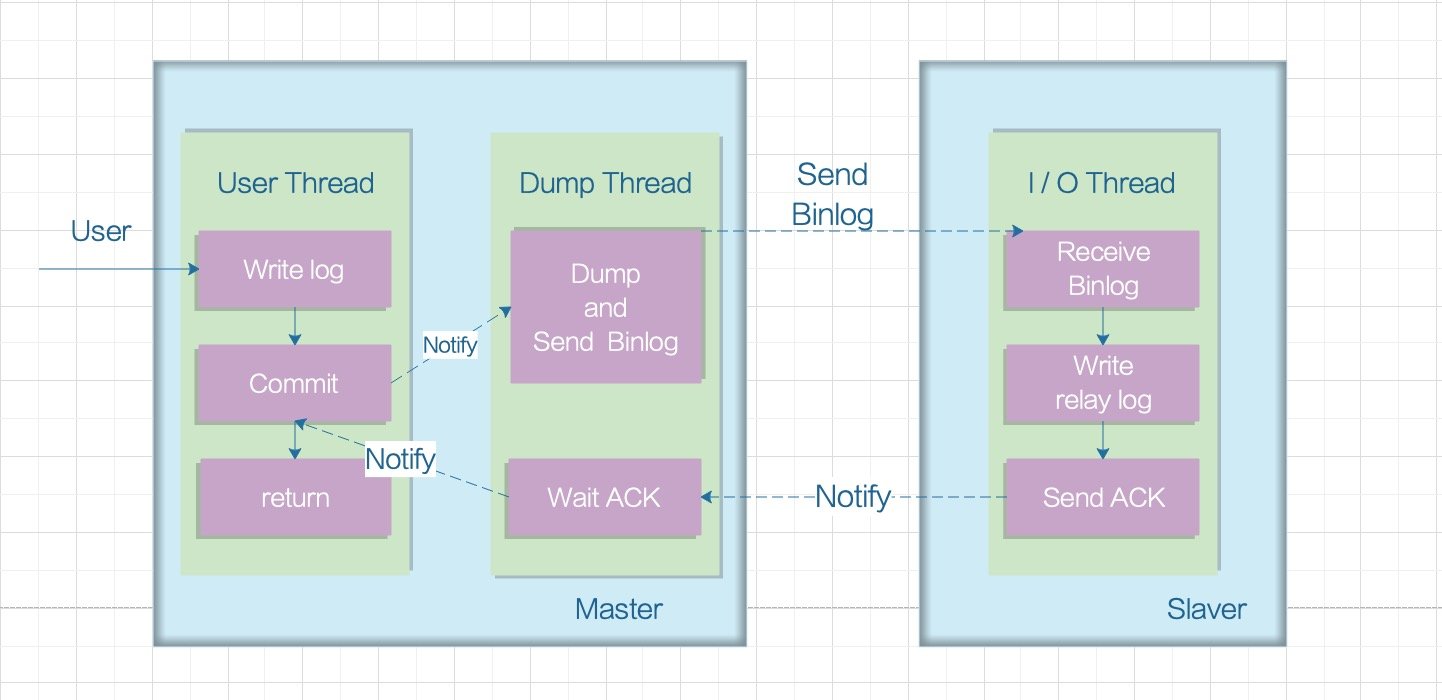
Compared with asynchronous replication, semi synchronous replication improves the security of data and ensures that the data can be successfully backed up to the slave library to a certain extent. At the same time, it also causes a certain degree of delay, but it is lower than that of full synchronous mode. This delay is at least one TCP/IP round-trip time. Therefore, semi synchronous replication is best used in low latency networks.
The semi synchronous mode is not built in MySQL. Since MySQL 5.5 is integrated, the semi synchronous mode needs to be started by installing plug-ins for master and slave.
Fully synchronous mode
It means that when the master database finishes executing a transaction, and then all slave databases copy the transaction and execute it successfully, the success information is returned to the client. Because you need to wait for all slave libraries to complete the transaction before returning the success information, the performance of full synchronous replication is bound to be seriously affected.
Binlog replication practice
Configure my cnf
[mysqld]
log-bin
server-id
gtid_mode=off #Disable gtid
Add master-slave replication user:
grant replication slave on *.* to 'repl'@'%' identified by 'gtidUser';
flush privileges;
Then we add a slave library.
Then we use the command line to load the binlog of the master library to the slave library, where you can set the specified binlog file and displacement value. Execute the following command from the Library:
mysql>change master to
master_host='192.168.199.117',
master_user='slave',
master_port=7000,
master_password='slavepass',
master_log_file='mysql-bin.000008',
master_log_pos=0;

mysql>start slave;
mysql>show slave status\G;
If a code error occurs during the copying process, the individual will decide whether to skip the error and continue the execution according to the error log:
mysql>stop slave;
mysql>set global sql_slave_skip_counter=1;
Possible problems with master-slave replication
Slave synchronization delay
Because the Slave end realizes data analysis and warehousing through I/O thread single thread; Because the Master side writes Binlog sequentially, the efficiency is very high. When the TPS of the main database is very high, the writing efficiency of the Master side must be higher than the reading efficiency of the Slave side. At this time, there is a problem of synchronization delay.
The synchronization of I / O threads is based on libraries, that is, synchronizing several libraries will open several I / O threads.
You can view "seconds" through the "show slave status" command_ Behind_ The value of master , represents the time of master-slave synchronization delay. The larger the value, the more serious the delay. A value of 0 is normal. A positive value indicates that a delay has occurred. The larger the number, the more the slave library lags behind the master library.
There must be such a problem with the Binlog based replication method. MySQL officials also realize that single thread is not as strong as multi thread. Therefore, in MySQL version 5.7, parallel replication based on group submission (officially known as enhanced multi threaded slaves, or MTS) is introduced. Set the parameters:
slave_ parallel_ Workers > 0 , and , global slave_ parallel_ type=‘LOGICAL_CLOCK’,
Can support a schema (Library), slave_parallel_workers a worker thread concurrently executes the transactions submitted by the main database in the relay log.
Its core idea:
Transactions submitted by a group can be played back in parallel (with binary log group commit);
Last in the relay log of the slave machine_ The same committed transactions (different sequence_num) can be executed concurrently. Among them, the variable "slave parallel type" can have two values:
- The default value of DATABASE is the parallel replication method based on the library
- LOGICAL_CLOCK, a parallel replication method based on group submission
Starting MTS with MySQL 5.7 is very simple. You only need to start MTS from my CNF file can be configured as follows:
# slave
 slave-parallel-type=LOGICAL_CLOCK
 slave-parallel-workers=8        #It is generally recommended to set 4-8. Too many threads will increase the synchronization overhead between threads
 master_info_repository=TABLE
 relay_log_info_repository=TABLE
 relay_log_recovery=ON
Of course, the parallel replication scheme brought by multithreading also has many implementation difficulties. For example, transactions are executed in order. If parallel playback, will there be the problem of disordered execution data. These problems are not explained in this section. If you are interested, you can continue to study them in depth.
New generation master-slave replication mode - GTID replication mode
In traditional replication, in case of failure, master-slave switching is required. Binlog and location information need to be found. After data recovery, the master node points to the new master node. MySQL 5.6 provides a new idea of data recovery. You only need to know the IP, port, account and password of the primary node. Because replication is automatic, MySQL will automatically find some synchronization through the internal mechanism GTID.
GTID based replication is a new replication method after MySQL 5.6.5.
GTID (global transaction identifier) is the global transaction ID. a transaction corresponds to a GTID, which ensures that each transaction submitted on the main database has a unique ID in the cluster.
GTID replication principle
In the original log based replication, the slave database needs to tell the master database from which offset to perform incremental synchronization. If it is specified incorrectly, it will cause data omission and data inconsistency.
In GTID based replication, the slave database will inform the master database of the GTID value of the executed transaction, and then the master database will return the list of gtids of all unexecuted transactions to the slave database, which can ensure that the same transaction is executed only once in the specified slave database, The method of determining the transaction to be executed from the database through the global transaction ID replaces the previous method of determining the transaction to be executed from the database with Binlog and location.
The GTID based replication process is as follows:
- When the master updates the data, it will generate gtids before the transaction and record them in the Binlog log.
- The I/O thread on the slave side writes the changed Binlog into the local relay log, and the read value is based on GITD_ The next variable tells us which GTID the slave will execute next.
- The SQL thread obtains the GTID from the relay log, and then compares whether the Binlog on the slave side has records. If there is a record, it indicates that the transaction of the GTID has been executed, and the slave will ignore it.
- If there is no record, the slave will execute the transaction of the GTID from the relay log and record it to the Binlog.
- In the process of parsing, we will judge whether there is a primary key. If there is no primary key, we will use the secondary index. If there is no secondary index, we will use all scanning.
GTID composition
GTID = source_id:transaction_id
source_id , normal is , server_ UUID, generated at the first startup (function generate_server_uuid) and persisted to dataDir / auto CNF file.
transaction_id ¢ is the sequential number. It is a sequence starting from 1 and growing on each MySQL server. It is the unique identification of the transaction.
GTID generation
The generation of GTID is governed by gtid_next control.
On the Master, gtid_next , is the default , AUTOMATIC, that is, GTID is automatically generated when each transaction is committed. It finds an unused minimum value greater than 0 from the currently executed GTID set (i.e. gtid_executed) as the GTID of the next transaction. Write the GTID to Binlog before the actual update transaction record.
On Slave, the GTID of the main database (i.e. set gtid_next record) is read from Binlog, and then the transaction executed adopts the GTID.
Benefits of GTID
- GTID uses} master_auto_position=1 , replaces Binlog's Master-Slave replication scheme, which is easier to build master-slave replication than Binlog.
- GTID is convenient to realize the failover between master and slave, and there is no need to locate Binlog log files and find Binlog site information step by step.
GTID mode replication limitations
-
The mixed use of engines in a transaction, such as InnoDB (supporting transactions) and MyISAM (not supporting transactions), causes errors in the association of multiple GTIDs with the same transaction.
-
CREATE TABLE….. SELECT cannot be used. The two events generated by this statement. In a certain case, the same GTID will be used (the same GTID can only be used once in the slave):
- event one: create table statement
- event two: insert data statement
-
CREATE TEMPORARY TABLE and DROP TEMPORARY TABLE , cannot be used within a transaction (the – enforce gtid consistency , parameter is enabled).
-
SQL is not supported when skipping errors from the library using GTID replication_ slave_ skip_ Syntax of the counter} parameter.
GTID master-slave replication practice
1. Operations on master database
In my Configure GTID master-slave replication in CNF file
[root@mysql-master ~]# cp /etc/my.cnf /etc/my.cnf.bak
[root@mysql-master ~]# >/etc/my.cnf
[root@mysql-master ~]# cat /etc/my.cnf
[mysqld]
datadir = /var/lib/mysql
socket = /var/lib/mysql/mysql.sock

symbolic-links = 0

log-error = /var/log/mysqld.log
pid-file = /var/run/mysqld/mysqld.pid

#GTID:
server_id = 1
gtid_mode = on
enforce_gtid_consistency = on

#binlog
log_bin = mysql-bin
log-slave-updates = 1
binlog_format = row
sync-master-info = 1
sync_binlog = 1

#relay log
skip_slave_start = 1
After configuration, restart MySQL service:
[root@mysql-master ~]# systemctl restart mysqld
Log in to MySQL and check the status of the Master. One more item is found, which is "executed"_ Gtid_ Set:
mysql> show master status;
+-------------------+----------+--------------+------------------+-------------------+
| File              | Position | Binlog_Do_DB | Binlog_Ignore_DB | Executed_Gtid_Set |
+-------------------+----------+--------------+------------------+-------------------+
| mysql-bin.000001 |      154 |              |                  |                   |
+-------------------+----------+--------------+------------------+-------------------+
1 row in set (0.00 sec)

mysql> show global variables like '%uuid%';
+---------------+--------------------------------------+
| Variable_name | Value                                |
+---------------+--------------------------------------+
| server_uuid   | 317e2aad-1565-11e9-9c2e-005056ac6820 |
+---------------+--------------------------------------+
1 row in set (0.00 sec)
Check to confirm that the GTID function is on:
mysql> show global variables like '%gtid%';
+----------------------------------+-------+
| Variable_name                    | Value |
+----------------------------------+-------+
| binlog_gtid_simple_recovery      | ON    |
| enforce_gtid_consistency         | ON    |
| gtid_executed                    |       |
| gtid_executed_compression_period | 1000  |
| gtid_mode                        | ON    |
| gtid_owned                       |       |
| gtid_purged                      |       |
| session_track_gtids              | OFF   |
+----------------------------------+-------+
8 rows in set (0.00 sec)
Check and confirm that the Binlog log function is on:
mysql> show variables like 'log_bin';
+---------------+-------+
| Variable_name | Value |
+---------------+-------+
| log_bin       | ON    |
+---------------+-------+
1 row in set (0.00 sec)
Authorize slave to copy users and refresh permissions:
mysql> flush privileges;
Query OK, 0 rows affected (0.04 sec)

mysql> show grants for slave@'172.23.3.66';
+-------------------------------------------------------------------------------+
| Grants for slave@172.23.3.66                                                |
+-------------------------------------------------------------------------------+
| GRANT REPLICATION SLAVE, REPLICATION CLIENT ON *.* TO 'slave'@'172.23.3.66' |
+-------------------------------------------------------------------------------+
1 row in set (0.00 sec)
Check the master status again:
mysql> show master status;
+-------------------+----------+--------------+------------------+------------------------------------------+
| File              | Position | Binlog_Do_DB | Binlog_Ignore_DB | Executed_Gtid_Set                        |
+-------------------+----------+--------------+------------------+------------------------------------------+
| mysql-bin.000001 |      622 |              |                  | 317e2aad-1565-11e9-9c2e-005056ac6820:1-2 |
+-------------------+----------+--------------+------------------+------------------------------------------+
1 row in set (0.00 sec)
Here we need to pay attention to:
Before starting the configuration, you also need to initialize the slave server. The method of initializing from the server is basically the same as that based on log points, but after the GTID mode is started, what is recorded in the backup is not the binary log file name and offset at the time of backup, but the last GTID value at the time of backup.
You need to back up the target database on the main database machine first. Suppose the target database here is slave_test:
mysql> CREATE DATABASE slave_test CHARACTER SET utf8 COLLATE utf8_general_ci;
Query OK, 1 row affected (0.02 sec)

mysql> use slave_test;
Database changed
mysql> create table user (id int(10) PRIMARY KEY AUTO_INCREMENT,name varchar(50) NOT NULL);
Query OK, 0 rows affected (0.27 sec)

mysql> insert into slave_test.user values(1,"xiaoming"),(2,"xiaohong"),(3,"xiaolv");
Query OK, 3 rows affected (0.06 sec)
Records: 3  Duplicates: 0  Warnings: 0

mysql> select * from slave_test.user;
+----+----------+
| id | name     |
+----+----------+
|  1 | xiaoming |
|  2 | xiaohong |
|  3 | xiaolv   |
+----+----------+
3 rows in set (0.00 sec)
Save the slave_ Backup the test library:
[root@mysql-master ~]# mysqldump --single-transaction --master-data=2 --triggers --routines --databases slave_test -uroot -p123456 > /root/user.sql
Here is a version problem:
When MySQL 5.6 uses mysqldump to back up, specify the specific database to back up and use -- database.
When MySQL 5.7 uses mysqldump for backup, specify the specific database for backup and use -- databases.
Then put the backup / root / user Copy the SQL} file to the slave database server.
[root@mysql-master ~]# rsync -e "ssh -p20" -avpgolr /root/user.sql
Here, the operation of the master library is completed, and the backup data containing GTID has been copied to the slave library. Next, we will operate the slave library.
2. Operation from library
In my Configure GTID master-slave replication in CNF file
The configuration is roughly the same as that of the main server, except for the server_ In addition to inconsistent IDS, the slave server can also add read to the configuration file_ Only = on, so that the slave server can only read. This parameter is invalid for superuser and will not affect the replication of the slave server.
[root@mysql-slave1 ~]# >/etc/my.cnf
[root@mysql-slave1 ~]# vim /etc/my.cnf
[mysqld]
datadir = /var/lib/mysql
socket = /var/lib/mysql/mysql.sock

symbolic-links = 0

log-error = /var/log/mysqld.log
pid-file = /var/run/mysqld/mysqld.pid

#GTID:
server_id = 2
gtid_mode = on
enforce_gtid_consistency = on

#binlog
log_bin = mysql-bin
log-slave-updates = 1
binlog_format = row
sync-master-info = 1
sync_binlog = 1

#relay log
skip_slave_start = 1
read_only = on
After configuration, restart the mysql service.
[root@mysql-slave1 ~]# systemctl restart mysql
Then, the backup data of the target database of the main database is saved to user Import SQL into the slave database.
[root@mysql-slave1 ~]# ls /root/user.sql
/root/user.sql
[root@mysql-slave1 ~]# mysql -p123456
.........
mysql> show databases;
+--------------------+
| Database           |
+--------------------+
| information_schema |
| mysql              |
| performance_schema |
| sys                |
+--------------------+
4 rows in set (0.00 sec)

mysql> source /root/user.sql;

mysql> select * from slave.test;
+----+----------+
| id | name     |
+----+----------+
|  1 | xiaoming |
|  2 | xiaohong |
|  3 | xiaolv   |
+----+----------+
3 rows in set (0.00 sec)
In the slave database, use change master to configure master-slave replication:
mysql> stop slave;
Query OK, 0 rows affected, 1 warning (0.00 sec)

mysql> change master to master_host='172.23.3.66',master_user='slave1',master_password='123456',master_auto_position=1;
Query OK, 0 rows affected, 2 warnings (0.26 sec)

mysql> start slave;
Query OK, 0 rows affected (0.02 sec)

mysql> show slave status \G;
*************************** 1. row ***************************
               Slave_IO_State: Waiting for master to send event
                  Master_Host: 172.23.3.66
                  Master_User: slave1
                  Master_Port: 3306
                Connect_Retry: 60
              Master_Log_File: mysql-bin.000001
          Read_Master_Log_Pos: 1357
               Relay_Log_File: mysql-slave1-relay-bin.000002
                Relay_Log_Pos: 417
        Relay_Master_Log_File: mysql-bin.000001
             Slave_IO_Running: Yes
            Slave_SQL_Running: Yes
................
................
            Executed_Gtid_Set: 317e2aad-1565-11e9-9c2e-005056ac6820:1-5
                Auto_Position: 1
Therefore, the Master and Slave nodes have configured the Master-Slave synchronization relationship. Next, you can insert a piece of data into the main library and observe whether the Slave library is synchronized.
There are two ways to add a slave library using GTID
Directly synchronize all gtids of the main library
If the master library starts with GTID, you can directly obtain all gtids of the master library to synchronize to the slave library. However, if there are too many Binlog logs in the main database, the corresponding synchronization time will be longer. This method is suitable for synchronization of small amount of data.
Use this method to synchronize the corresponding commands:
mysql>change master to master_host='xxxxxxx',master_user='xxxxxx',master_password='xxxxx',MASTER_AUTO_POSITION=1;
mysql> start slave;
mysql> stop slave io_thread; #Restart io thread and refresh status
mysql> start slave io_thread;
When using MASTER_AUTO_POSITION , parameter, MASTER_LOG_FILE,MASTER_LOG_POS} parameter cannot be used.
If you want to configure pos from GTID, execute this statement again, but set MASTER_AUTO_POSITION is set to 0.
Synchronization by setting the range
Specify the range of gtid, and then set @ @ global. In the slave GTID_ Purged} to skip the gtid contained in the backup.
This scheme is suitable for data with a large amount of data, and a synchronization takes a lot of time. But at the same time, there are complex problems in operation. You need to remember the scope of each synchronization.
The corresponding commands to synchronize in this way are:
mysql>change master to master_host='xxxxxxx',master_user='xxxxxx',master_password='xxxxx',MASTER_LOG_POS='xxxx';
mysql> start slave;
mysql> stop slave io_thread; #Restart io thread and refresh status
mysql> start slave io_thread;
Notice here that our parameter is changed: MASTER_LOG_POS, which indicates the starting point value of the GTID transaction that needs to be synchronized at present.
summary
last
Share some information with you. I think these are very useful things. You can also learn from them to find out and fill in deficiencies.
Get the full version: get it here for free~
Java advanced interview

Java advanced architecture knowledge

Algorithm knowledge
, you need to remember the range of each synchronization.
The corresponding commands to synchronize in this way are:
mysql>change master to master_host='xxxxxxx',master_user='xxxxxx',master_password='xxxxx',MASTER_LOG_POS='xxxx';
mysql> start slave;
mysql> stop slave io_thread; #Restart io thread and refresh status
mysql> start slave io_thread;
Notice here that our parameter is changed: MASTER_LOG_POS, which indicates the starting point value of the GTID transaction that needs to be synchronized at present.
summary
last
Share some information with you. I think these are very useful things. You can also learn from them to find out and fill in deficiencies.
Get the full version: get it here for free~
Java advanced interview
[external chain picture transferring... (img-n7u6mHK1-1623738178527)]
Java advanced architecture knowledge
[external chain picture transferring... (IMG ntwufif7-1623738178527)]
Algorithm knowledge
