catalogue
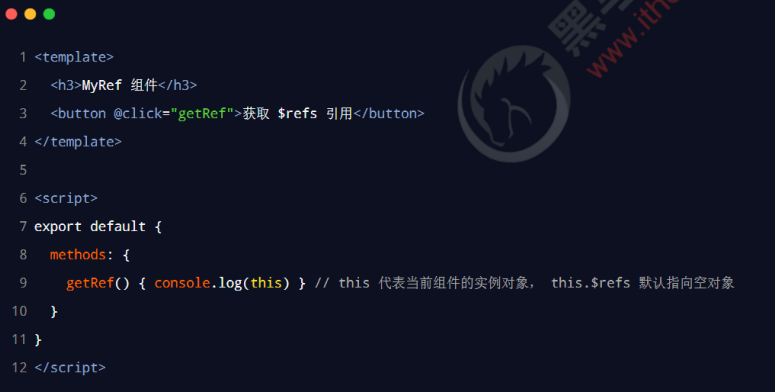
ref reference
1. What is ref reference
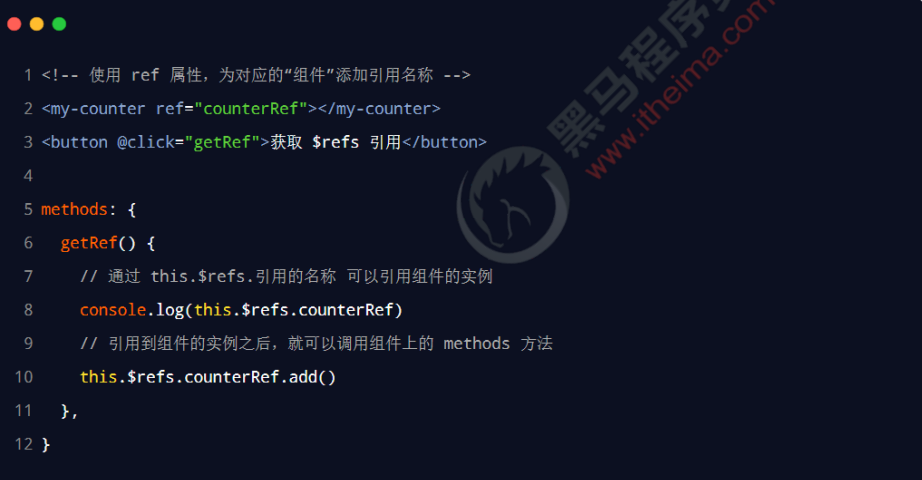
2. Using ref to reference DOM elements
If you want to use ref to reference DOM elements on a page, you can do so as follows:
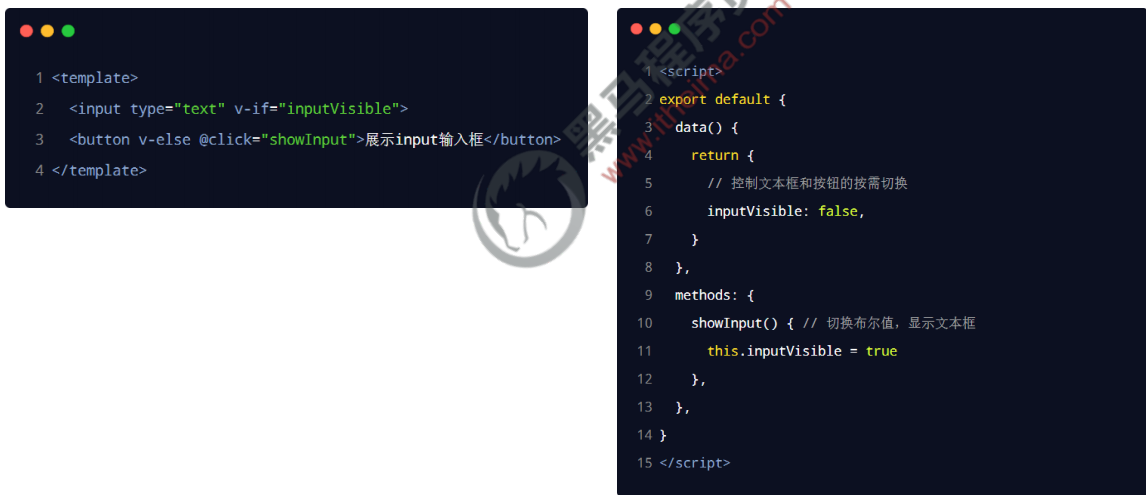
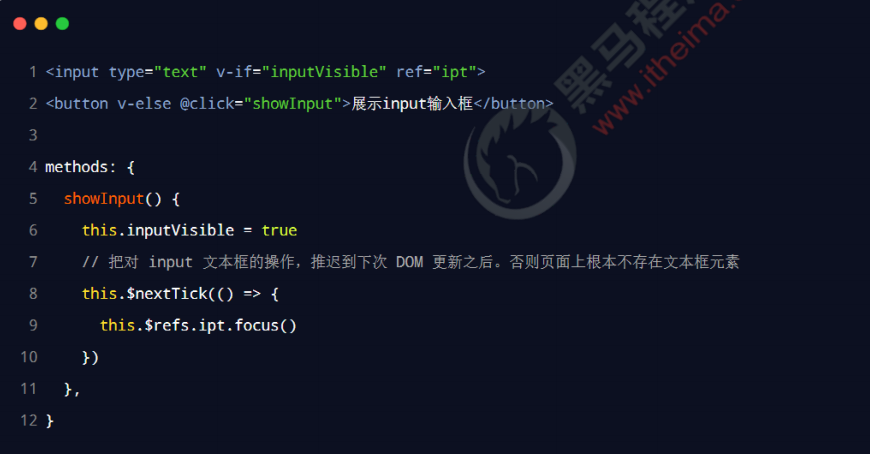
4. Controls the on-demand switching of text boxes and buttons
The Boolean inputVisible is used to control the on-demand switching between text box and button in the component. The example code is as follows:
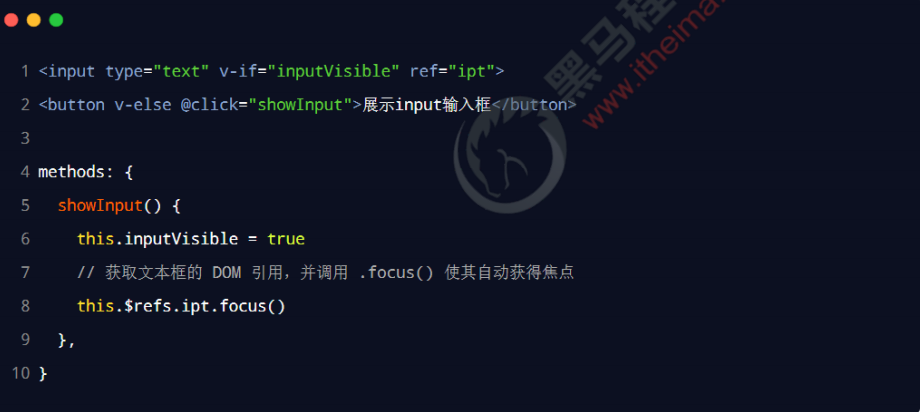
5. Let the text box get focus automatically
6. this.$nextTick(cb) method
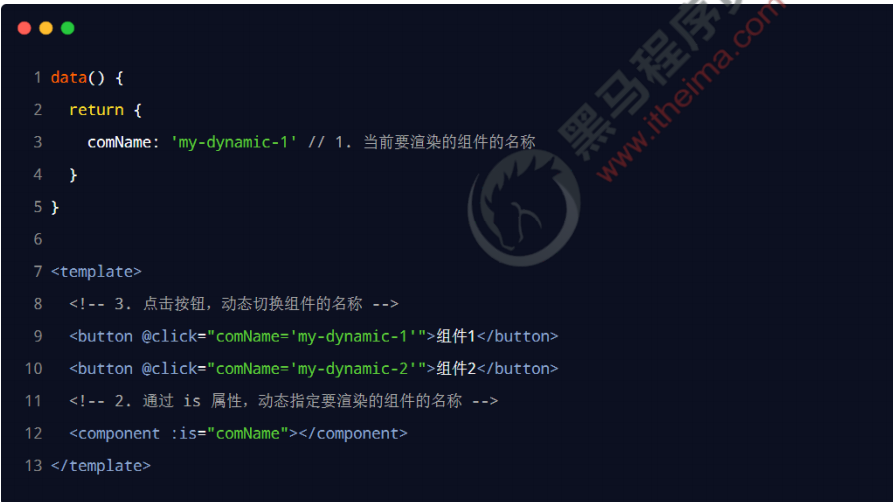
Dynamic component
- ① < component > is a placeholder for a component
- ② Dynamically specify the name of the component to render through the is attribute
- ③ < component is = "name of component to render" > < / component
2. How to realize dynamic component rendering
3. Keep alive

Slot
1. What is a slot
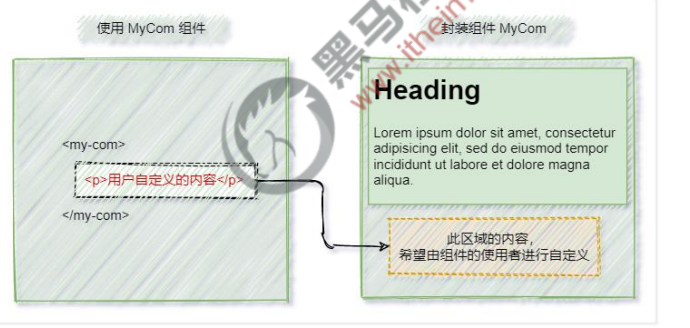
2. Experience the basic usage of slots
When encapsulating components, slots can be defined through the < slot > element to reserve content placeholders for users. The example code is as follows:
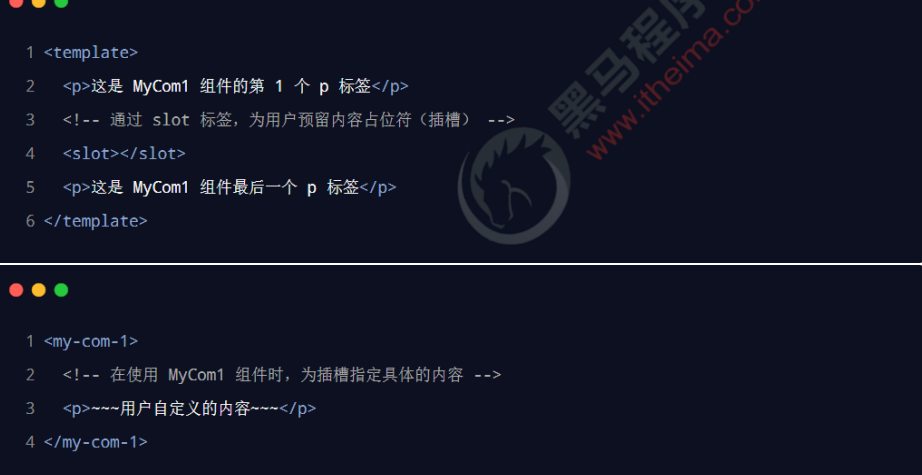
If no < slot > slots are reserved when packaging components, any customized content provided by the user will be discarded.
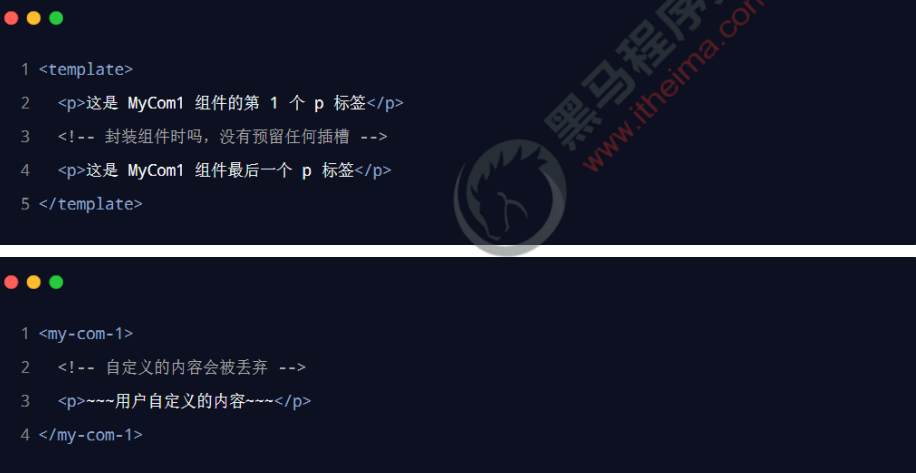
2.2 backup content

3. Named slot
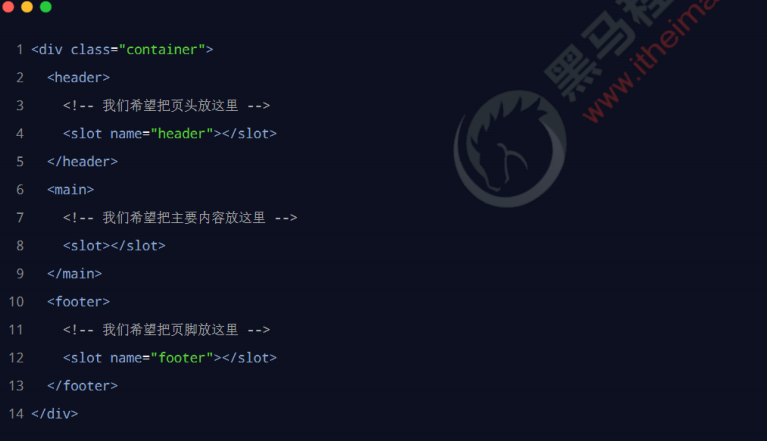
3.1 providing content for named slots
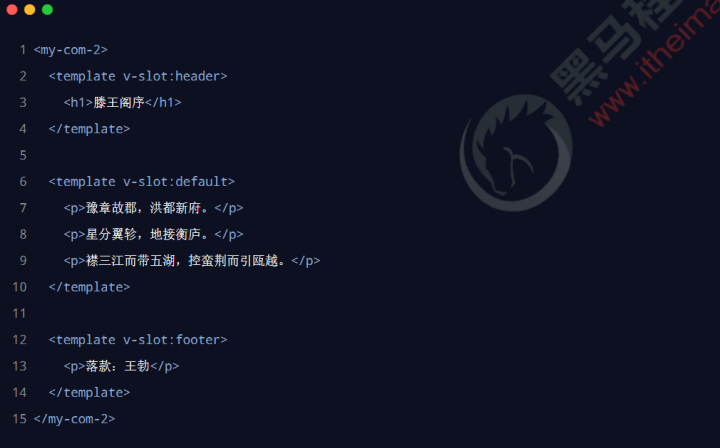
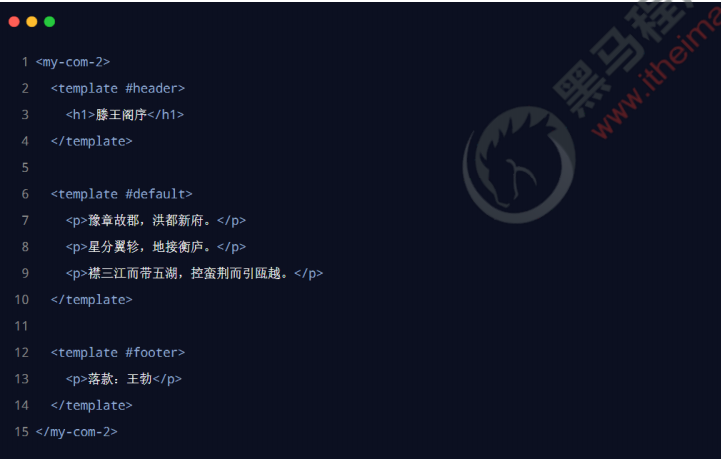
3.2 abbreviated form of named slot
4. Scope slot
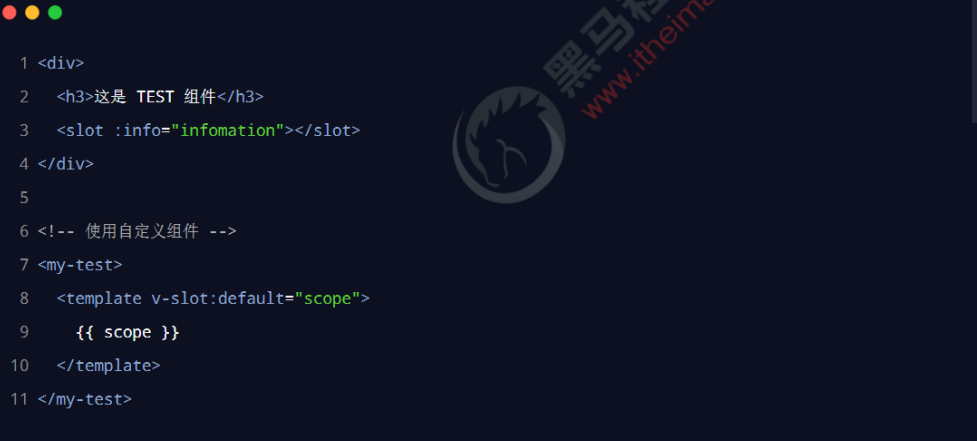
4.1 deconstruct the Prop of the scope slot
For the data objects provided by the scope slot, deconstruction assignment can be used to simplify the data receiving process. The example code is as follows:
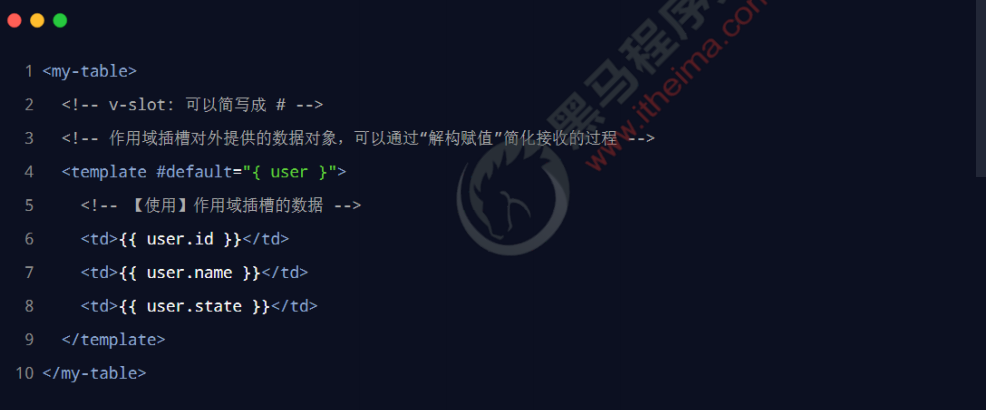
4.2 declaring scope slots
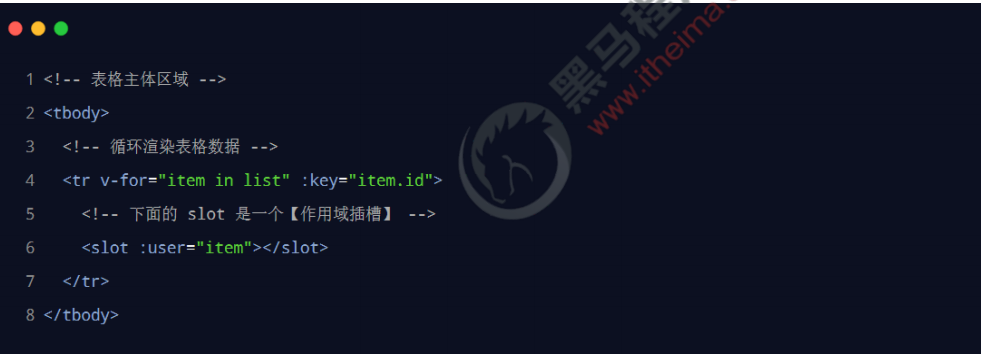
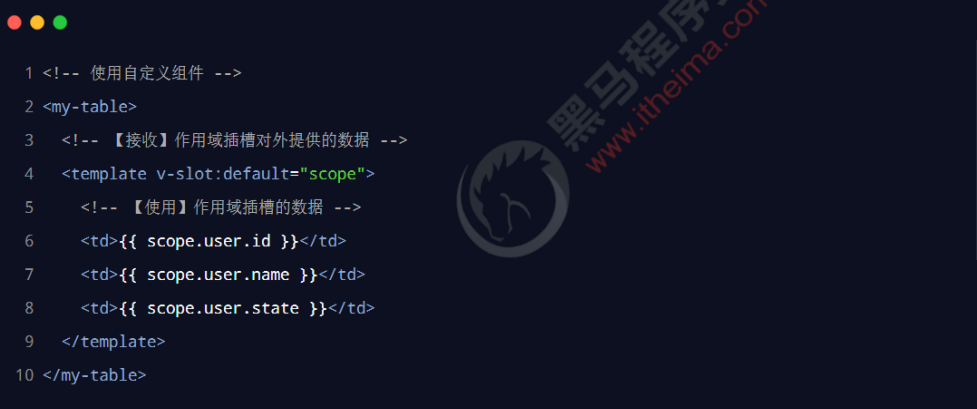
4.3 using scope slots
When using the MyTable component, customize the rendering method of cells and receive the data provided by the scope slot
Custom instruction
1. What is a custom instruction
vue officially provides v-for, v-model, v-if and other commonly used built-in instructions. In addition, vue also allows developers to customize instructions
The user-defined instructions in vue are divided into two categories: private user-defined instructions and global user-defined instructions
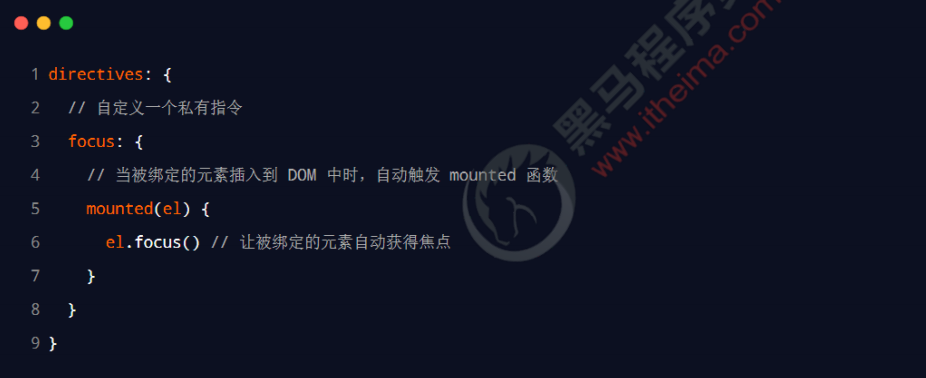
2. Syntax for declaring private custom instructions
In each vue component, private user-defined instructions can be declared under the directives node. The example code is as follows:
3. Use custom directives
When using custom instructions, you need to add a v-prefix. The example code is as follows:

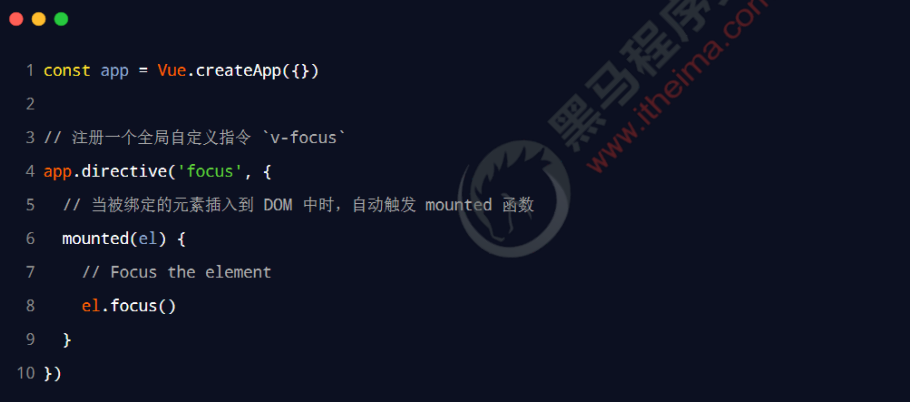
4. Syntax for declaring global custom directives
Custom instructions for global sharing need to be declared through "instance object of single page application". The example code is as follows:
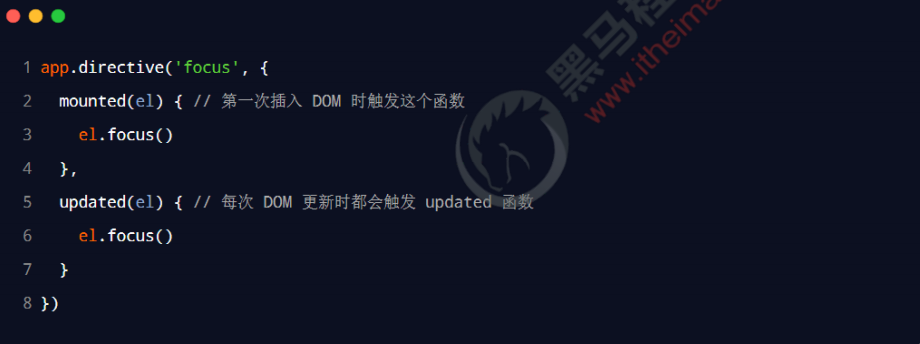
5. updated function
The mounted function is only called when the element is inserted into the DOM for the first time. The mounted function will not be triggered when the DOM is updated. The updated function is called after each DOM update. The example code is as follows:
Note: when using custom instructions in vue2 projects, [mounted - > bind] [Updated - > update]
6. Function abbreviation
If the format of the updated function is exactly the same as that of the updated function:

7. Parameter value of instruction
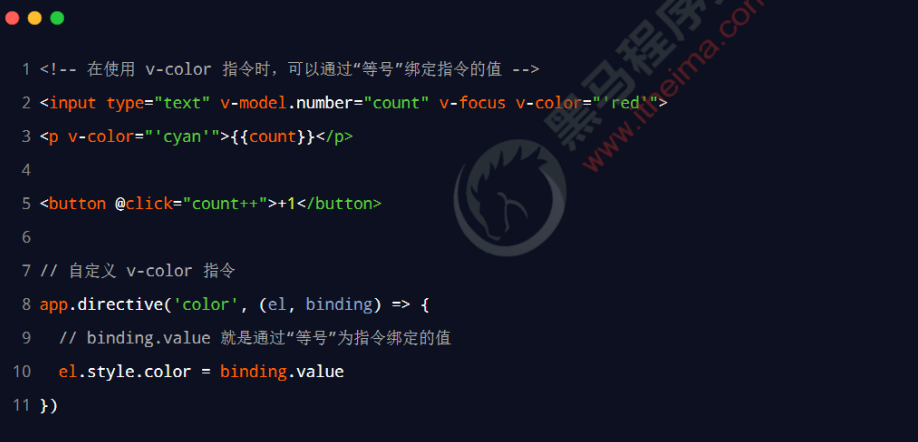
Table case
1. Case effect
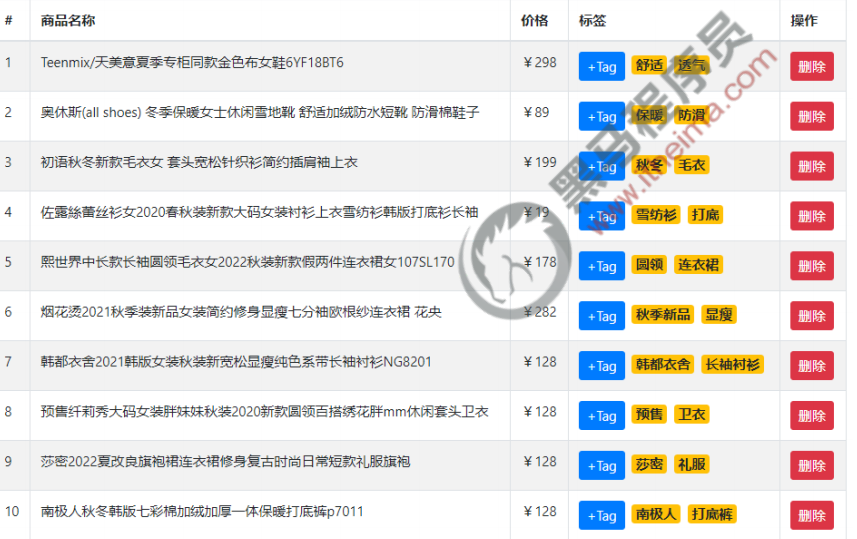
2. Knowledge points used
- Component encapsulation
- Named slot
- Scope slot
- Custom instruction
3. Implementation steps
1. Build the basic structure of the project
1.1 initialization items
1. Run the following command on the terminal to initialize the vite project:
2. cd to the project root directory and install dependencies:
3. Install less dependency package:
4. Open the project with vscode, and run the following command under the vscode integrated terminal to run the project:
npm init vite-app table-demo
npm install
npm i less -D
npm run dev
<template>
 <div>
 <h1>App Root component</h1>
 </div>
</template> <script>
export default {
 name: 'MyApp', }
</script> <style lang="less" scoped></style>:root {
font-size: 12px; }
body {
padding: 8px; } 1234567import { createApp } from 'vue'
import App from './App.vue'
// Import bootstrap style sheet
import './assets/css/bootstrap.css'
import './index.css'
createApp(App).mount('#app')npm install axios@0.21.0 -S
/ 1. Import axios
import axios from 'axios'
const app = createApp(App)
// 2. Mount axios to the global. In the future, each component can be directly accessed through
this.$http replace axios launch Ajax request
app.config.globalProperties.$http = axios
// 3. Configure the root path of the request
axios.defaults.baseURL = 'https://www.escook.cn'
app.mount('#app')data() {
return {
// Item list data
goodslist: []
}
} methods: {
// Initialize the data of the item list
async getGoodsList() {
// Initiate an Ajax request
const { data: res } = await this.$http.get('/api/goods')
// request was aborted
if (res.status !== 0) return console.log('Get product list missing
Defeat!')
// Request succeeded
this.goodslist = res.data
}
}created() {
this.getGoodsList()
} - 1. The user passes the prop attribute named data to mytable The Vue component specifies the data source
- 2. On mytable In the Vue component, a named slot named header is reserved
- 3. On mytable In the Vue component, a scope slot with the name of body is reserved
3.1 create and use MyTable component
<template>
 <div>MyTable assembly</div>
</template> <script>
export default {
 name: 'MyTable',
}
</script> <style lang="less" scoped></style>/ Import MyTable assembly
import MyTable from './components/my-table/MyTable.vue'
export default {
name: 'MyApp',
// ... Omit other codes
// Register MyTable component
components: {
MyTable
}
} <template> <div> <h1>App Root component</h1> <hr /> <!-- Using table components --> <my-table></my-table> </div> </template>
export default {
 name: 'MyTable',
 props: {
 // Table data source
 data: {
 type: Array,
 required: true,
 default: [],
 },
 },
} <!-- Using table components --> <my-table :data="goodslist"></my-table>
<template>
 <table class="table table-bordered table-striped">
 <!-- Header area of the table -->
 <thead>
 <tr>
 <th>#</th>
 <th>Trade name</th>
 <th>Price</th>
 <th>label</th>
 <th>operation</th>
 </tr>
 </thead>
 <!-- Body area of the table -->
 <tbody></tbody>
 </table>
</template>
<template>
 <table class="table table-bordered table-striped">
 <!-- Header area of the table -->
 <thead>
 <tr>
 <!-- Named slot -->
 <slot name="header"></slot>
 </tr>
 </thead>
 <!-- Body area of the table -->
 <tbody></tbody>
 </table>
</template>
<!-- Using table components -->
<my-table :data="goodslist">
 <!-- Table title -->
 <template v-slot:header>
 <th>#</th>
 <th>Trade name</th>
 <th>Price</th>
 <th>label</th>
 <th>operation</th>
 </template>
</my-table>
<template>
 <table class="table table-bordered table-striped">
 <thead>
 <tr>
 <slot name="header"></slot>
 </tr>
 </thead>
 <!-- Body area of the table -->
 <tbody>
<!-- use v-for Instruction to cycle through the data rows of the table -->
 <tr v-for="(item, index) in data" :key="item.id"></tr>
 </tbody>
 </table>
</template>
<template>
 <table class="table table-bordered table-striped">
 <thead>
 <tr>
 <slot name="header"></slot>
 </tr>
 </thead>
 <!-- Body area of the table -->
 <tbody>
 <!-- use v-for Instruction to cycle through the data rows of the table -->
 <tr v-for="(item, index) in data" :key="item.id">
 <!-- For data rows td Reserved slot -->
 <slot name="body"></slot>
 </tr>
 </tbody>
 </table>
</template>
<template>
 <table class="table table-bordered table-striped">
 <thead>
 <tr>
 <slot name="header"></slot>
 </tr>
 </thead>
 <!-- Body area of the table -->
 <tbody>
 <!-- use v-for Instruction to cycle through the data rows of the table -->
 <tr v-for="(item, index) in data" :key="item.id">
 <!-- For data rows td Reserved scope slot -->
 <slot name="body" :row="item" :index="index"></slot>
 </tr>
</tbody>
 </table>
</template>
<!-- Using table components -->
<my-table :data="goodslist">
 <!-- Table title -->
 <template v-slot:header>
 <th>#</th>
 <th>Trade name</th>
 <th>Price</th>
 <th>label</th>
 <th>operation</th>
 </template>
 <!-- Cells in each row of the table -->
 <template v-slot:body="{ row, index }">
 <td>{{ index + 1 }}</td>
 <td>{{ row.goods_name }}</td>
 <td>¥{{ row.goods_price }}</td>
 <td>{{ row.tags }}</td>
 <td>
 <button type="button" class="btn btn-danger btn-sm">delete
</button>
 </td>
 </template>
</my-table> <td> <button type="button" class="btn btn-danger btn-sm" @click="onRemove(row.id)">delete</button> </td> 123
methods: {
 // Delete product information according to Id
 onRemove(id) {
 this.goodslist = this.goodslist.filter(x => x.id !== id)
 },
}<td>
<span class="badge badge-warning ml-2" v-for="item in row.tags"
:key="item">{{tag}}</span>
</td> <td>
<!-- Based on the current row inputVisible,To control input and button On demand Exhibition
show-->
<input type="text" class="form-control form-control-sm ipt-tag"
v-if="row.inputVisible">
<button type="button" class="btn btn-primary btn-sm" velse>+Tag</button>
<span class="badge badge-warning ml-2" v-for="item in row.tags"
:key="item">{{item}}</span>
</td> <td>
<!-- Based on the current row inputVisible,To control input and button On demand Exhibition
show-->
<input type="text" class="form-control form-control-sm ipt-tag"
v-if="row.inputVisible" />
<button type="button" class="btn btn-primary btn-sm" v-else
@click="row.inputVisible = true">+Tag</button>
<span class="badge badge-warning ml-2" v-for="item in row.tags"
:key="item">{{item}}</span>
</td> directives: {
// Encapsulates instructions that automatically gain focus
focus(el) {
el.focus()
},
}<input type="text" class="form-control ipt-tag form-control-sm" vif="row.inputVisible" v-focus />
<input
 type="text"
 class="form-control ipt-tag form-control-sm"
 v-if="row.inputVisible"
 v-focus
 v-model.trim="row.inputValue"
/>
<input
 type="text"
 class="form-control ipt-tag form-control-sm"
 v-if="row.inputVisible"
 v-focus
 v-model.trim="row.inputValue"
 @blur="onInputConfirm(row)"
/>
onInputConfirm(row) {
 // 1. Transfer the value entered by the user in the text box to the constant val in advance
 const val = row.inputValue
 // 2. Clear the value of the text box
 row.inputValue = ''
 // 3. Hide text box
 row.inputVisible = false
} onInputConfirm(row) {
// The value entered by the user in the text box is transferred to the constant val in advance
const val = row.inputValue
// Clear the value of the text box
row.inputValue = ''
// Hide text box
row.inputVisible = false
// 1.1 judge whether the value of val is empty. If it is empty, it will not be added
// 1.2 judge whether the value of val already exists in the tags array to prevent repeated addition
if (!val || row.tags.indexOf(val) !== -1) return
// 2. push the content entered by the user into the tags array of the current row as a new tag
row.tags.push(val) }<input type="text" class="form-control ipt-tag form-control-sm" v-if="row.inputVisible" v-focus v-model.trim="row.inputValue" @blur="onInputConfirm(row)" @keyup.enter="onInputConfirm(row)" />
<input
 type="text"
 class="form-control ipt-tag form-control-sm"
 v-if="row.inputVisible"
 v-focus
 v-model.trim="row.inputValue"
 @blur="onInputConfirm(row)"
 @keyup.enter="onInputConfirm(row)"
 @keyup.esc="row.inputValue = ''"
/>
Summary
① Know how to use ref to reference DOM and component instances
Specify the name of the reference through the ref attribute and use this$ Refs access reference instance
② Be able to know the calling time of $nextTick
The callback in $nextTick is not executed until the DOM of the component is updated
③ Be able to say the function of keep alive element
Status of dynamic components
④ Be able to master the basic usage of slots
< slot > tag, named slot, scope slot, v-slot: abbreviated as#
⑤ Know how to customize instructions
Private custom instruction, global custom instruction