This project is based on Django. Due to the interface related development, the front-end development is not involved for the time being. MySQL is used at the back end for data storage, addition, deletion, modification and query.
1) What is Django?
Django is a free and open source Web framework developed in python. It provides many modules commonly used in website background development, so that developers can focus on the business part.
- Django has the most complete functions. It defines a complete set of functions such as service publishing, route mapping, template programming and data processing.
- Django draws lessons from the classic MVC pattern and divides the interaction process into three levels, namely MTV design pattern: Model, Template and View.
- For detailed introduction, please refer to Introduction and launch of Django framework for [practical learning (III)] open source project learning.
2) Project introduction
Student information management system:
- Function: collect students' personal information, so as to provide teachers with the status of each student in school or graduate, and let students use their student number to check their performance in school.
- Relevant databases: student information, course information and college information.
College information management module interface:
- Function: manage college information and support the addition, deletion, modification and query of college information.
3) Development environment deployment
1. Installation of Python and pychar
Can refer to Preparation for [practical learning (II)] open source project learning.
2. Installation of Django and other libraries
To avoid affecting the version dependency of other projects, choose to install in a virtual environment.
- You can also refer to the introduction of virtual environment and the installation of Django in virtual environment Preparation for [practical learning (II)] open source project learning.
requirements.txt contents:
certifi==2017.11.5
chardet==3.0.4
coreapi==2.3.3
coreschema==0.0.4
Django==1.11
djangorestframework==3.7.3
idna==2.6
itypes==1.1.0
Jinja2==2.10
MarkupSafe==1.1.1
pytz==2017.3
requests==2.18.4
uritemplate==3.0.0
urllib3==1.22
PyMySQL==0.7.11
Installation steps in virtual environment:
C:\Users\Facek>workon  //View what virtual environments are currently available

Pass a name to activate one of the following virtualenvs:
==============================================================================
apitest
myproject

C:\Users\Facek>mkvirtualenv depapi  # Create the required virtual environment
created virtual environment CPython3.7.9.final.0-64 in 3843ms
  creator CPython3Windows(dest=C:\Users\Facek\Envs\depapi, clear=False, no_vcs_ignore=False, global=False)
  seeder FromAppData(download=False, pip=bundle, setuptools=bundle, wheel=bundle, via=copy, app_data_dir=C:\Users\Facek\AppData\Local\pypa\virtualenv)
    added seed packages: pip==21.0.1, setuptools==56.1.0, wheel==0.36.2
  activators BashActivator,BatchActivator,FishActivator,PowerShellActivator,PythonActivator,XonshActivator

(depapi) C:\Users\Facek>pip -V  # View the version of pip in the virtual environment
pip 21.0.1 from C:\Users\Facek\Envs\depapi\lib\site-packages\pip (python 3.7)

(depapi) C:\Users\Facek>pip list  # View existing installation packages
Package    Version
---------- -------
pip        21.0.1
setuptools 56.1.0
wheel      0.36.2

(depapi) C:\Users\Facek\Desktop\study\actual combat\depapi>pip install -r requirements.txt --default-timeout=100 -i http://pypi.mirrors.ustc.edu.cn/simple/ --trusted-host pypi.mirrors.ustc.edu.cn # through requirements Txt installation library, -- default timeout to avoid the timeout problem, using the pypi image of the University of science and technology of China
4) Creating projects with Django
4.1 creating projects using the command line
After you install Django, you should have the available management tool Django admin. If Windows does not configure environment variables, you can use Django admin.
Django admin startproject project project name
(depapi) C:\Users\Facek\Desktop\study\actual combat\depapi>django-admin startproject depapi

(depapi) C:\Users\Facek\Desktop\study\actual combat\depapi>tree /F  # Print the file tree structure of the specified directory, / F displays the names of the files in each folder.
volume Windows  Folder for PATH list
 The volume serial number is 709 F-EA84
C:.
│  requirements.txt
│
└─depapi
    │  manage.py  # A practical command line tool that interacts with the Django project in various ways
    │
    └─depapi  # Container for project
            settings.py  #  Setup / configuration of this Django project
            urls.py  # The URL statement of the Django project, a website "directory" driven by Django
            wsgi.py  # An entry to a WSGI compatible Web server to run your project
            __init__.py
-
You can use Python manage Py runserver 0.0.0.0:8000 runs and checks whether the project is created normally.
-
You can also use pychart to create a project: file - > new project ---- select Django - > configure path and project name - > configure environment (the default system environment) - -- > click create
4.2 create APP (application)
Django a project consists of multiple applications. Django's APP can be understood as a module in a website. We can write each module as an APP separately, which can make the project relatively clean and easier to maintain.
The creation principle is basically the same as that of creating a project. Python manage Py startapp is the name of the app.
- For the method of complete deletion, please refer to: https://blog.csdn.net/huochen1994/article/details/52680067
After creation, relevant configuration is required:
1. In settings Register the app in PY
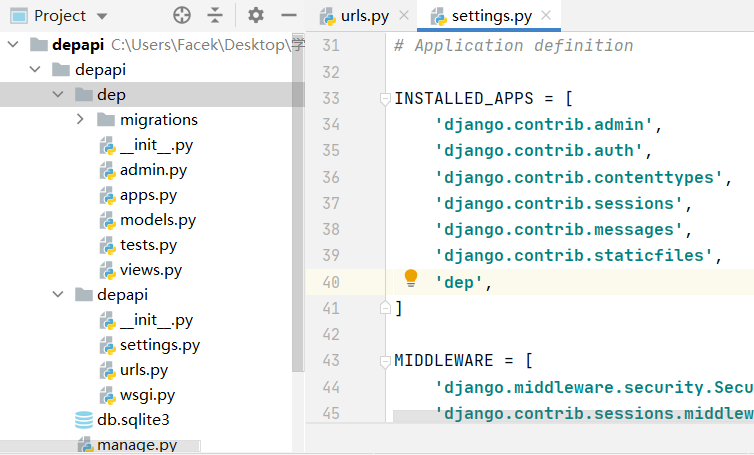
In settings Register app in py, that is, add app to installed in project configuration (settings.py)_ In apps.
- You can choose to add the app name directly. In most cases, add the app name directly to INSTALLED_APPS is enough.
- You can also add the configuration AppConfig subclass corresponding to the app. Only when you need to customize the configuration information for the app, you need to add the AppConfig subclass path corresponding to the app directly to INSTALLED_APPS.
*INSTALLED_ Role of apps
INSTALLED_APPS helps django synchronize databases, run tests, make URLs work, and solve more related problems.
- INSTALLED_APPS is registered for and models The model / database in py is used interactively. If it is not registered, the normal access is view, as long as it is not related to models Py can be accessed normally without any impact.
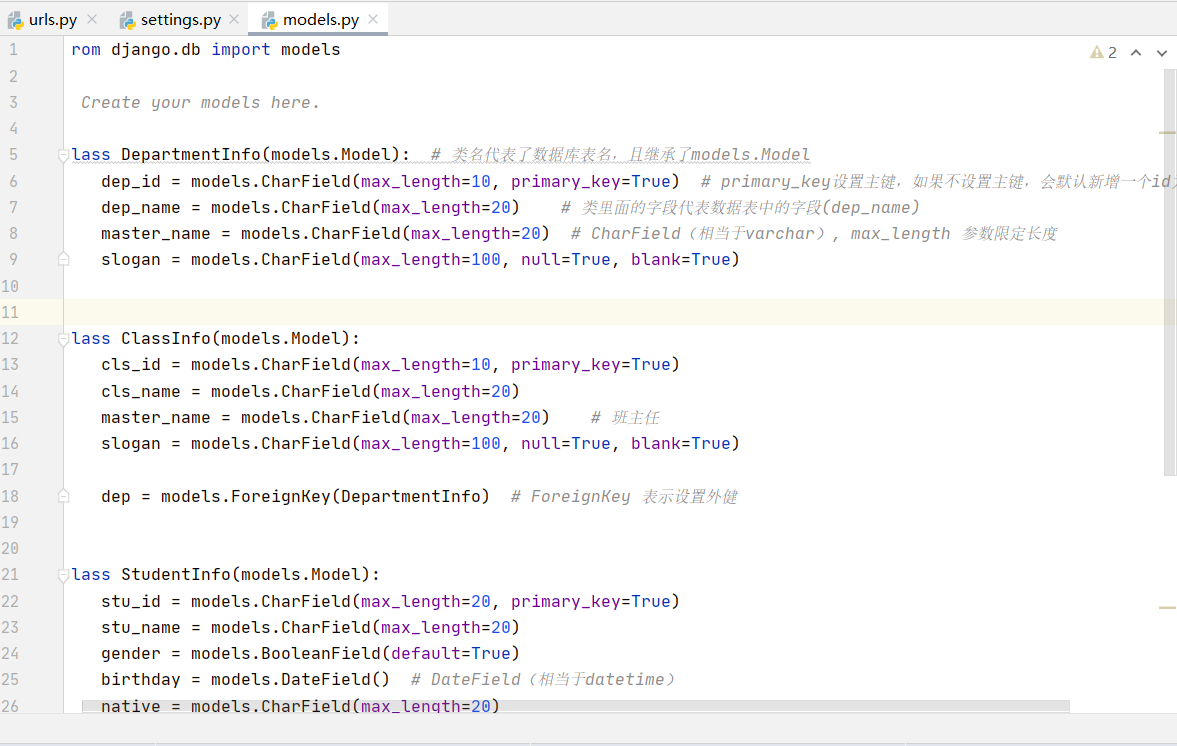
2. Define models
Django provides good support for various databases, including PostgreSQL, MySQL, SQLite and Oracle. Django provides a unified call API for these databases.
3. Configure Django to use mysql database
Django's default database engine is sqlite3. In addition to sqlite3, it also supports postgresql, mysql and oracle.
In settings Py under DATABASES:
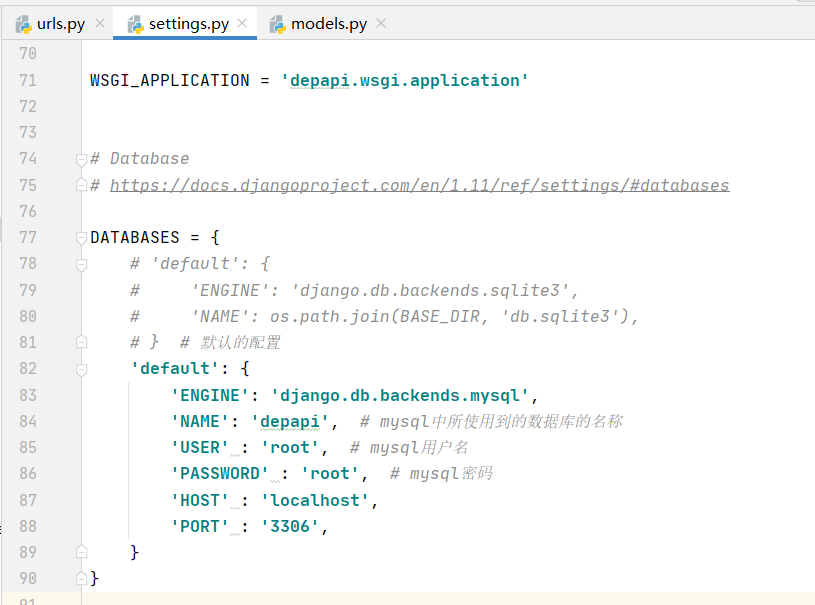
- Change sqlite3 in ENGINE to mysql
- mysql related configuration
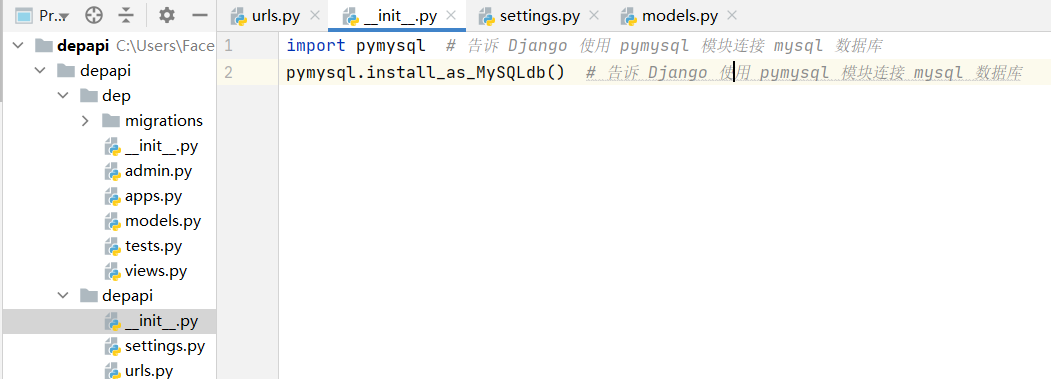
Then you need to work with settings init.py under the same level directory Import modules and configure them in py:
4. Set models Conversion of model into data table under PY
It should be noted that Django ORM cannot operate at the database level and can only operate on data tables. Therefore, you need to manually create your own MySQL database.
mysql> show databases;  //View existing database
ERROR 2006 (HY000): MySQL server has gone away
No connection. Trying to reconnect...
Connection id:    174
Current database: studentmanagementsystem

+-------------------------+
| Database                |
+-------------------------+
| information_schema      |
| dailyfresh              |
| learn1                  |
| mysql                   |
| performance_schema      |
| studentmanagementsystem |
| sys                     |
| test                    |
+-------------------------+
8 rows in set (0.04 sec)

mysql> create database depapi;  //Create database
Query OK, 1 row affected (0.00 sec)

mysql> show databases;
+-------------------------+
| Database                |
+-------------------------+
| information_schema      |
| dailyfresh              |
| depapi                  |
| learn1                  |
| mysql                   |
| performance_schema      |
| studentmanagementsystem |
| sys                     |
| test                    |
+-------------------------+
9 rows in set (0.00 sec)
Set models To convert the model under py into a data table, use the following command:
(depapi) C:\Users\Facek\Desktop\study\actual combat\depapi\depapi>python manage.py makemigrations  //Make migration generates ddl (database schema definition language)
Migrations for 'dep':
  dep\migrations\0001_initial.py
    - Create model ClassInfo
    - Create model DepartmentInfo
    - Create model StudentInfo
    - Add field dep to classinfo

(depapi) C:\Users\Facek\Desktop\study\actual combat\depapi\depapi>python manage.py migrate  //migrate execute ddl
Operations to perform:
  Apply all migrations: admin, auth, contenttypes, dep, sessions
Running migrations:
  Applying contenttypes.0001_initial... OK
  Applying auth.0001_initial... OK
  Applying admin.0001_initial... OK
  ...
-
python manage.py makemigrations:
- First, django will check the validity of creating or modifying the database. If it is not legal, it will give a prompt. For example, CharField must be set to max_length, a non empty field without default value is added.
- This operation is performed for the first time: the migrations directory will be created under the app and 0001 will be created_ inital. Py file, which records the current table creation, dependency and other information.
- Perform this operation next time: if there is any information about model The change of Py will generate the modified content under migrations, which is named, similar to 0002_alter_permission_name_max_length.py file, which records your modified fields and other information. If there are no changes, prompt: No changes detected.
- Note: these changes are not migrated to the database at this time!
-
python manage.py migrate: migrate the changes to the database, and complete the operations of creating tables and modifying fields. After the operation is successful, it will be displayed in the database Django_ Add a piece of data to the migrations table to indicate that the migration file has been migrated.
When viewing the database, you will find that except for the tables defined in the model, other tables are generated by the administrator:
mysql> use depapi;
Database changed

mysql> show tables;
+----------------------------+
| Tables_in_depapi           |
+----------------------------+
| auth_group                 |
| auth_group_permissions     |
| auth_permission            |
| auth_user                  |
| auth_user_groups           |
| auth_user_user_permissions |
| dep_classinfo              |
| dep_departmentinfo         |
| dep_studentinfo            |
| django_admin_log           |
| django_content_type        |
| django_migrations          |
| django_session             |
+----------------------------+
13 rows in set (0.00 sec)
4.3 compiling views
The main implementation logic of the background is defined here.
Because it involves interface development, it will be described in the next article.
[some contents refer to]
- Django tutorial: https://www.runoob.com/django/django-tutorial.html
- Django's installed_ Should app name or AppConfig subclass be written in apps https://zhuanlan.zhihu.com/p/220440450
- Django1.8.3 not installed_ Add a new reference in apps and you can still access it normally?: https://segmentfault.com/q/1010000003100424
- django migration details: https://blog.csdn.net/weixin_33127753/article/details/90717038