preface
Use Erupt framework + amis foreground framework to quickly build project procedures
[currently open: Foreground link ](not finished, but the team forming function is finished)
-
First blow Erupt framework !! This framework is a powerful tool for background development. You don't even need to build a table first. You can directly use it to run, and then the background management page appears. You can use code generation to generate entity classes in reverse, and directly map to generate a database. With jpa, you can realize it in an hour without a simple system, including the background, including a full set of APIs. Let you put your time on specific business!!
-
The second is Amis low code front end framework !! I did this front desk together with semantic. My front desk is only limited to changing other people's pages. This time, I realized a set of customized front desk completely independently for the first time. Although it's not very beautiful, at least the framework came out. I'm going to learn about vue and amis. I feel I can take off.
Although github/gitee are not popular now, according to my current development experience, I think they are two dark horses that will rise later. It's difficult for beginners to get started. It's true to take off after using it. Let's take a brief look at my development process~
1, Frame structure
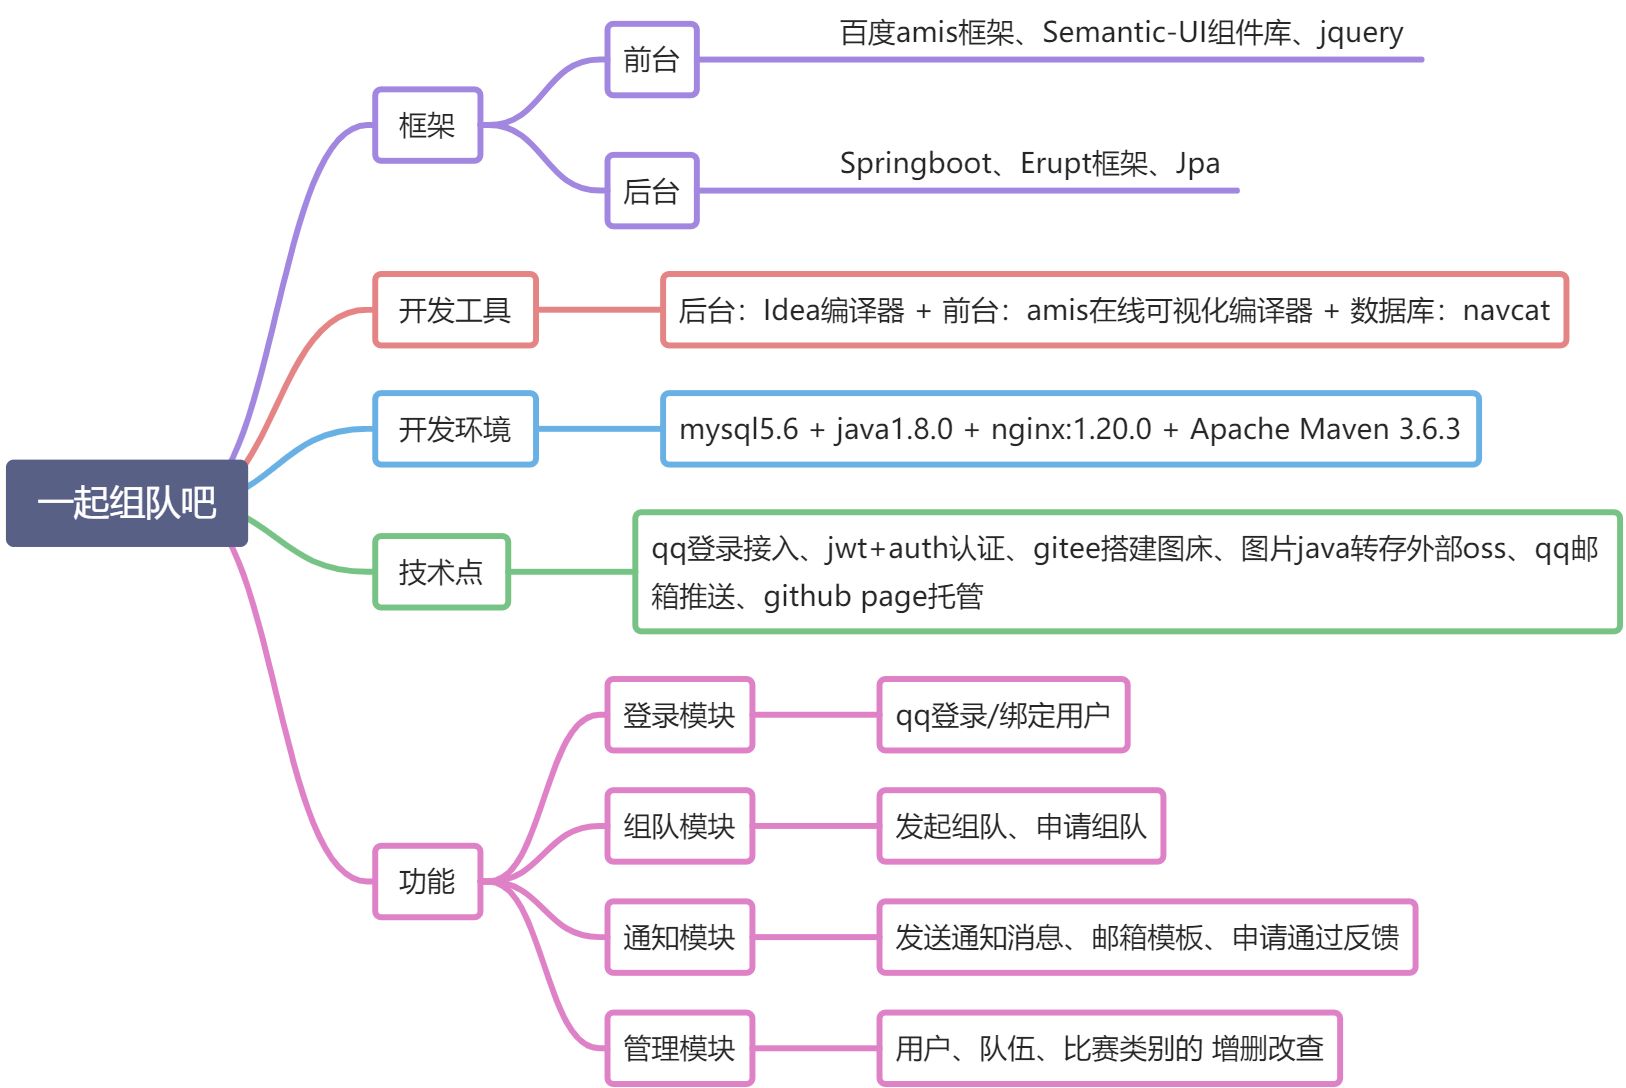 >Current project development cycle: half a month from mid May to June 10
It is mainly to learn some new technologies: the technical principle is simple, but it is not a conceptual level in practice. Some technologies have been successfully connected intermittently, and there are still many deficiencies. This project will continue to be improved in the future [project follow-up]
Because of the separated projects, the front desk may be reconstructed with vue+amis, or Android mobile terminal or Hongmeng;
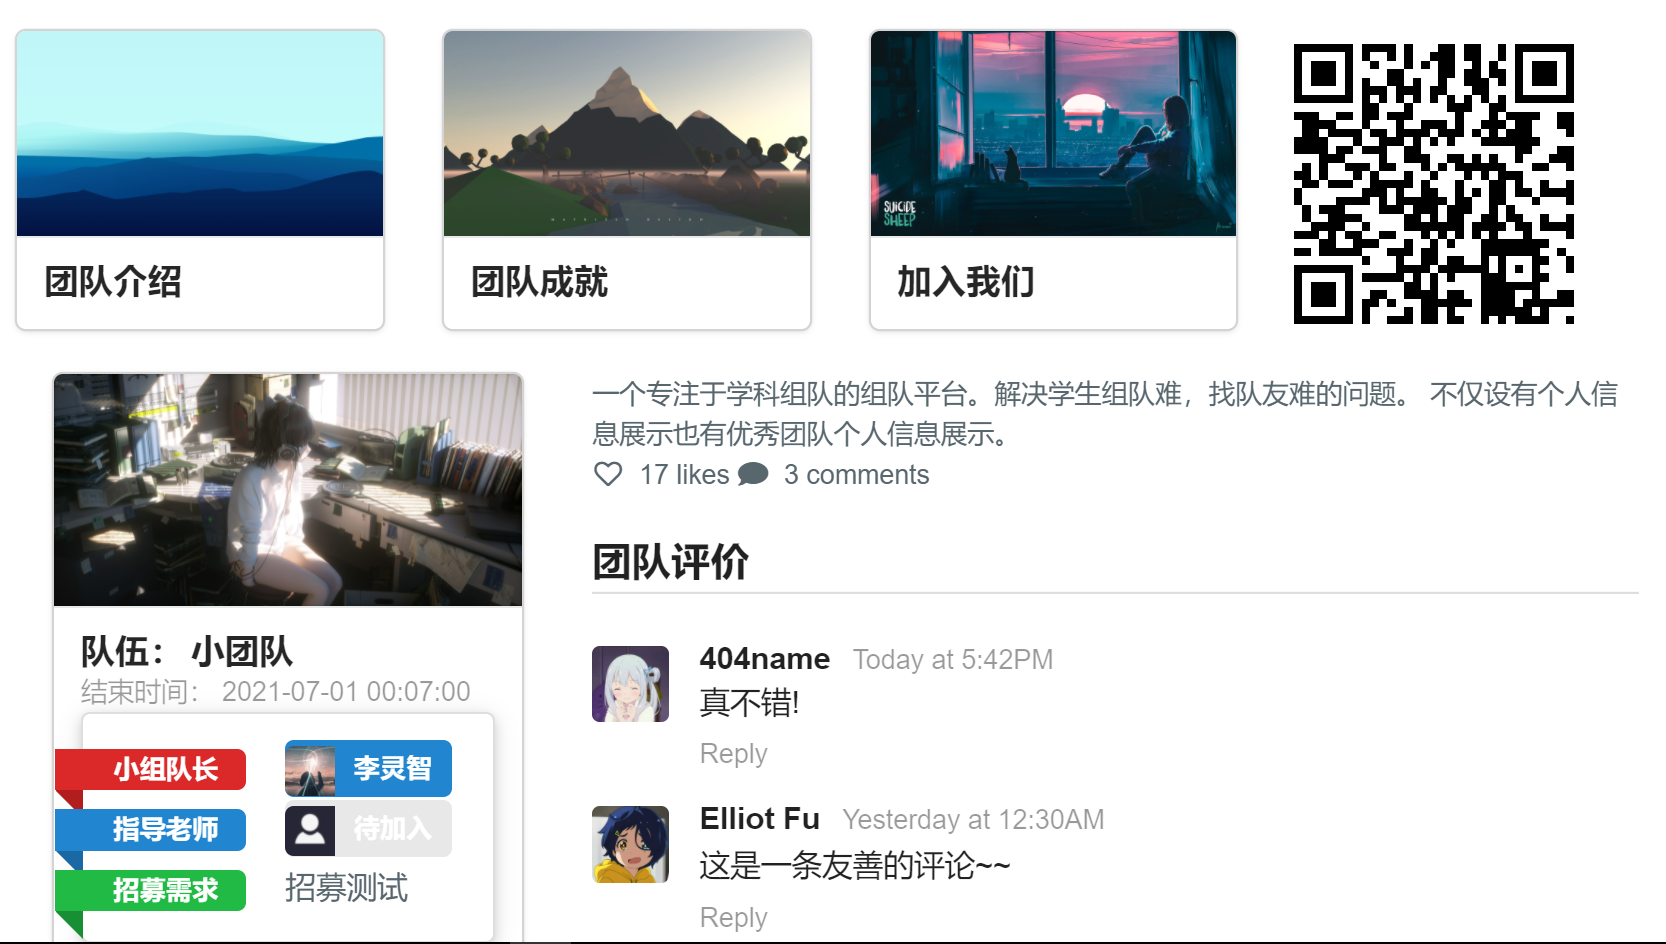
2, Interface display
Fluid layout + computer mobile terminal adaptation
Front desk interface:


Detailed interface of team formation
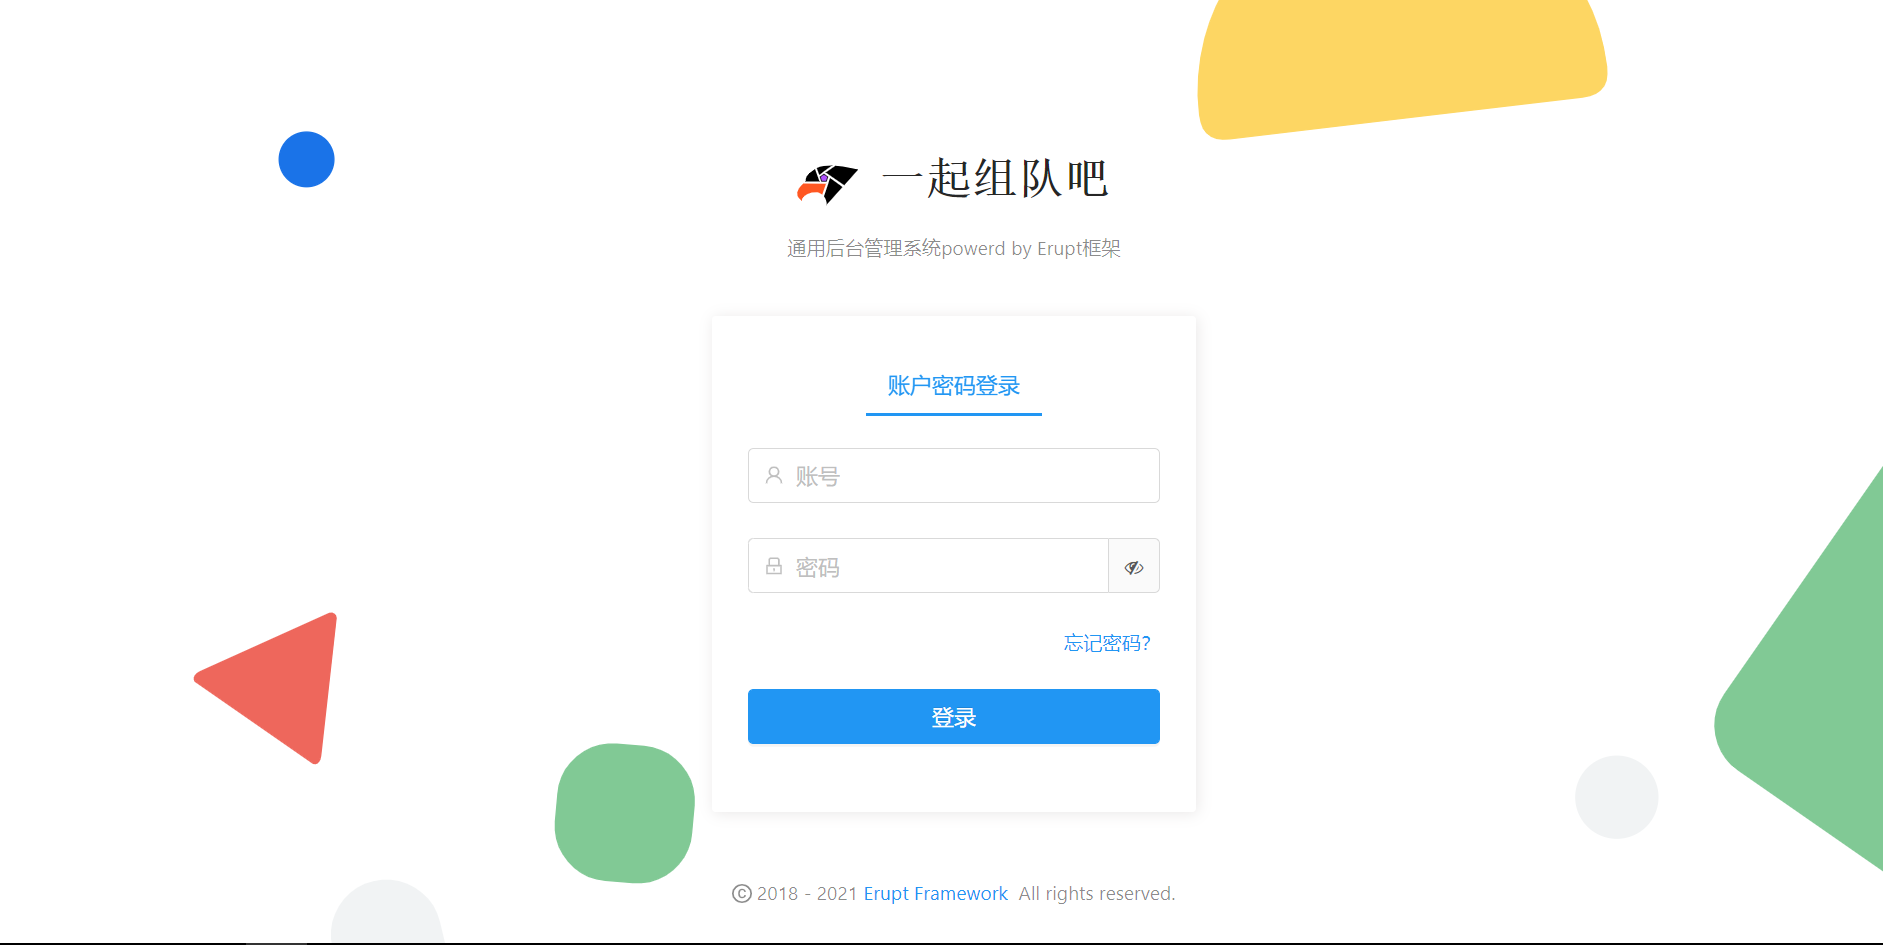
General background management framework
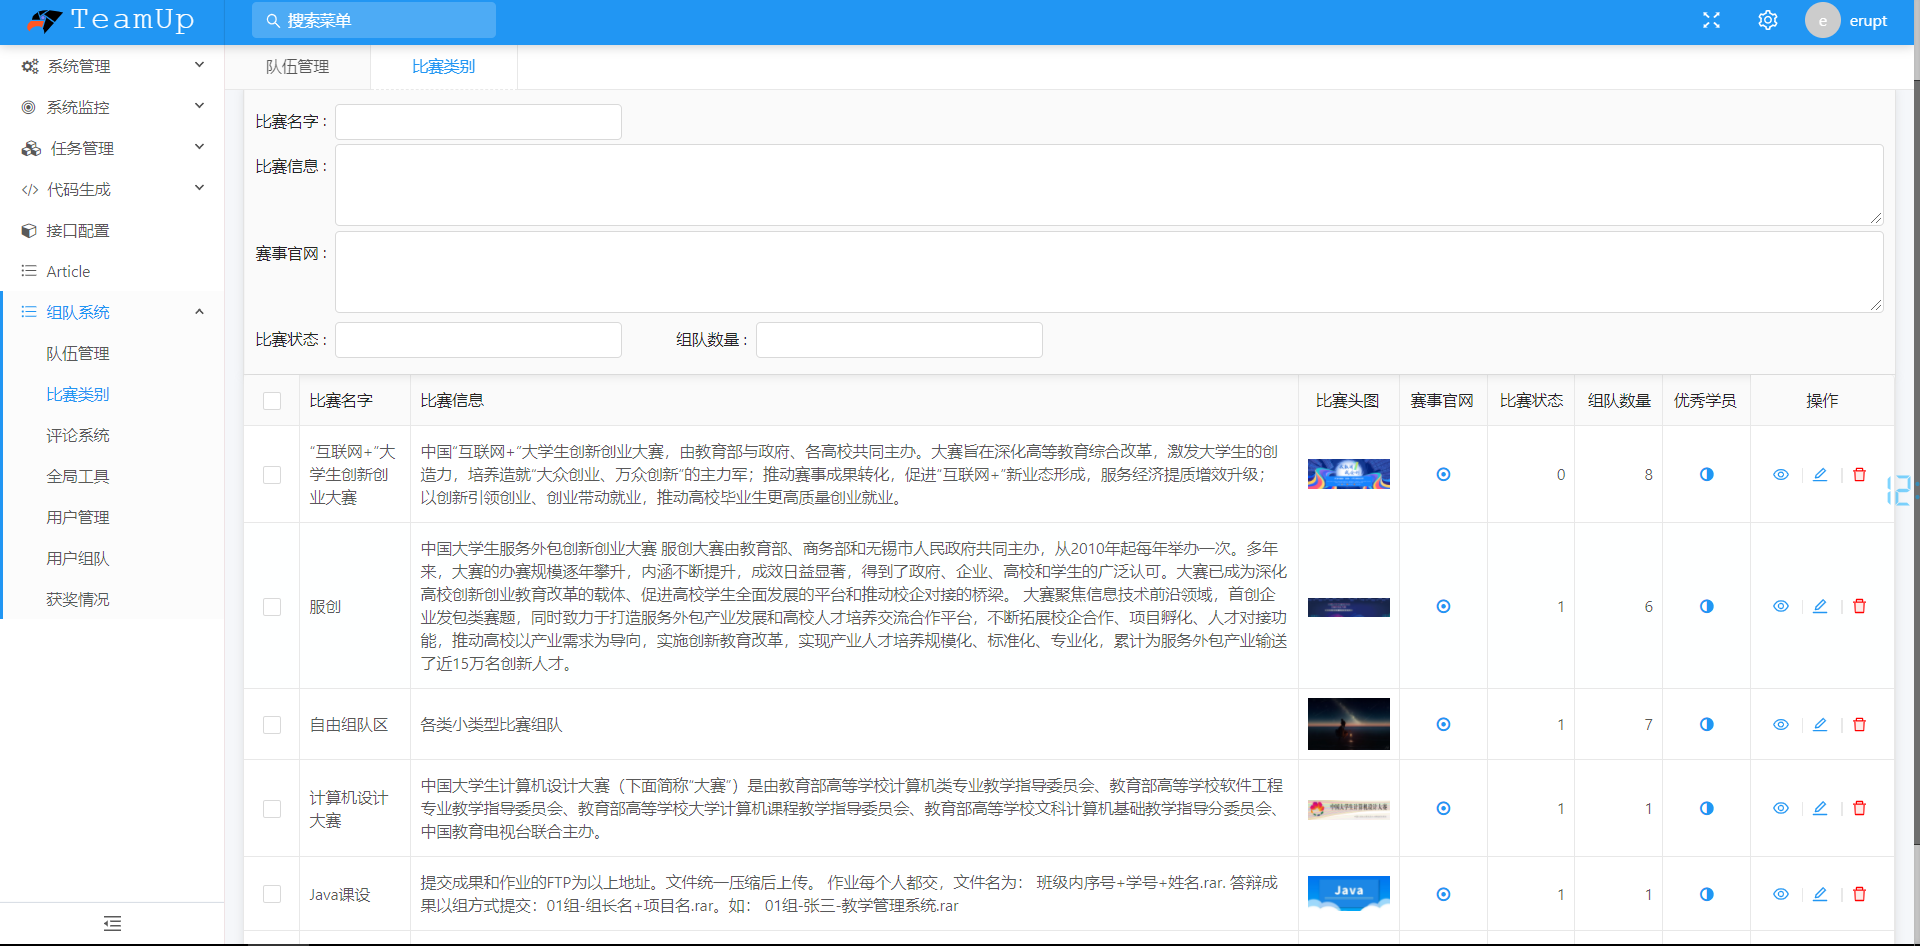
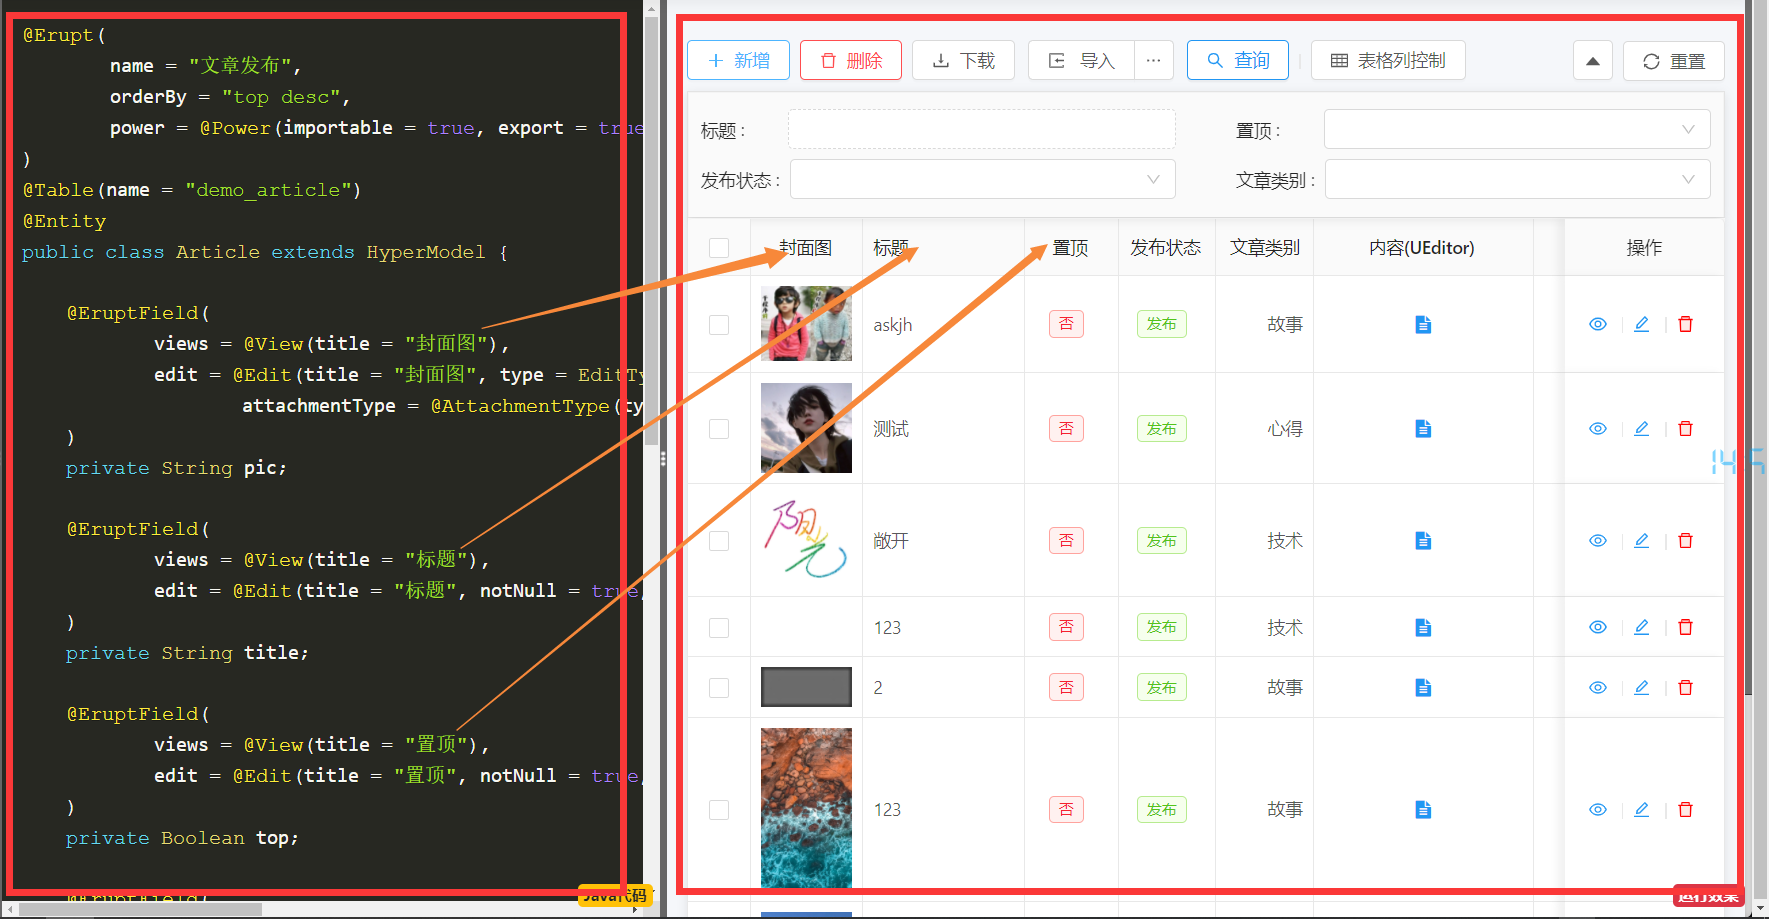
Background code interface

Foreground code
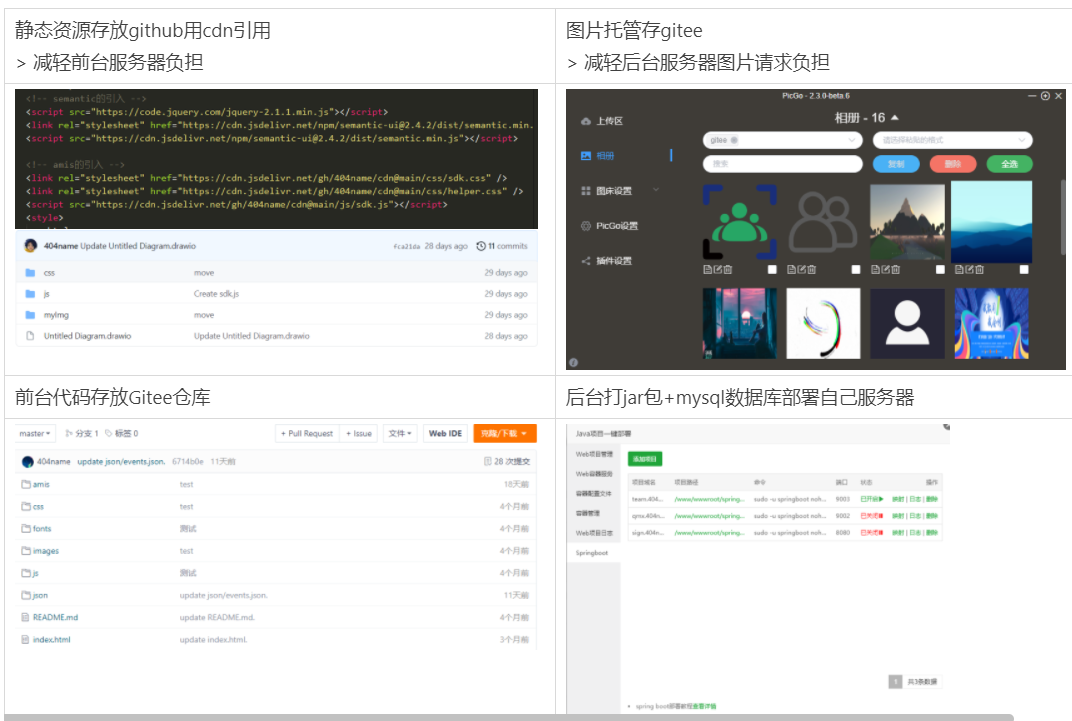
Distributed deployment / resource storage
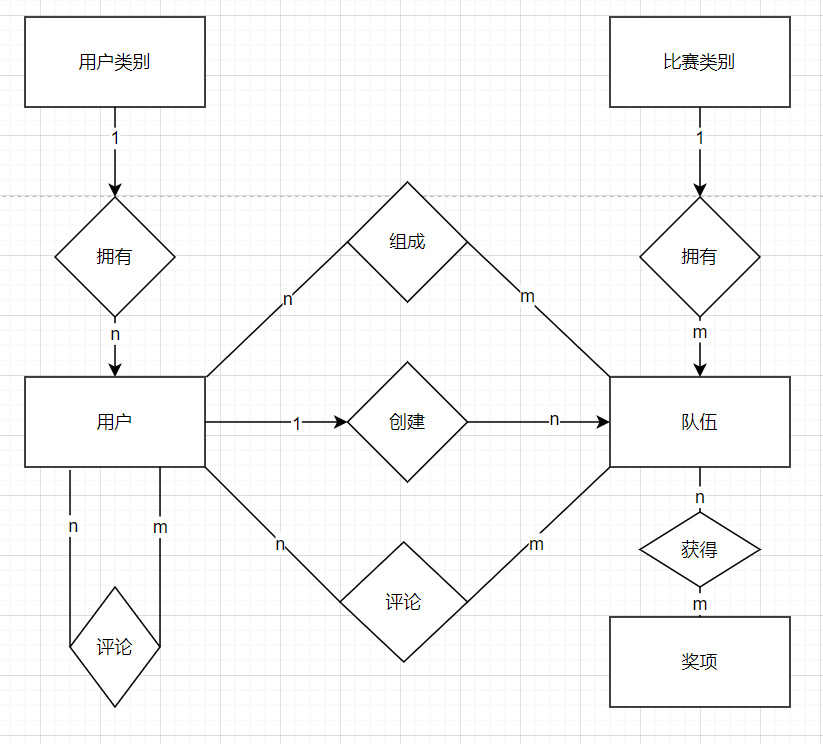
3, Database design
ER flow chart
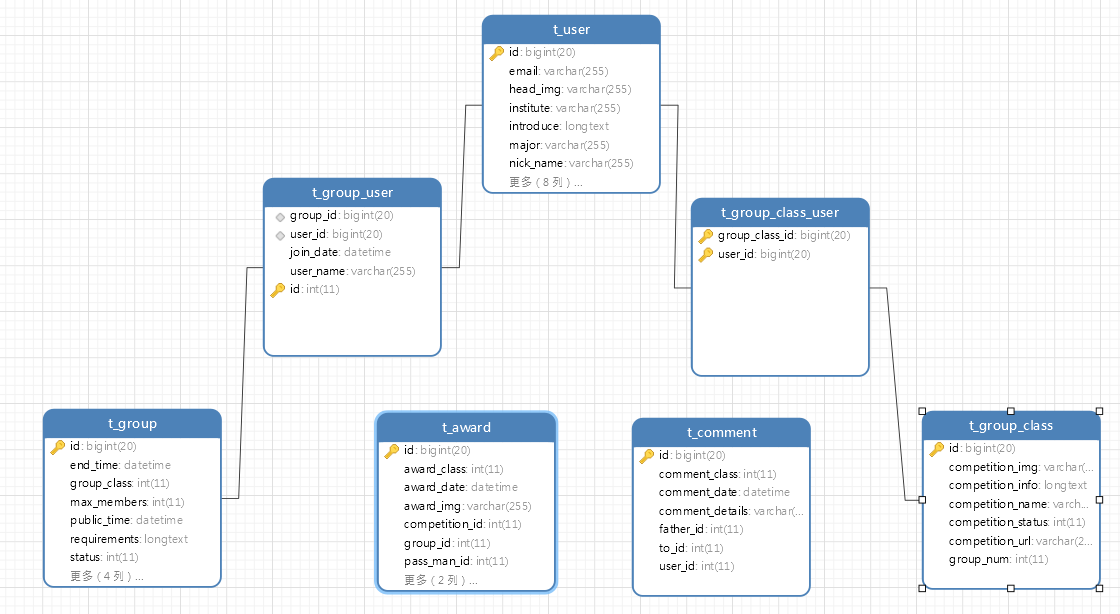
elide attributes
Database association
4, Introduction to the use of the framework
**Business presentation layer: Erupt background general framework + Amis Baidu foreground general framework + Semantic general foreground component library**
Interaction specification layer: [restful interface specification + Alibaba java development manual Specification]
**
The specific use of the framework will be updated below after the summary
Erupt background management – development management page based on annotation [details to be updated]

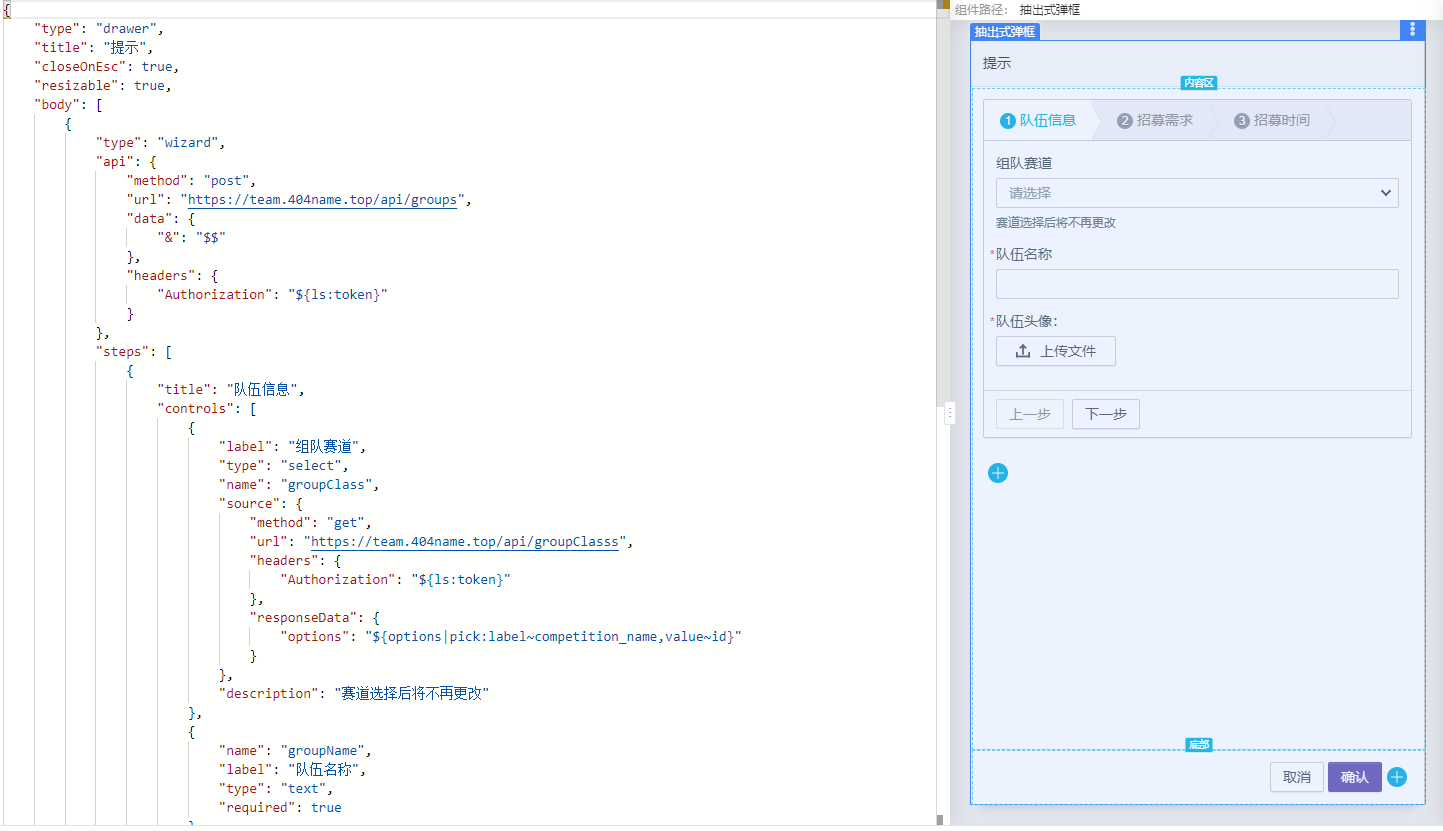
Amis Baidu foreground framework - developing foreground interface based on json [details to be updated]
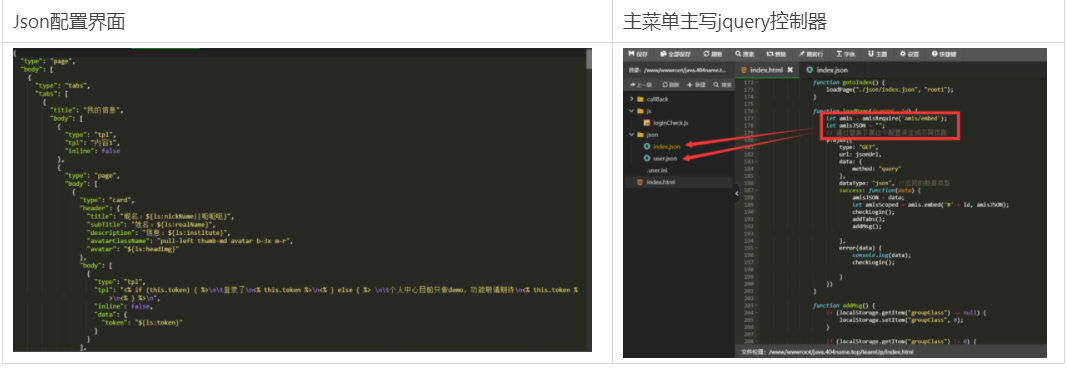
What is amis
amis is a low code front-end framework. It uses JSON configuration to generate pages, which can reduce the workload of page development and greatly improve efficiency. Quickly develop page templates.
Semantic common component library [details to be updated]
Providing rich components through semantic and building content based on the framework built by amis is equivalent to building a house, while semantic is a furniture library.


5, Combing of technical points
- The system only uses qq login to solve the problem of difficult login and registration of user password, so as to scan the code and log in and use it
- The technical points are sorted according to the business process
Process and technical points
qq login – user binding – token generation – queue request [jwt verification + picture storage] - email notification
qq login [JustAuth support]
operation flow
qq request login - background controller layer encapsulation to return qq login link - front stage jump logon link - login request sent to Tencent - Tencent authentication after calling callback address - background controller layer response processing data binding verification user - generate permissions + user package to front desk - front desk for storage.
Binding user process

Relevant codes:
    @RequestMapping("/callback/qq")
	//QQ login callback request
    public Result login(AuthCallback callback) {
        Object obj = null;
        try{
            AuthRequest authRequest = getAuthRequest();
            obj = authRequest.login(callback);
        }catch (Exception e){
            return Result.error("Login exception");
        }

        //Return to the background bundled user through qq callback
        JSONObject jsonObject = JSONObject.parseObject(JsonUtil.objectToJson(obj));
        JSONObject  data = JSONObject.parseObject(JsonUtil.objectToJson(jsonObject.get("data")));
        System.out.println(data);

        //Verify user
        User haveUser =null;
        User newUser = new User();
        haveUser = userRepository.findUserByUuid(data.getString("uuid"));
        if(haveUser!= null && haveUser.getId()!=null){
            newUser = haveUser;
        }else{
            newUser.setInstitute("The man was lazy and left nothing");
            newUser.setRegisterTime(new Date());
            newUser.setUuid(data.getString("uuid"));
            newUser.setGender(data.getString("gender"));
            newUser.setHeadImg(data.getString("avatar"));
            newUser.setNickName(data.getString("nickname"));
            newUser = userRepository.save(newUser);
        }
        //Verify necessary information
        HashMap<String,Object> map = new HashMap<>();

        String token = UserJsonUtil.UserToJwt(newUser);
        map.put("token",token);
        map.put("user",newUser);

        if (newUser.getQq() == null || newUser.getEmail() == null || newUser.getRealName() == null
                || newUser.getUserId() == null) {
            System.out.println(map);
            return Result.build(200,"Please supplement the necessary information",map);
        }
        return  Result.success(map);
        //JSONObject json = (JSONObject)JSONObject.toJSON(authRequest.login(callback));
        //Processing authority
    }
Difficulties:
- qq open platform registration needs domain name + audit
- Before the application goes online, the qq open platform only supports the review of domain name callback, which is difficult to test locally [the solution is to modify the local domain name resolution with host] + nginx port forwarding
jwt + interception authentication
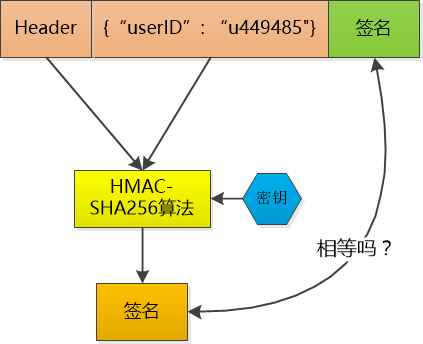
**Business process**
Given the content body area that can identify a specific user to obtain the response resource - encrypted by key signature - sent to the user - sent in the headers when the user needs to request data - the server parses and confirms and returns the corresponding request
Solve technical problems
There is a problem of user authentication in traditional projects. As for how to make the server identify users, storing the session of the server will increase the burden of the server, and simply storing the cookie on the client side is easy to be tampered with;
A solution is needed, that is jwt. By storing and encrypting the key on the server, the token sent to the user is unique and cannot be tampered with, and only the server has key matching.
Related code
Sign and issue a token [checksum generation is omitted, which can be generated by Baidu]
public static String createJWT(String id, String subject, long ttlMillis) {
    SignatureAlgorithm signatureAlgorithm = SignatureAlgorithm.HS256;
    long nowMillis = System.currentTimeMillis();
    Date now = new Date(nowMillis);
    SecretKey secretKey = generalKey();
    JwtBuilder builder = Jwts.builder().setId(id).setSubject(subject) // theme
        .setIssuer("404name") // Issuer
        .setIssuedAt(now) // Time filed
        .signWith(signatureAlgorithm, secretKey); // Signature algorithm and key
    if (ttlMillis >= 0) {
        long expMillis = nowMillis + ttlMillis;
        Date expDate = new Date(expMillis);
        builder.setExpiration(expDate); // Expiration time
    }
    return builder.compact();
}
Intercept authentication
Intercept each request through the interceptor and verify whether the header passes
Configure intercaptor to intercept all requests
public class AuthInterceptor implements HandlerInterceptor {
    @Autowired
    private UserRepository userRepository;
    @Override
    public boolean preHandle(HttpServletRequest request, HttpServletResponse response, Object handler) throws IOException {
        //Configure interceptor to realize release logic
        return true;
    }

    @Override
    public void postHandle(HttpServletRequest request, HttpServletResponse response, Object handler, ModelAndView modelAndView) {
    }

    @Override
    public void afterCompletion(HttpServletRequest request, HttpServletResponse response, Object handler, Exception ex) {

    }
    //Return error message
    private static void setReturn(HttpServletResponse response, int status, String msg) throws IOException {

    }

}
The path specified by config release does not pass header verification
@Configuration
public class InterceptorConfig implements WebMvcConfigurer {


    @Bean
    public AuthInterceptor authInterceptor() {
        return new AuthInterceptor();
    }

    @Override
    public void addInterceptors(InterceptorRegistry registry) {
        // Release path
        List<String> patterns = new ArrayList();
        registry.addInterceptor(authInterceptor())
                .addPathPatterns("/api/**")
                .excludePathPatterns("/api/login")
                .excludePathPatterns("/api/get/**");
    }
}
Picture storage
Specify external oss storage [Alibaba cloud, qiniu cloud, git warehouse]
Select gitee warehouse here. Open the warehouse first – configure the key – simulate http request in java and send upload request – return to the access link and save it in the database
    @Override
    public String upLoad(InputStream inputStream, String path) {
        //Create upload object based on storage area
        System.out.println(inputStream + "  " + path);
        //Set parameters for transferring to Gitee warehouse
        String paramImgFile = Base64.encode(inputStream);
        Map<String, Object> paramMap = new HashMap<String, Object>();
        paramMap.put("access_token", GiteeImgBed.ACCESS_TOKEN);
        paramMap.put("message", GiteeImgBed.ADD_MESSAGE);
        paramMap.put("content", paramImgFile);
        //Transfer file path
        String targetDir =GiteeImgBed.PATH +  path;
        String requestUrl = String.format(GiteeImgBed.CREATE_REPOS_URL, GiteeImgBed.OWNER,
                GiteeImgBed.REPO_NAME, targetDir);
        System.out.println("Url" + requestUrl);
        //Tool class simulates post request
        String resultJson = HttpUtil.post(requestUrl, paramMap);
        return getUrlFromJson(resultJson);//Extract the specified string from json
    }
Mail sending**
Simulate the request and configure the email tool class - open the email port of the mailbox in advance - configure the mailbox template - encapsulate it for use;
EmailUtil. Sendemail (accept email, title, content template);
effect:

6, Problems encountered and Solutions
Cross domain problem
1, Question:
When the cross domain request contains a custom header field, the browser console reports an error.
Request header field xfilesize is not allowed by Access-Control-Allow-Headers
2, Reason:
For cross domain requests with custom header fields, the browser will first send OPTIONS requests to the server to detect whether the server allows custom cross domain fields.
If allowed, continue the actual normal POST / GET request; otherwise, return the error shown in the title.

So you need to add a filter in the background to respond to him
package com.jfly.apps.restful.springmvc;

import java.io.IOException;

import javax.servlet.Filter;
import javax.servlet.FilterChain;
import javax.servlet.FilterConfig;
import javax.servlet.ServletException;
import javax.servlet.ServletRequest;
import javax.servlet.ServletResponse;
import javax.servlet.http.HttpServletResponse;

public class CORSInterceptor implements Filter {

    @Override
    public void init(FilterConfig filterConfig) throws ServletException {
    }

    @Override
    public void doFilter(ServletRequest servletRequest, ServletResponse servletResponse, FilterChain filterChain)
            throws IOException, ServletException {
        HttpServletResponse response = (HttpServletResponse) servletResponse;
        String origin = (String) servletRequest.getRemoteHost() + ":" + servletRequest.getRemotePort();
        response.setHeader("Access-Control-Allow-Origin", "*");
        response.setHeader("Access-Control-Allow-Methods", "POST, GET, OPTIONS, DELETE");
        response.setHeader("Access-Control-Max-Age", "3600");
        response.setHeader("Access-Control-Allow-Headers", "x-requested-with,authorization");
        response.setHeader("Access-Control-Allow-Credentials", "true");
        filterChain.doFilter(servletRequest, servletResponse);

    }

    @Override
    public void destroy() {
    }
}
Start the @ servletscan function with this annotation.