| Background management system is generally used by internal personnel, so the requirements for interface are not high, and template development is generally used. The front desk system is for tourists and should highlight their personality, so it is generally developed by themselves without using templates |
|---|
- If you want to write from beginning to end, you can refer to my front desk system. Every detail will be mentioned (you can write a template yourself after reading): @ TODO will write it later
- Here is the background management system. We use the template "simple version of PanJiaChen"
- Compact version: https://github.com/PanJiaChen/vue-admin-template
- Enhanced version: https://github.com/PanJiaChen/vue-element-admin
- If you can't get into GitHub, you can download it here (code cloud): https://gitee.com/panjiachen/vue-admin-template.git
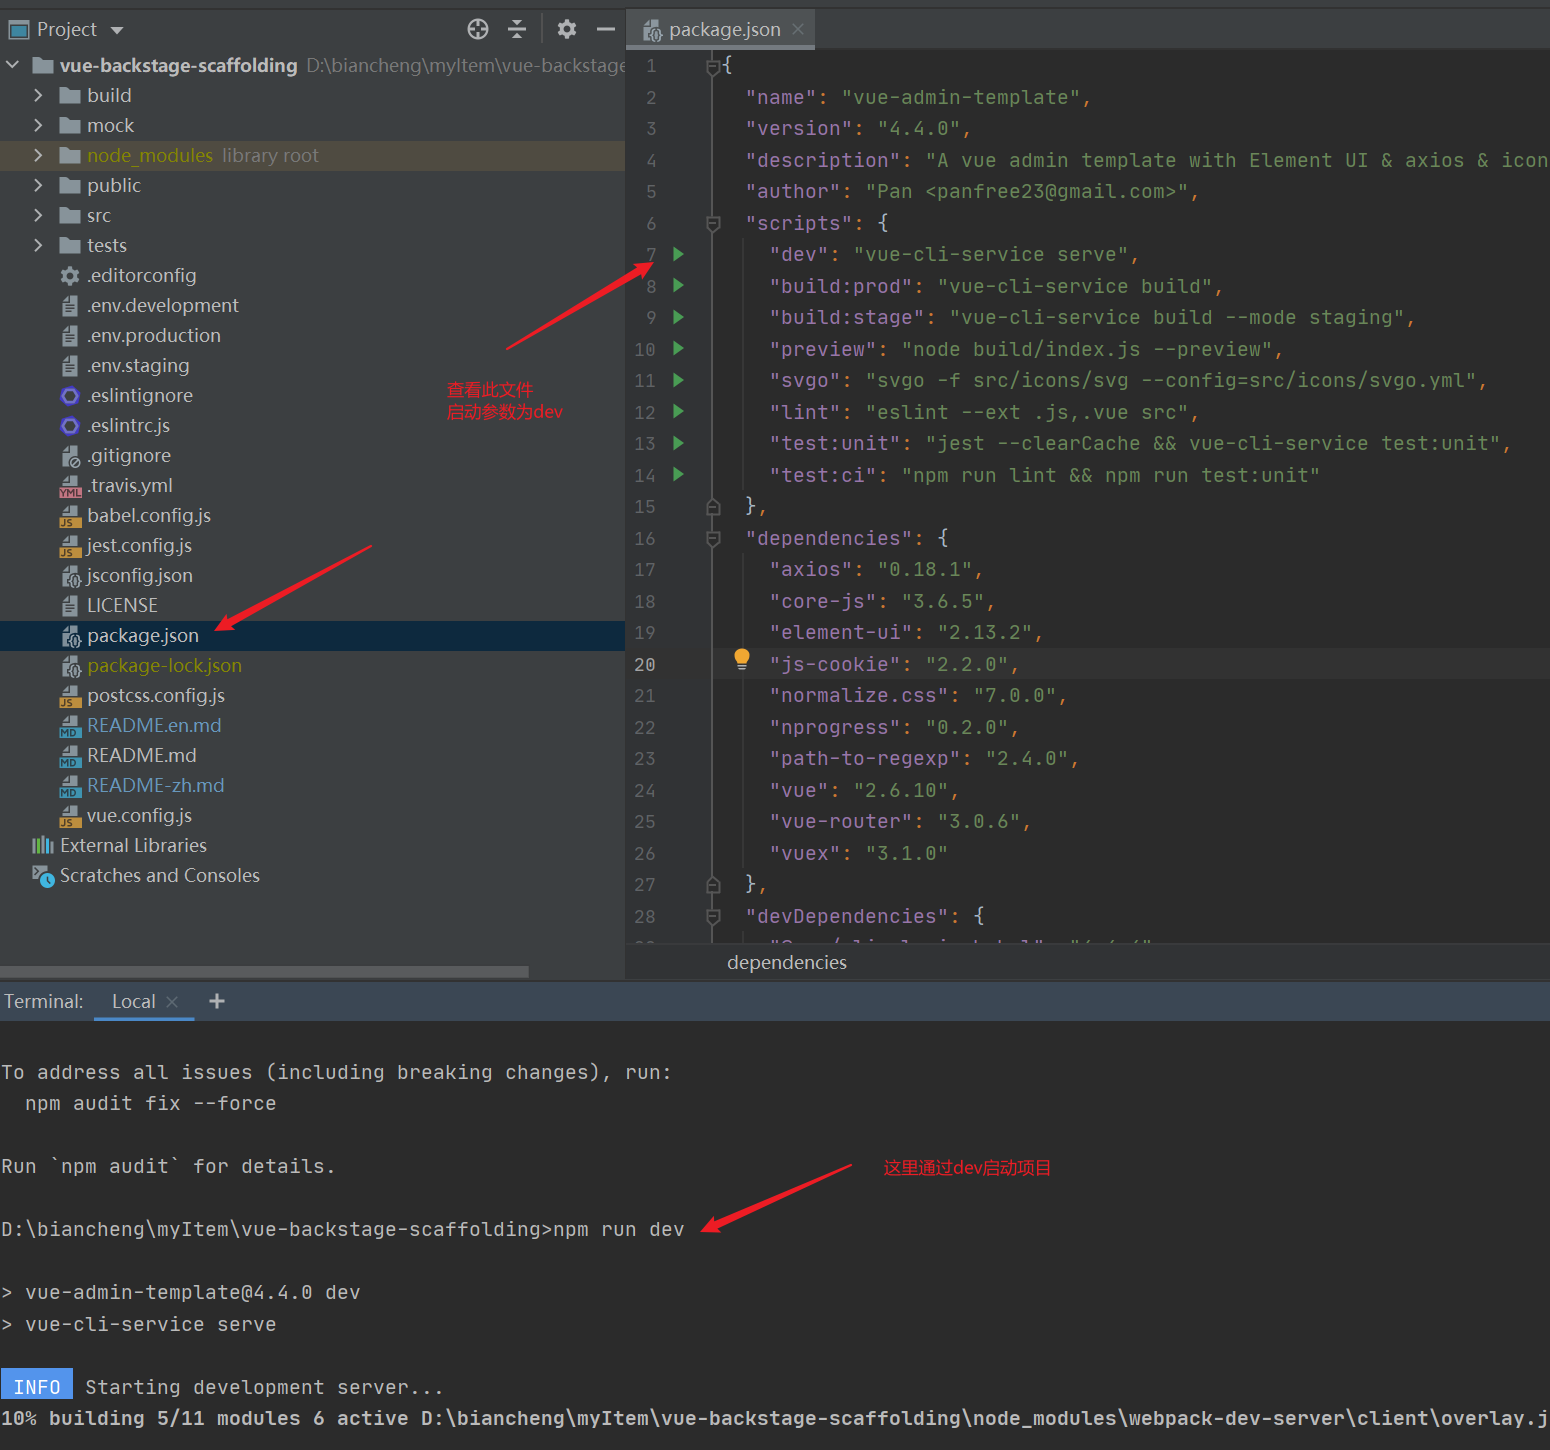
| After downloading, we use it as a project, execute npm install --save to download relevant dependencies, then start the project through npm run dev, and finally view the project through the browser |
|---|
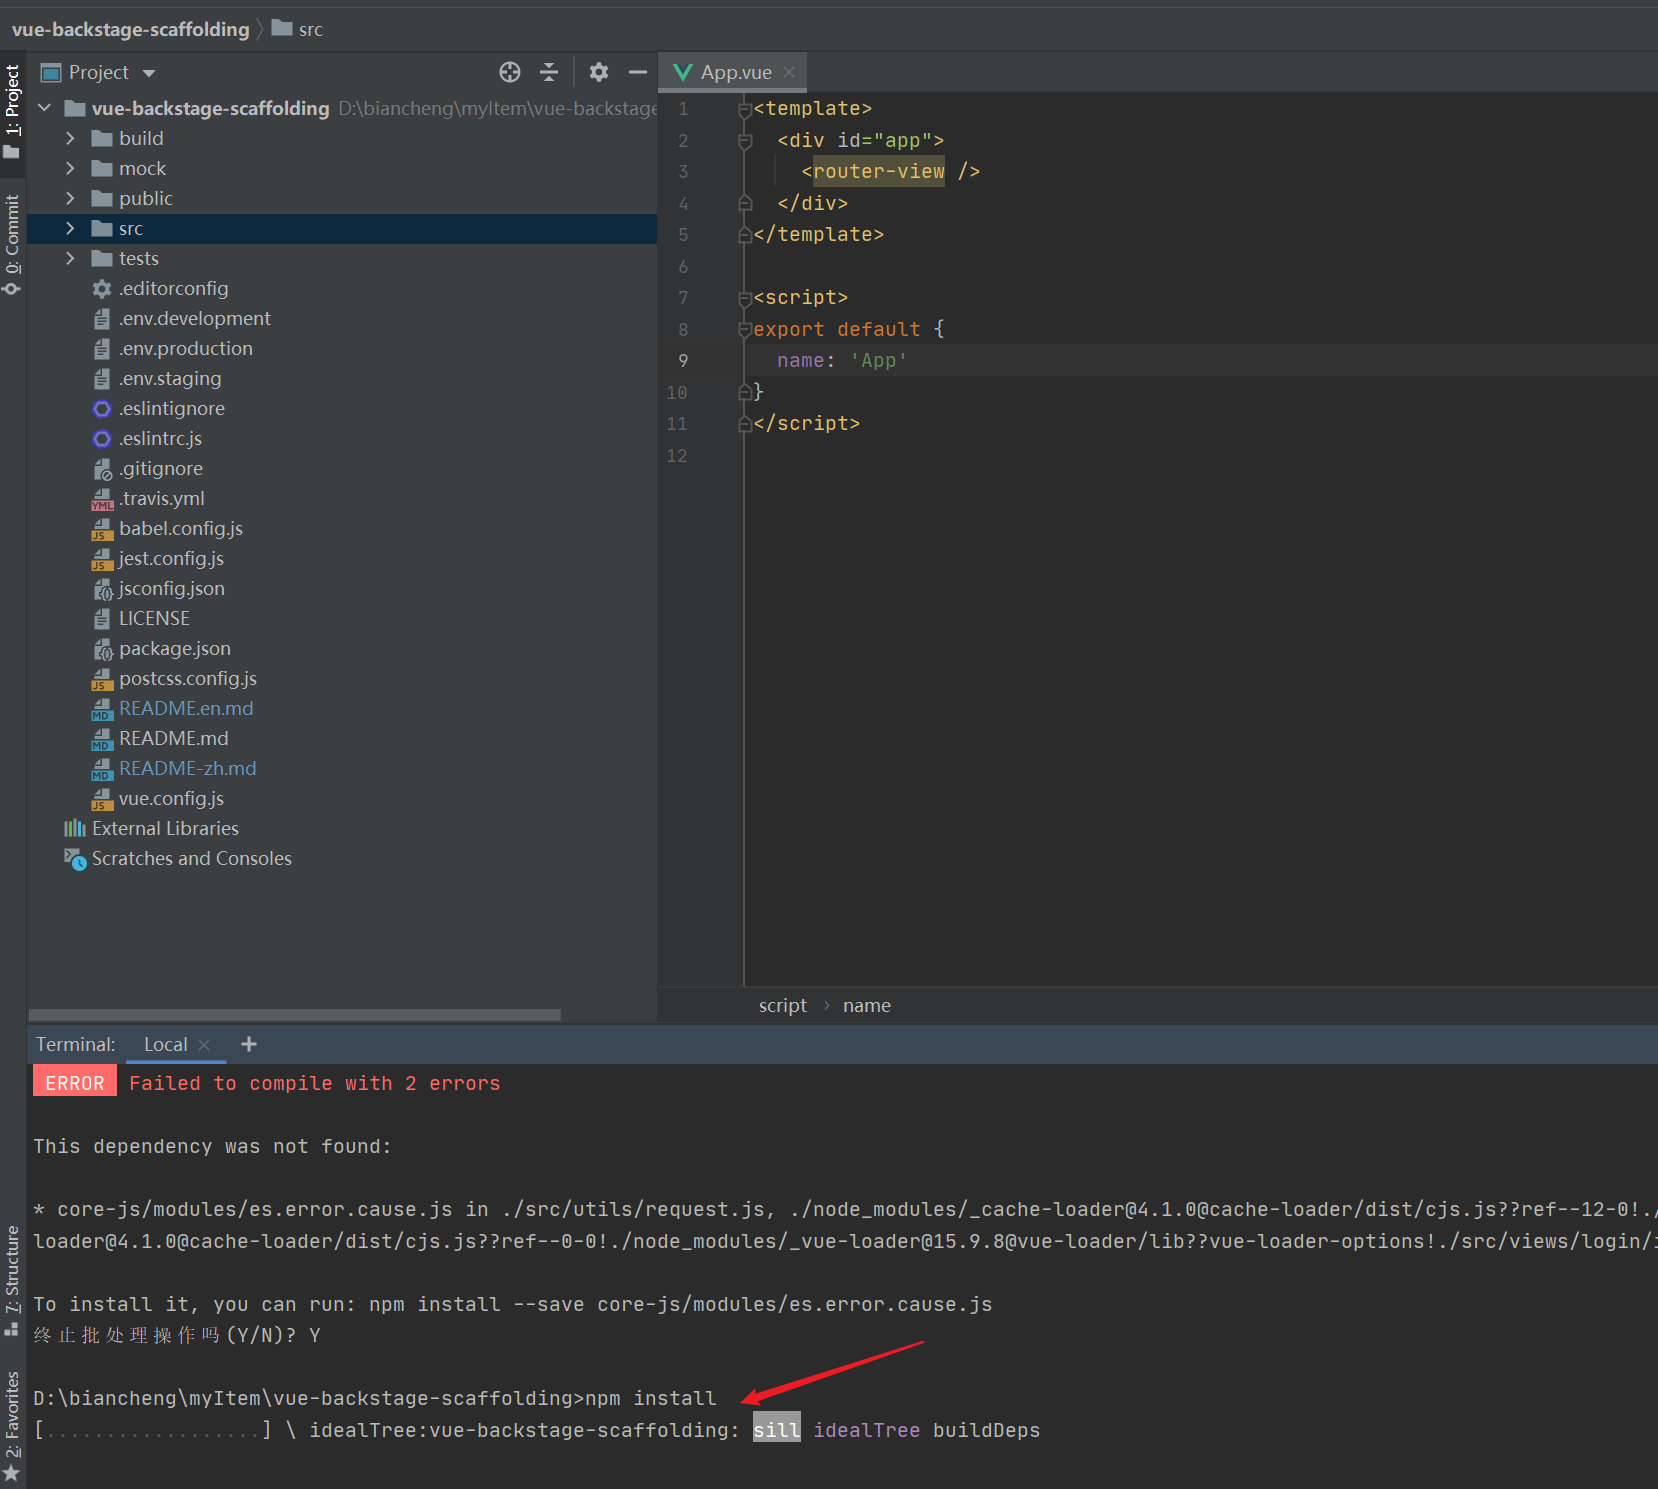
be careful:::::::::
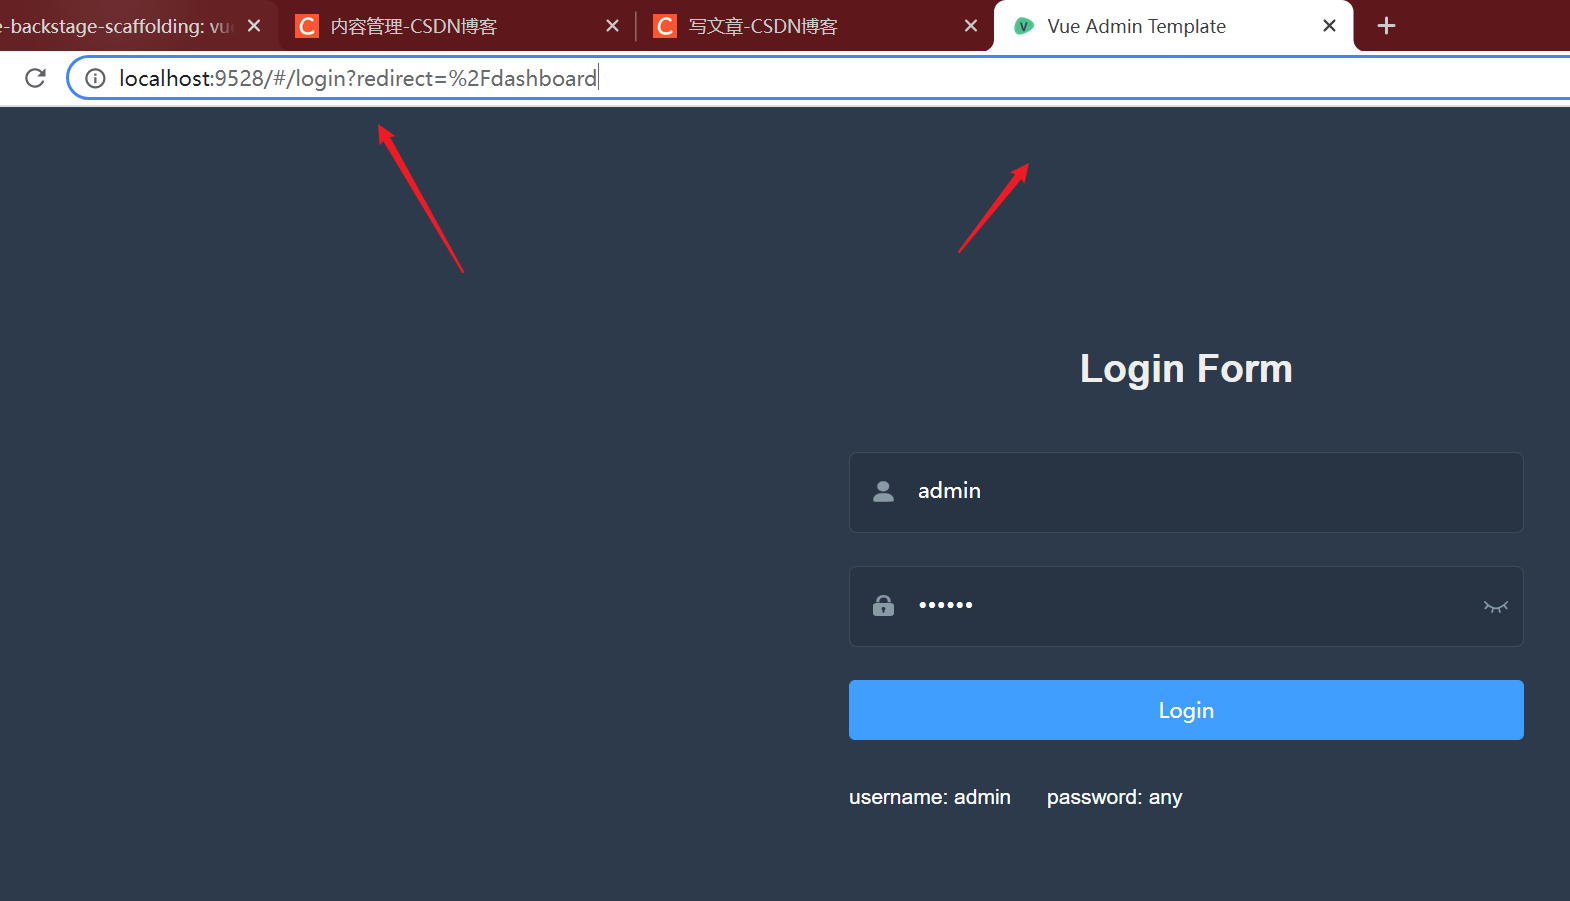
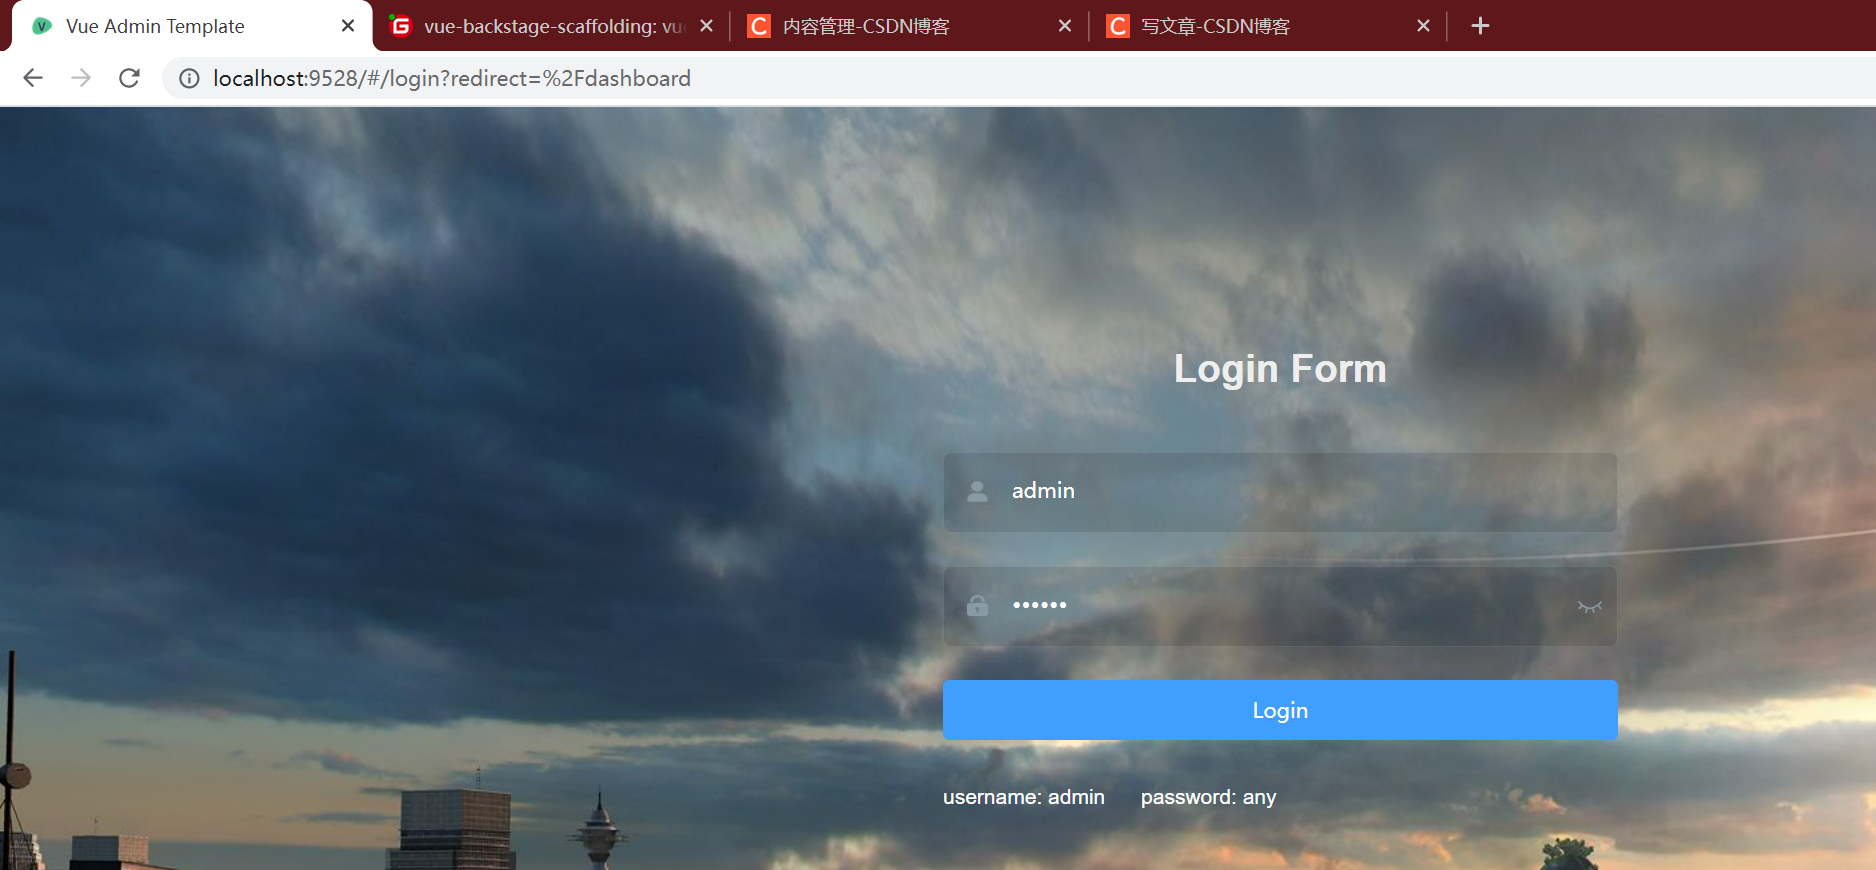
| Display of final project results |
|---|
1, Concept and technical summary (key points must be understood)
| Here is a summary of the front-end knowledge used in the project, which will not be repeated later |
|---|
- At least you need to be familiar with it. You can use it in the following code without knowing what it is (many people can use it now, but you don't know why. How can you optimize and tune it wrong?)
- If there are things you don't know or haven't seen here (those you don't understand after reading my introduction), you can refer to the official documents (indicating that you haven't learned Vue related knowledge at all, just go directly to Baidu Vue official website)
1. vue
| Component communication mode (the most basic 6) |
|---|
- props: applicable to the scenario of parent-child component communication. There is one easily confused point, as follows:
- If the parent component uses props to pass data to the child component, it passes a function. In fact, the child component passes data to the parent component (because it calls the function of the parent component).
- If the function is not passed, the real parent component passes data to the child component (the child component uses the passed data)
- You can specify the type of parent component transmission, {type:Array}, you can also specify the default value {type:Array,default: []}, or you can specify nothing, ['todos']
- Custom event: applicable to the transfer of data from the child component to the parent component, $on, and $emit
- Global event bus $bus: applicable to any scenario, Vue prototype. $ bus = this;
- PubSub JS publish and subscribe: applicable to any scenario, but Vue is not used much, and the general React framework is often used
- Vuex: it is applicable to any scene and uses a lot
- solt slot: it is used for parent-child component communication of structure (label). The commonly used slots are default slot, named slot and scope slot
2. Vue admin template template file parsing
| File directory analysis (Note: all the following folders and files will have the same effect if you write them yourself. They don't have to be used in this template file) |
|---|
build
--index.js webpack configuration file[We basically don't need to modify it]
mock
--mock Data folder[Simulate some false data, mock.js realization],We already have a back-end and interface, and we basically don't need it
node_modules
--Project dependent modules
p ublic
--deposit ico Icons, static pages and other static resources, webpack When packing, this folder will not be compiled and packed to dist folder
src --Where we write code
--api Folders: asynchronous request related codes
--assets Folder: static resources, which are generally shared, but the static resources here, webpack Packaging will compile
--components Folders: global components (non routing components)
--icons folder: svg Vector graph
--layout Folder: place some components and mix in mixin
--router Folders: routing related
--store folder: vuex dependent
--style Folders: style related
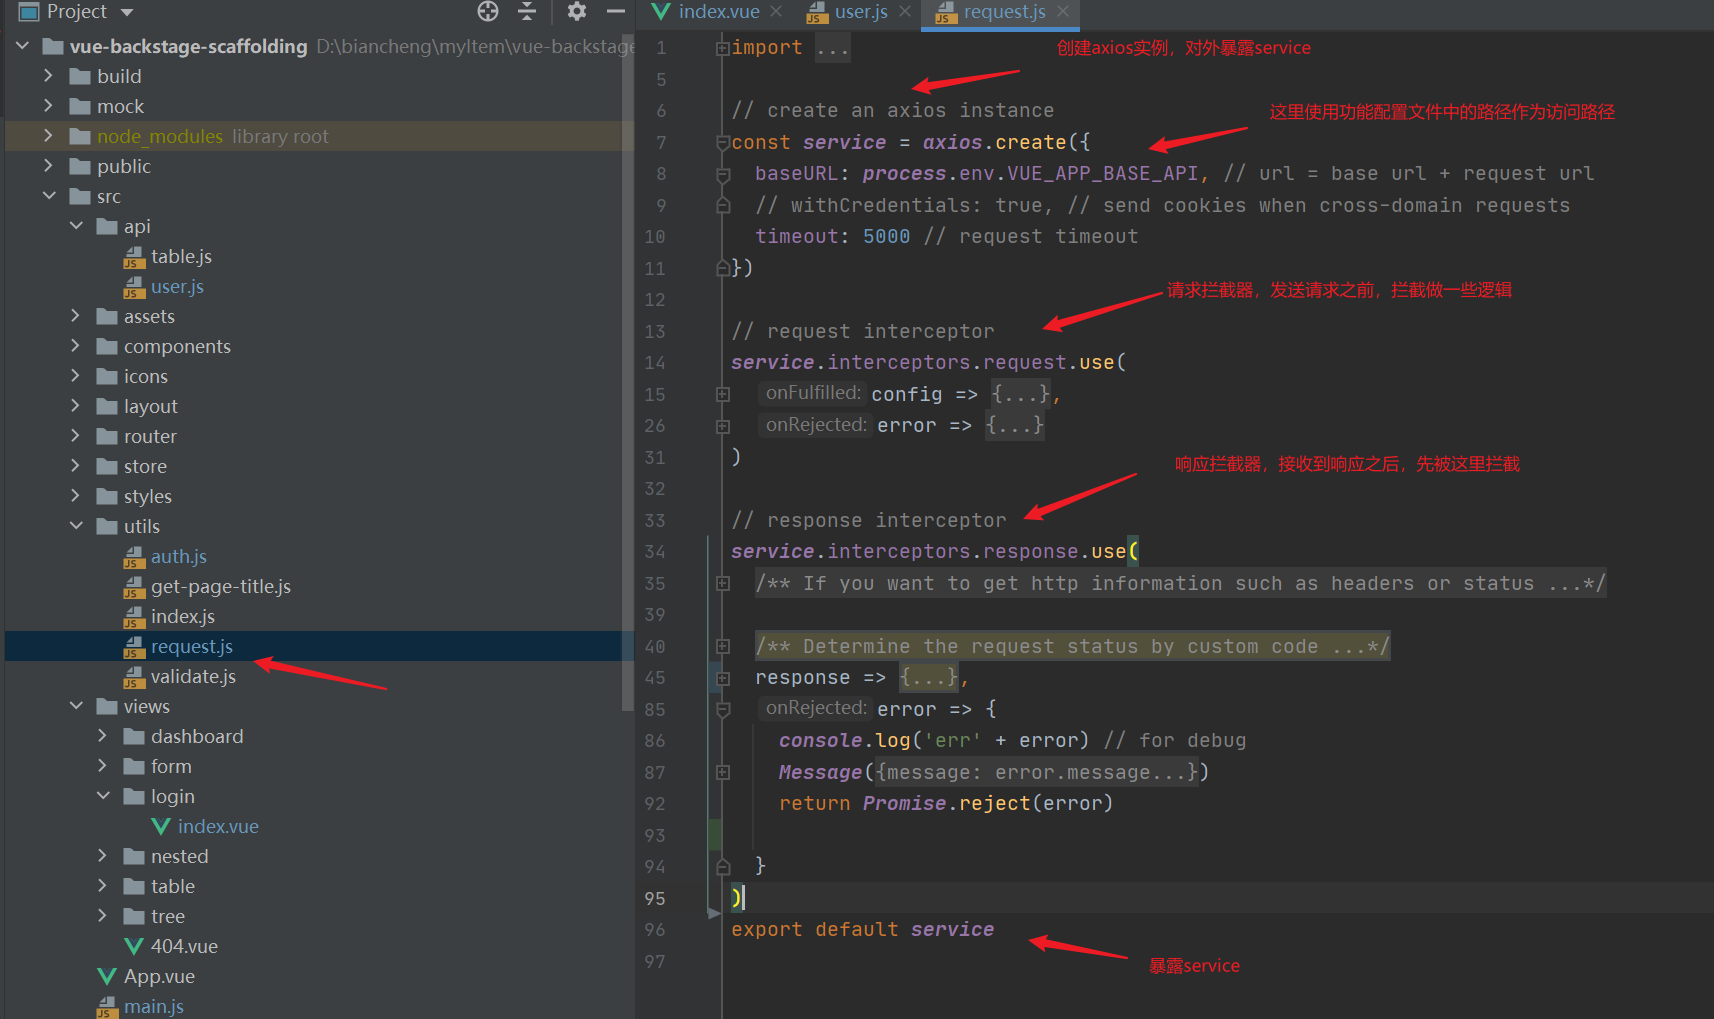
--utils Folders: tool classes, where request.js yes axios Secondary packaging, more commonly used
--views Folders: routing components (not global components)
App.vue
--Root component
main.js
--Entry file
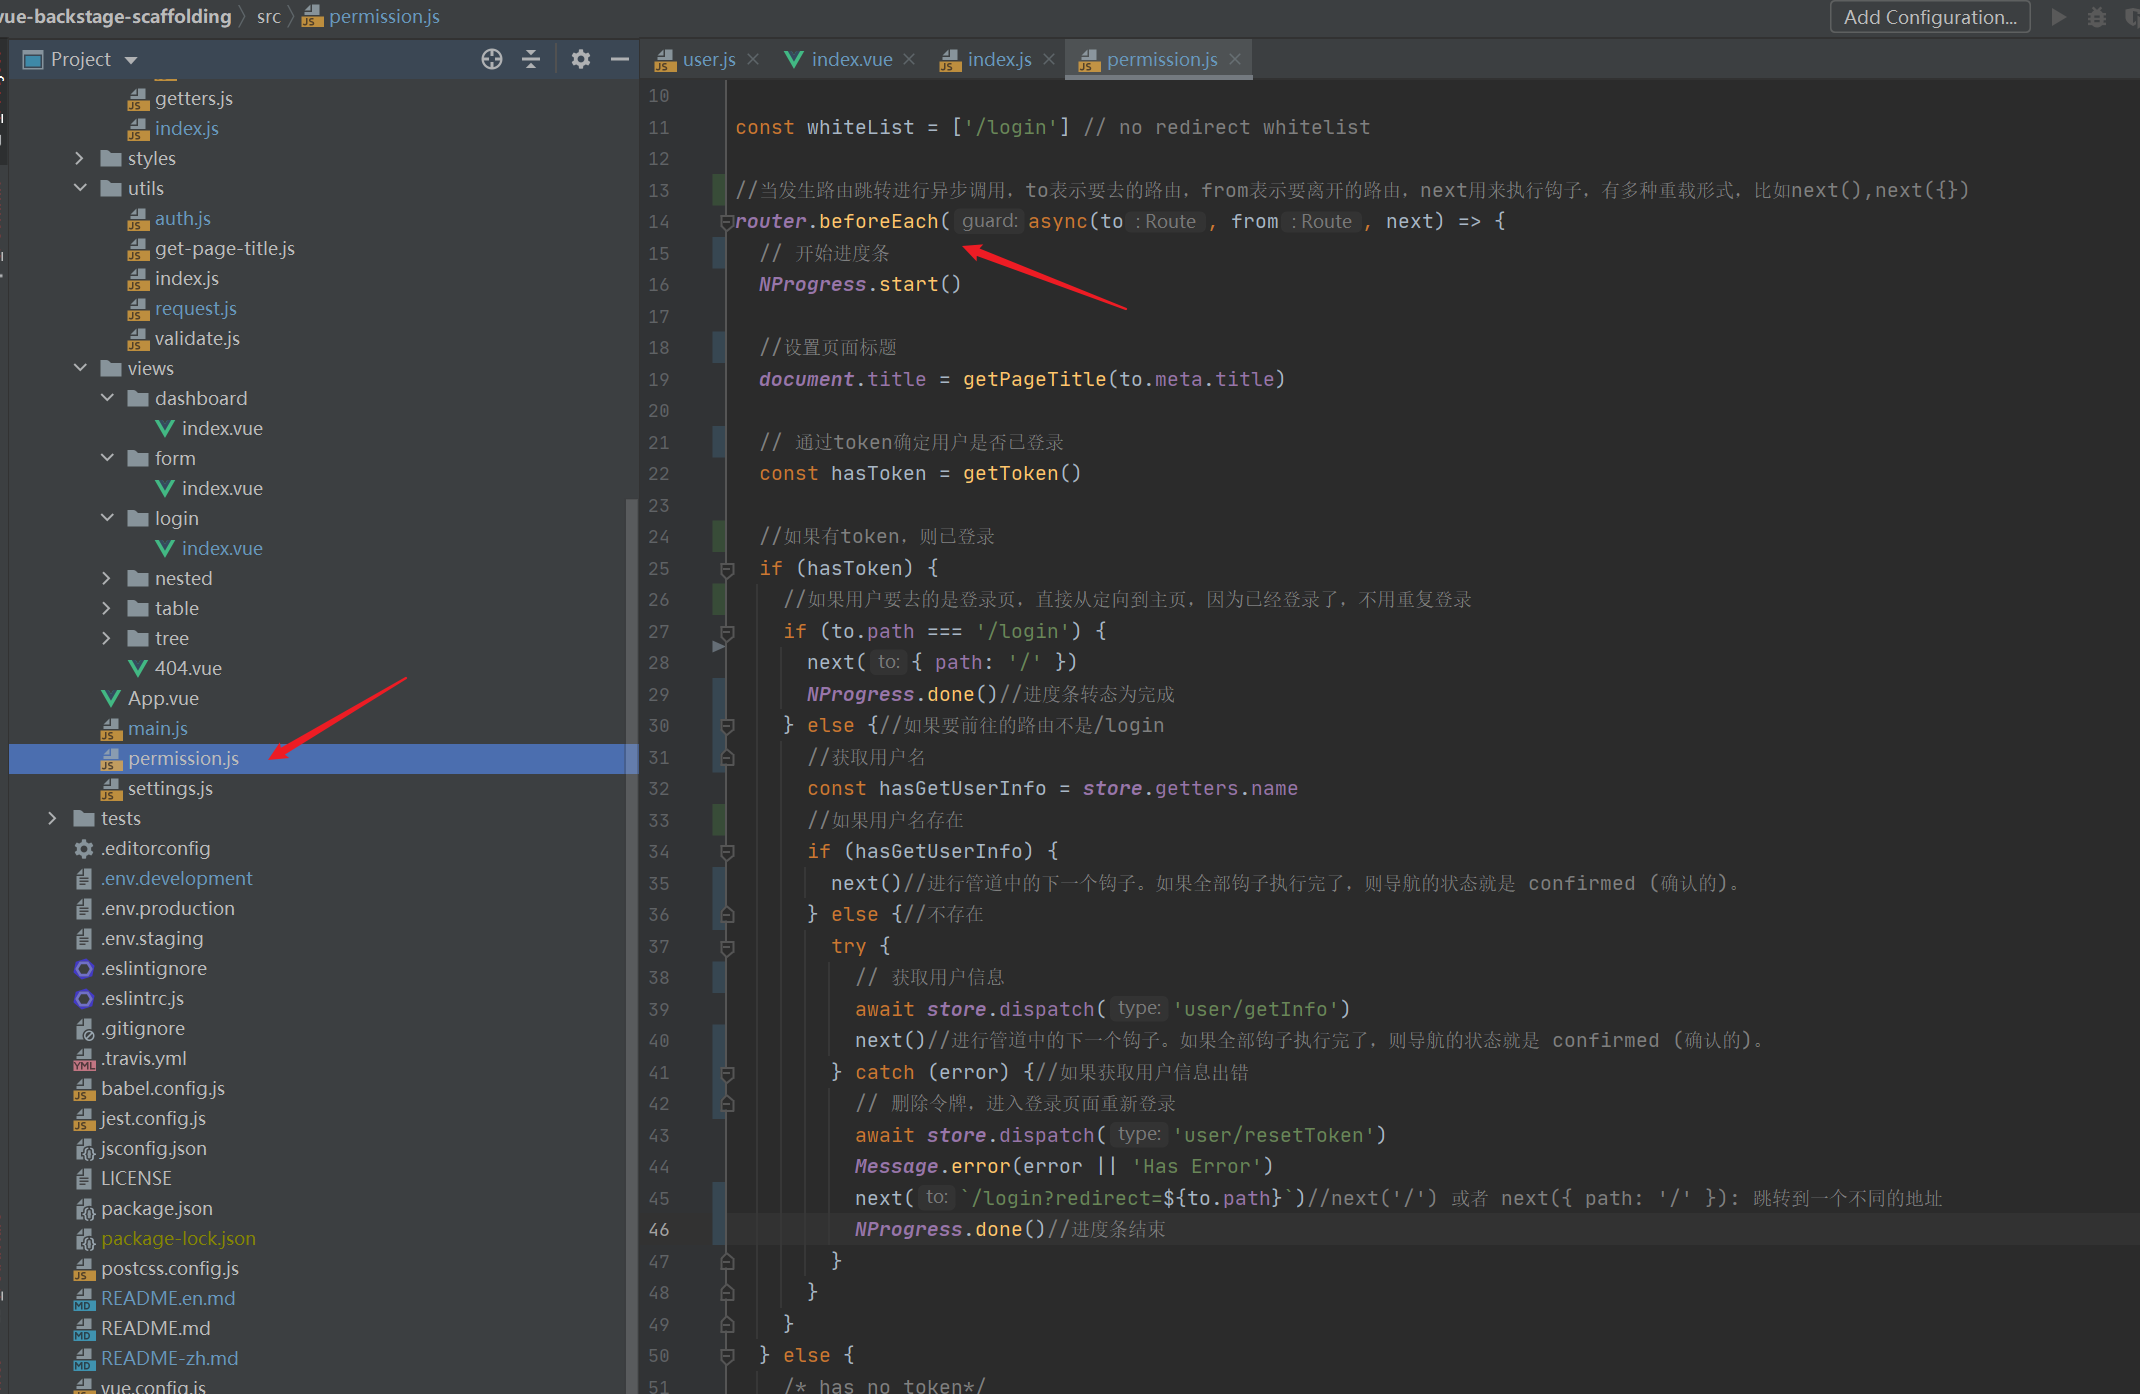
permission.js
--Navigation guard, which mainly controls login and other related affairs
settings
--For the configuration items of the project (facing the display layer), such as our browser tag title What to display, whether the header is fixed, navigation bar logo Show
--The rest are configuration files
.editorconfig
--Programming style configuration, such as indenting two spaces
-- Three very important configuration files can be webpack Exposed function process obtain
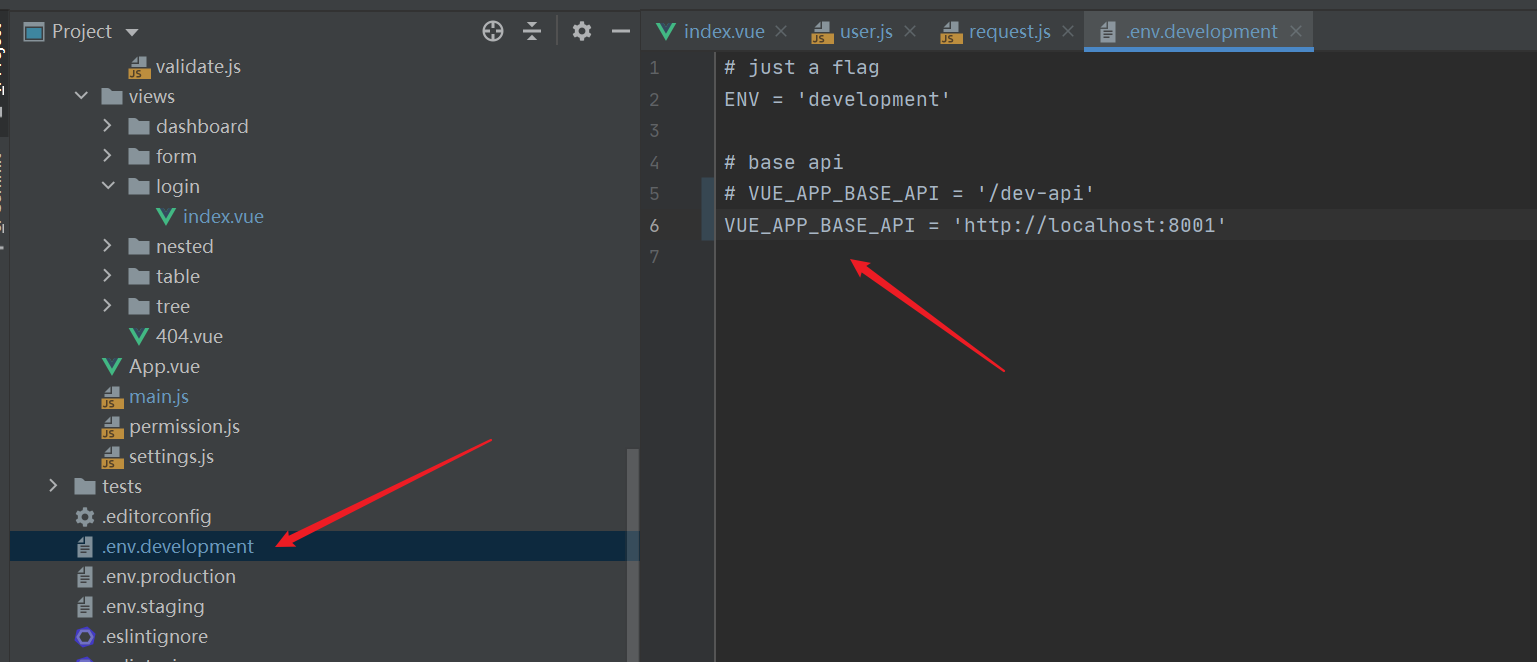
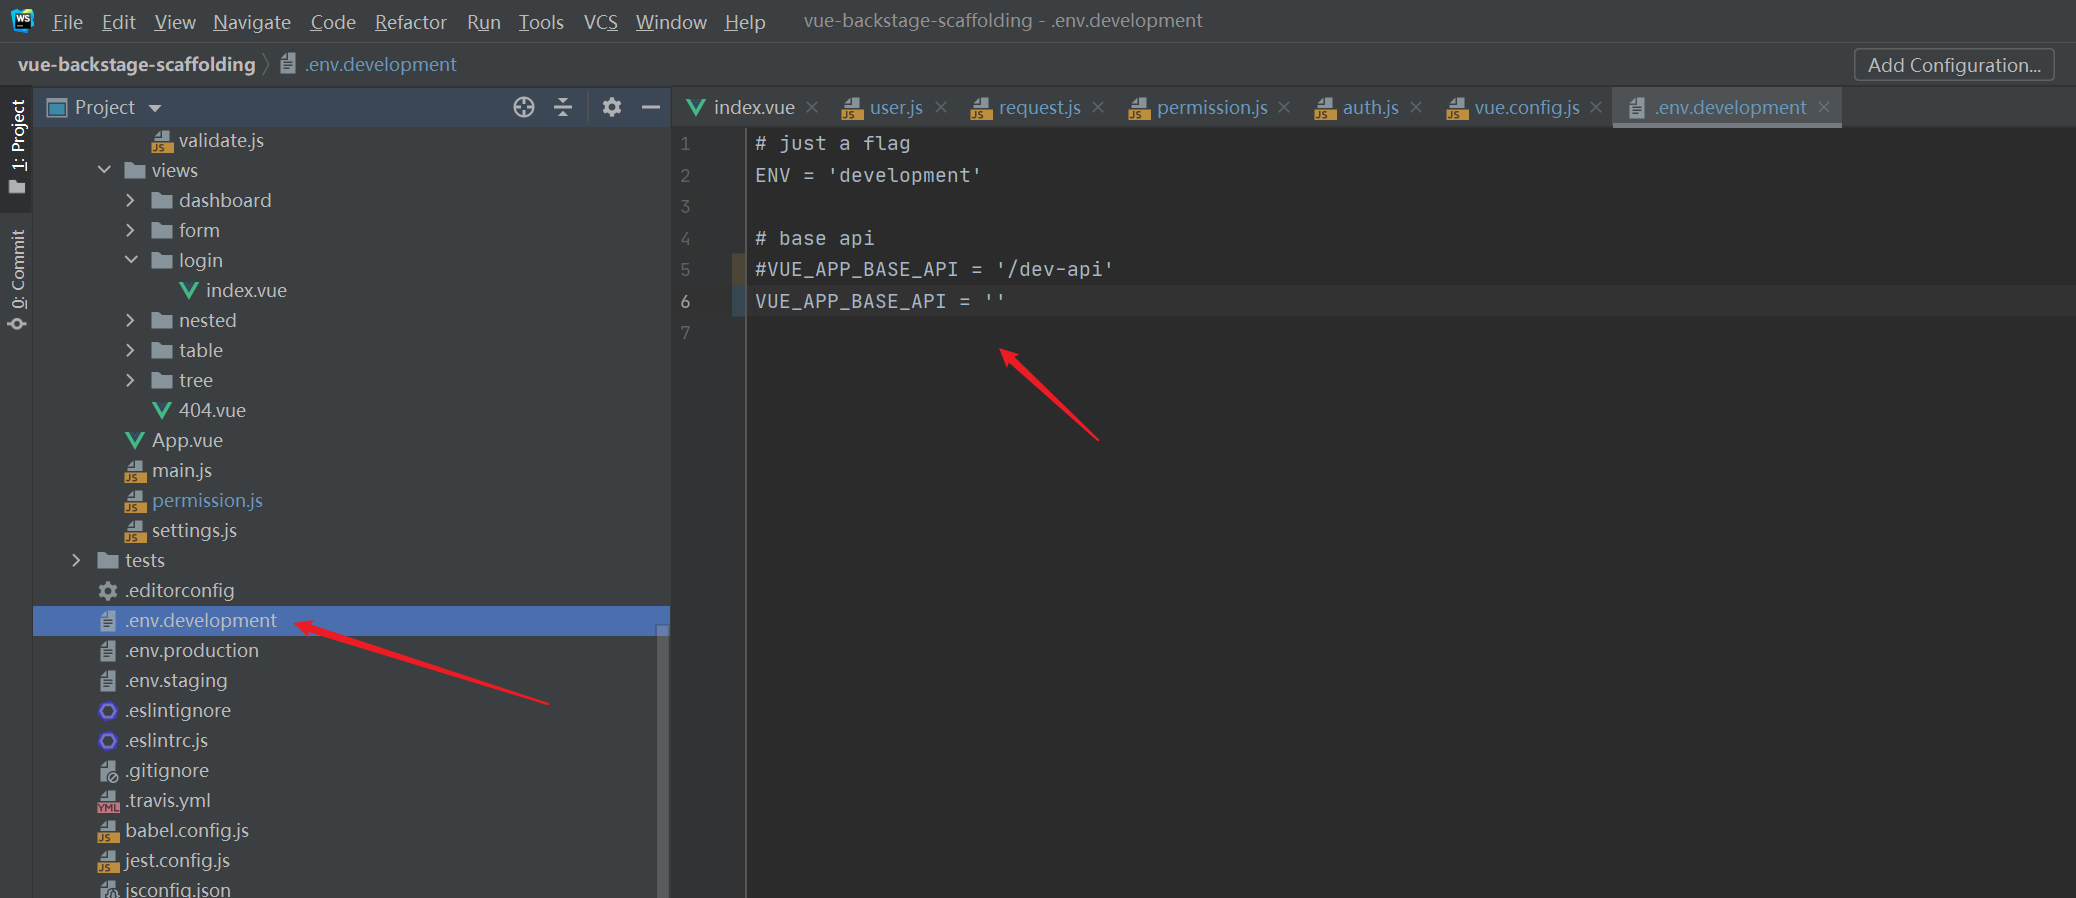
.env.development
-- Configuration file of development environment
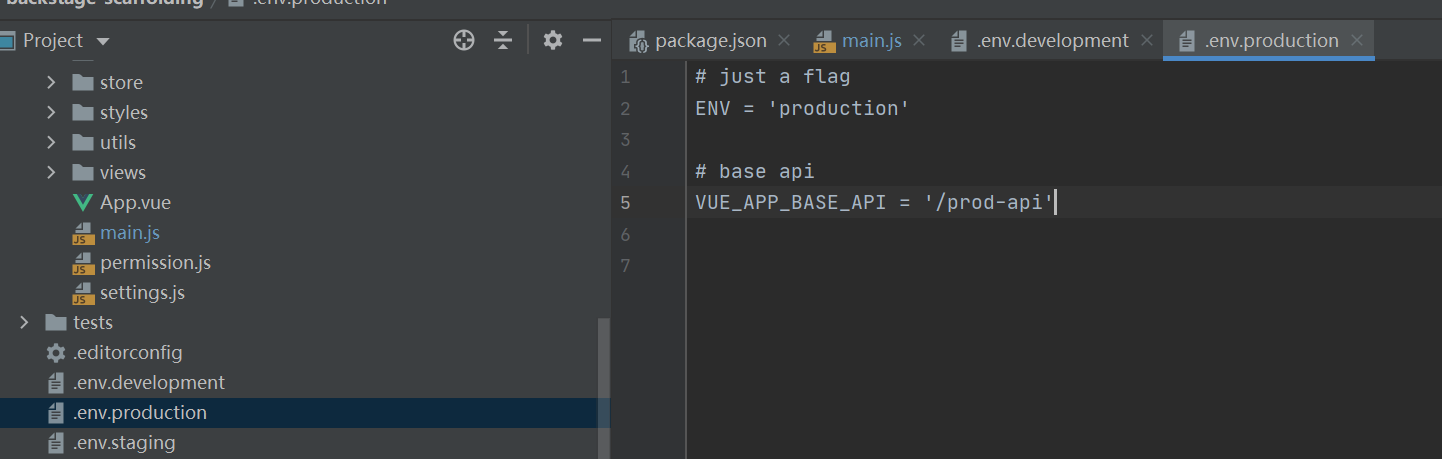
.env.production
-- Configuration file of online environment
.env.staging
-- Configuration files for the test environment
-- 3 important but unimportant profiles
.eslintignore
-- eslint The detected files will be ignored, which has nothing to do with us. We don't need them at all eslint testing
.eslintrc.js
-- eslint configuration file
.gitignore
-- Only related to the author, upload git Ignore files for
-- Infrequently used profiles
.travis.yml
-- Some languages, development versions of configuration files
babel.config.js
-- babel The configuration file is often used to configure on-demand loading, such as element ui Load on demand
jest.config.js
-- Configuration file of test framework
LICENSE
-- Document of copyright notice
-- Key profile
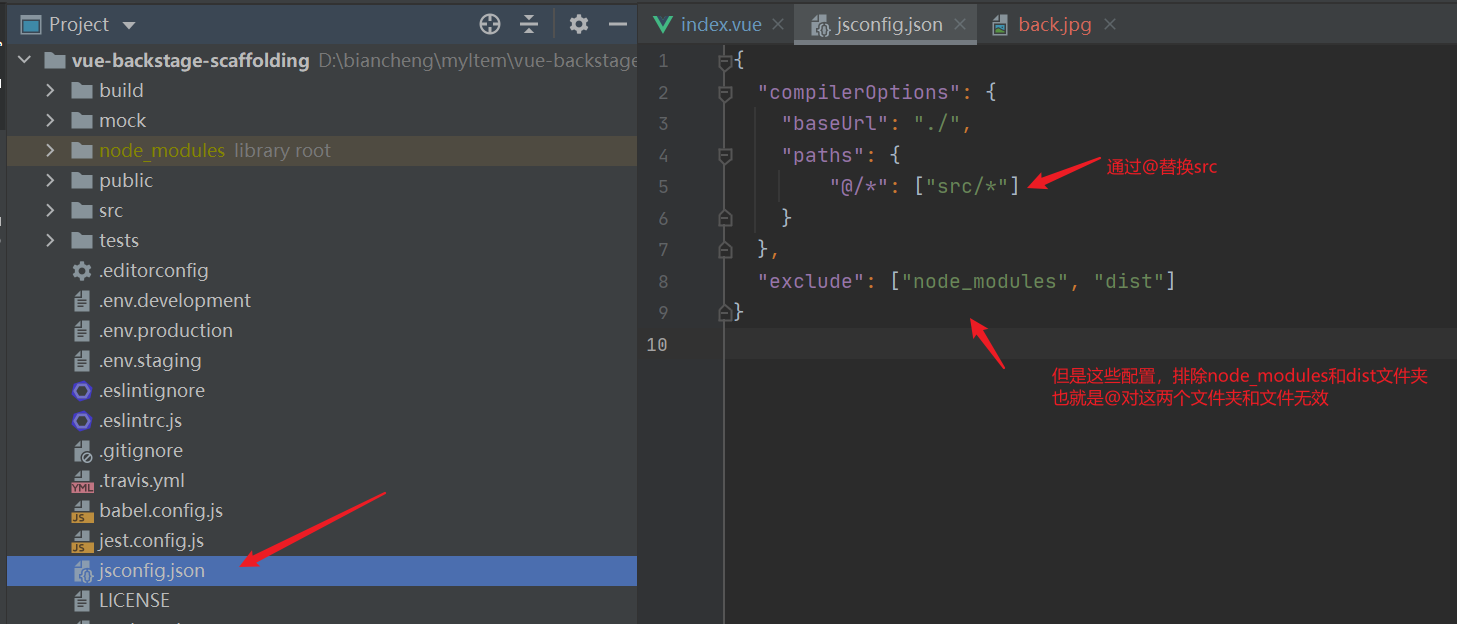
jsconfig.json
-- to configure src Alias file
package.json
-- Configure project information, operation parameters and required dependencies
postcss.config.js
-- css Configuration files and compatibility problems of different browsers can be solved here
vue.config.js
-- Can be regarded as webpack.config.js,We often use this file for agent and other operations
| router folder index JS parsing |
|---|
- First, mount the routing module to Vue, and then encapsulate all routing configurations into constant constantRoutes. Then, call back the function to create a route, mount the constant constantRoutes, and place the function in the constant createRouter. Then, change the function constant createRouter() to a simple name router. Finally, expose the router and a reset route function resetRouter()
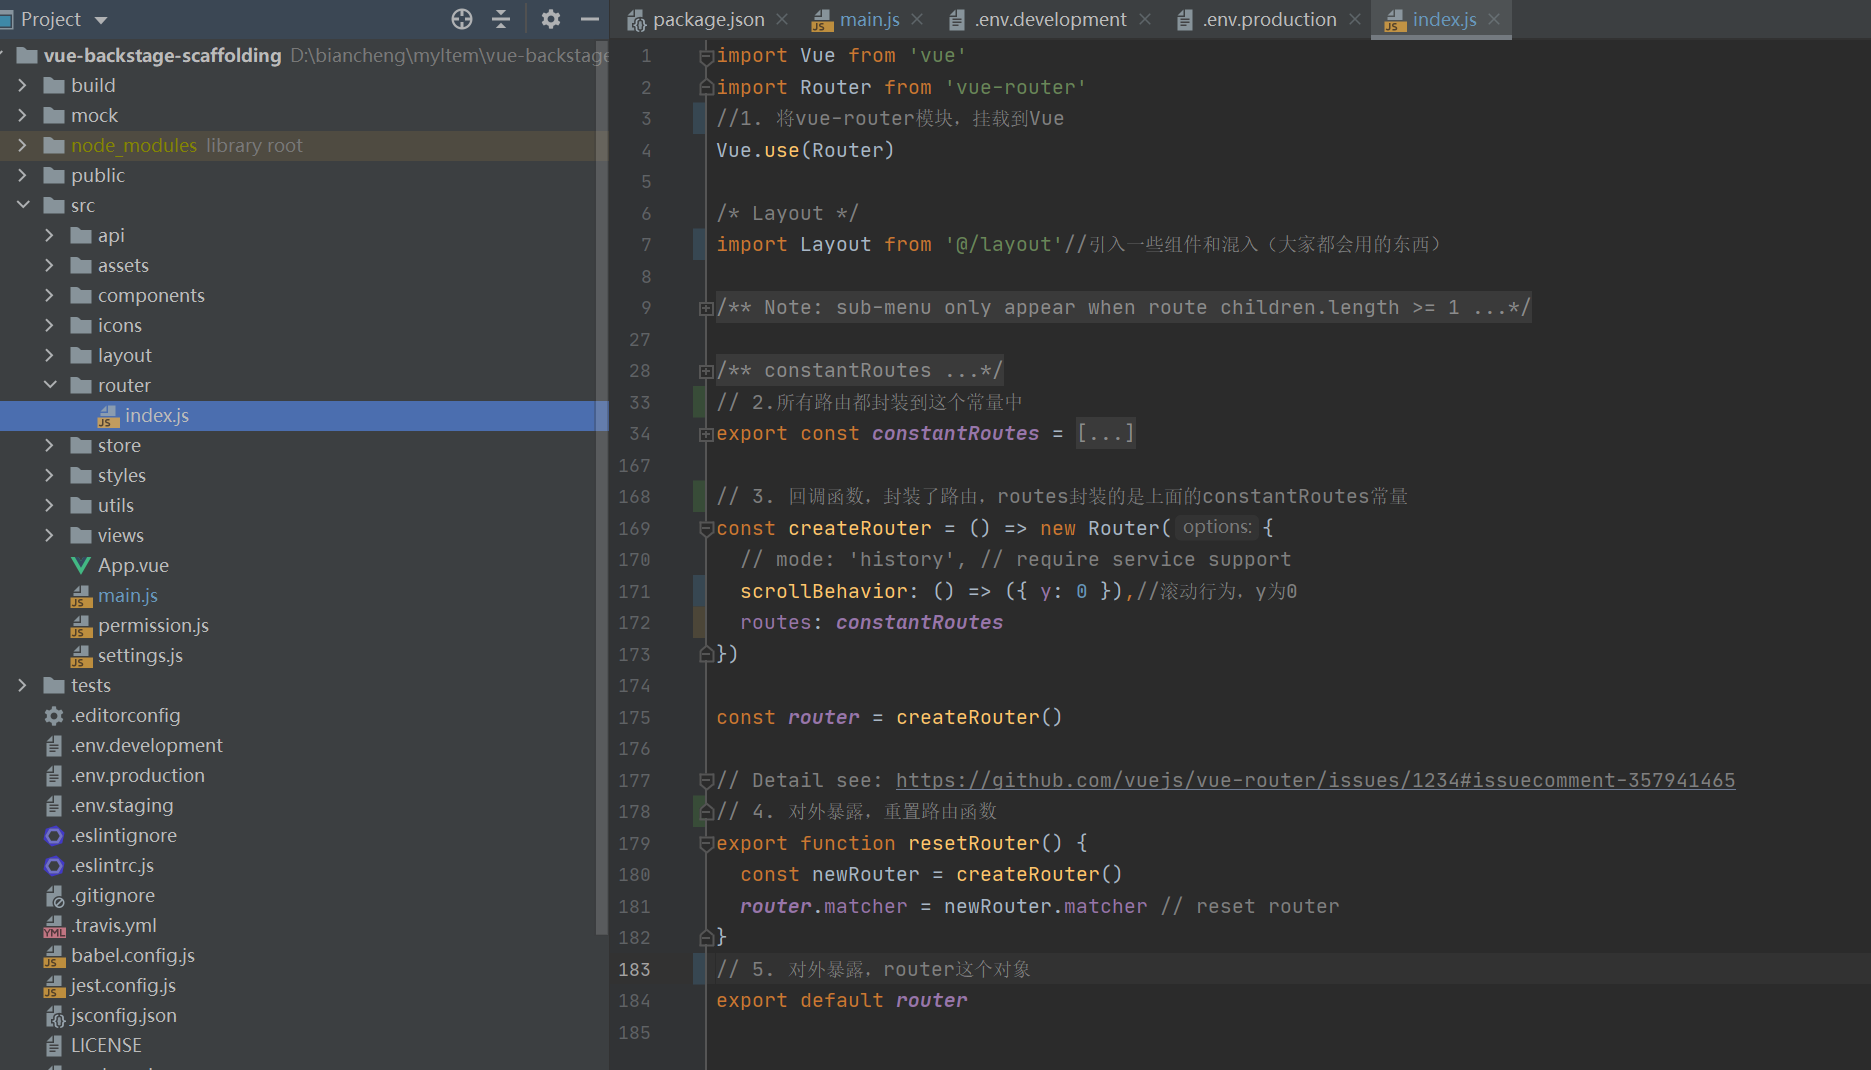
- In this way, we can directly operate and obtain routing related information through $router
| jsconfig.json file configuration src alias @ resolution |
|---|
| Three environment configuration files can be obtained through the function process exposed by webpack. Pay attention to the contents in the configuration file and use VUE_APP_***** Beginning (just like the initial letter of java class name should be capitalized, and everyone should abide by it) |
|---|
- Let's look at the configuration content of the configuration file of the development environment and test whether it can be obtained correctly
- main.js file to output process and process Env, view the results
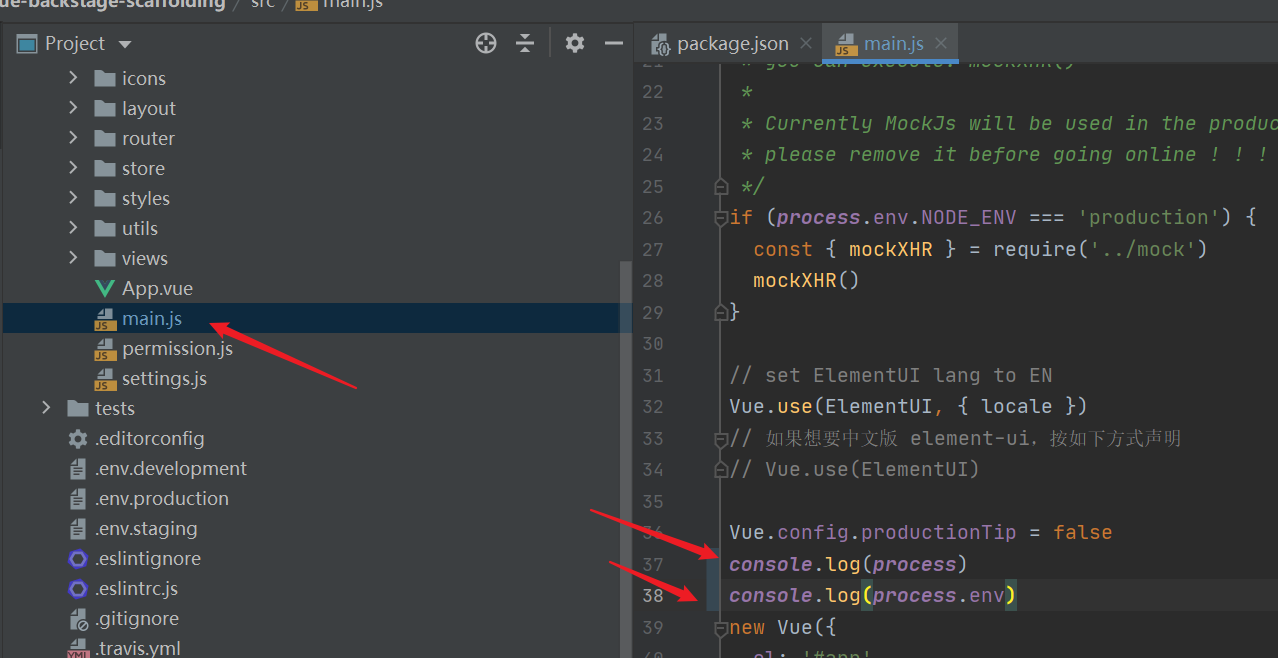
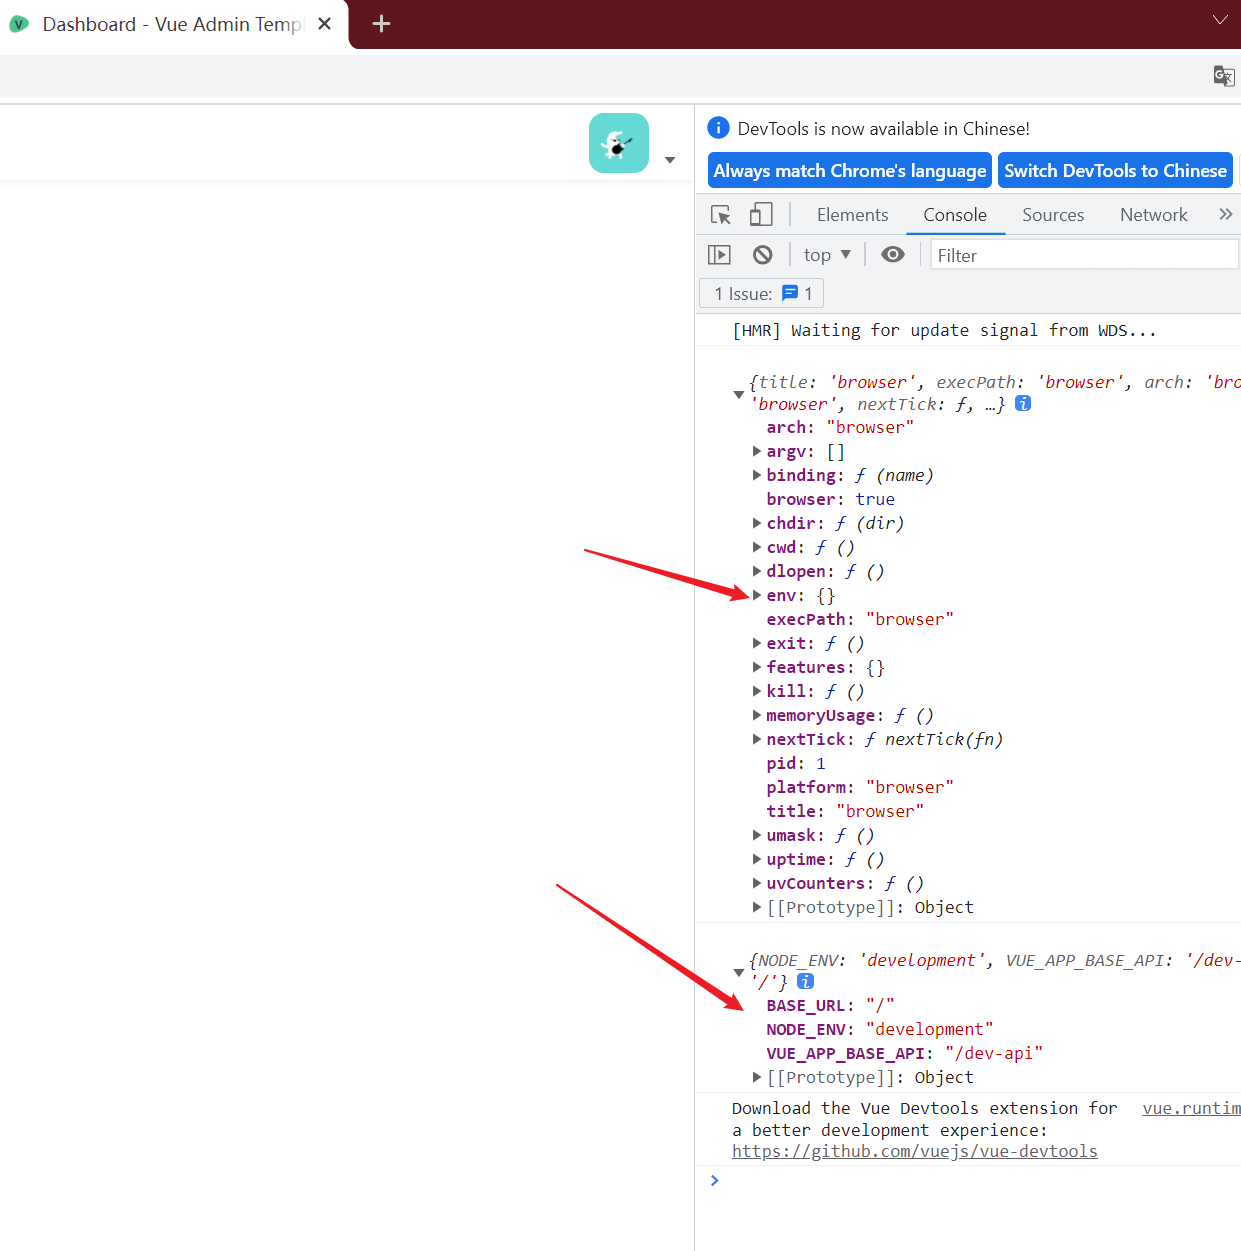
console.log(process)
console.log(process.env)
| Auth. In utils JS file details |
|---|
- The function function of permission is encapsulated here

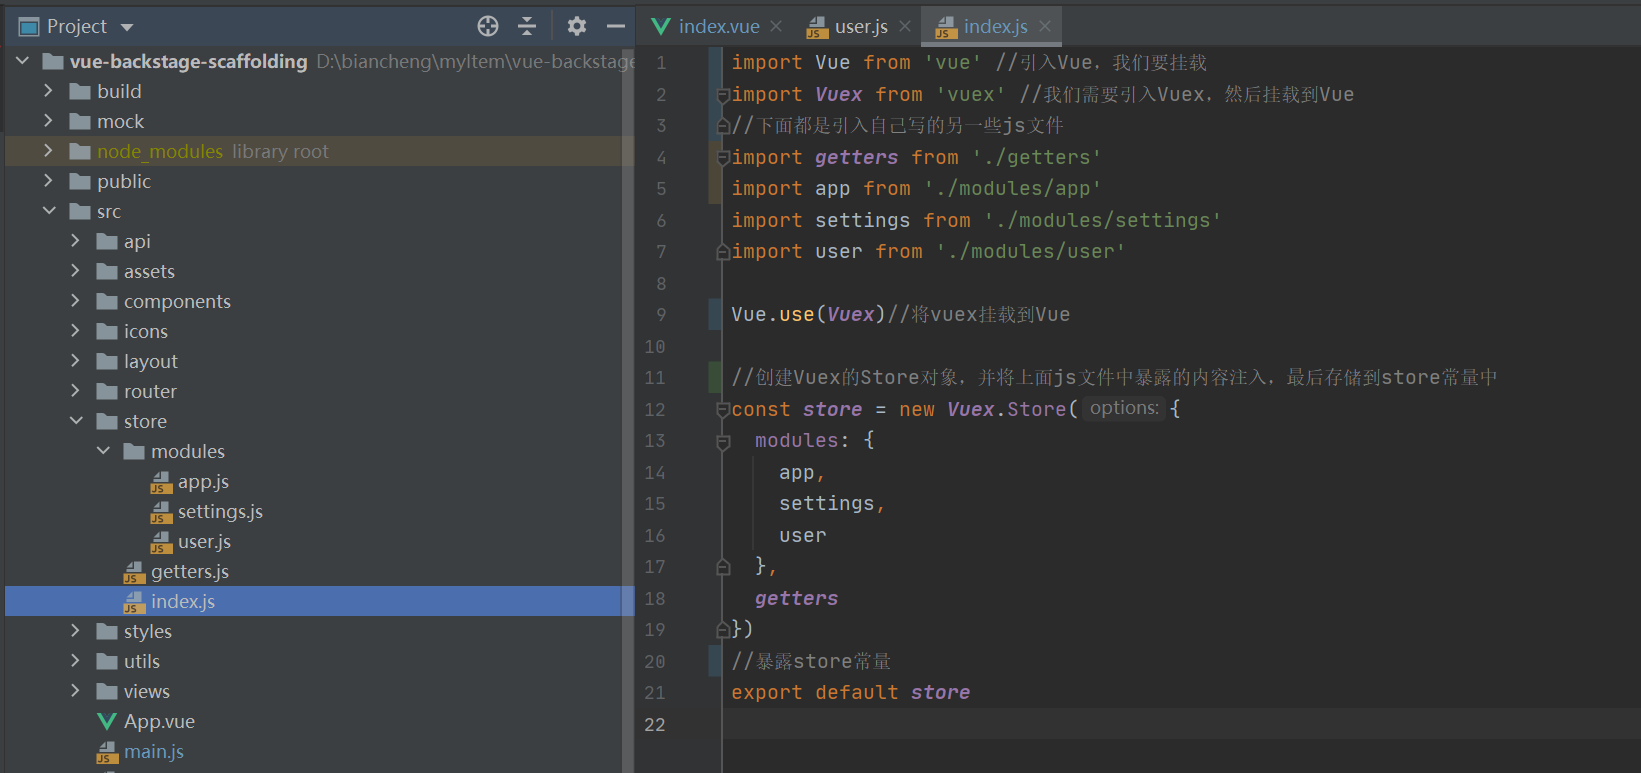
| Detailed explanation of store folder |
|---|
- index.js file, mainly to control the overall situation of Vuex and mount it to Vue
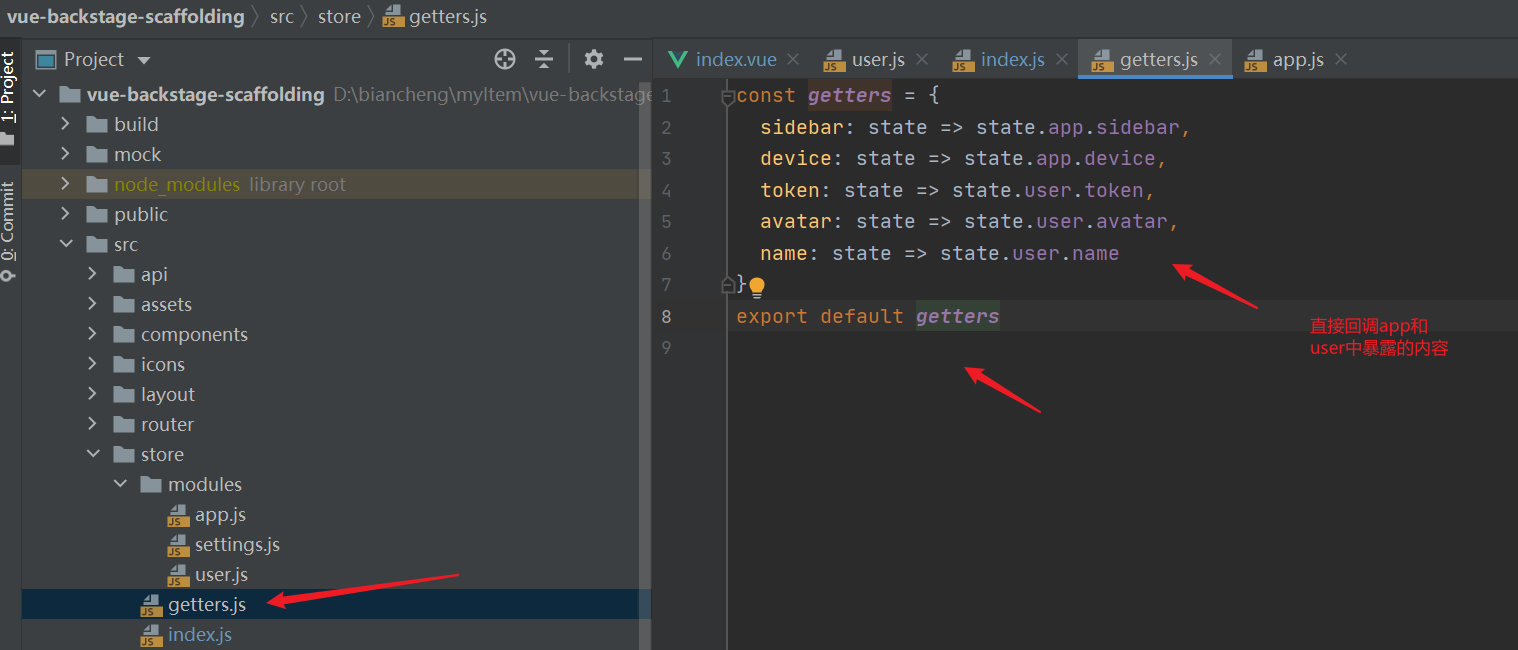
- getters.js file, encapsulating getters operation. lambda expression (arrow function) is used here in a unified way, using the contents in app and user in the modules configured above, such as state app.*****
//lambda is the representation of a parameter. The parameter we pass is a, followed by the execution logic
a =>  return a;
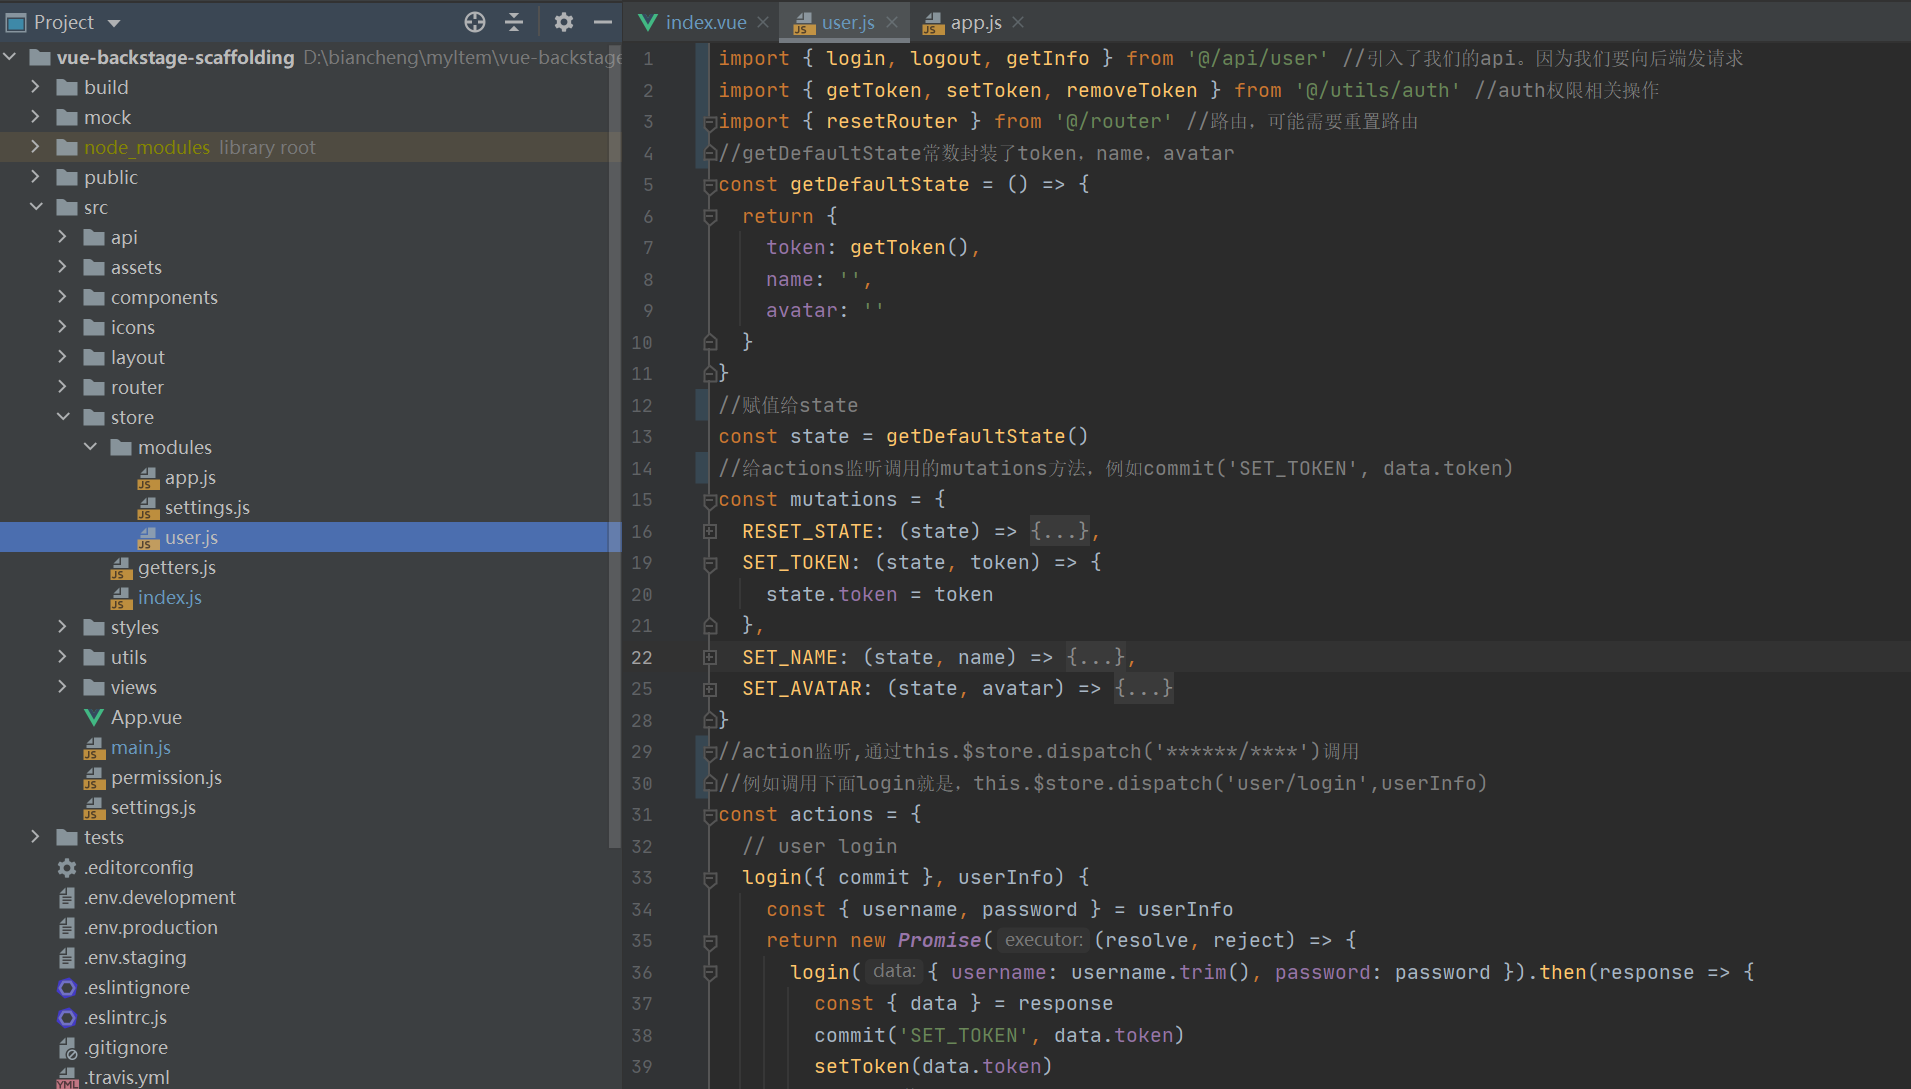
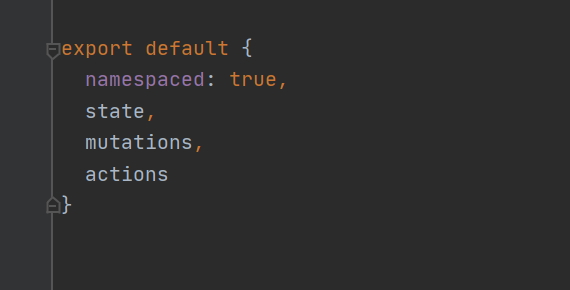
- user.js, which mainly provides login state, setter (action and changes) and exposes them In addition, app js,settings.js file and user JS almost
3. Asynchronous correlation, front and rear end interaction
| 1. When PanJiaChen developed this template, there was no async function (syntax of ES6), so we used traditional Promise to handle asynchrony. Later, we will transform it into async function. For Promise and async, please refer to the article: https://blog.csdn.net/grd_java/article/details/105384601 |
|---|
| 3. Configure the access path and access ip and port |
|---|
- We found the above request JS, the encapsulation of the request path uses the Vue in the configuration file_ APP_ BASE_ API, what do we configure here, request The request initiated by JS will request anything, so we can configure our back-end interface or gateway address here
- Note: for the configured address, the protocol must be specified, such as http: / /, otherwise it will not be able to request forwarding normally
4. Navigation guard
| permission.js file parsing |
|---|
- This file mainly controls the service of route jump. Like a navigation, it can be understood as a route interceptor
- The main function of this file is to intercept a route jump and judge whether the user has a token. If so, judge whether to jump to the route of / login (login path). If so, jump is not allowed and directed to the "/" home page. If it is not the login path, try to obtain the user information. If it cannot be obtained, try to obtain it again. If the re acquisition fails, delete the token and let the user enter the login page to log in again
2, Single sign on Implementation
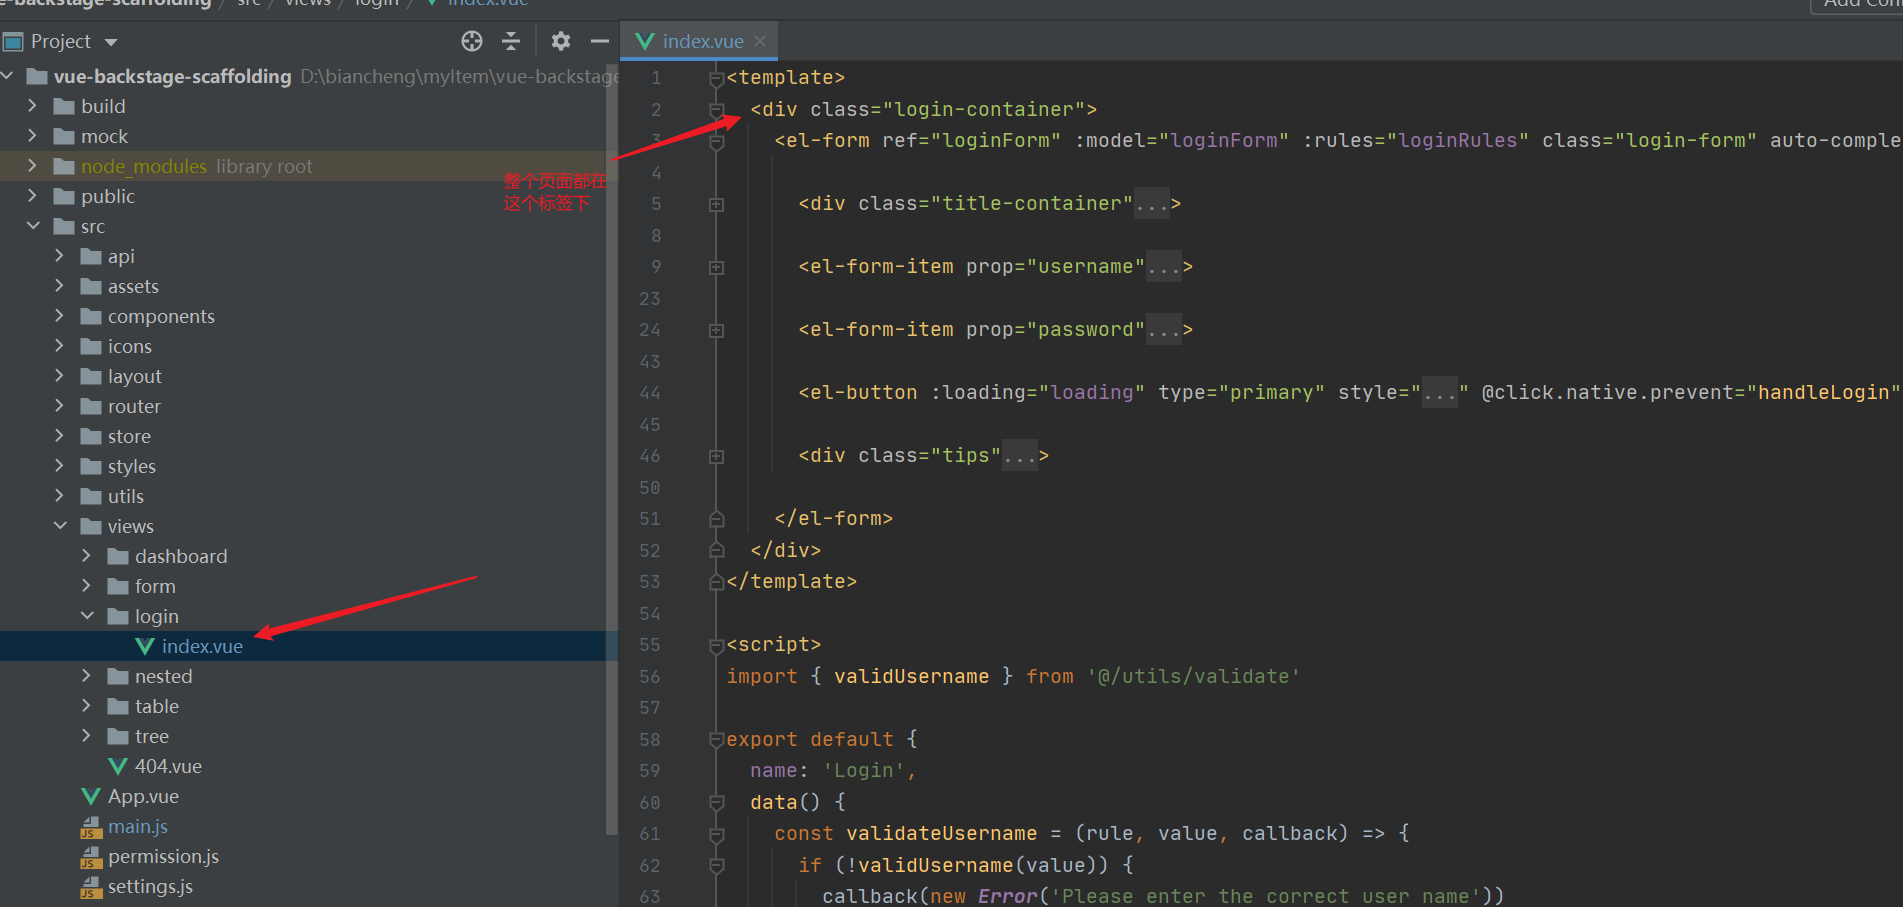
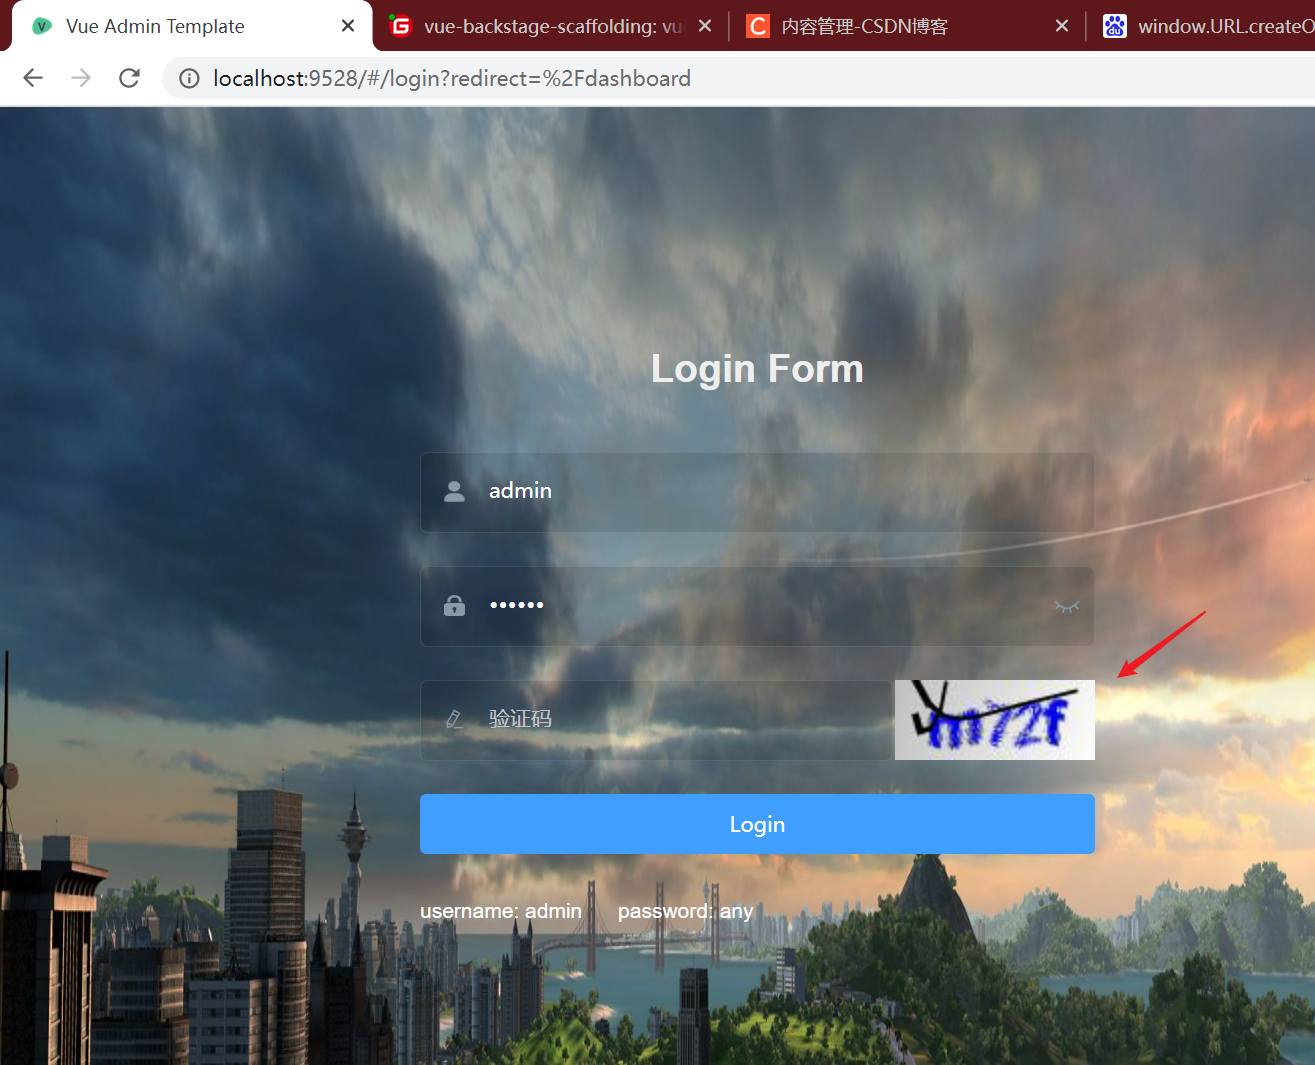
| The login page can be directly provided by the template. We will modify its style to let you know how to customize it |
|---|
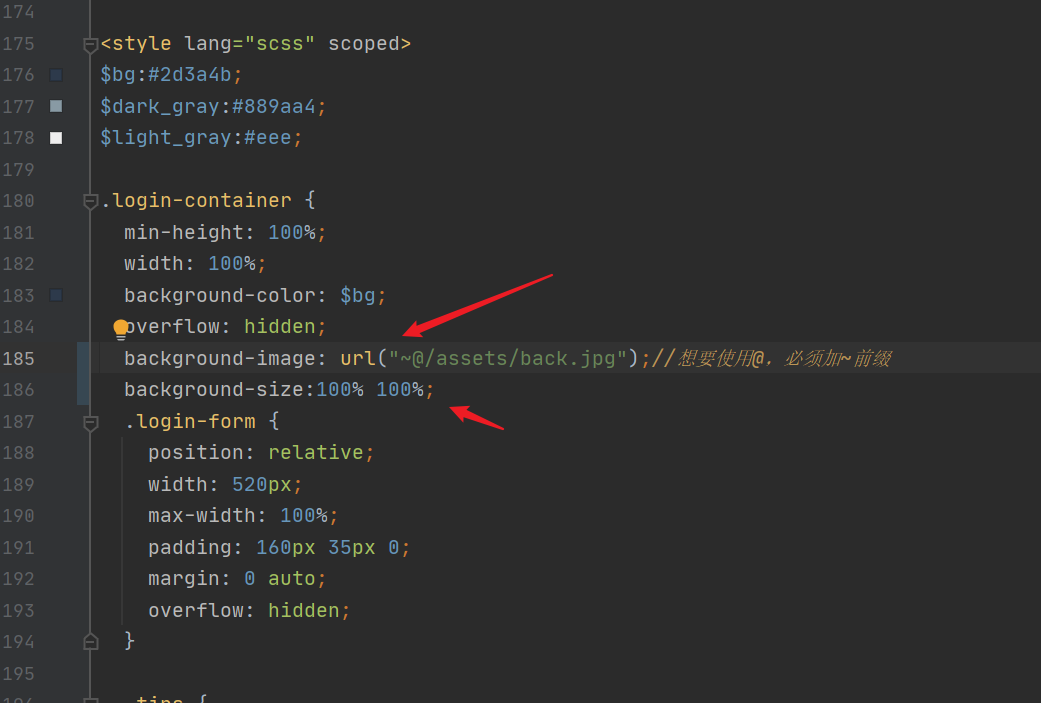
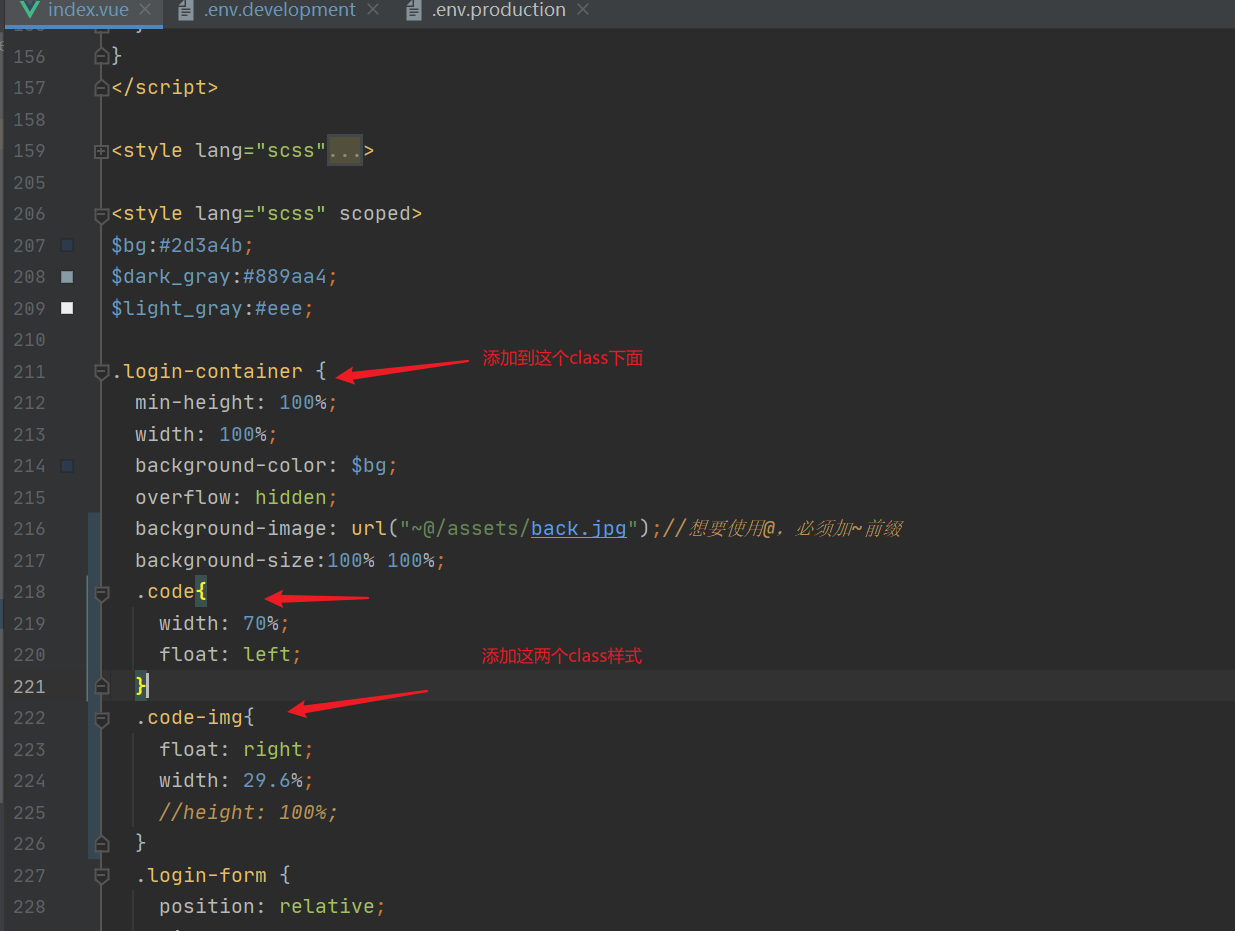
- To change the background picture, you can also use the @ symbol, but you need to add a ~ prefix
- Add a back to the assets file Jpg picture
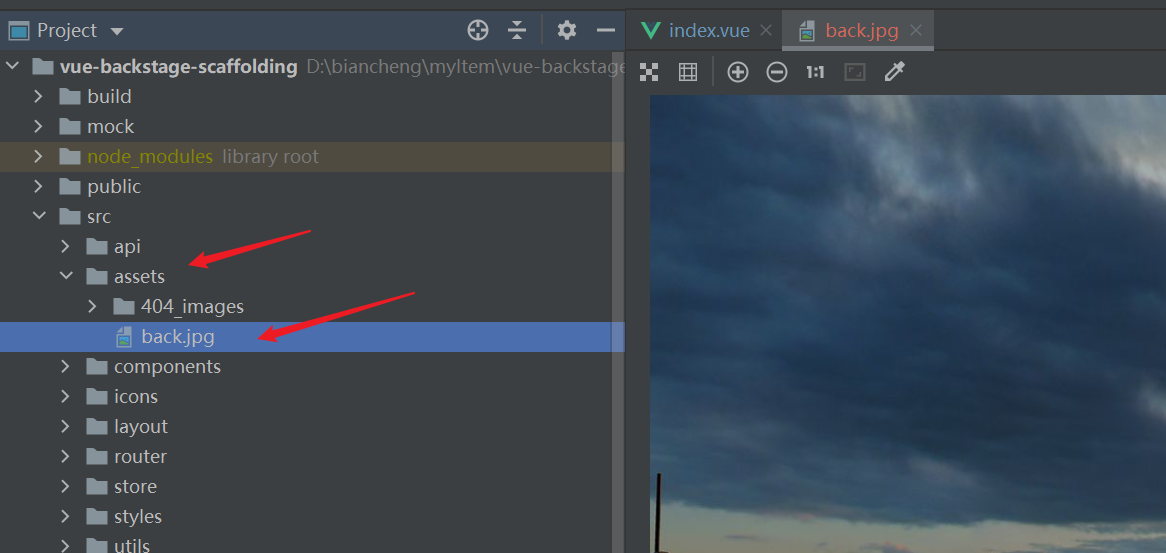
- Modify css Style
1. Back end interface and response result analysis
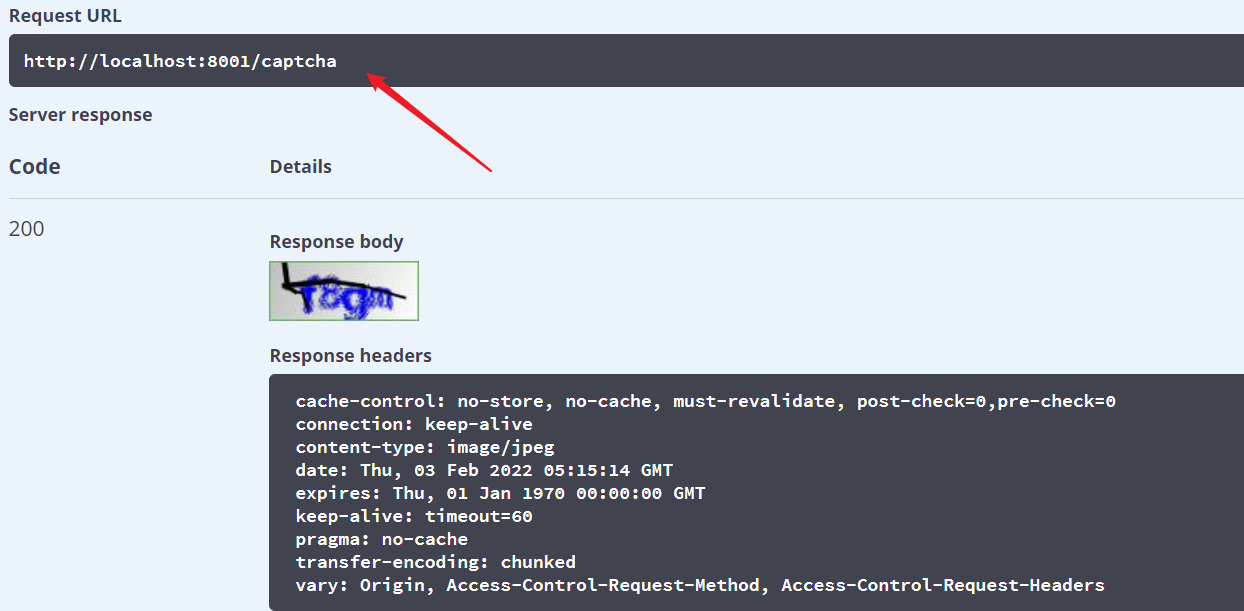
- Verification Code: request captcha to return a picture
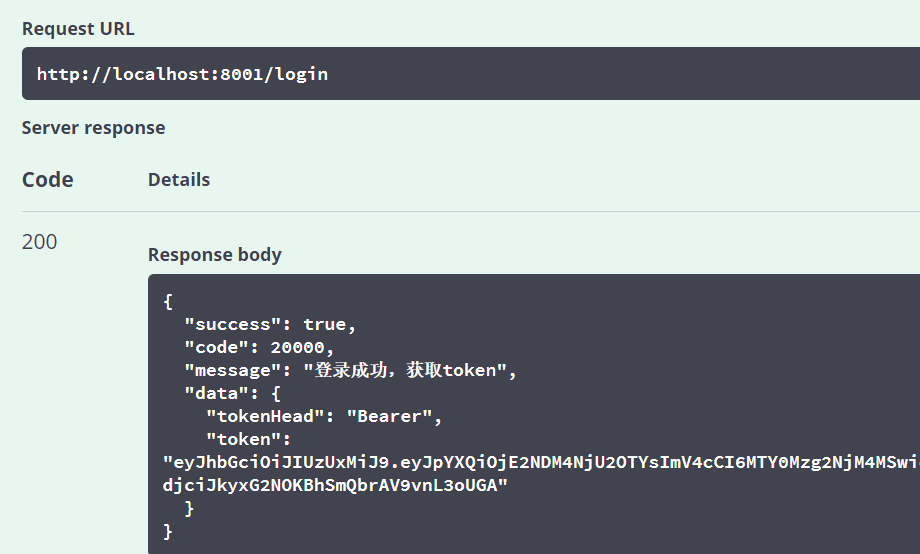
- Login, Post request, transmit username, password and code3 parameters, all of which are correct. Login succeeds, and tokenHead and token are returned. The specified format of the final token is tokenHead + "space" + token, that is, bear eyjh..., success status code 20000 and failure status code 20001

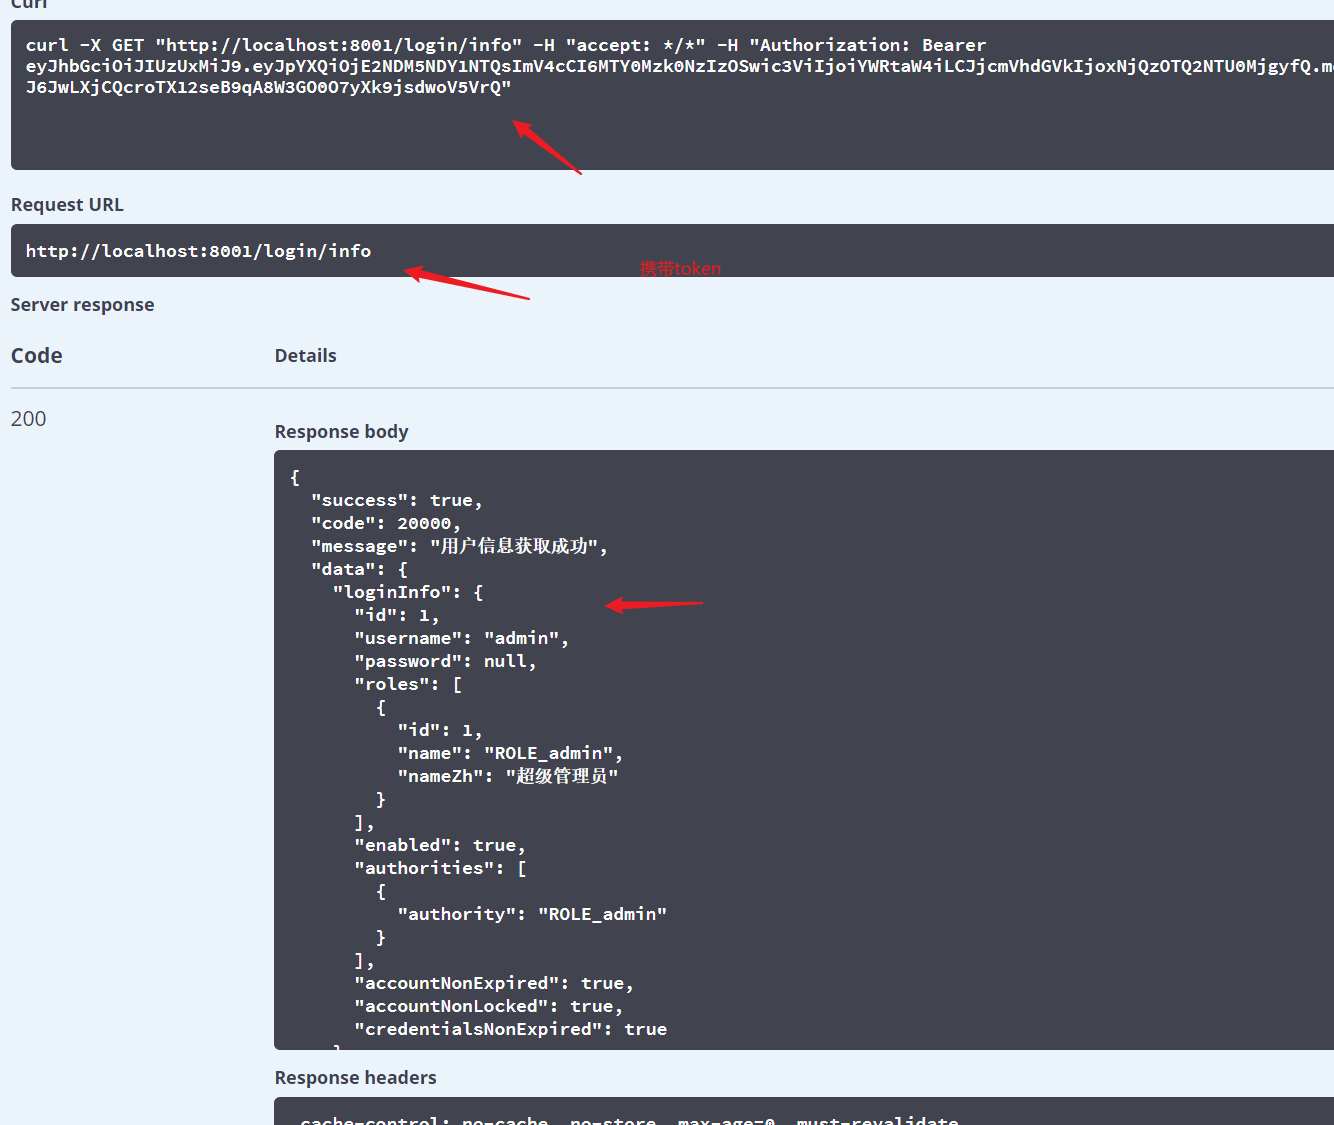
- The current login user information needs to carry a token. Note that the token format and the name of the header are authorization
2. Solve cross domain and request headers Almost all projects need configuration. Memorize it.
| 1. First, we know that there are vues in the environment configuration file_ APP_ BASE_ API, through which we specify the request path, we can specify it Remember to restart the project after modification (we are a development environment, so modify the. env.development file) |
|---|
| 2. Then we modify the configuration file Vue of webpack config. JS, configure the cross domain proxy, the main location, and don't write the wrong location. Similarly, remember to restart the project after configuration |
|---|
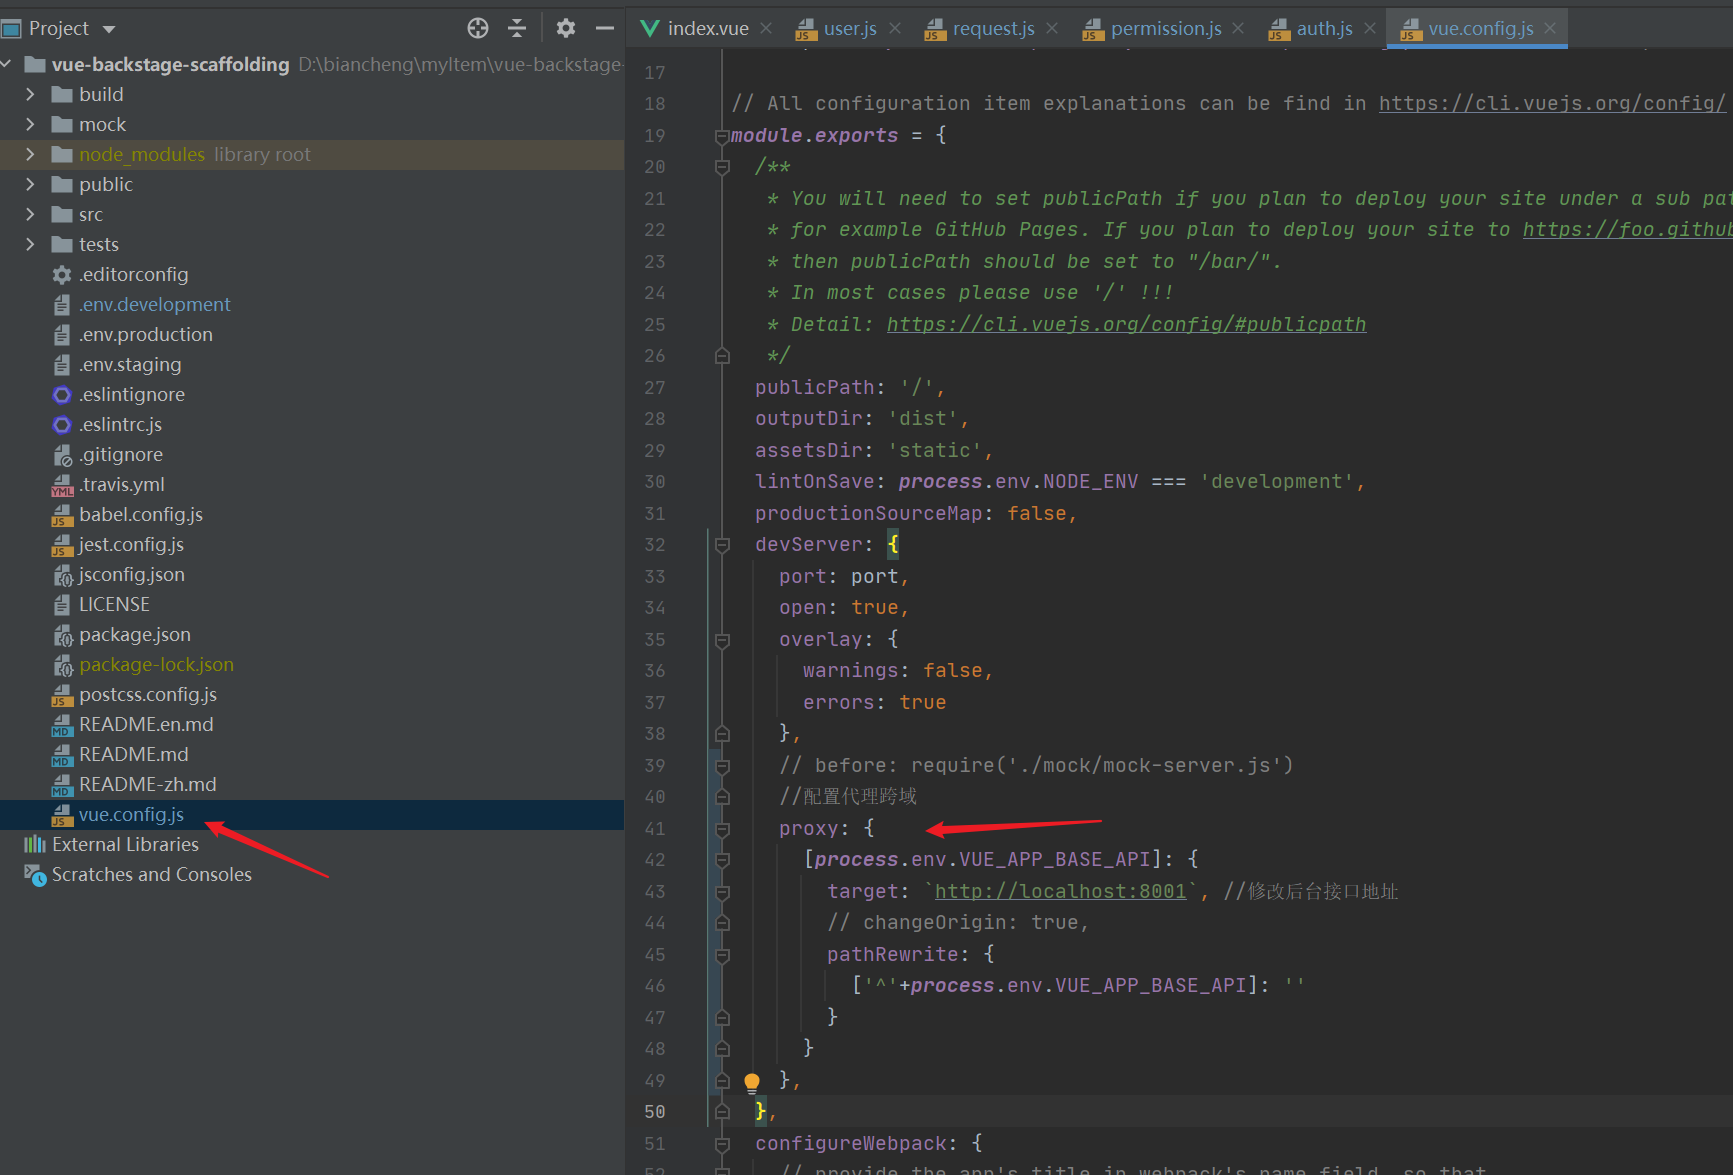
    //Configure proxy cross domain
    proxy: {
      [process.env.VUE_APP_BASE_API]: {
        target: `http://localhost:8001 `, / / modify the background interface address
        // changeOrigin: true,
        pathRewrite: {
          ['^'+process.env.VUE_APP_BASE_API]: ''
        }
      }
    },
| 3. The token request header can be directly configured into the request interceptor, request JS. Note that the key of the token request header must be authorization |
|---|

// request interceptor
service.interceptors.request.use(
  config => {
    // do something before request is sent
    if (store.getters.token) {
      // let each request carry token
      // ['X-Token'] is a custom headers key
      // please modify it according to the actual situation
      config.headers['authorization'] = getToken()
    }
    return config
  },
  error => {
    // do something with request error
    console.log(error) // for debug
    return Promise.reject(error)
  }
)
3. Verification code display
| The back end directly returns a picture to us. We can use window url. Create object url (response) to get a url address of the picture |
|---|
| window.URL.createObjectURL is used to create a new object URL, which can represent a specified File object or Blob object |
- The response type must be either blob or file (responseType: 'blob' or responseType: 'file')
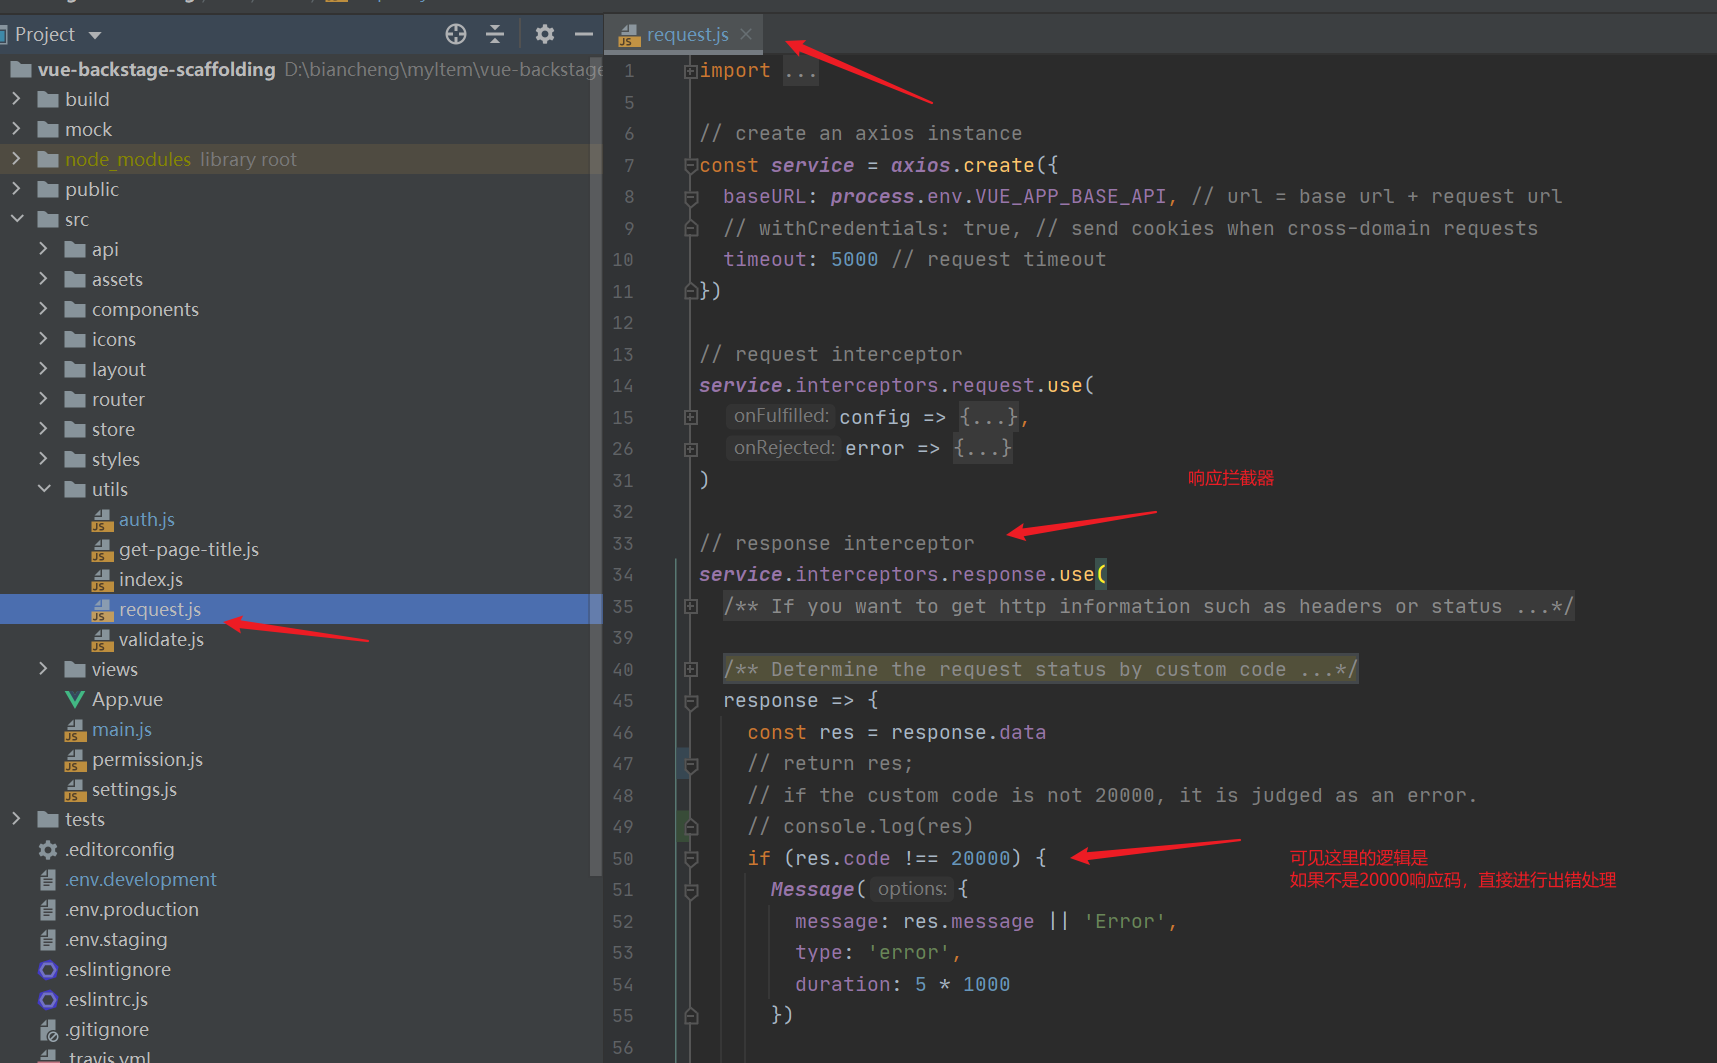
| 1. First of all, there is no response code in our backend verification code function, and the template we use is in request JS encapsulates the request interceptor and response interceptor. The fatal thing is that the response interceptor directly intercepts all responses with response codes other than 20000 |
|---|
- The advantage of this is that if all requests have errors (the response code is not 20000), the error logic will be carried out uniformly, but this is also a disadvantage. Because we want different feedback for different errors, rather than a unified one
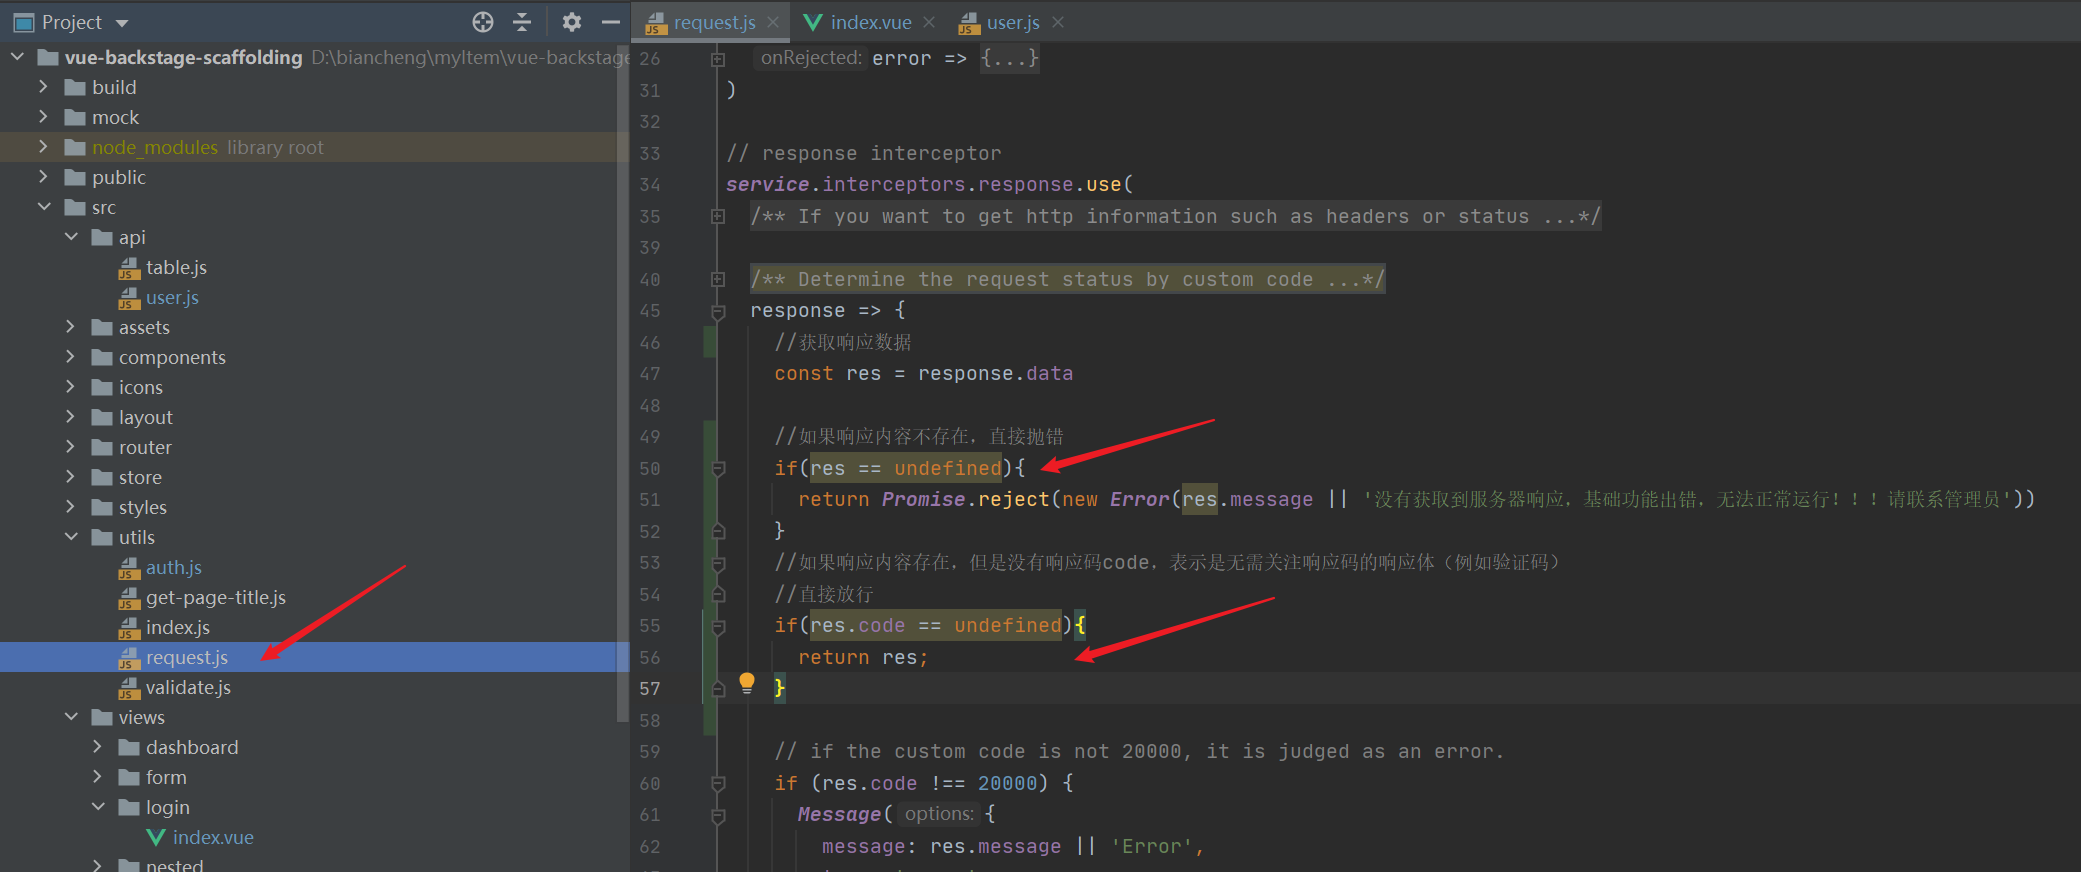
- Therefore, we should enrich its functions (one if is enough). For the response that does not need code status code, if there is a response body, it means that the response is successful, otherwise it means that the response fails
| 2. When encapsulating api requests, be sure to set the response type to 'blob' (responseType: 'blob') |
|---|
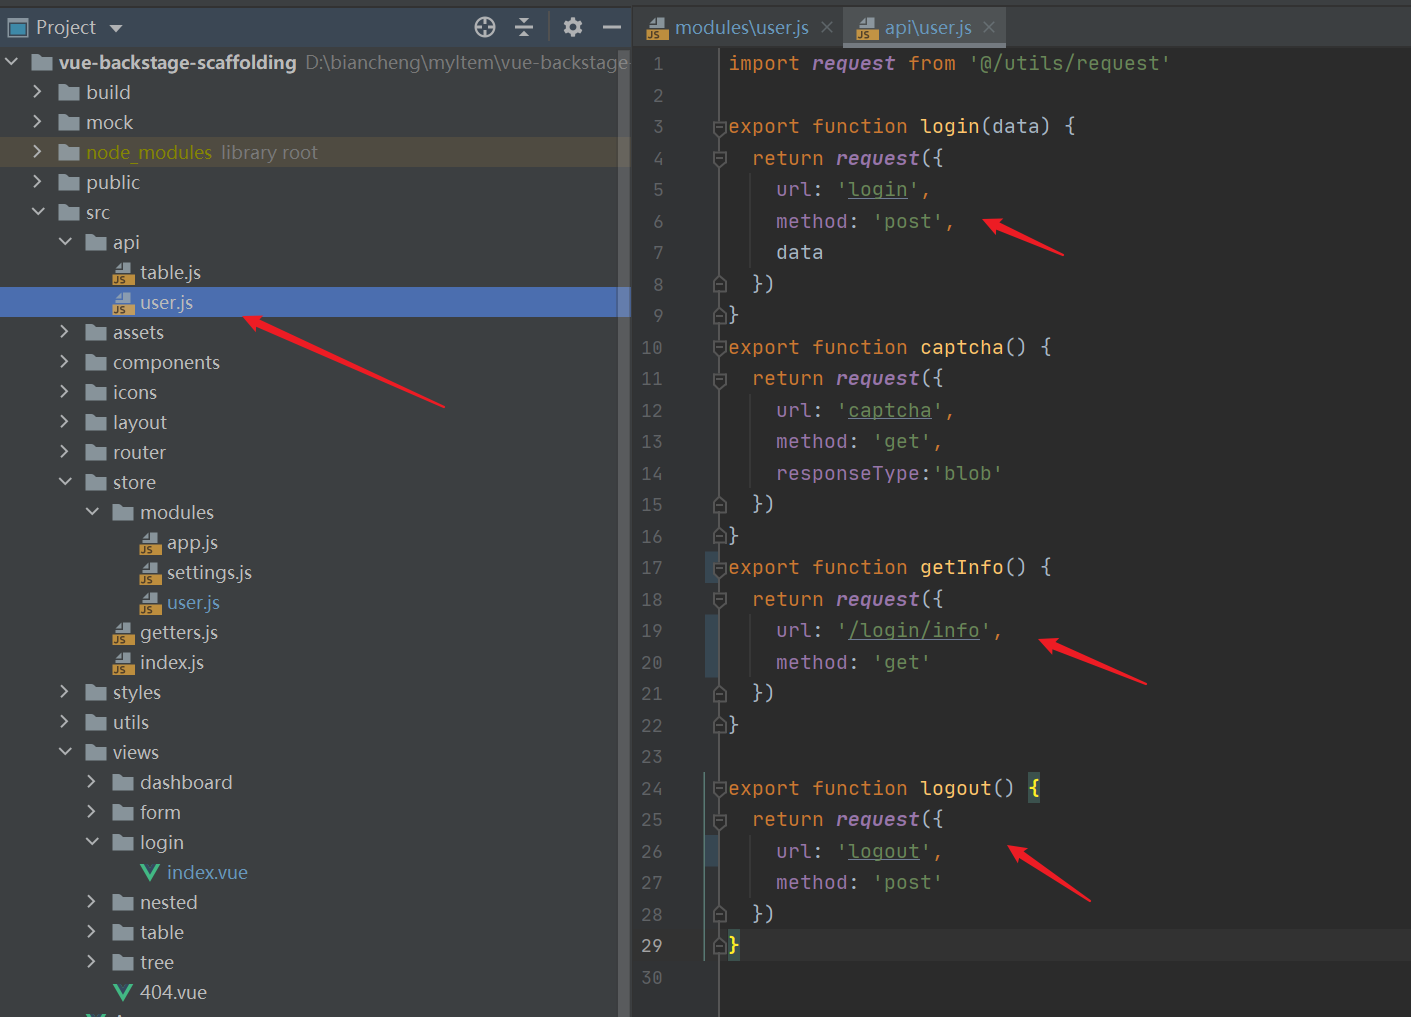
- api/user.js add verification code interface
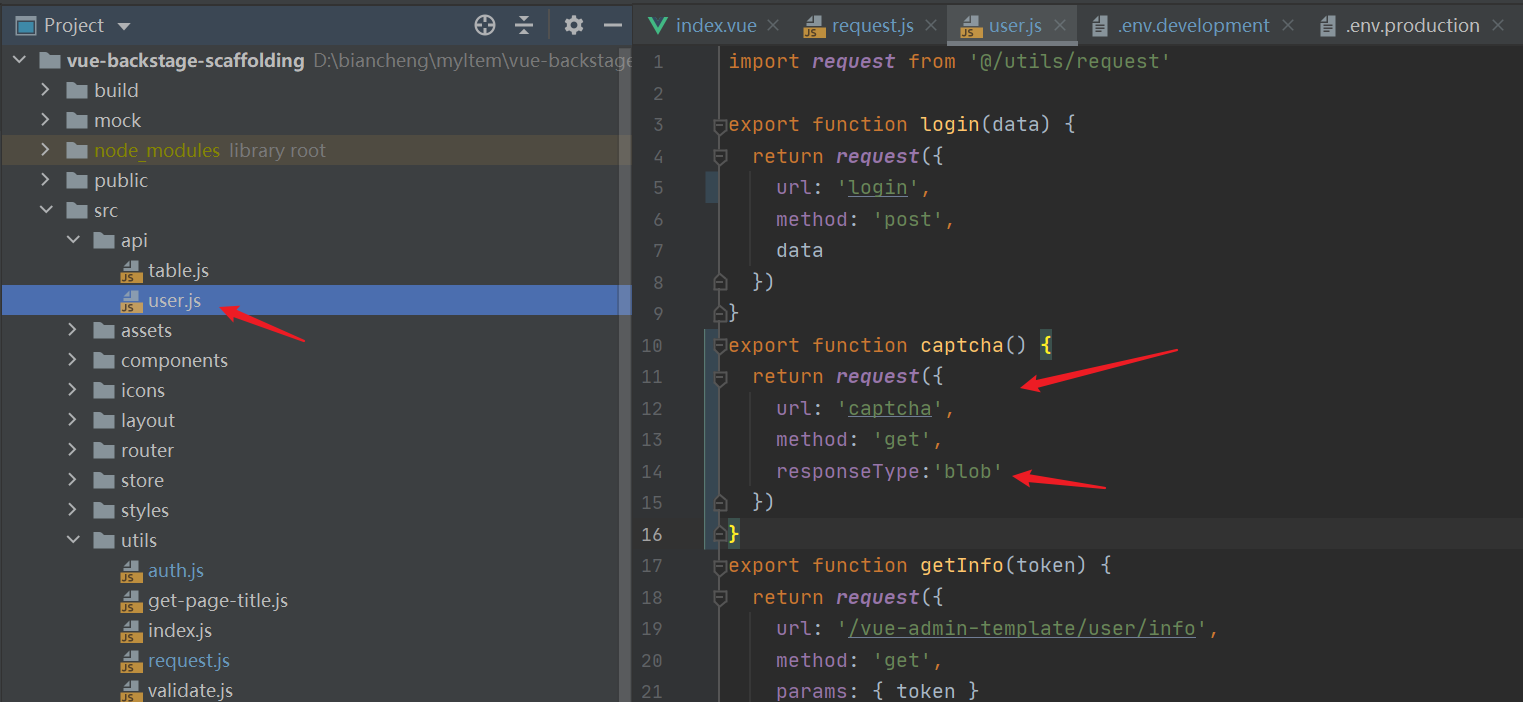
export function captcha() {
  return request({
    url: 'captcha',
    method: 'get',
    responseType:'blob'
  })
}
| 3. login page, login / index JS file introduces the api, and then displays the verification code |
|---|
- Write the function getImgCode through window url. Createobjecturl (response) encapsulates the image as a url
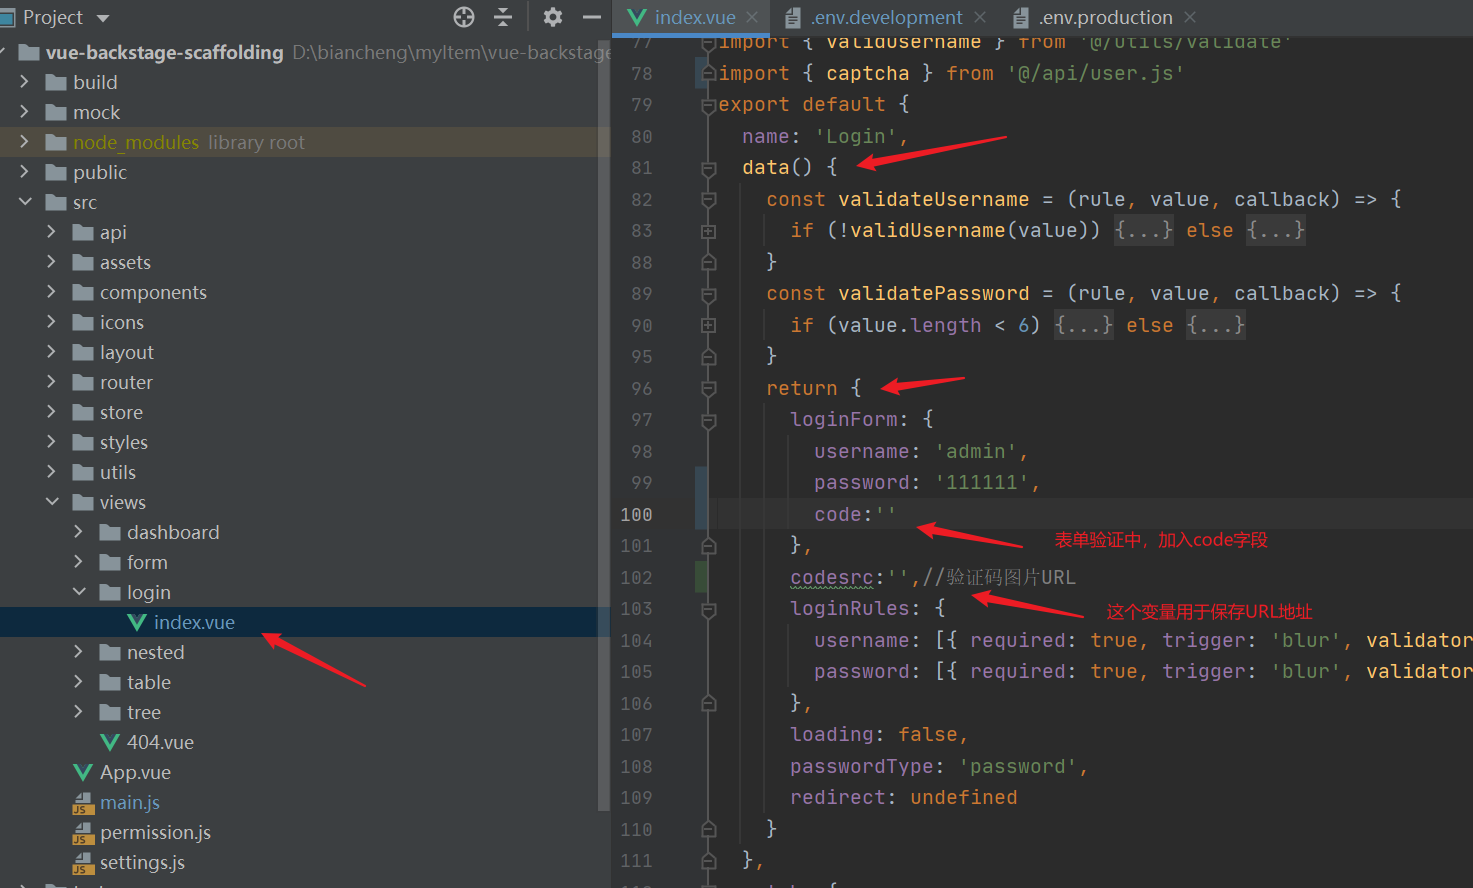
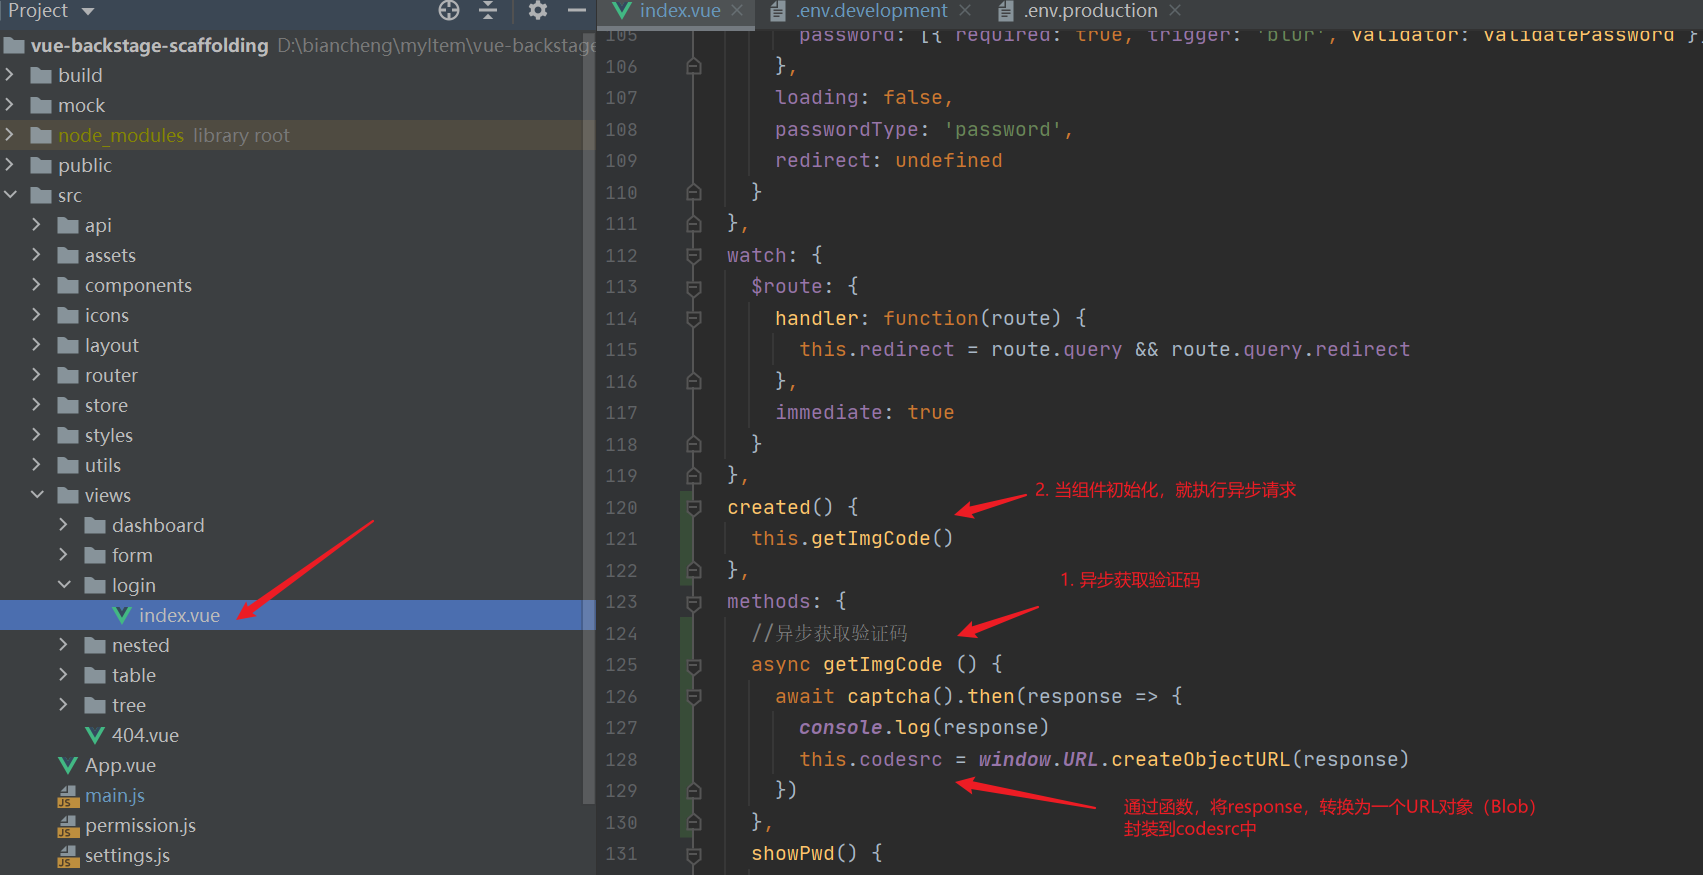
    //Asynchronous acquisition of verification code
    async getImgCode () {
      await captcha().then(response => {
        this.codesrc = window.URL.createObjectURL(response)
      })
    },
- Add components and styles, and specify the function callback (click event) to click the picture and regenerate the verification code
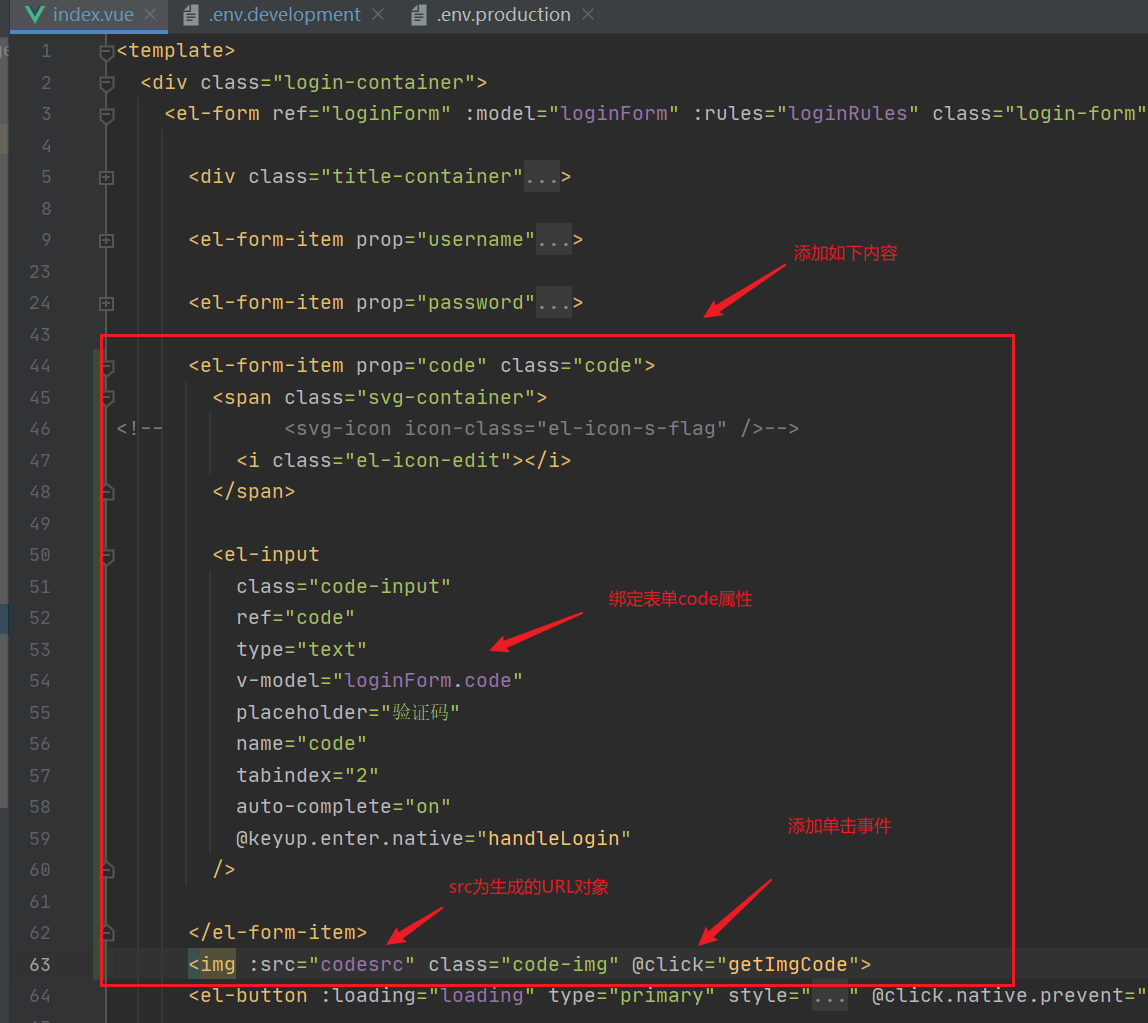
//html tag
      <el-form-item prop="code" class="code">
        <span class="svg-container">
<!--          <svg-icon icon-class="el-icon-s-flag" />-->
          <i class="el-icon-edit"></i>
        </span>

        <el-input
          class="code-input"
          ref="code"
          type="text"
          v-model="loginForm.code"
          placeholder="Verification Code"
          name="code"
          tabindex="2"
          auto-complete="on"
          @keyup.enter.native="handleLogin"
        />

      </el-form-item>
      <img :src="codesrc" class="code-img" @click="getImgCode">
//sass style
  .code{
    width: 70%;
    float: left;
  }
  .code-img{
    float: right;
    width: 29.6%;
    //height: 100%;
  }
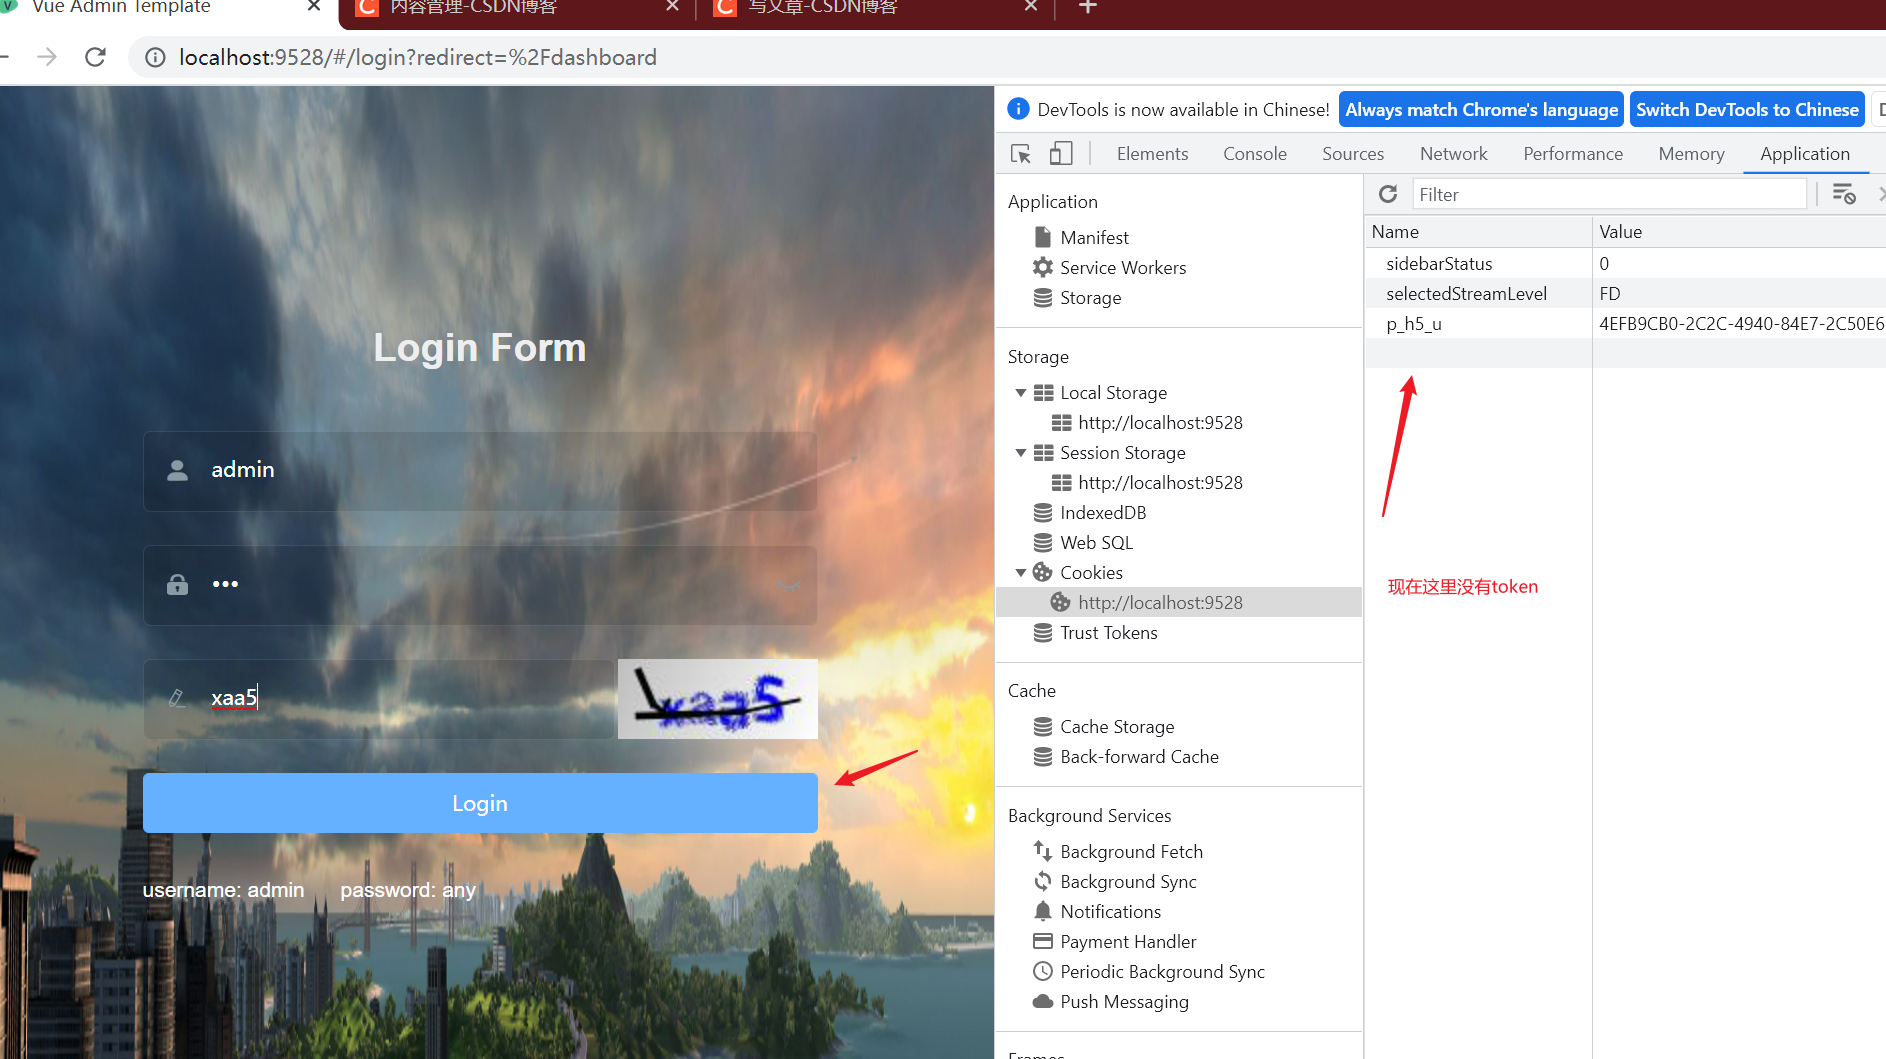
4. Single sign on, logout, according to the backend API
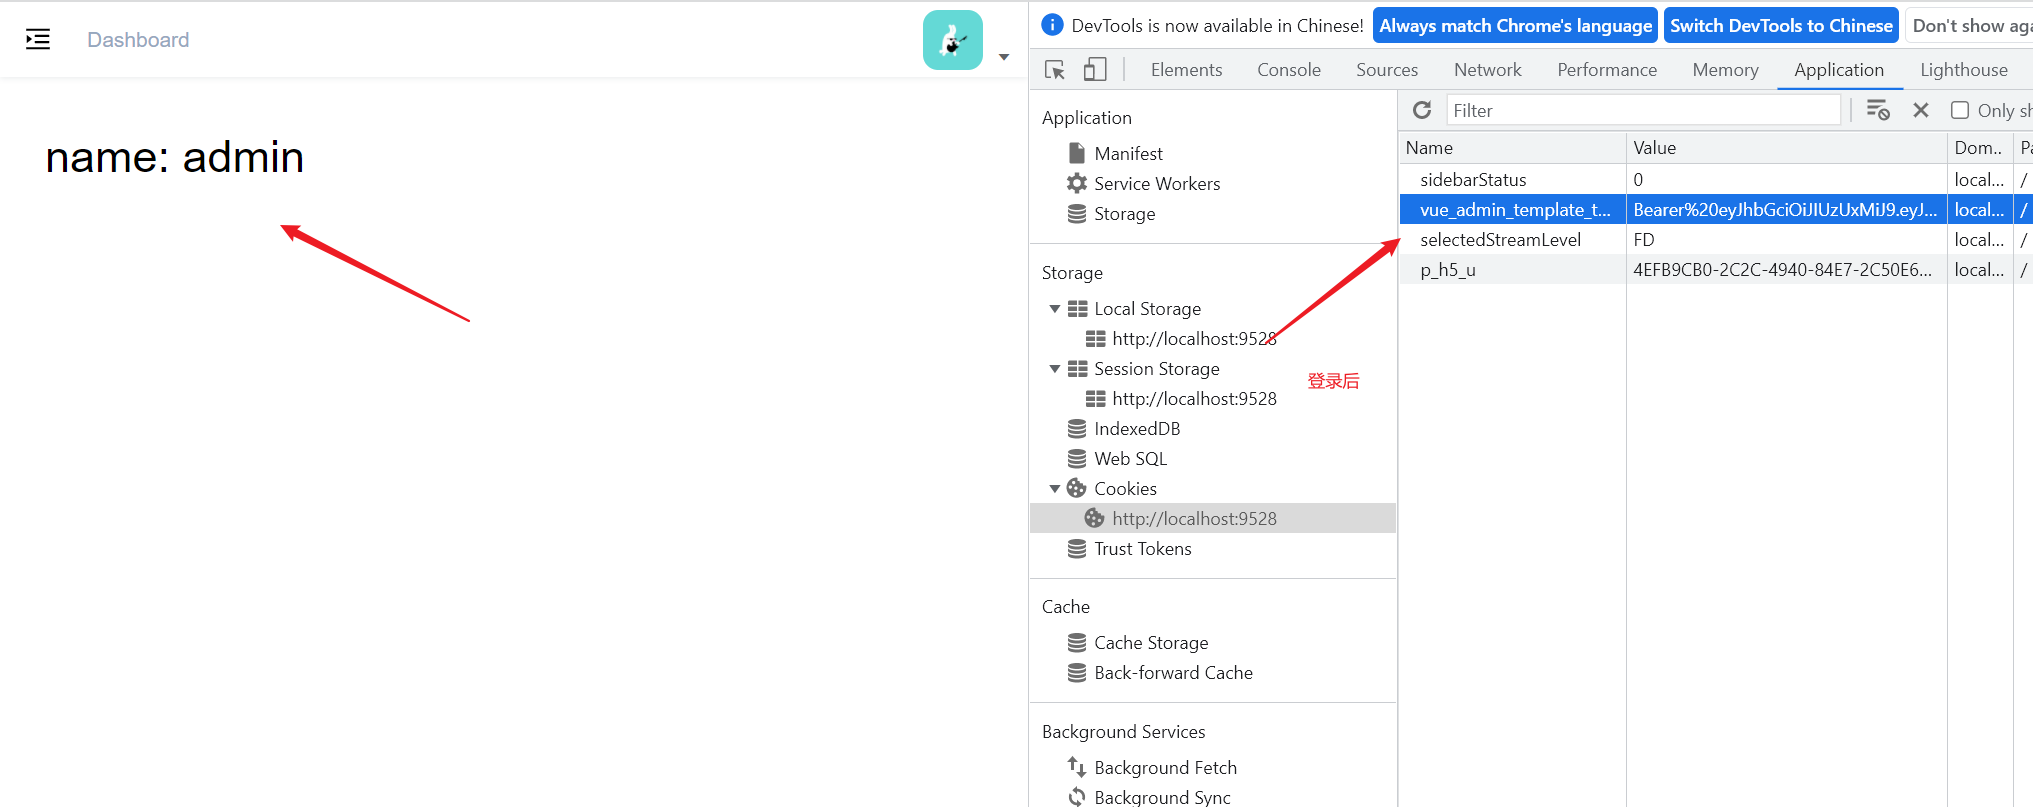
- After logging in, check the token
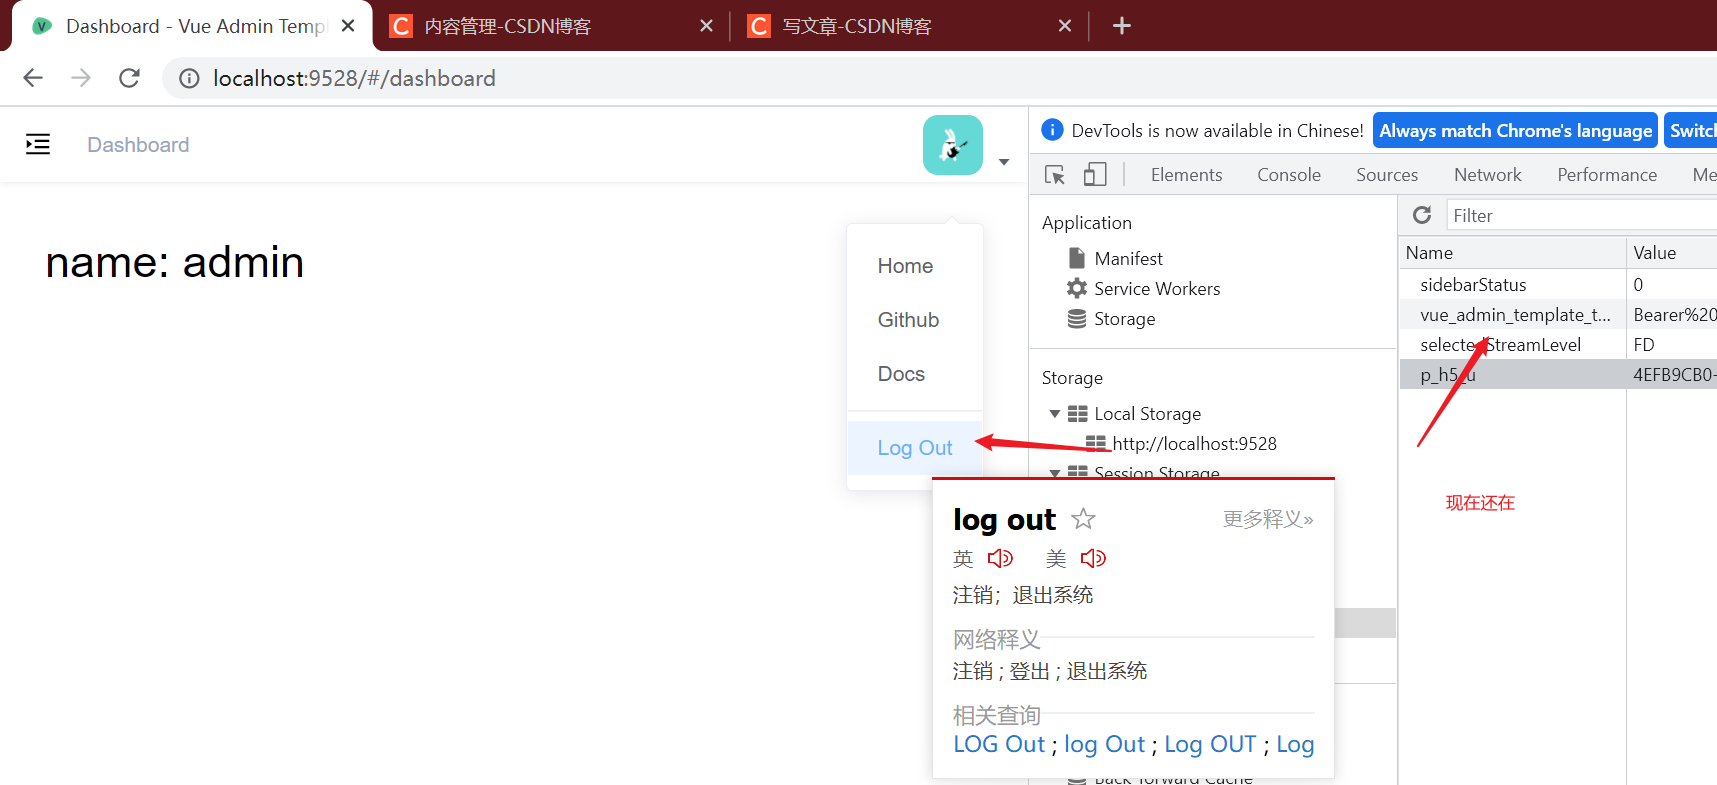
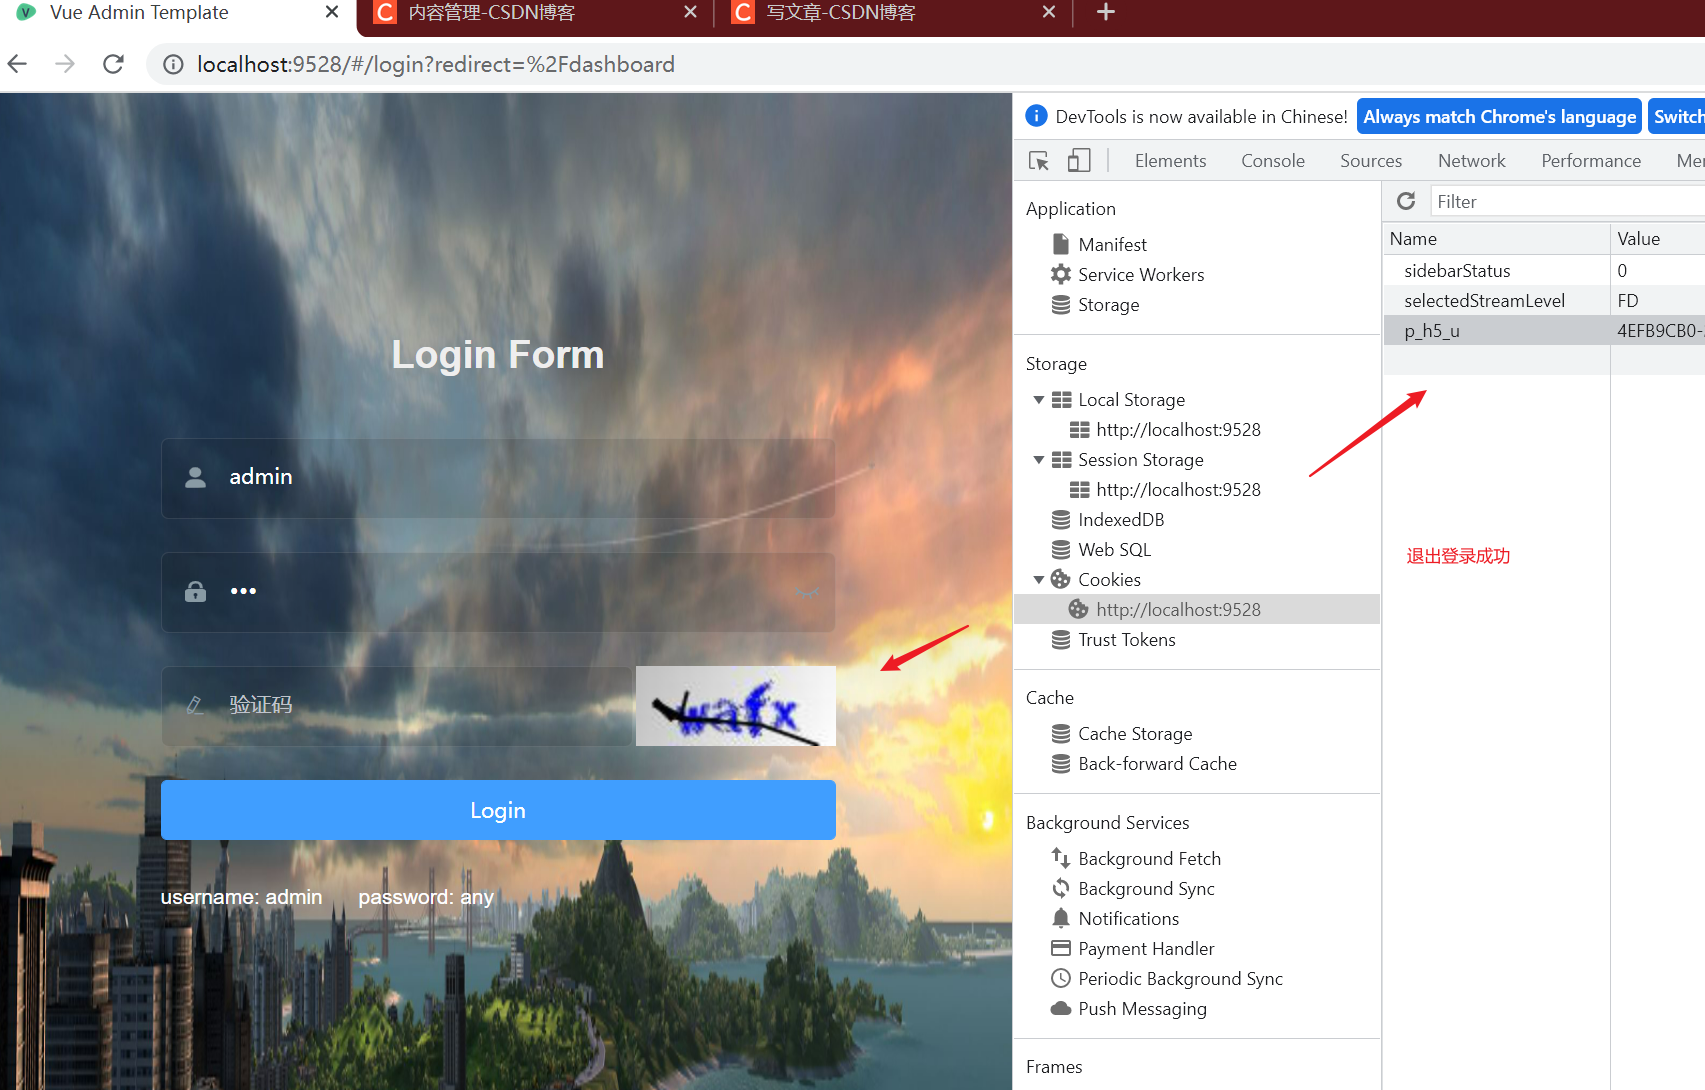
- Log out and check the token
1. api interface
| api folder user JS file, modify the login, getInfo and logout interfaces |
|---|
2. The routing component writes the login function logic
| We found that all login logic of this template is in view / login / index In the handleLogin method in the Vue file, modify it |
|---|
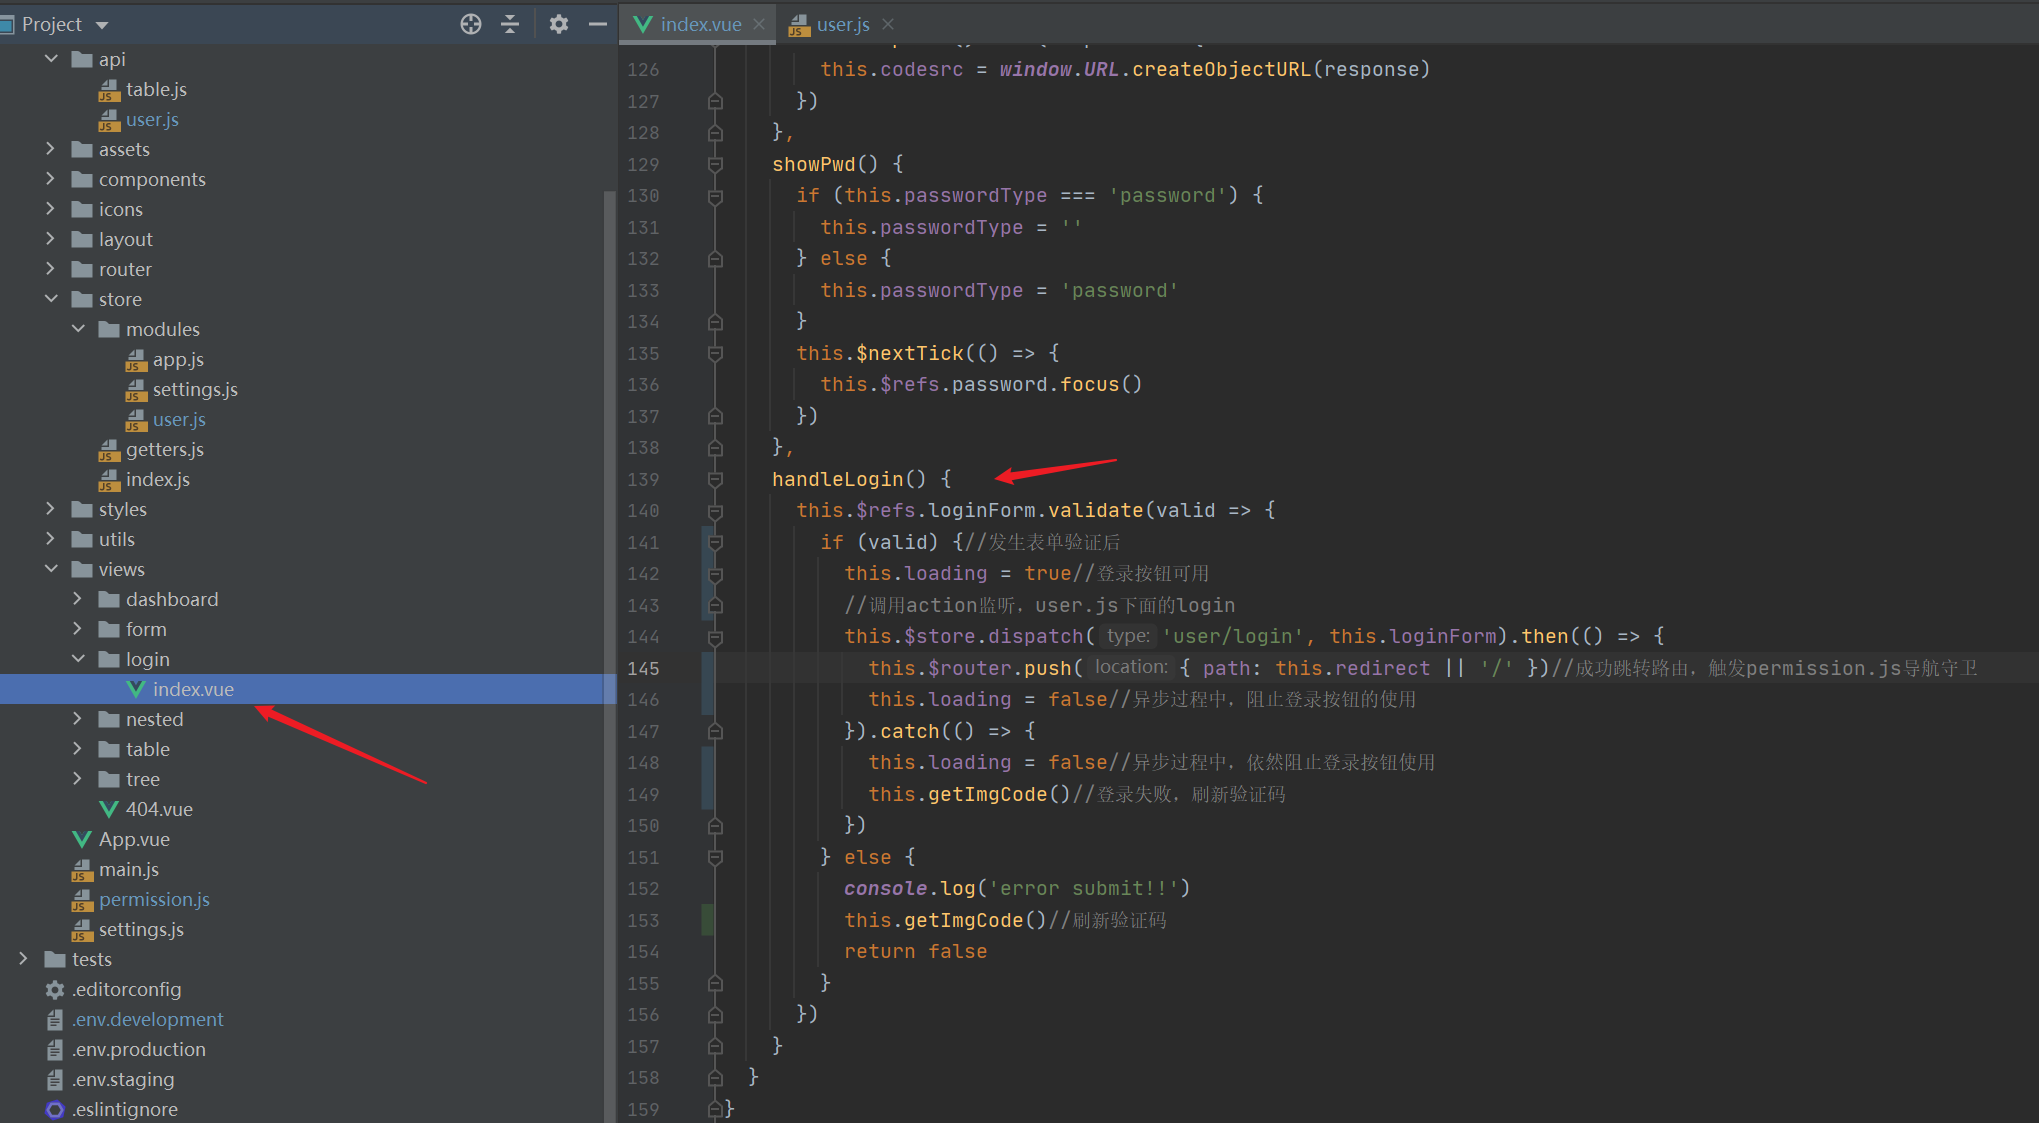
    handleLogin() {
      this.$refs.loginForm.validate(valid => {
        if (valid) {//After form validation
          this.loading = true//Login button available
          //Call action to listen, user JS login
          this.$store.dispatch('user/login', this.loginForm).then(() => {
            this.$router.push({ path: this.redirect || '/' })//Successfully jump the route and trigger permission JS navigation guard
            this.loading = false//Prevent the use of login button during asynchronous process
          }).catch(() => {
            this.loading = false//During the asynchronous process, the login button is still blocked
            this.getImgCode()//Login failed, refresh verification code
          })
        } else {
          console.log('error submit!!')
          this.getImgCode()//Refresh verification code
          return false
        }
      })
    }
3. Modify store (vuex) asynchronous logic
| All operations are in store / user JS, we need to modify login, getInfo and logout |
|---|
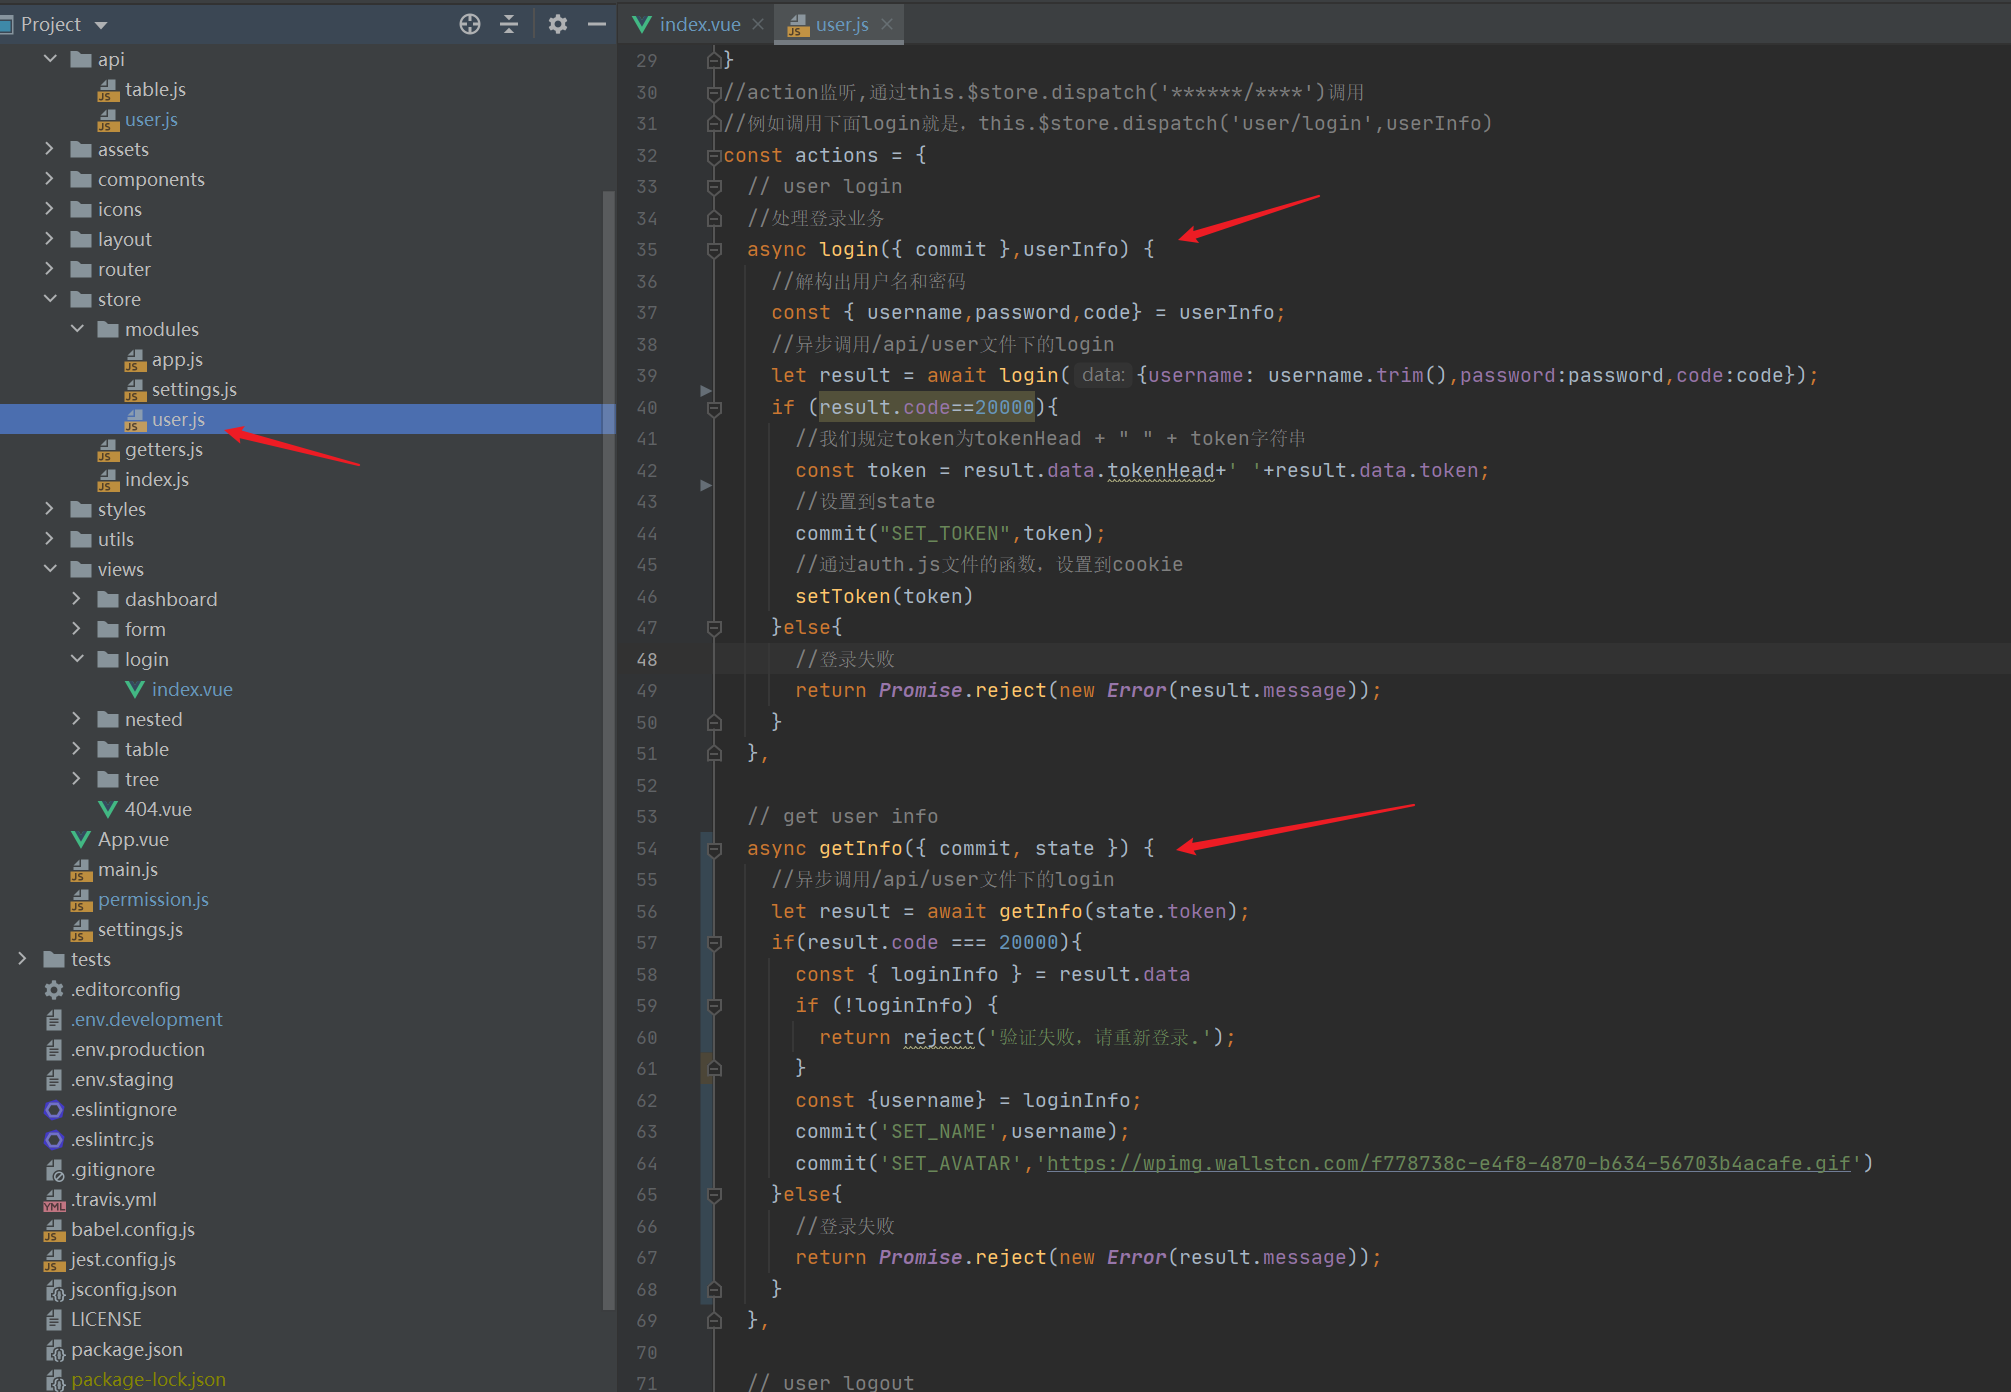

  // user login
  //Handle login business
  async login({ commit },userInfo) {
    //Deconstruct the user name and password
    const { username,password,code} = userInfo;
    //Asynchronously call login under / api/user file
    let result = await login({username: username.trim(),password:password,code:code});
    if (result.code==20000){
      //We specify token as tokenhead + "" + token string
      const token = result.data.tokenHead+' '+result.data.token;
      //Set to state
      commit("SET_TOKEN",token);
      //Through auth JS file, set to cookie
      setToken(token)
    }else{
      //Login failed
      return Promise.reject(new Error(result.message));
    }
  },

  // get user info
  async getInfo({ commit, state }) {
    //Asynchronously call login under / api/user file
    let result = await getInfo(state.token);
    if(result.code === 20000){
      const { loginInfo } = result.data
      if (!loginInfo) {
        return reject('Verification failed, please login again.');
      }
      const {username} = loginInfo;
      commit('SET_NAME',username);
      commit('SET_AVATAR','https://wpimg.wallstcn.com/f778738c-e4f8-4870-b634-56703b4acafe.gif')
    }else{
      //Login failed
      return Promise.reject(new Error(result.message));
    }
  },
  // user logout
  async logout({ commit, state }) {
    let result = await logout(state.token);
    if(result.code === 20000){
      removeToken() // must remove  token  first
      resetRouter()
      commit('RESET_STATE')
    }else{
      //Failed to log out
      return Promise.reject(new Error(result.message));
    }
  },
3, Implementation of background management system
| Due to space reasons, I put it in another article: @ TODO is not finished yet |
|---|