1 ACL overview
(1) Definition: Access Control List access control list is actually a packet filtering technology. Access Control List (ACL) is an access control technology based on packet filtering. It can filter the data packets on the interface according to the set conditions and allow them to pass or discard.
(2) Function:
- 1) Access control list is widely used in routers and three-tier switches. With the help of access control list, users' access to the network can be effectively controlled, so as to ensure network security to the greatest extent.
- 2) When the ACL table is applied to the router interface, the instructions in the ACL are used to tell the router which packets can be received and which packets need to be rejected.
- 3) Most other occasions play the function of condition matching.
(3) What filtering is based on: layer 3 IP packet header (source IP address, destination IP address), layer 4 header (TCP, UDP port number), [layer 5 data (occasionally)].
(4) Application: router, layer-3 switch and firewall configuration (commonly referred to as policy). This section mainly introduces ACL S applied to routers and layer 3 switches.
tips:
1) ACL in this section controls network resources.
2) Why is ACL a packet filtering technology? Why not a frame? Because IP packets are filtered.
3) The firewall does not recommend filtering layer 5 data because it will reduce the speed. Firewall is mainly used to filter network traffic, but it is not special for virus Trojan horse. You need to filter virus Trojan horse. You can buy IDS and IPS.
2 ACL principle
(1) ACL table must be applied to the in or out direction of the interface to take effect. As shown in the figure below, in/out is for routers. There are two directions on each interface.
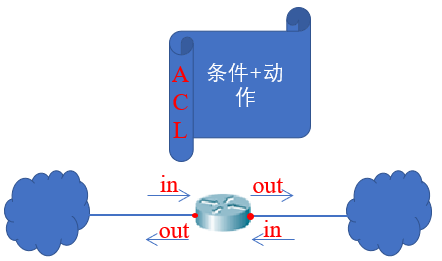
(2) Only one ACL table is applied to one direction (in or out) of an interface.
(3) Whether applied to the in or out direction depends on the overall direction of flow control.
(4) Check order: the ACL table is strictly checked one by one from top to bottom, so the order of entries is very important.
(5) There are multiple entries from top to bottom in the ACL table, and each entry is composed of conditions and actions. Whenever there is flow, check the items strictly from top to bottom one by one. ① when the flow fully meets the conditions, execute the action; ② When the flow does not fully meet the conditions, continue to check the next one; ③ When all conditions are not met, it will be rejected, which is hidden at the end of the ACL table.
(6) Case:
- 1) Case 1

- 2) Case 2
3) Case 3
3 ACL classification
ACL is mainly divided into standard ACL and extended ACL. Among them, extended ACL is used more.
3.1 standard ACL
(1) Table number range: 1 ~ 99. As long as the table number is set within this range, it is a standard ACL table.
(2) Feature: the packet can only be filtered based on the source IP address in the packet.
(3) Configuration location: on the router through which the traffic flows, since the standard ACL table can only check the source IP, it needs to be configured on the router close to the target as much as possible to avoid accidental killing.
(4) Whether it is applied to the inlet or outlet depends on the general direction of flow control.
(5) Configure commands on which router you want to apply:
'''Create standard ACL And compilation standards ACL'''
en
conf t
access-list Table No((1) action conditions       	                    #Each command needs to indicate which table to target
access-list Table No((e.g. 1) permit/deny source IP Or source segment anti subnet mask	#Each command needs to indicate which table to target
#Inverse subnet mask: reverse the positive subnet mask 0 and 1. For example, the positive subnet mask 255.255.255.0 corresponds to the inverse subnet mask 0.0.0.255
#The function of anti subnet mask: used for matching. Those corresponding to 0 need to be strictly matched, and those corresponding to 1 need to be ignored.
access-list 1 deny 10.1.1.1 0.0.255.255				#Indicates that all source IP addresses are rejected. It is 10.1 x. X packets
access-list 1 deny 10.1.0.0 0.0.255.255				#In order to make it easier to understand without ambiguity, the previous line is generally written like this
access-list 1 deny 10.1.1.1 255.255.255.255			#Say no to everyone
access-list 1 deny any								#Abbreviation of the previous line
access-list 1 permit any							#Indicates that all packets are allowed to pass
access-list 1 deny 10.1.1.1 0.0.0.0  			    #Indicates that the host with source IP 10.1.1.1 is rejected
access-list 1 deny host 10.1.1.1					#Abbreviation of the previous line

'''View table'''
en
show ip access-list Table No((e.g. 1)		#View Table 1. If no table number is specified, view all ACL tables.

'''Delete table'''
en
conf t
no access-list Table No((e.g. 1)			#To delete a table, you need to specify the table number.

'''Finished editing ACL After the table, you need to ACL Which interface and which direction should the table be used for'''
en
conf t
int f0/x
ip access-group Table No((e.g. 1) in/out	#Either in or out
exit
(6) Complete case:
#Forbidden source IP10 1.1.1 the passage of 20.1.1.0 network segment is prohibited, and all others are released
conf t
acc 1 deny host 10.1.1.1
acc 1 deny 20.1.1.0 0.0.0.255
acc 1 permit any
3.2 extending ACL
(1) Table number range: 100 ~ 199.
(2) Features: IP packets can be filtered based on source IP address, target IP address, port number, protocol, etc.
(3) Configuration location: on the router through which the traffic flows, due to the rich conditions of expanding ACL table, it should be configured on the router close to the source IP as much as possible to reduce the burden on the router.
(4) Whether it is applied to the inlet or outlet depends on the general direction of flow control.
(5) Configure commands on which router you want to apply:
'''Create standard ACL And new entries'''
en
conf t
#Standard command, the action is executed only when all conditions are met.
#The protocol is generally written as tcp/udp/ip/icmp. When there is a write port number, the corresponding protocol TCP or UDP must be written. Note that tcp/udp/icmp needs to flow through ip.
#When the requirement is to deny an IP / network segment access to all services of a target IP / network segment, the protocol writes IP.
#[] means optional, that is, all but the port number should be written, and eq means equal to.
acc Table No permit/deny Protocol source IP Or source segment anti subnet mask target IP Or target network segment anti subnet mask [eq Port number]

# Indicates that the host 10.1.1.1 is allowed to access the TCP80 port of the host 20.1.1.3
acc 100 permit tcp host 10.1.1.1 host 20.1.1.3 eq 80

# Indicates that the host 10.1.1.1 is prohibited from accessing the UDP53 port of any server, and the host will not be able to perform DNS resolution.
acc 100 deny udp host 10.1.1.1 any eq 53

#Indicates that the host 10.1.1.1 is prohibited from accessing the network segment 20.1.1.0
acc 100 deny ip host 10.1.1.1 20.1.1.0 0.0.0.255

#Indicates that the host 10.1.1.1 is prohibited from accessing the TCP based services of network segment 20.1.1.0, which is rarely used
acc 100 deny tcp host 10.1.1.1 20.1.1.0 0.0.0.255

#Indicates that host 10.1.1.1ping20 is prohibited 1.1.0 network segment
acc 100 deny icmp host 10.1.1.1 20.1.1.0 0.0.0.255

# Indicates that all are allowed to pass
acc 100 permit ip any any

'''View table'''
en
show ip access-list 1		#View Table 1. If no table number is specified, view all ACL tables.

'''Delete table'''
en
conf t
no access-list 1			#To delete a table, you need to specify the table number.

'''Finished editing ACL After the table, you need to ACL Which interface and which direction should the table be used for'''
en
conf t
int f0/x
ip access-group Label (e.g. 100) in/out	#Either in or out
exit
4 steps of writing ACL
(1) ACL table editing and application should be considered after the whole network has been able to ping normally.
(2) Because the ACL table is used to filter IP packets, first judge the location of ACL writing (which router, which interface and which direction) according to the flow direction of traffic and the type of ACL table used.
(3) Then consider how to write
- 1) At the beginning of writing, judge whether most traffic is rejected or allowed, and decide how to write the last row of the ACL table.
- 2) When writing, pay attention to: the more upward, the more stringent the general conditions are.
(4) In general, once the standard or extended ACL table is written, it cannot modify a certain entry, delete a certain entry, modify the order, or insert a certain entry. You can only add a new entry at the end. If you want to modify / delete / adjust the order, you can only delete the whole table and write it again.
5 naming ACL
(1) It perfects the functions of standard ACL and extended ACL, not the third kind of ACL table.
(2) Function: you can customize the naming of standard or extended ACL S.
(3) Advantages: (1) custom naming is easier to identify and remember. (2) You can modify / delete / insert a certain item at will.
It can be understood that entries can only be modified / deleted / inserted after entering the ACL table configuration mode. In the global configuration mode, only the whole table can be deleted.
(4) Related commands:
- 1) Create and write standard and extended ACL S
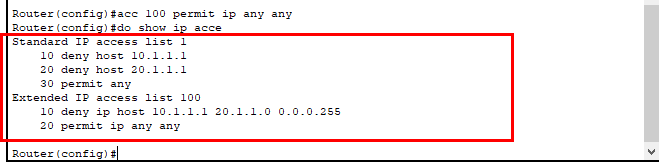
en
conf t
'''Create and write standards and extensions ACL'''
acc 1 deny host 10.1.1.1
acc 1 deny host 20.1.1.1
acc 1 permit any
acc 100 deny ip host 10.1.1.1 20.1.1.0 0.0.0.255
acc 100 permit ip any any
do sh ip acc
- 2) Create and write named ACL S
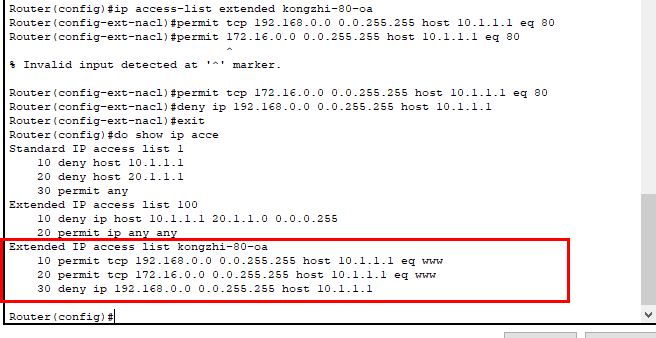
'''Create and write naming ACL'''
#Requirements: I hope that people on the Intranet can access the website server, and those on the Internet cannot access the website server
ip access-list extended/standard Custom table name  #Create a named ACL table, where ex represents extension and stan represents standard. This command will enter the extended ACL table configuration mode, without every sentence beginning with "access + table number"
ip access-list ex kongzhi-80-oa                             #Create named ACL table kongzhi-80-oa
    permit tcp 192.168.0.0 0.0.255.255 host 10.1.1.1 eq 80  #Allow intranet 192.168 network segment to access tcp80 port of host 10.1.1.1.
    permit tcp 172.16.0.0 0.0.255.255 host 10.1.1.1 eq 80	#Allow intranet 172.16 network segment to access tcp80 port of host 10.1.1.1.
    deny ip 192.168.0.0 0.0.255.255 host 10.1.1.0           #Prohibit the intranet 192.168 network segment from accessing all other services of the host 10.1.1.1
exit
#View all tables
do sh ip acc
- 3) Delete or insert entries for named ACL S
'''Delete an item'''
ip access-list extended/standard Custom table name #Enter an ACL table
no entry ID #Delete an item
exit
'''Insert a clause'''
ip access-list extended/standard Custom table name #Enter an ACL table
entry ID Action condition #The entry ID is between the two entries that need to be inserted.
exit
'''Specific examples'''
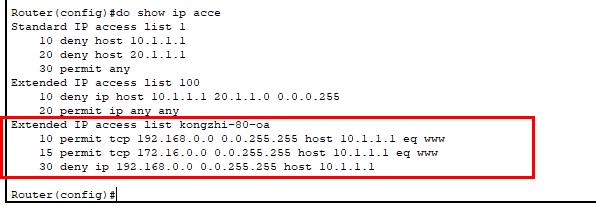
ip access-list ex kongzhi-80-oa #Enter the named ACL table again and adjust the entries
no 20 #Delete the entry with table No. 20 in the table, or write "no action condition", but generally write the entry for convenience
15 permit tcp 172.16.0.0 0.0.255.255 host 10.1.1.1 eq 80 #To insert an entry, write the entry ID first.
exit
do sh ip acc #View all tables
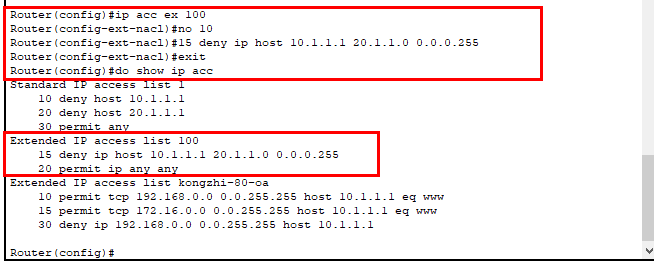
- 4) Delete or insert entries of standard ACL and extended ACL by naming ACL
ip access-list ex 100
    no 10
    15 deny ip host 10.1.1.1 20.1.1.0 0.0.0.255
      exit
do sh ip acc                                            #View all tables
6 Experiment 1 - based on Cisco packet tracker
6.1 experimental requirements
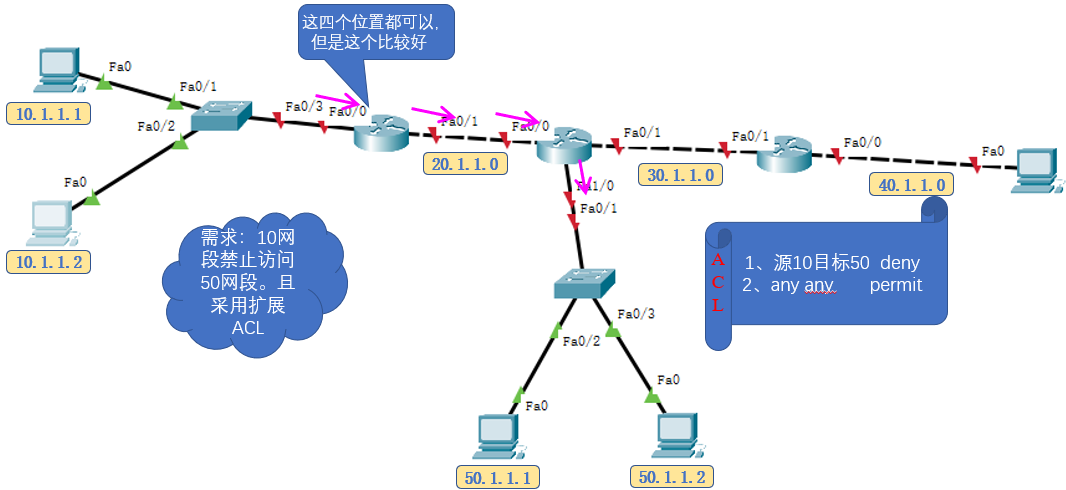
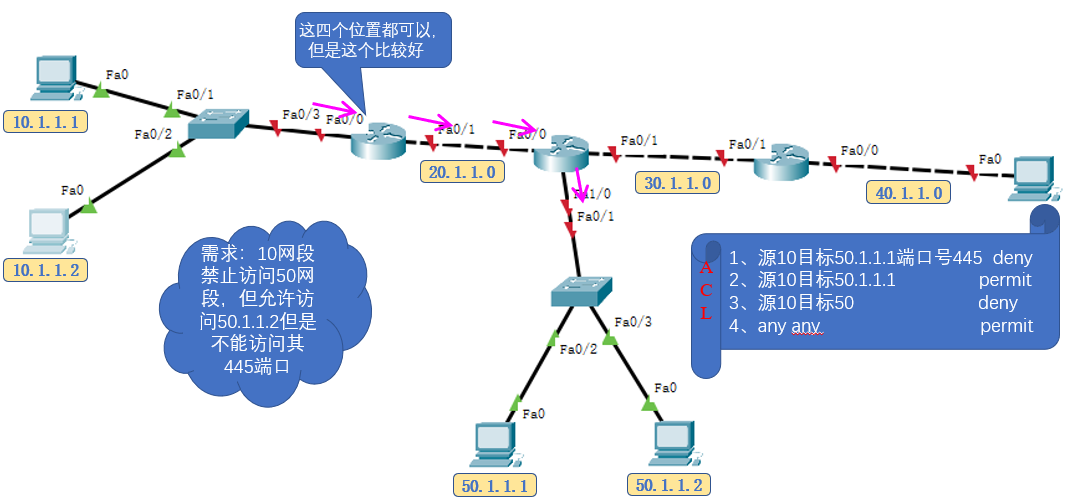
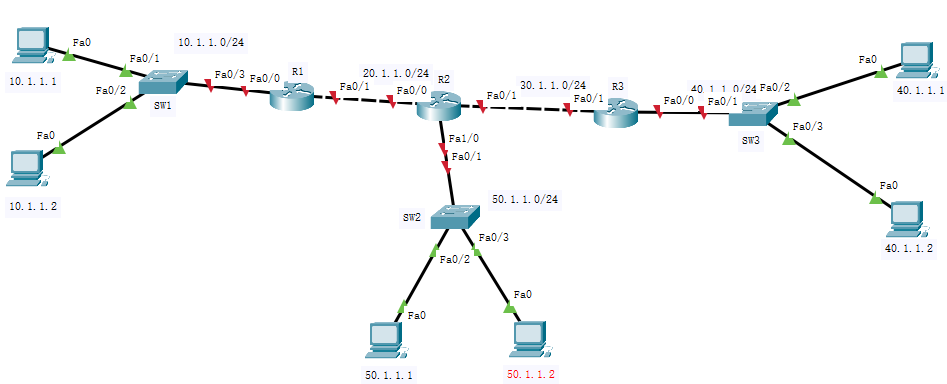
Set up the following network topology diagram, and all of the following are required to be realized by using the standard ACL table:
(1) It is required that 10 network segments are forbidden to access the entire 50 network segments, and access to other networks is not restricted;
(2) 40.1.1.1 PC is required to prohibit access to 50 network segments, and other accesses will not be affected;
(3) Requirement 10.1.1.1 access to 40 network segments is prohibited, and others will not be affected.
6.2 experimental steps
ACL table editing and application should be considered after the whole network has been able to ping normally. Therefore, it is necessary to ping the whole network first.
(1) First, assign IP address to PC
(2) Configure IP for each interface of the router
(3) Configure routing for routers
(4) Consider the direction of which router and interface the ACL table is written in, and start writing the ACL table
6.3 specific ideas and orders of the experiment
- (1) (2) (3) see details for steps and commands Routing experiment demonstration
- (4) Consider the direction of which router and interface the ACL table is written in
According to the experimental requirements, it is necessary to write two tables. Table 1 is written in the outlet direction of F1/0 interface of R2 (to meet the first and second experimental requirements), and table 2 is written in the outlet direction of F0/0 interface of R3 (to meet the third experimental requirements). Start to write ACL table. The specific commands are as follows:
#Configure on R2
en
conf t
ho R2
access-list 1
access-list 1 deny 10.1.1.0 0.0.0.255
access-list 1 deny host 40.1.1.1
access-list 1 permit any
int f1/0
ip acess-group 1 out
exit
do show ip acess-list
do wr
#Configure on R3
en
conf t
ho R3
access-list 1
access-list 1 deny host 10.1.1.1
access-list 1 permit any
int f0/0
ip acess-group 1 out
exit
do show ip acess-list
do wr
7 Experiment 2 - based on Cisco packet tracker
7.1 experimental requirements
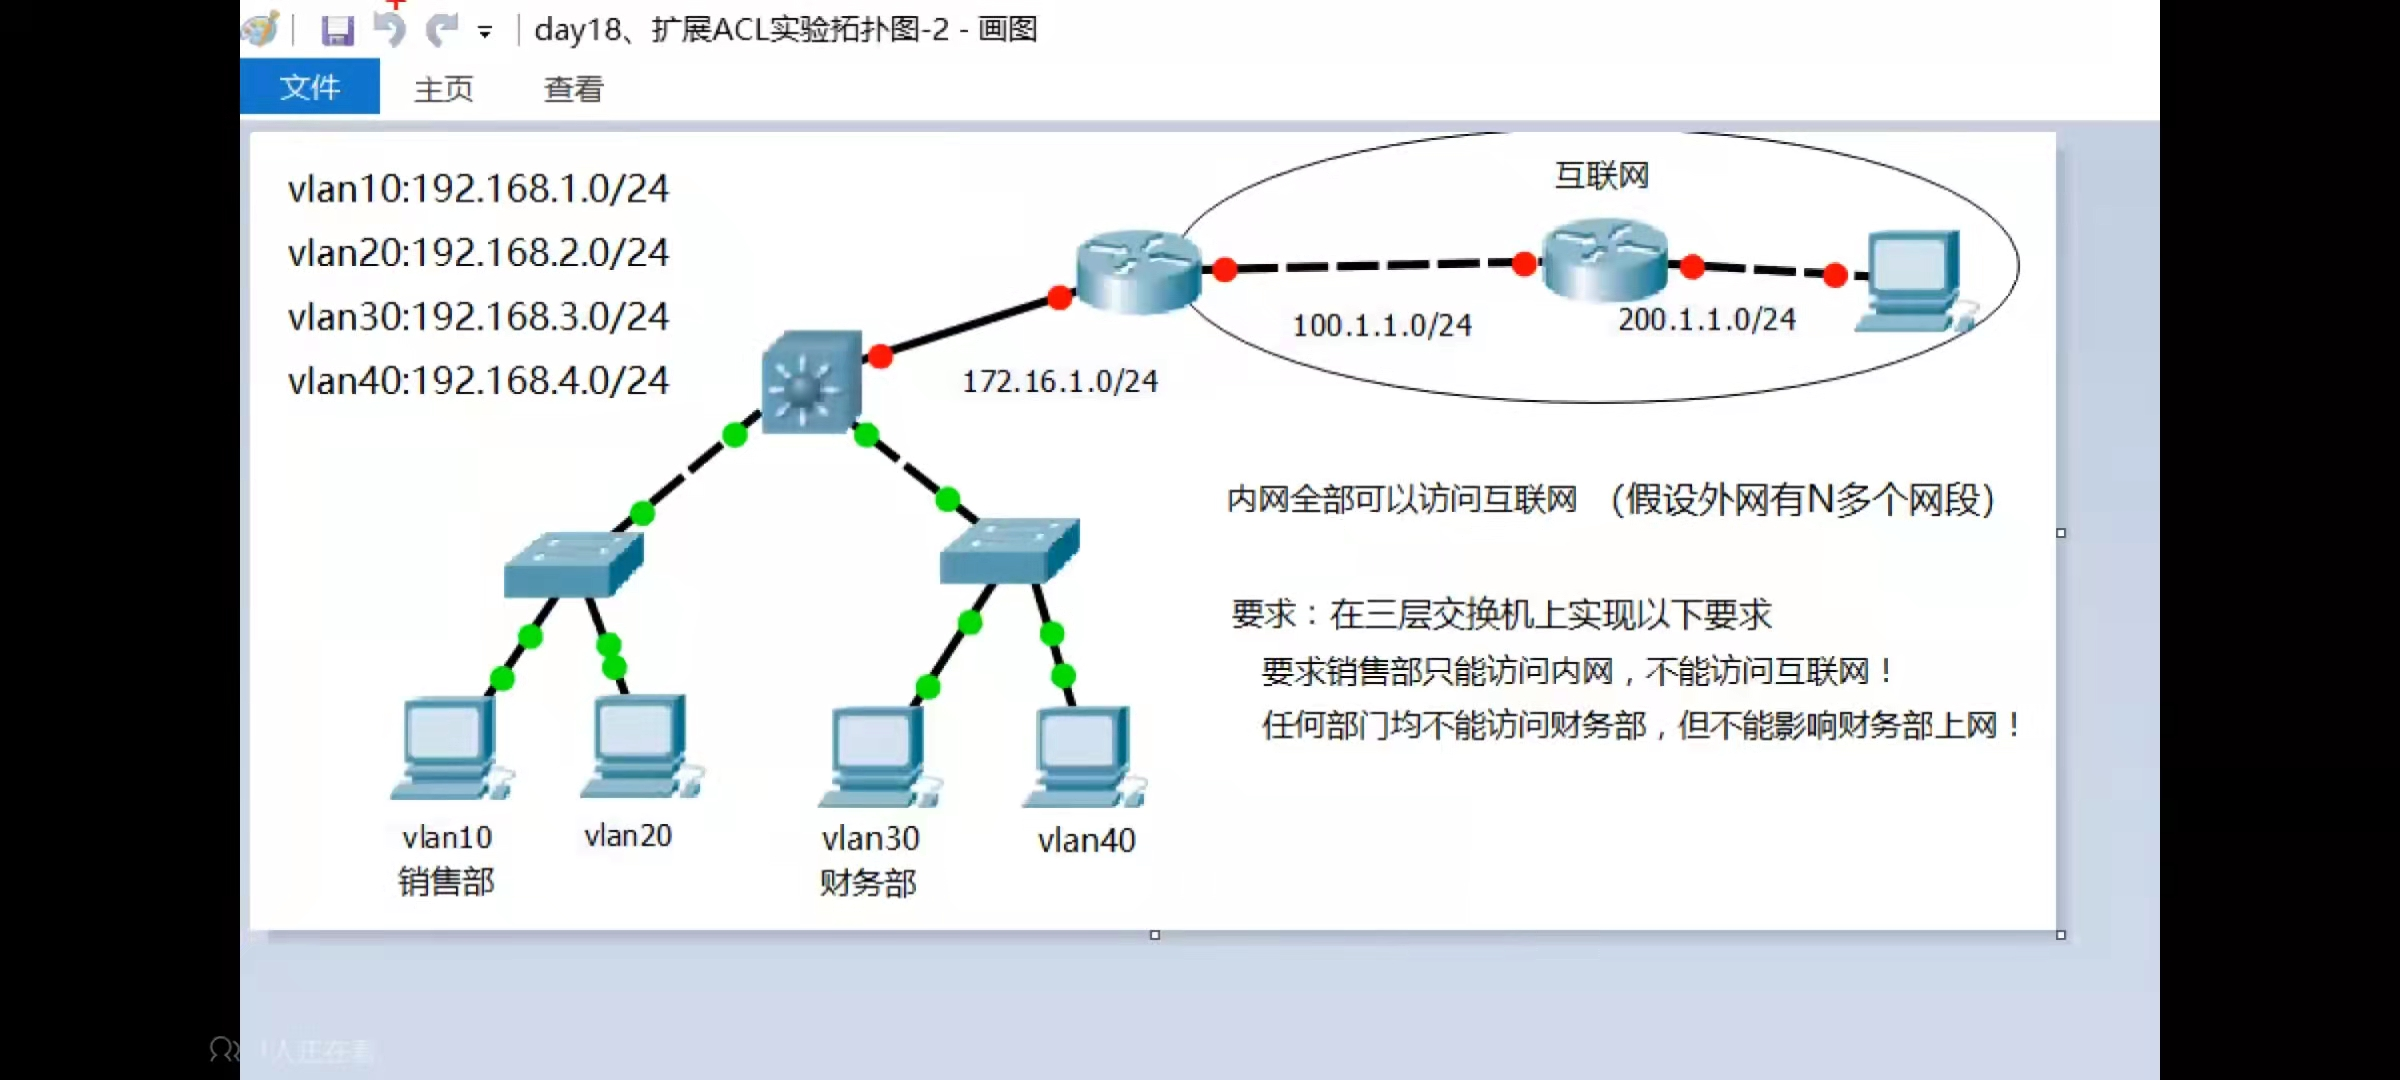
7.2 experimental steps
(1) Layer 2 switching part:
- Step 1: configure trunk interface mode
- Step 2: configure VTP domain and create VLAN
- Step 3: divide the interface to the corresponding VLAN
(2) Layer 3 routing:
- Step 1: the core switch turns on the three-layer routing and creates a virtual interface, and then configures the IP for the gateway and turns it on
- Step 2: upgrade the interface between the core switch and the router to a three-level interface and configure IP
- Step 3: configure IP for router interface
- Step 4: configure routing table
(3) Create and write ACL tables
Consider the direction of which router and interface the ACL table is written in, and start writing the ACL table
7.3 specific ideas and orders of the experiment
- (1) (2) see details for steps and commands [experimental demonstration of layer 3 switch -- Based on Cisco packet tracker
- (3) Create and write ACL tables
According to the experimental requirements, the ACL table needs to be configured on the layer 3 switch. Start to write ACL table. The specific commands are as follows:
'''Configure this table on the outgoing interface of layer 3 switch'''
conf t
ip access-list ex kongzhi-shangwang
deny ip 192.168.1.0 0.0.0.255 0.0.0.0 0.0.0.0
permit ip 192.168.0.0 0.0.255.255 0.0.0.0 0.0.0.0
exit
do show ip acc b
int f0/3
ip acess-group kongzhi-shangwang out
exit


'''In the layer 3 switch, the gateway of the finance department is shown in this table'''
conf t
ip access-list ex kongzhi-caiwu
deny ip 192.168.0.0 0.0.255.255 192.168.3.0 0.0.0.255
permit ip any any
exit
do show ip acc
int vlan 30
ip acess-group kongzhi-caiwu in
exit
8. Summary
(1) NTFS permission list is also an ACL table, but it is the control of users. This section has nothing to do with it. This section is the control of network traffic.
(2) Understand which router, interface and direction the ACL table should be configured in.
(3) Master the principle of ACL, the execution law of entries, and write ACL entries as needed.
(4) Familiar with relevant commands.
Reference articles
[1]<Encyclopedia of access control lists>
[2] ACL - Rules for controlling access to the interface gate on the router
[3] Video portal