Vue Knowledge Summary
1. Binding and Responsive Principles
Understanding of MVVM?
MVVM is composed of Model, View and ViewModel.
- The Model layer represents a data model in which business logic for data modification and manipulation can be defined.
- View represents the UI component and is responsible for transforming data models into UI presentations.
- ViewModel is an object that synchronizes View and Model.
MVVM is composed of Model, View and ViewModel. Model represents data layer and view represents view layer. ViewModel is an object that synchronizes View and Model.
ViewModel connects View and Model layers through two-way data binding, making the interaction between Model and View two-way. Therefore, changes in View data are synchronized with Models, and changes in Model data are immediately reflected on Views.
Role: Make developers focus only on business logic, do not need to operate DOM manually, do not need to focus on synchronization of data states, complex data state maintenance is completely managed by MVVM.
Vue Data Binding Principle
Implementing two-way data binding for mvvm is through Object using data hijacking combined with publisher-subscriber mode. DefineProperty() adds setter s, getter s, and hijacks listeners to properties, publishes messages to subscribers when data changes, and triggers corresponding listen callbacks.
Data hijacking
DoumentFragment fragments the document to prevent the browser from refluxing multiple times. Hijacking data
Let's start with the concept of DocuemntFragment. You can think of it as a container for collecting a dom node. When you create 10 nodes, each node inserted into the document will cause a browser to flow back once. That is, the browser will flow back 10 times, which is very resource intensive.
Using fragmented documents means that I put all 10 nodes in a container first, and then I insert the container directly into the document. The browser only reflows once.
Note: Another important feature is that if you add a node from the original dom tree to the DocumentFragment using the appendChid method, the original node will be deleted.
Publisher-Subscriber Mode:
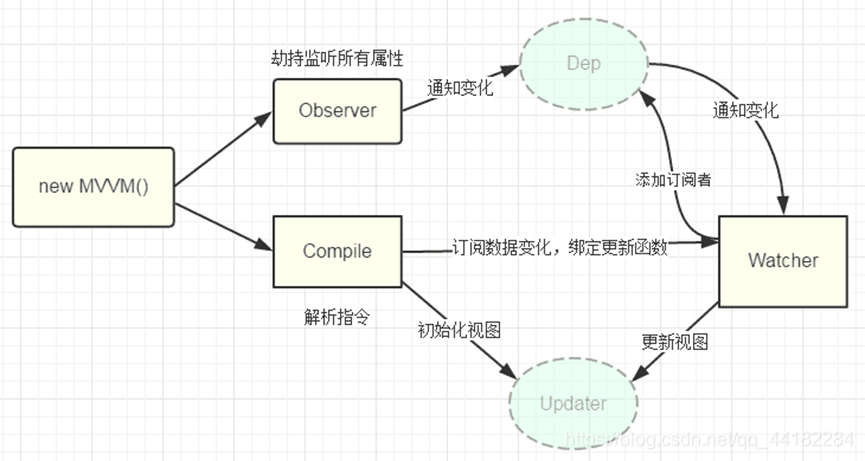
1. Implement a data listener Observer that can listen on all properties of a data object, get the latest value and notify subscribers if there is a change
2. Implement an instruction parser Compile that scans and parses instructions for each element node, replaces data according to the instruction template, and binds corresponding update functions
3. Implement a Watcher that serves as a bridge between Observer and Compile to update the view by subscribing to and receiving notifications of each property change and executing the corresponding callback functions for the binding of instructions
view layer: Compile compiler function parsing instructions,
- Compile all HTML nodes to find all data-bound nodes.
- Update node is the latest value in data.
- For each node in html associated with data binding, a subscriber watcher is generated and added to the dep of the corresponding property. (triggers get in defineProperty)
Model layer: observe data monitoring (observer)
- All attributes in the data are observed, and each attribute generates a subject object dep
- Object. defineProperty
Get=>Add watcher to dep.
Set =>dep.notify()=>update method that triggers subscribers=>update view
Watcher Subscriber (Listener)
- Node generation watcher at complie
- Dep.target is a global variable
- Updata->Update node get: trigger get corresponding to observe
Response principle of Vue
What is responsive, that is, when the data changes, the view is re-rendered and matches are updated to the latest values.
Object. DefneProperty sets the get and set methods for each property in the object, and for each declared property, there will be a dedicated dependency collector subs. When a page uses a property, the ObjectdefineProperty - get function is triggered, and the watcher of the page is placed in the dependency collector subs of the property, notifying updates when the data changes;
Object is triggered when the data changes. DefneProperty - set function, the data traverses its own dependent collector subs, notifies watcher one by one, and the view begins to update;
-
Object.flex object freeze
-
How an array of modified objects for component instance initialization binds updates
-
Child component changes parent component? Watcher granularity
-
Parent component direct communication v-model
2. Life cycle
Life cycle details
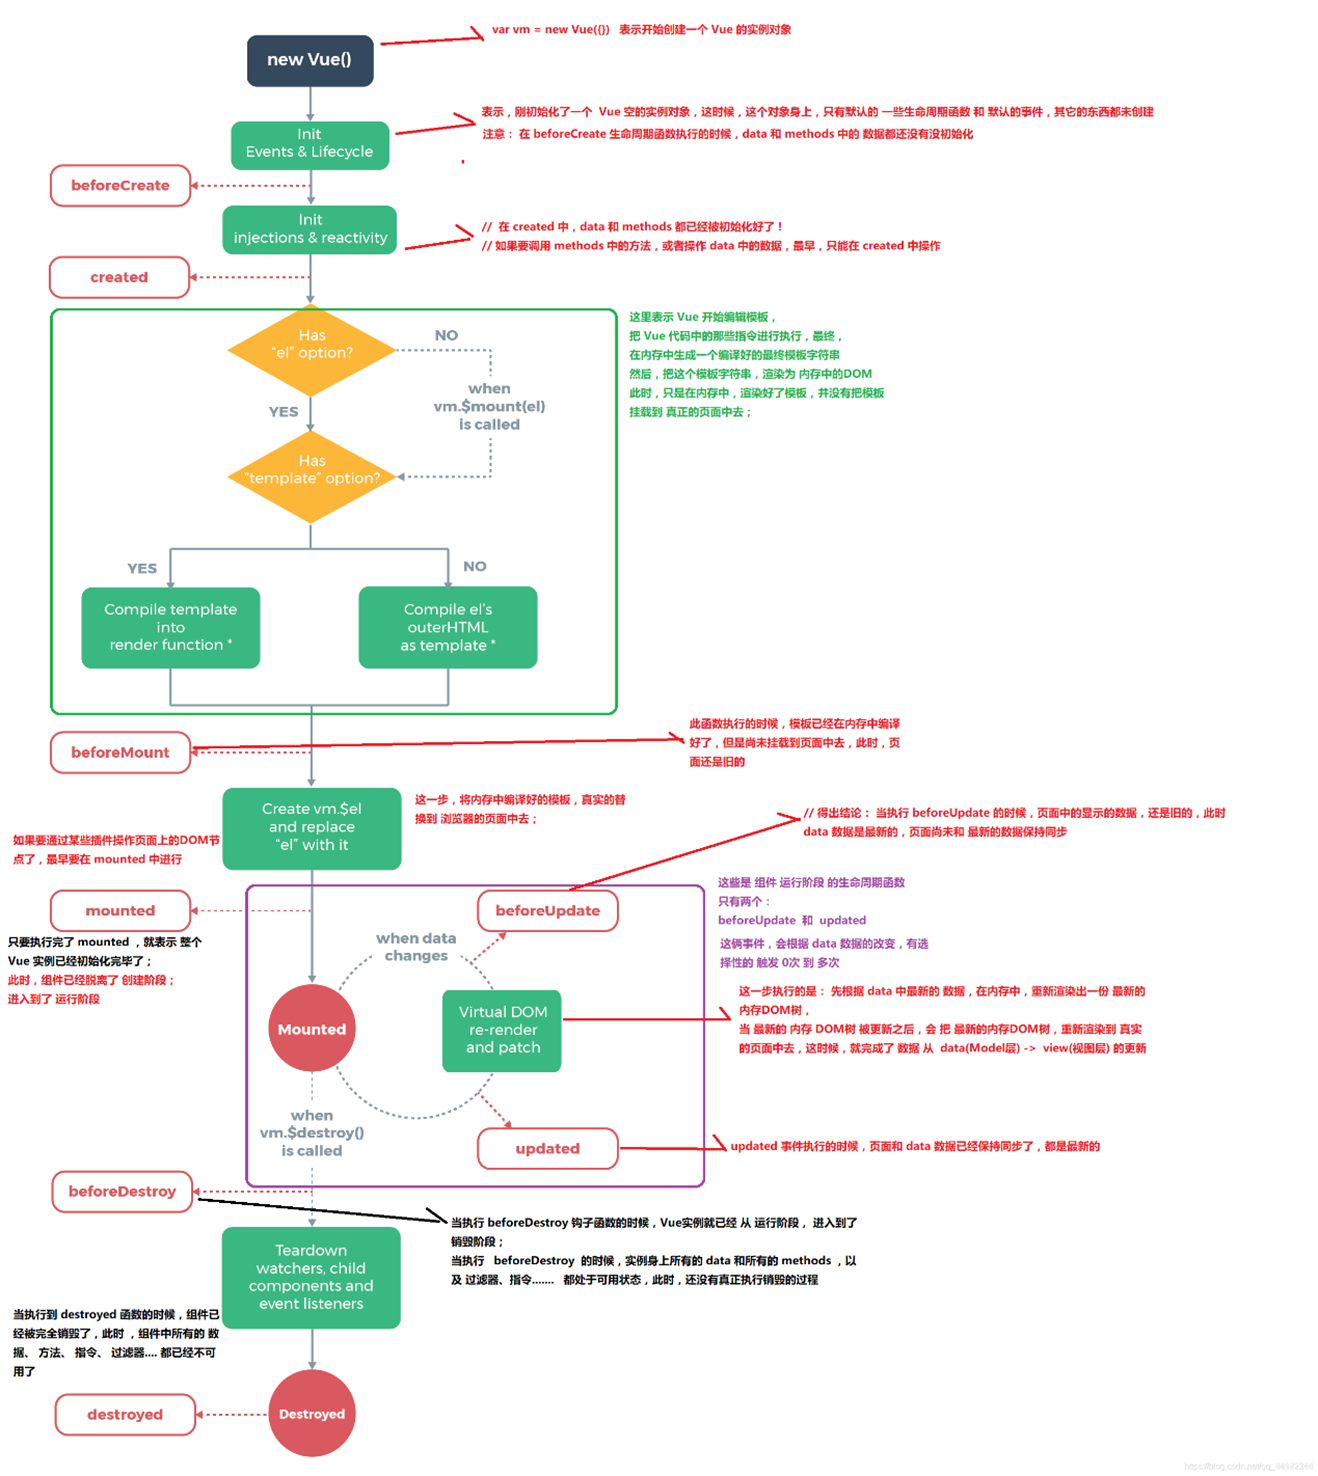
Generally speaking, the process from creation to destruction of a Vue instance is the life cycle.
Lifecycle: From Vue instance creation, operation, to destruction, there are always a variety of events, these events are collectively referred to as life cycle!
Lifecycle hook : Just an alias for life cycle events;
Lifecycle hook = Lifecycle function = Life
Main life cycle function categories:
1. Life cycle functions during creation:
beforeCreate: The instance has just been created in memory and the data and methods properties have not been initialized yet
Created: instance has created OK in memory, data and methods have created OK, and template compilation has not started yet
beforeMount: The template has now been compiled but has not been mounted on the page
Mounted: At this point, the compiled template is mounted in the container specified by the page and displayed, and the user can see the rendered page.
2. Life cycle functions during operation:
beforeUpdate: This function is executed before the status update, when the status value in the data is up-to-date, but the data displayed on the interface is still old because the DOM node has not been re-rendered at this time
Updated: This function is called after the instance has been updated, when the status values in the data and the data displayed on the interface have been updated, and the interface has been rendered again!
3. Life cycle functions during destruction:
beforeDestroy: Called before the instance is destroyed. At this stage, the instance is still fully available.
Destroyed: Called after the Vue instance is destroyed. After invocation, everything indicated by the Vue instance is unbound, all event listeners are removed, and all child instances are destroyed.
-
Update Data/Views Synchronous/Asynchronous
JS Interaction Logic Details - Synchronization when data changes (setData function) - View layer updates are asynchronous
The setData function is used to send data from the logical layer to the view layer (asynchronous) while changing the corresponding this. The value of data (synchronous).
- Synchronized when data data changes: that is, after the call to setData is complete, the latest values can be obtained directly after
- View layer updates are asynchronous: after the call to setData completes, the page may not have been updated until the setData callback function triggers.
handleTap: function () {

    // setData update data is synchronous

    // But the page content changes asynchronously

    this.setData({

      msg: 'hello'

    }, () => {

      // Page content was updated when the callback function was executed

      console.log('Page content has been updated')

    })

    // When the latest data is available here, the content of the page may not have been updated

    console.log(this.data.msg)

  },
Creation and mounting order of vue parent-child components
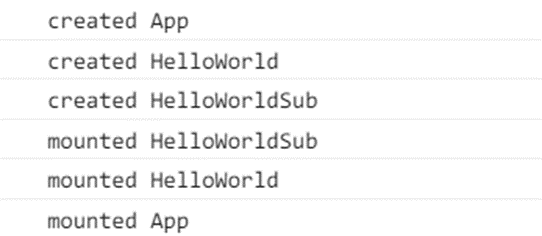
Vue Created and mounted execution order of, created from top to bottom, mounted from bottom to top
Vue Component Communication
(1) props/$emit (very common)
Parent components pass values to child components: through props. Note: There are three types of data in the component: data, props, computed
Child component passes value to parent component via $emit.
(2)$emit/$on (EventBus)
EventBus is also known as event bus. EventBus can be used as a communication bridge in Vue, just as all components share the same event center, and send or receive events can be registered with the center, so components can notify other components in parallel.
But it is also too convenient to use carelessly, which can cause disasters that are difficult to maintain, so a better Vuex is needed as a state management center to elevate the concept of notification to a shared state level.
Use:
- Initialization:
// event-bus.js

import Vue from 'vue'
export const EventBus = new Vue()

//Create Global EventBus

var EventBus = new Vue();
Object.defineProperties(Vue.prototype, {
        $bus: {
            get: function () {
              return EventBus
           }
         }
})
- Examples of component use
We created a ShowMessage component to display information, and an UpdateMessage component to update information.
<!-- UpdateMessage.vue -->
<template>
    <div class="form">
        <div class="form-control">
            <input v-model="message" >
            <button @click="updateMessage()">update message</button>
        </div>
    </div>
</template>
<script>
export default {
        name: "UpdateMessage",
        data() {
            return {
                message: "This is a message"
            };
        },
        methods: {
            updateMessage() {
                this.$bus.$emit("updateMessage", this.message);
            }
        },
        beforeDestroy () {
            $this.$bus.$off('updateMessage')//Remove event monitoring
        }
    };
 </script>


<!-- ShowMessage.vue -->
<template>
    <div class="message">
        <h1>{{ message }}</h1>
    </div>
</template>

<script>
export default {
        name: "ShowMessage",
        data() {
            return {
                message: "I'm a message"
            };
        },
        created() {
            var self = this
            this.$bus.$on('updateMessage', function(value) {
                self.updateMessage(value);
            })
        },
        methods: {
            updateMessage(value) {
                this.message = value
            }
        }
    };
</script>
This model persists between siblings and is very easy to implement.
(3)vuex
1. Briefly introduce the Vuex principle
Vuex implements a one-way stream of data, has a State to store data globally, and must be Mutation when a component wants to change data in a State. Mutation also provides subscriber mode for external plug-in calls to update the State data. When all asynchronous operations (typically invoking back-end interfaces to obtain updated data asynchronously) or batch synchronous operations require Action, the Action cannot directly modify the State, or the State data needs to be modified through Mutation. Finally, depending on the State changes, render to the view.
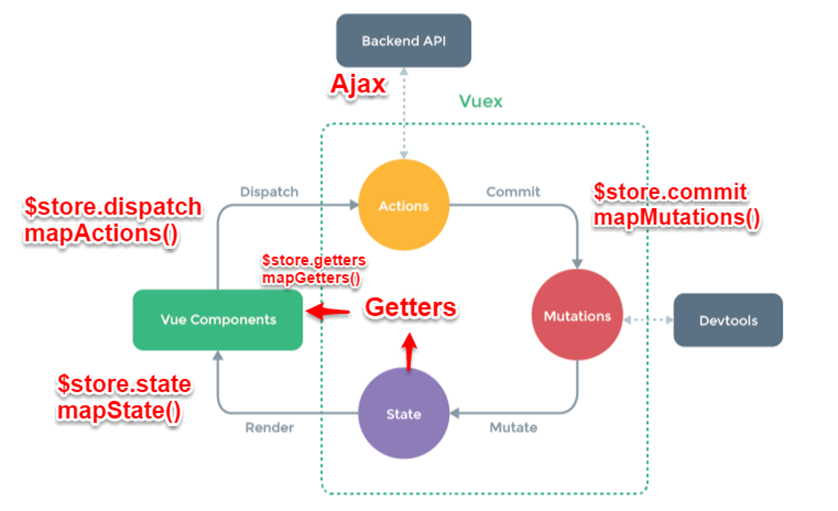
2. Briefly introduce the function of each module in the process:
- Vue Components: Vue components. On HTML pages, responsible for receiving user actions and other interactive behaviors, executing the dispatch method triggers the corresponding action to respond.
- dispatch: The action trigger method is the only method that can execute an action.
- Actions: An operational behavior processing module consisting of $store in the component. Dispatch ('action name', data1) to trigger. commit() then triggers the call to mutation, updating the state indirectly. Responsible for handling all interaction behaviors received by Vue Components. Contains synchronous/asynchronous operations, supports multiple methods with the same name, triggers in the order registered. The operations requested from the background API are performed in this module, including triggering other actions and committing mutations. This module provides an encapsulation of Promise to support chain triggering of actions.
- Commit: State change commit operation method. Committing a mutation is the only way to execute it.
- mutations: The state change action method triggered by commit('mutation name') in actions. It is the only recommended way for Vuex to modify the state. This method can only be synchronized and the method name can only be globally unique. Some hook s are exposed during the operation for state monitoring, etc.
- State: Page state management container object. Centrally stores scattered data of data objects in Vue components, globally unique, for unified state management. The data needed for page display is read from this object, and Vue's fine-grained data response mechanism is used for efficient status updates.
- getters:state object read method. This module is not listed separately in the diagram and should be included in render, where Vue Components read global state objects.
3.Vuex and localStorage
Vuex is the vue's state manager and the stored data is responsive. However, it will not be saved. After refreshing, it returns to its original state. You should save a copy of the data in the local store when the data in vuex changes. After refreshing, if there is data saved in the local store, take it out and replace the state in the store.
let defaultCity = "Shanghai"
try {   // The user has turned off local storage, adding a try outside now... Catch
  if (!defaultCity){
    defaultCity = JSON.parse(window.localStorage.getItem('defaultCity'))
  }
}catch(e){}
export default new Vuex.Store({
  state: {
    city: defaultCity
  },
  mutations: {
    changeCity(state, city) {
      state.city = city
      try {
      window.localStorage.setItem('defaultCity', JSON.stringify(state.city));
      // Save a copy of the data in the local store when the data changes
      } catch (e) {}
    }
  }
})
It is important to note that in vuex, the state we save is an array, whereas localStorage only supports strings, so we need to convert with JSON:
JSON.stringify(state.subscribeList);   // array -> string
JSON.parse(window.localStorage.getItem("subscribeList"));    // string -> array
(4)$attrs/$listeners
1. Introduction
$attrs/$listeners are used by parent components to pass data to child or grandchild components
- $attrs: Contains attribute bindings (except classes and styles) in the parent scope that are not recognized (and obtained) by prop. When a component does not declare any props, all parent-scoped bindings (except classes and styles) are included and internal components can be passed in via v-bind='$attrs'. Usually used with the interitAttrs option.
- $listeners: a v-on event listener that contains the parent scope (without the.native modifier). It can be passed in to internal components via v-on="$listeners"
- Adding $attrs to the tag renders unregistered attributes
inheritAttrs:true is an unregistered property that allows component bindings to be rendered on the component root node - Next let's look at an example of cross-level communication:
// index.vue
<template>
  <div>
    <h2>Boat sailing in the waves</h2>
    <child-com1
      :foo="foo"
      :boo="boo"
      :coo="coo"
      :doo="doo"
      title="Front end craftsmen"
    ></child-com1>
  </div>
</template>
<script>
const childCom1 = () => import("./childCom1.vue");
export default {
  components: { childCom1 },
  data() {
    return {
      foo: "Javascript",
      boo: "Html",
      coo: "CSS",
      doo: "Vue"
    };
  }
};
</script>
// childCom1.vue
<template class="border">
  <div>
    <p>foo: {{ foo }}</p>
    <p>childCom1 Of $attrs: {{ $attrs }}</p>
    <child-com2 v-bind="$attrs"></child-com2>
  </div>
</template>
<script>
const childCom2 = () => import("./childCom2.vue");
export default {
  components: {
    childCom2
  },
  inheritAttrs: false, // You can turn off properties that are not declared in props that are automatically mounted on the root element of a component
  props: {
    foo: String // foo bound as props property
  },
  created() {
    console.log(this.$attrs); // {boo:'Html','coo':'CSS','doo':'Vue','title':'Front End Craftsman'}
  }
};
</script>
// childCom2.vue
<template>
  <div class="border">
    <p>boo: {{ boo }}</p>
    <p>childCom2: {{ $attrs }}</p>
    <child-com3 v-bind="$attrs"></child-com3>
  </div>
</template>
<script>
const childCom3 = () => import("./childCom3.vue");
export default {
  components: {
    childCom3
  },
  inheritAttrs: false,
  props: {
    boo: String
  },
  created() {
    console.log(this.$attrs); // {coo:'CSS','doo':'Vue','title':'Front end craftsman'}
  }
};
</script>
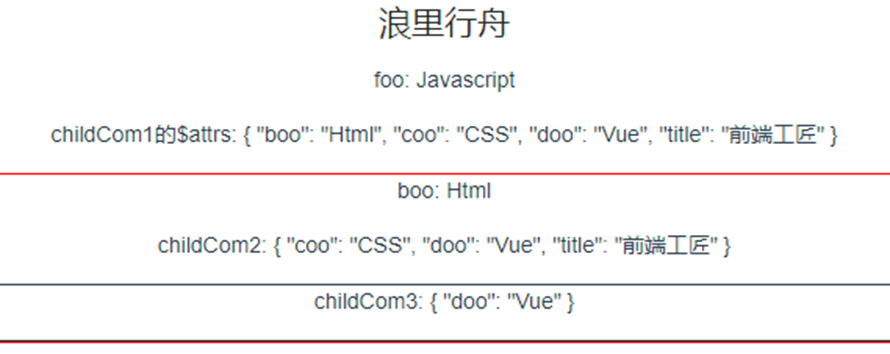 As shown in the figure above, $attrs denotes an object that does not inherit data in the format {attribute name: attribute value}. Vue2.4 Provides $attrs, $listeners for data and events, making communication between cross-level components easier.
Simply put: $attrs and $listeners are two objects, $attrs stores non-Props properties bound in the parent component, and $listeners stores non-native events bound in the parent component.
(5)provide/inject
1. Introduction
Vue2.2.0 adds an API, which needs to be used together to allow an ancestor component to inject a dependency into all its descendants, regardless of how deep the component hierarchy is and for as long as the upstream and downstream relationships are established. In other words, a variable is provided through a provider in an ancestor component, then injected into a descendant component by an inject.
The provide / inject API mainly solves the communication problem between the cross-level components, but its usage scenario is that the sub-components get the state of the parent components, and a relationship between active provisioning and dependent injection is established between the cross-level components.
2. Take an example
Assume there are two components: A.vue and B.vue, B is a subcomponent of A
// A.vue
export default {
  provide: {
    name: 'Boat sailing in the waves'
  }
}
// B.vue
export default {
  inject: ['name'],
  mounted () {
    console.log(this.name);  // Boat sailing in the waves
  }
}
As you can see, in A.vue, we set a provide: name, which is a sailing boat in the waves, and it serves to provide the name variable to all its subcomponents. In B.vue, the name variable provided from component A is injected through inject, so in component B, it can be passed directly through this.name accesses this variable, and its value is also boating in the waves. This is the core use of the provide / inject API.
It is important to note that the provide r and inject bindings are not responsive. This is intentional. However, if you pass in a listenable object, the object's properties are responsive--the official vue document
So if the name of A.vue above changes, B.vue's this.name won't change, it's still sailing in the waves.
3. How providers and inject s implement data response
Generally speaking, there are two ways:
- provide an instance of an ancestor component and then inject dependencies into the descendant component, which allows you to directly modify the properties of the ancestor component's instance in the descendant component, but one drawback of this approach is that it mounts many unnecessary things such as props, methods
- Use 2.6 latest API Vue.observable optimized response provide (recommended)
Let's take an example: Sun Components D, E, and F get the color value passed by A Component and can make data-responsive changes, that is, when the color of A Component changes, components D, E, F change with each other (the core code is as follows: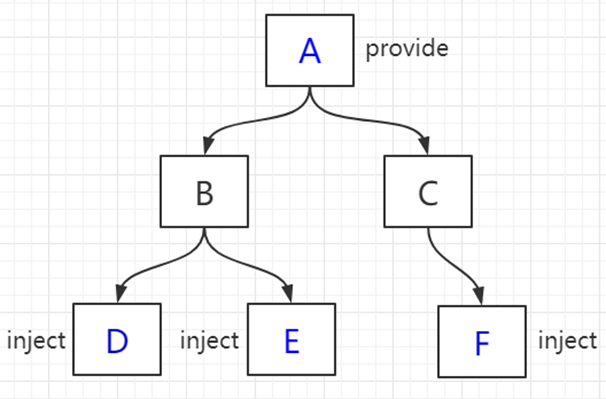
// A Component
<div>
      <h1>A assembly</h1>
      <button @click="() => changeColor()">change color</button>
      <ChildrenB />
      <ChildrenC />
</div>
......
  data() {
    return {
      color: "blue"
    };
  },
  // provide() {
  //   return {
  //     theme: {
  //       color: this.color //Data bound this way is not responsive
  //     } // Components D, E, F do not change when the color of component A changes
  //   };
  // },
  provide() {
    return {
      theme: this//Method 1: Provide an instance of an ancestor component
    };
  },
  methods: {
    changeColor(color) {
      if (color) {
        this.color = color;
      } else {
        this.color = this.color === "blue" ? "red" : "blue";
      }
    }
  }
  // Method 2: Use 2.6 latest API Vue.observable optimized response provide
  // provide() {
  //   this.theme = Vue.observable({
  //     color: "blue"
  //   });
  //   return {
  //     theme: this.theme
  //   };
  // },
  // methods: {
  //   changeColor(color) {
  //     if (color) {
  //       this.theme.color = color;
  //     } else {
  //       this.theme.color = this.theme.color === "blue" ? "red" : "blue";
  //     }
  //   }
  // }
// F Component
<template functional>
  <div class="border2">
    <h3 :style="{ color: injections.theme.color }">F assembly</h3>
  </div>
</template>
<script>
export default {
  inject: {
    theme: {
      //Functional components have different values
      default: () => ({})
    }
  }
};
</script>
Although provide and inject provide use cases mainly for high-level plug-ins/component libraries, you can achieve twice the result with half the effort if you are proficient in your business!
(6) $parent / $children and ref
ref: If used on a common DOM element, the reference points to the DOM element; If used on a subcomponent, the reference points to the component instance
$parent/$children: access parent/child instances
It is important to note that both of these are direct instances of components that can be used to directly invoke a component's methods or access data. Let's start with an example of using ref to access components:
// component-a subcomponent
export default {
  data () {
    return {
      title: 'Vue.js'
    }
  },
  methods: {
    sayHello () {
      window.alert('Hello');
    }
  }
}
// Parent Component
<template>
  <component-a ref="comA"></component-a>
</template>
<script>
  export default {
    mounted () {
      const comA = this.$refs.comA;
      console.log(comA.title);  // Vue.js
      comA.sayHello();  // Popup
    }
  }
</script>
However, the disadvantage of these two methods is that they cannot communicate across levels or between brothers.
// parent.vue
<component-a></component-a>
<component-b></component-b>
<component-b></component-b>
Official introduction of $children:
The direct child component of the current instance. It is important to note that $children does not guarantee order or responsiveness. If you find yourself trying to use $children for data binding, consider using an array with v-for to generate subcomponents and using Array as the real source.
$children is an array, a collection of direct sons. As for the specific number of sons, there is a _within the son The uid attribute, which lets you know which element he is, is the unique identifier of the element, allows us to do other things
Official description of $parent:
The root of the current component tree Vue Instances. If the current instance has no parent, it will be itself.
Now that you can get an instance of a component, you can call its properties or methods to operate on it
summary
Common usage scenarios can be divided into three categories:
- Parent-Child Communication:
Children pass data through props and children pass data to their parents through events ($emit);
Parent/child chains can also communicate ($parent/ $children);
ref can also access component instances; provide / inject API; $ attrs/$listeners
- Brothers'correspondence: Bus; Vuex
- Cross-level communication: Bus; Vuex; provide / inject API, $attrs/$listeners
vuex
What is Vuex? How do you use it?
Vuex is a mechanism to manage the global state (data) of components, which makes it easy to share data among components. Vuex centrally manages shared data for ease of development and later maintenance. It can effectively share data among components and improve development efficiency. The data stored in Vuex is responsive and keeps pages and data synchronized in real time.
This state self-managed application consists of the following sections:
- state, the data source that drives the application;
- View, which declaratively maps state to view;
- actions in response to state changes caused by user input on view.
Here is a simple illustration of the concept of "one-way data flow":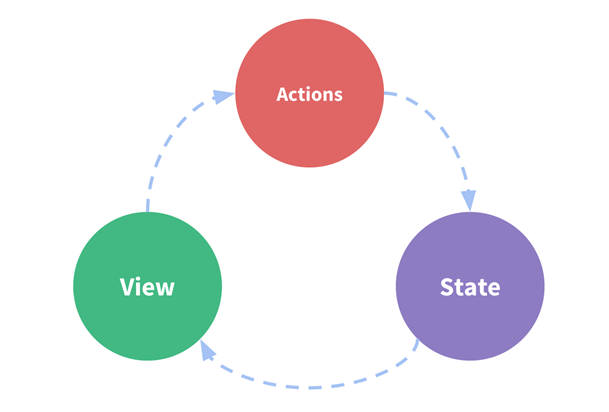
Key core properties of Vuex include state,mutations,action,getters,modules.
state
Vuex uses a single state tree, which means that each application will contain only one store instance, but the single state tree and modularization do not conflict. Stored data state, can not directly modify the data inside.
When a component needs to acquire multiple states, declaring them as computed attributes is somewhat duplicated and redundant. To solve this problem, we can use the mapState auxiliary function to help us generate calculation attributes so that you can press fewer keys:
// In a separate build, the auxiliary function is Vuex.mapState
import { mapState } from 'vuex'

export default {
  // ...
  computed: mapState({
    // Arrow functions can make your code more concise
    count: state => state.count,

    // The pass string parameter'count'is equivalent to `state => state. Count`
    countAlias: 'count',

    // In order to be able to use `this` to obtain a local state, a general function must be used
    countPlusLocalState (state) {
      return state.count + this.localCount
    }
  })
}
mutations
The methods defined by mutations dynamically modify the state or data in the store of Vuex.
const store = new Vuex.Store({
  state: {
    count: 1
  },
  mutations: {
    increment (state) {
      // Change status
      state.count++
    }
  }
})
store.commit('increment')
action
actions can be understood as turning the way data inside mutations into an asynchronous way of processing data, simply by manipulating data asynchronously. The view layer passes through the store.dispath to distribute action s.
getters
Computed attributes like vue are mainly used to filter some data.
modules
When the project is particularly complex, each module can have its own state, mutation, action, getters, which makes the structure very clear and easy to manage.
Under what circumstances is Vuex used?
If the application is simple enough, it is better not to use Vuex, a simple store mode can be used;
When you need to build a medium-sized and large single-page application, you can better manage the state outside the components by using Vuex.
What is the difference between Vuex and a single global object?
The state store for Vuex is responsive. When the Vue component reads the state from the store, if the state changes in the store, the corresponding component will be updated efficiently accordingly.
You cannot directly change the state in the store. The only way to change the state in a store is to explicitly commit a mutation. This allows us to easily track changes in each state, enabling us to implement tools that help us better understand our applications.
Why can't Vuex mutation do asynchronous operations?
After each mutation is executed, a new state change is corresponding, so devtools can take a snapshot and save it, then time-travel ing can be implemented. If mutation supports asynchronous operations, there is no way to know when the state is updated, and tracking the state is not good, making debugging difficult.
Virtual dom diff algorithm
Definition and role of virtual dom
What is virtual dom
One thing you must remember is that a virtual DOM is a common js object. Is a js object used to describe the real DOM structure, because it is not a real dom, so it is called virtual dom.
Structure of virtual dom
From the following figure, let's see what the virtual dom structure is like
As shown in the figure above, this is the structure of the virtual dom. It is an object with six attributes below. SELIS the current node label name, data is the node's attribute, elm is the actual node corresponding to the current virtual node (not available here), text is the text under the current node, and children is the other labels under the current node.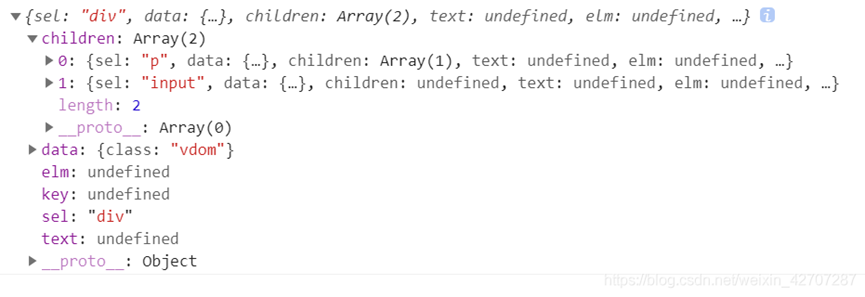
The role of virtual DOMS
1. We all know that when traditional dom data sends changes, we need to constantly operate dom in order to update the dom data, although there is a template engine behind it, which allows us to update more than one dom at a time. However, the Template Engine still does not have a mechanism to track the state, and when some data within the engine changes, it still operates the dom to re-render the entire engine.
A virtual dom is a good way to track the current state of the dom because it generates a virtual dom describing the current structure of the dom from the current data, and then a new virtual dom is generated when the data is sent to change, which exactly saves the state before and after the change. Then, the diff algorithm is used to calculate the difference between the two virtual DOMS to get an optimal method for updating (which changes, which updates). Can significantly improve rendering efficiency and user experience
2. Because virtual dom is a common javascript object, it can not only be allowed in browser side, but also in node or weex app environment. Very good cross-end
Virtual dom in vue
There are many kinds of class libraries for virtual doms. The common ones are snabbdom and virtual-dom. vue used virtual-dom before, from 2. Snbbdom has been used since version X.
Today, we use snabbdom source to parse vue's virtual dom
First let's look at the snabbdom source structure.
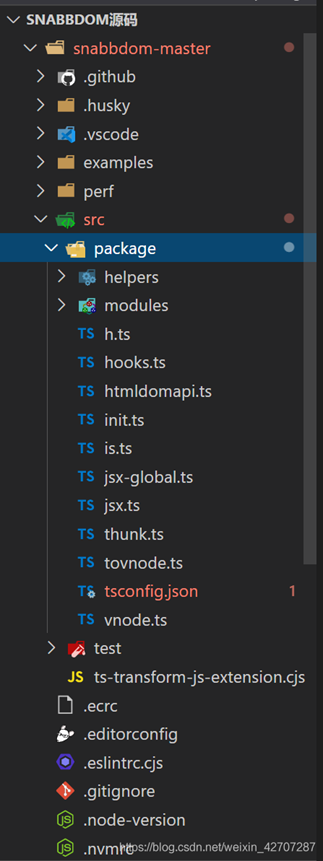
To understand vue virtual dom, we need to understand several core methods
- h-function
- patch function
- patchVnode function
- updateChildren function
These core functions of the source code, may look tired, I do not do a pair of source code to do a detailed introduction, I will mainly describe what each function does, and then attach the source code, will add some comments, to see the understanding can be looked at in detail
h-function
h function, look familiar? At what stage did he call vue?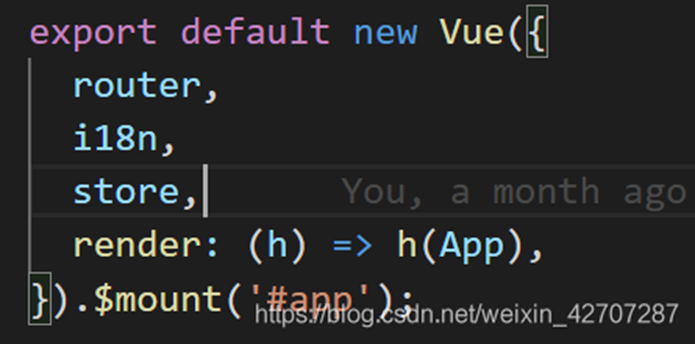
Well-known, have you seen it here? Yes, the h function runs inside the render function. As mentioned in the previous vue life cycle article, vue compiles templates into render functions when creating ->beforeMount, which is essentially to compile templates into a format inside the render function, and then generate virtual dom when the render function runs well. So what format does it compile into? Is the format approved for compiling into the h function. So let's see what format the h function needs
Some people might say, well, how does this h-function define more than one? Yes, the h function is defined using function overload, so what is function overload
function overloading
Function overload is defined as multiple functions with multiple names, which are distinguished by the number and type of parameters of the function. When the number and type of parameters are different, the code executed within the function will be different.
Next, let's look at the most typical one, the fourth one in the picture.
- The first parameter, sel, represents a dom selector, such as div#app.wrap =="<div id="app"class="wrap"></div>
- The second parameter represents the dom property and is an object such as: {class:'ipt', value:'It's a nice day today'}
- The third parameter represents a child node, which can be either a child virtual node or a text node
const vdom = h('div', { class: 'vdom'}, [
  h('p', { class: 'text'}, ['hello word']),
  h('input', { class: 'ipt', value: 'Today is Tuesday' })
]) // Templates are compiled into this format
console.log(vdom)
The most important thing in the h function is to execute the vnode function. The main function of the vnode function is to pass in the h function to change the parameters into js objects (virtual dom)
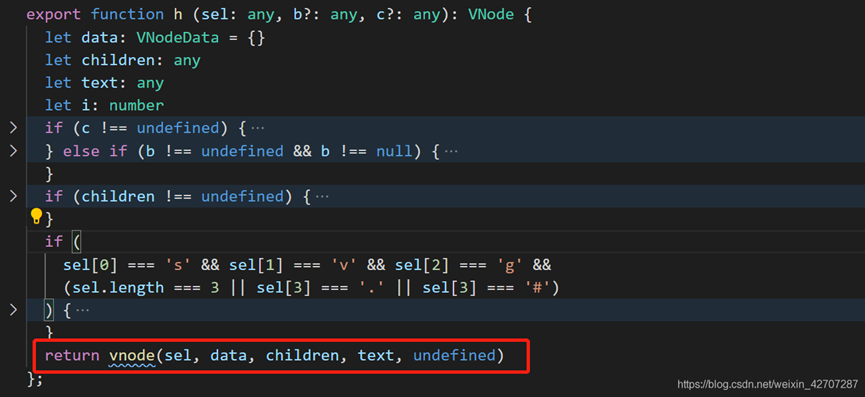
And the vnode function, which I won't say much about, has very few lines of code and is very simple, but instead executes the code that generates the js object (virtual dom). Directly above
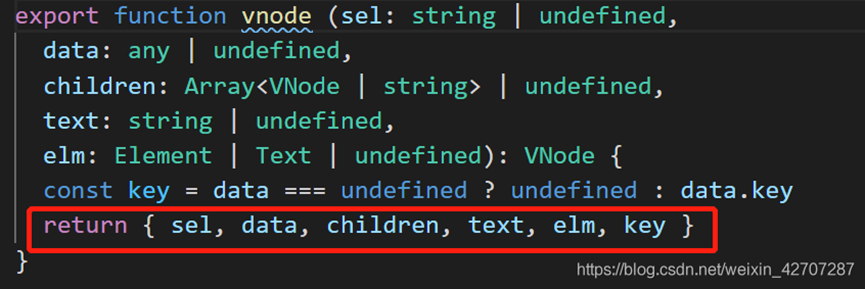
Now, we should have a clear idea of how and when virtual domains are generated. If it's not clear, slide up and look again, haha. Below we summarize the process of virtual dom generation.
- First, when the code is first run, it goes through the life cycle, and when the life cycle reaches between created and beforeMount, the template is compiled as a render function. Then when the render function runs, the h function is called, and the vnode function is called inside the h function to generate the virtual dom and return the result. So virtual DOMS are generated for the first time.
- Then, when the data changes, it is recompiled to generate a new vdom. Wait for the old and new vdoms to compare. We'll continue with the comparison later.
vue-router routing management
The difference between router and route
- Router is an instance of VueRouter, which is equivalent to a global router object with many attributes and subobjects, such as a history object. You can use this. $for frequently used jump links. Router. Push, just like router-link jump.
- route corresponds to the routing object that is currently being jumped. You can get name,path,params,query, and so on from it
-
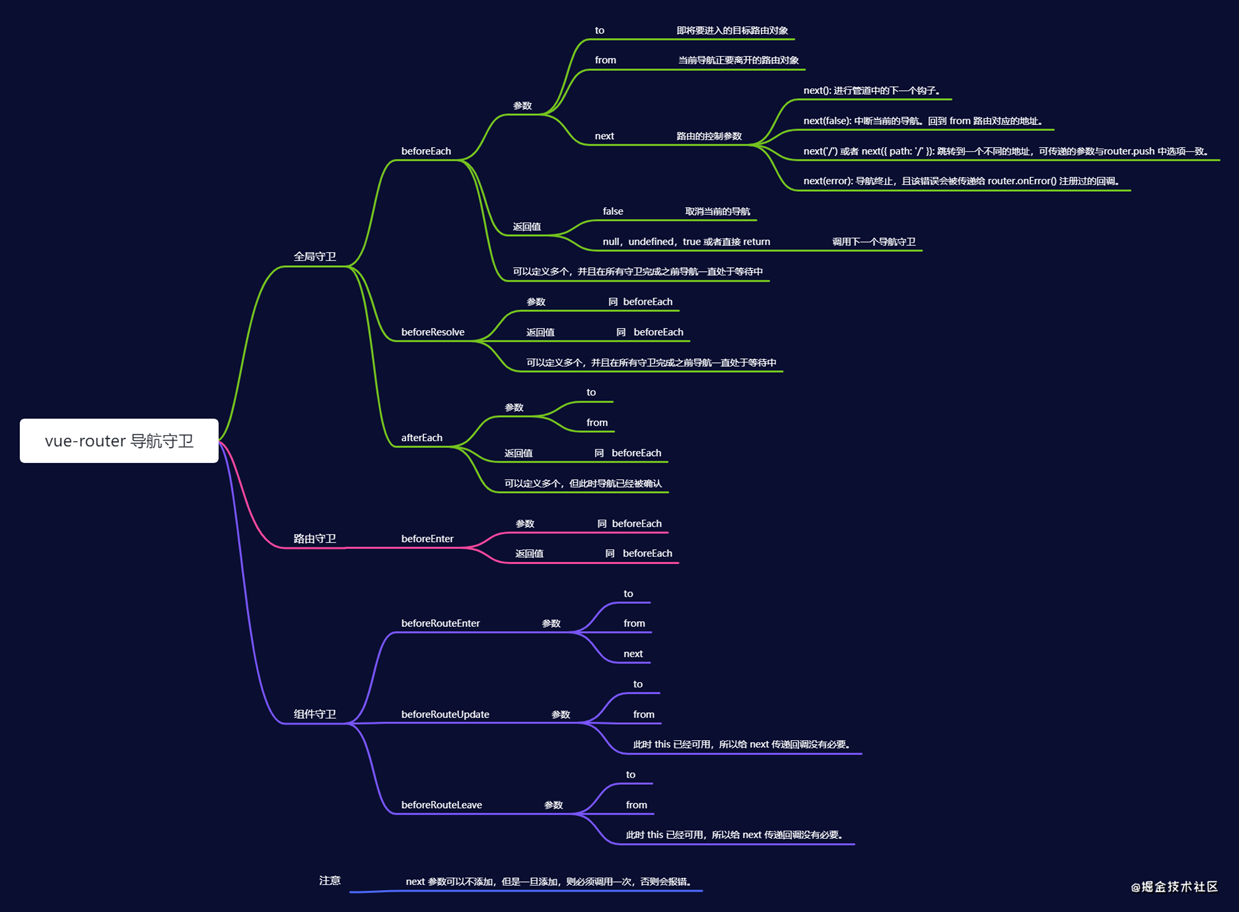
How many hook functions does vue-router have? Execution order?
The hook function of vue-router is actually a navigation guard.
Navigation indicates that the route is changing.
The navigation guard provided by vue-router is mainly used to guard navigation by jumping or canceling. There are many opportunities to implant in the routing navigation process: global, single-route exclusive, or component-level.
That is, global guard, routing guard, component guard.
One: Global Navigation Hook Function
Global navigation hooks have two main types: beforeEach and afterEach.
1. vue router.beforeEach
beforeEach's hook function, which is a global beforehook function, (before each) means that it must be executed every time a route changes.
It has three parameters:
to: (Route routing object) The following properties of the target routing object to object to which you are about to enter: path params query hash fullPath matched name meta (under matched, but this example can be used directly)
from: (Route routing object) Current navigation is leaving the route
next: (Function function) Make sure to call this method to resolve the hook. Call method: next (parameter or empty) *** must be called
Next (no parameter): proceed to the next hook in the pipe, if you go to the last hook function, then the state of navigation is confirmed
next('/') or next({path:'/'}): Jump to a different address. The current navigation is interrupted and a new navigation is performed. (
Scenario: Some page Jump pre-processing can be done, such as judging which pages need to be logged in to intercept and make a logon jump!!
router.beforeEach((to, from, next) => {
    if (to.meta.requireAuth) {
        //Determine if the route requires login privileges
        if (cookies('token')) {
            //Read token from encapsulated cookies, if it exists, name takes the next step if it does not exist, then jump back to the login page
            next()//Don't add "path:/" to next, it will end up in an infinite loop
        }
        else {
            next({
                path: '/login',
                query: {redirect: to.fullPath}//Take the route path of the jump as a parameter and jump to the route after successful login
            })
        }
    }
    else {
        next()
    }
})
Scenarios, entry page login judgment, administrator privilege judgment, browser judgment
//Use hook function for privilege jumps on routes
router.beforeEach((to, from, next) => {
    const role = localStorage.getItem('ms_username');
    if(!role && to.path !== '/login'){
        next('/login');
    }else if(to.meta.permission){
        // If it's Administrator privileges, you can enter it. It's just a simple simulation of Administrator privileges
        role === 'admin' ? next() : next('/403');
    }else{
        // Simple judgment IE10 and below will not enter rich text editor, this component is incompatible
        if(navigator.userAgent.indexOf('MSIE') > -1 && to.path === '/editor'){
            Vue.prototype.$alert('vue-quill-editor Component incompatibility IE10 And the following browsers, please use a later version of the browser to view', 'Browser Incompatibility Notification', {
                confirmButtonText: 'Determine'
            });
        }else{
            next();
        }
    }
})
2. vue router.afterEach
router.beforeEach is the opposite router before the page loads. AfterEach is after the page loads
2: exclusive guard of routes (route hook)
You can define the beforeEnter guard directly on the routing configuration:
const router = new VueRouter({
  routes: [
    {
      path: '/foo',
      component: Foo,
      beforeEnter: (to, from, next) => {
        // ...
      }
    }
  ]
These guards have the same method parameters as the global front guards.
3: Guards within components (hooks within components)
1,beforeRouteEnter,beforeRouteUpdate,beforeRouteLeave
const Foo = {
  template: `...`,
  beforeRouteEnter (to, from, next) {
    // Called before rendering the component's corresponding route is confirm ed
    // No Yes! Get Component Instances`this`
    // Because the component instance was not created before the hook was executed
  },
  beforeRouteUpdate (to, from, next) {
    // Called when the current route changes but the component is multiplexed
    // For example, for a path/foo/:id with dynamic parameters, when jumping between/foo/1 and/foo/2,
    // Because the same Foo components are rendered, the component instances are reused. This hook is called in this case.
    // Accessible Component Instances`this`
  },
  beforeRouteLeave (to, from, next) {
    // Called when navigating away from the component's corresponding route
    // Accessible Component Instances`this`

  }
2. Scenarios for the application of routing hooks in practical development
(1) Clear the timer in the current component
When a timer is in a component and the route is switched, beforeRouteLeave can be used to clarify the timer to avoid memory consumption:
beforeRouteLeave (to, from, next) {
  window.clearInterval(this.timer) //Clear timer
  next()
}
(2) Prevent page jumps when there are open windows or unsaved content on the page
If important information on the page needs to be saved by the user before jumping, Or if there is a pop-up box. User jumps should be prevented, combined vuex State Management ( dialogVisibility Is it saved)

 beforeRouteLeave (to, from, next) {
 //Determine whether pop-up box status and save information
 if (this.dialogVisibility === true) {
    this.dialogVisibility = false //Close the pop-up box
    next(false) //Go back to the current page and prevent page jumps
  }else if(this.saveMessage === false) {
    alert('Please save your information and exit!') //pop-up warning
    next(false) //Go back to the current page and prevent page jumps
  }else {
    next() //Otherwise, jumps are allowed
  }
(3) Save relevant contents in Vuex or Session
When a user needs to close a page, he or she can save common information to session or Vuex
beforeRouteLeave (to, from, next) {
    localStorage.setItem(name, content); //Save to localStorage
    next()
}
vue-router execution order
- Navigation triggered.
- Call the beforeRouteLeave guard in the inactive component.
- Call the global beforeEach guard.
- Call the beforeRouteUpdate guard (2.2+) in reused components.
- Call beforeEnter in the routing configuration.
- Resolves the asynchronous routing component.
- Call beforeRouteEnter in the active component.
- Call the global beforeResolve guard (2.5+).
- Navigation is confirmed.
- Call the global afterEach hook.
- Trigger DOM updates.
- Call the callback function passed to next in the beforeRouteEnter guard, and the created component instance will
- Pass in as a parameter to the callback function.
vue-router routing jump
Declarative (label jump)
<router-link :to="{name:'home'}"></router-link>
<router-link :to="{path:'/home'}"></router-link>
Programming (js jump)
this.$router.push('/home')
this.$router.push({name:'home'})
this.$router.push({path:'/home'})
router-link Page Button Routing Jump Parameters
Routing Configuration in router
{
   path: 'homeDetails/:id',//Parameters to be passed are preceded by:
   name:'homeDetails'
   component: () =>import ('@/views/home/homeDetails.vue'),
   //Absolute path of subrouting
  },
Parent Component home Click Password
// Parent Component's Jump Passage <router-link to="/Route Path to Jump/Parameter to Pass"></router-link>
<router-link to="/homeDetails/12345"></router-link>
Subcomponent homeDetails accepts parameters
// Subcomponents use this.$route.params.id to receive routing parameters
<template>
 <div><span>I passed it from the parent component id: </span>{{this.$route.params.id}}</div>
  //or
 <div><span>I passed it from the parent component id: </span>{{id}}</div>
</template>
<script>
 export default{
   data(){
    id:''
   },
   mounted(){
    this.id = this.$route.params.id  //12345
   }
 }
</script>
this.$router.push for programmatic routing jump parameters
Routing Configuration in router
params First Pass-Through Routing Configuration
{
   path: '/homeDetails/:id',//Parameters to be passed are preceded by:
   name:'homeDetails'
   component: () =>import ('@/views/home/homeDetails.vue'),
   //Absolute path of subrouting
  },
query mode/params second (name pass-through) routing configuration
 {
   path: '/homeDetails',//Parameters to be passed are preceded by:
   name:'homeDetails'
   component: () =>import ('@/views/home/homeDetails.vue'),
   //Absolute path of subrouting
  },
Component home Click parameter
// For example, clicking on a table name in a table to jump to a new page requires passing the id to the new page to use
<template>
  <el-table :data="tableDatas">
    <el-table-column label="Product Name">
      <template slot-scope="scope" @click="handleClick(scope.row.id)">{{ scope.row.name}}</template>
    </el-table-column>
     ...
  </el-table>
 </template>
 <script>
 export default{
   data(){
    tableDatas:[];//Tabular data
   },
   methods:{
    handleClick(id){
      console.log(id) //121345
      this.$router.push({path:`/homeDetails/${id}`}) //params method Pass-through first method
      this.$router.push({name:'homeDetails',params:{id:id}}) //params Pass-By Second
Component homeDetails accepts parameters
// Subcomponents use this.$route.params.id to receive routing parameters
<template>
 <div><span>That's what I need id: </span>{{$route.params.id || $route.query.id}}</div>
  //or
 <div><span>And that's what I need id: </span>{{id}}</div>
</template>
<script>
 export default{
   data(){
    id:''
   },
   mounted(){
    this.id = this.$route.params.id  //121345 params parametric reception
    //or
    this.id = this.$route.query.id  //121345 query parametric reception
   }
 }
</script>
Differences between params and query
- Parameters can be passed in both params and query.
- Params parameters can only be used to introduce routes by name, that is, push can only have name:'xxx', not path:'/xxx', because params can only use name to introduce routes, if path is written here, the receive parameter page will be undefined!!!!
- Use query pass-through to introduce routes using path.
- params are part of a route and must be followed by a parameter name. query is a parameter spliced behind the url, and that's okay.
- There is also a difference between the two. To be frank, query is equivalent to a get request. When the page jumps, you can see the request parameters in the address bar, while params is equivalent to a post request, and the parameters are no longer displayed in the address bar.
Vue Dynamic Routing Configuration and Problems
Dynamic routing:
When many pages or components are reused many times, our routes point to the same component, where different components enter a "shared" component and pass parameters to render different data. Dynamic routing and routing parameters are needed!
First let's look at router-link:
Now that you have a basic understanding of router-link, let's start with dynamic routing configuration
When configuring a route, we configure the path of the target component first, such as:
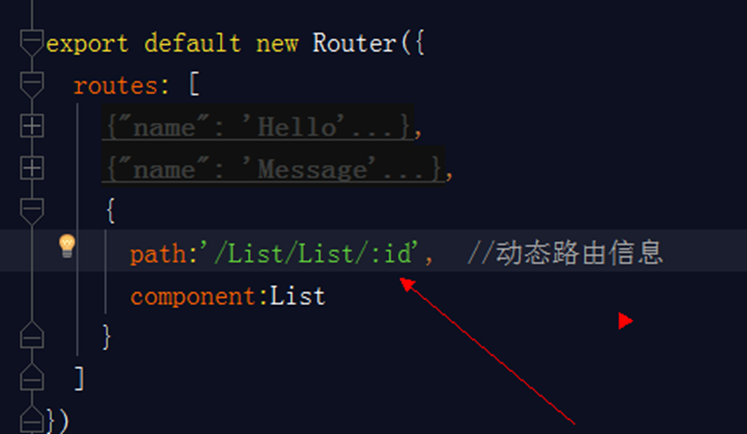
For example, multiple routes will enter the List component, which is then added after configuring the route: id(id can be named or identified freely), this attribute ID can be in $route. Params. Get in id, for example:

For the current child component to enter, the above configured id is equal to on; Print out $route in the List component at this time. Params. id to get the attribute value on

At this point, different components can be identified and commented on when they enter the same target component, or they can be used to pass some normal parameters.
Next, look down at the routes with parameters, followed by getting the parameter values passed in
When router-link is activated and clicked, the current value of to is push into the router object (routing stack), so it can be either string or obj
When we pass parameters, we write them as objects, using the js expression of v-bind

At this point, the whole understanding can be as follows: I came from the child component, and I also brought my name, my name is child
Get the value of this parameter and the value of id in the List component
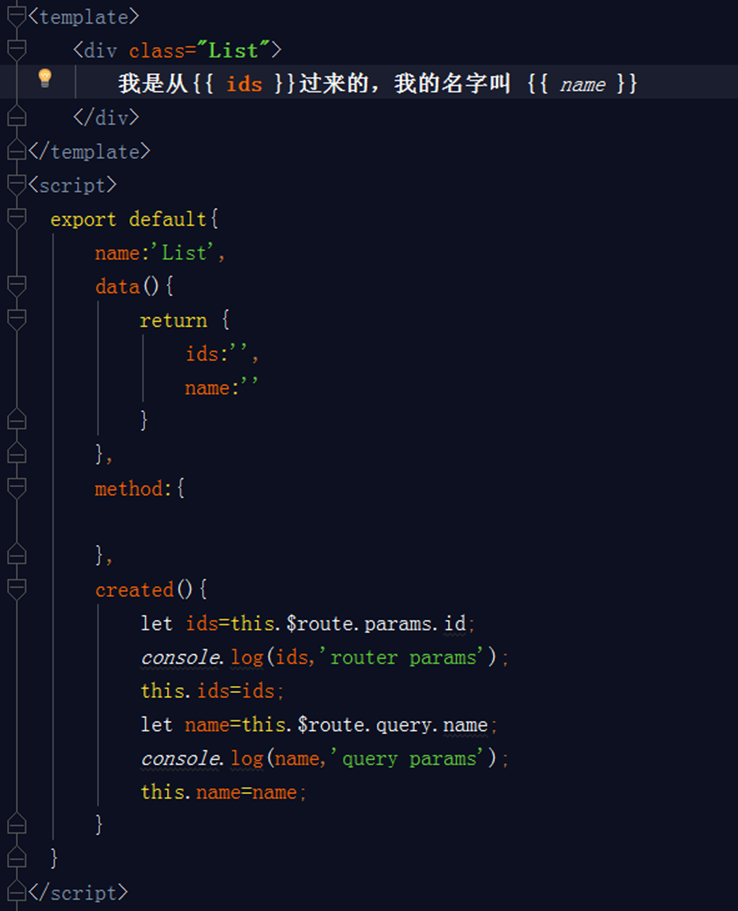
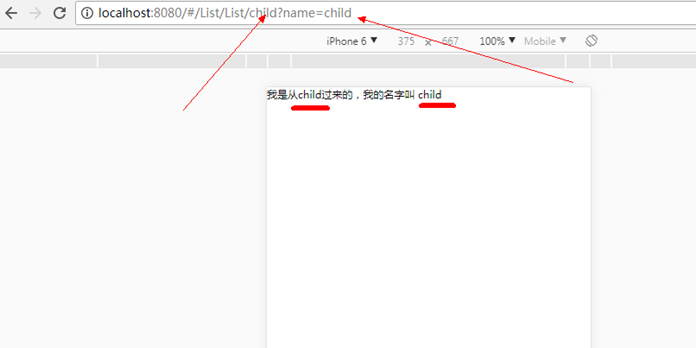
If different components come over, you can set different id values. As long as you get the value of the attribute id in the target component, the parameter takes advantage of query. Attribute value to get
Why is data of a component in vue a function? In the new Vue instance, data can be an object directly
We know that a Vue component is actually a Vue instance.
Instances in JS are created through constructors, and each constructor can produce many new instances, each instance inherits methods or properties from the prototype.
Vue's data data data is actually a property on the Vue prototype, and the data exists in memory. To ensure the independence of data data data on each instance, Vue specifies that functions, not objects, must be used.
Because using objects, the data used on each instance (component) interacts with each other, which of course is not what we want. Objects are references to memory addresses that are used between components when they are defined directly, which can cause data interactions between components.
Once the function is used, the data() function is used, and the this in the data() function points to the current instance itself, without interacting with each other.
keep-alive
concept
Keep-alive is a built-in component of Vue that caches inactive component instances instead of destroying them when it wraps dynamic components. Similar to transition, keep-alive is an abstract component: it does not render itself as a DOM element, nor does it appear in the parent component chain.
Effect
Keep state in memory during component switching, prevent duplicate rendering of DOM, reduce load time and performance consumption, and improve user experience
principle
The VNode node that will need to be cached is saved in this when the create function is called. In cache / in render, if the name of the VNode meets the caching criteria (can be controlled with include and exclude), it will be changed from this. Remove the previously cached VNode instance from the cache for rendering.
VNode: Virtual DOM is actually a JS object
Props
Life cycle functions
1. activated
Called when the keep-alive component is activated
This hook function is not called during server-side rendering
2. deactivated
Called when the keep-alive component is deactivated
This hook is not called during server-side rendering
Included in keep-alive are two more life cycle hooks: activated and deactivated
keep-alive keeps the data in memory. If you want to get the latest data every time you enter the page, you need to get the data in the active stage and take on the task of getting the data in the original created hook function.
Note: These two life cycle functions will only be called if the components are wrapped in keep-alive. If they are used as normal components, they will not be called, and after version 2.1.0, they will not be called even if they are wrapped in keep-alive if exclude d! Also, this hook function will not be called when rendering on the server side.
Cache all pages
stay App.vue inside
<template>
  <div id="app">
  	<keep-alive>
      <router-view/>
    </keep-alive>
  </div>
</template>

<script>
export default {
  name: 'App'
}
</script>
Cache pages conditionally
At App. Inside Vue
<template>
  <div id="app">
  	// 1. Components whose cache name is test
  	<keep-alive include='test'>
      <router-view/>
    </keep-alive>

	// 2. Cache components name d a or b and use them in conjunction with dynamic components
	<keep-alive include='a,b'>
  	  <router-view/>
	</keep-alive>

	// 3. Using regular expressions, use v-bind
	<keep-alive :include='/a|b/'>
  	  <router-view/>
	</keep-alive>

	// 5. Dynamic Judgment
	<keep-alive :include='includedComponents'>
  	  <router-view/>
	</keep-alive>

	// 5. Components with name test will not be cached
	<keep-alive exclude='test'>
  	  <router-view/>
	</keep-alive>
  </div>
</template>

<script>
export default {
  name: 'App'
}
</script>
Cache partial pages with Router
Index in the 1 router directory. In JS file
import Vue from 'vue'
import Router from 'vue-router'
const Home = resolve => require(['@/components/home/home'], resolve)
const Goods = resolve => require(['@/components/home/goods'], resolve)
const Ratings = resolve => require(['@/components/home/ratings'], resolve)
const Seller = resolve => require(['@/components/home/seller'], resolve)

Vue.use(Router)

export default new Router({
  mode: 'history',
  routes: [
    {
      path: '/',
      name: 'home',
      component: Home,
      redirect: 'goods',
      children: [
        {
          path: 'goods',
          name: 'goods',
          component: Goods,
          meta: {
        	keepAlive: false // No cache required
      	  }
        },
        {
          path: 'ratings',
          name: 'ratings',
          component: Ratings,
          meta: {
        	keepAlive: true  // Cache required
      	  }
        },
        {
          path: 'seller',
          name: 'seller',
          component: Seller,
          meta: {
        	keepAlive: true  // Cache required
      	  }
        }
      ]
    }
  ]
})
2 App. Inside Vue
<template>
  <div id="app">
  	<keep-alive>
      <router-view v-if="$route.meta.keepAlive"></router-view>
    </keep-alive>
    <router-view v-if="!$route.meta.keepAlive"></router-view>
  </div>
</template>

<script>
export default {
  name: 'App'
}
</script>
nextTick
The official documents are interpreted as follows:
Delayed callback is performed after the end of the next DOM update cycle. Use this method immediately after modifying the data to obtain the updated DOM.
Emphasis: Getting the updated DOM means what operation needs to use the updated DOM instead of the previous DOM or use the updated DOM or something went wrong, so this Vue method to get the updated DOM is derived. So put it in Vue. The nextTick() callback function should execute js code that manipulates the DOM.
When do I need a Vue? NextTick()
computed and watch
Computed property computed:
-
- Supports caching and recalculates only if dependent data changes
- Asynchronous is not supported and is not valid when there are asynchronous operations within computed to listen for data changes
- The computed attribute values are cached by default based on their responsive dependencies, which are calculated based on data declared in the data or data in props passed by the parent component
- If an attribute is computed from other attributes, the attribute relies on other attributes and is either many-to-one or one-to-one, typically computed
- If the computed attribute value is a function, the get method will be used by default. The return value of a function is the attribute value of an attribute. In computed, the property has a get and a set method, which is called when the data changes.
-
Listening property watch:
- Caching is not supported, data changes will trigger the corresponding operation directly
- watch supports asynchronous
- The listened function receives two parameters, the first of which is the latest value; The second parameter is the value before input
- When an attribute changes, the corresponding action needs to be performed. One-to-many
- Listening data must be data in props declared in the data or passed in by the parent component. When the data changes, triggering other operations, the function has two parameters:
immediate: component loading immediately triggers callback function execution
watch: {
  firstName: {
    handler(newName, oldName) {
      this.fullName = newName + ' ' + this.lastName;
    },
    // Represents executing the handler method immediately after declaring firstName in wacth
    immediate: true
  }
}
deep: deep means deep observation, where the listener iterates down one layer to add this listener to all the properties of the object, but the performance overhead is enormous, and any modification to any property in the obj triggers the handler in the listener
watch: {
  obj: {
    handler(newName, oldName) {
      console.log('obj.a changed');
    },
    immediate: true,
    deep: true
  }
}
Optimize: We can listen in the form of a string
watch: {
  'obj.a': {
    handler(newName, oldName) {
      console.log('obj.a changed');
    },
    immediate: true,
    // deep: true
  }
}
So Vue.js does not parse down one layer at a time until it encounters property a and then sets a listener function for a.
immediate and deep in Watch
In vue, watch es are used to respond to changes in data.
One feature of using watch es is that when a value is first bound, the listener function is not executed and only if the value is changed. The immediate property is required if we need to execute the function as well when the value is initially bound.
For example, when a parent component dynamically passes a value to a child component, the first time a child component props gets the default value passed from the parent component, it also needs to execute the function, and then it needs to set the immediate to true.
new Vue({
  el: '#root',
  data: {
    cityName: ''
  },
  watch: {
    cityName: {
      handler(newName, oldName) {// ...   },
      immediate: true
    }
  }
})
The listened data is then written as an object, including the handler method and immediate, which was the function we wrote before.
The immediate indicates whether the handler is executed the first time it is bound in the watch, and the value true indicates that the handler method is executed immediately when it is declared in the watch. The value false means that the handler is executed only when the data changes, as with watches in general.
deep
When you need to listen for changes in an object, the common watch method can't listen for changes in the object's internal properties. Only the data in the data can listen for changes. In this case, the deep property is needed to listen deeply on the object.
<input type="text" v-model="cityName.name"/>

new Vue({
  el: '#root',
  data: {
    cityName: {id: 1, name: 'shanghai'}
  },
  watch: {
    cityName: {
    handler(newName, oldName) {      // ...    },
    deep: true,
    immediate: true
    }
  }
})
Set deep: true to listen for cityName.name change, which adds this listener to all attributes of cityName, executes handler for each attribute value change when there are many object attributes. If you only need to listen for one attribute value in the object, you can do the following optimization: listen for object properties as strings:
watch: { 'cityName.name': {
      handler(newName, oldName) {      // ...      },
      deep: true,
      immediate: true
    }
  }
This only adds listeners to a particular property of the object.
Changes in arrays (one-dimensional, multidimensional) do not require deep listening, while changes in object attributes in object arrays require deep listening.
style-scope attribute
In a vue project, a scope attribute is usually added to the style tag to privatize the style and avoid global pollution.
Sometimes, however, this property is cumbersome: when a third-party component is introduced and its style needs to be modified, there is usually a case where the modification is unsuccessful
1. Principles of scope's Privatization Style
Privatization of styles by adding a non-repeating tag to the structure of DOM elements and to the css style to ensure their uniqueness
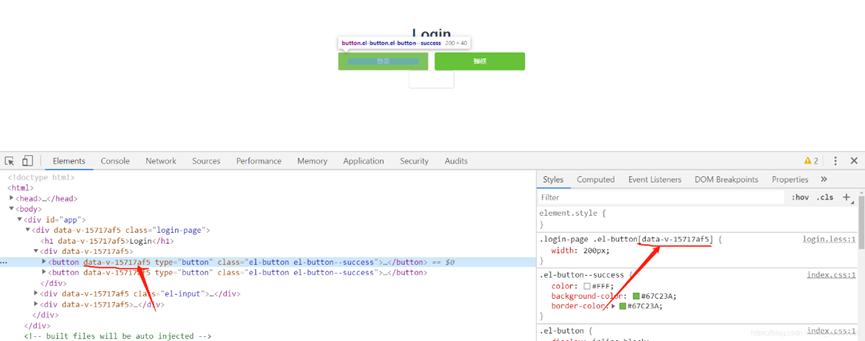
1. After adding the scoped attribute, the DOM node adds a non-repeating data attribute to indicate its uniqueness
2. After adding the scoped attribute, a data attribute selector is added at the end of the css selector of the DOM node to privateize the style of the element
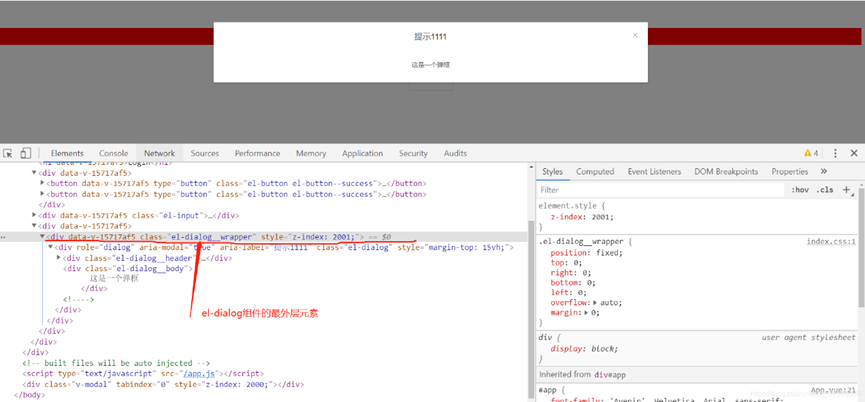
3. After adding the scoped attribute, the data attribute will be added to the exterior of the component. If there are other components in the component, the other components will not work.
For example, when using the button, dialog component of the third-party plug-in elementui and adding scoped s to the style tag
<template>
  <div class="login-page">
    <h1>{{ msg }}</h1>
    <div>
      <el-button type="success" @click="login">Sign in</el-button>
      <el-button type="success" @click="dialogVisible = true">Bounce Box</el-button>
    </div>
    <el-input></el-input>
    <div>
      <el-dialog
        title="Tip 1111"
        :visible.sync="dialogVisible"
      >
        This is a pop-up box
      </el-dialog>
    </div>
  </div>
</template>


<style lang="less" scoped>
  @import "../less/login.less";
</style>
login.less file
.login-page{
  h1{
    cursor: pointer;
    background: #f00;
  }
  .el-button{
    width: 200px;
  }
  .el-input{
    width: 100px;
  }

  .el-dialog{
    width:200px;
    height: 300px;
    background: #ddd;
  }
}
After the browser runs, the DOM displays as follows:
2. Solve the problem that the introduction of third-party components and modification of their styles are not effective
1. Solution 1:
<template>
  <div class="login-page">
    <h1>{{ msg }}</h1>
    <div>
      <el-button type="success" @click="login">Sign in</el-button>
      <el-button type="success" @click="dialogVisible = true">Bounce Box</el-button>
    </div>
    <el-input></el-input>
    <div>
      <el-dialog
        title="Tip 1111"
        :visible.sync="dialogVisible"
      >
        This is a pop-up box
      </el-dialog>
    </div>
  </div>
</template>

<style lang="less" scoped>
  @import "../less/login.less";
</style>
<style lang="less">
   .el-dialog{//Place nested element styles in third-party components inside style elements without scoped s so that styles in nested elements in sub-third-party components take effect
      width:200px;
      height: 300px;
      background: #ddd;
    }
</style>
login.less file
.login-page{
  h1{
    cursor: pointer;
    background: #f00;
  }
  .el-button{
    width: 200px;
  }
  .el-input{
    width: 100px;
  }
}
2. Solution 2: Use depth selector: <<< or/deep/
Penetrating changes to the style of third-party components require adding deep if stylus uses >> or / deep if less or sass
<template>
  <div class="login-page">
    <h1>{{ msg }}</h1>
    <div>
      <el-button type="success" @click="login">Sign in</el-button>
      <el-button type="success" @click="dialogVisible = true">Bounce Box</el-button>
    </div>
    <el-input></el-input>
    <div>
      <el-dialog
        title="Tip 1111"
        :visible.sync="dialogVisible"
      >
login.less file
.login-page{
  h1{
    cursor: pointer;
    background: #f00;
  }
  .el-button{
    width: 200px;
  }
  .el-input{
    width: 100px;
  }
  //Penetrating changes to the style of third-party components require adding deep if stylus uses >> or / deep if less or sass
  /deep/.el-dialog{
        width:200px;
        height: 300px;
        background: #ddd;
  }
}
el-dialog successfully produces a custom style:
v-for and v-if cannot be put together
The calculation priority of v-for is higher than v-if, so all the elements will be rendered, and then V-IF will be judged, rendering the elements that do not need to be rendered, wasting performance.
To avoid this, nest template s in the outer layer (page rendering does not generate dom nodes), make v-if judgments in this layer, and then make v-for loops inside
If conditions occur within a loop, you can filter out items that do not need to be displayed in advance by calculating the property computed
computed: {
items: function() {
return this.list.filter(function (item) {
return item.isShow
})
}
The role of v-for key
Note: When v-for loops, the key attribute can only use number s or string s, not objects.
When using a key, you must specify the value of the key in the form of a v-bind property binding
When Vue.js uses the in-place reuse policy by default when v-for is updating the rendered list of elements. If the order of the data items is changed, the Vue will not move the DOM elements to match the order of the data items, but simply reuse each element here and ensure that it displays each element rendered at a specific index.
To give Vue a hint so that it can track the identity of each node, thereby reusing and reordering existing elements, you need to provide a unique key attribute for each item.
When rendering lists in vue, the in-place reuse policy is followed by default
In-place reuse strategy:
When rendering lists, vue will directly reuse existing tags, not delete and create all tags, only re-render the data, and then create new elements until the data is rendered.
An attribute for v-for is provided in Vue, key:
The key attribute can be used to improve the efficiency of v-for rendering!, Instead of changing the original elements and data, vue creates new elements and renders the new data
When using v-for, vue requires us to add a key attribute to the element, which must be a unique identifier
Assignments to key s cannot be mutable
1. When writing v-for, you need to add a key attribute to the element
2. The main purpose of key is to improve rendering performance!
3. The key attribute avoids data clutter (if the element contains elements with temporary data, data clutter will occur if the key is not used)
vue blends in using scenarios mixins
What is mixins?
mixins are vue An extension of a component that incorporates common data or methods into a data structure that can be mixed up by different vue components to use the same method or base data in different vue components.
A slight understanding of Vue mixing can be confusing, as mixins are similar to vue's public components or vuex.
The difference between mixins and vuex.
Vuex public state management, after a component is introduced, if the component changes the data state inside vuex, other components that introduce vuex data will also be modified accordingly. All vuex components apply the same vuex data. (in js, it's a bit like a shallow copy)
vue introduces mixins data, mixins data, or methods, which are independent, non-intrusive, and belong to the vue component itself. (in js, it's a bit like deep copy)
Differences between mixins and public components
Common data and methods do provide a common component that is shared as a parameter by parent and child components.
Common Components
The child component receives parameters or methods from the parent component (public component) through props, but vue does not recommend that the child component directly modify the data received by props from the parent component. You need to define a field in the data of the subcomponent or in computed to receive. (A little troublesome)
The primary role of public components is to reuse the same vue components (with views, methods, states).
mixins
If you are extracting only common data or common methods that do not require maintenance between components, you can use mixins. (similar to some common methods encapsulated in js)
Mixing
Mixing provides a very flexible way to distribute reusable functionality in Vue components. A mixed object can contain any component option. When a component uses mixed objects, all options for mixed objects are "mixed" into the options for the component itself.
Personal understanding is a storage for reused data and methods for easy reuse
Official demo
//Define a mixed object
var myMixin = {
  created: function () {
    this.hello()
  },
  methods: {
    hello: function () {
      console.log('hello from mixin!')
    }
  }
}
//Define a component that uses mixed objects
var Component = Vue.extend({
  mixins: [myMixin]
})

var component = new Component() // => "hello from mixin!"
Give yourself another demo
There is now a modal box and a prompt box. These prompt boxes and modal boxes have nothing in common except functionality: they look different, use different, but have the same logic. The code is as follows:
//Modal Box
const Modal = {
  template: '#modal',
  data() {
    return {
      isShowing: false
    }
  },
  methods: {
    toggleShow() {
      this.isShowing = !this.isShowing;
    }
  },
  components: {
    appChild: Child
  }
}
//Tip box
// prompt box
const Tooltip = {
  template: '#tooltip',
  data() {
    return {
      isShowing: false
    }
  },
  methods: {
    toggleShow() {
      this.isShowing = !this.isShowing;
    }
  },
  components: {
    appChild: Child
  }
}


//After merging
const toggle = {
    data () {
        isshowing: false
    },
    methods: {
        toggleShow() {
            this.isshowing = !this.isshowing
        }
    }
}

const Modal = {
  template: '#modal',
  mixins: [toggle],
  components: {
    appChild: Child
  }
};

const Tooltip = {
  template: '#tooltip',
  mixins: [toggle],
  components: {
    appChild: Child
  }
};
During development, if you are writing a project created with vue-cli, you can do this
// mixin.js

export const toggle = {
    data () {
        isshowing: false
    },
    methods: {
        toggleShow() {
            this.isshowing = !this.isshowing
        }
    }
}
// modal.vue
// By introducing mixin to this component, you can use toggleShow() directly
import {mixin} from '../mixin.js'

export default {
    mixins: [mixin],
    mounted () {

    }
}
// tooltip components as above
Option Merge (Focus)
1. data Object data
Data objects are merged recursively internally and take precedence over component data in case of conflicts.
var mixin = {
  data: function () {
    return {
      message: 'hello',
      foo: 'abc'
    }
  }
}

new Vue({
  mixins: [mixin],
  data: function () {
    return {
      message: 'goodbye',
      bar: 'def'
    }
  },
  created: function () {
    console.log(this.$data)
    // => { message: "goodbye", foo: "abc", bar: "def" }
  }
})
2. Hook function
The hook function with the same name will be merged into an array and will therefore be called. In addition, hooks that blend in objects are called before the component's own hooks.
var mixin = {
  created: function () {
    console.log('Mixed object hook called')
  }
}

new Vue({
  mixins: [mixin],
  created: function () {
    console.log('Component hook called')
  }
})

// => "Mixed object hook called"
// => "Component hook called"
3. Options for Value as Object
Options whose values are objects, such as methods, components, and directives, will be merged into the same object. When two object keynames conflict, take the key-value pair of the component object.
var mixin = {
  methods: {
    foo: function () {
      console.log('foo')
    },
    conflicting: function () {
      console.log('from mixin')
    }
  }
}

var vm = new Vue({
  mixins: [mixin],
  methods: {
    bar: function () {
      console.log('bar')
    },
    conflicting: function () {
      console.log('from self')
    }
  }
})

vm.foo() // => "foo"
vm.bar() // => "bar"
vm.conflicting() // => "from self"
Note: Vue.extend() also uses the same strategy for merging.
Global Mixing
Mixed can also be registered globally. Use with extra care! Once global blending is used, it will affect each subsequently created Vue instance. This can be used to inject processing logic for custom options when appropriate. Use global mixing with caution, as it affects each individually created Vue instance, including third-party components. In most cases, only custom options should be applied, so they are used in extremely limited scenarios and with great care. One use I can think of is that it's like a plug-in and you need to give it access to everything. But even in this case, I'm cautious about what you're doing, especially the functions you've extended in your application, which may be unknown to you.
//Inject a processor for the custom option'myOption'.
// Inject a processor for the custom option'myOption'.
Vue.mixin({
  created: function () {
    var myOption = this.$options.myOption
    if (myOption) {
      console.log(myOption)
    }
  }
})

new Vue({
  myOption: 'hello!'
})
// => "hello!"
Custom Options Merge Policy
This is generally not done on my own, and I hardly use it. Let's see the official explanation. Custom options will use the default policy, which simply overrides existing values. If you want to customize options to customize logical merge, you can
Vue.config.optionMergeStrategies Add a function:

Vue.config.optionMergeStrategies.myOption = function (toVal, fromVal) {
  // Returns the merged value
}
For options where most values are objects, you can use the same merge strategy as methods:
var strategies = Vue.config.optionMergeStrategies
strategies.myOption = strategies.methods
Can be in Vuex 1. A more advanced example is found in the blending strategy of x:
const merge = Vue.config.optionMergeStrategies.computed
Vue.config.optionMergeStrategies.vuex = function (toVal, fromVal) {
  if (!toVal) return fromVal
  if (!fromVal) return toVal
  return {
    getters: merge(toVal.getters, fromVal.getters),
    state: merge(toVal.state, fromVal.state),
    actions: merge(toVal.actions, fromVal.actions)
  }
}
Take another look at demo
import {mapGetters} from 'vuex'

// The purpose is to work with the bottom value of scroll, in the case of playlist lists
export const playlistMixin = {
  computed: {
    ...mapGetters([
      'playList'
    ])
  },
  mounted() {
    this.handlePlaylist(this.playList)
  },
  activated() {
    this.handlePlaylist(this.playList)
  },
  watch: {
    playlist(newVal) {
      this.handlePlaylist(newVal)
    }
  },
  methods: {
    // If this method is not present in the component, an error will be reported
    handlePlaylist() {
      throw new Error('component must implement handlePlaylist method')
    }
  }
}
In general, mixing is useful for encapsulating a small piece of code that you want to reuse. They are certainly not the only viable ones for you. It's a good mix, it doesn't need to pass status, but of course this pattern can also be abused. Use it or look good.
New vue3 features ref and reactive
- Simply put, it's a navigator that uses the to attribute to navigate to the target component and automatically generates an a tag when rendering. Of course, the official also says that adding a tag tag attribute can render different tags, which can be viewed on the browser side
- And when a navigator is activated, a css activation style is added automatically, which allows the linkActiveClass property to be set globally in the routing configuration. The property name is the style css name, which is usually written as active
- include - String or regular expression. Only components with matching names will be cached.
- exclude - String or regular expression. Any components with matching names will not be cached.
- max - Number. Maximum number of component instances that can be cached.
- DOM operations performed on the created() hook function in the Vue lifecycle must be placed on the Vue. In the callback function of nextTick ().
- An operation to be performed after a data change that requires the use of a DOM structure that changes with the data should all be placed in the Vue. In the callback function of nextTick ().
- Supports caching and recalculates only if dependent data changes
- Asynchronous is not supported and is not valid when there are asynchronous operations within computed to listen for data changes
- The computed attribute values are cached by default based on their responsive dependencies, which are calculated based on data declared in the data or data in props passed by the parent component
- If an attribute is computed from other attributes, the attribute relies on other attributes and is either many-to-one or one-to-one, typically computed
- If the computed attribute value is a function, the get method will be used by default. The return value of a function is the attribute value of an attribute. In computed, the property has a get and a set method, which is called when the data changes.
- Caching is not supported, data changes will trigger the corresponding operation directly
- watch supports asynchronous
- The listened function receives two parameters, the first of which is the latest value; The second parameter is the value before input
- When an attribute changes, the corresponding action needs to be performed. One-to-many
- Listening data must be data in props declared in the data or passed in by the parent component. When the data changes, triggering other operations, the function has two parameters:
-
- The el-button element has a data attribute and its css has a data attribute selector
- The el-dialog component element only has the data attribute on the outermost element, not from the second element, although in login. Change its style in less file, but it has no effect
- Because multiple styles can appear in a vue file, you can use two styles, one style with scopeds and one style without scopeds.
- Place nested element styles in third-party components inside style elements without scoped s so that styles in nested elements in sub-third-party components take effect
