preface
As the saying goes, before soldiers and horses move, grain and grass go first, and high-rise buildings rise from the ground. A set of practical and available microservice framework is the guarantee for the follow-up and efficient development of the whole project team. In the early construction process of microservice framework, generally speaking, three points are mainly considered:
- For technology options, if the business scale of the company can be estimated in advance, it is sufficient to select an appropriate technology stack that can reserve a certain expansion space, rather than the perfection of the planning at the beginning
- The combination of technology stack and technology selection determine the technical tone of the whole project. For a business, there are many choices to use message oriented middleware, such as kafka or rabbitmq. It needs to be matched reasonably in combination with the technical matching degree of team personnel, technical implementation cost and business requirements
- The applicability of technology should be the technology that is more common and popular in the market, and the community in the technology ecosystem is more active
- Security. With the development of the times, data security has increasingly become the focus of many users. Therefore, when building the framework, we must improve the requirements for security
- Subsequent maintainability, such as whether the framework of the current project is easy to expand and split with the growth of business and team size
Following the topic of the previous article, this article continues to focus on security and puts forward the integration and construction of another set of security framework that is more applicable and easy to start in small and micro service projects
Framework technology stack
springboot +shiro + jwt + redis
- shiro, a lightweight framework for authentication and authorization
- jwt, a security component capable of bidirectional encryption and decryption
- redis, together with shiro, stores secure session information
Business background
In the previous article, we talked about a popular front-end and back-end secure interaction mode accepted by many teams, that is, the token mode. Generally speaking, this mode is safe and efficient, but there are two main problems to be solved
- The security of token itself, that is, it cannot be easily cracked, that is, even if it is intercepted by an illegal person, it cannot be cracked or used in a short time
- token is usually stored in cookie s at the front end and redis or other storage media at the server end
- Timeliness of token
The previous article only focused on the strength of using spring security in microservice security authentication. The authorization should be determined in combination with the actual situation of each project. For example, if the project is biased towards management projects, it is necessary to continue to supplement and improve the authorization. If it is closer to the c-end project, the authorization can be weakened appropriately
However, in most projects, authentication and authorization are considered together. Authentication can be understood as login operation, while authorization is generally understood as that the current login person can only operate the functions on the page with certain roles or permissions, that is, the familiar RBAC permission model
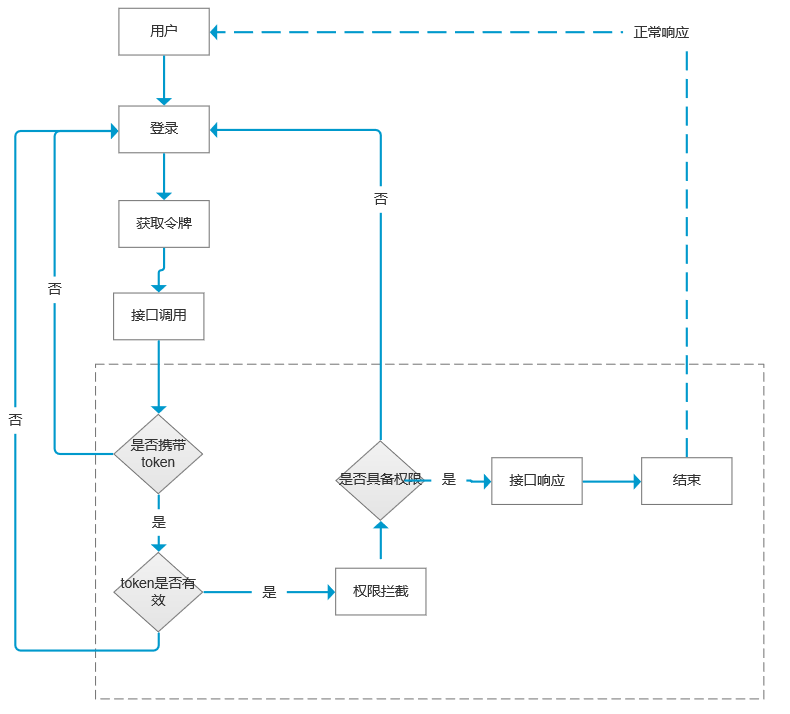
The above is a basic authentication and authorization business model to be implemented in this article, that is, to complete the whole process of a user from registration, login to calling an interface on the server. I believe students with development experience can understand the meaning
Environmental preparation
1. sql script used in this article
User table
CREATE TABLE `tb_user` (
  `id` int(10) unsigned NOT NULL AUTO_INCREMENT COMMENT 'Primary key',
  `open_id` varchar(200) DEFAULT NULL COMMENT 'Long term authorization string',
  `nickname` varchar(200) DEFAULT NULL COMMENT 'nickname',
  `photo` varchar(200) DEFAULT NULL COMMENT 'Avatar website',
  `name` varchar(20) DEFAULT NULL COMMENT 'full name',
  `sex` enum('male','female') DEFAULT NULL COMMENT 'Gender',
  `tel` char(11) DEFAULT NULL COMMENT 'phone number',
  `email` varchar(200) DEFAULT NULL COMMENT 'mailbox',
  `hiredate` date DEFAULT NULL COMMENT 'Entry date',
  `role` json NOT NULL COMMENT 'role',
  `root` tinyint(1) NOT NULL COMMENT 'Super administrator',
  `dept_id` int(10) unsigned DEFAULT NULL COMMENT 'Department number',
  `status` tinyint(4) NOT NULL COMMENT 'state',
  `create_time` datetime NOT NULL ON UPDATE CURRENT_TIMESTAMP COMMENT 'Creation time',
  PRIMARY KEY (`id`) USING BTREE,
  UNIQUE KEY `unq_open_id` (`open_id`) USING BTREE,
  KEY `unq_email` (`email`) USING BTREE,
  KEY `idx_dept_id` (`dept_id`) USING BTREE,
  KEY `idx_status` (`status`) USING BTREE
) ENGINE=InnoDB AUTO_INCREMENT=4 DEFAULT CHARSET=utf8 ROW_FORMAT=DYNAMIC COMMENT='User table';
Department table
CREATE TABLE `tb_dept` (
  `id` int(10) unsigned NOT NULL AUTO_INCREMENT COMMENT 'Primary key',
  `dept_name` varchar(200) NOT NULL COMMENT 'Department name',
  PRIMARY KEY (`id`) USING BTREE,
  UNIQUE KEY `unq_dept_name` (`dept_name`) USING BTREE
) ENGINE=InnoDB AUTO_INCREMENT=12 DEFAULT CHARSET=utf8 ROW_FORMAT=DYNAMIC;
Permission related table
CREATE TABLE `tb_role` (
  `id` int(10) unsigned NOT NULL AUTO_INCREMENT COMMENT 'Primary key',
  `role_name` varchar(200) NOT NULL COMMENT 'Role name',
  `permissions` json NOT NULL COMMENT 'Permission set',
  PRIMARY KEY (`id`) USING BTREE,
  UNIQUE KEY `unq_role_name` (`role_name`) USING BTREE
) ENGINE=InnoDB AUTO_INCREMENT=5 DEFAULT CHARSET=utf8 ROW_FORMAT=DYNAMIC COMMENT='Role table';

CREATE TABLE `tb_module` (
  `id` int(10) unsigned NOT NULL AUTO_INCREMENT COMMENT 'Primary key',
  `module_code` varchar(200) NOT NULL COMMENT 'Module number',
  `module_name` varchar(200) NOT NULL COMMENT 'Module name',
  PRIMARY KEY (`id`) USING BTREE,
  UNIQUE KEY `unq_module_id` (`module_code`) USING BTREE
) ENGINE=InnoDB AUTO_INCREMENT=6 DEFAULT CHARSET=utf8 ROW_FORMAT=DYNAMIC COMMENT='Module resource table';

CREATE TABLE `tb_permission` (
  `id` int(10) unsigned NOT NULL AUTO_INCREMENT COMMENT 'Primary key',
  `permission_name` varchar(200) NOT NULL COMMENT 'jurisdiction',
  `module_id` int(10) unsigned NOT NULL COMMENT 'modular ID',
  `action_id` int(10) unsigned NOT NULL COMMENT 'behavior ID',
  PRIMARY KEY (`id`) USING BTREE,
  UNIQUE KEY `unq_permission` (`permission_name`) USING BTREE,
  UNIQUE KEY `unq_complex` (`module_id`,`action_id`) USING BTREE
) ENGINE=InnoDB AUTO_INCREMENT=19 DEFAULT CHARSET=utf8 ROW_FORMAT=DYNAMIC;

CREATE TABLE `tb_action` (
  `id` int(11) unsigned NOT NULL AUTO_INCREMENT COMMENT 'Primary key',
  `action_code` varchar(200) NOT NULL COMMENT 'Behavior number',
  `action_name` varchar(200) NOT NULL COMMENT 'Behavior name',
  PRIMARY KEY (`id`) USING BTREE,
  UNIQUE KEY `unq_action_name` (`action_name`) USING BTREE
) ENGINE=InnoDB AUTO_INCREMENT=8 DEFAULT CHARSET=utf8 ROW_FORMAT=DYNAMIC COMMENT='Behavior table';
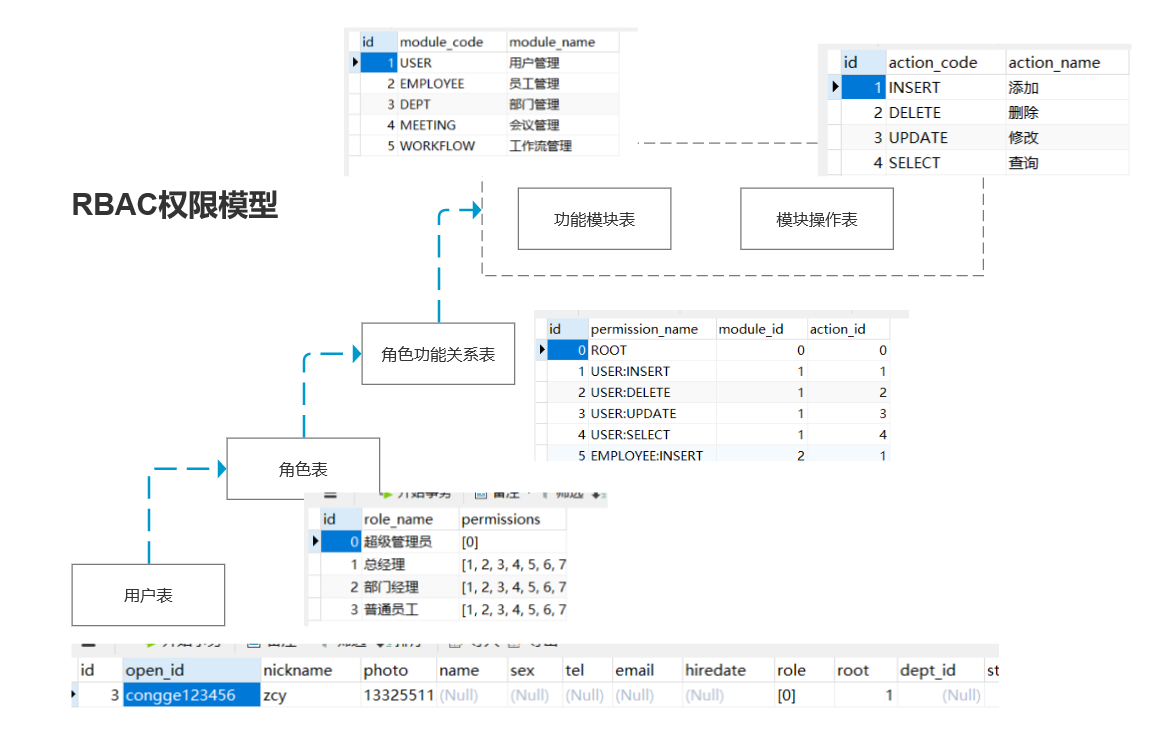
The above diagram is used to describe the relationship between RBAC permission tables
2. Project structure
This article still uses maven project to build the environment
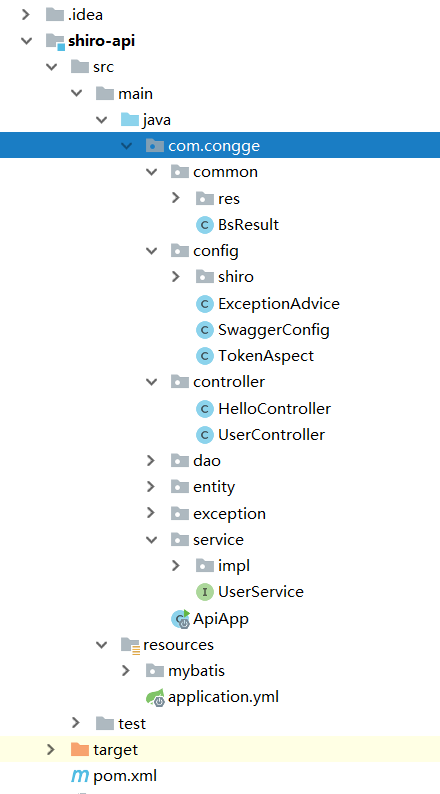
Add pom dependency
Parent project pom
	<properties>
        <spring-boot-version>2.3.4.RELEASE</spring-boot-version>
    </properties>

    <dependencyManagement>
        <dependencies>
            <dependency>
                <groupId>org.springframework.boot</groupId>
                <artifactId>spring-boot-dependencies</artifactId>
                <version>${spring-boot-version}</version>
                <type>pom</type>
                <scope>import</scope>
            </dependency>
        </dependencies>

    </dependencyManagement>
Module project dependency
 	<dependencies>

        <dependency>
            <groupId>org.springframework.boot</groupId>
            <artifactId>spring-boot-starter-data-redis</artifactId>
        </dependency>

        <dependency>
            <groupId>org.springframework.boot</groupId>
            <artifactId>spring-boot-starter-web</artifactId>
        </dependency>

        <dependency>
            <groupId>org.mybatis.spring.boot</groupId>
            <artifactId>mybatis-spring-boot-starter</artifactId>
            <version>2.1.3</version>
        </dependency>

        <dependency>
            <groupId>org.springframework.boot</groupId>
            <artifactId>spring-boot-devtools</artifactId>
            <scope>runtime</scope>
            <optional>true</optional>
        </dependency>
        <dependency>
            <groupId>mysql</groupId>
            <artifactId>mysql-connector-java</artifactId>
            <scope>runtime</scope>
        </dependency>
        <dependency>
            <groupId>org.projectlombok</groupId>
            <artifactId>lombok</artifactId>
            <optional>true</optional>
        </dependency>

        <dependency>
            <groupId>com.alibaba</groupId>
            <artifactId>druid-spring-boot-starter</artifactId>
            <version>1.1.13</version>
        </dependency>
        <dependency>
            <groupId>org.apache.httpcomponents</groupId>
            <artifactId>httpcore</artifactId>
            <version>4.4.13</version>
        </dependency>

        <dependency>
            <groupId>io.springfox</groupId>
            <artifactId>springfox-swagger2</artifactId>
            <version>2.9.2</version>
        </dependency>

        <dependency>
            <groupId>io.springfox</groupId>
            <artifactId>springfox-swagger-ui</artifactId>
            <version>2.9.2</version>
        </dependency>

        <dependency>
            <groupId>org.springframework.boot</groupId>
            <artifactId>spring-boot-starter-validation</artifactId>
        </dependency>

        <dependency>
            <groupId>cn.hutool</groupId>
            <artifactId>hutool-all</artifactId>
            <version>5.4.0</version>
        </dependency>

        <dependency>
            <groupId>org.apache.shiro</groupId>
            <artifactId>shiro-web</artifactId>
            <version>1.5.3</version>
        </dependency>

        <dependency>
            <groupId>org.apache.shiro</groupId>
            <artifactId>shiro-spring</artifactId>
            <version>1.5.3</version>
        </dependency>

        <dependency>
            <groupId>com.auth0</groupId>
            <artifactId>java-jwt</artifactId>
            <version>3.10.3</version>
        </dependency>

        <dependency>
            <groupId>org.springframework.boot</groupId>
            <artifactId>spring-boot-configuration-processor</artifactId>
            <optional>true</optional>
        </dependency>

        <dependency>
            <groupId>org.apache.commons</groupId>
            <artifactId>commons-lang3</artifactId>
            <version>3.11</version>
        </dependency>

        <dependency>
            <groupId>org.apache.httpcomponents</groupId>
            <artifactId>httpcore</artifactId>
            <version>4.4.13</version>
        </dependency>

        <dependency>
            <groupId>org.springframework.boot</groupId>
            <artifactId>spring-boot-starter-aop</artifactId>
        </dependency>

        <dependency>
            <groupId>org.json</groupId>
            <artifactId>json</artifactId>
            <version>20200518</version>
        </dependency>

    </dependencies>

    <build>
        <plugins>
            <plugin>
                <groupId>org.springframework.boot</groupId>
                <artifactId>spring-boot-maven-plugin</artifactId>
            </plugin>
        </plugins>
    </build>
yml profile
server:
  tomcat:
    uri-encoding: UTF-8
    threads:
      max: 200
      min-spare: 30
    connection-timeout: 5000ms
  port: 8081
  servlet:
    context-path: /shiro-api

spring:
  datasource:
    type: com.alibaba.druid.pool.DruidDataSource
    druid:
      driver-class-name: com.mysql.cj.jdbc.Driver
      url: jdbc:mysql://10.15.36.48:3306/wx-shiro?autoReconnect=true&useUnicode=true&characterEncoding=utf8&serverTimezone=GMT%2B8&useSSL=false
      username: root
      password: root
      initial-size: 8
      max-active: 16
      min-idle: 8
      max-wait: 60000
      test-while-idle: true
      test-on-borrow: false
      test-on-return: false

#redis related configuration
  redis:
    database: 0
    host: localhost
    port: 6379
    jedis:
      pool:
        max-active: 1000
        max-wait: -1ms
        max-idle: 16
        min-idle: 8

#mybatis related configuration
mybatis:
  mapper-locations: classpath*:mybatis/*.xml
  type-aliases-package: com.congge.entity
  configuration:
    log-impl: org.apache.ibatis.logging.stdout.StdOutImpl
    map-underscore-to-camel-case: true

#sql log printing
logging:
  level:
    root: info
    com.congge.dao : warn
  pattern:
    console: "%d{HH:mm:ss}  %-5level  %msg%n"

#Key expiration time, jwt
congge:
  jwt:
    secret: abc123456
    expire: 5
    cache-expire: 10

wx:
  app-id: congge
  app-secret: congge123456
The database persistence layer interaction used in this article adopts the mybatis framework. The above mainly configures what is used in this article. More can be added according to your own needs
Due to space constraints, I will not explain all the codes in this article one by one, mainly about the relevant configuration files, key configuration classes and the operation principle behind shiro authentication and authorization module
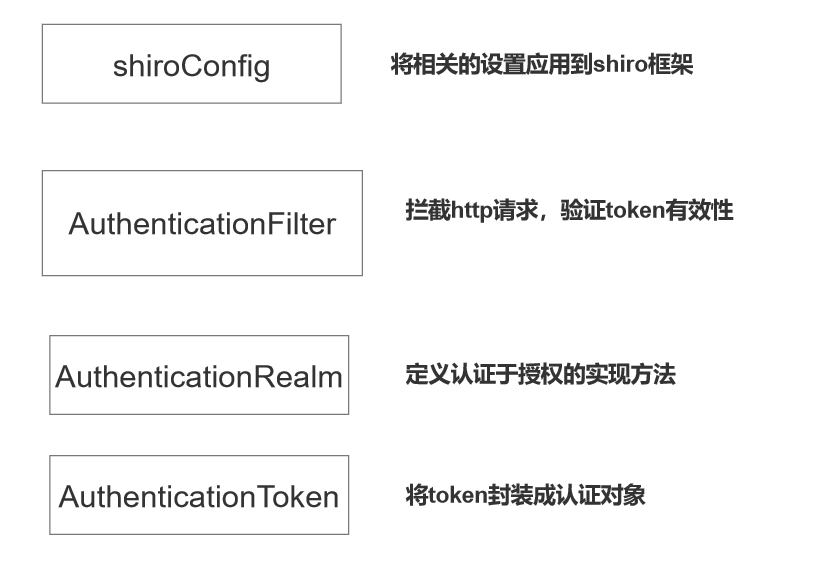
We will focus on several configuration classes under this package
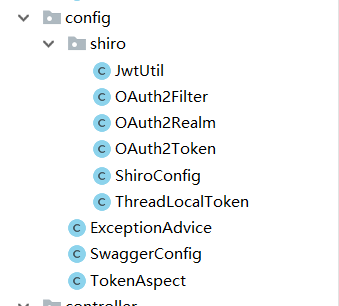
Several internal important components related to shiro in the configuration class involved
JwtUtil
@Component
@Slf4j
public class JwtUtil {

    @Value("${congge.jwt.secret}")
    private String secret;

    @Value("${congge.jwt.expire}")
    private int expire;

    public String createToken(int userId){
        Date date=DateUtil.offset(new Date(), DateField.DAY_OF_YEAR,5);
        Algorithm algorithm=Algorithm.HMAC256(secret);
        JWTCreator.Builder builder= JWT.create();
        String token=builder.withClaim("userId",userId).withExpiresAt(date).sign(algorithm);
        return token;
    }

    public int getUserId(String token){
        DecodedJWT jwt=JWT.decode(token);
        int userId=jwt.getClaim("userId").asInt();
        return userId;
    }

    public void verifierToken(String token){
        Algorithm algorithm=Algorithm.HMAC256(secret);
        JWTVerifier verifier=JWT.require(algorithm).build();
        verifier.verify(token);
    }
}
I have shared in detail about jwt in my previous blog. If you are interested, this class provides several main methods, such as creating a token, parsing userId from the token, and verifying the validity of the token. This tool class is provided to the login stage for token creation and authentication in shiro
OAuth2Token
public class OAuth2Token implements AuthenticationToken {
    private String token;

    public OAuth2Token(String token) {
        this.token = token;
    }

    @Override
    public Object getPrincipal() {
        return token;
    }

    @Override
    public Object getCredentials() {
        return token;
    }
}
The token submitted by the client cannot be directly handed over to shiro for processing. It needs to be encapsulated into an object of AuthenticationToken type. Therefore, it is necessary to create a class of AuthenticationToken type and only need to implement the interface
OAuth2Realm
To realize authentication and authorization, this class needs to inherit the AuthorizingRealm class and cover the authentication and authorization methods inside
@Component
public class OAuth2Realm extends AuthorizingRealm {

    @Autowired
    private JwtUtil jwtUtil;

    @Autowired
    private UserService userService;

    @Override
    public boolean supports(AuthenticationToken token) {
        return token instanceof OAuth2Token;
    }

    /**
     * Authorization (called when verifying permissions)
     */
    @Override
    protected AuthorizationInfo doGetAuthorizationInfo(PrincipalCollection collection) {
        TbUser user= (TbUser) collection.getPrimaryPrincipal();
        int userId=user.getId();
        Set<String> permsSet=userService.searchUserPermissions(userId);
        SimpleAuthorizationInfo info=new SimpleAuthorizationInfo();
        info.setStringPermissions(permsSet);
        return info;
        /*SimpleAuthorizationInfo info=new SimpleAuthorizationInfo();
        return info;*/
    }

    /**
     * Authentication (called when verifying login)
     */
    @Override
    protected AuthenticationInfo doGetAuthenticationInfo(AuthenticationToken token) throws AuthenticationException {
        String accessToken=(String)token.getPrincipal();
        int userId=jwtUtil.getUserId(accessToken);
        TbUser user=userService.searchById(userId);
        if(user==null){
            throw new LockedAccountException("Account locked,Please contact the administrator");
        }
        SimpleAuthenticationInfo info=new SimpleAuthenticationInfo(user,accessToken,getName());
        return info;
        /*SimpleAuthenticationInfo info=new SimpleAuthenticationInfo();
        return info;*/
    }
}
It can be understood that all visitors who log in need to go through this class when requesting the back-end interface. Therefore, we delegate the authentication and authorization permissions to the shiro framework, which verifies the user's token and permissions. This is the same as the effect achieved by security in the previous article
ThreadLocalToken
@Component
public class ThreadLocalToken {
    private ThreadLocal<String> local=new ThreadLocal<>();

    public void setToken(String token){
        local.set(token);
    }

    public String getToken(){
        return local.get();
    }

    public void clear(){
        local.remove();
    }
}
We know that in order to improve the user's operation experience, when designing the function of token, it is said that the token has an expiration time. The general practice is that if the user is logging in and the token expires at this time, the server needs a mechanism to automatically renew the expiration time of the token, so as to achieve an insensitive state for the user
The simple way is to store the generated token in redis after successful login, and write the token to the response and output it to the client. Each subsequent request from the client needs to carry the token, and shiro calls the basic method to complete the verification of the token. Once the token expires during login, After the server detects it, it completes an automatic renewal and writes it out to the response again
We use ThreadLocalToken and TokenAspect configuration classes to accomplish this
ThreadLocalToken
@Component
public class ThreadLocalToken {
    private ThreadLocal<String> local=new ThreadLocal<>();

    public void setToken(String token){
        local.set(token);
    }

    public String getToken(){
        return local.get();
    }

    public void clear(){
        local.remove();
    }
}
For the request of the same session, put the token into ThreadLocal to facilitate other places to obtain it
TokenAspect
@Aspect
@Component
public class TokenAspect {

    @Autowired
    private ThreadLocalToken threadLocalToken;

    @Pointcut("execution(public * com.congge.controller.*.*(..))")
    public void aspect(){

    }

    @Around("aspect()")
    public Object around(ProceedingJoinPoint point) throws Throwable{
        BsResult bsResult=(BsResult)point.proceed();
        String token=threadLocalToken.getToken();
        if(token!=null){
            bsResult.put("token",token);
            threadLocalToken.clear();
        }
        return bsResult;
    }
}
The interface from the request to the back end will be processed through this aspect class, and the token information will be updated to help complete the renewal of the token
ShiroConfig
The last is the following configuration class, which brings the OAuth2Filter and OAuth2Realm classes defined above into shiro's management. At the same time, this class can define the path to access the back-end interface resources for interception and shiro's life cycle management
@Configuration
public class ShiroConfig {

    @Bean("securityManager")
    public SecurityManager securityManager(OAuth2Realm realm) {
        DefaultWebSecurityManager securityManager = new DefaultWebSecurityManager();
        securityManager.setRealm(realm);
        securityManager.setRememberMeManager(null);
        return securityManager;
    }

    @Bean("shiroFilter")
    public ShiroFilterFactoryBean shiroFilter(SecurityManager securityManager, OAuth2Filter filter) {
        ShiroFilterFactoryBean shiroFilter = new ShiroFilterFactoryBean();
        shiroFilter.setSecurityManager(securityManager);

        Map<String, Filter> map = new HashMap<>();
        map.put("oauth2", filter);
        shiroFilter.setFilters(map);

        Map<String, String> filterMap = new LinkedHashMap<>();
        filterMap.put("/webjars/**", "anon");
        filterMap.put("/druid/**", "anon");
        filterMap.put("/app/**", "anon");
        filterMap.put("/sys/login", "anon");
        filterMap.put("/swagger/**", "anon");
        filterMap.put("/v2/api-docs", "anon");
        filterMap.put("/swagger-ui.html", "anon");
        filterMap.put("/swagger-resources/**", "anon");
        filterMap.put("/captcha.jpg", "anon");
        filterMap.put("/user/register", "anon");
        filterMap.put("/user/login", "anon");
        filterMap.put("/test/**", "anon");
        filterMap.put("/meeting/recieveNotify", "anon");
        filterMap.put("/**", "oauth2");

        shiroFilter.setFilterChainDefinitionMap(filterMap);

        return shiroFilter;

    }

    @Bean("lifecycleBeanPostProcessor")
    public LifecycleBeanPostProcessor lifecycleBeanPostProcessor() {
        return new LifecycleBeanPostProcessor();
    }

    @Bean
    public AuthorizationAttributeSourceAdvisor authorizationAttributeSourceAdvisor(SecurityManager securityManager) {
        AuthorizationAttributeSourceAdvisor advisor = new AuthorizationAttributeSourceAdvisor();
        advisor.setSecurityManager(securityManager);
        return advisor;
    }
}
To facilitate testing, two interface classes are provided, UserController and HelloController. The interface path of HelloController is not configured in the above shiroConfig path
UserController
@RestController
@RequestMapping("/user")
@Api("user Web Interface")
public class UserController {

    @Autowired
    private UserService userService;

    @Autowired
    private JwtUtil jwtUtil;

    @Autowired
    private RedisTemplate redisTemplate;

    @Value("${congge.jwt.cache-expire}")
    private int cacheExpire;

    @PostMapping("/register")
    @ApiOperation("Registered user")
    public BsResult register(@Valid @RequestBody RegisterForm form){
        int id=userService.registerUser(form);
        String token=jwtUtil.createToken(id);
        Set<String> permsSet=userService.searchUserPermissions(id);
        saveCacheToken(token,id);
        return BsResult.ok("User registration succeeded").put("token",token).put("permission",permsSet);
    }

    @PostMapping("/login")
    @ApiOperation("land")
    public BsResult login(@Valid @RequestBody LoginForm form){
        int id=userService.login(form.getCode());
        String token=jwtUtil.createToken(id);
        saveCacheToken(token,id);
        Set<String> permsSet = userService.searchUserPermissions(id);
        return BsResult.ok("Login successful").put("token",token).put("permission",permsSet);
    }

    @GetMapping("/getUserInfo")
    @ApiOperation("Query user information")
    public BsResult getUserInfo(@RequestHeader("userId") String userId){
        TbUser tbUser = userService.getUserInfo(userId);
        return BsResult.ok().put("result",tbUser);
    }

    @GetMapping("/searchUserSummary")
    @ApiOperation("Query user summary")
    public BsResult searchUserSummary(@RequestHeader("token") String token){
        int userId=jwtUtil.getUserId(token);
        HashMap map=userService.searchUserSummary(userId);
        return BsResult.ok().put("result",map);
    }

    private void saveCacheToken(String token,int userId){
        redisTemplate.opsForValue().set(token,userId+"",cacheExpire, TimeUnit.DAYS);
    }
}
HelloController
@RestController
@RequestMapping("/hello")
@Api("test hello Web Interface")
public class HelloController {

    @GetMapping("/sayHello")
    @ApiOperation("Simple test")
    public BsResult sayHello(String name) {
        return BsResult.ok().put("message", "Hello,"+name);
    }

    @GetMapping("/getUser")
    @ApiOperation("Test permission interception")
    //@RequiresPermissions(value = {"ROOT","USER:ADD"},logical = Logical.OR)
    @RequiresPermissions(value = {"AA","BB"},logical = Logical.OR)
    public BsResult getUser(){
        return BsResult.ok();
    }

}
Service realization
@Service
@Slf4j
@Scope("prototype")
public class UserServiceImpl implements UserService {

    @Value("${wx.app-id}")
    private String appId;

    @Value("${wx.app-secret}")
    private String appSecret;

    @Autowired
    private TbUserDao userDao;

    @Autowired
    private TbDeptDao deptDao;

    @Override
    public int registerUser(RegisterForm registerForm) {
        String nickname = registerForm.getNickname();
        String photo = registerForm.getPhoto();
        String authRes = getAuthRoles(registerForm);
        HashMap param = new HashMap();
        param.put("openId", "congge123456");
        param.put("nickname", nickname);
        param.put("photo", photo);
        param.put("role", authRes);
        param.put("status", 1);
        param.put("createTime", new Date());
        param.put("root", registerForm.isRoot());
        userDao.insert(param);
        int id = userDao.searchIdByOpenId("congge123456");
        return id;
    }

    private String getAuthRoles(RegisterForm registerForm) {
        List<String> authList = registerForm.getAuthList();
        String authRes = null;
        if(CollectionUtil.isNotEmpty(authList)){
            StringBuilder authStr = new StringBuilder();
            String[] authArr = authList.toArray(new String[0]);
            for(int i=0;i<authArr.length;i++){
                if(i != authArr.length - 1){
                    authStr.append(authArr[i]).append(",");
                }else {
                    authStr.append(authArr[i]);
                }
            }
            authRes = authStr.toString();
            authRes = "[" + authRes + "]";
        }
        return authRes;
    }

    @Override
    public Set<String> searchUserPermissions(int userId) {
        Set<String> permissions = userDao.searchUserPermissions(userId);
        return permissions;
    }

    @Override
    public Integer login(String code) {
        String openId = "congge123456";
        Integer id = userDao.searchIdByOpenId(openId);
        if (id == null) {
            throw new BusinessException("Account does not exist");
        }
        return id;
    }

    @Override
    public TbUser searchById(int userId) {
        TbUser user = userDao.searchById(userId);
        return user;
    }

    @Override
    public String searchUserHiredate(int userId) {
        String hiredate = userDao.searchUserHiredate(userId);
        return hiredate;
    }

    @Override
    public HashMap searchUserSummary(int userId) {
        HashMap map = userDao.searchUserSummary(userId);
        return map;
    }

    @Override
    public ArrayList<HashMap> searchUserGroupByDept(String keyword) {
        ArrayList<HashMap> list_1 = deptDao.searchDeptMembers(keyword);
        ArrayList<HashMap> list_2 = userDao.searchUserGroupByDept(keyword);
        for (HashMap map_1 : list_1) {
            long deptId = (Long) map_1.get("id");
            ArrayList members = new ArrayList();
            for (HashMap map_2 : list_2) {
                long id = (Long) map_2.get("deptId");
                if (deptId == id) {
                    members.add(map_2);
                }
            }
            map_1.put("members", members);
        }
        return list_1;
    }

    @Override
    public ArrayList<HashMap> searchMembers(List param) {
        ArrayList<HashMap> list = userDao.searchMembers(param);
        return list;
    }

    @Override
    public List<HashMap> selectUserPhotoAndName(List param) {
        List<HashMap> list = userDao.selectUserPhotoAndName(param);
        return list;
    }

    @Override
    public String searchMemberEmail(int id) {
        String email = userDao.searchMemberEmail(id);
        return email;
    }

    @Override
    public TbUser getUserInfo(String userId) {
        return userDao.getUserInfo(userId);
    }
}
Test steps:
1. Registered user. The registration information includes: user basic information and permission information
2. If you are not logged in, observe the results returned in the background
3. After logging in, use the correct token request interface to observe the results
4. After logging in, use the wrong token request interface to observe the results
5. The effect of requesting some interfaces that require permission, but the current user does not have (have) the permission
Start project (redis to start)
1. Registered user. The registration information includes: user basic information and permission information

2. After successful registration, execute login


3. After logging in, use the correct token request interface to observe the results
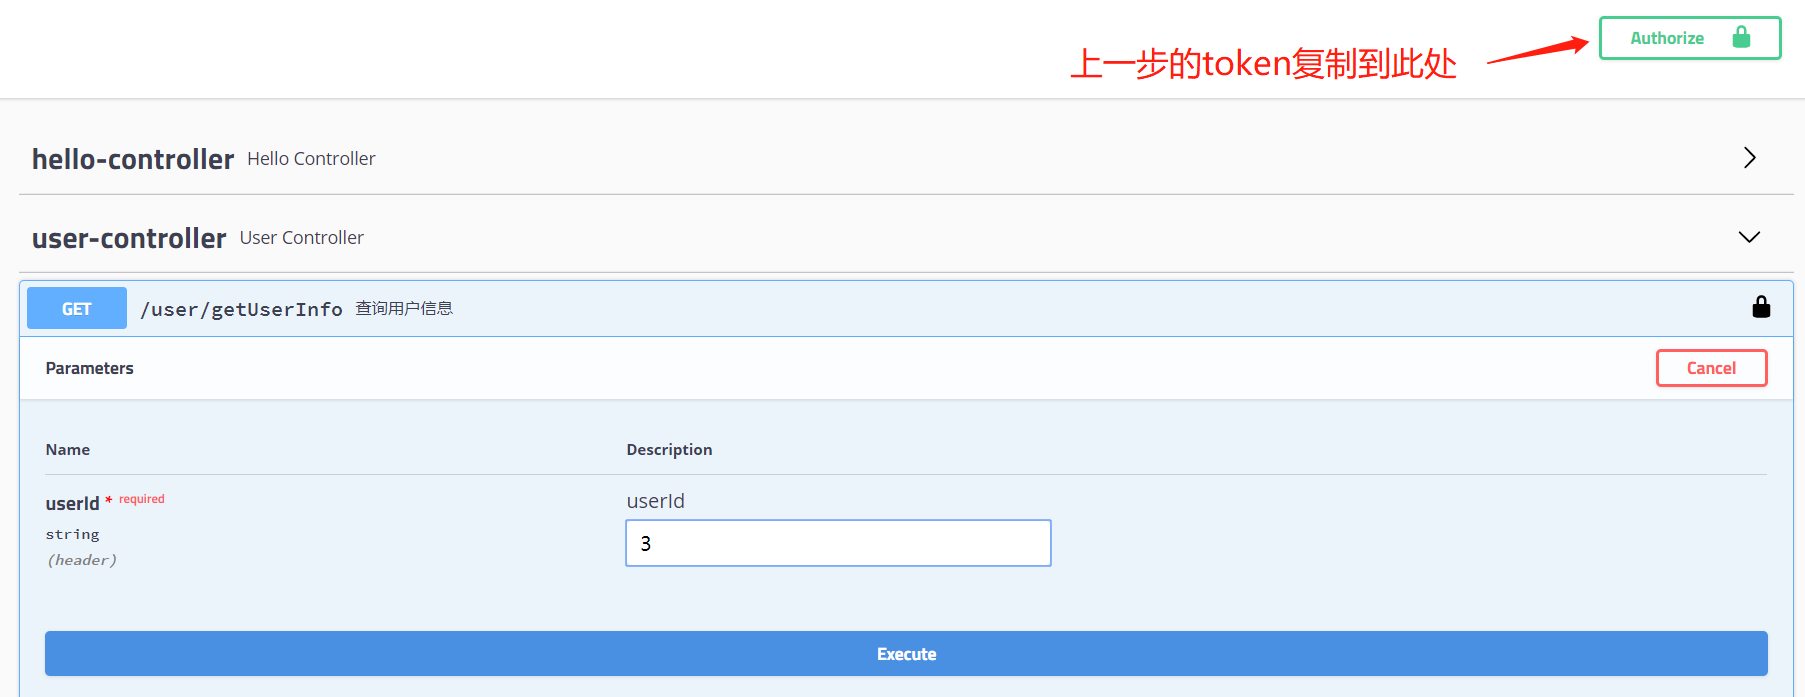
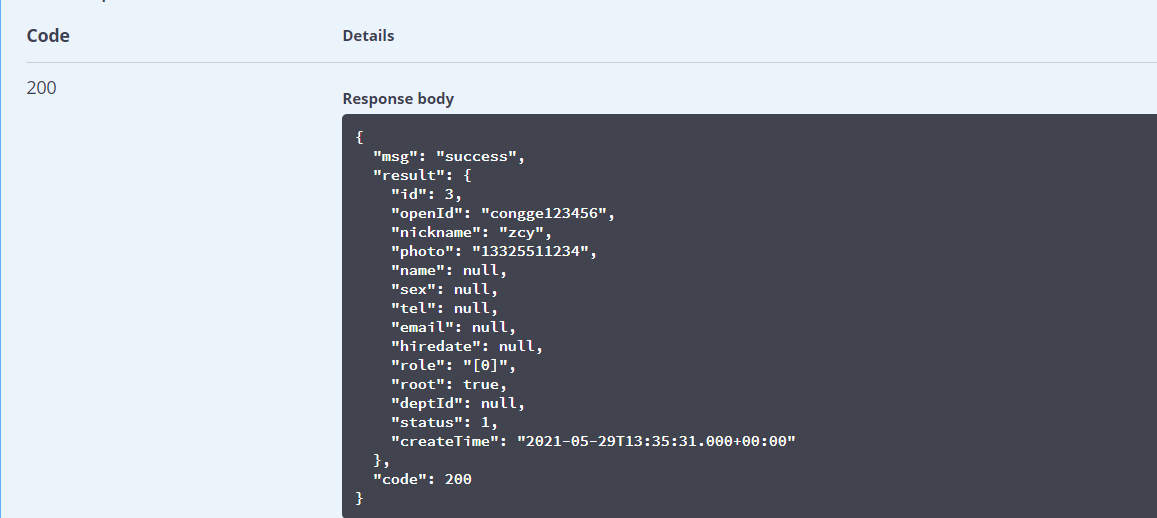
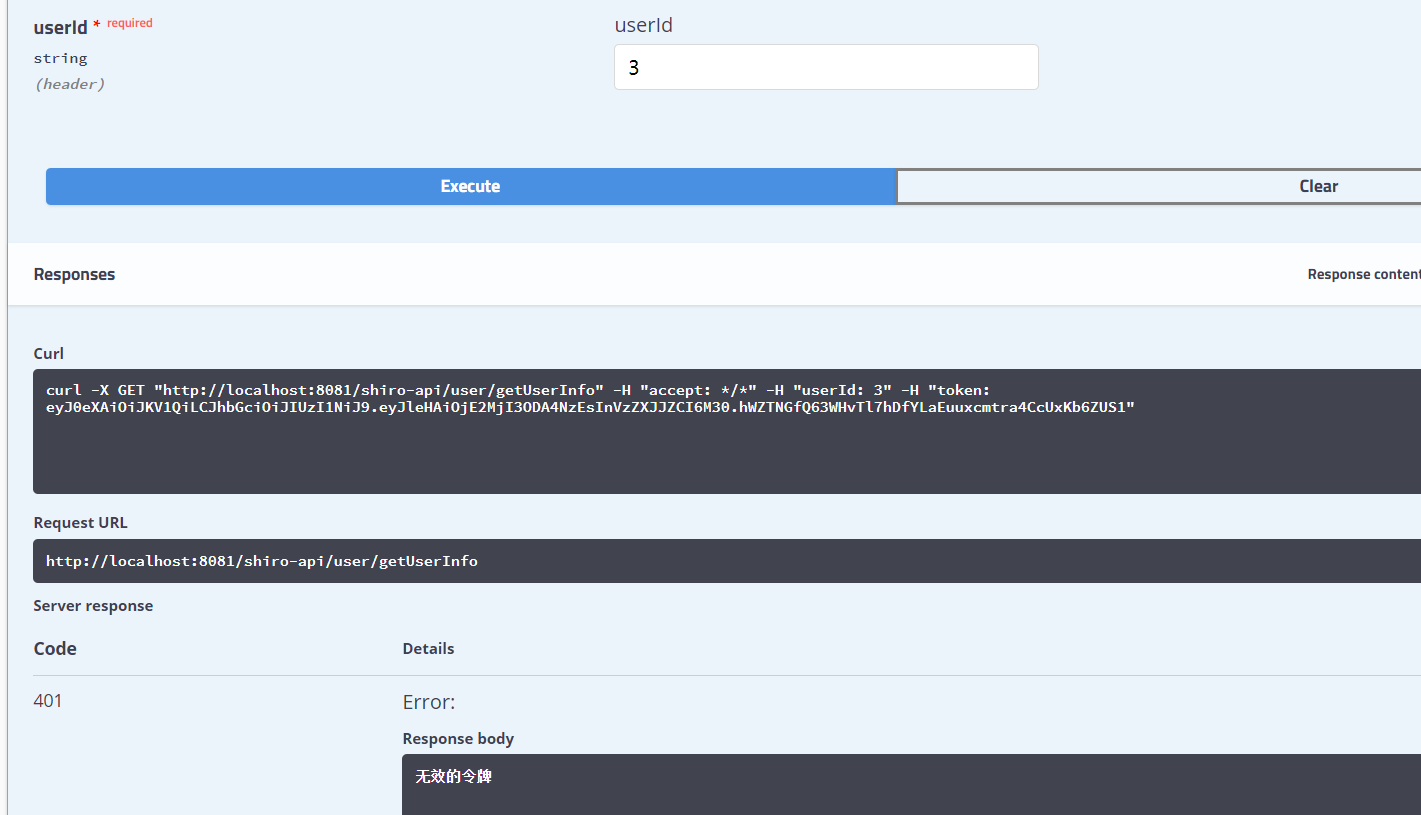
4. After logging in, use the wrong token request interface to observe the results
We modify the above token value and request the above interface again,
5. The effect of requesting some interfaces that require permission, but the current user does not have (have) the permission
For the getUser method in the helloController interface, we added this annotation for the first time, which means that you can access it as long as you have the permission of root or USER:ADD
@RequiresPermissions(value = {"ROOT","USER:ADD"},logical = Logical.OR)
	@GetMapping("/getUser")
    @ApiOperation("Test permission interception")
    @RequiresPermissions(value = {"ROOT","USER:ADD"},logical = Logical.OR)
    //@RequiresPermissions(value = {"AA","BB"},logical = Logical.OR)
    public BsResult getUser(){
        return BsResult.ok();
    }
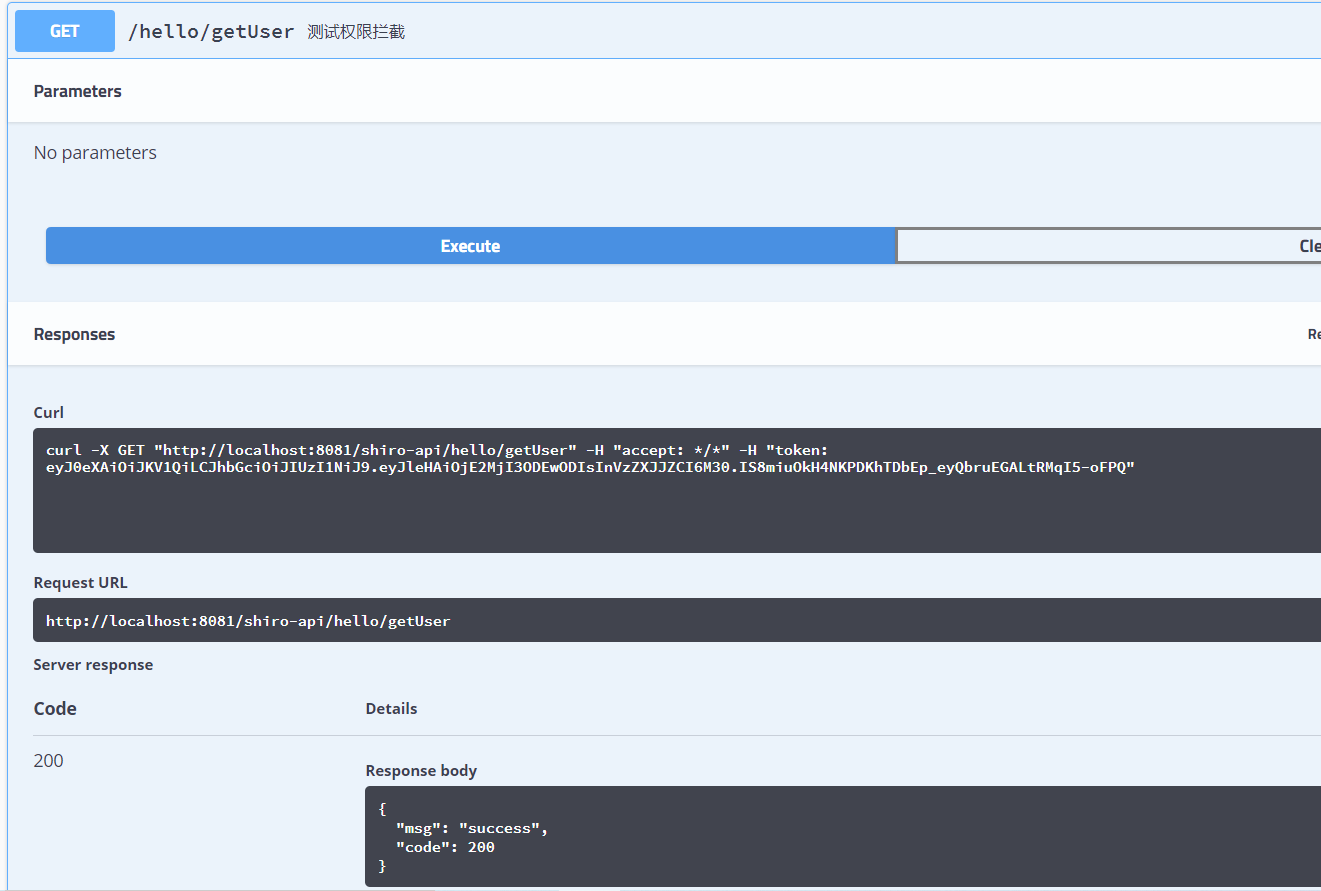
You can see that in this case, you can see the normal response results
If the user does not have the permission, the next comment will be tested again
	@GetMapping("/getUser")
    @ApiOperation("Test permission interception")
    //@RequiresPermissions(value = {"ROOT","USER:ADD"},logical = Logical.OR)
    @RequiresPermissions(value = {"AA","BB"},logical = Logical.OR)
    public BsResult getUser(){
        return BsResult.ok();
    }
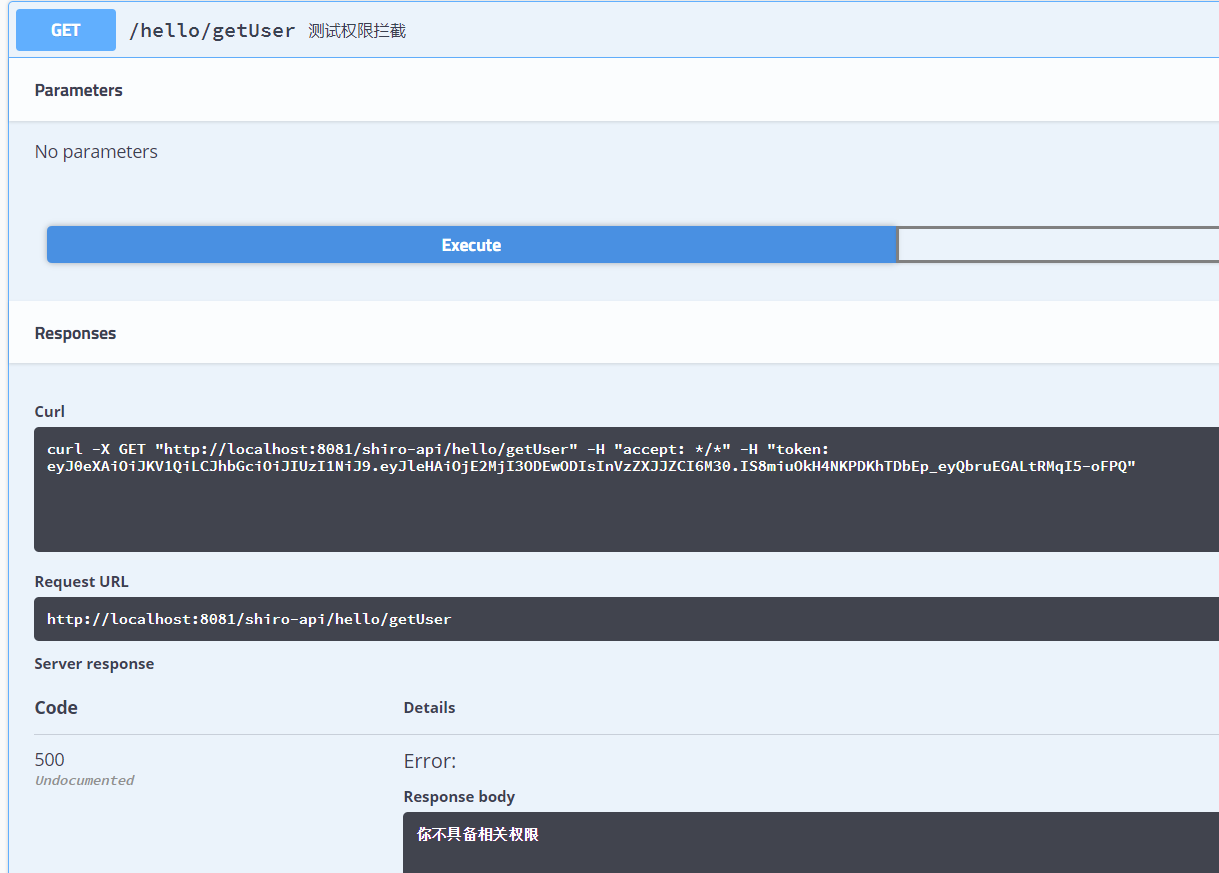
At this time, we can find that when we come to the logic of permission interception, we throw an exception without relevant permission, which achieves our original purpose
More testing and verification scenarios, interested students can continue to study in depth, this article will not be too much demonstration
This is the end of this article. Finally, thank you for watching!