This note is compiled when I study at station B. in order to better study, I will organize it into notes to prevent forgetting relevant knowledge points.
Spring overview
summary
Spring: it appeared around 2002, reducing the difficulty of enterprise development. Help to manage between modules and between classes, help developers create objects and manage the relationship between objects.
It was introduced into China in 2003 and widely used.
In 2017, a new popular framework SpringBoot appeared, with the same core idea as Spring.
Core technology: IoC and AOP, which can decouple modules and classes.
Dependency: class A uses the attributes or methods of class B, which is called class A dependency class B.
Official website: https://spring.io/
advantage
(1) Lightweight: the jar packages required by Spring are very small, generally less than 1M and hundreds of kb. The total number of jar packages required for core functions is about 3M. The Spring framework runs with less resources and high efficiency, and does not rely on other jars.
(2) For interface programming, decoupling
(3) AOP programming support
(4) Convenient integration of various excellent frameworks
(2) The advantages of (3) (4) will be realized in the following study.
Spring architecture
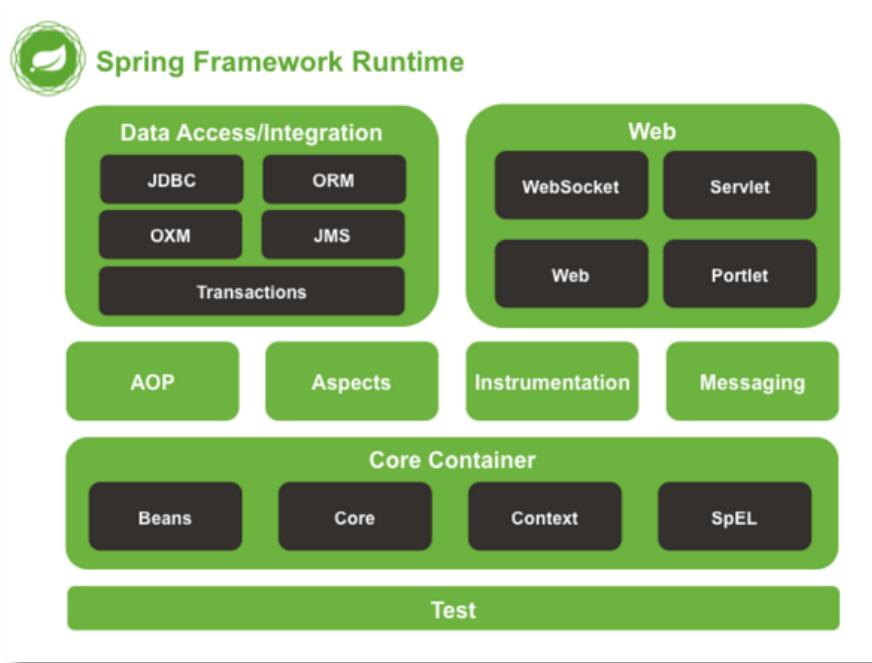
Spring consists of more than 20 modules, which can be divided into Data Access/Integration, Web, aspect oriented programming (AOP, Aspects), agent providing JVM, Messaging, Core Container and Test.
Spring family bucket: spring, spring MVC, spring boot, spring cloud
How to learn a framework: a framework is a piece of software written by others.
1) Knowing what the framework can do, mybatis can access the database and perform addition, deletion, modification and query on the data in the table.
2) The syntax of the framework. To complete a function, the framework needs to be supported by certain steps,
3) The internal implementation of the framework and how to do it within the framework. What is the principle.
4) Through learning, a framework can be realized.
IoC control reversal
IoC (Inversion of Control) is a concept and an idea. It refers to handing over the call right of the object directly controlled by the program code to the container, and realizing the assembly and management of the object through the container. Inversion of Control is the transfer of control over the object, from the program code itself to the external container. The creation of objects, attribute assignment and dependency management are realized through containers.
Implementation of Ioc:
Dependency lookup: DL (dependency lookup), the container provides callback interface and context environment to components.
Dependency injection: DI(Dependency Injection), the program code does not do location query, and these tasks are completed by the container itself.
The Spring framework uses dependency injection (DI) to implement IoC.
Spring container is a super factory, which is responsible for creating and managing all Java objects, which are called beans.
Spring container manages the dependencies between beans in the container. Spring uses "dependency injection" to manage the dependencies between beans. Use IoC to realize decoupling between objects.
Understanding of control reversal
Inversion of control is a theory, concept and idea.
Relationship between objects: create and manage the relationship between objects.
Forward conversion: developers use the new construction method to create objects in the code, and developers actively manage objects.
The original developer management and the permission to create objects are transferred to the container implementation outside the code. Instead of developers, containers manage objects, create objects, and assign values to attributes.
Why use ioc: the purpose is to reduce the changes to the code and realize different functions. Realize decoupling.
The underlying implementation is the reflection mechanism.
Spring's first program
Implementation steps:
(1) Add a module, create a new maven project, and select maven archetype QuickStart skeleton template
(2) Fill in engineering coordinates:
GroupId: com.kwxy
ArtifactId: ch01-hello-spring
Version: 1.0-SNAPSHOT
(3) Set the Module name to CH01 Hello spring, click finish and wait for the maven project to be built. If the console displays the word BUILD SUCCESS, the construction is successful
(4) Right click the java directory under src/main and src/test to mark directory as -- > sources root
(5) Create a new resources directory under src/main, and right-click mark directory as -- > resources root
(6) Delete the APP class files created by default. These files are in the main and test directories respectively
(7) Delete POM XML file, change the compiled and running jdk version to 1.8
(8) Add the configuration of 'specify resource location' in the build tab. The configuration is roughly as follows:
<?xml version="1.0" encoding="UTF-8"?>

<project xmlns="http://maven.apache.org/POM/4.0.0" xmlns:xsi="http://www.w3.org/2001/XMLSchema-instance"
         xsi:schemaLocation="http://maven.apache.org/POM/4.0.0 http://maven.apache.org/xsd/maven-4.0.0.xsd">
    <modelVersion>4.0.0</modelVersion>

    <groupId>com.kwxy</groupId>
    <artifactId>ch01-hello-spring</artifactId>
    <version>1.0-SNAPSHOT</version>


    <properties>
        <project.build.sourceEncoding>UTF-8</project.build.sourceEncoding>
        <maven.compiler.source>1.8</maven.compiler.source>
        <maven.compiler.target>1.8</maven.compiler.target>
    </properties>

    <dependencies>
        <!--unit testing -->
        <dependency>
            <groupId>junit</groupId>
            <artifactId>junit</artifactId>
            <version>4.11</version>
            <scope>test</scope>
        </dependency>
    </dependencies>

    <build>
        <resources>
            <resource>
                <directory>src/main/java</directory><!--Directory of-->
                <includes><!--Including the.properties,.xml The files will be scanned-->
                    <include>**/*.properties</include>
                    <include>**/*.xml</include>
                </includes>
                <filtering>false</filtering>
            </resource>
        </resources>
    </build>
</project>
(9) Add Spring dependency (right click POM. XML - > Maven - > reimport)
<!--Spring Dependence of-->
<dependency>
    <groupId>org.springframework</groupId>
    <artifactId>spring-context</artifactId>
    <version>5.2.4.RELEASE</version>
</dependency>
<!--
add to spring-context After dependency, the following will be automatically associated jar
spring-aop
spring-beans
spring-core
spring-expression
-->
(10) Create business interface and implementation class
Interface:
package com.kwxy.service;

public interface SomeService {
    void doSome();
}
Implementation class:
package com.kwxy.service.impl;

import com.kwxy.service.SomeService;

public class SomeServiceImpl implements SomeService {

    /**
     * spring By default, the parameterless constructor method is called to create the object.
     * If there is no parameterless construction method, an error is reported: No default constructor found
     */
    public SomeServiceImpl() {
        System.out.println("SomeServiceImpl Nonparametric construction method of");
    }

    @Override
    public void doSome() {
        System.out.println("Yes SomeServiceImpl of doSome()method");
    }
}
(11) Create Spring configuration file
As in servlets, we need to be on the web Register in XML. Just as we want the server to automatically create and manage servlet objects, we also need a similar configuration in Spring to automatically create the SomeServiceImpl object just now.
Now create an XML file in the src/main/resources / directory. The file name can be arbitrary, but the name suggested by Spring is ApplicationContext xml.
IDEA has designed the template of Spring configuration file for us: right click resources – > New – > XML configuration file – > Spring config
The template is as follows:
<?xml version="1.0" encoding="UTF-8"?>
<beans xmlns="http://www.springframework.org/schema/beans"
       xmlns:xsi="http://www.w3.org/2001/XMLSchema-instance"
       xsi:schemaLocation="http://www.springframework.org/schema/beans http://www.springframework.org/schema/beans/spring-beans.xsd">

</beans>
Note that the constraint file used in the Spring configuration file is an xsd file. The function is similar to the dtd constraint file of the sql mapping file of Mybatis, but the xsd constraint is stronger:
1) Define what elements are in an xml document
2) Define what attributes exist in an xml document
3) Define which child elements an element in an xml document can have and the order of the elements
4) Define the data types of elements and attributes in an xml document
< beans / > is the root label of the configuration file. In Spring, java objects are called beans. Register java objects under this tag:
<bean id="someService" class="com.kwxy.service.SomeServiceImpl" scope="prototype"/>
1. Declaring java objects is left to Spring to create and manage. This step is called declaring bean s.
Equivalent to:
SomeService someService = new com.kwxy.service.SomeServiceImpl();
Then put the created object into the container of Spring (map < ID, Object >):
private final Map<String, Object> factoryBeanObjectCache = new ConcurrentHashMap(16);
factoryBeanObjectCache.put("service",someService);
A bean tag declares an object.
2. < bean / > tag attributes:
Class: the fully qualified name of the class, which cannot be an interface (Spring uses reflection to create objects);
class can be a non custom object, such as "Java util. Date "can still be created by Spring.
id: custom object name, which must be a unique value. Represents the name of the object in Spring. Through this name, you can find the object from Spring and get the object.
Scope: Specifies the scope of the bean object (the scope and visibility of the object).
The desirable values of scope are:
1) Single example: singleton, the default value, means that there is only one object with this name in the spring container.
2) Prototype: prototype, which means that a new object is created every time getBean() is used.
(12) Create test method in test class
public class MyTest {
    @Test
    public void test01(){
        //Define the Spring configuration file, which is under the root directory of the classpath
        String config = "applicationContext.xml";

        //Create a Spring container object Different implementation classes of interfaces are used according to the location of Spring configuration files
        //1. If the Spring configuration file is in the classpath, use ClassPathXmlApplicationContext
        //2. If the Spring configuration file is placed under the root of the project (the same level directory as src and target), use FileSystemXmlApplicationContext
        //When you create a Spring container, you will read the bean tag in the configuration file and create the corresponding object.
        //ClassPathXmlApplicationContext: indicates the configuration file of spring loaded from the classpath
        ApplicationContext ac = new ClassPathXmlApplicationContext(config);

        //Get the object from the container and use getBean ("< bean > id")
        SomeService service = (SomeService) ac.getBean("someService");

        //Call business method
        service.doSome();
    }

    /**
     * Get the information of java objects in spring container
     */
    @Test
    public void test02(){
        String config="applicationContext.xml";
        ApplicationContext ac = new ClassPathXmlApplicationContext(config);
        //Use the method provided by spring to get the number of objects defined in the container
        int nums  = ac.getBeanDefinitionCount();
        System.out.println("Number of objects defined in container:"+nums);
        //The name of each defined object in the container
        String names [] = ac.getBeanDefinitionNames();
        for(String name:names){
            System.out.println(name);
        }
    }
}
Bean assembly
Default assembly method
When we create the ApplicationContext object, Spring will read the < bean / > of the configuration file and execute the parameterless constructor of the corresponding class. Adding an output statement to the parameterless constructor of these classes can verify the above conclusion.
The ApplicationContext container will assemble all the objects in it at one time when the container object is initialized.
If you want to use these objects in future code, you just need to get them directly from memory. High execution efficiency. But it takes up memory.
Scope of Bean in container
When creating a Bean instance through the spring container, you can not only complete the instantiation of the Bean, but also specify a specific scope for the Bean through the scope attribute. Spring supports multiple scopes.
(1) Singleton: Singleton mode. That is, in the whole Spring container, the Bean defined with singleton will be singleton, and the object with this name has only one instance. The default is single instance.
(2) Prototype: prototype pattern. That is, every time you use the getBean method to obtain the same instance, it is a new instance.
(3) Request: for each HTTP request, a different Bean instance will be generated.
(4) Session: for each different HTTP session, a different Bean instance will be generated.
be careful:
For the values of request and session of scope, the scope is valid only when Spring is used in Web applications.
For the singleton mode with a scope of singleton, the Bean is assembled when the container is created;
For the prototype pattern whose scope is prototype, the Bean instance is assembled only when the Bean instance is used in the code.
We just created the object automatically without assigning a value to the attribute of the object. Two methods of assigning values to attributes are introduced later.
XML based DI
By assigning values to the attributes of the object in the xml configuration file.
Setpoint injection (Master)
Also known as set injection, it assigns values to attributes by calling the setter of attributes in the class.
Simple type (basic type and String type in java)
Under the < bean / > tag, add: < property name = "property name" value = "property value of simple type" / >
Each property tag completes the assignment of a property.
Note: the principle of Spring executing the property tag is to execute the set method corresponding to the value of the name attribute. It doesn't care about the specific implementation of the set method and whether the attributes really exist.
reference type
When a property value of a specified bean is an instance of another bean, the reference relationship between them is specified through Ref. The value of ref must be the id value of a bean.
For example: create a school class:
package com.kwxy.domain;

public class School {
    private  String name;
    private  String address;

    public void setName(String name) {
        this.name = name;
    }

    public void setAddress(String address) {
        this.address = address;
    }

    @Override
    public String toString() {
        return "School{" +
                "name='" + name + '\'' +
                ", address='" + address + '\'' +
                '}';
    }
}
Add the School type attribute to the student class:
package com.kwxy.domain;

public class Student {

    private String name;
    private int age;

    //reference type
    private  School school;

    public Student() {
        System.out.println("Student Nonparametric construction method of");
    }

    public void setName(String name) {
        this.name = name;
    }

    public void setAge(int age) {
        this.age = age;
    }

    public void setSchool(School school) {
        System.out.println("setSchool:"+school);
        this.school = school;
    }

    @Override
    public String toString() {
        return "Student{" +
                "name='" + name + '\'' +
                ", age=" + age +
                ", school=" + school +
                '}';
    }
}
Add the following bean s to the Spring configuration file:
	<!--statement School-->
    <bean id="mySchool" class="com.kwxy.domain.School">
        <property name="name" value="Peking University" />
        <property name="address" value="Haidian District " />
    </bean>

    <!--ref As attribute-->
    <bean id="myStudent" class="com.kwxy.domain.Student" >
        <property name="name" value="Li Si" />
        <property name="age" value="20" />
        <property name="school" ref="mySchool" /> <!--setSchool(mySchool) -->
    </bean>

    <!--ref As a child tag-->
    <bean id="myStudent2" class="com.kwxy.domain.Student">
        <property name="name" value="Zhang San" />
        <property name="age" value="22" />
        <property name="school">
            <ref bean="mySchool"/>
        </property>
    </bean>
Construction injection (understanding)
Execute the parameterized construction of the class, and assign values to the attributes while constructing the object.
1. Add a parameter constructor to the Student class:
//Parameter construction method defined
public Student(String name, int age, School school) {
    	System.out.println("Student Parametric construction method");
        this.name = name;
        this.age = age;
        this.school = school;
    }
2. Configure the xml configuration file:
<!--use name attribute-->
    <bean id="myStu" class="com.kwxy.domain.Student" >
        <constructor-arg name="age" value="22"/>
        <constructor-arg name="name" value="Zhang San" />
        <constructor-arg name="school" ref="mySch" />
    </bean>

<!--statement School-->
    <bean id="mySch" class="com.kwxy.domain.School">
        <property name="name" value="Jiangsu Normal University" />
        <property name="address" value="Kewen College" />
    </bean>
The attributes used to specify parameters in the < constructor Arg / > tag are:
Name: Specifies the parameter name, which refers to the formal parameter in the construction method.
index: indicates that the parameter corresponds to the first parameter of the constructor, starting from 0. However, this attribute should not be used, but it should be noted that if the parameter types are the same or there is a containment relationship between them, it is necessary to ensure that the assignment order is consistent with the parameter order in the constructor.
Value: the formal parameter type of the constructor is a simple type. Use value
ref: if the formal parameter type of the construction method is a reference type, use ref
Automatic injection of reference types
For the injection of reference type attributes, you can also not display the injection in the configuration file. You can implicitly auto inject the reference type attribute by setting the autowire attribute value for the < bean / > tag (the default is not to automatically inject the reference type attribute).
According to the different judgment criteria of automatic injection, it can be divided into two types:
(1) byName: automatically inject by name
(2) byType: automatically inject according to the type
byName mode automatic injection
When the id value of the caller bean in the configuration file is in line with the attribute name of the caller bean class in the code, the byName can be used to allow the container to automatically inject caller bean to the caller bean.
The container is automatically injected by comparing the attribute name of the caller's bean class with the id of the callee's bean in the configuration file.
For example, in the Student class, if the attribute name of the school type is "school", then in the xml configuration file:
<bean id="mySchool" class="com.kwxy.domain.School" autowire="byName">
     <property name="name" value="Peking University" />
     <property name="address" value="Haidian District " />
</bean>


<bean id="myStudent" class="com.kwxy.domain.Student" >
     <property name="name" value="Li Si" />
     <property name="age" value="20" />
    <!--<property name="school" ref="mySchool" />-->
</bean>
byType mode automatic injection
Automatic injection in byType mode requires that the class specified by the class attribute of the caller bean in the configuration file should be the same as the reference type attribute type of the bean class in the code.
That is, it is either the same or has an is-a relationship (subclass or implementation class). However, there can only be one such homologous called bean. If there is more than one, the container does not know which one to match.
    <!--
        byType(Injection by type) :  java The data type and of the reference type in the class spring In container (profile)<bean>of class attribute
                            It's homologous, like this bean Can be assigned to a reference type
         Homology means one kind:
          1.java The data type and of the reference type in the class bean of class The value of is the same.
          2.java The data type and of the reference type in the class bean of class The value of the parent-child relationship.
          3.java The data type and of the reference type in the class bean of class Value interface and implementation class relationship
         Syntax:
         <bean id="xx" class="yyy" autowire="byType">
            Simple type attribute assignment
         </bean>

         Note: in byType In, in xml Declared in configuration file bean There can only be one qualified,
              The extra one is wrong
    -->

    <!--byType Automatic injection-->
    <bean id="myStudent" class="com.kwxy.domain.Student" autowire="byType">
        <property name="name" value="Jingge" />
        <property name="age" value="22"/>
    </bean>

    <!--statement School-->
    <!--<bean id="mySchool" class="com.kwxy.domain.School">
        <property name="name" value="Tsinghua University" />
        <property name="address" value="Haidian District " />
    </bean>-->

    <!--statement School Subclass object of-->
    <bean id="xiaoXueSchool" class="com.kwxy.domain.XiaoXueSchool">
        <property name="name" value="Zhongxing primary school" />
        <property name="address" value="Daxing District of Beijing"/>
    </bean>
Specify multiple Spring configuration files for the application
In practical application, with the increase of application scale, the number of beans in the system also increases greatly, resulting in the configuration file becoming very large and bloated.
In order to avoid this situation and improve the readability and maintainability of the configuration file, the Spring configuration file can be decomposed into multiple configuration files.
Configuration file containing relationship: there is a general file in multiple configuration files, which introduces other sub files through < import / >.
In Java code, you only need to initialize the container with the general configuration file.
For example: spring school xml,spring-student.xml configuration file and a total XML general configuration file.
In total In XML:
<?xml version="1.0" encoding="UTF-8"?>
<beans xmlns="http://www.springframework.org/schema/beans"
       xmlns:xsi="http://www.w3.org/2001/XMLSchema-instance"
       xsi:schemaLocation="http://www.springframework.org/schema/beans http://www.springframework.org/schema/beans/spring-beans.xsd">

    <!--
         Profiles containing relationships:
         spring-total Indicates the main configuration file: if there are other configuration files, the main configuration file generally does not define objects.
         Syntax:<import resource="Path to other configuration files" />
         keyword:"classpath:" Path representation class( class Directory where the file is located),
         stay spring To specify the location of other files in the configuration file of, you need to use classpath,tell spring Where to load and read files.
    -->

    <!--Loading is a list of files-->
    <!--
    <import resource="classpath:ba06/spring-school.xml" />
    <import resource="classpath:ba06/spring-student.xml" />
    -->

    <!--
       Wildcards can be used in configuration files that contain relationships(*: Indicates any character). If wildcard is used, the configuration file must be placed in a directory
       That is, the configuration file should be placed in resources In the next directory. Create this directory yourself, such as the following ba06.
       Note: the configuration file name of the master cannot be included in the range of wildcards (cannot be called spring-total.xml)
    -->
    <import resource="classpath:ba06/spring-*.xml" />
</beans>
Note: the profile name of the master cannot be included in the range of wildcards.
Annotation based DI
DI is realized through the following four steps:
(1) Create Maven project in POM Adding AOP dependency to XML
<dependency>
  <groupId>org.springframework</groupId>
  <artifactId>spring-aop</artifactId>
   <version>5.2.4.RELEASE</version>
</dependency>
If you're in POM If spring context is added to XML, this dependency will automatically include spring AOP without adding it again.
(2) You need to change the header of the configuration file and add spring context XSD constraint
Constraint in% SPRING_HOME%\docs\spring-framework-reference\html\xsd-configuration.html file.
<beans xmlns="http://www.springframework.org/schema/beans"
       xmlns:xsi="http://www.w3.org/2001/XMLSchema-instance"
       xmlns:context="http://www.springframework.org/schema/context"
       xsi:schemaLocation="http://www.springframework.org/schema/beans
       http://www.springframework.org/schema/beans/spring-beans.xsd
       http://www.springframework.org/schema/context
       http://www.springframework.org/schema/context/spring-context.xsd">

</beans>
If you use IDEA for editing, this step can be omitted. When you execute step 4, you can automatically add it according to the prompt.
(3) Add annotation to class
package com.kwxy.domain;

import org.springframework.stereotype.Component;

/**
 * @Component: Creating objects is equivalent to the function of < bean >
 *     Attribute: value is the name of the object, that is, the id value of the bean,
 *          value The value of is unique, and the created object is one in the whole spring container
 *     Location: above the class
 *
 *  @Component(value = "myStudent")Equivalent to
 *   <bean id="myStudent" class="com.kwxy.domain.Student" />
 *
 *  spring Consistent with the @ Component function, the annotations for creating objects include:
 *  1.@Repository(Used on the persistence layer class): on the implementation class of dao,
 *               Represents the creation of dao objects, which can access the database.
 *  2.@Service(Used on the business layer class): on the implementation class of the service,
 *              Create a service object. The service object is used for business processing and can have transaction and other functions.
 *  3.@Controller(Used on the controller: it is placed on the controller (processor) class to create the controller object,
 *              The controller object can accept the parameters submitted by the user and display the processing results of the request.
 *  The syntax of the above three annotations is the same as @ Component. Can create objects, but these three annotations have additional functions.
 *  @Repository,@Service,@Controller Is to layer the objects of the project.
 *  The default is a singleton object
 */
@Component("myStudent")
public class Student {
    private String name;
    private int age;

    public Student(String name, int age, School school) {
        this.name = name;
        this.age = age;
        this.school = school;
    }

    //reference type
    private  School school;

    public Student() {
        System.out.println("Student Nonparametric construction method of");
    }

    public void setName(String name) {
        this.name = name;
    }

    public void setAge(int age) {
        this.age = age;
    }

    public void setSchool(School school) {
        System.out.println("setSchool:"+school);
        this.school = school;
    }

    @Override
    public String toString() {
        return "Student{" +
                "name='" + name + '\'' +
                ", age=" + age +
                ", school=" + school +
                '}';
    }
}
(4) Declare the component scanner. Under the < beans / > tab of the Spring configuration file:
    <!--Declaration component scanner(component-scan),Component is java object
    base-package: Specify the package name of the annotation in your project.
    component-scan operation mode: spring Scan traversal base-package Specified package,
    All classes in the package and sub package, find the annotation in the class, create objects according to the function of the annotation, or assign values to attributes.

   Joined component-scan Tag, change of configuration file:
    1.Add a new constraint file spring-context.xsd
    2.Give the new constraint file a namespace name
-->
    <context:component-scan base-package="com.kwxy.domain" />

    <!--Three ways to specify multiple packages-->
    <!--The first way: use multiple component scanners to specify different packages-->
    <context:component-scan base-package="com.kwxy.domain"/>
    <context:component-scan base-package="com.kwxy.domain2"/>

    <!--Second way: use separator(;or,)Separating multiple package names-->
    <context:component-scan base-package="com.kwxy.domain;com.kwxy.domain2" />

    <!--The third way: specify the parent package-->
    <context:component-scan base-package="com.kwxy" />
Define the annotation @ component of the Bean (Master)
@Component: creates an object of a class, which is equivalent to < bean / >. The default is a singleton object
Attribute: value indicates the name of the object (bean id)
Location: above the class definition, it indicates the object to create this class.
For example: @ Component(value = "myStudent") is equivalent to < bean id = "mystudent" class = "com. Kwxy. Domain. Student" / >
In addition, Spring also provides three annotations for creating objects:
The @ Repository is used to annotate DAO implementation classes
The @ Service is used to annotate the Service implementation class
The @ Controller is used to annotate the Controller implementation class. These three annotations and @ Component can create objects
However, these three annotations have other meanings, @ Service creates business layer objects, which can be added to transaction functions, and the objects created by @ Controller annotation can be used as processors to receive user requests.
@Repository, @ Service, @ Controller is the refinement of @ Component annotation, marking objects of different layers. That is, persistence layer object, business layer object and control layer object.
@Component does not specify the value attribute, and the bean id is the lowercase initial of the class name.
If you want to use DI in the form of these annotations, you must declare the component scanner in the spring configuration file:
<context:component-scan base-package="Package name of annotation class" />
Simple type attribute injection @ value (Master)
@Component("myStudent")
public class Student {
    /**
     * @Value: Attribute assignment of simple type
     *   Attribute: value is of String type and represents the attribute value of simple type
     *   Location: 1 The set method is not required for attribute definition. It is recommended.
     *         2.Above the set method
     */
    @Value("Li Jing")
    private String name;

    private int age;

    public void setName(String name) {
        this.name = name;
    }

    @Value("23")
    public void setAge(int age) {
        this.age = age;
    }

    @Override
    public String toString() {
        return "Student{" +
                "name='" + name + '\'' +
                ", age=" + age +
                '}';
    }
}
byType auto inject @ Autowired (Master)
The annotation @ Autowired needs to be used on the reference attribute. By default, the annotation uses the method of automatically assembling beans by type.
When using this annotation to complete attribute injection, there is no need for setters in the class. Of course, if the property has a setter, it can also be added to the setter.
@Autowired: the annotation provided by the spring framework, which realizes the assignment of reference type. byType automatic injection is used by default;
When there are multiple types matching, use the name of the object variable to be injected as the id of the bean and look it up in the spring container. If it is found, the injection can also be successful. If you can't find it, report an error.
That is, Autowired defaults to byType first. If multiple bean s are found, they are compared by byName. If multiple names are the same, an exception is reported.
When it is uncertain which bean to inject, the annotation @ Autowired and @ Qualifier can be used together to specify the id of a bean to be injected.
For example, the School class:
@Component("mySchool")
public class School {
    @Value("Normal University")
    private  String name;
    @Value("Xuzhou Kewen")
    private  String address;

    public void setName(String name) {
        this.name = name;
    }

    public void setAddress(String address) {
        this.address = address;
    }

    @Override
    public String toString() {
        return "School{" +
                "name='" + name + '\'' +
                ", address='" + address + '\'' +
                '}';
    }
}
Student class:
@Component("myStudent")
public class Student {
    /**
     * @Value: Attribute assignment of simple type
     *   Attribute: value is of String type and represents the attribute value of simple type
     *   Location: 1 The set method is not required for attribute definition. It is recommended.
     *         2.Above the set method
     */
    @Value("Li Jing")
    private String name;

    @Value("23")
    private int age;

    /**
     * reference type
     * @Autowired: spring The annotation provided by the framework realizes the assignment of reference types.
     * spring The reference type is assigned by annotation in. The principle of automatic injection is used. Byname and bytype are supported
     * @Autowired:byType auto injection is used by default.
     *
     *  Location: 1) on the attribute definition, there is no need for the set method, which is recommended
     *       2)Above the set method
     */
    @Autowired
    private  School school;


    public void setName(String name) {
        this.name = name;
    }


    public void setAge(int age) {
        this.age = age;
    }

    public void setSchool(School school) {
        System.out.println("setSchool:"+school);
        this.school = school;
    }

    @Override
    public String toString() {
        return "Student{" +
                "name='" + name + '\'' +
                ", age=" + age +
                ", school=" + school +
                '}';
    }
}
To prevent null pointer exceptions, it is recommended that the @ AutoWired annotation be added to the constructor with parameters. For specific reasons, see: A Bing blog
byName automatically injects @ Autowired and @ qualifier (Master)
The annotation @ Autowired and @ Qualifier need to be used together on the reference attribute@ The value attribute of Qualifier is used to specify the id value of the Bean to be matched. Class does not need a set method, but can also be added to the set method.
For example, to inject the school class automatically, students only need to add comments in front of the school attribute:
@Autowired
@Qualifier("mySchool")//It is the same as the @ component annotation value of the School class
private School school;
@Autowired also has an attribute required, and the default value is true, which means that the program will be terminated when the matching fails. If the value is set to false, the matching fails and will be ignored. The unmatched property value is null.
JDK annotation @ Resource automatic injection (Master)
Spring provides support for @ Resource annotation in jdk.
@Resource annotations can match beans by name or type.
The default is to inject by name. Using this annotation requires that the JDK must be version 6 or above.
@Resource can be on property or set method.
The essence is to use @ Resource annotation instead of @ Autowired and @ Qualifier annotations.
(1) byType injection reference type attribute
@If the Resource annotation does not take any parameters, it is injected by name by default. If Bean cannot be injected by name, Bean matching injection will be carried out according to type.
If students want to inject the school class automatically, they only need to add comments before the school attribute:
@Resource
private School school;
(2) byName injection reference type attribute
@If the Resource annotation specifies its name attribute, the value of name is the id of the Bean matched by name.
If students want to inject the school class automatically, they only need to add comments before the school attribute:
@Resource(name = "mySchool")
private School school;
If the JDK is version 11, add the following dependencies when learning the @ Resource annotation, otherwise an error will be reported. Because the modified module is removed in the higher version.
<dependency>
	<groupId>javax.annotation</groupId>
	<artifactId>javax.annotation-api</artifactId>
	<version>1.2</version>
</dependency>
When an interface has multiple implementation classes
When there are multiple implementations of an interface, using @ Autowired directly may report an exception. The reason is that Autowired injects by default according to byType and finds multiple qualified bean s, but does not know which one to inject, and an exception will be reported.
Mode 1:
Use the annotation @ Autowired in conjunction with @ Qualifier@ The value attribute of Qualifier is used to specify the id value of the Bean to be matched.
Mode 2:
@If the Resource annotation specifies its name attribute, the value of name is the id of the Bean matched by name.
Comparison between annotation and XML
The advantages of annotation are:
(1) Convenient
(2) Intuitive
(3) Efficient (less code, less complex than writing configuration files)
Its disadvantages are also obvious: it is written into Java code by hard coding, and the modification needs to recompile the code
The advantages of XML are:
(1) Configuration and code are separate
(2) Make changes in xml without compiling code. Just restart the server to load the new configuration
The disadvantages of xml are: writing is cumbersome, inefficient, and large-scale projects are too complex.
Another difference between xml and annotation method is that xml method can create multiple objects of a class through bean tags, but annotation method cannot, because a class cannot have two annotations with the same name.
AOP aspect oriented programming
AOP overview
AOP (aspect oriented programming), aspect oriented programming. Aspect oriented programming is to consider the running process of the program from a dynamic point of view.
The bottom layer of AOP is realized by dynamic agent mode.
Two kinds of agents are used: dynamic agent of JDK and dynamic agent of CGLIB. AOP can be regarded as the standardization and standardization of dynamic agent.
Aspect oriented programming is to encapsulate the cross business logic into aspects and weave the aspects into the main business logic by using the function of AOP container.
The so-called cross business logic refers to the common code that has nothing to do with the main business logic, such as security check, transaction, log, cache, etc.
If AOP is not used, code entanglement will occur, that is, cross business logic and main business logic are mixed together. In this way, the main business logic will become confused.
For example, before and after the real transfer business logic, transfer requires cross business logic such as permission control, logging, loading transactions and ending transactions, which are not directly related to the main business logic.
However, the proportion of their code volume can reach half or even more of the total code volume. Their existence not only produces a large number of "redundant" codes, but also greatly interferes with the main business logic - transfer.
AOP related terms
(1) Aspect
Aspect generally refers to cross business logic. The transaction processing and log processing in the above example can be understood as aspects. A common aspect is Advice. In fact, it is an enhancement of the main business logic.
(2) Join point
Connection point refers to the specific method that can be woven into the section. Generally, the methods in the business interface are connection points.
(3) Pointcut
A pointcut is a collection of one or more declared join points. Specify a set of methods through pointcuts. Methods marked final cannot be used as join points and pointcuts. Because the final can not be modified, can not be enhanced.
(4) Target object
Target object refers to the object to be enhanced. That is, the object of the class containing the main business logic. If the object of StudentServiceImpl in the above example is enhanced, this class is called the target class, and this class of object is called the target object. Of course, it doesn't matter if it is not enhanced.
(5) Advice
Notification is an implementation of aspect, which can complete the simple weaving function (the weaving function is completed here). Advice is also called enhancement. The MyInvocationHandler in the above example can be understood as a notification. In other words, notification defines the time point when the enhanced code cuts into the target code, whether it is executed before or after the execution of the target method. Different notification types lead to different cut in times.
The pointcut defines the position of the pointcut and notifies the time of the pointcut.
Implementation of AOP
Technical implementation framework of AOP:
Spring: the AOP implementation of spring is relatively cumbersome, which is generally used in transaction processing.
aspectJ: an open source framework dedicated to AOP, which belongs to the Eclipse foundation.
The Spring framework integrates the functions of aspectJ.
aspectJ framework can implement AOP in two ways:
1) xml configuration files are generally used to configure global transactions;
2) Use annotations. This method is generally used in project development.
Implementation of AOP by AspectJ
Notification type of AspectJ
The execution time of the aspect, which is called advice in the specification
There are five types of notifications commonly used in AspectJ, which are reflected in five different annotations added to the aspect:
(1) Advance notice @ Before
(2) Post notification @ AfterReturning
(3) Surround notification @ Around
(4) Exception notification @ AfterThrowing
(5) Final notification @ After
Pointcut expression for AspectJ
Represents the execution position of the slice, using the pointcut expression
AspectJ defines special expressions for specifying pointcuts. The prototype of the expression is:
execution (
    	[modifiers-pattern]  Access type
	ret-type-pattern return type
	[declaring-type-pattern]  Fully qualified class name
	name-pattern(param-pattern) Method name(Parameter type and number)
	[throws-pattern]  Throw exception type
	 )
The object to be matched by the pointcut expression is the method name of the target method. Therefore, the execution expression is obviously the signature of the method. Note that the part with [] in the expression indicates that the part can be omitted, and the parts are separated by spaces.
The following symbols can be used:
*: 0 up to any character
..: used in method parameters to represent any number of parameters; Used after the package name to indicate the current package and its sub packages
+: used after the class name to represent the current class and its subclasses; Used after the interface name to represent the current interface and its implementation class
For example:
execution(* *..service.*.*(..))
The above expression means that the return value is arbitrary, and all methods in all classes (interfaces) under all servce sub packages under all packages are specified as the pointcut
skill:
Execution (access permission method return value method declaration (parameter) exception type) method return value and method declaration are required.
In fact, it is similar to declaring a method: public void method name (parameter) throws exception
AspectJ development environment
(1) Introduce AspectJ dependency:
<!--aspectj Dependence of-->
<dependency>
  <groupId>org.springframework</groupId>
  <artifactId>spring-aspects</artifactId>
  <version>5.2.4.RELEASE</version>
</dependency>
(2) Introducing constraints (lines 4, 7, and 8)
<?xml version="1.0" encoding="UTF-8"?>
<beans xmlns="http://www.springframework.org/schema/beans"
   xmlns:xsi="http://www.w3.org/2001/XMLSchema-instance"
   xmlns:aop="http://www.springframework.org/schema/aop"
   xsi:schemaLocation="http://www.springframework.org/schema/beans
   http://www.springframework.org/schema/beans/spring-beans.xsd
   http://www.springframework.org/schema/aop
   http://www.springframework.org/schema/aop/spring-aop.xsd">

</beans>
This step can be omitted when developing in IDEA. Constraint files are automatically introduced when adding aop tags.
AspectJ annotation based AOP implementation
AspectJ annotation based AOP implementation steps
(1) Define business interfaces and implementation classes
package com.kwxy.service;

public interface SomeService {
    void doSome(String name, int age);
}
package com.kwxy.service.impl;

import com.kwxy.service.SomeService;

public class SomeServiceImpl implements SomeService {

    @Override
    public void doSome(String name, int age) {
        System.out.println("SomeSeviceImpl Business methods doSome");
    }
}
(2) Define facet class
package com.kwxy.aspect;

import org.aspectj.lang.annotation.Before;

import java.util.Date;

@Aspect
public class MyAspect {
    /**
     * @Before: Pre notification annotation
     *   Attribute: value, is the pointcut expression, which indicates the execution position of the function in the aspect.
     *   Location: above the method
     * characteristic:
     *  1.Executed before the target method
     *  2.The execution result of the target method will not be changed
     *  3.It will not affect the execution of the target method.
     */

     @Before(value = "execution(public void com.kwxy.service.impl.SomeServiceImpl.doSome(..))")
    public void myBefore(){
        //Is the function code you want to execute
        System.out.println("Pre notification, aspect function: output the execution time before the target method:"+ new Date());
    }
}
(3) Declare the target object and facet class object, and register the automatic proxy of AspectJ
<?xml version="1.0" encoding="UTF-8"?>
<beans xmlns="http://www.springframework.org/schema/beans"
       xmlns:xsi="http://www.w3.org/2001/XMLSchema-instance"
       xmlns:context="http://www.springframework.org/schema/context"
       xmlns:aop="http://www.springframework.org/schema/aop"
       xsi:schemaLocation="http://www.springframework.org/schema/beans http://www.springframework.org/schema/beans/spring-beans.xsd http://www.springframework.org/schema/context https://www.springframework.org/schema/context/spring-context.xsd http://www.springframework.org/schema/aop https://www.springframework.org/schema/aop/spring-aop.xsd">

    <!--Declare target object-->
    <bean id="someService" class="com.kwxy.service.impl.SomeServiceImpl"/>

    <!--Declare facet class objects-->
    <bean id="myAspect" class="com.kwxy.aspect.MyAspect"/>

    <!--Declaring automatic proxy generators: Using aspectj The function inside the framework creates the proxy object of the target object.
        Creating a proxy object is implemented in memory and modifying the structure in memory of the target object. Create as proxy object
        Therefore, the target object is the modified proxy object.
        aspectj-autoproxy:Will put spring All target objects in the container generate proxy objects at one time.
    -->
    <aop:aspectj-autoproxy/>
</beans>
< AOP: AspectJ AutoProxy / > find the facet class defined by @ Aspect through scanning, then find the target method of the target class according to the pointcut, and then find the pointcut time by the notification type.
(4) Create a test method test and obtain the id of the proxy object according to the target object.
@Test
public void test01(){
    //Define the Spring configuration file, which is under the root directory of the classpath
    String config = "applicationContext.xml";
    ApplicationContext ac = new ClassPathXmlApplicationContext(config);
    //Get the object from the container and use getBean ("< bean > id")
    SomeService proxy = (SomeService) ac.getBean("someService");
    System.out.println(proxy.getClass().getName());
    //Call business method
    proxy.doSome("Li Jing",23);
}
/*Output results
com.sun.proxy.$Proxy8
 Pre notification, slice function: output before the target method execution time: Wed Jul 22 19:33:30 CST 2020
SomeSeviceImpl Business method doSome
*/
AspectJ notification annotation
Notification annotations: annotations that modify methods in the aspect class. These annotations reflect the notification type. For example, @ Before in the above example is a notification annotation. The method of notifying annotation modification is called notification method.
There are five notification types, corresponding to five notification annotations. Let's introduce them one by one.
@Before pre Notification - method has JoinPoint parameter
Execute before the target method executes. Methods annotated as pre notification can contain a JoinPoint type parameter. An object of this type is itself a pointcut expression. With this parameter, you can obtain the pointcut expression, method signature, target object, etc.
@Before(value = "execution(public void com.kwxy.service.impl.SomeServiceImpl.doSome(..))")
    public void myBefore(JoinPoint jp) {
        //In the method, implement the enhancement of functions, such as the code of log

        //Gets the definition of the method
        System.out.println("Method definition of connection point:" + jp.getSignature());
        System.out.println("Method name of connection point:" + jp.getSignature().getName());
        //Get the parameters of method execution
        Object args[] = jp.getArgs();
        for (Object arg : args) {
            System.out.println(arg);
        }
    }

/*
Test method output results:
com.sun.proxy.$Proxy8
 Method definition of connection point: void com kwxy. service. SomeService. doSome(String,int)
Method name of connection point: doSome
 Li Jing
23
*/
Not only the pre notification method, it can contain a JoinPoint type parameter, which can be included in all notification methods.
@AfterReturning post Notification - the annotation has the returning attribute
Execute after the target method is executed. Since it is executed after the target method, the return value of the target method can be obtained. The returning attribute of this annotation is used to specify the variable name that receives the return value of the method.
Therefore, the method annotated as post notification can contain not only the JoinPoint parameter, but also the variable used to receive the return value. This variable is preferably of type Object, because the return value of the target method may be of any type.
For example, define an abstract method with return value in the business interface:
String doOther(String name,int age);
Then implement in the business class:
@Override
public String doOther(String name, int age) {
    System.out.println("SomeSeviceImpl Business methods doOther");
    return "abcd";
}
Then define a facet in the facet class:
@AfterReturning(value = "execution(public String com.kwxy.service.impl.SomeServiceImpl.doOther(..))", returning = "result")
public void myAfterReturning(JoinPoint jp, Object result) {
    //Modify the return value of the target method
    if (result != null) {
    String st = (String) result;
    result = st.toUpperCase();
    }
    System.out.println("Post notification, executed after the target method. The execution result of the target method can be obtained:" + result);
}
Test method:
@Test
public void test03(){
	//Define the Spring configuration file, which is under the root directory of the classpath
	String config = "applicationContext.xml";
    ApplicationContext ac = new ClassPathXmlApplicationContext(config);
    //Get the object from the container and use getBean ("< bean > id")
    SomeService proxy = (SomeService) ac.getBean("someService");
    System.out.println(proxy.getClass().getName());
    //Call business method
    String res = proxy.doOther("Li Jing", 23);
    System.out.println("Results in the test method:" + res);
}

/*
Test method output results:
com.sun.proxy.$Proxy8
SomeSeviceImpl Business methods do other
 Post notification, executed after the target method. Method to get the result of ABCD execution
 Results in the test method: abcd
*/
@Around surround Notification - the enhancement method has the ProceedingJoinPoint parameter
Execute before and after the target method is executed.
Methods annotated as surround enhancement should have a return, Object type. And the method can contain a parameter of type ProceedingJoinPoint.
The interface ProceedingJoinPoint inherits from JoinPoint, so you can get the method information according to it.
It has a proceed() method that executes the target method. If the target method has a return value, the return value of the method is the return value of the target method.
Finally, the surround enhancement method returns its return value. The enhancement method actually intercepts the execution of the target method.
Interface addition method:
String doFirst(String name,int age);
Implement the method in the implementation class:
@Override
public String doFirst(String name, int age) {
    System.out.println("SomeSeviceImpl Business methods doFirst");
    return "doFirst";
}
Add section:
@Around(value = "execution(* *..SomeServiceImpl.doFirst(..))")
    public Object myAround(ProceedingJoinPoint pjp) throws Throwable {

        //ProceedingJoinPoint can obtain the definition, parameters and other information of the connection point method
        String name = "";
        Object args[] = pjp.getArgs();
        if (args.length > 1) {
            name = (String) args[0];
        }

        Object result = null;
        System.out.println("Surround notification: add log before target method");

        //Whether the control target method is implemented
        if ("zs".equals(name)) {
            //Execution target method
            result = pjp.proceed(); //doFirst  result = method.invoke(target, args);
        }

        System.out.println("Surround notification: add transactions after the target method");

        //Return the execution result of the target method (it can be the modified result)
        //Modify the execution result of the target method
        if (result != null) {
            result = "Hello AspectJ";
        }
        return result;
    }
The surround notification can control whether the target method is executed, and create a test method:
In the above code, if the name is zs, execute, otherwise do not execute.
@Test
public void test03(){
    //Define the Spring configuration file, which is under the root directory of the classpath
    String config = "applicationContext.xml";
    ApplicationContext ac = new ClassPathXmlApplicationContext(config);
    //Get the object from the container and use getBean ("< bean > id")
    SomeService proxy = (SomeService) ac.getBean("someService");
    System.out.println(proxy.getClass().getName());
    //Call business method
    String res = proxy.doFirst("Li Jing", 23);
    System.out.println("Results in the test method:" + res);
}
/*
Test results:
com.sun.proxy.$Proxy8
 Surround notification: add log before target method
 Surround notification: add transactions after the target method
 Result in test method: null
*/
After changing the name to zs, the running result is:
/*
com.sun.proxy.$Proxy8
 Surround notification: add log before target method
SomeSeviceImpl Business method doFirst
 Surround notification: add transactions after the target method
 Results in test method: Hello AspectJ
*/
@AfterThrowing exception Notification - throwing attribute in annotation
Execute after the target method throws an exception. The throwing attribute of this annotation is used to specify the exception class object that occurs.
Of course, the method annotated as exception notification can contain a parameter Throwable. The parameter name is the name specified by throwing, indicating the exception object.
In effect, it is equivalent to a try... Catch statement. The method body of the target method is in the try statement block, while the method body of the aspect method is in the catch clause.
@After final notification
This enhancement is performed whether or not the target method throws an exception.
In terms of execution effect, it is equivalent to putting the method body of the aspect method in the finally clause of the try... catch... Finally... Statement.
@Pointcut defines the pointcut
When more notification enhancement methods use the same execution Pointcut expression, it is troublesome to write and maintain. AspectJ provides the @ Pointcut annotation to define the execution Pointcut expression.
Its usage is to annotate @ Pointcut on a method. In the future, all the value attribute values of execution can use the method name as the entry point.
Pointcut is the definition of pointcut. This method using @ pointcut annotation generally uses the private identification method, that is, the method that has no practical effect. There is no need to add code inside the method.
For example:
 @After(value = "mypt()")
    public void myAfter(){
        System.out.println("The final notification will always be executed. You can do the last work of the program, such as resource recovery and memory release");
    }

    /**
     * @Pointcut: Define and manage entry points
     *     Attribute: value pointcut expression
     *     Location: above the custom method.
     * 	   Function: @ Pointcut is defined on the method. The name of this method is the alias of the Pointcut
     *     The value attribute of other notification annotations can use the method name to represent the pointcut.
     */
    @Pointcut(value = "execution(* *..SomeServiceImpl.doThird(..))")
    private void mypt(){
        //No code required
    }
Set how AspectJ implements AOP
In the Spring configuration file, select whether to implement AOP through JDK dynamic proxy or cglib dynamic proxy by setting the proxy target class attribute of < AOP: AspectJ AutoProxy / >.
<!--Declaring automatic proxy generators: Using aspectj hold spring Generate proxy for target class object in container
        proxy-target-class="true"Indicates use cglib Dynamic agent

        The target class has an interface, which is used by default jdk Dynamic proxy.
        The target class has no interface. By default cglib Dynamic agent
        The target class has an interface and can also be used cglib Dynamic proxy, need to be set proxy-target-class="true"
-->
    <!-- <aop:aspectj-autoproxy proxy-target-class="true" />-->
    <aop:aspectj-autoproxy/>
Spring integrates myBatis
summary
Spring integrates mybatis. Its essential work is to hand over some objects that need to be created when using the mybatis framework to spring for unified management.
Integrate the mybatis framework with spring and use it like a framework.
The technology used is: ioc.
Why ioc: it can integrate mybatis and spring together, like a framework, because ioc can create objects.
The objects in the mybatis framework can be created uniformly by spring, and developers can obtain the objects from spring.
Developers don't have to face two or more frameworks at the same time, but one spring.
explain:
/*
mybatis To work with objects
1.Define dao interface, StudentDao
2.Define mapper file studentdao xml
3.Define the main configuration file of mybatis mybatis config xml
4.Create a proxy object for dao, studentdao = sqlsession getMapper(StudentDao.class);
				    List<Student> students  = dao.selectStudents();

To use dao objects, you need to use the getMapper() method.
How can I use the getMapper() method? What conditions are required?
1.To obtain the SqlSession object, you need to use the openSession() method of SqlSessionFactory.
2.Create a SqlSessionFactory object. The SqlSessionFactory object can be created by reading the main configuration file of mybatis

SqlSessionFactory object is required. SqlSession can be obtained by using Factory. With SqlSession, dao can be obtained. The purpose is to obtain dao object
Factory Create the master configuration file that needs to be read

We will use an independent connection pool class to replace the one brought by mybatis by default, and leave the connection pool class to spring to create.

Master profile:
 1.database information
 <environment id="mydev">
            <transactionManager type="JDBC"/>
            <dataSource type="POOLED">
                <!--Database driver class name -- >
                <property name="driver" value="com.mysql.jdbc.Driver"/>
                <!--url string to connect to database -- >
                <property name="url" value="jdbc:mysql://localhost:3306/ssm"/>
                <!--User name to access the database -- >
                <property name="username" value="root"/>
                <!--Password -- >
                <property name="password" value="root"/>
            </dataSource>
2. mapper File location
   <mappers>
        <mapper resource="com/kwxy/dao/StudentDao.xml"/>
    </mappers>
*/
Through the above description, we need spring to create the following objects:
(1) Data source. Is the object that holds the database connection information. In actual business development, we give up using the database connection pool provided by Mybatis and use Alibaba Druid, which is more efficient;
(2) Generate sqlSessionFactory of sqlSession object;
(3) Implementation class object of Dao interface.
You need to learn the creation syntax of the above three objects and use the bean tag of xml.
Spring integrates the process of creating projects with myBatis
(1) Create a new mysql database and prepare the data. (student table)
Create table statement
DROP TABLE IF EXISTS `student`;
CREATE TABLE `student` (
  `id` int(11) NOT NULL AUTO_INCREMENT,
  `name` varchar(80) DEFAULT NULL,
  `email` varchar(100) DEFAULT NULL,
  `age` int(11) DEFAULT NULL,
  PRIMARY KEY (`id`)
) ENGINE=InnoDB AUTO_INCREMENT=1003 DEFAULT CHARSET=utf8;
Add data
INSERT INTO `student` VALUES ('1001', 'Li Jing', 'lijing@163.com', '23');
INSERT INTO `student` VALUES ('1002', 'Li Hui', 'lihui@qq.com', '25');
mysql> select *from student;
+------+--------+----------------+------+
| id   | name   | email          | age  |
+------+--------+----------------+------+
| 1001 | Li Jing   | lijing@163.com |   23 |
| 1002 | Li Hui   | lihui@qq.com   |   25 |
+------+--------+----------------+------+
(2) Create a new module for maven
(3) Join dependency
1) spring dependency
2) dependence on mybatis
3) mybatis spring dependency. This jar is downloaded from the official website of mybatis. Mybatis provides classes for creating objects in spring.
4) mysql driver
5) druid, dependency of database connection pool
<?xml version="1.0" encoding="UTF-8"?>

<project xmlns="http://maven.apache.org/POM/4.0.0" xmlns:xsi="http://www.w3.org/2001/XMLSchema-instance"
  xsi:schemaLocation="http://maven.apache.org/POM/4.0.0 http://maven.apache.org/xsd/maven-4.0.0.xsd">
  <modelVersion>4.0.0</modelVersion>

  <groupId>com.kwyx</groupId>
  <artifactId>spring_mybatis</artifactId>
  <version>1.0-SNAPSHOT</version>


  <properties>
    <project.build.sourceEncoding>UTF-8</project.build.sourceEncoding>
    <maven.compiler.source>1.8</maven.compiler.source>
    <maven.compiler.target>1.8</maven.compiler.target>
  </properties>

  <dependencies>
    <!--unit testing -->
    <dependency>
      <groupId>junit</groupId>
      <artifactId>junit</artifactId>
      <version>4.11</version>
      <scope>test</scope>
    </dependency>
    <!--Spring Dependence of-->
    <dependency>
      <groupId>org.springframework</groupId>
      <artifactId>spring-context</artifactId>
      <version>5.2.4.RELEASE</version>
    </dependency>

    <!--spring Business of-->
    <dependency>
      <groupId>org.springframework</groupId>
      <artifactId>spring-tx</artifactId>
      <version>5.2.4.RELEASE</version>
    </dependency>

    <!--spring Access database-->
    <dependency>
      <groupId>org.springframework</groupId>
      <artifactId>spring-jdbc</artifactId>
      <version>5.2.4.RELEASE</version>
    </dependency>

    <!--aspectj Dependence of-->
    <dependency>
      <groupId>org.springframework</groupId>
      <artifactId>spring-aspects</artifactId>
      <version>5.2.4.RELEASE</version>
    </dependency>

    <!--mybatis rely on-->
    <dependency>
      <groupId>org.mybatis</groupId>
      <artifactId>mybatis</artifactId>
      <version>3.5.1</version>
    </dependency>

    <!--mybatis integration spring Dependencies: Creating mybatis object-->
    <dependency>
      <groupId>org.mybatis</groupId>
      <artifactId>mybatis-spring</artifactId>
      <version>1.3.1</version>
    </dependency>

    <!--mysql drive-->
    <dependency>
      <groupId>mysql</groupId>
      <artifactId>mysql-connector-java</artifactId>
      <version>5.1.9</version>
    </dependency>

    <!--Database connection pool-->
    <dependency>
      <groupId>com.alibaba</groupId>
      <artifactId>druid</artifactId>
      <version>1.1.12</version>
    </dependency>
  </dependencies>


  <build>
    <resources>
      <resource>
        <directory>src/main/java</directory><!--Directory of-->
        <includes><!--Including the.properties,.xml The files will be scanned-->
          <include>**/*.properties</include>
          <include>**/*.xml</include>
        </includes>
        <filtering>false</filtering>
      </resource>
    </resources>
  </build>
</project>
(4) New entity class Student
package com.kwyx.domain;

public class Student {
    private Integer id;
    private String name;
    private String email;
    private Integer age;

    public Student() {
    }

    public Student(Integer id, String name, String email, Integer age) {
        this.id = id;
        this.name = name;
        this.email = email;
        this.age = age;
    }

    public Integer getId() {
        return id;
    }

    public void setId(Integer id) {
        this.id = id;
    }

    public String getName() {
        return name;
    }

    public void setName(String name) {
        this.name = name;
    }

    public String getEmail() {
        return email;
    }

    public void setEmail(String email) {
        this.email = email;
    }

    public Integer getAge() {
        return age;
    }

    public void setAge(Integer age) {
        this.age = age;
    }

    @Override
    public String toString() {
        return "Student{" +
                "id=" + id +
                ", name='" + name + '\'' +
                ", email='" + email + '\'' +
                ", age=" + age +
                '}';
    }
}
Remember in POM Add resource plug-in in XML!
(5) Create a new Dao interface and sql mapping file
package com.kwyx.dao;


import com.kwyx.domain.Student;

import java.util.List;

public interface StudentDao {

    List<Student> selectAll();

    int insertStudent(Student student);
}
<?xml version="1.0" encoding="UTF-8" ?>
<!DOCTYPE mapper
        PUBLIC "-//mybatis.org//DTD Mapper 3.0//EN"
        "http://mybatis.org/dtd/mybatis-3-mapper.dtd">
<mapper namespace="com.kwxy.dao.StudentDao">
    <select id="selectAll" resultType="com.kwxy.domain.Student">
        select id,name,email,age from student
    </select>

    <insert id="insertStudent">
        insert into student values (#{id},#{name},#{email},#{age})
    </insert>
</mapper>
(6) Create a new mybatis main configuration file mybatis config xml
Since Alibaba's database connection pool is used, the < environments / > tag is not required
<?xml version="1.0" encoding="UTF-8" ?>
<!DOCTYPE configuration
        PUBLIC "-//mybatis.org//DTD Config 3.0//EN"
        "http://mybatis.org/dtd/mybatis-3-config.dtd">
<configuration>

    <!--settings: control mybatis Global behavior-->
    <settings>
        <!--set up mybatis Output log-->
        <setting name="logImpl" value="STDOUT_LOGGING"/>
    </settings>

    <!--Set alias-->
    <typeAliases>
        <!--name:Package name of entity class-->
        <package name="com.kwxy.domain"/>
    </typeAliases>


    <!-- sql mapper(sql Mapping file)Location of-->
    <mappers>
        <!--
          name: Is the name of the package. All the files in this package mapper.xml It can be loaded at one time
        -->
        <package name="com.kwxy.dao"/>
    </mappers>
</configuration>
(7) Create a new Service interface and implementation class with Dao attribute in the implementation class
In the actual project, we need some other business codes before the database, such as logical judgment, identity authentication, etc., which are put in the Service
package com.kwyx.service;

import com.kwyx.domain.Student;

import java.util.List;

public interface StudentService {
    List<Student> selectAll();

    int insertStudent(Student student);
}
package com.kwyx.service.impl;

import com.kwyx.service.StudentService;
import com.kwyx.dao.StudentDao;
import com.kwyx.domain.Student;

import java.util.List;

public class StudentServiceImpl implements StudentService {

    private StudentDao studentDao;

    //Using ioc, set value injection and assign values to dao in the configuration file
    public void setStudentDao(StudentDao studentDao) {
        this.studentDao = studentDao;
    }

    @Override
    public List<Student> selectAll() {
        return studentDao.selectAll();
    }

    @Override
    public int insertStudent(Student student) {
        return studentDao.insertStudent(student);
    }
}
(8) Create database connection configuration file JDBC properties
jdbc.url=jdbc:mysql://localhost:3306/ssm
jdbc.user=root
jdbc.password=root
jdbc.maxActive=20
There is no need to configure the database driver
(9) Create a new Spring configuration file ApplicationContext XML (important)
1) Declare Druid's data source DruidDataSource object
2) Declare SqlSessionFactoryBean and create SqlSessionFactory object
3) Declare mappercannerconfigurer, the scanner of MyBatis, and create the implementation class object of Dao interface
4) Declare a custom Service, and inject the Dao object in 3) into the attribute assigned to the Service
<?xml version="1.0" encoding="UTF-8"?>
<beans xmlns="http://www.springframework.org/schema/beans"
       xmlns:xsi="http://www.w3.org/2001/XMLSchema-instance"
       xmlns:context="http://www.springframework.org/schema/context"
       xsi:schemaLocation="http://www.springframework.org/schema/beans http://www.springframework.org/schema/beans/spring-beans.xsd http://www.springframework.org/schema/context https://www.springframework.org/schema/context/spring-context.xsd">

    <!--read jdbc configuration file
        location:Specifies the path to the property profile
        "classpath:":Keyword represents a class file, that is class Directory where the file is located
    -->
    <context:property-placeholder location="classpath:jdbc.properties"/>

    <!--Declare data source DataSource-->
    <bean id="dataSource" class="com.alibaba.druid.pool.DruidDataSource">
        <!--To read a property profile key Value of, using ${key}-->
        <property name="url" value="${jdbc.url}"/>
        <property name="username" value="${jdbc.user}"/>
        <property name="password" value="${jdbc.password}"/>
        <property name="maxActive" value="${jdbc.maxActive}"/>
    </bean>
    <!--
       DruidDataSource myDataSource = new DruidDataSource();
       myDataSource.setUrl();
       myDataSource.setUsername();
       myDataSource.setPassword();
       myDataSource.init();
     -->

    <!--statement SqlSessionFactoryBean,establish SqlSessionFactory object-->
    <bean id="sqlSessionFactory" class="org.mybatis.spring.SqlSessionFactoryBean">
        <!--data source-->
        <property name="dataSource" ref="dataSource"/>
        <!--appoint mybatis Master profile for-->
        <property name="configLocation" value="classpath:mybatis-config.xml"/>
    </bean>

    <!--statement MyBatis Scanner, creating Dao Implementation class object of interface-->
    <bean class="org.mybatis.spring.mapper.MapperScannerConfigurer">
        <!--appoint SqlSessionFactory Object, can get SqlSession-->
        <property name="sqlSessionFactoryBeanName" value="sqlSessionFactory"/>
        <!--appoint Dao The package name of the interface. The framework will create all interfaces in this package at one time Dao object-->
        <property name="basePackage" value="com.kwxy.dao"/>
    </bean>

    <!--
       from spring Get in SqlSessionFacotory,because spring It's a container( Map)
       SqlSessionFactory factory  = map.get("sqlSessionFactory");
       SqlSession session = factory.openSession();

       for(Interface: com.kwxy.dao)
       {
           Dao object =  session.getMapper(Interface)
           //Put the created object into the spring container
           spring of Map.put( The first letter of the interface name is lowercase, Dao object )

       }

       Created dao Object into spring In the container. dao The default name of an object is the initial lowercase of the interface name

   -->
    <!--statement Service-->
    <bean id="studentService" class="com.kwxy.service.impl.StudentServiceImpl">
        <property name="studentDao" ref="studentDao"/>
    </bean>
</beans>
(10) Create a new test class, get the Service from the spring container, call the Service method, and complete the database operation
public class MyTest {

    @Test
    public void test01() {
        ApplicationContext ac = new ClassPathXmlApplicationContext("applicationContext.xml");
        StudentService studentService = (StudentService) ac.getBean("studentService");
        List<Student> students = studentService.selectAll();
        for (Student student : students) {
            System.out.println("student:" + student);
        }
    }

    /**result
     * JDBC Connection [com.mysql.jdbc.JDBC4Connection@662b4c69] will not be managed by Spring
     * ==>  Preparing: select id,name,email,age from student
     * ==> Parameters:
     * <==    Columns: id, name, email, age
     * <==        Row: 1001, Li Jing, lijing@163.com, 23
     * <==        Row: 1002, Li Hui, lihui@qq.com, 25
     * <==      Total: 2
     * Closing non transactional SqlSession [org.apache.ibatis.session.defaults.DefaultSqlSession@53aad5d5]
     * Student: Student{id=1001, name = 'Li Jing', email='lijing@163.com', age=23}
     * Student: Student{id=1002, name = 'Li Hui', email='lihui@qq.com', age=25}
     */

    @Test
    public void test02() {
        ApplicationContext ac = new ClassPathXmlApplicationContext("applicationContext.xml");
        StudentService studentService = (StudentService) ac.getBean("studentService");
        Student student = new Student(3, "Fei Zhang", "zhangfei@163.com", 24);
        int nums = studentService.insertStudent(student);
        System.out.println("Added " + nums + " Students");
    }
    /**result
     * JDBC Connection [com.mysql.jdbc.JDBC4Connection@662b4c69] will not be managed by Spring
     * ==>  Preparing: insert into student values (?,?,?,?)
     * ==> Parameters: 3(Integer), Zhang Fei (String), zhangfei@163.com(String), 24(Integer)
     * <==    Updates: 1
     * Closing non transactional SqlSession [org.apache.ibatis.session.defaults.DefaultSqlSession@76f2bbc1]
     * Added 1 student
     */
}
Spring and transactions
Knowledge theory
(1) What is a transaction
When talking about mysql, the transaction is proposed. Transaction refers to a set of sql statements. There are multiple sql statements in the set,
It may be insert, update, select or delete. We hope these multiple sql statements can succeed,
Or both fail. The execution of these sql statements is consistent and executed as a whole.
(2) When do you think of using transactions
When my operation involves getting multiple tables or insert ing, updating and deleting multiple sql statements.
You need to ensure that these statements are successful to complete my function, or fail to ensure that the operation meets the requirements.
Write programs in java code to control transactions. Where should transactions be placed at this time?
On the business method of service class, because the business method will call multiple dao methods and execute multiple sql statements.
(3) Do you usually use JDBC to access the database or mybatis to access the database? How do you handle transactions
jdbc accesses the database and handles the transaction connection conn; conn.commit(); conn.rollback();
mybatis accesses the database, handles transactions, and sqlsession commit(); SqlSession. rollback();
hibernate accesses the database, handles transactions, session commit(); Session. rollback();
(4) What are the shortcomings of the above transaction handling methods
Different database access technologies have different objects and methods to deal with transactions. It is necessary to understand the principle of transactions used by different database access technologies
To master the transaction processing logic in multiple databases, when to commit transactions and when to review transactions
Dealing with transactions requires a variety of methods
(5) How to solve the problem
The first mock exam is spring, which provides a unified model for transaction processing. It can accomplish transaction processing of different database access technologies by using unified steps.
Using the transaction processing mechanism of spring, you can complete the transaction processing of mybatis accessing the database.
Using the transaction processing mechanism of spring, you can complete the transaction processing of hibernate accessing the database.
Spring's transaction processing model uses fixed steps. Just provide the information used by the transaction to spring.
Transaction manager interface
The transaction manager is the PlatformTransactionManager interface object. It is mainly used to complete the submission and rollback of transactions and obtain the status information of transactions.
The PlatformTransactionManager interface has two common implementation classes:
Data source transaction manager: used when using JDBC or MyBatis for database operations.
Hibernate transaction manager: used when using hibernate to persist data.
Rollback method of Spring
The default rollback method of Spring transactions is: rollback when runtime exception and error occur, and commit when checked (compiled) exception occurs. However, for the checked exception, the programmer can also manually set its rollback method.
Runtime exception is the RuntimeException class or its subclass, that is, the exception that occurs only at runtime.
For example, NullPointerException, ArrayIndexOutOfBoundsException, IllegalArgumentException, etc. are runtime exceptions.
These exceptions are thrown by the JVM and are not required to be handled (caught or thrown) at compile time.
However, as long as the code is written carefully enough and the program is robust enough, runtime exceptions can be avoided.
Checked exceptions, also known as compile time exceptions, are exceptions that must be caught or thrown during code writing. If they are not handled, they cannot be compiled.
Such as SQLException, ClassNotFoundException, IOException, etc. are all checked exceptions. Exceptions other than RuntimeException and its subclasses belong to checked exceptions.
Transaction definition interface
The transaction definition interface, TransactionDefinition, defines three types of constants related to transaction description: transaction isolation level, transaction propagation behavior, transaction default timeout and their operations.
(1) Five transaction isolation level constants are defined
These constants are based on ISOLATION_ start. Such as ISOLATION_XXX.
Fault: the DEFAULT transaction isolation level of DB is adopted. MySql defaults to REPEATABLE_READ; Oracle defaults to READ_COMMITTED.
➢ READ_UNCOMMITTED: read uncommitted. No concurrency issues were resolved.
➢ READ_COMMITTED: read committed. Solve dirty reading, there are non repeatable reading and unreal reading.
➢ REPEATABLE_READ: repeatable. Solve dirty reading, non repeatable reading and phantom reading.
SERIALIZABLE: serialization. There is no concurrency problem.
(2) Seven transaction propagation behavior constants are defined
The so-called transaction PROPAGATION behavior refers to the maintenance of transactions during execution when methods in different transactions call each other. For example, when the method doSome() in transaction A calls the method doOther() in transaction B, the maintenance of the transaction during the call execution is called transaction PROPAGATION behavior. Transaction PROPAGATION behavior is added to the method. Transaction PROPAGATION behavior constants are based on PROPAGATION_ Start with the shape of promotion_ XXX.
PROPAGATION_REQUIRED
PROPAGATION_REQUIRES_NEW
PROPAGATION_SUPPORTS
PROPAGATION_MANDATORY
PROPAGATION_NESTED
PROPAGATION_NEVER
PROPAGATION_NOT_SUPPORTED
1)PROPAGATION_REQUIRED:
The specified method must be executed within a transaction. If there is a current transaction, it will be added to the current transaction; If there is no current transaction, a new transaction is created. This propagation behavior is the most common choice and the default transaction propagation behavior of Spring. If the propagation behavior is added to the doOther() method. If the doSome() method runs in a transaction when calling the doOther() method, the execution of the doOther() method is also added to the transaction. If the doSome() method is not executed within a transaction when calling the doOther() method, the doOther() method creates a transaction and executes it.
2)PROPAGATION_SUPPORTS
The specified method supports the current transaction, but if there is no current transaction, it can also be executed in a non transactional manner.
3)PROPAGATION_REQUIRES_NEW
Always create a new transaction. If there is a current transaction, suspend the current transaction until the new transaction is executed.
Manage transactions using Spring's transaction annotations
(1) Turn on the annotation driver and tell the spring framework to use annotations to process transactions. Add the following code in the spring configuration file applicationContext:
<!--Enable annotation driven and transaction support to tx At the beginning, you can see that it is used for transactions-->
<tx:annotation-driven transaction-manager="transactionManager"/>
(2) Claim transaction manager
 <!--Claim transaction manager-->
<bean id="transactionManager" class="org.springframework.jdbc.datasource.DataSourceTransactionManager">
    <property name="dataSource" ref="dataSource"/>
</bean>
It can be regarded as a fixed writing method, where the ref of the property tag is the id property value of the data source object in the configuration file.
(3) Add transaction annotations to the public method of the business layer
/**
     *
     * rollbackFor:Indicates that the specified exception must be rolled back
     *   The processing logic is:
     *     1) spring The framework will first check whether the exception thrown by the method is in the property value of rollbackFor
     *         If the exception is in the rollbackFor list, no matter what type of exception it is, it must be rolled back.
     *     2) If the exception you throw is not in the rollbackFor list, spring will judge whether the exception is a RuntimeException,
     *         If yes, it must be rolled back.
     *
     */
   /* @Transactional(
            propagation = Propagation.REQUIRED,
            isolation = Isolation.DEFAULT,
            readOnly = false,
            rollbackFor = {
                    NullPointerException.class
            }
    )*/

    //The DEFAULT value of transaction control is used. The DEFAULT propagation behavior is REQUIRED and the DEFAULT isolation level is DEFAULT
    //By default, a runtime exception is thrown and the transaction is rolled back.
    @Transactional
    @Override
    public int insertStudent(Student student) {
        return studentDao.insertStudent(student);
    }
@All optional properties of Transactional are as follows:
Propagation: used to set transaction Propagation properties. The attribute type is Propagation enumeration, and the default value is Propagation REQUIRED.
Isolation: used to set the isolation level of transactions. The attribute type is isolation enumeration, and the default value is isolation DEFAULT.
readOnly: used to set whether the operation of this method on the database is read-only. This attribute is boolean and the default value is false.
・ timeout: used to set the timeout period of the connection between this operation and the database. The unit is seconds, the type is int, and the default value is - 1, that is, there is no time limit. It is generally not set in actual business development.
rollbackFor: Specifies the exception Class that needs to be rolled back. The type is Class [], and the default value is an empty array. Of course, if there is only one exception Class, you can not use an array.
rollbackForClassName: Specifies the name of the exception class that needs to be rolled back. The type is String [], and the default value is an empty array. Of course, if there is only one exception class, you can not use an array.
noRollbackFor: Specifies the exception Class that does not need to be rolled back. The type is Class [], and the default value is an empty array. Of course, if there is only one exception Class, you can not use an array.
noRollbackForClassName: Specifies the name of the exception class that does not need to be rolled back. The type is String [], and the default value is an empty array. Of course, if there is only one exception class, you can not use an array.
It should be noted that @ Transactional can only be used on public methods if it is used on methods.
For other non-public methods, if the annotation @ Transactional is added, although Spring will not report an error,
The specified Transaction is not woven into the method. Because Spring will ignore the @ Transaction annotation on all non public methods.
If @ Transaction is annotated on a class, it means that all methods on the class will be woven into the Transaction at execution time.
Manage transactions using AspectJ's AOP configuration
Generally used for large projects. Manage transactions without changing the source code. The configuration of code and transaction is completely separated. There is no need to annotate the code. It is all configured in xml.
(1) Add Maven dependency
<!--aspectj Dependence of-->
    <dependency>
      <groupId>org.springframework</groupId>
      <artifactId>spring-aspects</artifactId>
      <version>5.2.4.RELEASE</version>
    </dependency>
(2) Claim transaction manager
 <!--Declare transaction manager object-->
<bean id="transactionManager" class="org.springframework.jdbc.datasource.DataSourceTransactionManager">
    <property name="dataSource" ref="dataSource"/>
</bean>
(3) Configure transaction notifications
Set relevant properties for transaction notification. Used to specify how transactions are woven into which methods.
<!--Declare the transaction attributes of the business method (isolation level, propagation behavior, timeout)
          id:Custom name, indicating <tx:advice> and </tx:advice>Configuration content between
          transaction-manager:Of the transaction manager object id
    -->
    <tx:advice id="buyAdvice" transaction-manager="transactionManager">
        <tx:attributes>
            <!--tx:method: Configure transaction attributes for specific methods, method There can be multiple methods, and the transaction attributes can be set for different methods
                name:Method name, 1) complete method name without package and class.
                              2)Method can use wildcards,* Represents any character
                propagation: Propagation behavior, enumeration value
                isolation: Isolation level
                rollback-for: The exception class name you specified, the fully qualified class name. If an exception occurs, it must be rolled back
            -->
             <tx:method name="buy" propagation="REQUIRED" isolation="DEFAULT"
                       rollback-for="java.lang.NullPointerException"/>
            <!--Use wildcards to specify many methods-->
            <tx:method name="add*" propagation="REQUIRES_NEW" />
            <!--Specify modification method-->
            <tx:method name="modify*" />
            <!--Delete method-->
            <tx:method name="remove*" />
            <!--Query method, query,search,find-->
            <tx:method name="*" propagation="SUPPORTS" read-only="true" />
        </tx:attributes>

    </tx:advice>
(4) Configure aop and intensifier
Specify which type of proxy to create
<!--to configure aop-->
    <aop:config>
        <!--Configure pointcut expression: specify which classes in the package and which transactions to use
            id:The name and unique value of the pointcut expression
            expression: Pointcut expressions that specify which classes use transactions, aspectj The proxy object is created
        -->
        <aop:pointcut id="servicePt" expression="execution(* *..service..*.*(..))"/>

        <!--Configuring enhancers: associations adivce and pointcut
           advice-ref:Notice, above tx:advice Where is the configuration
           pointcut-ref: Of pointcut expressions id
        -->
        <aop:advisor advice-ref="studentService" pointcut-ref="servicePt" />
    </aop:config>
Spring and Web
This chapter mainly introduces a core knowledge point: to solve the problem of memory waste caused by repeatedly creating ApplicationContext objects in different servlets, that is, repeatedly creating Spring containers.
An idea to solve this problem is to create a ServletContextListener, create an ApplicationContext object when the ServletContext is initialized, and save it in the ServletContext.
In this way, in each servlet, you can get an ApplicationContext object shared in this webapp by calling the getAttribute method of the ServletContext object of the current servlet.
The spring web framework has helped us create such a listener. We just need to be on the web Register the listener with XML and you can use it.
(1) maven creates a web module, adds servlet s and jsp dependencies, and copies the dependencies previously used in spring and mybatis
<!--The following is the newly added dependency. Other dependencies are copied into the previous project-->
<!-- servlet rely on -->
<dependency>
 <groupId>javax.servlet</groupId>
 <artifactId>javax.servlet-api</artifactId>
 <version>3.1.0</version>
 <scope>provided</scope>
</dependency>
<!-- jsp rely on -->
<dependency>
 <groupId>javax.servlet.jsp</groupId>
 <artifactId>jsp-api</artifactId>
 <version>2.2.1-b03</version>
 <scope>provided</scope>
</dependency>
<!--spring-web Dependency: with listener-->
<dependency>
  <groupId>org.springframework</groupId>
  <artifactId>spring-web</artifactId>
  <version>5.2.4.RELEASE</version>
</dependency>
(2) You need to provide the listener with Spring configuration file path information
<!--register spring Listener provided by the framework
    When the listener starts, it will look for/WEB-INF/applicationContext.xml,Why did you find this file?
    In the listener's initial method, a spring When creating a container object, you need to read the configuration file
    The default listener is to find/WEB-INF/applicationContext.xml.
-->
<!--custom spring Location and name of the configuration file-->
<context-param>
    <param-name>contextConfigLocation</param-name>
    <param-value>classpath:applicationContext.xml</param-value>
</context-param>
<listener>
    <listener-class>org.springframework.web.context.ContextLoaderListener</listener-class>
</listener>
(3) Get ApplicationContext object in Sevlet
WebApplicationContext ctx = null;
String key = WebApplicationContext.ROOT_WEB_APPLICATION_CONTEXT_ATTRIBUTE;
Object attr = getServletContext().getAttribute(key);
if( attr != null){
    ctx = (WebApplicationContext)attr;
}
webApplicationContext is a subclass of ApplicationContext and a Spring container object used in web projects.
In order to obtain webApplicationContext without using the difficult to remember key value given by the framework, the framework also provides a tool class.
Get webApplicationContext using tool class:
//Get the container object in ServletContext. spring provides a method to get the container object
WebApplicationContext ctx = WebApplicationContextUtils.getRequiredWebApplicationContext(getServletContext());