If you want to see the rest of this series, please move to Vue.js actual combat series to realize the project development of video WebApp.
Project warehouse address Welcome, Star
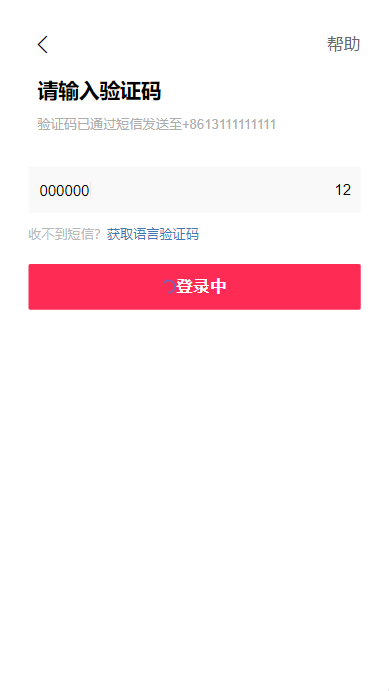
Realization effect

Function realization
-
Introduce Vuex
What is Vuex?
Vuex is designed for Vue JS application development state management mode. It uses centralized storage to manage the state of all components of the application, and uses corresponding rules to ensure that the state changes in a predictable way.
Generally speaking, there is a root component and two subcomponents. If the root component communicates with the subcomponents, it can be realized by passing values through props; However, if you want two sub components to communicate, the implementation is more complex. Before Vuex is introduced, you can pass the content of sub component A to the parent component, and then the parent component receives it and then passes it to sub component B, which is equivalent to the parent component passing it as an intermediary. However, after Vuex is introduced, the implementation is relatively simple.-
Install Vuex
yarn add vuex
-
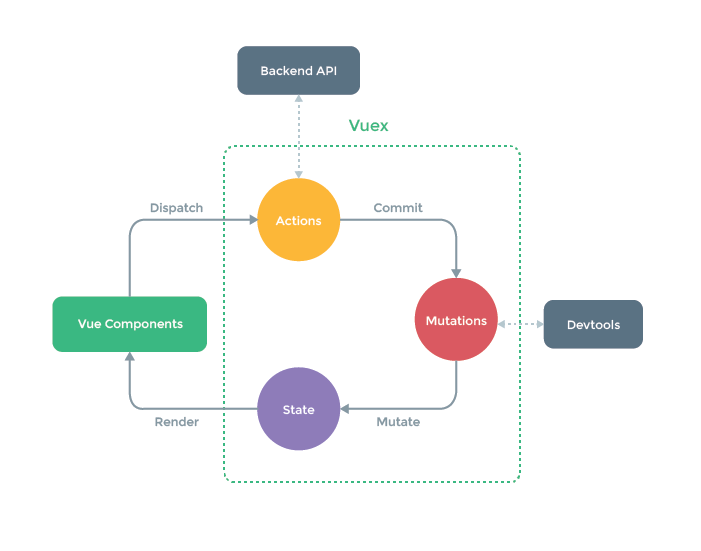
Vuex core
- state: storage status
- Changes: operation of state member
- actions: asynchronous operation (the difference between action and mutation is that action can perform asynchronous operation and synchronous operation, while mutations can only perform synchronous operation)
- getters: process state members to the outside world
- modules: modular state management
-
Vuex flow chart

-
-
Use modules to manage data modularity
Under src/store folder, create a new modules folder and create sign JS module
const sign = {
    // Namespace
    namespaced: true,
    state: {
        // Default verification code
        verifyCode: '000000',
    },
    mutations: { },
    actions: { },
    getters: { },
};
export default sign;
Update Src / store / index js
Import the sign module just created intoimport Vue from 'vue'; import Vuex from 'vuex'; import sign from './modules/sign'; Vue.use(Vuex); export default new Vuex.Store({ state: { }, mutations: { }, actions: { }, modules: { sign, }, }); -
Implementation of verification code login process
In the normal process, the verification code is returned by the back-end for us. At this time, we have no real back-end interface, so now we write the verification code value returned by the back-end in state. Later, we will implement a back-end interface through nodejs. Welcome to pay attention.
-
Create verification code page code vue
<template> <div class="sign"> <div class="sign-header"> <span class="iconfont icon-guanbi" style="font-size: 30px"></span> <span style="color: #6868 "> help</span> </div> <div class="sign-content"> <div class="des"> <h2>Please enter the verification code</h2> <p>Verification code has been sent to via SMS+8615998362261</p> </div> </div> <div class="sign-box"> <div class="inp"> <input v-model="code" @input="changeCode" type="number" class="inp-controll" placeholder="Please enter the verification code" /> </div> <div class="time"> {{ time }} </div> </div> <div class="not-dx"> <p>Can't get text messages?<a>Get language verification code</a></p> </div> <div class="code-btn"> <button :disabled="disabled" :class="btnBg ? 'active' : ''" @click="getCode" > Sign in </button> </div> </div> </template> <script> export default { data() { return { // SMS sending countdown time: 60, }; }, }; </script> <style lang="less" scoped> .sign { padding: 30px; background: #fff; .sign-header { display: flex; justify-content: space-between; align-items: center; font-size: 18px; } .sign-content { padding: 20px 10px; h2 { margin: 0; font-size: 22px; font-weight: bold; } p { font-size: 14px; line-height: 20px; color: #adadad; } } .sign-box { display: flex; height: 50px; margin: 0; align-items: center; background-color: #f9f9f9; .inp { height: 36px; width: 90%; margin-left: 10px; .inp-controll { caret-color: #fe2c55; height: 36px; background-color: #f9f9f9; width: 90%; font-size: 16px; border: none; outline: none; } } .time { text-align: right; width: 80px; font-size: 16px; line-height: 80px; margin-right: 10px; } } .not-dx { margin-top: 10px; p { color: #b9b9b9; font-size: 14px; a { color: #3d79b4; } } } .code-btn { button { margin: 10px 0; width: 100%; padding: 15px 0; border: none; letter-spacing: 1px; font-size: 17px; color: #fff; font-weight: 600; background: #dbdbdb; border-radius: 2px; } .active { color: #ffffff; background-color: #fe2c55; } } } </style> -
Update Src / store / modules / sign js
import router from '../../router'; const sign = { // Namespace namespaced: true, state: { // Default verification code verifyCode: '000000', }, mutations: { }, actions: { // Login operation sign({ state, commit, rootState }, params) { // After successful login, the login ID is cached in the session sessionStorage.setItem('isLogin', JSON.stringify(true)); // After successful login, jump to the webApp home page router.replace({ path: '/' }); }, }, getters: { }, }; export default sign; -
Update code Vue finish login
Introduce mapActions and call sign Sign method in JS to realize login
Use this$ store. state. Get the value in state
Using van loading to realize the animation in loading<template> <div class="sign"> <div class="sign-header"> <span class="iconfont icon-fanhui" style="font-size: 30px" @click="goBack" ></span> <span style="color: #6868 "> help</span> </div> <div class="sign-content"> <div class="des"> <h2>Please enter the verification code</h2> <p>Verification code has been sent to via SMS+86{{ tel }}</p> </div> </div> <div class="sign-box"> <div class="inp"> <input v-model="code" @input="changeCode" type="number" class="inp-controll" placeholder="Please enter the verification code" /> </div> <div class="time"> {{ time }} </div> </div> <div class="not-dx"> <p>Can't get text messages?<a>Get language verification code</a></p> </div> <div class="code-btn"> <button :disabled="disabled" :class="btnBg ? 'active' : ''" @click="Login" > <div v-if="!loading"> {{ msg }} </div> <div v-else class="loading"> <van-loading color="#1989fa" size="16px" /> {{ msg }} </div> </button> </div> </div> </template> <script> import { mapActions } from 'vuex'; export default { data() { return { tel: '', // Telephone number code: '', // Verification Code verifyCode: '', // Default verification code provided in state time: 60, // SMS sending countdown disabled: true, btnBg: false, loading: false, msg: 'Sign in', }; }, created() { this.getCode(); this.tel = this.$route.query.tel; }, methods: { ...mapActions('sign', ['sign']), // Monitor input verification code changeCode(e) { this.code = e.target.value; if (this.code === this.verifyCode) { this.disabled = false; this.btnBg = true; } else { console.log('Verification code input error'); } }, // Get verification code getCode() { this.verifyCode = this.$store.state.sign.verifyCode; this.countDown(); }, // count down countDown() { if (this.time > 0) { this.time -= 1; setTimeout(this.countDown, 1000); } else { this.time = 'Resend'; } }, // Login button click event Login() { this.loading = true; this.msg = 'Logging in'; setTimeout(() => { this.loading = false; this.msg = 'Login successful'; }, 1500); setTimeout(() => { this.sign({ code: this.code }); // Login jump operation }, 2000); }, // Return to previous page goBack() { this.$router.go(-1); }, }, }; </script> <style lang="less" scoped> .sign { ... .code-btn { button { .loading { display: flex; justify-content: center; align-items: center; } } } } </style>
-
summary
Several points needing attention in this chapter:
- Use of Vuex
- Use modules to manage data modularity
- SessionStorage front end data storage
- Login process implementation
Previous chapter: 11. Realization of mobile number login, password login and other login methods
Next section: 13. Implementation of custom pop-up box component
Overall introduction of the project: Vue. Implementation of JS project actual combat video playback WebApp tiktok development (imitation app)
Project warehouse address Welcome, Star.
If you have any questions, please leave a message in the comment area for discussion.