Original article publishing address: https://www.jianshu.com/p/d0e8b605c4ce
Click "read the original text" or visit https://linkis.apache.org/#/ Learn more about Apache links
Community developer: Maria Carrie
GitHub : mindflow94
This article is mainly used to guide users to install and deploy Linkis and datasphere studio, and test Hive, Spark and Flink engine scripts in Scriptis functions, so that users can quickly start with Linkis and understand its core functions. The functions such as data exchange, data service, data quality and task scheduling are not tested. They can be installed and tested in combination with official documents.
1. Background
The company's self-developed big data middle platform products are used to help users quickly collect data, sort out data, build data warehouses, data services and data asset management. Many big data components are involved. Each component has its own API, which leads to high learning cost and difficult maintenance for developers.
Therefore, it is considered to pull away from the computing layer, be responsible for connecting the upper application, and the work of connecting the lower storage of big data and the computing engine is also handled by the computing layer. Linkis provides this ability, connects multiple computing storage engines (such as Spark, Flink, Hive, Python, etc.) and provides a unified REST/WebSocket/JDBC interface externally, so it is installed, Test its core functions.
2. Introduction
2.1 Linkis
As the computing middleware between the upper application and the lower engine, by using the REST/WebSocket/JDBC and other standard interfaces provided by Linkis, the upper application can easily connect and access the lower engine such as MySQL/Spark/Hive/Presto/Flink, and realize the cross upper application interworking of user resources such as variables, scripts, functions and resource files. As a computing middleware, Linkis provides powerful connectivity, reuse, orchestration, expansion, governance and control capabilities.
The application layer and engine layer are decoupled by computing middleware, which simplifies the complex network call relationship, reduces the overall complexity, and saves the overall development and maintenance cost.
In August 2021, Linkis, the open source project of Weizhong bank, officially passed the voting resolution of the international top open source organization Apache Software Foundation (hereinafter referred to as ASF), and became an ASF incubator project with the excellent performance of unanimous approval.
2.1.1 core features
(1) Rich underlying computing storage engine support. Currently supported computing storage engines: Spark, Hive, Python, Presto, ElasticSearch, MLSQL, TiSpark, JDBC, Shell, Flink, etc. Supported scripting languages: SparkSQL, HiveQL, Python, Shell, Pyspark, R, Scala, JDBC, etc.
(2) Strong computing governance capabilities. For example, spring gateway supports multi-level routing and multi tenant routing based on fine-grained and multi tenant policies, such as cloud gateway and linkmanager.
(3) Full stack computing storage engine architecture support. It can receive, execute and manage tasks and requests for various computing and storage engines, including offline batch tasks, interactive query tasks, real-time streaming tasks and storage tasks.
(4) Resource management capability. ResourceManager not only has the resource management capability for Yarn and Linkis EngineManager, but also provides multi-level resource allocation and recycling capability based on tags, so that ResourceManager has strong resource management capability across clusters and computing resource types.
(5) Unified context service. Generate context id for each computing task, manage user and system resource files (JAR, ZIP, Properties, etc.), result set, parameter variables, functions, etc. across users, systems and computing engines, set them in one place and reference them automatically everywhere.
(6) Unify materials. System and user level material management, which can share and flow, and share materials across users and systems.
2.2 DataSphereStudio
Datasphere studio (hereinafter referred to as DSS) is a data application development and management integration framework developed by Weizhong bank. Based on plug-in integration framework design and computing middleware Linkis, it can easily access various data application systems on the upper layer, making data development simple and easy to use. Under the unified UI, DSS will meet the needs of the whole process of data application development from data exchange, desensitization cleaning, analysis and mining, quality detection, visual display, timing scheduling to data output application with the graphical drag and drop development experience of workflow.
DSS is highly integrated. At present, the integrated systems include:
-
Data development IDE tool -- Scriptis
-
Data visualization tool -- Visualis
-
Quality data management tool
-
Workflow scheduling tool - Scheduler
-
Data exchange tool -- Exchangis
-
Data Api service
-
Streaming application development management tool -- Streamis
3. Installation
The linkis version 1.0.2 and DSS version 1.0.0 are used for the installation and testing of this article. Since the installation is in the internal test stage, dss1.0 is directly used 0 + Linkis1. 0.2 one click deployment package can be downloaded and installed directly. This deployment package mainly includes Scriptis (data development panel) and management console (engine, micro service management and global history log). For visualization, data quality, workflow scheduling, data exchange, data service and other functions, you can refer to the official documents for installation, which will not be repeated in this paper.
The components involved in this installation include Hadoop, Hive, spark and Flink. The JAR packages related to this environment will also be put on the network disk, including Hive's support for TEZ engine, Spark's support for Hive and Flink's support for various connectors. In addition, JAR packages in lib directory of Hive engine and Flink engine will also be uploaded for reference. Some problems are caused by lack of JAR packages or version problems.
Link: https://pan.baidu.com/s/17g05rtfE_JSt93Du9TXVug
Extraction code: zpep

 Computing layer
    ├─Linkisengine #Wikis engine plug-in package
    │      flink_engine.zip
    │      hive_engine.zip #Support tez
    │      spark_engine.zip
    └─Local cluster #Local cluster configuration andJARpackage
    │       flink_linkis.zip
    │       hive_linkis.zip
    │       spark_linkis.zip
    └─udf #Custom function testJARpackage
            hive_udf.jar
            flink_udf.jar
If you encounter problems during installation, you can first consult the official Q & A and record the common problems during installation and use. The address is: https://docs.qq.com/doc/DSGZhdnpMV3lTUUxq
Because it is only a functional test, the DSS and Linkis installed in this paper are stand-alone versions, and there is no multi live and multi copy deployment. For multi node deployment, please refer to the official document Cluster_Deployment
3.1 version description of components involved
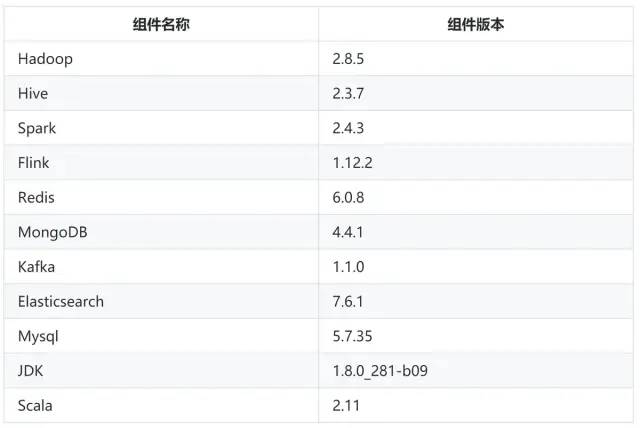
Version Description: due to the difference between our cluster component version and the engine component version supported by Linkis by default, the corresponding plug-ins need to be compiled by ourselves. You need to download the source code of Linkis, modify the corresponding component version and recompile.
3.2 environment dependent installation
As a computing middleware, the storage of its own metadata depends on Mysql, and some computing and storage engines are installed according to our needs. This paper mainly uses Hive, Spark and Flink engines, among which Flink engine will involve Kafka, Redis, MongoDB, Elasticsearch and other components. Before installing Linkis, you should ensure that these components have been installed and can be used normally. This article tests that the dependent cluster is a non secure cluster and Kerberos authentication is not enabled.
Among them, the Spark official website installation package does not support Hive, so Spark needs to be compiled to support Hive. It is necessary to correctly specify the Hadoop version, Scala version and add Hive support, and ensure that SparkSQL can be successfully run locally.
In theory, the server installing Linkis only needs to ensure network interoperability with the server installing the above services.
3.3 preparation of installation package
You can use DSS1 0 + Linkis1. 0.2 one click deployment package for installation. However, due to the inconsistent version of the linker engine plug-in, the corresponding component version needs to be changed globally and the linker needs to be recompiled. In version 1.0.2, although Flink engine has been supported, it will not be added to the installation package during compilation. It needs to be compiled separately to add new plug-ins, which will be described in detail later.
The following are the compilation commands:
// To pull the code for the first time, you need to execute the following commands to complete initialization
mvn -N install
// Execute package command
mvn clean install -Dmaven.test.skip=true
Installation
3.4.1 installation environment inspection
Before the formal installation of Linkis, some preparations need to be done:
(1) The hardware environment check mainly ensures that the microservice can be started normally and will not be unable to start normally due to insufficient resources.
(2) The dependency environment check mainly ensures that the Linkis startup can be used normally, so as to avoid the failure of script execution caused by the inability to execute commands.
(3) Installation user check mainly checks whether the installation user exists and configures the corresponding permissions. Linkis supports specifying submission and execution users.
(4) The installation command check mainly ensures the smooth installation. Some commands will be used during the installation process. Check in advance to ensure smooth installation.
(5) The directory check mainly ensures the existence of the cache directory configured by Linkis to avoid the directory not being found during execution.
3.4.1.1 hardware environment inspection
By default, the heap memory of each microservice JVM is 512 M, which can be modified by modifying SERVER_HEAP_SIZE to uniformly adjust the heap memory of each microservice. If the server resources are small, it is recommended to modify this parameter to 128 M. As follows:
vim ${LINKIS_HOME}/config/linkis-env.sh
    # java application default jvm memory.
    export SERVER_HEAP_SIZE="128M"
Installing DSS and Linkis services will start 6 DSS microservices and 8 Linkis microservices in total. When Linkis performs Hive, Spark, Flink and other tasks, it will also start LINKIS-CG-ENGINECONN microservices. It is installed in a stand-alone version. It is necessary to ensure that all microservices can be started.
3.4.1.2 dependent environment inspection
Hadoop environment: Hadoop needs to be configured_ HOME,HADOOP_CONF_DIR environment variable, and these two directories exist. And the hadoop fs -ls / command can be executed on the server where Linkis is installed.
Hive environment: hive needs to be configured_ HOME,HIVE_CONF_DIR environment variable, and these two directories exist. If hive configuration file cannot be read, metadata information may not be obtained normally, and built-in Derby will be used as hive metabase.
Spark environment: Spark needs to be configured_ HOME,SPARK_CONF_DIR environment variables and these two directories exist. It is necessary to ensure that the spark engine plug-in server can execute the spark submit -- version command, and spark tasks will be submitted to YARN for execution through this command. In order to ensure SparkSQL's support for Hive, in addition to successfully running the spark SQL command locally, it is also necessary to ensure that the SparkSQL on YARN mode can also be successfully executed. The specific order is/ Spark SQL -- Master YARN -- deploy mode client, test SQL tasks in the client.
Flink environment: Flink needs to be configured_ HOME,FLINK_CONF_DIR,FLINK_LIB_DIR environment variable, and these three directories exist.
It is recommended to directly copy the Hadoop, Hive, Spark, Flink directories and subdirectories to the corresponding nodes, and configure the environment variables. After the environment variables are modified, they need to take effect. The command source /etc/profile. The environment variables are referenced as follows:
export JAVA_HOME=/opt/jdk1.8
export CLASSPATH=.$CLASSPATH:$JAVA_HOME/lib
export HADOOP_HOME=/opt/install/hadoop
export HADOOP_CONF_DIR=$HADOOP_HOME/etc/hadoop
export HIVE_HOME=/opt/install/hive
export HIVE_CONF_DIR=$HIVE_HOME/conf
export FLINK_HOME=/opt/install/flink
export FLINK_CONF_DIR=/opt/install/flink/conf
export FLINK_LIB_DIR=/opt/install/flink/lib
export SPARK_HOME=/opt/install/spark
export SPARK_CONF_DIR=$SPARK_HOME/conf
export PATH=$MAVEN_HOME/bin:$HADOOP_HOME/bin:$HIVE_HOME/bin:$SPARK_HOME/bin:$SQOOP_HOME/bin/:$FLINK_HOME/bin:$FLINKX_HOME/bin:$JAVA_HOME/bin:$PATH
export CLASSPATH=.$CLASSPATH:$JAVA_HOME/lib
Check whether the environment variable is effective:
sudo su - ${username}
echo ${JAVA_HOME}
echo ${FLINK_HOME}
MySQL environment: because Linkis uses Mysql to save metadata and the query syntax is incompatible with the default configuration of MySQL, only will appear_ FULL_ GROUP_ An error is reported in by, and the SQL needs to be modified_ mode. In addition, in the test of Flink engine, it is necessary to open Mysql binlog and make modifications when checking the environment. If it is not necessary to open binlog, it can also be left unmodified.
i. Modify sql_mode configuration:
1. View current sql_mode
select @@global.sql_mode;
2. modify sql_mode
vim /etc/my.cnf
sql_mode=STRICT_TRANS_TABLES,NO_ZERO_IN_DATE,NO_ZERO_DATE,ERROR_FOR_DIVISION_BY_ZERO,NO_AUTO_CREATE_USER,NO_ENGINE_SUBSTITUTION
3. restart Mysql service
service mysqld restart
service mysqld status
ii. Enable binlog
1. Modify configuration vim /etc/my.cnf,Add the following configuration
   server_id=1
   log_bin=mysql-bin
   binlog_format=ROW
   expire_logs_days=30
2. restart Mysql service
service mysqld restart
service mysqld status
3. View status
show VARIABLES LIKE 'log_bin';
show global variables like "binlog%";
3.4.1.3 installation user inspection
For example, the deployment user is a hadoop account
First check whether there are hadoop users in the system. After setting up the cluster, hadoop users may already exist. If they already exist, they can be authorized directly; If it does not exist, create a user first and then authorize.
-
Check whether there are hadoop users. The command is: cat /etc/passwd | grep hadoop
httpfs:x:983:976:Hadoop HTTPFS:/var/lib/hadoop-httpfs:/bin/bash
mapred:x:982:975:Hadoop MapReduce:/var/lib/hadoop-mapreduce:/bin/bash
kms:x:979:972:Hadoop KMS:/var/lib/hadoop-kms:/bin/bash
-
If the user group does not exist, the user group will be created as - hado. If the user group does not exist, the user group will be created as - hado. If the user group does not exist, the user group will be added as - hadoop
-
Grant sudo permission to hadoop users. The command is: vi /etc/sudoers. Add hadoop ALL=(ALL) NOPASSWD: NOPASSWD: ALL content to the file. Since the file is read-only, use wq! Force save
-
Modify the environment variable of the installation user, VIM / home / Hadoop / bash_ RC configure environment variables as follows:
export JAVA_HOME=/opt/jdk1.8
export HADOOP_HOME=/opt/install/hadoop
export HADOOP_CONF_DIR=/opt/install/hadoop/etc/hadoop
export HIVE_HOME=/opt/install/hive
export HIVE_CONF_DIR=/opt/install/hive/conf
export FLINK_HOME=/opt/install/flink
export FLINK_CONF_DIR=/opt/install/flink/conf
export FLINK_LIB_DIR=/opt/install/flink/lib
export SPARK_HOME=/opt/install/spark
export SPARK_CONF_DIR=/opt/install/spark/conf
3.4.1.4 installation order inspection
Command tools required by Linkis (before formal installation, the script will automatically detect whether these commands are available. If they do not exist, the script will try to install them automatically. If the installation fails, the user needs to manually install the following basic shell command tools): telnet, tar, sed, dos2unix, yum, java, unzip and expect.
You can view VIM bin / checkenv The commands checked in the SH script can be commented out for the command check of some unnecessary functions. For example: check of python command, etc.
3.4.1.5 catalog inspection
The Linkis service requires the user to configure the local engine directory ENGINECONN_ROOT_PATH and log cache directory HDFS_USER_ROOT_PATH, you can choose to cache the log on HDFS or locally. If HDFS path is configured, the log and execution results will be written to HDFS by default.
ENGINECONN_ROOT_PATH is a local directory, which needs to be created by the user in advance and authorized. The authorization command chmod -R 777 / directory, if it is linkis1 In version 0.2, there is no need to create and authorize in advance. It will be automatically created and authorized in scripts and programs.
HDFS_USER_ROOT_PATH is the path on HDFS. It needs to be created in advance and authorized. The authorization command is hadoop fs -chmod -R 777 / directory.
3.4.2 unzip the installation package
Unzip the package with the unzip command, including the installation packages of linkis, dss and web. Each component also has its own installation and configuration script. The general principle is to modify the configuration file in the conf directory as needed. If the configuration is modified, the installation and startup scripts in the bin directory can be used to complete the installation and startup operations. Users can use the one click Install command for one click installation, or decompress each compressed package and install it by themselves. If you use one click installation, the unified configuration may not be synchronized to components such as linkers, dss and web. You need to check carefully before starting.
The decompression directory is as follows:
│  wedatasphere-dss-1.0.0-dist.tar.gz #The dss backend installation package will be automatically decompressed by using the one click install command
│  wedatasphere-dss-web-1.0.0-dist.zip #The web front-end installation package will be automatically decompressed by using the one click install command
│  wedatasphere-linkis-1.0.2-combined-package-dist.tar.gz #The linkes backend installation package will be automatically decompressed by using the one click install command
│
├─bin
│      checkEnv.sh #Pre installation command check script. For unnecessary commands, you can comment and skip the check
│      install.sh #The one click installation command will complete operations such as decompressing, creating necessary directories, importing metadata, etc
│      replace.sh #Scripts are used internally to complete the coverage of unified configuration
│      start-all.sh #Start all microservice scripts with one click. Start linkis first, then the dss back end, and then the dss front end
│      stop-all.sh #One click stop all microservice scripts
│
└─conf
        config.sh #The unified configuration script will be through replace SH script to cover the configuration in each microservice of each component
        db.sh #Unified database configuration script, including linkis metabase configuration and hive metabase configuration
3.4.3 modify configuration
The user needs to be in conf / DB SH configure the meta database connection information of Linkis and Hive in conf / config Configure DSS, Linkis installation and startup information in the SH script. Since there are more than a dozen microservices, special attention should be paid when configuring the microservice port number to avoid the port number being occupied. View port number occupancy:
# View all port numbers
netstat -ntlp
# Check whether it is currently occupied
netstat -tunlp |grep  8080
db.sh configuration example:
## for DSS-Server and Eventchecker APPJOINT
MYSQL_HOST=host
MYSQL_PORT=port
MYSQL_DB=db
MYSQL_USER=user
MYSQL_PASSWORD=password
##hive configuration
HIVE_HOST=host
HIVE_PORT=port
HIVE_DB=db
HIVE_USER=user
HIVE_PASSWORD=password
config.sh configuration example:
### deploy user
deployUser=hadoop
### Linkis_VERSION
LINKIS_VERSION=1.0.2
### DSS Web
DSS_NGINX_IP=127.0.0.1
DSS_WEB_PORT=8088
### DSS VERSION
DSS_VERSION=1.0.0
############## ############## linkis Other default configuration information for start ############## ##############
### Generally local directory
WORKSPACE_USER_ROOT_PATH=file:///tmp/linkis/
### User's root hdfs path
HDFS_USER_ROOT_PATH=hdfs:///tmp/linkis
### Path to store job ResultSet:file or hdfs path
RESULT_SET_ROOT_PATH=hdfs:///tmp/linkis
### Path to store started engines and engine logs, must be local
ENGINECONN_ROOT_PATH=/appcom/tmp
### Engine environment variable configuration
HADOOP_CONF_DIR=/opt/install/hadoop/etc/hadoop
HIVE_CONF_DIR=/opt/install/hive/conf
SPARK_CONF_DIR=/opt/install/spark/conf
##YARN REST URL  spark engine required
YARN_RESTFUL_URL=http://127.0.0.1:8088
### for install
LINKIS_PUBLIC_MODULE=lib/linkis-commons/public-module
## Microservice port configuration
###  You can access it in your browser at the address below:http://${EUREKA_INSTALL_IP}:${EUREKA_PORT}
#LINKIS_EUREKA_INSTALL_IP=127.0.0.1         # Microservices Service Registration Discovery Center
LINKIS_EUREKA_PORT=20303
###  Gateway install information
#LINKIS_GATEWAY_PORT =127.0.0.1
LINKIS_GATEWAY_PORT=8001
### ApplicationManager
#LINKIS_MANAGER_INSTALL_IP=127.0.0.1
LINKIS_MANAGER_PORT=8101
### EngineManager
#LINKIS_ENGINECONNMANAGER_INSTALL_IP=127.0.0.1
LINKIS_ENGINECONNMANAGER_PORT=8102
### EnginePluginServer
#LINKIS_ENGINECONN_PLUGIN_SERVER_INSTALL_IP=127.0.0.1
LINKIS_ENGINECONN_PLUGIN_SERVER_PORT=8103
### LinkisEntrance
#LINKIS_ENTRANCE_INSTALL_IP=127.0.0.1
LINKIS_ENTRANCE_PORT=8104
###  publicservice
#LINKIS_PUBLICSERVICE_INSTALL_IP=127.0.0.1
LINKIS_PUBLICSERVICE_PORT=8105
### cs
#LINKIS_CS_INSTALL_IP=127.0.0.1
LINKIS_CS_PORT=8108
########## Linkis Microservice configuration completed#####
################### The install Configuration of all DataSphereStudio's Micro-Services #####################
# Used to store temporary ZIP package files published to schedule
WDS_SCHEDULER_PATH=file:///appcom/tmp/wds/scheduler
### This service is used to provide dss-framework-project-server capability.
#DSS_FRAMEWORK_PROJECT_SERVER_INSTALL_IP=127.0.0.1
DSS_FRAMEWORK_PROJECT_SERVER_PORT=9007
### This service is used to provide dss-framework-orchestrator-server capability.
#DSS_FRAMEWORK_ORCHESTRATOR_SERVER_INSTALL_IP=127.0.0.1
DSS_FRAMEWORK_ORCHESTRATOR_SERVER_PORT=9003
### This service is used to provide dss-apiservice-server capability.
#DSS_APISERVICE_SERVER_INSTALL_IP=127.0.0.1
DSS_APISERVICE_SERVER_PORT=9004
### This service is used to provide dss-workflow-server capability.
#DSS_WORKFLOW_SERVER_INSTALL_IP=127.0.0.1
DSS_WORKFLOW_SERVER_PORT=9005
### dss-flow-Execution-Entrance
### This service is used to provide flow execution capability.
#DSS_FLOW_EXECUTION_SERVER_INSTALL_IP=127.0.0.1
DSS_FLOW_EXECUTION_SERVER_PORT=9006
### This service is used to provide dss-datapipe-server capability.
#DSS_DATAPIPE_SERVER_INSTALL_IP=127.0.0.1
DSS_DATAPIPE_SERVER_PORT=9008
########## DSS Microservice configuration completed#####
############## ############## other default configuration Other default configuration information  ############## ##############
## java application minimum jvm memory
export SERVER_HEAP_SIZE="128M"
##In the process of configuring the sending email function, only the sending email function is affected
EMAIL_HOST=smtp.163.com
EMAIL_PORT=25
EMAIL_USERNAME=xxx@163.com
EMAIL_PASSWORD=xxxxx
EMAIL_PROTOCOL=smtp
3.4.4 installation directory and configuration inspection
i. Installation
After modifying the configuration, use the one click installation command bin / install SH, complete the installation. After installation, three directories will be generated: linkis, dss and web. The directory tree of each directory is listed below, and only the main directories are displayed. The linkis directory tree is as follows:
├── linkis
│   ├── bin #It mainly stores commands related to linkis functions, such as the client executing hive and spark tasks
│   │   ├── linkis-cli
│   │   ├── linkis-cli-hive
│   │   ├── linkis-cli-spark-sql
│   │   ├── linkis-cli-spark-submit
│   │   └── linkis-cli-start
│   ├── conf #Configuration file of linkis micro service
│   │   ├── application-eureka.yml
│   │   ├── application-linkis.yml
│   │   ├── linkis-cg-engineconnmanager.properties
│   │   ├── linkis-cg-engineplugin.properties
│   │   ├── linkis-cg-entrance.properties
│   │   ├── linkis-cg-linkismanager.properties
│   │   ├── linkis-cli
│   │   │   ├── linkis-cli.properties
│   │   │   └── log4j2.xml
│   │   ├── linkis-env.sh
│   │   ├── linkis-mg-gateway.properties
│   │   ├── linkis.properties
│   │   ├── linkis-ps-cs.properties
│   │   ├── linkis-ps-publicservice.properties
│   │   ├── log4j2.xml
│   │   └── token.properties
│   ├── db #sql script for linkis metadata initialization
│   │   ├── linkis_ddl.sql
│   │   ├── linkis_dml.sql
│   ├── lib #Dependent packages of each module of linkis
│   │   ├── linkis-commons
│   │   ├── linkis-computation-governance
│   │   │   ├── linkis-cg-engineconnmanager
│   │   │   ├── linkis-cg-engineplugin
│   │   │   ├── linkis-cg-entrance
│   │   │   ├── linkis-cg-linkismanager
│   │   │   └── linkis-client
│   │   │       └── linkis-cli
│   │   ├── linkis-engineconn-plugins
│   │   │   ├── appconn
│   │   │   ├── flink
│   │   │   ├── hive
│   │   │   ├── python
│   │   │   ├── shell
│   │   │   └── spark
│   │   ├── linkis-public-enhancements
│   │   │   ├── linkis-ps-cs
│   │   │   └── linkis-ps-publicservice
│   │   └── linkis-spring-cloud-services
│   │       ├── linkis-mg-eureka
│   │       └── linkis-mg-gateway
│   ├── LICENSE
│   ├── README_CN.md
│   ├── README.md
│   └── sbin #The linkis startup script is used to start various micro services
│       ├── common.sh
│       ├── ext
│       │   ├── linkis-cg-engineconnmanager
│       │   ├── linkis-cg-engineplugin
│       │   ├── linkis-cg-entrance
│       │   ├── linkis-cg-linkismanager
│       │   ├── linkis-common-start
│       │   ├── linkis-mg-eureka
│       │   ├── linkis-mg-gateway
│       │   ├── linkis-ps-cs
│       │   └── linkis-ps-publicservice
│       ├── linkis-daemon.sh
│       ├── linkis-start-all.sh
│       └── linkis-stop-all.sh
The DSS directory tree is as follows:
├── dss
│   ├── bin #dss installation script directory
│   │   ├── appconn-install.sh
│   │   ├── checkEnv.sh
│   │   ├── excecuteSQL.sh
│   │   └── install.sh
│   ├── conf #dss micro service configuration directory
│   │   ├── application-dss.yml
│   │   ├── config.sh
│   │   ├── db.sh
│   │   ├── dss-apiservice-server.properties
│   │   ├── dss-datapipe-server.properties
│   │   ├── dss-flow-execution-server.properties
│   │   ├── dss-framework-orchestrator-server.properties
│   │   ├── dss-framework-project-server.properties
│   │   ├── dss.properties
│   │   ├── dss-workflow-server.properties
│   │   ├── log4j2.xml
│   │   ├── log4j.properties
│   │   └── token.properties
│   ├── dss-appconns #dss integrates other systems to store directories, such as visualization, data quality, scheduling, etc
│   ├── lib #dss micro service dependent packages
│   ├── README.md
│   └── sbin #dss micro service startup script directory supports one click Startup and single startup
│       ├── common.sh
│       ├── dss-daemon.sh
│       ├── dss-start-all.sh
│       ├── dss-stop-all.sh
│       └── ext
│           ├── dss-apiservice-server
│           ├── dss-datapipe-server
│           ├── dss-flow-execution-server
│           ├── dss-framework-orchestrator-server
│           ├── dss-framework-project-server
│           └── dss-workflow-server
The web directory tree is as follows:
├── web
│   ├── config.sh #Configuration script of web front end, such as gateway address, etc
│   ├── dist #dss front-end static file
│   ├── dss #Linkis front-end static files (the management console is integrated by linkis)
│   │   └── linkis
│   └── install.sh #Install startup script, install and configure nginx
ii. Check configuration
Configuration check: after the installation is completed by using the one click installation command, some configurations are not completely covered, which needs to be checked by the user to ensure that the configuration is correct. The following are the problems encountered during installation:
1. dss in gateway Address configuration error, modified dss.properties Configuration file, correct configuration gateway address
2. web in config.sh In the script, gateway The address configuration is wrong and needs to be modified by the user
3. linkis1.0.2 In the engine directory, the automatic authorization will be completed before the engine is created, and the agent needs to be started. modify linkis-cg-engineconnmanager.properties,add to wds.linkis.storage.enable.io.proxy=true
3.4.5 start service
i. Start service
After completing the installation and configuration check steps, there are two ways to start the microservice:
One is to use the one click Start script bin / start all SH to start all microservices, including linkis back end, dss back end and web front end.
Another way is to enter the respective installation directory and start all micro services by yourself. First start the linkis service and use linkis / SBIN / linkis start all The SH command is OK. Of course, for the linkis service, you can also start and stop each micro service separately. Restart the dss service and use dss / SBIN / dss start all SH command. Finally, start the web service and use Web / install SH, it will automatically check whether nginx is installed. If not, it will automatically download and install and complete the configuration. Also note that Web / install The SH script configures ngnix in an overlay way. If multiple web services need to be started and multiple nginx listening needs to be configured on a server, the script needs to be modified to prevent the ngnix configuration from being overwritten.
ii. Check whether it starts successfully
You can view the startup of various micro services in the background of Linkis & DSS in Eureka interface. When the task is not executed, there are 8 micro services in Linkis and 6 micro services in DSS; When a Scriptis task is executed, Linkis will start the LINKIS-CG-ENGINECONN service. The log directory of the default microservice is given below:
// 1. linkis microservice log directory. The logs of the eight microservices started by default are all here. You can view the logs of each microservice accordingly
linkis/logs
// 2. For the logs of the wikis engine microservice, please refer to 'engineconn'_ ROOT_ Path ` get the root directory of the engine. Generally, if the engine fails to start successfully, you need to pay attention to the 'links CG engineconnmanager' log; If the startup is successful, you need to pay attention to the engine log; If the engine starts successfully and the task fails, you can check the engine log first. If there is no specific information, you can check the YARN log and check the specific error reports.
${ENGINECONN_ROOT_PATH}/hadoop/workDir/UUID/logs
// 3. dss microservice logs. The six microservice logs started by default are here. You can view each microservice log accordingly
dss/logs
// 4. For the front-end problem, you can open debugging, view the specific request, obtain the specific microservice interface problem according to the request, and then view the log of the specific microservice according to the above directory
Eureka microservice interface:
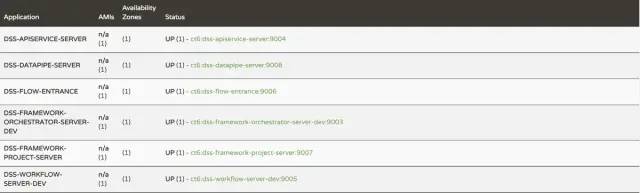
DSS micro service

Links - micro services
iii. Google browser access
Please use Google browser to access the following front-end address: http://DSS_NGINX_IP:DSS_WEB_PORT The startup log prints this access address. When logging in, the user name and password of the administrator are the deployment user name. If the deployment user is hadoop, the user name / password of the administrator is hadoop/hadoop. It can be found at linkis mg gateway Configure LDAP information in the properties configuration to access the internal LDAP service. Based on DSS1 0 trial version, many functions are limited:
-
On the login page, the main function panels and cases will be displayed on the home page;

home page
-
Scriptis panel is the focus of our installation and testing this time. It is used to write Hive, Spark, Flink and other scripts and function management;
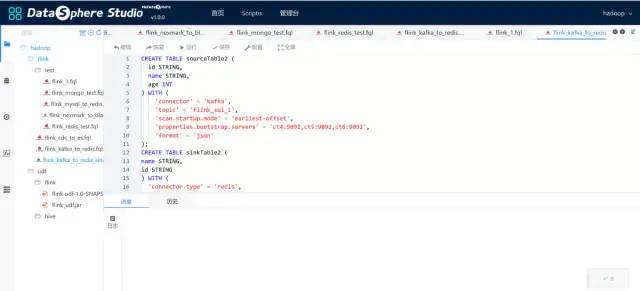
Scriptis
-
The management console is integrated into the foreground interface of linkis, mainly including global history (script execution log), resource management (the usage of engine resources will be displayed when the engine is started), parameter configuration (yarn resource queue, engine resource configuration, etc.), global variables (global variable configuration) ECM Management (ECM instance management, which can also manage the engine under ECM), micro service management (micro service management panel)
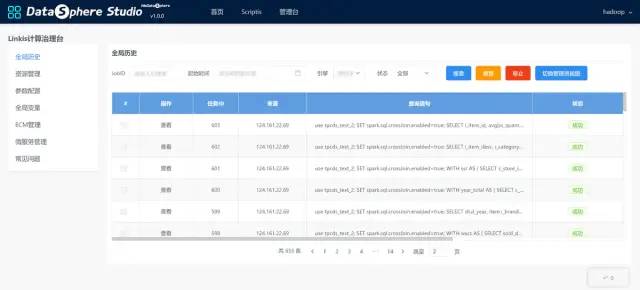
Management desk
3.4.6 function test
This paper mainly tests Hive, Spark and Flink engines. The default installed Linkis does not integrate Flink engine, so test Hive and Spark engines first. In addition, the custom function is also tested.
Some errors and solutions encountered during use will also be pointed out in the following best practices. In case of error reporting, you can refer to best practices.
3.4.6.1 Hive
i. Hive profile
Hive connector supports a variety of computing engines, such as MR, TEZ, Spark, etc. MR engine is used by default and needs to be in hive site It is specified in the XML that this article is configured for testing without optimization. It is for reference only:
>
    >
        >hive.metastore.schema.verification>
        >false> > > >hive.metastore.uris> >thrift://host:9083> > > >spark.master> >yarn-cluster> > > >javax.jdo.option.ConnectionURL> >jdbc:mysql://host:3306/hive> > > >javax.jdo.option.ConnectionDriverName> >com.mysql.cj.jdbc.Driver> > > >javax.jdo.option.ConnectionUserName> >root> > > >javax.jdo.option.ConnectionPassword> >MySQL5.7> > > >hive.auto.convert.join> >false> >Enables the optimization about converting common join into mapjoin> > >
ii. Script test
Create a new script in the Scriptis panel, and select hive as the script type. Script test requires a slightly more complex SQL to avoid hive parsing, only local query, and MR task is not started. For script reference:
show
tables;
select name, addr, id
from linkis_1
group by name, addr, id
order by id;
select a.name, a.addr, b.phone
from linkis_1 a
         left join linkis_2 b on a.id = b.id
group by a.name, a.addr, b.phone
order by a.name;
iii. benchmarking
If benchmarking is required, you can refer to the hive testbench benchmarking framework, which provides data generators and sample queries based on TPC-DS and TPC-H benchmarking. TPC-DS adopts star, snowflake and other multidimensional data modes. It contains 7 fact tables and 17 latitude tables, with an average of 18 columns per table. Its workload includes 99 SQL queries, covering the core parts of SQL99 and 2003 and OLAP. This test set contains complex applications such as statistics, report generation, online query and data mining of large data sets. The data and values used in the test are inclined and consistent with the real data. TPC-DS is the best test set to objectively measure multiple different Hadoop versions and SQL on Hadoop technology. This benchmark has the following main features:
-
A total of 99 test cases follow the syntax standards of SQL99 and SQL 2003. SQL cases are relatively complex
-
The amount of data analyzed is large, and the test case is answering real business questions
-
Test cases include various business models (such as analysis report type, iterative online analysis type, data mining type, etc.)
-
Almost all test cases have high IO load and CPU computing requirements
3.4.6.2 Spark
Linkis's support for Spark enginecon plugin basically does not need to be changed. The main problems are: first, compile Spark plug-in and select Scala version and JDK version that are the same as Spark cluster environment; The second is the correct configuration of Spark cluster environment. If the following steps can be correctly executed locally, the general linkis plug-in can also be correctly executed.
i. Local test
// 1. Ensure that spakr job can be submitted successfully. The test command is as follows:

./spark-submit \\
--class org.apache.spark.examples.SparkPi \\
--master yarn \\
--executor-memory 1G \\
--total-executor-cores 2 \\
/opt/install/spark/examples/jars/spark-examples_2.11-2.4.3.jar \\
100

// 2. Make sure spark on hive is in yaw mode and can be executed successfully. The default startup mode is the local mode, which can succeed as long as there is a dependency on hive locally. In the yarn mode, you need to upload the JAR packages under the jars directory of spark to hdfs

./spark-sql  --master yarn --deploy-mode client

// You can execute the following sql to test
show tables;
select name,addr,id from linkis_1 group by name,addr,id order by id;
select a.name,a.addr,b.phone from linkis_1 a left join linkis_2 b on a.id=b.id group by a.name,a.addr,b.phone  order by a.name;
ii. Spark profile
-
spark-env.sh
#!/usr/bin/env bash
SPARK_CONF_DIR=/opt/install/spark/conf
HADOOP_CONF_DIR=/opt/install/hadoop/etc/hadoop
YARN_CONF_DIR=/opt/install/hadoop/etc/hadoop
SPARK_EXECUTOR_CORES=3
SPARK_EXECUTOR_MEMORY=4g
SPARK_DRIVER_MEMORY=2g
-
spark-defaults.conf
spark.yarn.historyServer.address=host:18080
spark.yarn.historyServer.allowTracking=true
spark.eventLog.dir=hdfs://host/spark/eventlogs
spark.eventLog.enabled=true
spark.history.fs.logDirectory=hdfs://host/spark/hisLogs
spark.yarn.jars=hdfs://host/spark-jars/*
iii. Linkis test
Create a new script in the Scriptis panel, and select Sql as the script type. The test based on hive testbench also provides Spark query statements. You can refer to this scenario for testing.
show
tables;
select name, addr, id
from linkis_1
group by name, addr, id
order by id;
select a.name, a.addr, b.phone
from linkis_1 a
         left join linkis_2 b on a.id = b.id
group by a.name, a.addr, b.phone
order by a.name;
Similarly, you can also select Scala type, initialize sqlContext in the script, and directly execute sql statements.
val sql = "show tables"
val df = sqlContext.sql(sql)
df.show()
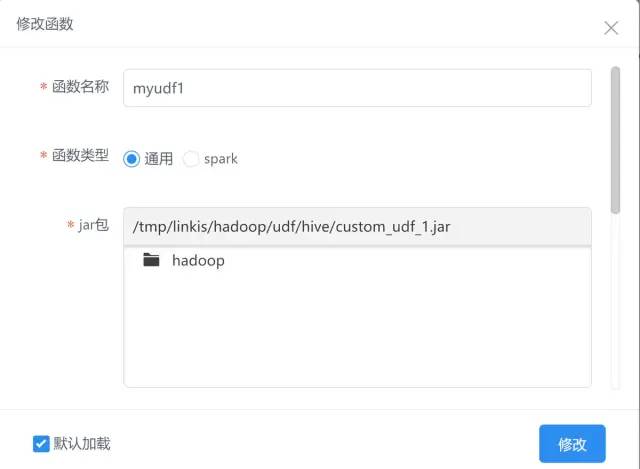
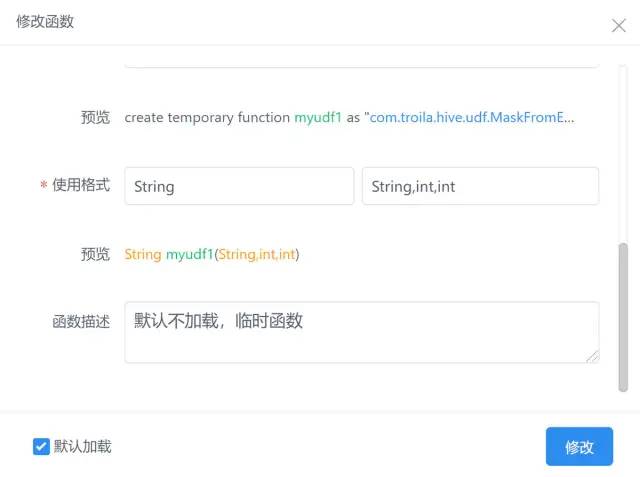
3.4.6.3 UDF function
Linkis provides a portable way for users to implement custom functions and use them in scripts. At present, Hive and Spark engine plug-ins support custom functions. After testing, Flink engine does not support creating functions temporarily. The current version of plug-ins only supports some syntax.
The functions created through the DSS console are temporary by default. When the engine plug-in is started, they are valid in the current session.
-
i. Use process
1. Local development udf Function to complete the packaging.
2. stay dss of Scriptis Interface upload JAR Bag.
3. stay dss Interface creation, function assignment JAR Package, function name, function format (supplementary main class).
4. Select whether to load. The default is load. When the engine is initialized, a temporary function will be created. Adding and modifying functions requires restarting the engine to take effect.
-
ii. Loading process
1. stay EngineConnServer Create in EngineConn,There will be execution logic before and after the engine is created.
2. implement afterExecutionExecute Method, by UDFLoadEngineConnHook Get all that need to be loaded udf Functions, viewing udf Registration format, traversal registration.
3. From the loading process, udf The life cycle of a function is the life cycle of an engine, udf After the function modification is completed, the engine must be restarted before it can take effect.
4. udf Function selection loading will JAR Put the package in the engine classpath Path and register when the engine is created; If not loaded, then classpath There will be no such path JAR Package will not be registered; And they are all session level functions by default.
5. The detailed loading process can be through UdfInfo Keyword search, and then view the specific logic.
-
iii. API call
If you do not create or modify functions through the DSS console, you can refer to UDF API to view the list of supported APIs through API. The following is an example:
POST http://gateway_ip:8001/api/rest_j/v1/udf/update

{"isShared":false,"udfInfo":{"id":4,"udfName":"testudf2","description":"7777","path":"file:///tmp/linkis/hadoop/udf/hive/hive_function.jar","shared":false,"useFormat":"testudf2()","load":true,"expire":false,"registerFormat":"create temporary function testudf2 as \\" com.troila.hive.udf.MaskFromEnds\\"","treeId":9,"udfType":0}}
3.4.6.4 Linkis debugging mode
In addition to script debugging on DSS console, you can also use client mode, SDK and other methods
3.4.6.4.1 client mode
Use example:
./linkis-cli -engineType spark-2.4.3 -codeType sql -code "select count(*) from default.ct_test;"  -submitUser hadoop -proxyUser hadoop
./linkis-cli -engineType hive-2.3.3 -codeType sql -code "select count(*) from default.ct_test;"  -submitUser hadoop -proxyUser hadoop
./linkis-cli -engineType hive-2.3.3 -codeType sql -code "select * from \\${table};" -varMap table=default.ct_test  -submitUser hadoop -proxyUser hadoop
3.4.6.4.2 SDK mode
-
Introduce dependency
>
    >com.webank.wedatasphere.linkis>
>linkis-computation-client> >${linkis.version}> > > >commons-codec> >commons-codec> > > >slf4j-api> >org.slf4j> > > >commons-beanutils> >commons-beanutils> > > > -
Scala code example
package com.troila.bench.linkis.spark

import com.webank.wedatasphere.linkis.common.utils.Utils
import com.webank.wedatasphere.linkis.httpclient.dws.authentication.StaticAuthenticationStrategy
import com.webank.wedatasphere.linkis.httpclient.dws.config.DWSClientConfigBuilder
import com.webank.wedatasphere.linkis.manager.label.constant.LabelKeyConstant
import com.webank.wedatasphere.linkis.ujes.client.UJESClient
import com.webank.wedatasphere.linkis.ujes.client.request.{JobSubmitAction, ResultSetAction}
import org.apache.commons.io.IOUtils
import java.util
import java.util.concurrent.TimeUnit

object ScalaClientTest {

  def main(args: Array[String]): Unit = {
    val user = "hadoop"
    val username = "hadoop"
    val password = "hadoop"
    val yarnQueue = "default"
    val executeCode = "select name,addr,id from linkis_1 group by name,addr,id order by id"
    val gatewayUrl = "http://gateway_ip:8001"

    // 1. Configure DWSClientBuilder and obtain a DWSClientConfig through DWSClientBuilder
    val clientConfig = DWSClientConfigBuilder.newBuilder()
      .addServerUrl(gatewayUrl) //Specify the address of ServerUrl and Linkis server-side gateway, such as http://{ip}:{port}
      .connectionTimeout(30000) //connectionTimeOut client connection timeout
      .discoveryEnabled(false).discoveryFrequency(1, TimeUnit.MINUTES) //Whether to enable registration discovery. If enabled, the newly started Gateway will be automatically discovered
      .loadbalancerEnabled(true) // Whether to enable load balancing. If registration discovery is not enabled, load balancing is meaningless
      .maxConnectionSize(5) //Specify the maximum number of connections, that is, the maximum number of concurrent connections
      .retryEnabled(false).readTimeout(30000) //Execution failed. Allow retry
      .setAuthenticationStrategy(new StaticAuthenticationStrategy()) //AuthenticationStrategy Linkis authentication method
      .setAuthTokenKey(username).setAuthTokenValue(password) //Authentication key, usually user name; Authentication value is generally the password corresponding to the user name
      .setDWSVersion("v1").build() //The version of the background protocol of Linkis. The current version is v1

    // 2. Obtain a UJESClient through DWSClientConfig
    val client = UJESClient(clientConfig)

    try {
      // 3. Start code execution
      println("user : " + user + ", code : [" + executeCode + "]")
      val startupMap = new java.util.HashMap[String, Any]()
      startupMap.put("wds.linkis.yarnqueue", yarnQueue) //Start parameter configuration
      //Specify Label
      val labels: util.Map[String, Any] = new util.HashMap[String, Any]
      //Add the tags that this execution depends on, such as engineLabel
      labels.put(LabelKeyConstant.ENGINE_TYPE_KEY, "spark-2.4.3")
      labels.put(LabelKeyConstant.USER_CREATOR_TYPE_KEY, "hadoop-IDE")
      labels.put(LabelKeyConstant.CODE_TYPE_KEY, "sql")
      //Specify source
      val source: util.Map[String, Any] = new util.HashMap[String, Any]
      // Parameter substitution
      val varMap: util.Map[String, Any] = new util.HashMap[String, Any]
      //      varMap.put("table", "linkis_1")

      val jobExecuteResult = client.submit(JobSubmitAction.builder
        .addExecuteCode(executeCode)
        .setStartupParams(startupMap)
        .setUser(user) //Job submission user
        .addExecuteUser(user) //Actual execution user
        .setLabels(labels)
        .setSource(source)
        .setVariableMap(varMap)
        .build) //User, request user; Used for user level multi tenant isolation
      println("execId: " + jobExecuteResult.getExecID + ", taskId: " + jobExecuteResult.taskID)

      // 4. Get the execution status of the script
      var jobInfoResult = client.getJobInfo(jobExecuteResult)
      val sleepTimeMills: Int = 1000
      while (!jobInfoResult.isCompleted) {
        // 5. Get the execution progress of the script
        val progress = client.progress(jobExecuteResult)
        val progressInfo = if (progress.getProgressInfo != null) progress.getProgressInfo.toList else List.empty
        println("progress: " + progress.getProgress + ", progressInfo: " + progressInfo)
        Utils.sleepQuietly(sleepTimeMills)
        jobInfoResult = client.getJobInfo(jobExecuteResult)
      }
      if (!jobInfoResult.isSucceed) {
        println("Failed to execute job: " + jobInfoResult.getMessage)
        throw new Exception(jobInfoResult.getMessage)
      }
      // 6. Get the Job information of the script
      val jobInfo = client.getJobInfo(jobExecuteResult)
      // 7. Get the result set list (if the user submits multiple SQL at one time, multiple result sets will be generated)
      val resultSetList = jobInfoResult.getResultSetList(client)
      println("All result set list:")
      resultSetList.foreach(println)
      val oneResultSet = jobInfo.getResultSetList(client).head
      // 8. Obtain a specific result set through a result set information
      val fileContents = client.resultSet(ResultSetAction.builder().setPath(oneResultSet).setUser(jobExecuteResult.getUser).build()).getFileContent
      println("First fileContents: ")
      println(fileContents)
    } catch {
      case e: Exception => {
        e.printStackTrace()
      }
    }
    IOUtils.closeQuietly(client)
  }
}
3.5 extended functions
This part mainly focuses on the practice of Hive on TEZ, and also includes the support for llap; In addition, we compiled the Flink engine plug-in, practiced Kafka, Elasticsearch, Mysql, CDC and other connectors, and realized the Sink Connector of Redis and MongoDB.
3.5.1 Hive supports TEZ engine
For the support of TEZ engine, there are two main modifications: one is that Hive cluster environment needs to support TEZ; Second, the Linkis engine plug-in also needs corresponding dependencies. When switching the TEZ engine, if an error is reported, it is mostly caused by the lack of JAR package or guava package conflict. The JAR package completed during the test will be uploaded to the online disk for retention.
Users need to download and compile TEZ, complete local configuration, and start Hive client locally to ensure that it is started with TEZ engine and successfully execute SQL logic. This process will not be repeated in this article.
3.5.1.1 Linkis operation
In order to support the tez engine, you need to copy the JAR package beginning with tez - * to the engine dependency path of Linkis, and then restart the ECM service.
For the early-stage test, you may need to adjust the JAR package frequently and start the ECM service frequently. The whole process will be slow. In the test stage, you can copy the JAR package directly to the engineConnPublickDir directory. After the ECM starts, the Lib dependency and conf of the engine will be placed in this public directory. After the engine starts, soft links will be suggested from this directory. Therefore, you can directly copy the required JAR package to this directory, so you don't have to restart the ECM service. After the test is successful, remember to put the JAR package in linkis / lib / linkis enginecon plugins / hive / dist / v2 3.7/lib directory to avoid restarting the service, resulting in the loss of JAR package. List of JAR packages to copy:
// linkis/lib/linkis-engineconn-plugins/hive/dist/v2.3.7/lib
// In this directory, when the engine starts for the first time, it will generate a lib Zip cache package. If the JAR package under lib is modified and the compressed package is not updated, the latest JAR package cannot be used
tez-api-0.9.2.jar
tez-build-tools-0.9.2.jar
tez-common-0.9.2.jar
tez-dag-0.9.2.jar
tez-examples-0.9.2.jar
tez-ext-service-tests-0.9.2.jar
tez-history-parser-0.9.2.jar
tez-javadoc-tools-0.9.2.jar
tez-job-analyzer-0.9.2.jar
tez-mapreduce-0.9.2.jar
tez-protobuf-history-plugin-0.9.2.jar
tez-runtime-internals-0.9.2.jar
tez-runtime-library-0.9.2.jar
tez-tests-0.9.2.jar
tez-yarn-timeline-history-0.9.2.jar
tez-yarn-timeline-history-with-acls-0.9.2.jar
hadoop-yarn-registry-2.8.5.jar
3.5.1.2 local cluster configuration
In Hive on TEZ mode, Hive has two execution modes, one is container mode; The other is the llap mode. llap provides a hybrid model, which includes a resident process for IO interaction with DataNode directly. It is closely integrated in the framework of DAG, which can significantly improve the efficiency of hive query.
3.5.1.2.1 container mode
-
Prepare TEZ dependency package, upload it to HDFS, and complete authorization.
# tez official documents indicate that this path can be a compressed package or a decompressed JAR file. After testing, it is recommended to directly upload the unzipped JAR file.
hdfs dfs -mkidr /tez_linkis
# Tez directory is the complete JAR package after compiling tez
hdfs dfs -put tez  /tez_linkis
# Complete the authorization and ensure that the user submitting the link can read the tez file
hadoop fs -chmod -R 755 /tez_linkis
-
Modify hive site XML, switch the engine, and configure the container mode
>
    >
        >hive.metastore.schema.verification>
>false> > > >hive.metastore.uris> >thrift://host:9083> > > >spark.master> >yarn-cluster> > > >javax.jdo.option.ConnectionURL> >jdbc:mysql://host:3306/hive> > > >javax.jdo.option.ConnectionDriverName> >com.mysql.cj.jdbc.Driver> > > >javax.jdo.option.ConnectionUserName> >root> > > >javax.jdo.option.ConnectionPassword> >MySQL5.7> > > >hive.execution.engine> >tez> >modify hive The execution engine is tez> > > >hive.execution.mode> >container> > > -
Modify ${hadoop_conf_dir} / etc / Hadoop / TEZ site XML, configure TEZ dependency
>
    >
        >tez.lib.uris>
        >${fs.defaultFS}/tez_linkis/tez> >  > >tez.lib.uris.classpath> >${fs.defaultFS}/tez_linkis/tez> > > >tez.use.cluster.hadoop-libs> >true> > > >tez.history.logging.service.class> >org.apache.tez.dag.history.logging.ats.ATSHistoryLoggingService> > >
3.5.1.2.2 llap mode
In the llap mode, the llap service needs to be deployed, and the user who starts the llap service and the user who submits the Hive job by Linkis must be the same user, otherwise the error No LLAP Daemons are running will be reported.
-
Refer to the container mode to complete the dependency upload and configuration of TEZ
-
Modify hive site XML, switch the engine, and configure the llap mode
>
    >
        >hive.metastore.schema.verification>
>false> > > >hive.metastore.uris> >thrift://host:9083> > > >spark.master> >yarn-cluster> > > >javax.jdo.option.ConnectionURL> >jdbc:mysql://host:3306/hive> > > >javax.jdo.option.ConnectionDriverName> >com.mysql.cj.jdbc.Driver> > > >javax.jdo.option.ConnectionUserName> >root> > > >javax.jdo.option.ConnectionPassword> >MySQL5.7> > > >hive.execution.engine> >tez> >modify hive The execution engine is tez> > > >hive.execution.mode> >llap> > > >hive.llap.execution.mode> >all> > > >hive.llap.daemon.service.hosts> >@llap_service> > > >hive.zookeeper.quorum> >ct4:2181,ct5:2181,ct6:2181> > > >hive.zookeeper.client.port> >2181> > > >hive.llap.daemon.num.executors> >1> > > -
Deploy llap service
If the version of hadoop yarn used is less than 3.1.0 (excluding 3.1.0), you need to use Apache slider for deployment, because before hadoop yarn 3.1.0, yarn itself does not support long running services, and the slider component can package, manage and deploy long-running services to run on yarn.
If you use hadoop yarn version 3.1.0 or above, you don't need the slider component at all, because since hadoop yarn 3.1.0, yarn has merged and supported long running services, and the slider project has stopped updating.
Our hadoop version is 2.8.5, so we need to deploy the llap service with the help of Apache slider. The specific process is as follows:
1. install slider,Configure environment variables SLIDER_HOME,PATH Wait.
2. implement hive Commands, generating llap The service name and hist-site The names configured in are consistent.
hive --service llap --name llap_service  --instances 2 --cache 512m --executors 2 --iothreads 2 --size 1024m --xmx 512m --loglevel INFO --javaHome /opt/jdk1.8
3. because linkis use hadoop Users submit tasks to ensure tez Your application can get llap The process needs to be switched to hadoop User to start llap Service. If linkis Submit jobs using other users, llap Start with the same user, linkis You can specify, dss By default, the console uses hadoop User.
su hadoop;./llap-slider-31Aug2021/run.sh
4. Verify that the service is available, yarn Successfully submitted on page llap_service Application of, and User by hadoop,Then use it on the server jps The command to view the process appears LlapDaemon That means success.
5. This service can be obtained by other applications as long as the submitting users are the same, so it only needs to be hive You can start this service on one node of the, and others hive Nodes do not need to be installed slider,llap-slider Startup package, etc.
3.5.1.3 linkage script test
After the local cluster configuration is completed and the local test is successful, it can be tested on the DSS console. It is necessary to ensure that the login user of DSS and the user who starts the llap service are the same user. Otherwise, an error message of No LLAP Daemons are running may appear. You can also use the API method to switch the execution user:
// userCreator can be specified as hadoop IDE, so user is hadoop.
POST http://gateway_ip:8001/api/rest_j/v1/entrance/submit

{
    "executionContent": {"code": "select name,addr,id from linkis_1 group by name,addr,id order by id", "runType":  "sql"},
    "params": {"variable": {}, "configuration": {}},
    "source":  {"scriptPath": ""},
    "labels": {
        "engineType": "hive-2.3.7",
        "userCreator": "root-IDE"
    }
}
3.5.2 Flink engine support
Flink engine has been integrated in Linkis 1.0.2, but it will not be put into the installation package during compilation. It needs to be manually configured by adding an engine. The debugging of Flink engine plug-in is mostly caused by JAR package problems. You need to ensure that the required Connector package and format package exist in the Flink engine directory of ${flink_lib_dir} and Linkis. At present, debugging is carried out.
Kafka, Mysql, CDC, Elasticsearch, Redis, MongoDB and other connectors, and the data format supports CSV, JSON, etc. The complete JAR package will be stored on the network disk.
Generally speaking, the debugging of Flink Conector is mostly the error that the class cannot be found. It can be solved from the following ideas:
-
If could not find any factory for identifier 'elasticsearch-7' that implements' org apache. flink. table. factories. DynamicTableFactory' in the classpath. This kind of error is generally that there is no corresponding Connector package in the Linkis engine plug-in directory, because the package in the engine plug-in directory will be placed on the classpath when starting.
-
If caused by: Java lang.ClassNotFoundException: org. apache. flink. connector. jdbc. table. The error of jdbcrowdatainputformat indicates that the package already exists on the classpath and contains this class. Generally, the package does not exist in Flink's lin directory.
-
In addition, for some Connector packages with SQL Connector, this package is preferred. This package will introduce the Connector package, so you can directly use the SQL Connector package.
-
For some special data formats, you need to compile Flink format and put it in the lib directory and the linkage engine directory. At present, CSV and JSON formats are supported. For Debezium, Maxwell, Canal, etc., you need to compile it yourself.
3.5.2.1 install Flink locally
i. Download installation package
You can directly download the compiled installation package provided by the official website, or download the source code and compile it yourself. The corresponding Scala version is 2.11 to avoid problems due to inconsistent Scala versions.
ii. Flink profile
-
flink-conf.yaml
VIM flynk-conf.yaml configures JDK and other information. Configuration example:
jobmanager.archive.fs.dir: hdfs://ct4:8020/flink-test
env.java.home: /opt/jdk1.8
classloader.resolve-order: parent-first
parallelism.default: 1
taskmanager.numberOfTaskSlots: 1
historyserver.archive.fs.dir: hdfs://ct4:8020/flink
jobmanager.rpc.port: 6123
taskmanager.heap.size: 1024m
jobmanager.heap.size: 1024m
rest.address: ct6
-
Configure environment variables
Examples of environment variables have been given in the environment check. Refer to the examples.
iii. selective compilation
Flink provides a variety of formats to support the conversion of different data formats. CSV, JSON and other transformations are provided in the default installation package. Avro, Orc, Raw, Parquet, Maxwell, Canal and Debezium need to be compiled by themselves.
Flink provides a variety of connectors to support Source, Sink, etc. of different data sources. The default installation package will not be all provided and needs to be compiled by itself.
-
Compilation process:
1. Format code first
mvn spotless:apply
2. Package compilation
mvn clean install -Dmaven.test.skip=true
3.5.2.2 add Flink engine plug-in
Because linkis1 0.2 does not automatically write the Flink engine into the engine plug-in. Users need to manually add an engine plug-in. For details, please refer to the engine plug-in installation document
Linkis1. Version 0.2 is slightly different from the official document description. The following is the installation process of the computing layer:
1. stay linkis Manual compilation in project flink Plug in, copy and upload after compilation flink-engineconn.zip
mvn clean install -Dmaven.test.skip=true

2. Unzip the compressed file flink-engineconn.zip reach `${LINKIS_HOME}/lib/linkis-engineconn-plugins` Under the directory
unzip flink-engineconn.zip

3. Upload required connector Package and data format conversion package. There are two directories to upload. The following is an example of the directory:
${LINKIS_HOME}/lib/linkis-engineconn-plugins/flink/dist/v1.12.2/lib
${FLINK_HOME}/lib

4. Refresh the engine. adopt restful Interface, hot load engine, request `LINKIS-CG-ENGINEPLUGIN` Service, you can get the port number of this service in the configuration file.
POST http://LINKIS-CG-ENGINEPLUGIN_IP:LINKIS-CG-ENGINEPLUGIN_PORT/api/rest_j/v1/rpc/receiveAndReply
{
  "method": "/enginePlugin/engineConn/refreshAll"
}

5. Optional. The parameters of the new engine need to be dynamically managed. You can add engine parameters to linkis In the metabase, so in the management console-->Parameter configuration can visually modify the parameters started by the engine. You can refer to the initialization sql Statement and flink Insert the plug-in according to the configuration of the plug-in.
-
Basic test
Submit Basic test scripts through DSS console to ensure normal execution:
SELECT 'linkis flink engine test!!!';
SELECT name, COUNT(*) AS cnt
FROM (VALUES ('Bob'), ('Alice'), ('Greg'), ('Bob')) AS NameTable(name)
GROUP BY name;
3.5.2.3 Flink Connector debugging
The debugging of Flink Connector is mostly the problem of JAR package, and the complete JAR package has been put on the network disk.
Link: https://pan.baidu.com/s/17g05rtfE_JSt93Du9TXVug
Extraction code: zpep
Again, make sure that the Connector package and format package are uploaded in the engine directory of Linkis and the installation directory of Flink.
3.5.2.3.1 Kafka Connector
Kafka Connector can be used as either Source or Sink.
-
Compile the flex SQL connector Kafka according to the above compilation method_ 2.11-1.12.2. Jar package and upload it to the two directories mentioned above
-
Test script
CREATE TABLE source_kafka
(
    id   STRING,
    name STRING,
    age  INT
) WITH (
      'connector' = 'kafka',
      'topic' = 'flink_sql_1',
      'scan.startup.mode' = 'earliest-offset',
      'properties.bootstrap.servers' = 'ct4:9092,ct5:9092,ct6:9092',
      'format' = 'json'
      );
CREATE TABLE sink_kafka
(
    id   STRING,
    name STRING,
    age  INT,
    PRIMARY KEY (id) NOT ENFORCED
) WITH (
      'connector' = 'upsert-kafka',
      'topic' = 'flink_sql_3',
      'properties.bootstrap.servers' = 'ct4:9092,ct5:9092,ct6:9092',
      'key.format' = 'json',
      'value.format' = 'json'
      );
INSERT INTO sink_kafka
SELECT `id`,
       `name`,
       `age`
FROM source_kafka;
Refer to Apache Kafka SQL Connector for detailed configuration
3.5.2.3.2 Mysql Connector
Mysql Connector can be used as either Source or Sink. As a Source, it will not monitor the changes of the database in real time.
-
Upload Flink connector JDBC_ 2.11-1.12.2. Jar and mysql-connector-java-5.1.49 Jar to the above two directories
-
Test script
CREATE TABLE source_mysql
(
    id   STRING,
    name STRING,
    age  int,
    PRIMARY KEY (id) NOT ENFORCED
) WITH (
      'connector' = 'jdbc',
      'url' = 'jdbc:mysql://host:3306/computation',
      'table-name' = 'flink_sql_1',
      'username' = 'root',
      'password' = 'MySQL5.7'
      );
CREATE TABLE sink_kafka
(
    id   STRING,
    name STRING,
    age  INT,
    PRIMARY KEY (id) NOT ENFORCED
) WITH (
      'connector' = 'upsert-kafka',
      'topic' = 'flink_sql_3',
      'properties.bootstrap.servers' = 'ct4:9092,ct5:9092,ct6:9092',
      'key.format' = 'json',
      'value.format' = 'json'
      );
INSERT INTO sink_kafka
SELECT `id`,
       `name`,
       `age`
FROM source_mysql;
Refer to JDBC SQL Connector for detailed configuration
3.5.2.3.3 Mysql CDC Connector
Mysql CDC Connector can be used as a Source to monitor the changes of the database in real time and send it to Flink SQL Source, thus eliminating the need for secondary sending using tools such as Debezium, Canal or Maxwell.
The Flink connector MySQL CDC can be downloaded directly. This package is provided by Ververica and is compatible with Flink 1.12 and can be used directly.
-
Upload Flink connector MySQL cdc-1.2.0 Jar and mysql-connector-java-5.1.49 Jar to the above two directories
-
Test script
CREATE TABLE mysql_binlog
(
    id   STRING NOT NULL,
    name STRING,
    age  INT
) WITH (
      'connector' = 'mysql-cdc',
      'hostname' = 'host',
      'port' = '3306',
      'username' = 'root',
      'password' = 'MySQL5.7',
      'database-name' = 'flink_sql_db',
      'table-name' = 'flink_sql_2',
      'debezium.snapshot.locking.mode' = 'none' --Suggest adding,Otherwise, the watch will be required to be locked
      );
CREATE TABLE sink_kafka
(
    id   STRING,
    name STRING,
    age  INT,
    PRIMARY KEY (id) NOT ENFORCED
) WITH (
      'connector' = 'upsert-kafka',
      'topic' = 'flink_sql_3',
      'properties.bootstrap.servers' = 'ct4:9092,ct5:9092,ct6:9092',
      'key.format' = 'json',
      'value.format' = 'json'
      );
INSERT INTO sink_kafka
SELECT `id`,
       `name`,
       `age`
FROM mysql_binlog;
3.5.2.3.4 Elasticsearch Connector
Elasticsearch Connector can be used as Sink side to persist data into ES, select the corresponding version and compile it. If it is Flink SQL, it is recommended to directly compile Flink SQL connector elasticsearch7_ 2.11 is enough.
-
Upload flick-sql-connector-elasticsearch7_ 2.11-1.12.2. Jar to the above two directories
-
Test script
CREATE TABLE mysql_binlog
(
    id   STRING NOT NULL,
    name STRING,
    age  INT
) WITH (
      'connector' = 'mysql-cdc',
      'hostname' = 'host',
      'port' = '3306',
      'username' = 'root',
      'password' = 'MySQL5.7',
      'database-name' = 'flink_sql_db',
      'table-name' = 'flink_sql_2',
      'debezium.snapshot.locking.mode' = 'none' --Suggest adding,Otherwise, the watch will be required to be locked
      );
CREATE TABLE sink_es
(
    id   STRING,
    name STRING,
    age  INT,
    PRIMARY KEY (id) NOT ENFORCED
) WITH (
      'connector' = 'elasticsearch-7',
      'hosts' = 'http://host:9200',
      'index' = 'flink_sql_cdc'
      );
INSERT INTO sink_es
SELECT `id`,
       `name`,
       `age`
FROM mysql_binlog;
Refer to Elasticsearch SQL Connector for detailed configuration
3.5.2.4 custom development Connector
The connectors officially provided by Flink are limited. For some scenarios that need to push data to redis and MongoDB through Flink SQL, they can not be well met. Therefore, corresponding connectors need to be developed to handle data push. Redis and MongoDB connectors currently developed only support Sink operations. For the uploaded github of the complete code, you can refer to the Flink Connector. In addition, Bahir Flink also maintains many connectors that Flink doesn't officially have. You can refer to them if necessary.
3.5.2.4.1 Redis Connector
The development of Redis Connector is based on the Redis Connector in Bahir Flink and supports the configuration of sentry mode and cluster mode. It has been optimized in two aspects:
1. New stand-alone version Redis Connection configuration and processing logic
2. The enabled code in the code is deleted and the new version is used `DynamicTableSink`,`DynamicTableSinkFactory` To achieve dynamic Sink handle
-
Upload Flink connector redis_ 2.11. Jar to the above two directories
-
Test script
CREATE TABLE datagen
(
    id   INT,
    name STRING
) WITH (
      'connector' = 'datagen',
      'rows-per-second' = '1',
      'fields.name.length' = '10'
      );
CREATE TABLE redis
(
    name STRING,
    id   INT
) WITH (
      'connector' = 'redis',
      'redis.mode' = 'single',
      'command' = 'SETEX',
      'single.host' = '172.0.0.1',
      'single.port' = '6379',
      'single.db' = '0',
      'key.ttl' = '60',
      'single.password' = 'password'
      );
insert into redis
select name, id
from datagen;
For details, please refer to the description of flip connector redis
3.5.2.4.2 MongoDB Connector
The development of MongoDB Connector refers to the MongoDB Connector of verica connector and retains the core processing logic.
For the development process, please refer to the article Flink SQL Connector MongoDB development guide
-
Upload flynk connector mongodb_ 2.11. Jar to the above two directories
-
Test script
CREATE TABLE datagen
(
    id   INT,
    name STRING
) WITH (
      'connector' = 'datagen',
      'rows-per-second' = '1',
      'fields.name.length' = '10'
      );
CREATE TABLE mongoddb
(
    id   INT,
    name STRING
) WITH (
      'connector' = 'mongodb',
      'database' = 'mongoDBTest',
      'collection' = 'flink_test',
      'uri' = 'mongodb://user:passeord@172.0.0.1:27017/?authSource=mongoDBTest',
      'maxConnectionIdleTime' = '20000',
      'batchSize' = '1'
      );
insert into mongoddb
select id, name
from datagen;
3.5.2.5 submit Flink job
Submit the Flink SQL job through the Scriptis of DSS, and start the session mode, which is applicable to select syntax, view data or test. For insert syntax, the default is 3 min utes, which will kill the task. Therefore, this Scriptis method is not suitable for long running tasks. In the production environment, such tasks should be submitted in the way of onceJob, that is, the way of pre job in Flink.
-
Introduce the link computing client POM dependency
>
    >com.webank.wedatasphere.linkis>
>linkis-computation-client> >${linkis.version}> > > >commons-codec> >commons-codec> > > >slf4j-api> >org.slf4j> > > >commons-beanutils> >commons-beanutils> > > > -
Configure links under resources Properties specifies the gateway address
wds.linkis.server.version=v1
wds.linkis.gateway.url=http://host:8001/
-
Code example
import com.webank.wedatasphere.linkis.common.conf.Configuration
import com.webank.wedatasphere.linkis.computation.client.once.simple.SimpleOnceJob
import com.webank.wedatasphere.linkis.computation.client.utils.LabelKeyUtils
import com.webank.wedatasphere.linkis.manager.label.constant.LabelKeyConstant

/**
 * Created on 2021/8/24.
 *
 * @author MariaCarrie
 */
object OnceJobTest {

  def main(args: Array[String]): Unit = {
    val sql =
      """CREATE TABLE source_from_kafka_8 (
        |  id STRING,
        |  name STRING,
        |  age INT
        |) WITH (
        |    'connector' = 'kafka',
        |    'topic' = 'flink_sql_1',
        |    'scan.startup.mode' = 'earliest-offset',
        |    'properties.bootstrap.servers' = 'ct4:9092,ct5:9092,ct6:9092',
        |    'format' = 'json'
        |);
        |CREATE TABLE sink_es_table1 (
        |  id STRING,
        |  name STRING,
        |  age INT,
        |  PRIMARY KEY (id) NOT ENFORCED
        |) WITH (
        |  'connector' = 'elasticsearch-7',
        |  'hosts' = 'http://host:9200',
        |  'index' = 'flink_sql_8'
        |);
        |INSERT INTO
        |  sink_es_table1
        |SELECT
        |  `id`,
        |  `name`,
        |  `age`
        |FROM
        |  source_from_kafka_8;
        |""".stripMargin

    val onceJob = SimpleOnceJob.builder().setCreateService("Flink-Test").addLabel(LabelKeyUtils.ENGINE_TYPE_LABEL_KEY, "flink-1.12.2")
      .addLabel(LabelKeyUtils.USER_CREATOR_LABEL_KEY, "hadoop-Streamis").addLabel(LabelKeyUtils.ENGINE_CONN_MODE_LABEL_KEY, "once")
      .addStartupParam(Configuration.IS_TEST_MODE.key, true)
      .addStartupParam("flink.taskmanager.numberOfTaskSlots", 4)
      .addStartupParam("flink.container.num", 4)
      .addStartupParam("wds.linkis.engineconn.flink.app.parallelism", 8)
      .addStartupParam(Configuration.IS_TEST_MODE.key, true)
      .setMaxSubmitTime(300000)
      .addExecuteUser("hadoop").addJobContent("runType", "sql").addJobContent("code", sql).addSource("jobName", "OnceJobTest")
      .build()

    onceJob.submit()
    onceJob.waitForCompleted()
    System.exit(0)
  }
}
4. Best practices
4.1 Hive
4.1.1 engine startup failure due to insufficient permissions
-
Problem description
The engine failed to start after submitting the job through Linkis.
-
Detailed error reporting
Error: Could not find or load main class com.webank.wedatasphere.linkis.engineconn.launch.EngineConnServer

Caused by: LinkisException{errCode=10010, desc='DataWorkCloud service must set the version, please add property [[wds.linkis.server.version]] to properties file.', ip='null', port=0, serviceKind='null'}
-
Solution
The above two errors are caused by insufficient engine permissions, and the JAR file or configuration file cannot be loaded. When the engine is started for the first time, Linkis will put the dependencies of various engines under engineConnPublickDir, including lib and conf. When creating the engine, the engine directory will be created to generate engineconnexec SH, and establish soft links with lib and conf under engineConnPublickDir. The reason for this problem is that the permissions under engineConnPublickDir are insufficient.
Optimize the handleInitEngineConnResources method to complete the authorization operation when initializing the engine. Recompile the linkis enginecon Manager Server package, replace the JAR in the directory of linkis / lib / linkis computing governance / linkis CG engineconnmanager, and then restart the ECM service separately. The code is as follows:
// todo fix bug. Failed to load com.webank.wedatasphere.linkis.engineconn.launch.EngineConnServer.
val publicDir = localDirsHandleService.getEngineConnPublicDir
val bmlResourceDir = Paths.get(publicDir).toFile.getPath
val permissions = Array(PosixFilePermission.OWNER_READ, PosixFilePermission.OWNER_WRITE, PosixFilePermission.OWNER_EXECUTE, PosixFilePermission.GROUP_READ, PosixFilePermission.GROUP_WRITE, PosixFilePermission.GROUP_EXECUTE, PosixFilePermission.OTHERS_READ, PosixFilePermission.OTHERS_WRITE, PosixFilePermission.OTHERS_EXECUTE)
// Authorization root path
warn(s"Start changePermission ${ENGINECONN_ROOT_DIR}")
changePermission(ENGINECONN_ROOT_DIR, true, permissions)

private def changePermission(pathStr: String, isRecurisive: Boolean, permissions: Array[PosixFilePermission]): Unit = {
  val path = Paths.get(pathStr)
  if (!Files.exists(path)) {
    warn(s"ChangePermission ${pathStr} not exists!")
    return
  }
  try {
    val perms = new util.HashSet[PosixFilePermission]()
    for (permission <- permissions) {
      perms.add(permission)
    }
    Files.setPosixFilePermissions(path, perms)
    warn(s"Finish setPosixFilePermissions ${pathStr} ")
  } catch {
    case e: IOException =>
      if (e.isInstanceOf[UserPrincipalNotFoundException]) {
        return
      }
      e.printStackTrace()
  }
  // When it is a directory, set file permissions recursively
  if (isRecurisive && Files.isDirectory(path)) {
    try {
      val ds = Files.newDirectoryStream(path)
      import java.io.File
      import scala.collection.JavaConversions._
      for (subPath <- ds) {
        warn(s"Recurisive setPosixFilePermissions ${subPath.getFileName} ")
        changePermission(pathStr + File.separator + subPath.getFileName, true, permissions)
      }
    } catch {
      case e: Exception => e.printStackTrace()
    }
  }
}
4.1.2 Container exited with a non-zero exit code 1
-
Problem description
After switching the TEZ engine and submitting the Hive job through Linkis, the engine can start successfully, and the job has been submitted to YARN, but the execution status has failed all the time.
-
Detailed error reporting
2021-08-30 11:18:33.018 ERROR SubJob : 73 failed to execute task, code : 21304, reason : Task is Failed,errorMsg: errCode: 12003 ,desc: MatchError: LinkisException{errCode=30002, desc='failed to init engine .reason:SessionNotRunning: TezSession has already shutdown. Application application_1630056358308_0012 failed 2 times due to AM Container for appattempt_1630056358308_0012_000002 exited with  exitCode: 1

yarn upper application Error message:`Error: Could not find or load main class org.apache.tez.dag.app.DAGAppMaster`
-
Solution
The TEZ engine is enabled, but the JAR package that the engine depends on cannot be read completely. The TEZ official website supports the configuration of compressed files and decompressed files, but this problem will occur in the configuration of compressed files when integrating with Linkis.
Upload the local unzipped TEZ dependent folder and modify TEZ site TEZ.xml lib. URIs is the extracted directory and subdirectory.
4.1.3 NoSuchMethodError
-
Problem description
TEZ engine is switched and hive is configured execution. Mode is llap. When submitting a job through Linkis, the engine can create it successfully, and the job can also be submitted to YARN. The execution fails.
-
Detailed error reporting
linkis Console error: return code 1 from org.apache.hadoop.hive.ql.exec.tez.TezTask

yarn upper application report errors:
2021-08-30 16:04:35,564 [FATAL] [org.apache.hadoop.hive.common.JvmPauseMonitor$Monitor@48abb5a6] |yarn.YarnUncaughtExceptionHandler|: Thread Thread[org.apache.hadoop.hive.common.JvmPauseMonitor$Monitor@48abb5a6,5,main] threw an Error.  Shutting down now...
java.lang.NoSuchMethodError: com.google.common.base.Stopwatch.elapsed(Ljava/util/concurrent/TimeUnit;)J
    at org.apache.hadoop.hive.common.JvmPauseMonitor$Monitor.run(JvmPauseMonitor.java:185)
    at java.lang.Thread.run(Thread.java:748)
-
Solution
Because the version of guava that TEZ depends on is too low, when local Hive is executed, it can be loaded to the higher version of guava locally, while the version of guava that TEZ uploads to HDFS depends on is too low. Copy the higher version of guava package under hive/lib and upload it to TEZ lib. URIs directory.
4.1.4 No LLAP Daemons are running
-
Problem description
TEZ engine is switched and hive is configured execution. Mode is llap. When submitting a job through Linkis, the engine can create it successfully, and the job can also be submitted to YARN. An error is reported in the engine log of Linkis.
-
Detailed error reporting
2021-08-31 18:05:11.421 ERROR [BDP-Default-Scheduler-Thread-3] SessionState 1130 printError - Status: Failed
Dag received [DAG_TERMINATE, SERVICE_PLUGIN_ERROR] in RUNNING state.
2021-08-31 18:05:11.421 ERROR [BDP-Default-Scheduler-Thread-3] SessionState 1130 printError - Dag received [DAG_TERMINATE, SERVICE_PLUGIN_ERROR] in RUNNING state.
Error reported by TaskScheduler [[2:LLAP]][SERVICE_UNAVAILABLE] No LLAP Daemons are running
2021-08-31 18:05:11.422 ERROR [BDP-Default-Scheduler-Thread-3] SessionState 1130 printError - Error reported by TaskScheduler [[2:LLAP]][SERVICE_UNAVAILABLE] No LLAP Daemons are running
Vertex killed, vertexName=Reducer 3, vertexId=vertex_1630056358308_0143_1_02, diagnostics=[Vertex received Kill while in RUNNING state., Vertex did not succeed due to DAG_TERMINATED, failedTasks:0 killedTasks:1, Vertex vertex_1630056358308_0143_1_02 [Reducer 3] killed/failed due to:DAG_TERMINATED]
2021-08-31 18:05:11.422 ERROR [BDP-Default-Scheduler-Thread-3] SessionState 1130 printError - Vertex killed, vertexName=Reducer 3, vertexId=vertex_1630056358308_0143_1_02, diagnostics=[Vertex received Kill while in RUNNING state., Vertex did not succeed due to DAG_TERMINATED, failedTasks:0 killedTasks:1, Vertex vertex_1630056358308_0143_1_02 [Reducer 3] killed/failed due to:DAG_TERMINATED]
Vertex killed, vertexName=Reducer 2, vertexId=vertex_1630056358308_0143_1_01, diagnostics=[Vertex received Kill while in RUNNING state., Vertex did not succeed due to DAG_TERMINATED, failedTasks:0 killedTasks:1, Vertex vertex_1630056358308_0143_1_01 [Reducer 2] killed/failed due to:DAG_TERMINATED]
-
Solution
Because the user who started the llap service is different from the user who submitted the task by Linkis, the user of Linkis cannot obtain the llap process.
Specify the user of Linkis, or use the Linkis user to start the llap service.
4.2 Spark
4.2.1 ClassNotFoundException
-
Problem description
After the local Spark cluster is installed, the Spark SQL job is submitted using Linkis, and the Spark engine can be started successfully, but there is an error in submitting the Spark job
-
Detailed error reporting
68e048a8-c4b2-4bc2-a049-105064bea6dc:   at org.apache.spark.deploy.JavaMainApplication.start(SparkApplication.scala:52)
68e048a8-c4b2-4bc2-a049-105064bea6dc:   at org.apache.spark.deploy.SparkSubmit.org$apache$spark$deploy$SparkSubmit$$runMain(SparkSubmit.scala:849)
68e048a8-c4b2-4bc2-a049-105064bea6dc:   at org.apache.spark.deploy.SparkSubmit.doRunMain$1(SparkSubmit.scala:167)
68e048a8-c4b2-4bc2-a049-105064bea6dc:   at org.apache.spark.deploy.SparkSubmit.submit(SparkSubmit.scala:195)
68e048a8-c4b2-4bc2-a049-105064bea6dc:   at org.apache.spark.deploy.SparkSubmit.doSubmit(SparkSubmit.scala:86)
68e048a8-c4b2-4bc2-a049-105064bea6dc:   at org.apache.spark.deploy.SparkSubmit$$anon$2.doSubmit(SparkSubmit.scala:924)
68e048a8-c4b2-4bc2-a049-105064bea6dc:   at org.apache.spark.deploy.SparkSubmit$.main(SparkSubmit.scala:933)
68e048a8-c4b2-4bc2-a049-105064bea6dc:   at org.apache.spark.deploy.SparkSubmit.main(SparkSubmit.scala)
68e048a8-c4b2-4bc2-a049-105064bea6dc:Caused by: java.lang.ClassNotFoundException: scala.Product$class
68e048a8-c4b2-4bc2-a049-105064bea6dc:   at java.net.URLClassLoader.findClass(URLClassLoader.java:382)
68e048a8-c4b2-4bc2-a049-105064bea6dc:   at java.lang.ClassLoader.loadClass(ClassLoader.java:418)
68e048a8-c4b2-4bc2-a049-105064bea6dc:   at sun.misc.Launcher$AppClassLoader.loadClass(Launcher.java:355)
68e048a8-c4b2-4bc2-a049-105064bea6dc:   at java.lang.ClassLoader.loadClass(ClassLoader.java:351)
68e048a8-c4b2-4bc2-a049-105064bea6dc:   ... 20 more
-
Solution
Because the local Spark cluster is compiled with Scala version 2.12 and the Spark engine plug-in is compiled with Scala version 2.11, Scala Product cannot be found. The local cluster is recompiled with Scala 2.11. It must be noted that the versions of scala and SDK of the Linkis engine plug-in are consistent with those in the cluster.
4.2.2 ClassCastException
-
Problem description
Spark SQL jobs can be successfully submitted and executed by using spark SQL locally, but spark SQL jobs submitted by using Linkis cannot be run.
-
Detailed error reporting
Caused by: java.lang.ClassCastException: cannot assign instance of scala.collection.immutable.List$SerializationProxy to field org.apache.spark.rdd.RDD.dependencies_ of type scala.collection.Seq in instance of org.apache.spark.rdd.MapPartitionsRDD
-
Solution
Because spark SQL does not specify the deploy mode of YARN, the dependency is taken from spark/lib drop-down. And spark defaults Spark.conf YARN. JAR package under jars path does not contain Hive dependency.
Upload local dependency with Hive support to spark yarn. Jars path, execute/ Spark SQL -- Master yarn -- deploy mode client, which can be executed successfully, and then submit the task using Linkis.
4.3 Flink
4.3.1 method did not exist
-
Problem description
After the MongoDB Connector is developed, there is no problem in the local test, and the data can be written successfully. Upload the JAR package to the Linkis engine plug-in, and submit the Flink job through Linkis with an error, which makes the Spring Boot job unable to start normally.
-
Detailed error reporting
***************************
APPLICATION FAILED TO START
***************************
Description:
An attempt was made to call a method that does not exist. The attempt was made from the following location:
    org.springframework.boot.autoconfigure.mongo.MongoClientFactorySupport.applyUuidRepresentation(MongoClientFactorySupport.java:85)
The following method did not exist:
    com.mongodb.MongoClientSettings$Builder.uuidRepresentation(Lorg/bson/UuidRepresentation;)Lcom/mongodb/MongoClientSettings$Builder;
-
Solution
Due to the introduction of MongoDB connector, MongoAutoConfiguration of Spring Boot will use mongoclient in the connector, which is caused by inconsistent versions of custom MongoDB connector.
For those who need to use the Spring Boot project, special attention should be paid to the Mongo version built in Spring Boot. This time, the Mongo driver version in the connector is upgraded.
5. Reference
-
https://github.com/WeBankFinTech/Linkis-Doc
-
https://github.com/WeBankFinTech/DataSphereStudio-Doc
-
https://github.com/apache/tez
-
Flink table & SQL connectors website: https://nightlies.apache.org/flink/flink-docs-release-1.12/zh/dev/table/connectors/