OpenCV learning notes (3)_ Examples of gray threshold filtering and connected domain analysis in OpenCV
1. Example source
Today's example comes from Halcon's example program:
threshold.hdev
read_image (Audi2, 'audi2')
fill_interlace (Audi2, ImageFilled, 'odd')
threshold (ImageFilled, Region, 0, 90)
connection (Region, ConnectedRegions)
select_shape (ConnectedRegions, SelectedRegions, 'width', 'and', 30, 70)
select_shape (SelectedRegions, Letters, 'height', 'and', 60, 110)
dev_clear_window ()
dev_set_colored (12)
dev_display (ImageFilled)
dev_display (Letters)
The picture is also from halcon's sample picture audi2 Png, this example extracts the license plate characters in an image one by one through simple gray threshold segmentation and connected domain analysis
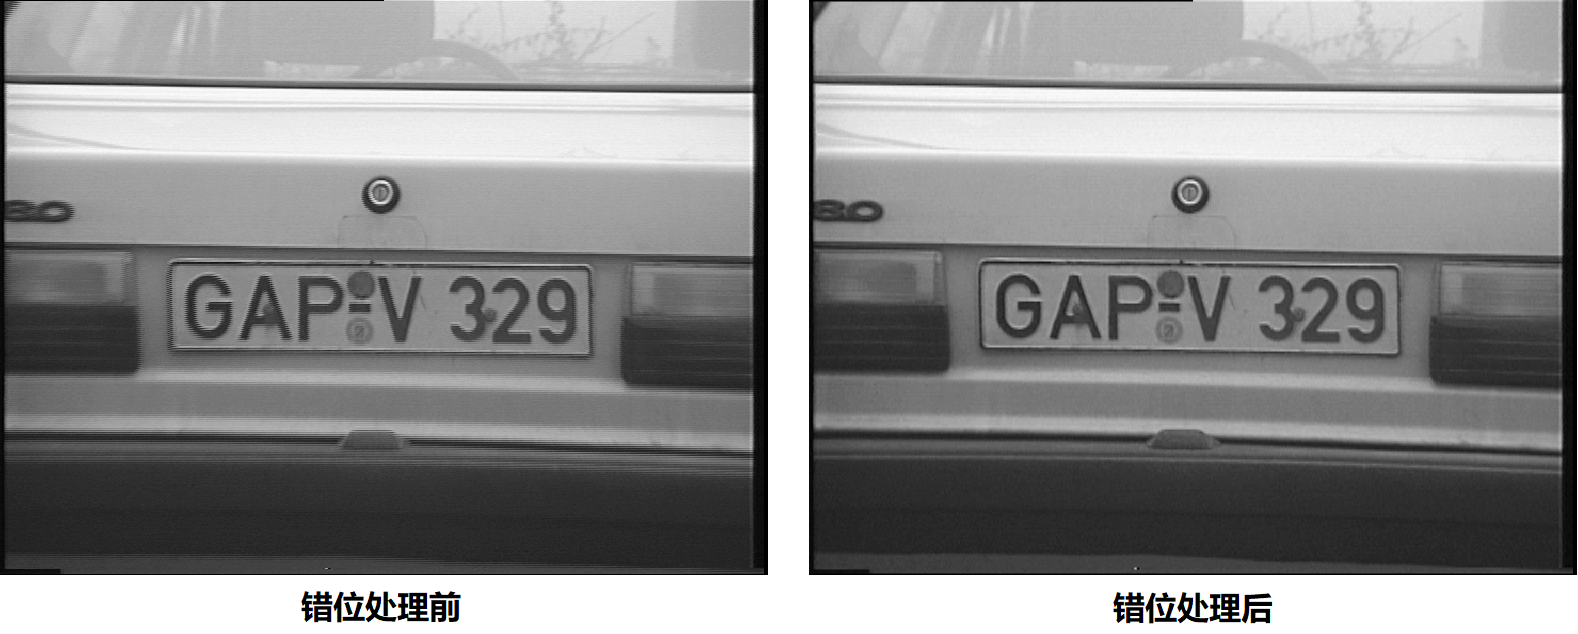
This paper realizes similar functions through OpenCV The difference is that the routine has a function fill to correct the dislocation in the video image_ Interlace (its function is to remove the jagged dislocation in the image, as shown in Figure 1). For simplicity, the corresponding processing is not carried out in the opencv example, but the processed intermediate process image in Halcon is extracted and used as the source image file of this example
2. Example core code
Don't talk too much, just go to the whole code:
#include <iostream>
#include "opencv2/opencv.hpp"
#include <string>
#include <vector>
#include <time.h>
int test1()
{
srand(time(NULL));
std::string filename = "../images/audi2.png";
cv::Mat src = cv::imread(filename, CV_8UC1);
cv::namedWindow("test1", CV_WINDOW_AUTOSIZE);
cv::Mat dst, showpic;
src.copyTo(dst);
cv::threshold(src, dst, 90, 255, cv::THRESH_BINARY_INV);
src.copyTo(showpic);
cv::Mat labels, stats, centroids;
int nccomps = cv::connectedComponentsWithStats(dst, labels, stats, centroids);
std::vector<cv::Vec3b> colors(nccomps);
std::vector<int> selectFlag(nccomps);
selectFlag.assign(nccomps, 1);
colors[0] = cv::Vec3b(0, 0, 0);
for (int i = 1; i < nccomps; ++i)
{
colors[i] = cv::Vec3b(rand() % 256, rand() % 256, rand() % 256);
if (stats.at<int>(i, cv::CC_STAT_HEIGHT) < 60 || stats.at<int>(i, cv::CC_STAT_HEIGHT) > 110
|| stats.at<int>(i, cv::CC_STAT_WIDTH) < 30 || stats.at<int>(i, cv::CC_STAT_WIDTH) > 70)
{
colors[i] = cv::Vec3b(0, 0, 0);
selectFlag[i] = 0;
}
}
cv::Mat imgBin(src.rows, src.cols, CV_8UC1, cv::Scalar(0));
for (int y = 0; y < imgBin.rows; ++y)
{
for (int x = 0; x < imgBin.cols; ++x)
{
int label = labels.at<int>(y, x);
// If it is a background connected domain or a connected domain that does not pass the length and width filter
if (0 == label || 0 == selectFlag[label])
{
imgBin.at<uchar>(y, x) = 0;
continue;
}
CV_Assert(0 <= label && label <= nccomps);
imgBin.at<uchar>(y, x) = 255;
}
}
cv::cvtColor(showpic, showpic, CV_GRAY2RGB);
for (int y = 0; y < showpic.rows; ++y)
{
for (int x = 0; x < showpic.cols; ++x)
{
int label = labels.at<int>(y, x);
// If it is a background connected domain or a connected domain that does not pass the length and width filter
if (0 == label || 0 == selectFlag[label])
continue;
CV_Assert(0 <= label && label <= nccomps);
showpic.at<cv::Vec3b>(y, x) = colors[label];
}
}
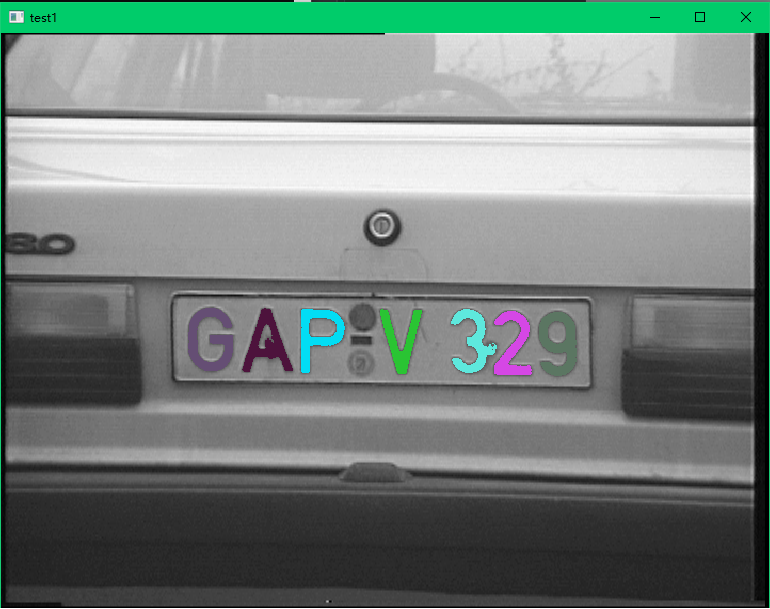
cv::imshow("test1", showpic);
cv::waitKey(0);
return 0;
}
int main(int argc, char** argv)
{
test1();
return 0;
}
The results show:
3. Examples and knowledge points
3.1 reading gray image
The core function of reading gray image is cv::imread
The prototype of this function is
Mat cv::imread	(	const String & 	filename,
int 	flags = IMREAD_COLOR
)
Where filename is the image address of string type and flags is the color type read. For example, in this example code, CV_8UC1 represents an 8-bit 1-channel gray image
int test1()
{
	......
	std::string filename = "../images/audi2.png";
	cv::Mat src = cv::imread(filename, CV_8UC1);
	......
}
3.2 cv::threshold
After reading the image, perform threshold segmentation on the gray image, and the core function is cv::threshold
The prototype of this function is
double cv::threshold	(	InputArray 	src,
OutputArray 	dst,
double 	thresh,
double 	maxval,
int 	type
)
The call in the instance is
int test1
{
    ......
	cv::Mat dst;
	src.copyTo(dst);
    cv::threshold(src, dst, 90, 255, cv::THRESH_BINARY_INV);
    ......
}
Note that the type here determines the method of threshold, CV:: threshold_ BINARY_ Inv means
d s t ( x , y ) = { 0 i f s r c ( x , y ) > t h r e s h m a x v a l o t h e r w i s e dst(x,y)= \left \{ \begin{array} {lr} 0 \qquad \qquad if \quad src(x,y) > thresh \\ maxval \qquad otherwise \\ \end{array} \right. dst(x,y)={0ifsrc(x,y)>threshmaxvalotherwise
Can refer to Description in openthresholdtypes online documentation
The thresh set here is 90, and the type set is cv::THRESH_BINARY_INV, the target is to extract the pixel points in the image with the gray level within the range of [0,90] (white points on black background, white points indicate that they are selected)
3.3 cv::connectedComponentsWithStats
This is the second core function of this example. Its function is complex and will not be explained in detail in this paper reference resources OpenCV online documentation on connectedComponentsWithStats
In Halcon, there is a more powerful select_ The shape operator filters the connected domain according to the characteristics of the connected domain
In OpenCV, this function can be used to complete
- Connected domain partition
- Area calculation
- Calculation of height and width
- Center point coordinate calculation
The function prototype is
int cv::connectedComponentsWithStats	(	InputArray 	image,
OutputArray 	labels,
OutputArray 	stats,
OutputArray 	centroids,
int 	connectivity = 8,
int 	ltype = CV_32S
)
labels mark different connected domains with different gray levels, and the gray level of each pixel represents the serial number of the connected domain;
stats records the information of connected domain, including area, width and height;
centroids records the coordinates of the central point of the connected domain;
The function call in the instance is
int test1
{
    ......
	cv::Mat labels, stats, centroids;
	int nccomps = cv::connectedComponentsWithStats(dst, labels, stats, centroids);
    ......
}
nccomps represents the number of connected domains returned by the function
3.4 connected domain length and width filtering
For this example, the core functions in Sections 3.1 ~ 3.3 have completed the main functions, but the visualization needs to be completed in this section and the following two sections
The length and width filtering of connected domains is mainly carried out through the return result of the connectedcomponents withstats function
It is mainly completed by analyzing stats. In this example:
int test1()
{
    ......
 	std::vector<cv::Vec3b> colors(nccomps);
	std::vector<int> selectFlag(nccomps);
	selectFlag.assign(nccomps, 1);
	colors[0] = cv::Vec3b(0, 0, 0);
	for (int i = 1; i < nccomps; ++i)
	{
		colors[i] = cv::Vec3b(rand() % 256, rand() % 256, rand() % 256);
		if (stats.at<int>(i, cv::CC_STAT_HEIGHT) < 60 || stats.at<int>(i, cv::CC_STAT_HEIGHT) > 110
			|| stats.at<int>(i, cv::CC_STAT_WIDTH) < 30 || stats.at<int>(i, cv::CC_STAT_WIDTH) > 70)
		{
			colors[i] = cv::Vec3b(0, 0, 0);
			selectFlag[i] = 0;
		}
	}
    ......
}
Ignore the handling of colors in this code first, which will be described in the content related to coloring later
Here, traverse the connected domain and get stats At < int > (I, CV:: cc_stat_height) and stats At < int > (I, CV:: cc_stat_width) In the code segment, select flag is used to mark whether each connected domain is selected
3.5 extraction of screening results
Through the mark in Section 3.4, a filtered result binary map (white map on black background) is generated through the following code, and the results are saved in imgBin:
int test1()
{
    ......
	cv::Mat imgBin(src.rows, src.cols, CV_8UC1, cv::Scalar(0));
	for (int y = 0; y < imgBin.rows; ++y)
	{
		for (int x = 0; x < imgBin.cols; ++x)
		{
			int label = labels.at<int>(y, x);

			// If it is a background connected domain or a connected domain that does not pass the length and width filter
			if (0 == label || 0 == selectFlag[label])
			{
				imgBin.at<uchar>(y, x) = 0;
				continue;
			}
			CV_Assert(0 <= label && label <= nccomps);
			imgBin.at<uchar>(y, x) = 255;
		}
	}
    ......
}
When the label is 0, it actually represents the background connected domain
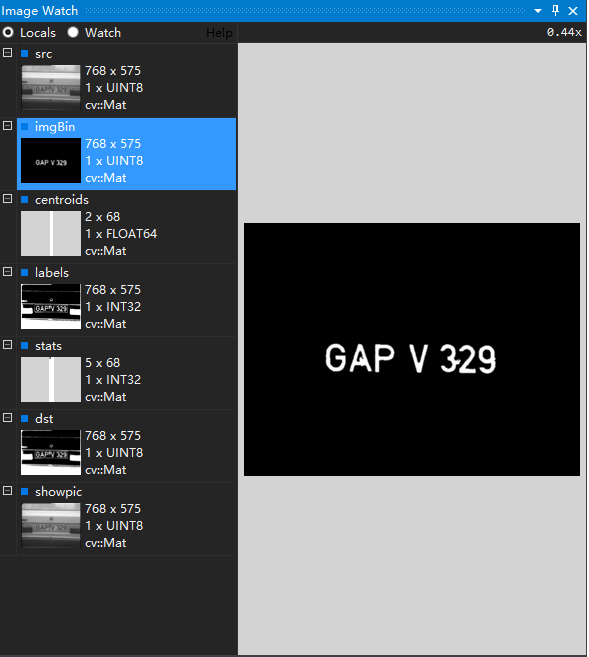
The results are displayed in ImageWatch as follows
3.6 color display of screening results
The results in section 3.5 can distinguish the selected connected domain from the background (binary graph), but the difference between connected domains is not very obvious. In order to color different connected domains as in HDevelop, we need to generate colors through random numbers and add the results marked in 3.4
The relevant code snippet is
int test1()
{	......
    std::vector<cv::Vec3b> colors(nccomps);
	std::vector<int> selectFlag(nccomps);
	selectFlag.assign(nccomps, 1);
	colors[0] = cv::Vec3b(0, 0, 0);
	for (int i = 1; i < nccomps; ++i)
	{
		colors[i] = cv::Vec3b(rand() % 256, rand() % 256, rand() % 256);
		if (stats.at<int>(i, cv::CC_STAT_HEIGHT) < 60 || stats.at<int>(i, cv::CC_STAT_HEIGHT) > 110
			|| stats.at<int>(i, cv::CC_STAT_WIDTH) < 30 || stats.at<int>(i, cv::CC_STAT_WIDTH) > 70)
		{
			colors[i] = cv::Vec3b(0, 0, 0);
			selectFlag[i] = 0;
		}
	}
	......
	cv::cvtColor(showpic, showpic, CV_GRAY2RGB);
	for (int y = 0; y < showpic.rows; ++y)
	{
		for (int x = 0; x < showpic.cols; ++x)
		{
			int label = labels.at<int>(y, x);

			// If it is a background connected domain or a connected domain that does not pass the length and width filter
			if (0 == label || 0 == selectFlag[label])
				continue;
			CV_Assert(0 <= label && label <= nccomps);
			showpic.at<cv::Vec3b>(y, x) = colors[label];
		}
	}

	cv::imshow("test1", showpic);
	cv::waitKey(0);
 	......
}
The method of rendering is pixel by pixel, and different colors are allocated through the connected domain of the marked pixels in labels
While marking different connected domains in Section 3.4, different colors are generated for different connected domains through random numbers. This is realized through a vector of cv::Vec3b. Each element is a ternary number, representing the value of RGB The value of each component is generated by random number
Black is used for background and connected fields that fail to pass the filter, and color is used for other connected fields
