It's a week old article. It's not easy to be original. In the whole process of actual combat, let's give you a one click three connection (like, comment and collection). If you have any questions, you can leave a message at the end of the article for discussion, or send a private letter to me on CSDN. I'll reply to you when I see it. In addition, the yaml installation files involved in this article can be obtained through private chat~~
Hello, I'm glacier~~
Recently, the DevOps environment was built on the cluster of k8s version 1.18.2, during which various pits were encountered. At present, all kinds of pits in the process of building the environment have been filled up. This is to record and share with you! The article is a little long, the whole process of actual combat, it is recommended to collect!! yaml installation files involved in this article can be obtained through private chat.
Server planning
| IP | host name | node | operating system |
|---|---|---|---|
| 192.168.175.101 | binghe101 | K8S Master | CentOS 8.0.1905 |
| 192.168.175.102 | binghe102 | K8S Worker | CentOS 8.0.1905 |
| 192.168.175.103 | binghe103 | K8S Worker | CentOS 8.0.1905 |
Install environment version
| Software name | Software version | explain |
|---|---|---|
| Docker | 19.03.8 | Provide container environment |
| docker-compose | 1.25.5 | Define and run applications composed of multiple containers |
| K8S | 1.8.12 | Kubernetes is an open source application for managing containerized applications on multiple hosts in the cloud platform. Kubernetes aims to make the deployment of containerized applications simple and efficient. Kubernetes provides a mechanism for application deployment, planning, updating and maintenance. |
| GitLab | 12.1.6 | Code warehouse (just install one with SVN) |
| Harbor | 1.10.2 | Private image warehouse |
| Jenkins | 2.89.3 | Continuous integration delivery |
| SVN | 1.10.2 | Code warehouse (just install one with GitLab) |
| JDK | 1.8.0_202 | Java basic running environment |
| maven | 3.6.3 | Build the basic plug-in of the project |
Server password free login
Execute the following commands on each server.
ssh-keygen -t rsa
cat ~/.ssh/id_rsa.pub >> ~/.ssh/authorized_keys
The IDS on binghe102 and binghe103 servers_ rsa. Copy the pub file to binghe101 server.
[root@binghe102 ~]# scp .ssh/id_rsa.pub binghe101:/root/.ssh/102
[root@binghe103 ~]# scp .ssh/id_rsa.pub binghe101:/root/.ssh/103
Execute the following command on binghe101 server.
cat ~/.ssh/102 >> ~/.ssh/authorized_keys
cat ~/.ssh/103 >> ~/.ssh/authorized_keys
Then authorized_ The keys files are copied to binghe102 and binghe103 servers respectively.
[root@binghe101 ~]# scp .ssh/authorized_keys binghe102:/root/.ssh/authorized_keys
[root@binghe101 ~]# scp .ssh/authorized_keys binghe103:/root/.ssh/authorized_keys
Delete ~ /. On binghe101 node 102 and 103 files under ssh.
rm ~/.ssh/102
rm ~/.ssh/103
Install JDK
The JDK environment needs to be installed on each server. Download JDK from Oracle. The version of JDK I download here is 1.8.0_ 202. After downloading, unzip and configure the system environment variables.
tar -zxvf jdk1.8.0_212.tar.gz
mv jdk1.8.0_212 /usr/local
Next, configure the system environment variables.
vim /etc/profile
The configuration items are as follows.
JAVA_HOME=/usr/local/jdk1.8.0_212
CLASS_PATH=.:$JAVA_HOME/lib
PATH=$JAVA_HOME/bin:$PATH
export JAVA_HOME CLASS_PATH PATH
Next, execute the following command to make the system environment variable effective.
source /etc/profile
Install Maven
Download Maven from Apache. The version of Maven I downloaded here is 3.6.3. After downloading, unzip and configure system environment variables directly.
tar -zxvf apache-maven-3.6.3-bin.tar.gz
mv apache-maven-3.6.3-bin /usr/local
Next, configure the system environment variables.
vim /etc/profile
The configuration items are as follows.
JAVA_HOME=/usr/local/jdk1.8.0_212
MAVEN_HOME=/usr/local/apache-maven-3.6.3-bin
CLASS_PATH=.:$JAVA_HOME/lib
PATH=$MAVEN_HOME/bin:$JAVA_HOME/bin:$PATH
export JAVA_HOME CLASS_PATH MAVEN_HOME PATH
Next, execute the following command to make the system environment variable effective.
source /etc/profile
Next, modify Maven's configuration file, as shown below.
<localRepository>/home/repository</localRepository>
Store the Jar package downloaded by Maven in the / home/repository directory.
Install Docker environment
This document builds Docker environment based on Docker version 19.03.8.
Create install on all servers_ docker. SH script. The script content is as follows.
export REGISTRY_MIRROR=https://registry.cn-hangzhou.aliyuncs.com
dnf install yum*
yum install -y yum-utils device-mapper-persistent-data lvm2
yum-config-manager --add-repo http://mirrors.aliyun.com/docker-ce/linux/centos/docker-ce.repo
dnf install https://mirrors.aliyun.com/docker-ce/linux/centos/7/x86_64/stable/Packages/containerd.io-1.2.13-3.1.el7.x86_64.rpm
yum install -y docker-ce-19.03.8 docker-ce-cli-19.03.8
systemctl enable docker.service
systemctl start docker.service
docker version
Install on each server_ docker. SH script gives executable permission and executes the script.
Install docker compose
Note: install docker compose on each server
1. Download the docker compose file
curl -L https://github.com/docker/compose/releases/download/1.25.5/docker-compose-`uname -s`-`uname -m` -o /usr/local/bin/docker-compose
2. Give the docker compose file executable permission
chmod a+x /usr/local/bin/docker-compose
3. Check docker compose version
[root@binghe ~]# docker-compose version
docker-compose version 1.25.5, build 8a1c60f6
docker-py version: 4.1.0
CPython version: 3.7.5
OpenSSL version: OpenSSL 1.1.0l  10 Sep 2019
Install K8S cluster environment
This document builds K8S cluster based on K8S version 1.8.12
Install K8S basic environment
Create install on all servers_ k8s. SH script file. The contents of the script file are as follows.
#Configure alicloud image accelerator
mkdir -p /etc/docker
tee /etc/docker/daemon.json <<-'EOF'
{
  "registry-mirrors": ["https://zz3sblpi.mirror.aliyuncs.com"]
}
EOF
systemctl daemon-reload
systemctl restart docker

#Install NFS utils
yum install -y nfs-utils
yum install -y wget

#Start NFS server
systemctl start nfs-server
systemctl enable nfs-server

#Turn off the firewall
systemctl stop firewalld
systemctl disable firewalld

#Close SeLinux
setenforce 0
sed -i "s/SELINUX=enforcing/SELINUX=disabled/g" /etc/selinux/config

# Close swap
swapoff -a
yes | cp /etc/fstab /etc/fstab_bak
cat /etc/fstab_bak |grep -v swap > /etc/fstab

#Modify / etc / sysctl conf
# If there is a configuration, modify it
sed -i "s#^net.ipv4.ip_forward.*#net.ipv4.ip_forward=1#g"  /etc/sysctl.conf
sed -i "s#^net.bridge.bridge-nf-call-ip6tables.*#net.bridge.bridge-nf-call-ip6tables=1#g"  /etc/sysctl.conf
sed -i "s#^net.bridge.bridge-nf-call-iptables.*#net.bridge.bridge-nf-call-iptables=1#g"  /etc/sysctl.conf
sed -i "s#^net.ipv6.conf.all.disable_ipv6.*#net.ipv6.conf.all.disable_ipv6=1#g"  /etc/sysctl.conf
sed -i "s#^net.ipv6.conf.default.disable_ipv6.*#net.ipv6.conf.default.disable_ipv6=1#g"  /etc/sysctl.conf
sed -i "s#^net.ipv6.conf.lo.disable_ipv6.*#net.ipv6.conf.lo.disable_ipv6=1#g"  /etc/sysctl.conf
sed -i "s#^net.ipv6.conf.all.forwarding.*#net.ipv6.conf.all.forwarding=1#g"  /etc/sysctl.conf
# Maybe not, add
echo "net.ipv4.ip_forward = 1" >> /etc/sysctl.conf
echo "net.bridge.bridge-nf-call-ip6tables = 1" >> /etc/sysctl.conf
echo "net.bridge.bridge-nf-call-iptables = 1" >> /etc/sysctl.conf
echo "net.ipv6.conf.all.disable_ipv6 = 1" >> /etc/sysctl.conf
echo "net.ipv6.conf.default.disable_ipv6 = 1" >> /etc/sysctl.conf
echo "net.ipv6.conf.lo.disable_ipv6 = 1" >> /etc/sysctl.conf
echo "net.ipv6.conf.all.forwarding = 1"  >> /etc/sysctl.conf
# Execute commands to apply
sysctl -p

# Configure yum source for K8S
cat <<EOF > /etc/yum.repos.d/kubernetes.repo
[kubernetes]
name=Kubernetes
baseurl=http://mirrors.aliyun.com/kubernetes/yum/repos/kubernetes-el7-x86_64
enabled=1
gpgcheck=0
repo_gpgcheck=0
gpgkey=http://mirrors.aliyun.com/kubernetes/yum/doc/yum-key.gpg
       http://mirrors.aliyun.com/kubernetes/yum/doc/rpm-package-key.gpg
EOF

# Uninstall old version K8S
yum remove -y kubelet kubeadm kubectl

# Install kubelet, kubedm and kubectl. I installed version 1.18.2 here. You can also install version 1.17.2
yum install -y kubelet-1.18.2 kubeadm-1.18.2 kubectl-1.18.2

# Modify docker Cgroup Driver to systemd
# # Add / usr / lib / SYSTEMd / system / docker This line in the service file execstart = / usr / bin / dockerd - H FD: / / -- containerd = / run / containerd / containerd sock
# # Modify to execstart = / usr / bin / dockerd - H FD: / / -- containerd = / run / containerd / containerd sock --exec-opt native. cgroupdriver=systemd
# If you do not modify it, you may encounter the following errors when adding a worker node
# [WARNING IsDockerSystemdCheck]: detected "cgroupfs" as the Docker cgroup driver. The recommended driver is "systemd".
# Please follow the guide at https://kubernetes.io/docs/setup/cri/
sed -i "s#^ExecStart=/usr/bin/dockerd.*#ExecStart=/usr/bin/dockerd -H fd:// --containerd=/run/containerd/containerd.sock --exec-opt native.cgroupdriver=systemd#g" /usr/lib/systemd/system/docker.service

# Set the docker image to improve the download speed and stability of the docker image
# If visit https://hub.docker.io The speed is very stable. You can also skip this step
# curl -sSL https://kuboard.cn/install-script/set_mirror.sh | sh -s ${REGISTRY_MIRROR}

# Restart docker and start kubelet
systemctl daemon-reload
systemctl restart docker
systemctl enable kubelet && systemctl start kubelet

docker version
Install on each server_ k8s. SH script gives executable permission and executes the script.
Initialize Master node
Operations performed only on the binghe101 server.
1. Initialize the network environment of the Master node
Note: the following commands need to be executed manually on the command line.
# Execute only on the master node
# The export command is only valid in the current shell session. After opening a new shell window, if you want to continue the installation process, please re execute the export command here
export MASTER_IP=192.168.175.101
# Replace k8s Master is the dnsName you want
export APISERVER_NAME=k8s.master
# The network segment where the kubernetes container group is located. After the installation, the network segment is created by kubernetes and does not exist in the physical network in advance
export POD_SUBNET=172.18.0.1/16
echo "${MASTER_IP}    ${APISERVER_NAME}" >> /etc/hosts
2. Initialize the Master node
Create init on binghe101 server_ master. SH script file. The contents of the file are as follows.
#!/bin/bash
# Terminate execution on script error
set -e

if [ ${#POD_SUBNET} -eq 0 ] || [ ${#APISERVER_NAME} -eq 0 ]; then
  echo -e "\033[31;1m Make sure you have set the environment variable POD_SUBNET and APISERVER_NAME \033[0m"
  echo current POD_SUBNET=$POD_SUBNET
  echo current APISERVER_NAME=$APISERVER_NAME
  exit 1
fi


# View full configuration options https://godoc.org/k8s.io/kubernetes/cmd/kubeadm/app/apis/kubeadm/v1beta2
rm -f ./kubeadm-config.yaml
cat <<EOF > ./kubeadm-config.yaml
apiVersion: kubeadm.k8s.io/v1beta2
kind: ClusterConfiguration
kubernetesVersion: v1.18.2
imageRepository: registry.cn-hangzhou.aliyuncs.com/google_containers
controlPlaneEndpoint: "${APISERVER_NAME}:6443"
networking:
  serviceSubnet: "10.96.0.0/16"
  podSubnet: "${POD_SUBNET}"
  dnsDomain: "cluster.local"
EOF

# kubeadm init
# Depending on the network speed of the server, you need to wait 3 - 10 minutes
kubeadm init --config=kubeadm-config.yaml --upload-certs

# Configure kubectl
rm -rf /root/.kube/
mkdir /root/.kube/
cp -i /etc/kubernetes/admin.conf /root/.kube/config

# Install calico network plug-in
# Reference documents https://docs.projectcalico.org/v3.13/getting-started/kubernetes/self-managed-onprem/onpremises
echo "install calico-3.13.1"
rm -f calico-3.13.1.yaml
wget https://kuboard.cn/install-script/calico/calico-3.13.1.yaml
kubectl apply -f calico-3.13.1.yaml
Give init_master.sh script file can execute permissions and execute scripts.
3. View the initialization results of the Master node
(1) Ensure that all container groups are in Running state
# Execute the following command and wait for 3-10 minutes until all container groups are in Running state
watch kubectl get pod -n kube-system -o wide
The specific implementation is as follows.
[root@binghe101 ~]# watch kubectl get pod -n kube-system -o wide
Every 2.0s: kubectl get pod -n kube-system -o wide                                                                                                                          binghe101: Sun May 10 11:01:32 2020

NAME                                       READY   STATUS    RESTARTS   AGE    IP                NODE        NOMINATED NODE   READINESS GATES
calico-kube-controllers-5b8b769fcd-5dtlp   1/1     Running   0          118s   172.18.203.66     binghe101   <none>           <none>
calico-node-fnv8g                          1/1     Running   0          118s   192.168.175.101   binghe101   <none>           <none>
coredns-546565776c-27t7h                   1/1     Running   0          2m1s   172.18.203.67     binghe101   <none>           <none>
coredns-546565776c-hjb8z                   1/1     Running   0          2m1s   172.18.203.65     binghe101   <none>           <none>
etcd-binghe101                             1/1     Running   0          2m7s   192.168.175.101   binghe101   <none>           <none>
kube-apiserver-binghe101                   1/1     Running   0          2m7s   192.168.175.101   binghe101   <none>           <none>
kube-controller-manager-binghe101          1/1     Running   0          2m7s   192.168.175.101   binghe101   <none>           <none>
kube-proxy-dvgsr                           1/1     Running   0          2m1s   192.168.175.101   binghe101   <none>           <none>
kube-scheduler-binghe101                   1/1     Running   0          2m7s   192.168.175.101   binghe101   <none>           <none>
(2) View the initialization result of Master node
kubectl get nodes -o wide
The specific implementation is as follows.
[root@binghe101 ~]# kubectl get nodes -o wide
NAME        STATUS   ROLES    AGE     VERSION   INTERNAL-IP       EXTERNAL-IP   OS-IMAGE                KERNEL-VERSION         CONTAINER-RUNTIME
binghe101   Ready    master   3m28s   v1.18.2   192.168.175.101   <none>        CentOS Linux 8 (Core)   4.18.0-80.el8.x86_64   docker://19.3.8
Initialize Worker node
1. Get the join command parameters
Execute the following command on the Master node (binghe101 server) to obtain the join command parameters.
kubeadm token create --print-join-command
The specific implementation is as follows.
[root@binghe101 ~]# kubeadm token create --print-join-command
W0510 11:04:34.828126   56132 configset.go:202] WARNING: kubeadm cannot validate component configs for API groups [kubelet.config.k8s.io kubeproxy.config.k8s.io]
kubeadm join k8s.master:6443 --token 8nblts.62xytoqufwsqzko2     --discovery-token-ca-cert-hash sha256:1717cc3e34f6a56b642b5751796530e367aa73f4113d09994ac3455e33047c0d
Among them, there is the following line of output.
kubeadm join k8s.master:6443 --token 8nblts.62xytoqufwsqzko2 --discovery-token-ca-cert-hash sha256:1717cc3e34f6a56b642b5751796530e367aa73f4113d09994ac3455e33047c0d
This is the command line to get the join.
Note: the valid time of the token in the join command is 2 hours. You can use this token to initialize any number of worker nodes within 2 hours.
2. Initialize the Worker node
It is executed for all worker nodes. Here, it is executed on binghe102 server and binghe103 server.
Manually execute the following commands in the command.
# Execute only on the worker node
# 192.168.175.101 is the intranet IP of the master node
export MASTER_IP=192.168.175.101
# Replace k8s Master is the apiserver used to initialize the master node_ NAME
export APISERVER_NAME=k8s.master
echo "${MASTER_IP}    ${APISERVER_NAME}" >> /etc/hosts

# Replace with the join output from the kubedm token create command on the master node
kubeadm join k8s.master:6443 --token 8nblts.62xytoqufwsqzko2     --discovery-token-ca-cert-hash sha256:1717cc3e34f6a56b642b5751796530e367aa73f4113d09994ac3455e33047c0d
The specific implementation is as follows.
[root@binghe102 ~]# export MASTER_IP=192.168.175.101
[root@binghe102 ~]# export APISERVER_NAME=k8s.master
[root@binghe102 ~]# echo "${MASTER_IP}    ${APISERVER_NAME}" >> /etc/hosts
[root@binghe102 ~]# kubeadm join k8s.master:6443 --token 8nblts.62xytoqufwsqzko2     --discovery-token-ca-cert-hash sha256:1717cc3e34f6a56b642b5751796530e367aa73f4113d09994ac3455e33047c0d
W0510 11:08:27.709263   42795 join.go:346] [preflight] WARNING: JoinControlPane.controlPlane settings will be ignored when control-plane flag is not set.
[preflight] Running pre-flight checks
        [WARNING FileExisting-tc]: tc not found in system path
[preflight] Reading configuration from the cluster...
[preflight] FYI: You can look at this config file with 'kubectl -n kube-system get cm kubeadm-config -oyaml'
[kubelet-start] Downloading configuration for the kubelet from the "kubelet-config-1.18" ConfigMap in the kube-system namespace
[kubelet-start] Writing kubelet configuration to file "/var/lib/kubelet/config.yaml"
[kubelet-start] Writing kubelet environment file with flags to file "/var/lib/kubelet/kubeadm-flags.env"
[kubelet-start] Starting the kubelet
[kubelet-start] Waiting for the kubelet to perform the TLS Bootstrap...

This node has joined the cluster:
* Certificate signing request was sent to apiserver and a response was received.
* The Kubelet was informed of the new secure connection details.

Run 'kubectl get nodes' on the control-plane to see this node join the cluster.
According to the output results, it can be seen that the Worker node has joined the K8S cluster.
Note: kubedm join... Is the join output from the kubedm token create command on the master node.
3. View initialization results
Execute the following command on the Master node (binghe101 server) to view the initialization results.
kubectl get nodes -o wide
The specific implementation is as follows.
[root@binghe101 ~]# kubectl get nodes
NAME        STATUS   ROLES    AGE     VERSION
binghe101   Ready    master   20m     v1.18.2
binghe102   Ready    <none>   2m46s   v1.18.2
binghe103   Ready    <none>   2m46s   v1.18.2
Note: the kubectl get nodes command can be followed by the - o wide parameter to output more information.
Problems caused by restarting K8S cluster
1. The worker node fails and cannot be started
The IP address of the Master node changes, so that the worker node cannot be started. You need to reinstall the K8S cluster and ensure that all nodes have fixed intranet IP addresses.
2.Pod crashes or cannot be accessed normally
After restarting the server, use the following command to view the running status of the Pod.
kubectl get pods --all-namespaces
It is found that many pods are not in Running status. At this time, you need to use the following command to delete the pods that are not Running normally.
kubectl delete pod <pod-name> -n <pod-namespece>
Note: if the Pod is created using Deployment, StatefulSet and other controllers, K8S will create a new Pod as an alternative. The restarted Pod usually works normally.
K8S install ingress nginx
Note: execute on the Master node (binghe101 server)
1. Create the ingress nginx namespace
Create ingress nginx namespace Yaml file. The contents of the file are as follows.
apiVersion: v1
kind: Namespace
metadata:
  name: ingress-nginx
  labels:
    name: ingress-nginx
Execute the following command to create the ingress nginx namespace.
kubectl apply -f ingress-nginx-namespace.yaml
2. Install the ingress controller
Create ingress nginx mandatory Yaml file. The contents of the file are as follows.
apiVersion: v1
kind: Namespace
metadata:
  name: ingress-nginx

---

apiVersion: apps/v1
kind: Deployment
metadata:
  name: default-http-backend
  labels:
    app.kubernetes.io/name: default-http-backend
    app.kubernetes.io/part-of: ingress-nginx
  namespace: ingress-nginx
spec:
  replicas: 1
  selector:
    matchLabels:
      app.kubernetes.io/name: default-http-backend
      app.kubernetes.io/part-of: ingress-nginx
  template:
    metadata:
      labels:
        app.kubernetes.io/name: default-http-backend
        app.kubernetes.io/part-of: ingress-nginx
    spec:
      terminationGracePeriodSeconds: 60
      containers:
        - name: default-http-backend
          # Any image is permissible as long as:
          # 1. It serves a 404 page at /
          # 2. It serves 200 on a /healthz endpoint
          image: registry.cn-qingdao.aliyuncs.com/kubernetes_xingej/defaultbackend-amd64:1.5
          livenessProbe:
            httpGet:
              path: /healthz
              port: 8080
              scheme: HTTP
            initialDelaySeconds: 30
            timeoutSeconds: 5
          ports:
            - containerPort: 8080
          resources:
            limits:
              cpu: 10m
              memory: 20Mi
            requests:
              cpu: 10m
              memory: 20Mi

---
apiVersion: v1
kind: Service
metadata:
  name: default-http-backend
  namespace: ingress-nginx
  labels:
    app.kubernetes.io/name: default-http-backend
    app.kubernetes.io/part-of: ingress-nginx
spec:
  ports:
    - port: 80
      targetPort: 8080
  selector:
    app.kubernetes.io/name: default-http-backend
    app.kubernetes.io/part-of: ingress-nginx

---

kind: ConfigMap
apiVersion: v1
metadata:
  name: nginx-configuration
  namespace: ingress-nginx
  labels:
    app.kubernetes.io/name: ingress-nginx
    app.kubernetes.io/part-of: ingress-nginx

---

kind: ConfigMap
apiVersion: v1
metadata:
  name: tcp-services
  namespace: ingress-nginx
  labels:
    app.kubernetes.io/name: ingress-nginx
    app.kubernetes.io/part-of: ingress-nginx

---

kind: ConfigMap
apiVersion: v1
metadata:
  name: udp-services
  namespace: ingress-nginx
  labels:
    app.kubernetes.io/name: ingress-nginx
    app.kubernetes.io/part-of: ingress-nginx

---

apiVersion: v1
kind: ServiceAccount
metadata:
  name: nginx-ingress-serviceaccount
  namespace: ingress-nginx
  labels:
    app.kubernetes.io/name: ingress-nginx
    app.kubernetes.io/part-of: ingress-nginx

---
apiVersion: rbac.authorization.k8s.io/v1beta1
kind: ClusterRole
metadata:
  name: nginx-ingress-clusterrole
  labels:
    app.kubernetes.io/name: ingress-nginx
    app.kubernetes.io/part-of: ingress-nginx
rules:
  - apiGroups:
      - ""
    resources:
      - configmaps
      - endpoints
      - nodes
      - pods
      - secrets
    verbs:
      - list
      - watch
  - apiGroups:
      - ""
    resources:
      - nodes
    verbs:
      - get
  - apiGroups:
      - ""
    resources:
      - services
    verbs:
      - get
      - list
      - watch
  - apiGroups:
      - "extensions"
    resources:
      - ingresses
    verbs:
      - get
      - list
      - watch
  - apiGroups:
      - ""
    resources:
      - events
    verbs:
      - create
      - patch
  - apiGroups:
      - "extensions"
    resources:
      - ingresses/status
    verbs:
      - update

---
apiVersion: rbac.authorization.k8s.io/v1beta1
kind: Role
metadata:
  name: nginx-ingress-role
  namespace: ingress-nginx
  labels:
    app.kubernetes.io/name: ingress-nginx
    app.kubernetes.io/part-of: ingress-nginx
rules:
  - apiGroups:
      - ""
    resources:
      - configmaps
      - pods
      - secrets
      - namespaces
    verbs:
      - get
  - apiGroups:
      - ""
    resources:
      - configmaps
    resourceNames:
      # Defaults to "<election-id>-<ingress-class>"
      # Here: "<ingress-controller-leader>-<nginx>"
      # This has to be adapted if you change either parameter
      # when launching the nginx-ingress-controller.
      - "ingress-controller-leader-nginx"
    verbs:
      - get
      - update
  - apiGroups:
      - ""
    resources:
      - configmaps
    verbs:
      - create
  - apiGroups:
      - ""
    resources:
      - endpoints
    verbs:
      - get

---
apiVersion: rbac.authorization.k8s.io/v1beta1
kind: RoleBinding
metadata:
  name: nginx-ingress-role-nisa-binding
  namespace: ingress-nginx
  labels:
    app.kubernetes.io/name: ingress-nginx
    app.kubernetes.io/part-of: ingress-nginx
roleRef:
  apiGroup: rbac.authorization.k8s.io
  kind: Role
  name: nginx-ingress-role
subjects:
  - kind: ServiceAccount
    name: nginx-ingress-serviceaccount
    namespace: ingress-nginx

---
apiVersion: rbac.authorization.k8s.io/v1beta1
kind: ClusterRoleBinding
metadata:
  name: nginx-ingress-clusterrole-nisa-binding
  labels:
    app.kubernetes.io/name: ingress-nginx
    app.kubernetes.io/part-of: ingress-nginx
roleRef:
  apiGroup: rbac.authorization.k8s.io
  kind: ClusterRole
  name: nginx-ingress-clusterrole
subjects:
  - kind: ServiceAccount
    name: nginx-ingress-serviceaccount
    namespace: ingress-nginx

---

apiVersion: apps/v1
kind: Deployment
metadata:
  name: nginx-ingress-controller
  namespace: ingress-nginx
  labels:
    app.kubernetes.io/name: ingress-nginx
    app.kubernetes.io/part-of: ingress-nginx
spec:
  replicas: 1
  selector:
    matchLabels:
      app.kubernetes.io/name: ingress-nginx
      app.kubernetes.io/part-of: ingress-nginx
  template:
    metadata:
      labels:
        app.kubernetes.io/name: ingress-nginx
        app.kubernetes.io/part-of: ingress-nginx
      annotations:
        prometheus.io/port: "10254"
        prometheus.io/scrape: "true"
    spec:
      serviceAccountName: nginx-ingress-serviceaccount
      containers:
        - name: nginx-ingress-controller
          image: registry.cn-qingdao.aliyuncs.com/kubernetes_xingej/nginx-ingress-controller:0.20.0
          args:
            - /nginx-ingress-controller
            - --default-backend-service=$(POD_NAMESPACE)/default-http-backend
            - --configmap=$(POD_NAMESPACE)/nginx-configuration
            - --tcp-services-configmap=$(POD_NAMESPACE)/tcp-services
            - --udp-services-configmap=$(POD_NAMESPACE)/udp-services
            - --publish-service=$(POD_NAMESPACE)/ingress-nginx
            - --annotations-prefix=nginx.ingress.kubernetes.io
          securityContext:
            capabilities:
              drop:
                - ALL
              add:
                - NET_BIND_SERVICE
            # www-data -> 33
            runAsUser: 33
          env:
            - name: POD_NAME
              valueFrom:
                fieldRef:
                  fieldPath: metadata.name
            - name: POD_NAMESPACE
              valueFrom:
                fieldRef:
                  fieldPath: metadata.namespace
          ports:
            - name: http
              containerPort: 80
            - name: https
              containerPort: 443
          livenessProbe:
            failureThreshold: 3
            httpGet:
              path: /healthz
              port: 10254
              scheme: HTTP
            initialDelaySeconds: 10
            periodSeconds: 10
            successThreshold: 1
            timeoutSeconds: 1
          readinessProbe:
            failureThreshold: 3
            httpGet:
              path: /healthz
              port: 10254
              scheme: HTTP
            periodSeconds: 10
            successThreshold: 1
            timeoutSeconds: 1

---
Execute the following command to install ingress controller.
kubectl apply -f ingress-nginx-mandatory.yaml
3. Install K8S SVC: ingress nginx
It is mainly used to expose pod: nginx ingress controller.
Create service nodeport Yaml file. The contents of the file are as follows.
apiVersion: v1
kind: Service
metadata:
  name: ingress-nginx
  namespace: ingress-nginx
  labels:
    app.kubernetes.io/name: ingress-nginx
    app.kubernetes.io/part-of: ingress-nginx
spec:
  type: NodePort
  ports:
    - name: http
      port: 80
      targetPort: 80
      protocol: TCP
      nodePort: 30080
    - name: https
      port: 443
      targetPort: 443
      protocol: TCP
      nodePort: 30443
  selector:
    app.kubernetes.io/name: ingress-nginx
    app.kubernetes.io/part-of: ingress-nginx
Execute the following command to install.
kubectl apply -f service-nodeport.yaml
4. Visit K8S SVC: ingress nginx
Check the deployment of the ingress nginx namespace, as shown below.
[root@binghe101 k8s]# kubectl get pod -n ingress-nginx
NAME                                        READY   STATUS    RESTARTS   AGE
default-http-backend-796ddcd9b-vfmgn        1/1     Running   1          10h
nginx-ingress-controller-58985cc996-87754   1/1     Running   2          10h
Enter the following command on the command line server command line to view the port mapping of ingress nginx.
kubectl get svc -n ingress-nginx
The details are as follows.
[root@binghe101 k8s]# kubectl get svc -n ingress-nginx
NAME                   TYPE        CLUSTER-IP    EXTERNAL-IP   PORT(S)                      AGE
default-http-backend   ClusterIP   10.96.247.2   <none>        80/TCP                       7m3s
ingress-nginx          NodePort    10.96.40.6    <none>        80:30080/TCP,443:30443/TCP   4m35s
Therefore, you can access ingress nginx through the IP address and 30080 port number of the Master node (binghe101 server), as shown below.
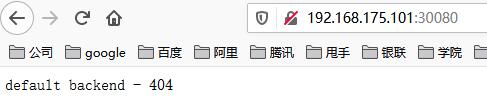
[root@binghe101 k8s]# curl 192.168.175.101:30080
default backend - 404
You can also open it in the browser http://192.168.175.101:30080 To access ingress nginx, as shown below.
K8S install gitlab code warehouse
Note: execute on the Master node (binghe101 server)
1. Create k8s-ops namespace
Create k8s OPS namespace Yaml file. The contents of the file are as follows.
apiVersion: v1
kind: Namespace
metadata:
  name: k8s-ops
  labels:
    name: k8s-ops
Execute the following command to create a namespace.
kubectl apply -f k8s-ops-namespace.yaml
2. Install gitlab redis
Create gitlab redis Yaml file. The contents of the file are as follows.
apiVersion: apps/v1
kind: Deployment
metadata:
  name: redis
  namespace: k8s-ops
  labels:
    name: redis
spec:
  selector:
    matchLabels:
      name: redis
  template:
    metadata:
      name: redis
      labels:
        name: redis
    spec:
      containers:
      - name: redis
        image: sameersbn/redis
        imagePullPolicy: IfNotPresent
        ports:
        - name: redis
          containerPort: 6379
        volumeMounts:
        - mountPath: /var/lib/redis
          name: data
        livenessProbe:
          exec:
            command:
            - redis-cli
            - ping
          initialDelaySeconds: 30
          timeoutSeconds: 5
        readinessProbe:
          exec:
            command:
            - redis-cli
            - ping
          initialDelaySeconds: 10
          timeoutSeconds: 5
      volumes:
      - name: data
        hostPath:
          path: /data1/docker/xinsrv/redis

---
apiVersion: v1
kind: Service
metadata:
  name: redis
  namespace: k8s-ops
  labels:
    name: redis
spec:
  ports:
    - name: redis
      port: 6379
      targetPort: redis
  selector:
    name: redis
First, execute the following command on the command line to create the / data1 / docker / xinsv / redis directory.
mkdir -p /data1/docker/xinsrv/redis
Execute the following command to install gitlab redis.
kubectl apply -f gitlab-redis.yaml
3. Install gitlab PostgreSQL
Create gitlab PostgreSQL Yaml, the contents of the file are as follows.
apiVersion: apps/v1
kind: Deployment
metadata:
  name: postgresql
  namespace: k8s-ops
  labels:
    name: postgresql
spec:
  selector:
    matchLabels:
      name: postgresql
  template:
    metadata:
      name: postgresql
      labels:
        name: postgresql
    spec:
      containers:
      - name: postgresql
        image: sameersbn/postgresql
        imagePullPolicy: IfNotPresent
        env:
        - name: DB_USER
          value: gitlab
        - name: DB_PASS
          value: passw0rd
        - name: DB_NAME
          value: gitlab_production
        - name: DB_EXTENSION
          value: pg_trgm
        ports:
        - name: postgres
          containerPort: 5432
        volumeMounts:
        - mountPath: /var/lib/postgresql
          name: data
        livenessProbe:
          exec:
            command:
            - pg_isready
            - -h
            - localhost
            - -U
            - postgres
          initialDelaySeconds: 30
          timeoutSeconds: 5
        readinessProbe:
          exec:
            command:
            - pg_isready
            - -h
            - localhost
            - -U
            - postgres
          initialDelaySeconds: 5
          timeoutSeconds: 1
      volumes:
      - name: data
        hostPath:
          path: /data1/docker/xinsrv/postgresql
---
apiVersion: v1
kind: Service
metadata:
  name: postgresql
  namespace: k8s-ops
  labels:
    name: postgresql
spec:
  ports:
    - name: postgres
      port: 5432
      targetPort: postgres
  selector:
    name: postgresql
First, execute the following command to create the / data1 / docker / xinsv / PostgreSQL directory.
mkdir -p /data1/docker/xinsrv/postgresql
Next, install gitlab PostgreSQL, as shown below.
kubectl apply -f gitlab-postgresql.yaml
4. Install gitlab
(1) User name and password configuration
First, use base64 encoding to transcode the user name and password on the command line. In this example, the user name is admin and the password is admin one thousand two hundred and thirty-one
Transcoding is as follows.
[root@binghe101 k8s]# echo -n 'admin' | base64
YWRtaW4=
[root@binghe101 k8s]# echo -n 'admin.1231' | base64
YWRtaW4uMTIzMQ==
User name after transcoding: YWRtaW4 = password: YWRtaW4uMTIzMQ==
You can also decode the base64 encoded string, for example, the password string, as shown below.
[root@binghe101 k8s]# echo 'YWRtaW4uMTIzMQ==' | base64 --decode
admin.1231
Next, create secret GitLab Yaml file is mainly used to configure the user name and password of GitLab. The contents of the file are as follows.
apiVersion: v1
kind: Secret
metadata:
  namespace: k8s-ops
  name: git-user-pass
type: Opaque
data:
  username: YWRtaW4=
  password: YWRtaW4uMTIzMQ==
Execute the contents of the configuration file, as shown below.
kubectl create -f ./secret-gitlab.yaml
(2) Installing GitLab
Create gitlab Yaml file. The contents of the file are as follows.
apiVersion: apps/v1
kind: Deployment
metadata:
  name: gitlab
  namespace: k8s-ops
  labels:
    name: gitlab
spec:
  selector:
    matchLabels:
      name: gitlab
  template:
    metadata:
      name: gitlab
      labels:
        name: gitlab
    spec:
      containers:
      - name: gitlab
        image: sameersbn/gitlab:12.1.6
        imagePullPolicy: IfNotPresent
        env:
        - name: TZ
          value: Asia/Shanghai
        - name: GITLAB_TIMEZONE
          value: Beijing
        - name: GITLAB_SECRETS_DB_KEY_BASE
          value: long-and-random-alpha-numeric-string
        - name: GITLAB_SECRETS_SECRET_KEY_BASE
          value: long-and-random-alpha-numeric-string
        - name: GITLAB_SECRETS_OTP_KEY_BASE
          value: long-and-random-alpha-numeric-string
        - name: GITLAB_ROOT_PASSWORD
          valueFrom:
            secretKeyRef:
              name: git-user-pass
              key: password
        - name: GITLAB_ROOT_EMAIL
          value: 12345678@qq.com
        - name: GITLAB_HOST
          value: gitlab.binghe.com
        - name: GITLAB_PORT
          value: "80"
        - name: GITLAB_SSH_PORT
          value: "30022"
        - name: GITLAB_NOTIFY_ON_BROKEN_BUILDS
          value: "true"
        - name: GITLAB_NOTIFY_PUSHER
          value: "false"
        - name: GITLAB_BACKUP_SCHEDULE
          value: daily
        - name: GITLAB_BACKUP_TIME
          value: 01:00
        - name: DB_TYPE
          value: postgres
        - name: DB_HOST
          value: postgresql
        - name: DB_PORT
          value: "5432"
        - name: DB_USER
          value: gitlab
        - name: DB_PASS
          value: passw0rd
        - name: DB_NAME
          value: gitlab_production
        - name: REDIS_HOST
          value: redis
        - name: REDIS_PORT
          value: "6379"
        ports:
        - name: http
          containerPort: 80
        - name: ssh
          containerPort: 22
        volumeMounts:
        - mountPath: /home/git/data
          name: data
        livenessProbe:
          httpGet:
            path: /
            port: 80
          initialDelaySeconds: 180
          timeoutSeconds: 5
        readinessProbe:
          httpGet:
            path: /
            port: 80
          initialDelaySeconds: 5
          timeoutSeconds: 1
      volumes:
      - name: data
        hostPath:
          path: /data1/docker/xinsrv/gitlab
---
apiVersion: v1
kind: Service
metadata:
  name: gitlab
  namespace: k8s-ops
  labels:
    name: gitlab
spec:
  ports:
    - name: http
      port: 80
      nodePort: 30088
    - name: ssh
      port: 22
      targetPort: ssh
      nodePort: 30022
  type: NodePort
  selector:
    name: gitlab

---
apiVersion: extensions/v1beta1
kind: Ingress
metadata:
  name: gitlab
  namespace: k8s-ops
  annotations:
    kubernetes.io/ingress.class: traefik
spec:
  rules:
  - host: gitlab.binghe.com
    http:
      paths:
      - backend:
          serviceName: gitlab
          servicePort: http
Note: when configuring GitLab, the IP address cannot be used when listening to the host, but the host name or domain name needs to be used. In the above configuration, I use GitLab binghe. Com host name.
On the command line, execute the following command to create the / data1 / docker / xinsv / gitlab directory.
mkdir -p /data1/docker/xinsrv/gitlab
Install GitLab as shown below.
kubectl apply -f gitlab.yaml
5. Installation completed
View k8s-ops namespace deployment, as shown below.
[root@binghe101 k8s]# kubectl get pod -n k8s-ops
NAME                          READY   STATUS    RESTARTS   AGE
gitlab-7b459db47c-5vk6t       0/1     Running   0          11s
postgresql-79567459d7-x52vx   1/1     Running   0          30m
redis-67f4cdc96c-h5ckz        1/1     Running   1          10h
You can also use the following command to view.
[root@binghe101 k8s]# kubectl get pod --namespace=k8s-ops
NAME                          READY   STATUS    RESTARTS   AGE
gitlab-7b459db47c-5vk6t       0/1     Running   0          36s
postgresql-79567459d7-x52vx   1/1     Running   0          30m
redis-67f4cdc96c-h5ckz        1/1     Running   1          10h
Both have the same effect.
Next, look at the port mapping of GitLab, as shown below.
[root@binghe101 k8s]# kubectl get svc -n k8s-ops
NAME         TYPE        CLUSTER-IP      EXTERNAL-IP   PORT(S)                     AGE
gitlab       NodePort    10.96.153.100   <none>        80:30088/TCP,22:30022/TCP   2m42s
postgresql   ClusterIP   10.96.203.119   <none>        5432/TCP                    32m
redis        ClusterIP   10.96.107.150   <none>        6379/TCP                    10h
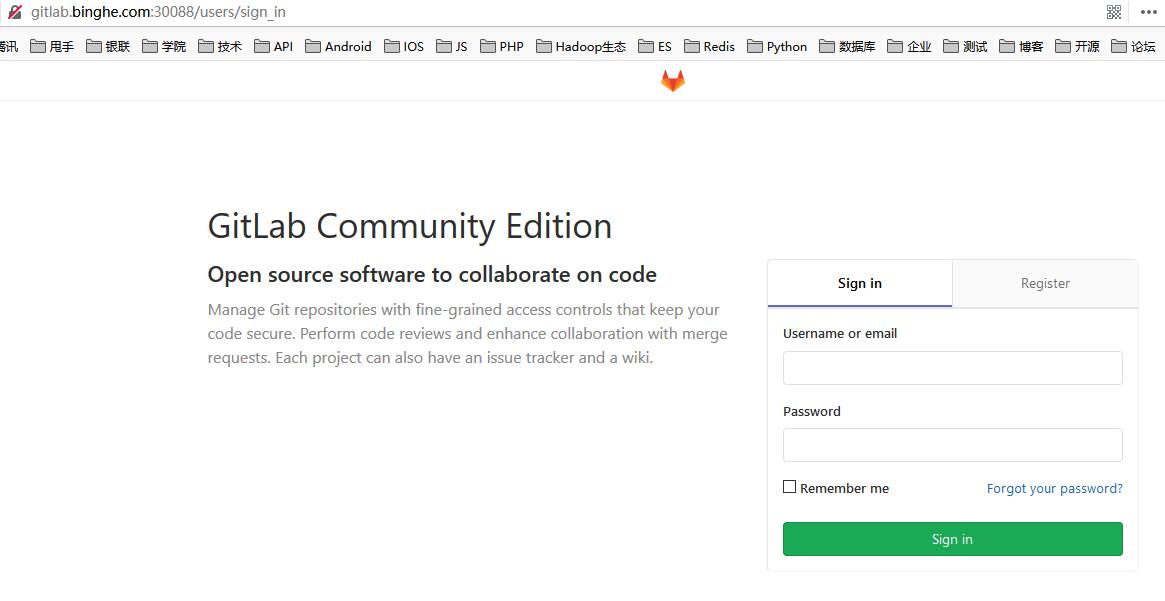
At this point, you can see that you can use the host name GitLab binghe. COM and port 30088 can access GitLab. Because I use virtual machine to build relevant environment here, I can access GitLab mapped by virtual machine locally binghe. COM, you need to configure the hosts file of this machine, and add the following configuration items to the hosts file of this machine.
192.168.175.101 gitlab.binghe.com
Note: in the Windows operating system, the directory where the hosts file is located is as follows.
C:\Windows\System32\drivers\etc
Next, you can link in the browser: http://gitlab.binghe.com:30088 To access GitLab, as shown below.
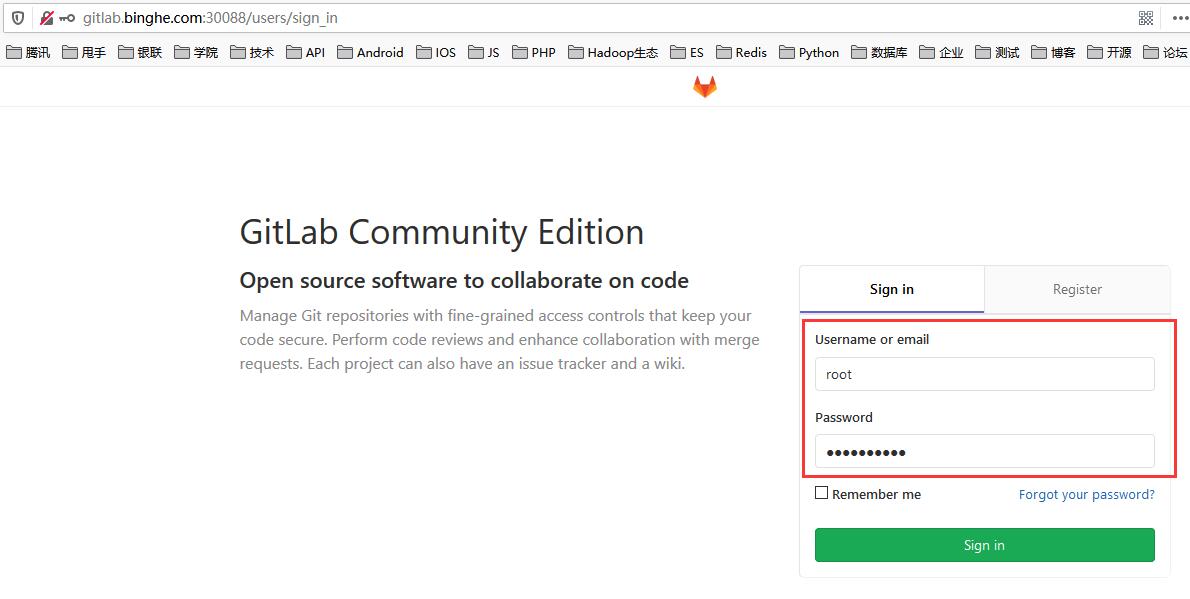
At this point, you can use the user name root and password admin 1231 to log in to GitLab.
Note: the user name here is root instead of admin, because root is the default super user of GitLab.
The interface after login is as follows.
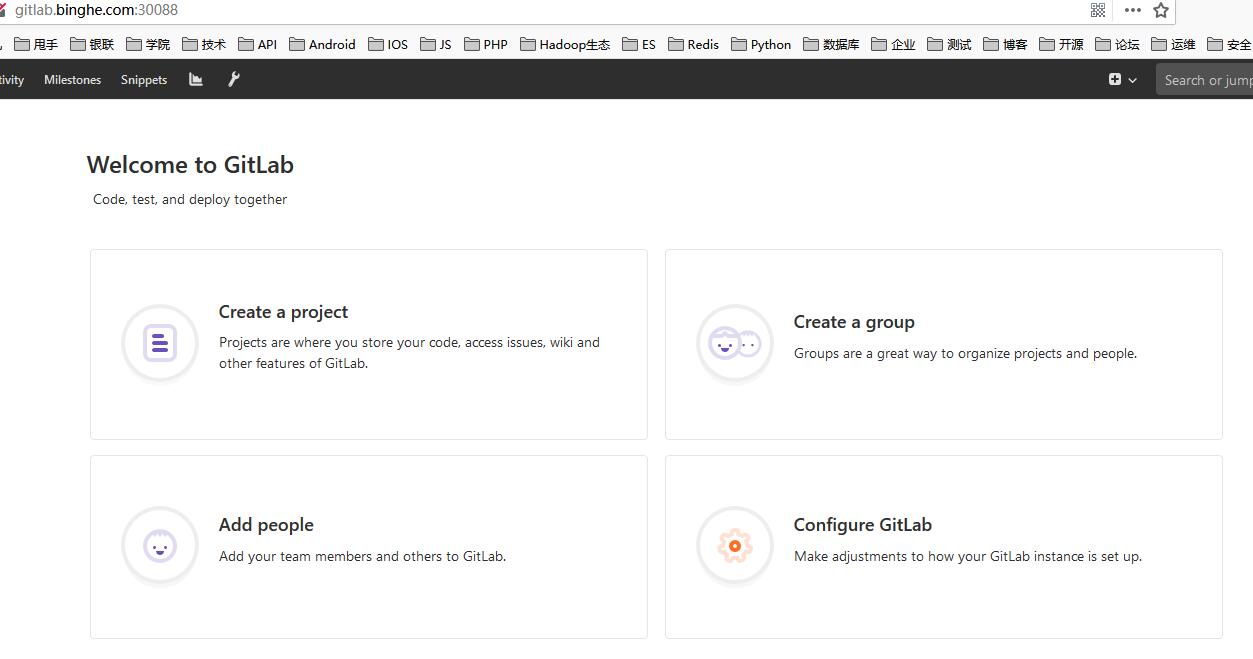
At this point, K8S installation of gitlab is completed.
Install Harbor private warehouse
Note: the Harbor private warehouse is installed on the Master node (binghe101 server). In the actual production environment, it is recommended to install it on other servers.
1. Download the offline installation version of Harbor
wget https://github.com/goharbor/harbor/releases/download/v1.10.2/harbor-offline-installer-v1.10.2.tgz
2. Unzip the Harbor installation package
tar -zxvf harbor-offline-installer-v1.10.2.tgz
After successful decompression, a harbor directory will be generated in the current directory of the server.
3. Configure Harbor
Note: here, I change the port of Harbor to 1180. If the port of Harbor is not modified, the default port is 80.
(1) Modify harbor YML file
cd harbor
vim harbor.yml
The modified configuration items are as follows.
hostname: 192.168.175.101
http:
  port: 1180
harbor_admin_password: binghe123
###And comment out https, otherwise an error will be reported during installation: ERROR:root:Error: The protocol is https but attribute ssl_cert is not set
#https:
  #port: 443
  #certificate: /your/certificate/path
  #private_key: /your/private/key/path
(2) Modify daemon JSON file
Modify / etc / docker / daemon JSON file, if not created, in / etc / docker / daemon Add the following content to the JSON file.
[root@binghe~]# cat /etc/docker/daemon.json
{
  "registry-mirrors": ["https://zz3sblpi.mirror.aliyuncs.com"],
  "insecure-registries":["192.168.175.101:1180"]
}
You can also use the ip addr command on the server to view all IP address segments of the machine and configure them to / etc / docker / daemon JSON file. Here, the contents of my configured file are as follows.
{
    "registry-mirrors": ["https://zz3sblpi.mirror.aliyuncs.com"],
    "insecure-registries":["192.168.175.0/16","172.17.0.0/16", "172.18.0.0/16", "172.16.29.0/16", "192.168.175.101:1180"]
}
4. Install and start harbor
After configuration, enter the following command to install and start Harbor
[root@binghe harbor]# ./install.sh
5. Log in to Harbor and add an account
After successful installation, enter in the browser address bar http://192.168.175.101:1180 Open the link, as shown in the following figure.
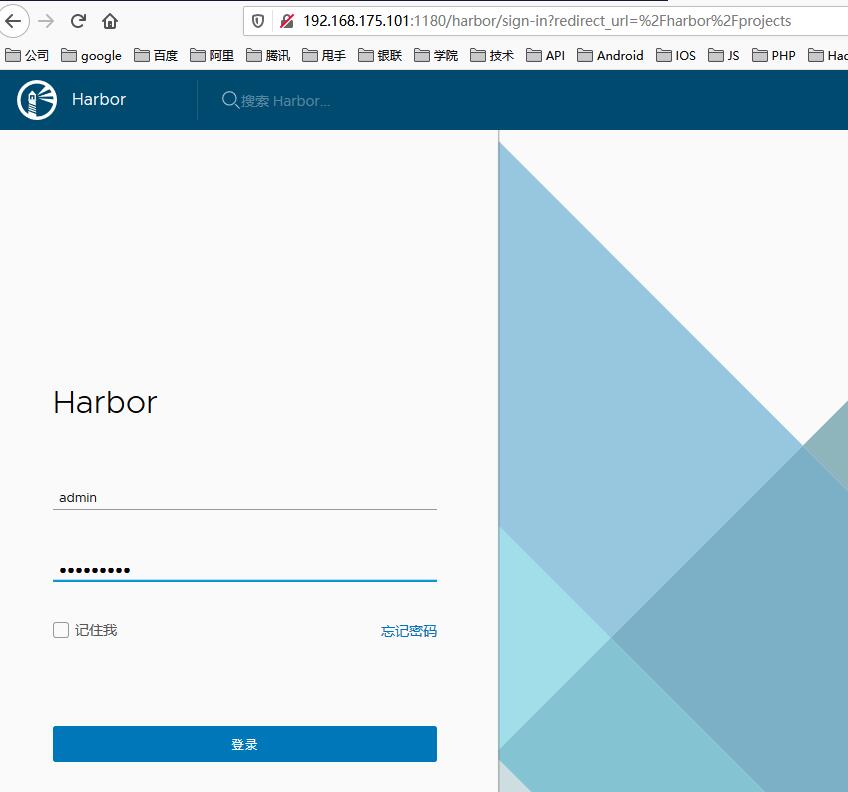
Enter the user name admin and password binghe123 to log in to the system, as shown in the figure below
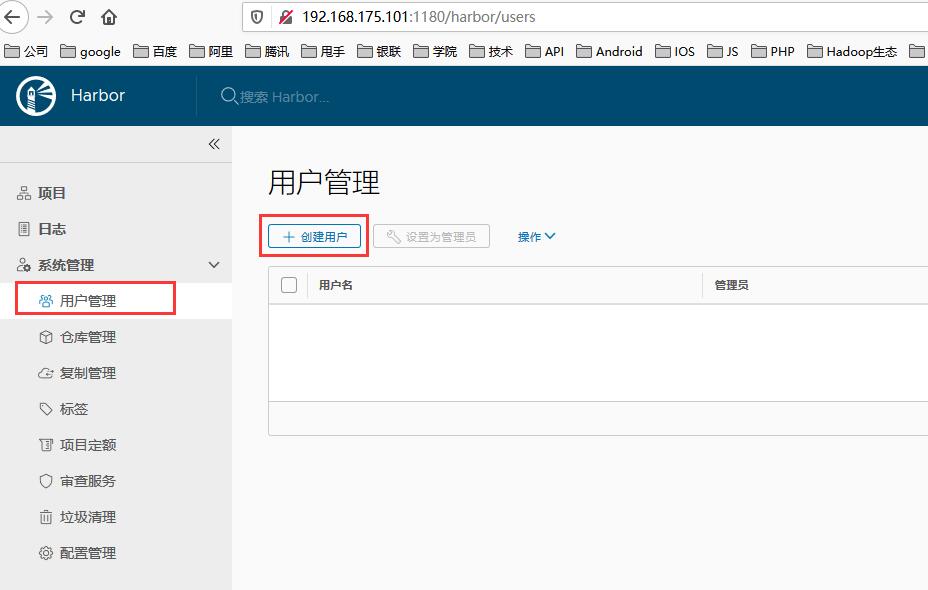
Next, we choose user management and add an administrator account to prepare for the subsequent packaging and uploading of Docker images. The steps to add an account are as follows.
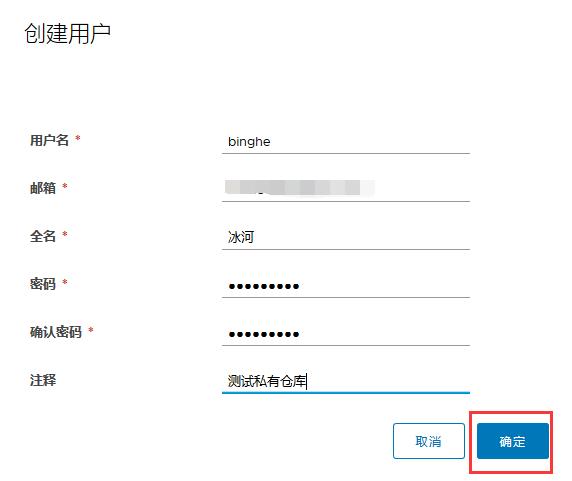
The password filled in here is Binghe123.
Click OK, as shown below.
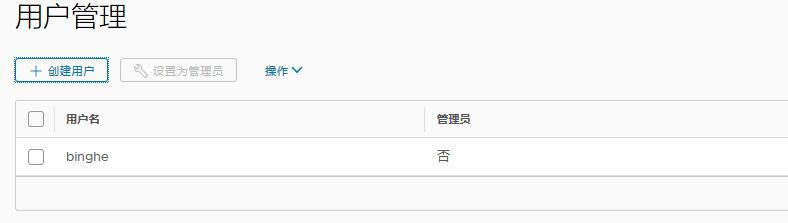
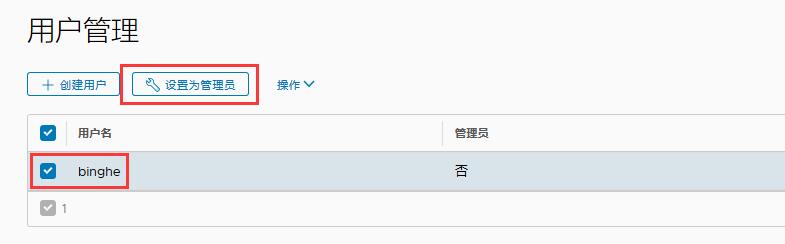
At this time, the binghe account is not an administrator. Select the binghe account and click "set as administrator".
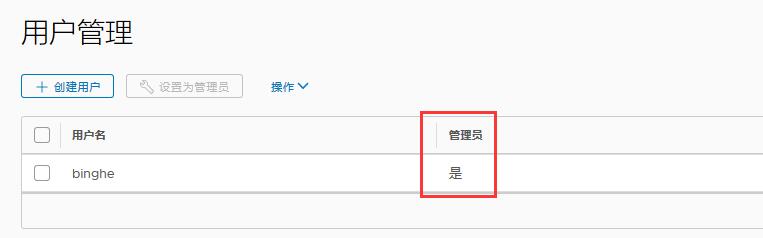
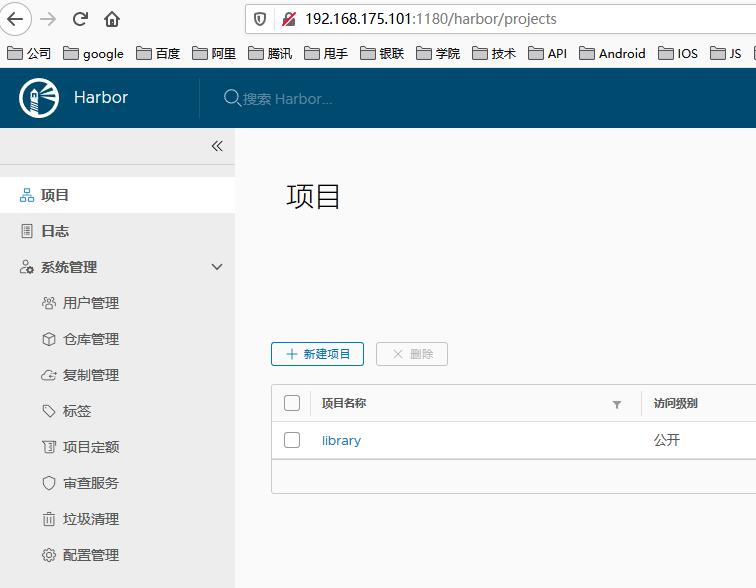
At this point, the binghe account is set as the administrator. At this point, the Harbor installation is completed.
6. Modify Harbor port
If you need to modify the port of Harbor after installing Harbor, you can modify the port of Harbor according to the following steps. Here, I take modifying port 80 to port 1180 as an example
(1) Modify harbor YML file
cd harbor
vim harbor.yml
The modified configuration items are as follows.
hostname: 192.168.175.101
http:
  port: 1180
harbor_admin_password: binghe123
###And comment out https, otherwise an error will be reported during installation: ERROR:root:Error: The protocol is https but attribute ssl_cert is not set
#https:
  #port: 443
  #certificate: /your/certificate/path
  #private_key: /your/private/key/path
(2) Modify docker compose YML file
vim docker-compose.yml
The modified configuration items are as follows.
ports:
      - 1180:80
(3) Modify config YML file
cd common/config/registry
vim config.yml
The modified configuration items are as follows.
realm: http://192.168.175.101:1180/service/token
(4) Restart Docker
systemctl daemon-reload
systemctl restart docker.service
(5) Restart Harbor
[root@binghe harbor]# docker-compose down
Stopping harbor-log ... done
Removing nginx             ... done
Removing harbor-portal     ... done
Removing harbor-jobservice ... done
Removing harbor-core       ... done
Removing redis             ... done
Removing registry          ... done
Removing registryctl       ... done
Removing harbor-db         ... done
Removing harbor-log        ... done
Removing network harbor_harbor

[root@binghe harbor]# ./prepare
prepare base dir is set to /mnt/harbor
Clearing the configuration file: /config/log/logrotate.conf
Clearing the configuration file: /config/nginx/nginx.conf
Clearing the configuration file: /config/core/env
Clearing the configuration file: /config/core/app.conf
Clearing the configuration file: /config/registry/root.crt
Clearing the configuration file: /config/registry/config.yml
Clearing the configuration file: /config/registryctl/env
Clearing the configuration file: /config/registryctl/config.yml
Clearing the configuration file: /config/db/env
Clearing the configuration file: /config/jobservice/env
Clearing the configuration file: /config/jobservice/config.yml
Generated configuration file: /config/log/logrotate.conf
Generated configuration file: /config/nginx/nginx.conf
Generated configuration file: /config/core/env
Generated configuration file: /config/core/app.conf
Generated configuration file: /config/registry/config.yml
Generated configuration file: /config/registryctl/env
Generated configuration file: /config/db/env
Generated configuration file: /config/jobservice/env
Generated configuration file: /config/jobservice/config.yml
loaded secret from file: /secret/keys/secretkey
Generated configuration file: /compose_location/docker-compose.yml
Clean up the input dir

[root@binghe harbor]# docker-compose up -d
Creating network "harbor_harbor" with the default driver
Creating harbor-log ... done
Creating harbor-db   ... done
Creating redis       ... done
Creating registry    ... done
Creating registryctl ... done
Creating harbor-core ... done
Creating harbor-jobservice ... done
Creating harbor-portal     ... done
Creating nginx             ... done

[root@binghe harbor]# docker ps -a
CONTAINER ID        IMAGE                                               COMMAND                  CREATED             STATUS                             PORTS
Install Jenkins (general practice)
1. Install nfs (if it has been installed before, this step can be omitted)
The biggest problem in using nfs is the write permission. You can use the securityContext/runAsUser of kubernetes to specify the uid of the user running jenkins in the jenkins container, so as to specify the permission of the nfs directory and make the jenkins container writable; It can also be unlimited, so that all users can write. For simplicity, all users can write here.
If nfs has been installed before, this step can be omitted. Find a host and install nfs. Here, I take installing nfs on the Master node (binghe101 server) as an example.
On the command line, enter the following command to install and start nfs.
yum install nfs-utils -y
systemctl start nfs-server
systemctl enable nfs-server
2. Create nfs shared directory
Create / opt / nfs / Jenkins data directory on the Master node (binghe101 server) as the shared directory of nfs, as shown below.
mkdir -p /opt/nfs/jenkins-data
Next, edit the / etc/exports file as shown below.
vim /etc/exports
Add the following line of configuration in the / etc/exports file.
/opt/nfs/jenkins-data 192.168.175.0/24(rw,all_squash)
The ip here uses the ip range of the kubernetes node node, followed by all_ The squash option will map all users accessing to nfsnobody users. No matter what user you access, it will eventually be compressed to nfsnobody. Therefore, as long as the owner of / opt / NFS / Jenkins data is changed to nfsnobody, any user accessing will have write permission.
On many machines, the user who starts the process is different due to the non-standard user uid, but it is very effective when you have write permission to a shared directory at the same time.
Next, authorize the / opt / nfs / Jenkins data directory and reload nfs, as shown below.
chown -R 1000 /opt/nfs/jenkins-data/
systemctl reload nfs-server
Use the following command to verify on any node in the K8S cluster:
showmount -e NFS_IP
If you can see / opt / NFS / Jenkins data, it means ok.
The details are as follows.
[root@binghe101 ~]# showmount -e 192.168.175.101
Export list for 192.168.175.101:
/opt/nfs/jenkins-data 192.168.175.0/24

[root@binghe102 ~]# showmount -e 192.168.175.101
Export list for 192.168.175.101:
/opt/nfs/jenkins-data 192.168.175.0/24
3. Create PV
Jenkins can actually read the previous data as long as the corresponding directory is loaded. However, since deployment cannot define the storage volume, we can only use StatefulSet.
First, create pv. pv is for stateful set. Every time stateful set is started, pvc will be created through the template volumeClaimTemplates. Therefore, pv must be available for pvc binding.
Create Jenkins PV Yaml file. The contents of the file are as follows.
apiVersion: v1
kind: PersistentVolume
metadata:
  name: jenkins
spec:
  nfs:
    path: /opt/nfs/jenkins-data
    server: 192.168.175.101
  accessModes: ["ReadWriteOnce"]
  capacity:
    storage: 1Ti
I have given 1T storage space here, which can be configured according to the actual situation.
Execute the following command to create pv.
kubectl apply -f jenkins-pv.yaml
4. Create serviceAccount
Create a service account because jenkins needs to be able to dynamically create a slave, so it must have some permissions.
Create Jenkins service account Yaml file. The contents of the file are as follows.
apiVersion: v1
kind: ServiceAccount
metadata:
  name: jenkins

---
kind: Role
apiVersion: rbac.authorization.k8s.io/v1beta1
metadata:
  name: jenkins
rules:
  - apiGroups: [""]
    resources: ["pods"]
    verbs: ["create", "delete", "get", "list", "patch", "update", "watch"]
  - apiGroups: [""]
    resources: ["pods/exec"]
    verbs: ["create", "delete", "get", "list", "patch", "update", "watch"]
  - apiGroups: [""]
    resources: ["pods/log"]
    verbs: ["get", "list", "watch"]
  - apiGroups: [""]
    resources: ["secrets"]
    verbs: ["get"]

---
apiVersion: rbac.authorization.k8s.io/v1beta1
kind: RoleBinding
metadata:
  name: jenkins
roleRef:
  apiGroup: rbac.authorization.k8s.io
  kind: Role
  name: jenkins
subjects:
  - kind: ServiceAccount
    name: jenkins
In the above configuration, a RoleBinding and a ServiceAccount are created, and the permissions of RoleBinding are bound to this user. Therefore, the jenkins container must run with this ServiceAccount, otherwise it will not have the permission of RoleBinding.
The permissions of RoleBinding are easy to understand, because jenkins needs to create and delete a slave, so these permissions are needed. As for the secrets permission, it is https certificate.
Execute the following command to create a serviceAccount.
kubectl apply -f jenkins-service-account.yaml
5. Install Jenkins
Create Jenkins statefullset Yaml file. The contents of the file are as follows.
apiVersion: apps/v1
kind: StatefulSet
metadata:
  name: jenkins
  labels:
    name: jenkins
spec:
  selector:
    matchLabels:
      name: jenkins
  serviceName: jenkins
  replicas: 1
  updateStrategy:
    type: RollingUpdate
  template:
    metadata:
      name: jenkins
      labels:
        name: jenkins
    spec:
      terminationGracePeriodSeconds: 10
      serviceAccountName: jenkins
      containers:
        - name: jenkins
          image: docker.io/jenkins/jenkins:lts
          imagePullPolicy: IfNotPresent
          ports:
            - containerPort: 8080
            - containerPort: 32100
          resources:
            limits:
              cpu: 4
              memory: 4Gi
            requests:
              cpu: 4
              memory: 4Gi
          env:
            - name: LIMITS_MEMORY
              valueFrom:
                resourceFieldRef:
                  resource: limits.memory
                  divisor: 1Mi
            - name: JAVA_OPTS
              # value: -XX:+UnlockExperimentalVMOptions -XX:+UseCGroupMemoryLimitForHeap -XX:MaxRAMFraction=1 -XshowSettings:vm -Dhudson.slaves.NodeProvisioner.initialDelay=0 -Dhudson.slaves.NodeProvisioner.MARGIN=50 -Dhudson.slaves.NodeProvisioner.MARGIN0=0.85
              value: -Xmx$(LIMITS_MEMORY)m -XshowSettings:vm -Dhudson.slaves.NodeProvisioner.initialDelay=0 -Dhudson.slaves.NodeProvisioner.MARGIN=50 -Dhudson.slaves.NodeProvisioner.MARGIN0=0.85
          volumeMounts:
            - name: jenkins-home
              mountPath: /var/jenkins_home
          livenessProbe:
            httpGet:
              path: /login
              port: 8080
            initialDelaySeconds: 60
            timeoutSeconds: 5
            failureThreshold: 12 # ~2 minutes
          readinessProbe:
            httpGet:
              path: /login
              port: 8080
            initialDelaySeconds: 60
            timeoutSeconds: 5
            failureThreshold: 12 # ~2 minutes
  # pvc template, corresponding to the previous pv
  volumeClaimTemplates:
    - metadata:
        name: jenkins-home
      spec:
        accessModes: ["ReadWriteOnce"]
        resources:
          requests:
            storage: 1Ti
When deploying jenkins, you should pay attention to the number of copies. You should have as many PVS as you have. Similarly, the storage will be consumed multiple times. I only used one copy here, so I only created one pv.
Use the following command to install Jenkins.
kubectl apply -f jenkins-statefulset.yaml
6. Create Service
Create Jenkins service Yaml file. The contents of the file are as follows.
apiVersion: v1
kind: Service
metadata:
  name: jenkins
spec:
  # type: LoadBalancer
  selector:
    name: jenkins
  # ensure the client ip is propagated to avoid the invalid crumb issue when using LoadBalancer (k8s >=1.7)
  #externalTrafficPolicy: Local
  ports:
    - name: http
      port: 80
      nodePort: 31888
      targetPort: 8080
      protocol: TCP
    - name: jenkins-agent
      port: 32100
      nodePort: 32100
      targetPort: 32100
      protocol: TCP
  type: NodePort
Use the following command to install the Service.
kubectl apply -f jenkins-service.yaml
7. Install ingress
jenkins' web interface needs to be accessed from outside the cluster. Here we choose to use ingress. Create jenkins ingress Yaml file. The contents of the file are as follows.
apiVersion: extensions/v1beta1
kind: Ingress
metadata:
  name: jenkins
spec:
  rules:
    - http:
        paths:
          - path: /
            backend:
              serviceName: jenkins
              servicePort: 31888
      host: jekins.binghe.com
Here, it should be noted that the host must be configured as domain name or host name, otherwise an error will be reported, as shown below.
The Ingress "jenkins" is invalid: spec.rules[0].host: Invalid value: "192.168.175.101": must be a DNS name, not an IP address
Use the following command to install ingress.
kubectl apply -f jenkins-ingress.yaml
Finally, because I use virtual machine to build relevant environment, I can access jekins mapped by virtual machine locally binghe. COM, you need to configure the hosts file of this machine, and add the following configuration items to the hosts file of this machine.
192.168.175.101 jekins.binghe.com
Note: in the Windows operating system, the directory where the hosts file is located is as follows.
C:\Windows\System32\drivers\etc
Next, you can link in the browser: http://jekins.binghe.com:31888 To visit Jekins.
Physical machine installation SVN
Here, take the installation of SVN on the Master node (binghe101 server) as an example.
1. Install SVN using yum or up2date
Execute the following command on the command line to install SVN.
yum -y install subversion
2. Create SVN Library
Execute the following commands in sequence.
#Create / data/svn
mkdir -p /data/svn
#Initialize svn
svnserve -d -r /data/svn
#Create code warehouse
svnadmin create /data/svn/test
3. Configure SVN
mkdir /data/svn/conf
cp /data/svn/test/conf/* /data/svn/conf/
cd /data/svn/conf/
[root@binghe101 conf]# ll
 Total consumption 20
-rw-r--r-- 1 root root 1080 5 December 2:17 authz
-rw-r--r-- 1 root root  885 5 December 2:17 hooks-env.tmpl
-rw-r--r-- 1 root root  309 5 December 2:17 passwd
-rw-r--r-- 1 root root 4375 5 December 2:17 svnserve.conf
- Configure authz files,
vim authz
The configured contents are as follows.
[aliases]
# joe = /C=XZ/ST=Dessert/L=Snake City/O=Snake Oil, Ltd./OU=Research Institute/CN=Joe Average

[groups]
# harry_and_sally = harry,sally
# harry_sally_and_joe = harry,sally,&joe
SuperAdmin = admin
binghe = admin,binghe

# [/foo/bar]
# harry = rw
# &joe = r
# * =

# [repository:/baz/fuz]
# @harry_and_sally = rw
# * = r

[test:/]
@SuperAdmin=rw
@binghe=rw
- Configure passwd file
vim passwd
The configured contents are as follows.
[users]
# harry = harryssecret
# sally = sallyssecret
admin = admin123
binghe = binghe123
- Configure svnserve conf
vim svnserve.conf
The configured file is shown below.
### This file controls the configuration of the svnserve daemon, if you
### use it to allow access to this repository.  (If you only allow
### access through http: and/or file: URLs, then this file is
### irrelevant.)

### Visit http://subversion.apache.org/ for more information.

[general]
### The anon-access and auth-access options control access to the
### repository for unauthenticated (a.k.a. anonymous) users and
### authenticated users, respectively.
### Valid values are "write", "read", and "none".
### Setting the value to "none" prohibits both reading and writing;
### "read" allows read-only access, and "write" allows complete
### read/write access to the repository.
### The sample settings below are the defaults and specify that anonymous
### users have read-only access to the repository, while authenticated
### users have read and write access to the repository.
anon-access = none
auth-access = write
### The password-db option controls the location of the password
### database file.  Unless you specify a path starting with a /,
### the file's location is relative to the directory containing
### this configuration file.
### If SASL is enabled (see below), this file will NOT be used.
### Uncomment the line below to use the default password file.
password-db = /data/svn/conf/passwd
### The authz-db option controls the location of the authorization
### rules for path-based access control.  Unless you specify a path
### starting with a /, the file's location is relative to the
### directory containing this file.  The specified path may be a
### repository relative URL (^/) or an absolute file:// URL to a text
### file in a Subversion repository.  If you don't specify an authz-db,
### no path-based access control is done.
### Uncomment the line below to use the default authorization file.
authz-db = /data/svn/conf/authz
### The groups-db option controls the location of the file with the
### group definitions and allows maintaining groups separately from the
### authorization rules.  The groups-db file is of the same format as the
### authz-db file and should contain a single [groups] section with the
### group definitions.  If the option is enabled, the authz-db file cannot
### contain a [groups] section.  Unless you specify a path starting with
### a /, the file's location is relative to the directory containing this
### file.  The specified path may be a repository relative URL (^/) or an
### absolute file:// URL to a text file in a Subversion repository.
### This option is not being used by default.
# groups-db = groups
### This option specifies the authentication realm of the repository.
### If two repositories have the same authentication realm, they should
### have the same password database, and vice versa.  The default realm
### is repository's uuid.
realm = svn
### The force-username-case option causes svnserve to case-normalize
### usernames before comparing them against the authorization rules in the
### authz-db file configured above.  Valid values are "upper" (to upper-
### case the usernames), "lower" (to lowercase the usernames), and
### "none" (to compare usernames as-is without case conversion, which
### is the default behavior).
# force-username-case = none
### The hooks-env options specifies a path to the hook script environment
### configuration file. This option overrides the per-repository default
### and can be used to configure the hook script environment for multiple
### repositories in a single file, if an absolute path is specified.
### Unless you specify an absolute path, the file's location is relative
### to the directory containing this file.
# hooks-env = hooks-env

[sasl]
### This option specifies whether you want to use the Cyrus SASL
### library for authentication. Default is false.
### Enabling this option requires svnserve to have been built with Cyrus
### SASL support; to check, run 'svnserve --version' and look for a line
### reading 'Cyrus SASL authentication is available.'
# use-sasl = true
### These options specify the desired strength of the security layer
### that you want SASL to provide. 0 means no encryption, 1 means
### integrity-checking only, values larger than 1 are correlated
### to the effective key length for encryption (e.g. 128 means 128-bit
### encryption). The values below are the defaults.
# min-encryption = 0
# max-encryption = 256
Next, set svnserve. Net in the / data/svn/conf directory Copy the conf file to the / data/svn/test/conf / directory. As shown below.
[root@binghe101 conf]# cp /data/svn/conf/svnserve.conf /data/svn/test/conf/
cp: Overwrite'/data/svn/test/conf/svnserve.conf'? y
4. Start SVN service
(1) Create svnserve Service
Create svnserve Service file
vim /usr/lib/systemd/system/svnserve.service
The contents of the document are as follows.
[Unit]
Description=Subversion protocol daemon
After=syslog.target network.target
Documentation=man:svnserve(8)

[Service]
Type=forking
EnvironmentFile=/etc/sysconfig/svnserve
#ExecStart=/usr/bin/svnserve --daemon --pid-file=/run/svnserve/svnserve.pid $OPTIONS
ExecStart=/usr/bin/svnserve --daemon $OPTIONS
PrivateTmp=yes

[Install]
WantedBy=multi-user.target
Next, execute the following command to make the configuration effective.
systemctl daemon-reload
After the command is executed successfully, modify the / etc/sysconfig/svnserve file.
vim /etc/sysconfig/svnserve
The contents of the modified file are as follows.
# OPTIONS is used to pass command-line arguments to svnserve.
#
# Specify the repository location in -r parameter:
OPTIONS="-r /data/svn"
(2) Start SVN
First, check the SVN status, as shown below.
[root@itence10 conf]# systemctl status svnserve.service
● svnserve.service - Subversion protocol daemon
   Loaded: loaded (/usr/lib/systemd/system/svnserve.service; disabled; vendor preset: disabled)
   Active: inactive (dead)
     Docs: man:svnserve(8)
You can see that SVN is not started at this time. Next, you need to start SVN.
systemctl start svnserve.service
Set the SVN service to start automatically.
systemctl enable svnserve.service
Next, you can download and install TortoiseSVN and enter the link svn://192.168.175.101/test And enter the user name binghe and password binghe123 to connect to SVN.
Physical machine installation Jenkins
Note: before installing Jenkins, you need to install JDK and Maven. I also install Jenkins on the Master node (binghe101 server).
1. Enable Jenkins Library
Run the following command to download the repo file and import the GPG key:
wget -O /etc/yum.repos.d/jenkins.repo http://pkg.jenkins-ci.org/redhat-stable/jenkins.repo
rpm --import https://jenkins-ci.org/redhat/jenkins-ci.org.key
2. Install Jenkins
Execute the following command to install Jenkis.
yum install jenkins
Next, modify the Jenkins default port, as shown below.
vim /etc/sysconfig/jenkins
The two modified configurations are as follows.
JENKINS_JAVA_CMD="/usr/local/jdk1.8.0_212/bin/java"
JENKINS_PORT="18080"
At this time, the port of Jenkins has been changed from 8080 to 18080
3. Start Jenkins
Enter the following command on the command line to start Jenkins.
systemctl start jenkins
Configure Jenkins to start automatically.
systemctl enable jenkins
Check the running status of Jenkins.
[root@itence10 ~]# systemctl status jenkins
● jenkins.service - LSB: Jenkins Automation Server
   Loaded: loaded (/etc/rc.d/init.d/jenkins; generated)
   Active: active (running) since Tue 2020-05-12 04:33:40 EDT; 28s ago
     Docs: man:systemd-sysv-generator(8)
    Tasks: 71 (limit: 26213)
   Memory: 550.8M
Description: Jenkins started successfully.
Configure Jenkins operating environment
1. Log in to Jenkins
After the first installation, you need to configure Jenkins' operating environment. First, access the link in the browser address bar http://192.168.175.101:18080 , open the Jenkins interface.

According to the prompt, use the following command to find the password value on the server, as shown below.
[root@binghe101 ~]# cat /var/lib/jenkins/secrets/initialAdminPassword
71af861c2ab948a1b6efc9f7dde90776
Copy the password 71af861c2ab948a1b6efc9f7dde90776 to the text box and click continue. It will jump to the custom Jenkins page, as shown below.
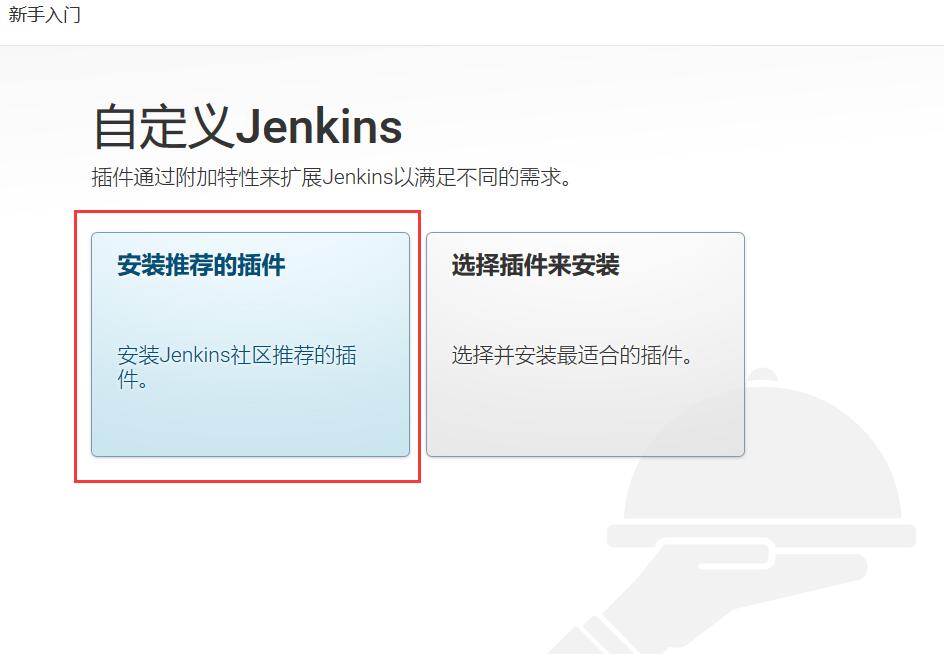
Here, you can directly select "install recommended plug-ins". After that, you will jump to a page for installing plug-ins, as shown below.
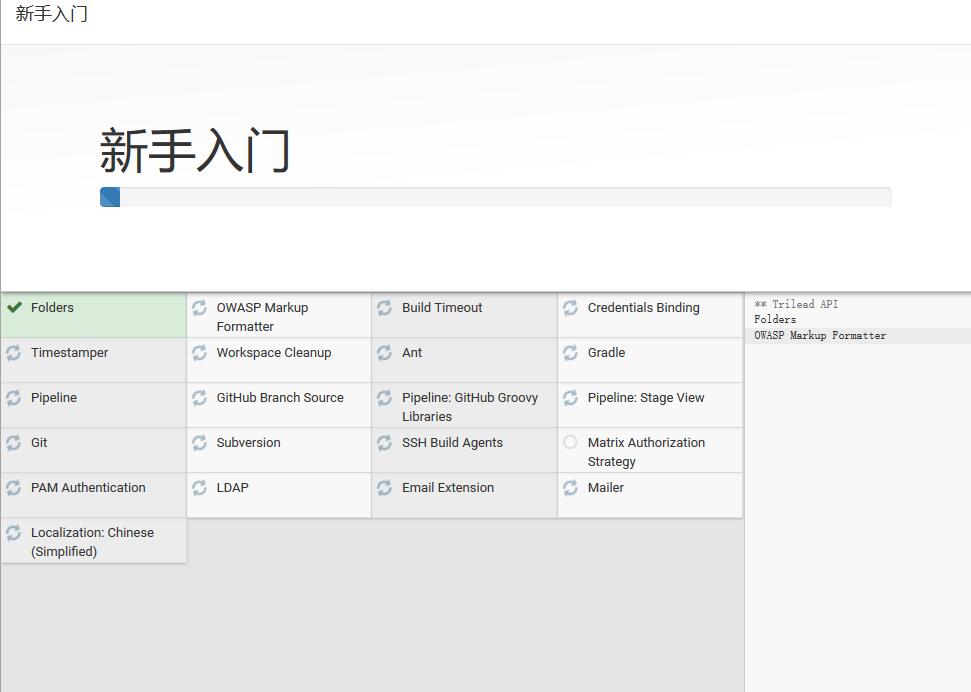
This step may fail to download and can be ignored directly.
2. Install the plug-in
Plug ins to be installed
-
Kubernetes Cli Plugin: this plug-in can be operated directly from the kubernetes command line in Jenkins.
-
Kubernetes plugin: you need to install this plugin to use kubernetes
-
Kubernetes Continuous Deploy Plugin: kubernetes deployment plug-in can be used as needed
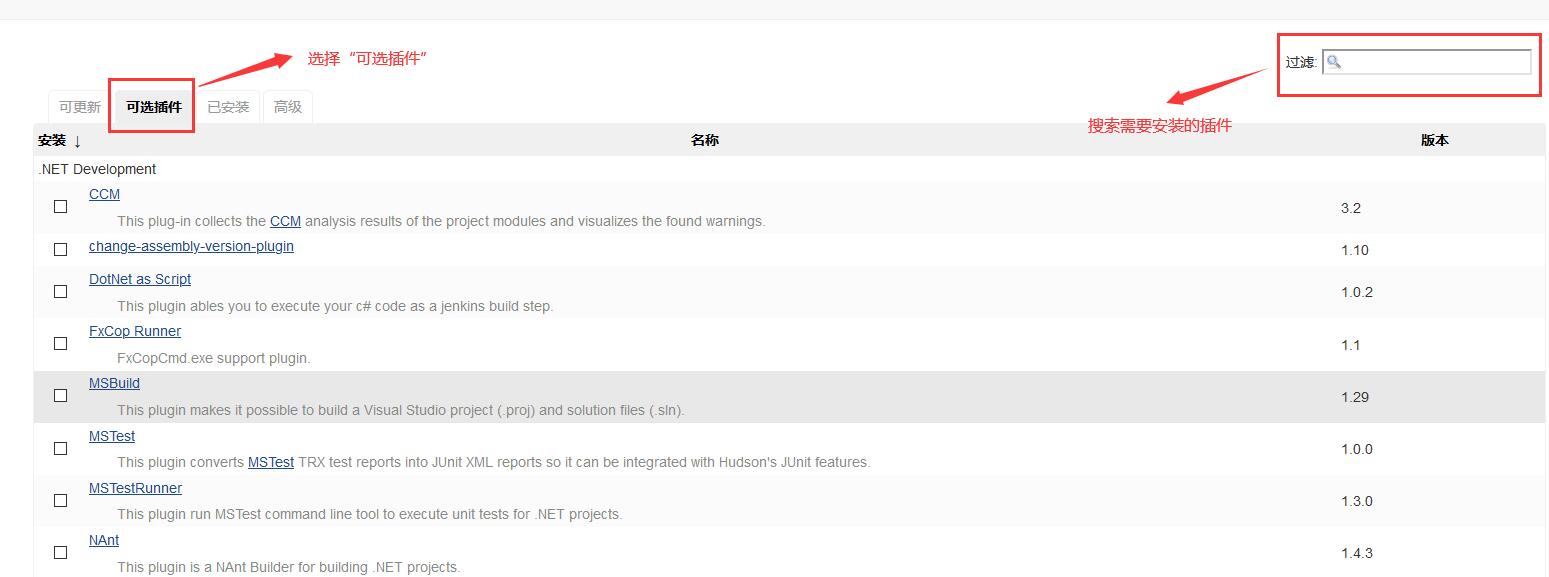
There are more plug-ins to choose from. You can click system management - > management plug-in to manage and add, and install the corresponding Docker plug-in, SSH plug-in and Maven plug-in. Other plug-ins can be installed as needed. As shown in the figure below.

3. Configure Jenkins
(1) Configure JDK and Maven
Configure JDK and Maven in Global Tool Configuration, as shown below, and open the Global Tool Configuration interface.

Next, start configuring JDK and Maven.
Since I installed Maven in / usr/local/maven-3.6.3 directory on the server, it needs to be configured in "Maven configuration", as shown in the following figure.
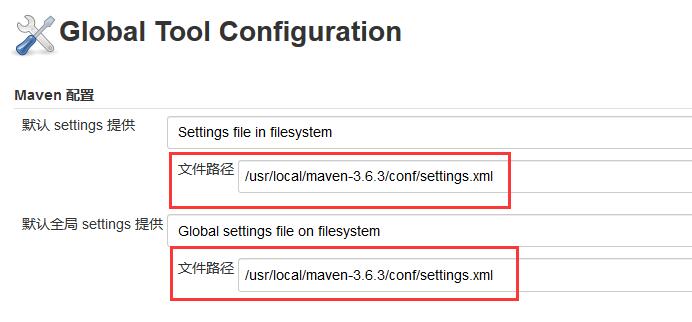
Next, configure the JDK, as shown below.
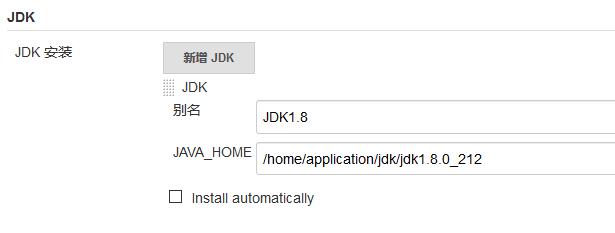
Note: do not check "Install automatically"
Next, configure Maven as shown below.
Note: do not check "Install automatically"
(2) Configure SSH
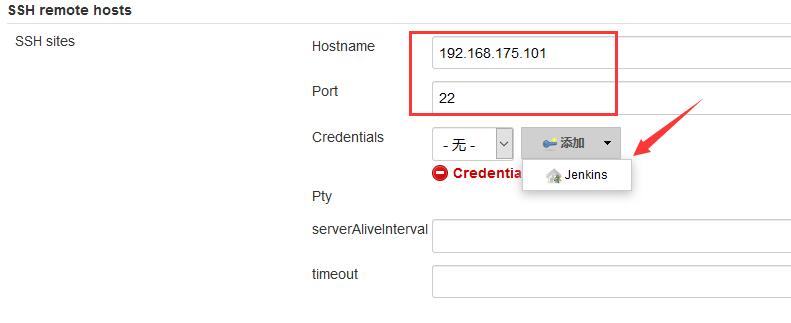
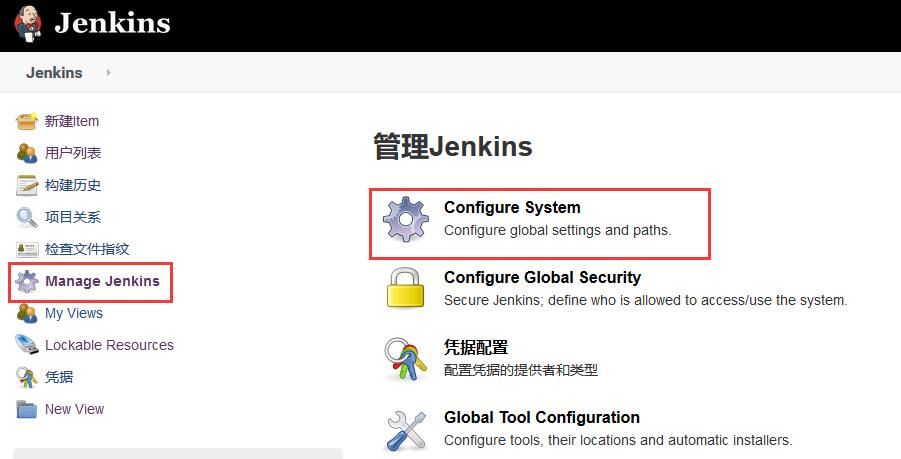
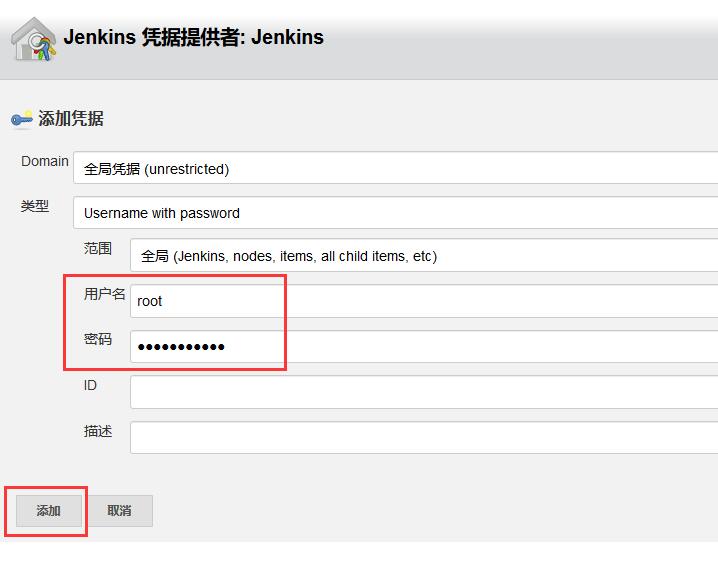
Enter the Configure System interface of Jenkins to configure SSH, as shown below.
Find SSH remote hosts for configuration.

After configuration, click the Check connection button to display successful connection. As shown below.

At this point, the basic configuration of Jenkins is completed.
Jenkins releases Docker project to K8s cluster
1. Adjust the configuration of the SpringBoot project
The POM of the module where the startup class is located in the SpringBoot project XML requires the introduction of configurations packaged as Docker images, as shown below.
  <properties>
  	 	<docker.repostory>192.168.175.101:1180</docker.repostory>
        <docker.registry.name>test</docker.registry.name>
        <docker.image.tag>1.0.0</docker.image.tag>
        <docker.maven.plugin.version>1.4.10</docker.maven.plugin.version>
  </properties>

<build>
  		<finalName>test-starter</finalName>
		<plugins>
            <plugin>
			    <groupId>org.springframework.boot</groupId>
			    <artifactId>spring-boot-maven-plugin</artifactId>
			</plugin>

			<!-- docker of maven Plug in, official website: https://github.com/spotify/docker‐maven‐plugin -->
			<!-- Dockerfile maven plugin -->
			<plugin>
			    <groupId>com.spotify</groupId>
			    <artifactId>dockerfile-maven-plugin</artifactId>
			    <version>${docker.maven.plugin.version}</version>
			    <executions>
			        <execution>
			        <id>default</id>
			        <goals>
			            <!--If package I don't want to use it docker pack,Just comment this out goal-->
			            <goal>build</goal>
			            <goal>push</goal>
			        </goals>
			        </execution>
			    </executions>
			    <configuration>
			    	<contextDirectory>${project.basedir}</contextDirectory>
			        <!-- harbor Warehouse user name and password-->
			        <useMavenSettingsForAuth>useMavenSettingsForAuth>true</useMavenSettingsForAuth>
			        <repository>${docker.repostory}/${docker.registry.name}/${project.artifactId}</repository>
			        <tag>${docker.image.tag}</tag>
			        <buildArgs>
			            <JAR_FILE>target/${project.build.finalName}.jar</JAR_FILE>
			        </buildArgs>
			    </configuration>
			</plugin>

        </plugins>

		<resources>
			<!-- appoint src/main/resources All files and folders under are resource files -->
			<resource>
				<directory>src/main/resources</directory>
				<targetPath>${project.build.directory}/classes</targetPath>
				<includes>
					<include>**/*</include>
				</includes>
				<filtering>true</filtering>
			</resource>
		</resources>
	</build>
Next, create a Dockerfile in the root directory of the module where the SpringBoot startup class is located. The content example is shown below.
#To add a dependent environment, the premise is to pull the Docker image of Java 8 from the official image warehouse, and then upload it to your own Harbor private warehouse
FROM 192.168.175.101:1180/library/java:8
#Specify image author
MAINTAINER binghe
#Run directory
VOLUME /tmp
#Copy local files to container
ADD target/*jar app.jar
#Commands executed automatically after starting the container
ENTRYPOINT [ "java", "-Djava.security.egd=file:/dev/./urandom", "-jar", "/app.jar" ]
Modify according to the actual situation.
Note: the premise of FROM 192.168.175.101:1180/library/java:8 is to execute the following commands.
docker pull java:8
docker tag java:8 192.168.175.101:1180/library/java:8
docker login 192.168.175.101:1180
docker push 192.168.175.101:1180/library/java:8
Create a yaml file in the root directory of the module where the SpringBoot startup class is located, and enter it called test Yaml file, as shown below.
apiVersion: apps/v1
kind: Deployment
metadata:
  name: test-starter
  labels:
    app: test-starter
spec:
  replicas: 1
  selector:
    matchLabels:
      app: test-starter
  template:
    metadata:
      labels:
        app: test-starter
    spec:
      containers:
      - name: test-starter
        image: 192.168.175.101:1180/test/test-starter:1.0.0
        ports:
        - containerPort: 8088
      nodeSelector:
        clustertype: node12

---
apiVersion: v1
kind: Service
metadata:
  name: test-starter
  labels:
    app: test-starter
spec:
  ports:
    - name: http
      port: 8088
      nodePort: 30001
  type: NodePort
  selector:
    app: test-starter
2.Jenkins configuration Release Project
Upload the project to SVN code base, for example, the address is svn://192.168.175.101/test
Next, configure automatic publishing in Jenkins. The steps are as follows.
Click new Item.
Enter description information in the description text box.
Next, configure SVN information.
Note: the steps of configuring GitLab are the same as those of SVN and will not be repeated.
Locate the "build module" of Jenkins and use the Execute Shell to build and publish the project to the K8S cluster.
The commands executed are as follows.
#Deleting the original local image will not affect the image in the Harbor warehouse
docker rmi 192.168.175.101:1180/test/test-starter:1.0.0
#Use Maven to compile and build the Docker image. After execution, the image file will be rebuilt in the local Docker container
/usr/local/maven-3.6.3/bin/mvn -f ./pom.xml clean install -Dmaven.test.skip=true
#Log in to Harbor warehouse
docker login 192.168.175.101:1180 -u binghe -p Binghe123
#Upload image to Harbor warehouse
docker push 192.168.175.101:1180/test/test-starter:1.0.0
#Stop and delete the running in the K8S cluster
/usr/bin/kubectl delete -f test.yaml
#Republish the Docker image to the K8S cluster
/usr/bin/kubectl apply -f test.yaml
Finally, the yaml installation files involved in this article can be obtained through private chat.
It's not easy to be original. Let's give you a one click three connection (like, comment and collection). If you have any questions, you can leave a message at the end of the text for discussion, or send a private letter to me on CSDN. I'll reply to you when I see it. OK, that's all for today. I'm glacier. I'll see you next time~~