Article introduction
Many articles on MySQL master-slave replication on the network explain how to implement and some implementation principles, and lack a comprehensive introduction to MySQL master-slave replication. For example, the mode of master-slave replication (semi synchronous mode and asynchronous synchronous mode), the principle of synchronization (binary log+position, GTID) and the common problems of master-slave replication lack a comprehensive summary.
This paper makes a comprehensive analysis and summary of these parts. The main contents of this paper include the reason, implementation principle, implementation steps, semi synchronous mode, asynchronous synchronous mode, GTID synchronization, common problems and solutions of MySQL master-slave replication.

Mode advantage
Before understanding master-slave replication, let's first understand what master-slave replication is. Simply put, synchronize the database files of a MySQL server to other MySQL services, so that the synchronized MySQL services can also read our data.
Why is there master-slave replication? Here I summarize two reasons:
- Data disaster recovery and backup. When our database only uses one service, if our database is damaged, such as hacker attack, human operation error and so on. At this time, we can ensure the recovery of our database to a certain extent.
If only to prevent the loss of the database, we can back up the data regularly. Why do we have to do master-slave replication? It's not more troublesome. If we only back up the database regularly, we can imagine that if there is a problem in the database at the stage when a backup operation has not been executed, this part of the data in the middle can not be recovered.
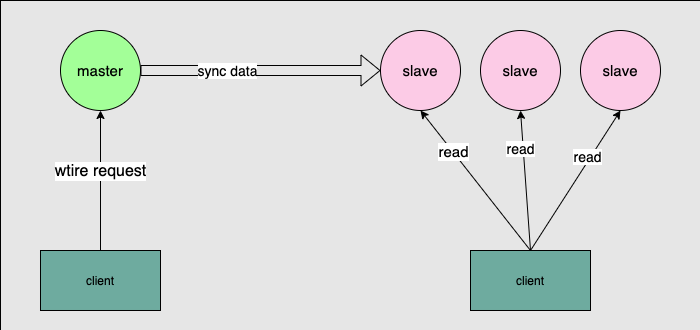
- Relieve the pressure of MySQL main service. When the number of online application users is small, all read and write operations are on one server. At this time, we won't encounter any problems. When the number of users gradually increases and more and more requests to access the database, it increases the burden on the MySQL server, which is easy to lead to service crash and other problems. Therefore, the master-slave replication mode can alleviate the pressure of a single server. Write operations to the master server and read operations to the slave server. Multiple slave servers can be deployed to share the pressure. Because in an application, the read operation must be greater than the write operation.
Implementation principle
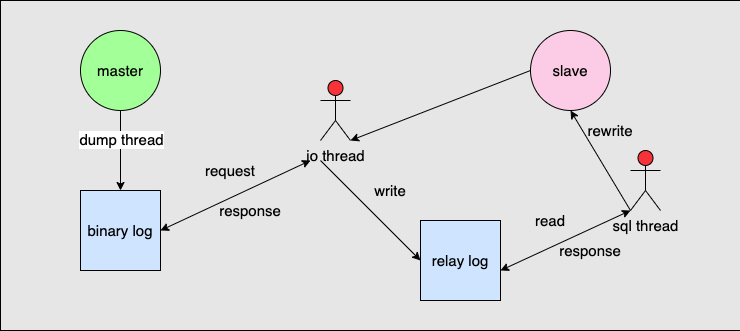
The following figure is a schematic diagram of MySQL master-slave replication:
-
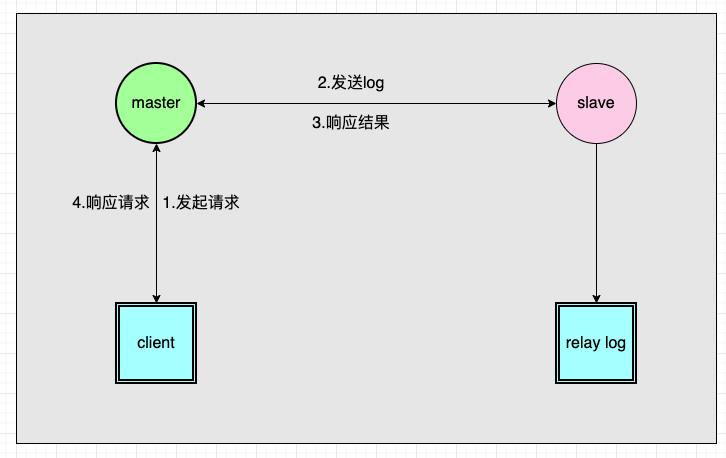
The master server will write SQL records to the binary log through multiple dump threads.
-
The slave server starts an io thread thread to send a request to the server and a binary log to the master server. After receiving the request, the master server sends the new binary log to the slave server according to the offset.
-
After the slave server receives the new binary log, it writes it into its own relay log, which is the so-called relay log.
-
The slave server starts a separate sql thread, reads the relay log, and writes it to its own data.
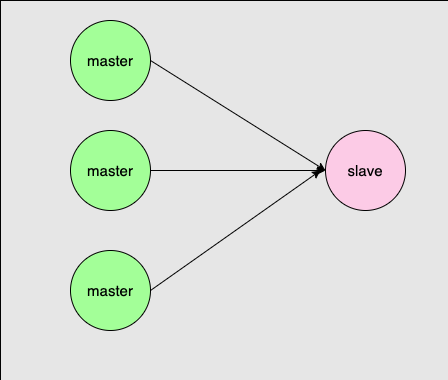
Common mode
There are several common master-slave modes. The specific mode also depends on the actual business needs. Select an appropriate architecture mode according to the actual situation.
- One master and one slave mode.

- One master multi slave mode.

- Cascade master-slave mode.
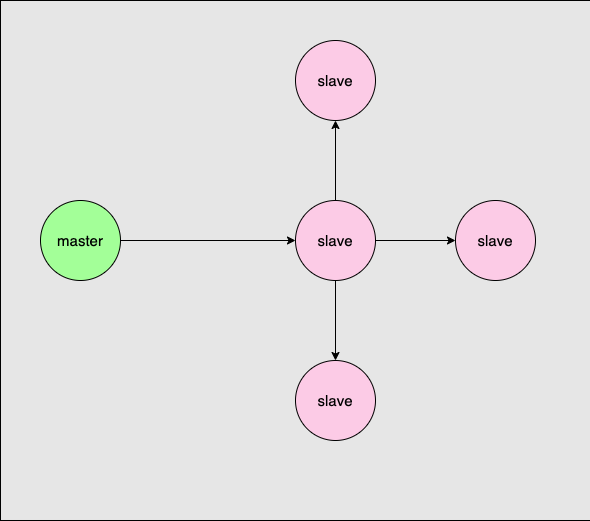
- One master multi slave mode.
Configuration process
In this demonstration, the architecture mode of one master and one slave is adopted.
| role | IP address | Port number | server-id |
|---|---|---|---|
| master | 192.168.0.112 | 3304 | 1 |
| slave | 192.168.0.112 | 3305 | 2 |
To enable master-slave replication, you must first follow the following conditions.
-
Both master and server must have their own server ID, and each server ID cannot be the same.
-
master enable log_bin option. It is recommended to turn on this option from the server.
-
Master enable binlog_format=row option. It is recommended to enable this option from the server and log_slave_updates is also started gradually. Later, if slave is upgraded to master, it is also convenient to expand.
master operation
Add the following configuration to the master configuration file and restart the service to make the configuration take effect.
server_id               = 1
log_bin                 = mysql-bin
binlog_format           = ROW
Next, log in to the master command line operation interface and create a master-slave copy account. Create an account here called slave_user, an account with a password of 123456.
grant replication slave on *.* to 'slave_user'@'%' identified by '123456';
flush privileges;
View the binary log file and position of the master. Record it. It needs to be used later when setting the master node information on the slave.
mysql root@127.0.0.1:(none)> show master status;
+------------------+----------+--------------+------------------+-------------------+
| File             | Position | Binlog_Do_DB | Binlog_Ignore_DB | Executed_Gtid_Set |
+------------------+----------+--------------+------------------+-------------------+
| mysql-bin.000062 | 728      |              |                  |                   |
+------------------+----------+--------------+------------------+-------------------+
1 row in set
Time: 0.011s
slave operation
Add the following configuration items to the slave configuration file and restart the service to make the configuration take effect.
server_id               = 2
log_bin                 = mysql-bin
binlog_format           = ROW
log_slave_updates		= ON
read_only				= ON
super_read_only			= ON
Next, log in to the slave command line operation interface and set the master node information.
change master to master_host='192.168.0.112',master_port=3304,master_user='slave_user',master_password='123456',master_log_file='mysql-bin.000062',master_log_pos=728;
start slave;
stop slave;
-
master_host: the IP address of the master.
-
master_port: the service port of the master.
-
master_user: the master-slave replication user created by the master.
-
master_password: the master-slave copy user password created by the master.
-
master_log_file: the binary log file of the master (the file value obtained by executing show master status on the master above).
-
master_log_pos: the copy offset of the master (the Position value obtained by executing show master status on the master above).
After configuring the information of the master node, the master-slave replication cannot be performed. We need to start the master-slave replication.
Enable master-slave replication
start slave;
Fracture master-slave replication
stop slave;
Reset master-slave replication information
reset slave all;
Effect demonstration
Before configuration, a table is implemented on the master. The table structure is as follows:
CREATE TABLE `mysql_test`.`master_slave_demo`  (
  `id` int(10) UNSIGNED ZEROFILL NOT NULL AUTO_INCREMENT,
  `name` varchar(255) CHARACTER SET utf8mb4 COLLATE utf8mb4_general_ci NOT NULL,
  PRIMARY KEY (`id`) USING BTREE
) ENGINE = InnoDB AUTO_INCREMENT = 10 CHARACTER SET = utf8mb4 COLLATE = utf8mb4_general_ci ROW_FORMAT = Dynamic;
Before configuring master-slave replication, we also create such a table on the slave server. The library name and table name are consistent with the master.
Suppose you have done all these work well. At this time, we insert a piece of data on the master, and then go to the slave to check whether there is new data.
mysql root@127.0.0.1:mysql_test> insert into `master_slave_demo` (`name`) value ('FFFFFF');
Query OK, 1 row affected
Time: 0.016s
mysql root@127.0.0.1:mysql_test> select * from `master_slave_demo`;
+----+--------+
| id | name   |
+----+--------+
| 1  | Zhang San   |
| 2  | Li Si   |
| 3  | Wang Wu   |
| 4  | Zhao Liu   |
| 5  | AA     |
| 6  | BB     |
| 7  | CC     |
| 8  | DD     |
| 9  | EE     |
| 10 | FFFFFF |
+----+--------+
10 rows in set
Time: 0.011s
At this time, log in to the slave to check whether there is new data.
mysql root@127.0.0.1:mysql_test> select * from master_slave_demo;
+----+--------+
| id | name   |
+----+--------+
| 1  | Zhang San   |
| 2  | Li Si   |
| 3  | Wang Wu   |
| 4  | Zhao Liu   |
| 7  | CC     |
| 8  | DD     |
| 9  | EE     |
| 10 | FFFFFF |
+----+--------+
8 rows in set
Time: 0.013s
At this time, it is found that our data has been automatically synchronized, and our master-slave replication has been configured.
This method is not recommended for master-slave replicated database tables, and various problems will be encountered in the actual process. This is just for the purpose of demonstrating a mode adopted in the article. Later, the data backup for MySQL will separately summarize how to operate correctly.
Synchronous mode
The above summarizes the principle of synchronization, the configuration process of synchronization and the actual effect of synchronization. Next, we will further explore the synchronization mode of master-slave replication. Why are there different synchronization modes? This must be because some mode has defects. The default synchronous mode uses asynchronous synchronous mode. In the following example, we will not demonstrate it, but directly demonstrate semi synchronous mode.
Synchronous mode classification
Synchronous mode is mainly divided into asynchronous synchronous mode and semi synchronous mode (there is another GTID mode, which will be explained separately, because it is not based on this simple form of binary + Log). The implementation methods of the two modes are as follows:
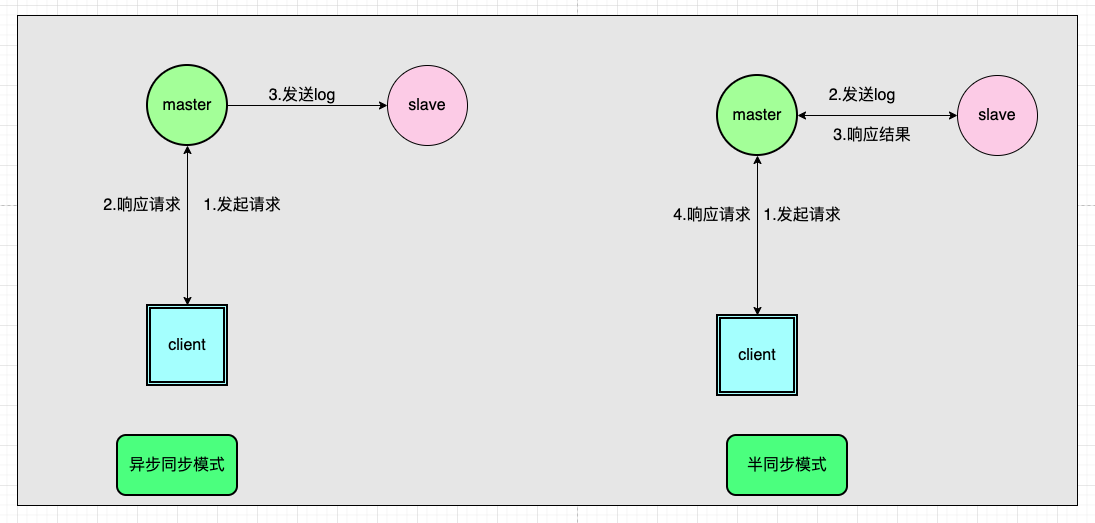
Asynchronous synchronous mode
Asynchronous synchronization mode is MySQL's default synchronization policy mode. After the client sends the request to the server, the master directly returns the client result after processing, and then sends the corresponding log information to the slave node.
The above demonstration steps belong to asynchronous and synchronous mode, so we won't demonstrate again here.
Semi synchronous mode
The biggest difference between semi synchronous mode and asynchronous synchronous mode is
-
After processing its own operations, the master sends the corresponding binary log to the slave server, writes it to the relay log through io thread, and then returns the result to the master. After receiving the response from save, the master returns it to the client.
-
Semi synchronous mode is also based on asynchronous replication. It is just that semi synchronous mode requires the installation of asynchronous plug-ins.
Specific operation flow of semi synchronous mode:
Semi synchronous implementation process
- Check whether dynamic plug-in installation mode is supported.
mysql root@127.0.0.1:(none)> select @@have_dynamic_loading
+------------------------+
| @@have_dynamic_loading |
+------------------------+
| YES                    |
+------------------------+
1 row in set
Time: 0.016s
- Installing the plug-ins corresponding to the master on the master does not necessarily only install the plug-ins corresponding to the master. The plug-ins of slave can also be installed, and the upgrade and downgrade of later services can also be used directly.
mysql root@127.0.0.1:(none)> INSTALL PLUGIN rpl_semi_sync_master SONAME 'semisync_master.so';
Query OK, 0 rows affected
Time: 0.015s
mysql root@127.0.0.1:(none)> show global variables like 'rpl_semi%';
+-------------------------------------------+------------+
| Variable_name                             | Value      |
+-------------------------------------------+------------+
| rpl_semi_sync_master_enabled              | OFF        |
| rpl_semi_sync_master_timeout              | 10000      |
| rpl_semi_sync_master_trace_level          | 32         |
| rpl_semi_sync_master_wait_for_slave_count | 1          |
| rpl_semi_sync_master_wait_no_slave        | ON         |
| rpl_semi_sync_master_wait_point           | AFTER_SYNC |
+-------------------------------------------+------------+
6 rows in set
Time: 0.015s
- Install the plug-in corresponding to the slave in the slave. Similarly, you can also install the plug-in corresponding to the master.
mysql root@127.0.0.1:(none)> INSTALL PLUGIN rpl_semi_sync_slave SONAME 'semisync_slave.so';
Query OK, 0 rows affected
Time: 0.006s
mysql root@127.0.0.1:(none)> show global variables like 'rpl_semi%';
+-------------------------------------------+------------+
| Variable_name                             | Value      |
+-------------------------------------------+------------+
| rpl_semi_sync_master_enabled              | OFF        |
| rpl_semi_sync_master_timeout              | 10000      |
| rpl_semi_sync_master_trace_level          | 32         |
| rpl_semi_sync_master_wait_for_slave_count | 1          |
| rpl_semi_sync_master_wait_no_slave        | ON         |
| rpl_semi_sync_master_wait_point           | AFTER_SYNC |
| rpl_semi_sync_slave_enabled               | OFF        |
| rpl_semi_sync_slave_trace_level           | 32         |
+-------------------------------------------+------------+
8 rows in set
Time: 0.012s
- Both the master server and the slave server enable the master-slave replication plug-in function.
mysql root@127.0.0.1:(none)> set global rpl_semi_sync_master_enabled=ON;
Query OK, 0 rows affected
Time: 0.004s
mysql root@127.0.0.1:(none)> set global rpl_semi_sync_slave_enabled=ON;
Query OK, 0 rows affected
Time: 0.002s
mysql root@127.0.0.1:(none)> show global variables like 'rpl_semi%';
+-------------------------------------------+------------+
| Variable_name                             | Value      |
+-------------------------------------------+------------+
| rpl_semi_sync_master_enabled              | ON         |
| rpl_semi_sync_master_timeout              | 10000      |
| rpl_semi_sync_master_trace_level          | 32         |
| rpl_semi_sync_master_wait_for_slave_count | 1          |
| rpl_semi_sync_master_wait_no_slave        | ON         |
| rpl_semi_sync_master_wait_point           | AFTER_SYNC |
| rpl_semi_sync_slave_enabled               | ON         |
| rpl_semi_sync_slave_trace_level           | 32         |
+-------------------------------------------+------------+
8 rows in set
Time: 0.013s
- The salve node is in semi synchronous replication mode.
stop slave io_thread;
start slave io_thread;
In this step, the step of configuring the master-slave relationship is omitted, because a master-slave replication relationship has been established during the demonstration of master-slave replication above, and the semi synchronous mode is also based on the asynchronous synchronous mode, so you only need to follow the above process of master-slave replication.
- View the slave information on the master.
mysql root@127.0.0.1:(none)> show global status like '%semi%';
+--------------------------------------------+-------+
| Variable_name                              | Value |
+--------------------------------------------+-------+
| Rpl_semi_sync_master_clients               | 1     |
| Rpl_semi_sync_master_status                | ON    |
+--------------------------------------------+-------+
15 rows in set
Time: 0.011s
Here we see RPL_ semi_ sync_ master_ If there is a node with clients = 1, then there is a node with clients = 1.
- detection result
Through the above configuration, the semi synchronous mode has been completed. You can directly operate the data on the master, and the slave node can synchronize the data normally.
Summary of semi synchronization problems
- slave node responds to master delay.
After the master sends the binary log to the slave node, it needs to wait for the response from the slave. Sometimes the slave node may respond very slowly and the master cannot wait all the time, which will lead to the timeout of the client request. You can set it through the following parameters.
The unit of this parameter is milliseconds. The default is 10 seconds. It is recommended to set it larger. Because after timeout, the master will automatically switch to asynchronous replication.
rpl_semi_sync_master_timeout
- Semi synchronous mode automatically changes to asynchronous synchronous mode.
As mentioned in face-to-face 1, if the timeout occurs, the semi synchronous mode will automatically switch to asynchronous replication mode. Therefore, you can set this parameter.
- The master receives the number of slave nodes and responds to the client.
When the master needs to send the binary log to multiple slave nodes, if there are multiple slave nodes, the master must wait for the slave to respond one by one before replying to the client. This is also a particularly time-consuming process, which can be set through the following parameters.
The meaning of this parameter is that as long as the master receives the response of n slave, it can return to the client. The default is 1.
rpl_semi_sync_master_wait_for_slave_count
- How to switch to semi synchronous mode after semi synchronous mode is automatically switched to asynchronous mode.
At this time, the mode needs to be switched manually. Is to turn off io_thread, turn on Io again_ thread.
start slave io_thread;
Semi synchronous consistency
Semi synchronous replication mode greatly improves the consistency of master-slave replication. At the same time, on mysql5 The 7 + version adds another parameter to make the consistency of replication more reliable. This parameter is rpl_semi_sync_master_wait_point, which needs to be executed on the master.
set global rpl_semi_sync_master_wait_point = 'x';
This parameter has two values. One value is AFTER_SYNC, one value is AFTER_COMMIT. The default is AFTER_SYNC.
- AFTER_SYNC
After the master writes the transaction to the binary log, it sends it to the slave. At the same time, the transactions of the master will be submitted automatically. After the slave responds, the master then responds to the client information.
- AFTER_SYNC
After the master writes the transaction to the binary log, it sends it to the slave. Wait for the slave response before committing the master transaction, and then respond to the client information.
Comparison between the two
-
Asynchronous synchronous mode is to directly return to the client to deal with the problem of slave. If the master responds to the success message to the client, the service will hang up when dealing with the problem of slave. At this time, there will be data inconsistency.
-
In the semi synchronous mode, you need to wait for the slave node to respond before the master responds to the client. If the salve response is slow, the waiting time of the client will be long.
-
In the semi synchronous mode, the master waits for the slave response before responding to the client. This method greatly ensures the data consistency and provides a more reliable guarantee for the data consistency of master-slave replication. This method is also recommended for master-slave replication.
GTID synchronization
What is GTID synchronization
GTID is a global transaction ID, which is a transaction that has been committed on the master. Slave directly performs replication operations based on this ID. This operation replaces binary log + position. This makes the configuration operation of master-slave replication easier.
This mode requires MySQL > = 5.6.
GTID component
Gtid = server ID + transaction ID. Server ID is not the ID in MySQL configuration file, but a globally random and unique ID will be generated when each MySQL service is started. Transaction ID is the ID of the transaction. When a transaction is created, an ID will be automatically generated.
Configuration process
- Add the following configuration to the master configuration file.
server_id               = 1
log_bin                 = ON
binlog_format           = ROW
gtid_mode				= ON
enforce_gtid_consistency = ON
- The following configuration is added to the slave configuration file.
server_id               = 2
log_bin                 = mysql-bin
binlog_format           = ROW
gtid_mode				= ON
enforce_gtid_consistency = ON
log_slave_updates		= ON
- After configuration, be sure to restart the master and save services. After restarting, log in to the master and use show master status; Check the GTID. You will see the following information.
mysql root@127.0.0.1:(none)> show master status;
+-----------+----------+--------------+------------------+------------------------------------------+
| File      | Position | Binlog_Do_DB | Binlog_Ignore_DB | Executed_Gtid_Set                        |
+-----------+----------+--------------+------------------+------------------------------------------+
| ON.000005 | 729      |              |                  | a9cf78c4-257f-11eb-94e0-0242ac120007:1-2 |
+-----------+----------+--------------+------------------+------------------------------------------+
1 row in set
Time: 0.011s
- The slave service establishes a connection relationship. The following operations are performed on the slave node.
# Reset all replication relationships.
mysql root@127.0.0.1:(none)> reset slave all;
Query OK, 0 rows affected
Time: 0.056s


# Check the master-slave replication status and find that there is no information, it indicates that the reset is successful.
mysql root@127.0.0.1:(none)> show slave status\G;
0 rows in set
Time: 0.005s


# Set master information.
change master to master_host='192.168.0.112',master_port=3304,master_user='slave_user',master_password='123456',master_auto_position=1;
Query OK, 0 rows affected
Time: 0.048s


# Start replication.
start slave;
mysql root@127.0.0.1:(none)> start slave;
Query OK, 0 rows affected
Time: 0.007s


# View replication status.
mysql root@127.0.0.1:(none)> stop slave io_thread;
***************************[ 1. row ]***************************
Slave_IO_State                | Waiting for master to send event
Master_Host                   | 192.168.0.112
Master_User                   | slave_user
Master_Port                   | 3304
Connect_Retry                 | 60
Master_Log_File               | ON.000005
Read_Master_Log_Pos           | 729
Relay_Log_File                | aa7863c59748-relay-bin.000002
Relay_Log_Pos                 | 928
Relay_Master_Log_File         | ON.000005
Slave_IO_Running              | Yes
Slave_SQL_Running             | Yes
Replicate_Do_DB               |
..........
- If you need test results, you can directly insert data into the master to see whether the slave data has changed.
Article summary
Through the above demonstration, you have basically mastered the principle and configuration process of master-slave replication. There are still many details about master-slave replication, which will be updated in the future due to the length problem.
Focus on PHP, MySQL, Linux and front-end development. Thank you for your attention!!! The article is arranged in GitHub , mainly including relevant theoretical knowledge, interview questions and practical content such as PHP, Redis, MySQL, JavaScript, HTML & CSS, Linux, Java, Golang, Linux and tool resources.