**
1, NVIDIA Xavier under ARM architecture switches domestic sources
**
Do not change the software source of AMD architecture PC platform here, but the source used by supporting ARM.
- First, back up the previous source list
sudo cp /etc/apt/sources.list /etc/apt/sources.list.backup
- Modify source list
Tsinghua source is recommended here, and Xavier's corresponding system is 18.04(bionic)
deb http://mirrors.tuna.tsinghua.edu.cn/ubuntu-ports/ bionic-updates main restricted universe multiverse
deb-src http://mirrors.tuna.tsinghua.edu.cn/ubuntu-ports/ bionic-updates main restricted universe multiverse
deb http://mirrors.tuna.tsinghua.edu.cn/ubuntu-ports/ bionic-security main restricted universe multiverse
deb-src http://mirrors.tuna.tsinghua.edu.cn/ubuntu-ports/ bionic-security main restricted universe multiverse
deb http://mirrors.tuna.tsinghua.edu.cn/ubuntu-ports/ bionic-backports main restricted universe multiverse
deb-src http://mirrors.tuna.tsinghua.edu.cn/ubuntu-ports/ bionic-backports main restricted universe multiverse
deb http://mirrors.tuna.tsinghua.edu.cn/ubuntu-ports/ bionic main universe restricted
deb-src http://mirrors.tuna.tsinghua.edu.cn/ubuntu-ports/ bionic main universe restricted
Save the source list
- to update
sudo apt update
**
2, ROS melody version installation
**
- Replace ROS source
The source instructions for adding ROS official website are as follows:
sudo sh -c 'echo "deb http://packages.ros.org/ros/ubuntu $(lsb_release -sc) main" > /etc/apt/sources.list.d/ros-latest.list'
However, the download speed of the source on the official website is too slow. It is recommended to replace Tsinghua source or university of science and technology source. I personally recommend Tsinghua source.
Tsinghua source
sudo sh -c '. /etc/lsb-release && echo "deb http://mirrors.tuna.tsinghua.edu.cn/ros/ubuntu/ $DISTRIB_CODENAME main" > /etc/apt/sources.list.d/ros-latest.list'
China University of science and technology
sudo sh -c '. /etc/lsb-release && echo "deb http://mirrors.ustc.edu.cn/ros/ubuntu/ $DISTRIB_CODENAME main" > /etc/apt/sources.list.d/ros-latest.list'
If you want to replace other sources, you can directly enter the instruction of the source you want to replace.
- Set secret key
sudo apt-key adv --keyserver 'hkp://keyserver.ubuntu.com:80' --recv-key C1CF6E31E6BADE8868B172B4F42ED6FBAB17C654
If the above setting fails, you can use the following alternative secret key, as long as one of the two can be executed successfully.
sudo apt-key adv --keyserver 'hkp://pgp.mit.edu:80' --recv-key C1CF6E31E6BADE8868B172B4F42ED6FBAB17C654
- ROS installation
First, update the software source sudo apt get update
Next, install the desktop full version of ROS sudo apt get install ROS melody desktop full
Waiting ing
- Initialize ROS
Rosdep is a built-in tool in ROS. Its main function is to install system dependencies for some function installation packages, and it is also a tool that must be used by some ROS core function packages. If you are prompted that the command rosdep cannot be found, execute:
sudo apt install rospack-tools
Next, execute the command to initialize and update ROS
sudo rosdep init
rosdep update
There are many update failures here. The best solution is to surf the Internet scientifically, followed by the mobile phone hot spot, and the computer connects the mobile phone hot spot for update. I summarized several solutions to errors.
The first is sudo rosdep init error. The most common is:
ERROR: cannot download default sources list from:
https://raw.githubusercontent.com/ros/rosdistro/master/rosdep/sources.list.d/20-default.list
Website may be down
resolvent:
open hosts file
sudo gedit /etc/hosts
#Add at the end of the file
199.232.68.133 raw.githubusercontent.com
#Exit after saving and try again
This ip address may change at any time, so log in to IPAddress as a precaution COM, enter raw githubusercontent. Com to find the optimal ip address and change it to this ip address
Then execute sudo GEDIT / etc / resolv Conf, annotate the original nameserver line and add the following two lines:
nameserver 8.8.8.8 #google domain name server
nameserver 8.8.4.4 #google domain name server
If sudo apt get update is executed first and then sudo rosdep init is executed, there will be an error that the file already exists
ERROR: default sources list file already exists: /etc/ros/rosdep/sources.list.d/20-default.list
Please delete if you wish to re-initialize
Just delete this file sudo RM / etc / ROS / rosdep / sources list. d/20-default. List and then execute sudo rosdep init. If the initialization is not successful, it will occur several times
wrote /etc/ros/rosdep/sources.list.d/20-default.list
Recommended: please run
rosdep update
Then execute rosdep update, which will also report errors. Most of them are caused by timeout or network (perfect solution for scientific Internet access). The frequent errors are as follows:
reading in sources list data from /etc/ros/rosdep/sources.list.d
Hit http://github.com/ros/rosdistro/raw/master/rosdep/osx-homebrew.yaml

ERROR: unable to process source [http://github.com/ros/rosdistro/raw/master/rosdep/base.yaml]:

<urlopen error _ssl.c:489: The handshake operation timed out> (http://github.com/ros/rosdistro/raw/master/rosdep/base.yaml)

ERROR: error loading sources list:
    The read operation timed out
resolvent:
Change / usr / lib / python2 Three files under 7 / dist packages / rosdep2 /_ list. py,gbpdistro_support.py,rep3. The value in py can be increased a little. Here I change it to 100. Execute the following three instructions:
sudo vim /usr/lib/python2.7/dist-packages/rosdep2/sources_list.py
sudo vim /usr/lib/python2.7/dist-packages/rosdep2/gbpdistro_support.py
sudo vim /usr/lib/python2.7/dist-packages/rosdep2/rep3.py
Find download through the search function_ Timeout = 15.0 modify the value and save it.
Execute rosdep update several more times.
If it doesn't work (this means that it has been implemented all afternoon, hahaha), there is a less recommended solution below, which is to directly download the file and replace it locally. You can directly skip the Hit process and connect the local file.
The file download address is github.com
The reference connection of this method is https://blog.csdn.net/super_sean/article/details/105433250 The steps are very detailed.
- Add ros environment variable
echo "source /opt/ros/melodic/setup.bash" >> ~/.bashrc
source ~/.bashrc
rosinstall is also a common tool in ROS. You can download and install the function package program in ROS
sudo apt-get install python-rosinstall python-rosinstall-generator python-wstool build-essential
- Run the example of little turtle to see if ROS is successfully installed
roscore

rosrun turtlesim turtlesim_node

rosrun turtlesim turtle_teleop_key
**
3, Lidar + A-loam to obtain point cloud image
**
- The laser radar adopts Suteng juchuang 16 line laser radar
First install Libpcap dev:
sudo apt-get install libpcap-dev
Then create the ROS working directory and clone the routine into the workspace for compilation
cd ~
mkdir -p catkin_ws/src
cd ~/catkin_ws/src
git clone https://github.com/RoboSense-LiDAR/ros_rslidar
cd ~/catkin_ws
catkin_make
-
A-loam
Routine link is https://github.com/HKUST-Aerial-Robotics/A-LOAM.git
Also put it into the workspace for compilation. -
Next, I'll mainly talk about the problems I encountered when compiling these two packages. I can't remember the wrong order clearly.
Error 1: Project 'CV'_ bridge‘ specifies ‘/usr/include/opencv‘ as an include dir, which is not found
CMake Error at /opt/ros/melodic/share/cv_bridge/cmake/cv_bridgeConfig.cmake:113 (message):
  Project 'cv_bridge' specifies '/usr/include/opencv' as an include dir,
  which is not found.  It does neither exist as an absolute directory nor in
  '/opt/ros/melodic//usr/include/opencv'.  Check the issue tracker
  'https://github.com/ros-perception/vision_opencv/issues' and consider
  creating a ticket if the problem has not been reported yet.
Call Stack (most recent call first):
  /opt/ros/melodic/share/catkin/cmake/catkinConfig.cmake:76 (find_package)
  open_quadtree_mapping/CMakeLists.txt:24 (find_package)
The opencv version we installed should be opencv4. The reason for the error is' / usr/include/opencv ', so we only need to change the location to / usr/include/opencv4, and execute the following instructions:
sudo gedit /opt/ros/melodic/share/cv_bridge/cmake/cv_bridgeConfig.cmake
Change behavior 96 / usr/include/opencv4
Original link: https://blog.csdn.net/weixin_42587961/article/details/107666708
Error 2: fatal error: pcap h: No such file or directory
When compiling, it is found that there is no pcap H header file go to this website to download the libpcap compressed package
http://www.tcpdump.org/#latest-release
Then decompress the cd libpcap-1.9.0 and execute the following instructions:
cd libpcap-1.9.0
./configure
Then put pcap in libcap-1.9.1/pcap / Copy the H file to / usr/include /
sudo cp pcap.h /usr/include/
Original link: https://blog.csdn.net/wuyou1995/article/details/104742424
Error 3: Opencv4 CV_LOAD_IMAGE_GRAYSCALE could not find a solution
Original link: https://blog.csdn.net/Bixiwen_liu/article/details/107345635
Error 4: the biggest and most troublesome error -- lack of ceres library and lack of glog when compiling ceresku
The packages to be downloaded are as follows:

ceres package download link github.com
Google test package download link github.com
gflags package download link github.com
glog package download link github.com
The compilation order of these four packages is Google test, gflags, glog and ceres.
The compilation instruction is
mkdir build
cd build
cmake ..
make -j4
sudo make install
Among them, Google test can be compiled normally. The compilation reference of gflags and glog packages is as follows: https://blog.csdn.net/yuchunhai321/article/details/87428994?utm_medium=distribute.pc_relevant.none-task-blog-baidujs_utm_term-3&spm=1001.2101.3001.4242
After the above three packages have been compiled successfully, compile the ceres package. After the ceres package is compiled successfully, recompile the A-Loam and lidar packages we want to use above. There should be no error.
- Get point cloud
First, configure the radar to be in the same network segment as your equipment. The default ip address of lidar is 192.168.1.200, and the equipment ip address is 192.168.1.102. See the link of the original text for the specific steps of configuring the equipment
https://blog.csdn.net/a1034214328/article/details/107024456
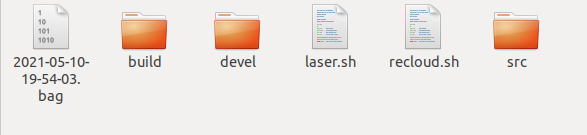
After the equipment and lidar are configured, the point cloud can be recorded. Write an example here It is more convenient for sh script to call two packages at the same time.
The specific operation instructions are:
roslaunch rslidar_pointcloud rs_lidar_16.launch
roslaunch aloam_velodyne aloam_velodyne_VLP_16.launch
To save point cloud data, run:
rosbag record /rslidar_points
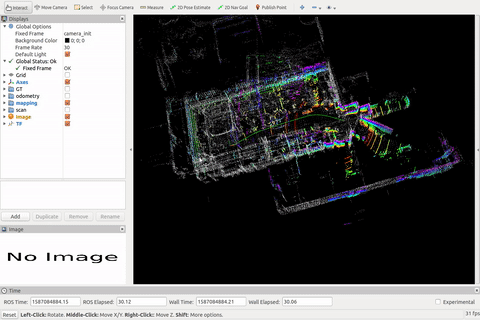
This instruction will record all the point cloud data you get and save it to the folder where you run the script. To reproduce the point cloud data, you need to run ROS first, then read the point cloud data package and run A-Loam. You can see the three bitmaps of point cloud reconstruction. The instructions are as follows:
roscore
rosbag play  bagname
roslaunch aloam_velodyne aloam_velodyne_VLP_16.launch
design sketch