1, Objectives and requirements of final assignment:
1. Garbage classification interface
Please try to simulate the functions of the following garbage classification APP, that is, refer to the following interface display forms and function modules.
2. Specific requirements
Simulate the garbage classification APP shown in Figure 1, introduce some knowledge points related to garbage classification and recycling, and provide corresponding services:
1) Some functions included in the proposal: conversion and data transfer between activities; Can adapt to different display interfaces; It has login function and forced offline function; Data has diversified persistence functions; Be able to provide and share data across programs; It has the function of displaying some multimedia;
2) Better realize some mature functions introduced in books, and better integrate these functions into a complete and bug free APP;
3) Be able to build their own report highlights on this basis, such as realizing different functional modules of books, finding some new application scenarios for a certain knowledge point, or solving some common problems of students;
4) The simulated APP is not limited to the functions of the referenced APP, that is, try to simulate these functions without realizing each function. If a function cannot reflect the learned knowledge, it can be ignored. Of course, if you can find a way to realize it, it can be used as a highlight of the report; That is, it does not have to be exactly the same as these functions, but can be modified on the basis of these functions to achieve similar effects; Some functions that the APP does not have can be designed, and the implementation mode and potential use of these functions can be clearly explained; At the same time, the layout design does not have to be exactly the same as the reference APP, and can be adjusted appropriately according to your own needs;
5) The overall goal is to make flexible use of the knowledge points learned, enrich various implementation methods of each function (for example, the three implementation methods of data persistence can be reflected in APP), and reflect the advantages and disadvantages of different implementation methods. If they can be reflected in app, it will be better;
3. Partial references
1) Function realization reference: refer to the knowledge points of Data Persistence technology in Chapter 6 as far as possible in the third column of Figure 1; Columns 1 and 4 try to refer to the layout and jump between activities, the realization of fragments and the function of multimedia display; Column 5 can use Data Persistence technology;
2) Potential extended functions: in column 1 of Figure 1, try to refer to and make use of Android location-based services, such as finding the nearest garbage placement point according to the user's location; Add a small function to integrate the application of network technology, that is, separate the text and picture website in an HTML web page file, and keep the text and picture in different folders; Use the function of data background download;
3) Chapter 12 can make your APP interface more beautiful; Chapter 14 shows a large-scale project, which can learn how to embody multiple functions in one project;
4. Other requirements
1) The APP to be constructed should be neat and beautiful;
2) Function description, screenshot image and detailed description of experimental results are required in the experimental report; The results should be displayed concretely and explained cross graphically; Code and text should be highlighted;
3) You are also welcome to use the knowledge points in the subsequent chapters of the course to complete this assignment. If the functions realized are reasonable, you will consider adding points as appropriate;
4) Each student needs to report on stage in the last class, and it is best to demonstrate the function of APP on site. The scores of students who do not report on stage will be affected to some extent;
5) The report is completed independently by individuals.
###5. Scoring criteria
- The APP protocol has a high degree of completion, has a certain similarity with the reference APP, and has perfect and rich functions. It can realize the compilation of activities, the development of user-defined interface, fragment development, broadcasting mechanism, data persistence and sharing technology, network technology, the application of background services, etc------------- (60 points)
- The simulated APP has reasonable structure, standard code, beautiful and easy-to-use interface. The project report is written in a standard, beautiful and neat manner, with detailed contents, and can be prepared to describe the project content and design idea, principle, framework, etc. the project report requires No. 5 characters, and the length of A4 page is not less than 10 pages except the first two pages------------- (15 points)
- Provide program source code and executable program (or installation program); The report document adopts a separate word document. All codes of the project (not the whole project document, which should be no more than 5M in total) shall be packaged as attachments and uploaded to the blackboard system before the 17th week; Submit the paper version to the teacher------------- (10 points)
- The project report can describe the project content in detail and accurately, and has a good display effect in the last class.
-------------(15 points)
2, Experimental process, code and results
1. Construction process and results of "my garbage classification APP"
(1) Implementation of startup page
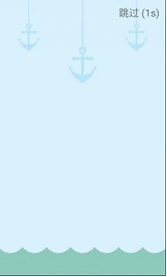
First, create a new activity StartActivity and write the fragment file frag_start.xml, the relative layout RelativeLayout is adopted in the fragment layout. The fragment contains only one TextView control, and layout is used_ Alignparenttop and layout_ Align parentright displays it in the upper right corner of the screen and sets the text "skip (3s)" to use layout_margin controls the distance between edges for beauty.
<?xml version="1.0" encoding="utf-8"?>
<RelativeLayout
    xmlns:android="http://schemas.android.com/apk/res/android"
    android:layout_width="match_parent"
    android:layout_height="match_parent">

    <TextView
        android:id="@+id/skip"
        android:layout_width="wrap_content"
        android:layout_height="wrap_content"
        android:layout_alignParentTop="true"
        android:layout_alignParentRight="true"
        android:text="skip (3s)"
        android:textSize="25dp"
        android:layout_margin="15dp" />

</RelativeLayout>
Create a new file StartFragment as the fragment adapter and load it in onCreateView.
public class StartFragment extends Fragment {

    @Override
    public View onCreateView(LayoutInflater inflater, ViewGroup container, Bundle savedInstanceState) {
        View view = inflater.inflate(R.layout.frag_start, container, false);
        return view;
    }
}
Create a new folder layout-sw600dp as the fragment folder of the tablet, and write activities in the layout folder and this folder_ Start to include the fragments.
<?xml version="1.0" encoding="utf-8"?>
<LinearLayout
    xmlns:android="http://schemas.android.com/apk/res/android"
    android:layout_width="match_parent"
    android:layout_height="match_parent"
    android:background="@drawable/welcome_small">

    <fragment
        android:id="@+id/start_fragment"
        android:layout_width="match_parent"
        android:layout_height="match_parent"
        android:name="com.example.refuseclassification.StartFragment" />

</LinearLayout>
<?xml version="1.0" encoding="utf-8"?>
<LinearLayout
    xmlns:android="http://schemas.android.com/apk/res/android"
    android:layout_width="match_parent"
    android:layout_height="match_parent"
    android:background="@drawable/welcome_large">

    <fragment
        android:id="@+id/start_fragment"
        android:layout_width="match_parent"
        android:layout_height="match_parent"
        android:name="com.example.refuseclassification.StartFragment" />

</LinearLayout>
You can see the activity of mobile phones and tablets_ Start directly uses the fragment file just written and loads pictures of corresponding size. Because of the screen size, a picture cannot fit the tablet and mobile phone at the same time, which will cause the picture to be compressed or stretched, making the welcome interface very ugly. Therefore, different photos are loaded into the layout file for different screen sizes.
Then write startactivity java. First, define the TextView object skip, which is used to obtain the TextView instance of the welcome interface later, then set the countdown to 3s, define the handler and thread runnable for processing information, and define the timer.
First, write the task class TimerTask and create a new thread in the task for timing. The reason for this is to prevent thread blocking. The main thread is used to update the UI display, and the sub thread is used for timing. Finally, update the skip. When the countdown is 0, hide the font of the skip.
public class StartActivity extends BaseActivity implements View.OnClickListener{

    private TextView skip;
    private int TIME = 3;
    private Handler handler;
    private Runnable runnable;
    Timer timer = new Timer();

    TimerTask task = new TimerTask() {
        @Override
        public void run() {
            runOnUiThread(new Runnable() {
                @Override
                public void run() {
                    TIME--;
                    skip.setText("skip " + "(" + TIME + "s)");
                    if (TIME < 0) {
                        // Hide font when less than 0
                        timer.cancel();
                        skip.setVisibility(View.GONE);
                    }
                }
            });
        }
    };
Then write the onCreate method of the activity. First, hide the title bar through the following statement to ensure the full screen display of the welcome page.
getWindow().addFlags(WindowManager.LayoutParams.FLAG_FULLSCREEN);
Then get the TextView instance and set the listener of the click event. Then use timer, a timer tool, to execute the task defined above, and execute the task every 1s. We use handler to implement the timer. When the timer is over, it will jump to the login interface after 2s.
    @Override
    protected void onCreate(Bundle savedInstanceState) {
        super.onCreate(savedInstanceState);
        // Remove the app title bar
        getWindow().addFlags(WindowManager.LayoutParams.FLAG_FULLSCREEN);
        setContentView(R.layout.activity_start);

        skip = findViewById(R.id.skip);
        skip.setOnClickListener(this);// Set click skip

        timer.schedule(task, 1000, 1000);// Waiting time 1s, pause time 1s
        // Set skip without clicking
        handler = new Handler();
        handler.postDelayed(runnable = new Runnable() {
            @Override
            public void run() {
                //Jump from the flash screen interface to the first interface
                Intent intent = new Intent(StartActivity.this, LoginActivity.class);
                startActivity(intent);
                finish();
            }
        }, 5000);//Send handler information after 5S delay
    }
Finally, the click event of TextView is realized. Use the switch... case... Statement to judge the id of the clicked View. If it is skip, jump to the login interface, and then end the runnable thread.
    @Override
    public void onClick(View view) {
        switch (view.getId()) {
            case R.id.skip:
                // Jump to login page
                Intent intent = new Intent(StartActivity.this, LoginActivity.class);
                startActivity(intent);
                finish();
                if (runnable != null) {
                    handler.removeCallbacks(runnable);
                }
                break;
            default:
                break;
        }
    }
}
Finally, change the start activity to StartActivity in Manifest.
        <activity android:name=".StartActivity">
            <intent-filter>
                <action android:name="android.intent.action.MAIN" />

                <category android:name="android.intent.category.LAUNCHER" />
            </intent-filter>
        </activity>
The results are shown in the figure. Just look for one picture on the Internet.

(2) Login interface
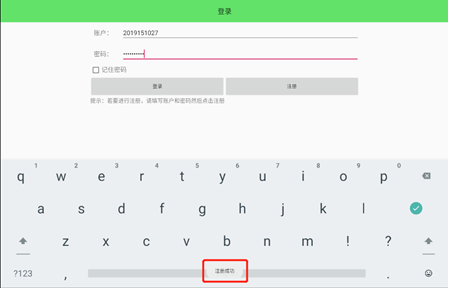
Create a new activity LoginActivity and write a fragment activity frag_login.xml. The interface is generally a LinearLayout layout, which includes four laterally distributed linearlayouts. The first two layouts contain a TextView and an EditText, which are used to set the input account and password; The third layout sets the option to remember the password; The last one sets two buttons, one for login and one for registration; Finally, add a prompt so that users can register in the correct way.
<?xml version="1.0" encoding="utf-8"?>
<LinearLayout
    xmlns:android="http://schemas.android.com/apk/res/android"
    android:layout_width="match_parent"
    android:layout_height="match_parent"
    android:orientation="vertical">

    <LinearLayout
        android:layout_width="match_parent"
        android:layout_height="60dp"
        android:orientation="horizontal">
        <TextView
            android:layout_width="90dp"
            android:layout_height="wrap_content"
            android:layout_gravity="center_vertical"
            android:textSize="18sp"
            android:text="Account:"
            android:padding="10dp"/>
        <EditText
            android:id="@+id/account"
            android:layout_width="0dp"
            android:layout_height="wrap_content"
            android:layout_weight="1"
            android:layout_gravity="center_vertical" />
    </LinearLayout>

    <LinearLayout
        android:layout_width="match_parent"
        android:layout_height="60dp"
        android:orientation="horizontal">
        <TextView
            android:layout_width="90dp"
            android:layout_height="wrap_content"
            android:layout_gravity="center_vertical"
            android:textSize="18sp"
            android:text="password:"
            android:padding="10dp"/>
        <EditText
            android:id="@+id/password"
            android:layout_width="0dp"
            android:layout_height="wrap_content"
            android:layout_weight="1"
            android:layout_gravity="center_vertical"
            android:inputType="textPassword" />
    </LinearLayout>

    <LinearLayout
        android:orientation="horizontal"
        android:layout_width="match_parent"
        android:layout_height="wrap_content">
        <CheckBox
            android:id="@+id/remember_pass"
            android:layout_width="wrap_content"
            android:layout_height="wrap_content" />
        <TextView
            android:layout_width="wrap_content"
            android:layout_height="wrap_content"
            android:textSize="18sp"
            android:text="Remember the password" />
    </LinearLayout>

    <LinearLayout
        android:layout_width="match_parent"
        android:layout_height="wrap_content"
        android:orientation="horizontal">
        <Button
            android:id="@+id/login"
            android:layout_width="0dp"
            android:layout_height="60dp"
            android:layout_weight="1"
            android:text="Sign in" />
        <Button
            android:id="@+id/register"
            android:layout_width="0dp"
            android:layout_height="60dp"
            android:layout_weight="1"
            android:text="register" />

    </LinearLayout>

    <TextView
        android:layout_width="match_parent"
        android:layout_height="wrap_content"
        android:text="Tip: to register, please fill in your account and password and click Register"
        android:textSize="16dp" />

</LinearLayout>
Create a new LoginFragment adapter as a fragment and load it in onCreateView.
public class LoginFragment extends Fragment {

    @Override
    public View onCreateView(LayoutInflater inflater, ViewGroup container, Bundle savedInstanceState) {
        View view = inflater.inflate(R.layout.frag_login, container, false);
        return view;
    }
}
Like the previous welcome interface, the login interface also needs to meet the needs of different sizes of screens such as tablets and mobile phones, so write activity in the layout folder and layout-sw600dp folder_ login. XML file to adapt to different screens.
<?xml version="1.0" encoding="utf-8"?>
<LinearLayout
    xmlns:android="http://schemas.android.com/apk/res/android"
    android:layout_width="match_parent"
    android:layout_height="match_parent"
    android:orientation="vertical">

    <androidx.appcompat.widget.Toolbar
        android:id="@+id/login_toolbar"
        android:layout_width="match_parent"
        android:layout_height="?attr/actionBarSize"
        android:background="#64E269" />

    <fragment
        android:id="@+id/login_fragment"
        android:layout_width="match_parent"
        android:layout_height="match_parent"
        android:name="com.example.refuseclassification.LoginFragment" />

</LinearLayout>
For the layout of the small screen, the Toolbar is used to replace the action bar of the system and set its own color. Then directly use fragment to include the previous login fragments.
The layout of the large screen also uses the Toolbar, and then uses a horizontal linear layout to control the login control in the center of the screen.
<?xml version="1.0" encoding="utf-8"?>
<LinearLayout
    xmlns:android="http://schemas.android.com/apk/res/android"
    android:layout_width="match_parent"
    android:layout_height="match_parent"
    android:orientation="vertical">

    <androidx.appcompat.widget.Toolbar
        android:id="@+id/login_toolbar"
        android:layout_width="match_parent"
        android:layout_height="?attr/actionBarSize"
        android:background="#64E269" />

    <LinearLayout
        android:layout_width="match_parent"
        android:layout_height="match_parent"
        android:orientation="horizontal">

        <LinearLayout
            android:layout_width="0dp"
            android:layout_height="match_parent"
            android:layout_weight="1"/>

        <fragment
            android:id="@+id/login_fragment"
            android:layout_width="0dp"
            android:layout_height="match_parent"
            android:layout_weight="3"
            android:name="com.example.refuseclassification.LoginFragment" />

        <LinearLayout
            android:layout_width="0dp"
            android:layout_height="match_parent"
            android:layout_weight="1"/>
    </LinearLayout>

</LinearLayout>
To realize the registration and login function, it is natural to use Data Persistence technology to store the Account and password of the user name. SQLite is used here. First, create a new MyDatabaseHelper and use MYSQL language to create an Account data table.
public class MyDatabaseHelper extends SQLiteOpenHelper {

    public static final String CREATE_ACCOUNT = "create table Account (" +
            "id integer primary key autoincrement, " +
            "account text, " +
            "password text)";

    private Context mContext;

    public MyDatabaseHelper(Context context, String name,
                            SQLiteDatabase.CursorFactory factory, int version) {
        super(context, name, factory, version);
        mContext = context;
    }

    @Override
    public void onCreate(SQLiteDatabase db) {
        db.execSQL(CREATE_ACCOUNT);
        Toast.makeText(mContext, "login was successful", Toast.LENGTH_SHORT);
    }

    @Override
    public void onUpgrade(SQLiteDatabase db, int oldVersion, int newVersion) {
        db.execSQL("drop table if exists Account");
        onCreate(db);
    }
}
Finally, write LoginActivity. First, call the findViewById() method to obtain the instance of account input box, password input box and login button. First judge whether the option "remember password" is selected. If so, set the account and password in the input box again.
public class LoginActivity extends BaseActivity {

    private SharedPreferences pref;
    private SharedPreferences.Editor editor;
    private EditText accountEdit;
    private EditText passwordEdit;
    private Button login;
    private Button register;
    private CheckBox rememberPass;
    private Toolbar toolbar;
    private MyDatabaseHelper dbhelper;

    @Override
    protected void onCreate(Bundle savedInstanceState) {
        super.onCreate(savedInstanceState);
        setContentView(R.layout.activity_login);
        pref = PreferenceManager.getDefaultSharedPreferences(this);
        toolbar = (Toolbar) findViewById(R.id.login_toolbar);
        toolbar.setTitle("Sign in");
        new setTitleCenter().setTitleCenter(toolbar);
        accountEdit = (EditText) findViewById(R.id.account);
        passwordEdit = (EditText) findViewById(R.id.password);
        rememberPass = (CheckBox) findViewById(R.id.remember_pass);
        login = (Button) findViewById(R.id.login);
        dbhelper = new MyDatabaseHelper(this, "Account password", null, 2);
        register = (Button) findViewById(R.id.register);
        boolean isRemember = pref.getBoolean("remember_password", false);
        if (isRemember) {
            // Set the account and password in the text box
            String account = pref.getString("account", "");
            String password = pref.getString("password", "");
            accountEdit.setText(account);
            passwordEdit.setText(password);
            rememberPass.setChecked(true);
        }
Then, in the click event of the login button, obtain the contents of account and password and obtain the instance of the database for reading and writing the database. First judge whether the database has been created. If not, create it first. Then call the query() method of SQLiteDatabase, and use the first parameter to specify to query the account table. All the following parameters are null. After the query, get a Cursor object, then call its moveToFirst() method to move the pointer of the data to the data in the first row, and then go in a loop to traverse each row of data. If there is a matching input, log in successfully and enter the next activity. If not, the pop-up window will show that the account or password is entered incorrectly.
        login.setOnClickListener(new View.OnClickListener() {
            @Override
            public void onClick(View v) {
                int flag = 1;   //Indicates whether the account and password are correct
                String account = accountEdit.getText().toString();
                String password = passwordEdit.getText().toString();
                SQLiteDatabase db = dbhelper.getWritableDatabase();
                Cursor cursor = db.query("Account", null, null,
                        null, null, null, null);
                if (cursor.moveToFirst()) {
                    do {
                        String hadaccount = cursor.getString(cursor.getColumnIndex("account"));
                        String hadpassword = cursor.getString(cursor.getColumnIndex("password"));
                        if (account.equals(hadaccount) && password.equals(hadpassword)) {
                            editor = pref.edit();
                            if (rememberPass.isChecked()) {
                                editor.putBoolean("remember_password", true);
                                editor.putString("account", account);
                                editor.putString("password", password);
                            }
                            else {
                                editor.clear();
                            }
                            editor.apply();
                            Intent intent = new Intent(LoginActivity.this, MainActivity.class);
                            startActivity(intent);
                            finish();
                            flag = 0;
                        }
                    } while (cursor.moveToNext());
                }
                cursor.close();
                if (flag == 1) {
                    Toast.makeText(LoginActivity.this, "Wrong account or password", Toast.LENGTH_SHORT).show();
                }
            }
        });
In the click event of the registration button, the contents entered in the account box and password box are added to the database to complete the registration function.
        register.setOnClickListener(new View.OnClickListener() {
            @Override
            public void onClick(View v) {
                SQLiteDatabase db = dbhelper.getWritableDatabase();
                String account = accountEdit.getText().toString();
                String password = passwordEdit.getText().toString();
                ContentValues values = new ContentValues();
                values.put("account", account);
                values.put("password", password);
                db.insert("Account", null, values);
                Toast.makeText(LoginActivity.this, "login was successful", Toast.LENGTH_SHORT).show();
            }
        });
    }
}
For the Toolbar, we need to make it display the title and center it. Since there are many activities to be written later, the method of centering the title is encapsulated in a class setTitleCenter.
public class setTitleCenter {
    public void setTitleCenter(Toolbar toolbar) {
        String title = "title";
        final CharSequence originalTitle = toolbar.getTitle();
        toolbar.setTitle(title);
        for (int i = 0; i < toolbar.getChildCount(); i++) {
            View view = toolbar.getChildAt(i);
            if (view instanceof TextView) {
                TextView textView = (TextView) view;
                if (title.equals(textView.getText())) {
                    textView.setGravity(Gravity.CENTER);
                    Toolbar.LayoutParams params = new Toolbar.LayoutParams
                            (Toolbar.LayoutParams.WRAP_CONTENT, Toolbar.LayoutParams.MATCH_PARENT);
                    params.gravity = Gravity.CENTER;
                    textView.setLayoutParams(params);
                }
            }
            toolbar.setTitle(originalTitle);
        }
    }
}
In this way, you only need to get the Toolbar instance in each activity main function, set the title and call this function.
        toolbar = (Toolbar) findViewById(R.id.login_toolbar);
        toolbar.setTitle("Sign in");
        new setTitleCenter().setTitleCenter(toolbar);
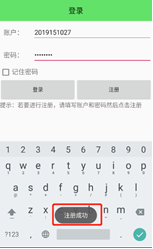
Finally, the results of the login interface are as follows. If it is for registration, the account and password errors will be displayed when logging in.
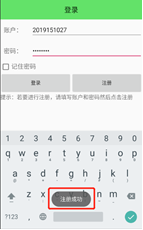
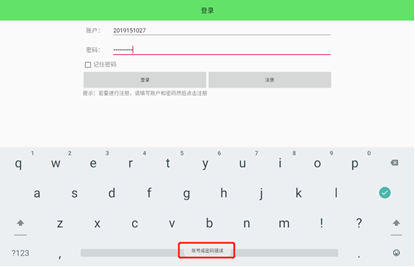
If you have registered, you can log in successfully
(3) Implementation of main interface
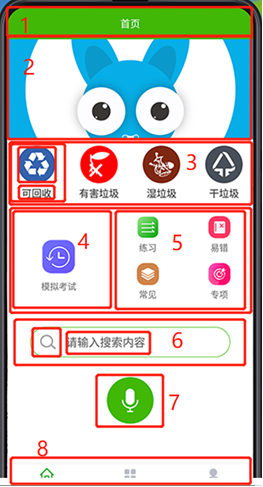
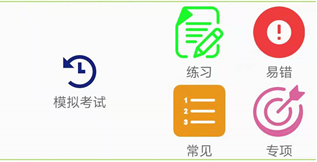
First, analyze the main interface of the sample. 1. The title bar can be realized by Toolbar; 2. One picture can be used; ImageView is used to realize this; 3 is a horizontal LinearLayout with four pairs of buttons and TextView distributed; 4. 5 in the same horizontal LinearLayout, each control can be arranged using LinearLayout, which is also composed of Button1 and TextView; 6 is a search box, which can be realized by EditText; 7 is a Button for speech recognition; 8 is the Bottom navigation bar.
First, implement the Bottom navigation of the Bottom navigation bar. You need to add dependencies first:
implementation 'com.google.android.material:material:1.0.0'
Then write the activity_main.xml. Similarly, linear layout is used here to arrange the controls vertically. There is also a title bar Toolbar. Then use the ViewPager container to fill the rest of the screen to display fragments. At the bottom is the bottom navigation bar of the BottomNavigationView.
<?xml version="1.0" encoding="utf-8"?>
<LinearLayout
    xmlns:android="http://schemas.android.com/apk/res/android"
    xmlns:app="http://schemas.android.com/apk/res-auto"
    android:layout_width="match_parent"
    android:layout_height="match_parent"
    android:orientation="vertical">

    <androidx.viewpager.widget.ViewPager
        android:id="@+id/viewPager"
        android:layout_width="match_parent"
        android:layout_height="0dp"
        android:layout_weight="1"/>

    <com.google.android.material.bottomnavigation.BottomNavigationView
        android:id="@+id/nav_view"
        android:layout_width="match_parent"
        android:layout_height="wrap_content"
        android:layout_marginStart="0dp"
        android:layout_marginEnd="0dp"
        android:background="?android:attr/windowBackground"
        android:layout_gravity="bottom"
        app:menu="@menu/bottom_nav_menu" />

</LinearLayout>
Then we need to write the menu bottom required by the bottom navigation bar_ nav_ menu. XML, add appropriate icons and corresponding titles to the bottom navigation bar.
<menu xmlns:android="http://schemas.android.com/apk/res/android">
    <item
        android:id="@+id/navigation_home"
        android:icon="@drawable/home"
        android:title="home page" />
    <item
        android:id="@+id/navigation_guide"
        android:icon="@drawable/menu"
        android:title="guide" />
    <item
        android:id="@+id/navigation_setting"
        android:icon="@drawable/setting"
        android:title="set up" />
</menu>
As mentioned earlier, BottomNavigationView uses the ViewPager container to store fragments, so we need an Adapter. Write pageradapter Java, you can initialize the Adapter. In the getItem() method, you need to return the element corresponding to your current List and current position (that is, the Fragment page). getCount() is relatively simple. Just return the size of the List directly.
public class PagerAdapter extends FragmentPagerAdapter {

    Context context;
    private List<Fragment> fragmentList;

    public PagerAdapter(@NonNull FragmentManager fragmentManager, Context context, List<Fragment> list) {
        super(fragmentManager);
        fragmentList = list;
        this.context = context;
    }

    public PagerAdapter(@NonNull FragmentManager fragmentManager, GuideFragment guideFragment, List<Fragment> list) {
        super(fragmentManager);
        fragmentList = list;
    }

    @NonNull
    @Override
    public Fragment getItem(int position) {
        return fragmentList.get(position);
    }

    @Override
    public int getCount() {
        return fragmentList.size();
    }

}
Finally, write mainactivity java. In the main class, first define the ViewPager and BottomNavigationView objects and the Fragment list for initialization. Then initialize the main interface in the onCreate method, then call the initView method.
public class MainActivity extends BaseActivity {

    private ViewPager viewPager;
    private BottomNavigationView navigation;
    private List<Fragment> fragmentList = new ArrayList<>();

    @Override
    protected void onCreate(Bundle savedInstanceState) {
        super.onCreate(savedInstanceState);
        setContentView(R.layout.activity_main);
        initView();
    }
In the initView method, first obtain the ViewPager and BottomNavigationView instances in the layout file. Then add three fragment s corresponding to the menu in the list, instantiate the adapter, and finally call ViewPager The setAdapter() method is passed into PagerAdapter to achieve the effect of sliding the interface from left to right.
    private void initView() {
        viewPager = (ViewPager) findViewById(R.id.viewPager);
        navigation = (BottomNavigationView) findViewById(R.id.nav_view);
        //Add Fragment
        fragmentList.add(new HomeFragment());
        fragmentList.add(new GuideFragment());
        fragmentList.add(new SettingFragment());
        PagerAdapter adapter = new PagerAdapter(getSupportFragmentManager(), this, fragmentList);
        //ViewPager setting adpatter
        viewPager.setAdapter(adapter);
Then realize the function of the bottom button driving the interface. We need to add an ItemSelectedListener (sub item selection listener) to the BottomNavigationView, and then call ViewPager according to the changes of sub items The setCurrentItem() method changes the currently displayed page; After clicking the button, the effect of page following is realized.
        //The navigation bar click event and ViewPager slide event associate the two controls with each other
        navigation.setOnNavigationItemSelectedListener(new BottomNavigationView.OnNavigationItemSelectedListener() {
            @Override
            public boolean onNavigationItemSelected(@NonNull MenuItem item) {
                //Here, it is set to: when clicking a sub item, the ViewPager will slide to the corresponding position
                switch (item.getItemId()) {
                    case R.id.navigation_home:
                        viewPager.setCurrentItem(0);
                        return true;
                    case R.id.navigation_guide:
                        viewPager.setCurrentItem(1);
                        return true;
                    case R.id.navigation_setting:
                        viewPager.setCurrentItem(2);
                        return true;
                    default:
                        break;
                }
                return false;
            }
        });
Finally, the ViewPager Sideswipe function is implemented to change the current option of the bottom BottomNavigationView. Just add a PageChangeListener to your ViewPager, and then call BottomNavigationView after the page changes The setChecked () method is implemented by manually making corresponding changes to the current options.
        viewPager.addOnPageChangeListener(new ViewPager.OnPageChangeListener() {
            @Override
            public void onPageScrolled(int position, float positionOffset, int positionOffsetPixels) {

            }

            @Override
            public void onPageSelected(int position) {
                //This method is only called when the slide stops, and position is the page position where the slide stops
//                When sliding to a certain position, the corresponding position of the navigation bar is pressed
                navigation.getMenu().getItem(position).setChecked(true);
            }

            @Override
            public void onPageScrollStateChanged(int state) {

            }
        });
    }
}
Then we write frag according to the analysis of the main interface elements just now_ home. XML to realize the content of the main interface (the first option of the menu). The interface mainly adopts LinearLayout layout, in which all interfaces are arranged vertically.
<LinearLayout
    xmlns:android="http://schemas.android.com/apk/res/android"
    android:layout_width="match_parent"
    android:layout_height="match_parent"
    android:orientation="vertical">
At the beginning, a picture is arranged. Here, scaleType is used for stretching.
    <ImageView
        android:id="@+id/home_image"
        android:layout_width="match_parent"
        android:layout_height="0dp"
        android:layout_weight="2"
        android:scaleType="fitXY"
        android:src="@drawable/home_image" />
Then there is the horizontal linear layout with four buttons.
    <LinearLayout
        android:layout_width="match_parent"
        android:layout_height="0dp"
        android:layout_weight="1"
        android:paddingBottom="5dp"
        android:orientation="horizontal">
In this layout, the following four vertical field layouts are stored. Each layout contains an ImageButton and a TextView. The ImageButton is also stretched with scaleType to prevent image deformation. Both elements use layout_gravity to ensure centering.
        <LinearLayout
            android:layout_width="0dp"
            android:layout_height="wrap_content"
            android:layout_weight="1"
            android:orientation="vertical">
            <ImageButton
                android:id="@+id/recyclable_button"
                android:layout_width="wrap_content"
                android:layout_height="0dp"
                android:layout_weight="1"
                android:scaleType="fitCenter"
                android:layout_gravity="center_horizontal"
                android:layout_margin="5dp"
                android:src="@drawable/recyclable"
                android:background="#00000000"/>
            <TextView
                android:layout_width="wrap_content"
                android:layout_height="wrap_content"
                android:layout_gravity="center_horizontal"
                android:text="Recyclable"
                android:textSize="15sp" />
        </LinearLayout>

        <LinearLayout
            android:layout_width="0dp"
            android:layout_height="wrap_content"
            android:layout_weight="1"
            android:orientation="vertical">
            <ImageButton
                android:id="@+id/harmful_button"
                android:layout_width="wrap_content"
                android:layout_height="0dp"
                android:layout_weight="1"
                android:scaleType="fitCenter"
                android:layout_gravity="center_horizontal"
                android:layout_margin="5dp"
                android:src="@drawable/harmful"
                android:background="#00000000" />
            <TextView
                android:layout_width="wrap_content"
                android:layout_height="wrap_content"
                android:layout_gravity="center_horizontal"
                android:text="Harmful Waste"
                android:textSize="15sp" />
        </LinearLayout>

        <LinearLayout
            android:layout_width="0dp"
            android:layout_height="wrap_content"
            android:layout_weight="1"
            android:orientation="vertical">
            <ImageButton
                android:id="@+id/wet_button"
                android:layout_width="wrap_content"
                android:layout_height="0dp"
                android:layout_weight="1"
                android:scaleType="fitCenter"
                android:layout_gravity="center_horizontal"
                android:layout_margin="5dp"
                android:src="@drawable/wet"
                android:background="#00000000"/>
            <TextView
                android:layout_width="wrap_content"
                android:layout_height="wrap_content"
                android:layout_gravity="center_horizontal"
                android:text="Wet waste"
                android:textSize="15sp" />
        </LinearLayout>

        <LinearLayout
            android:layout_width="0dp"
            android:layout_height="wrap_content"
            android:layout_weight="1"
            android:orientation="vertical">
            <ImageButton
                android:id="@+id/dry_button"
                android:layout_width="wrap_content"
                android:layout_height="0dp"
                android:layout_weight="1"
                android:scaleType="fitCenter"
                android:layout_gravity="center_horizontal"
                android:layout_margin="5dp"
                android:src="@drawable/dry"
                android:background="#00000000"/>
            <TextView
                android:layout_width="wrap_content"
                android:layout_height="wrap_content"
                android:layout_gravity="center_horizontal"
                android:text="Dry garbage"
                android:textSize="15sp" />
        </LinearLayout>

    </LinearLayout>
There is a section of layout below the layout, which is used to set the dividing line to make the interface more beautiful.
    <LinearLayout
        android:layout_width="match_parent"
        android:layout_height="1dp"
        android:background="#A3DD53" />
Then there is a horizontal linear layout, which is used to store two linear layouts and five buttons.
    <LinearLayout
        android:layout_width="match_parent"
        android:layout_height="0dp"
        android:layout_weight="2"
        android:orientation="horizontal">
The first block stores an ImageButton and TextView in a linear layout, which is similar to that before. The difference is that the value of padding is relatively large, so that the child control is scaled in the central position.
        <LinearLayout
            android:layout_width="0dp"
            android:layout_height="match_parent"
            android:layout_weight="1"
            android:orientation="vertical"
            android:padding="40dp">
            <ImageButton
                android:id="@+id/test_button"
                android:layout_width="wrap_content"
                android:layout_height="0dp"
                android:layout_weight="1"
                android:src="@drawable/test"
                android:background="#00000000"
                android:layout_gravity="center"
                android:padding="5dp"
                android:scaleType="fitCenter" />
            <TextView
                android:layout_width="wrap_content"
                android:layout_height="wrap_content"
                android:layout_gravity="center_horizontal"
                android:text="Mock examination"
                android:textSize="15sp" />
        </LinearLayout>
The second block is divided into two linear layouts arranged vertically.
        <LinearLayout
            android:layout_width="0dp"
            android:layout_height="match_parent"
            android:layout_weight="1"
            android:orientation="vertical">
Each block is divided into two horizontal linear layouts. In this way, we divide a large area into four.
            <LinearLayout
                android:layout_width="match_parent"
                android:layout_height="0dp"
                android:layout_weight="1"
                android:orientation="horizontal">
Then set ImageView and TextView, which will not be repeated here.
	<LinearLayout
                    android:layout_width="0dp"
                    android:layout_height="wrap_content"
                    android:layout_weight="1"
                    android:orientation="vertical">
                    <ImageButton
                        android:id="@+id/exercise_button"
                        android:layout_width="wrap_content"
                        android:layout_height="0dp"
                        android:layout_weight="1"
                        android:scaleType="fitCenter"
                        android:layout_gravity="center_horizontal"
                        android:layout_margin="5dp"
                        android:src="@drawable/exercise"
                        android:background="#00000000"/>
                    <TextView
                        android:layout_width="wrap_content"
                        android:layout_height="wrap_content"
                        android:layout_gravity="center_horizontal"
                        android:text="practice"
                        android:textSize="15sp" />
                </LinearLayout>
                <LinearLayout
                    android:layout_width="0dp"
                    android:layout_height="wrap_content"
                    android:layout_weight="1"
                    android:orientation="vertical">
                    <ImageButton
                        android:id="@+id/errorProne_button"
                        android:layout_width="wrap_content"
                        android:layout_height="0dp"
                        android:layout_weight="1"
                        android:scaleType="fitCenter"
                        android:layout_gravity="center_horizontal"
                        android:layout_margin="5dp"
                        android:src="@drawable/errorprone"
                        android:background="#00000000"/>
                    <TextView
                        android:layout_width="wrap_content"
                        android:layout_height="wrap_content"
                        android:layout_gravity="center_horizontal"
                        android:text="Fallibility"
                        android:textSize="15sp"
                        android:background="#00000000"/>
                </LinearLayout>
            </LinearLayout>
            <LinearLayout
                android:layout_width="match_parent"
                android:layout_height="0dp"
                android:layout_weight="1"
                android:orientation="horizontal">
                <LinearLayout
                    android:layout_width="0dp"
                    android:layout_height="wrap_content"
                    android:layout_weight="1"
                    android:orientation="vertical">
                    <ImageButton
                        android:id="@+id/common_button"
                        android:layout_width="wrap_content"
                        android:layout_height="0dp"
                        android:layout_weight="1"
                        android:scaleType="fitCenter"
                        android:layout_gravity="center_horizontal"
                        android:layout_margin="5dp"
                        android:src="@drawable/common"
                        android:background="#00000000"/>
                    <TextView
                        android:layout_width="wrap_content"
                        android:layout_height="wrap_content"
                        android:layout_gravity="center_horizontal"
                        android:text="common"
                        android:textSize="15sp" />
                </LinearLayout>
                <LinearLayout
                    android:layout_width="0dp"
                    android:layout_height="wrap_content"
                    android:layout_weight="1"
                    android:orientation="vertical">
                    <ImageButton
                        android:id="@+id/special_button"
                        android:layout_width="wrap_content"
                        android:layout_height="0dp"
                        android:layout_weight="1"
                        android:scaleType="fitCenter"
                        android:layout_gravity="center_horizontal"
                        android:layout_margin="5dp"
                        android:src="@drawable/special"
                        android:background="#00000000"/>
                    <TextView
                        android:layout_width="wrap_content"
                        android:layout_height="wrap_content"
                        android:layout_gravity="center_horizontal"
                        android:text="special"
                        android:textSize="15sp" />
                </LinearLayout>
            </LinearLayout>
        </LinearLayout>
    </LinearLayout>
Here is also a division line.
    <LinearLayout
        android:layout_width="match_parent"
        android:layout_height="1dp"
        android:background="#A3DD53" />
Finally, a SearchView search box and an ImageButton are set here. The content of the search box is set, and the circle file written is introduced into the background to make the edge of the search box appear circular.
    <LinearLayout
        android:layout_width="match_parent"
        android:layout_height="0dp"
        android:layout_weight="2"
        android:orientation="vertical">
        <EditText
            android:id="@+id/searchHome"
            android:layout_width="match_parent"
            android:layout_height="50dp"
            android:layout_marginLeft="20dp"
            android:layout_marginRight="20dp"
            android:layout_marginTop="10dp"
            android:hint=" 🔍 Please enter the search content"
            android:paddingLeft="20dp"
            android:background="@drawable/searchview_circle"/>
        <ImageButton
            android:id="@+id/recording_button"
            android:layout_width="wrap_content"
            android:layout_height="wrap_content"
            android:layout_gravity="center_horizontal"
            android:src="@drawable/recording"
            android:background="#00000000"
            android:scaleType="fitCenter"
            android:padding="20dp"/>
    </LinearLayout>

</LinearLayout>
The circle file is as follows. Set the shape and color, use color to set green, and use radius to set the edge to circle.
<shape xmlns:android="http://schemas.android.com/apk/res/android"
    android:shape="rectangle">
    <stroke
        android:width="1dp"
        android:color="#57A81C" />
    <corners android:radius="20dp" />
</shape>
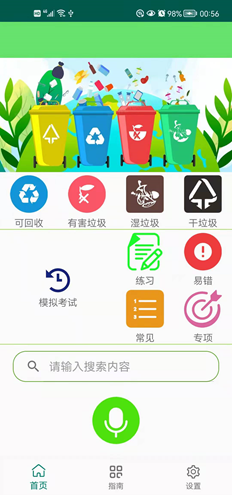
Finally, the effect of home interface is as follows:
(4) Home page interface logic writing
First, we built a database into the app to store garbage and the corresponding classification. The LitePal database is used here to store data.
Configure litepal XML file (create a litepal.xml file in app/src/main directory), and edit the content as follows:
<?xml version="1.0" encoding="UTF-8" ?>
<litepal>
    <dbname value="KnowledgeStore"></dbname>
    <version value="1"></version>
    <list>
        <mapping class="com.example.refuseclassification.Database.Knowledge"></mapping>
    </list>
</litepal>
Then configure LitePalApplication and modify manifest The code in the XML file is as follows:
    <application
        android:name="org.litepal.LitePalApplication"
Define a Knowledge class, which inherits from LitePalSupport, declares the attributes id, name, kind and answer, and implements its getter and setter methods. And then on the litepal Add the mapping model of this class to the XML file.
public class Knowledge extends LitePalSupport implements Serializable {

    private int id;
    private String name;
    private String kind;
    private String answer;

    public Knowledge() {

    }

    public Knowledge(int id, String name, String kind, String answer) {
        this.id = id;
        this.name = name;
        this.kind = kind;
        this.answer = answer;
    }

    public void setId(int id) {
        this.id = id;
    }

    public void setName(String name) {
        this.name = name;
    }

    public void setKind(String kind) {
        this.kind = kind;
    }

    public void setAnswer(String answer) {
        this.answer = answer;
    }

    public int getId() {
        return id;
    }

    public String getName() {
        return name;
    }

    public String getKind() {
        return kind;
    }

    public String getAnswer() {
        return answer;
    }
}
After the configuration is completed, start the creation and insertion of the database. First, use two arrays to store the name and kind to be inserted.
public class KnowledgeDatabase {

    String[] name = {"pineapple", "Duck neck", "Duck neck", "radish", "Carrot", "Dried radish", "grass", "strawberry",
                     "Red sausage", "sausage", "Fish intestines", "expired food", "leftover", "Dead mouse", "Mai Lishu", "Fruit grain",
                     "Chocolates", "aloe", "fallen leaves", "dairy", "Mooncakes with meat", "fried chicken drumsticks", "Drug residue", "caterpillar", "snail",
                     "condom", "Massage stick", "Dirty plastic bag", "Old broom", "Old mop", "The stirring rod", "Bar bone", "Clam shell",
                     "bowling", "Firecracker", "paper cup", "Scallop in Shell", "Nasal hair", "Nasal excrement", "pen", "paper made to resemble bank notes and burned as offerings to the dead",
                     "baby diapers", "napkin", "Meal paper", "Disposable fork", "Falling teeth", "T-back", "Earwax", "Masturbation cup", "Alkaline mercury free battery",
                     "safety hat", "cotton-padded jacket", "White paper", "Garage Kit", "Bag", "vacuum cup", "newspaper", "Computer equipment",
                     "sheets", "notebook", "Wrist watch", "Glass", "ruler", "portable battery", "Charger", "air conditioner",
                     "headset", "clothes", "Lego", "Doll", "Degradable plastics", "The wine bottle", "Basketball", "Red scarf", "Foam box",
                     "aspirin", "Yuba bulb", "acyeterion", "thermometer", "Antivirus agent", "coldrex", "Medicine bottle", "Cough syrup",
                     "capsule", "Light bulb:", "pesticides", "paint", "vitamin", "alcohol", "Nail Polish", "Lead-acid battery",
                     "Waste battery", "lighter", "Medical gauze", "Medical cotton swab", "photo", "dry battery", "calcium tablet", "Needle tube", "Syringe"};

    String[] kind = {"Wet waste", "Dry garbage", "Recyclable", "Harmful Waste"};
Then start the configuration of the database. First, obtain the instance of the database, and then insert the data circularly. First, use the where clause to query whether the data id already exists. If not, insert the data with the class method insert. Otherwise, skip the insertion to prevent repeated insertion of data.
    public void setKnowledgeDatabase() {
        LitePal.getDatabase();
        for (int i = 0; i < 100; i++) {
            // Obtain the data of the data table and query whether there is the same data to prevent repeated insertion
            List<Knowledge> knowledges = LitePal.where("id = ?", String.valueOf(i + 1))
                    .find(Knowledge.class);
            if (knowledges == null || knowledges.size()== 0)
                if (i < 25)
                    insert(i + 1, name[i], kind[0]);
                else if (i < 50)
                    insert(i + 1, name[i], kind[1]);
                else if (i < 75)
                    insert(i + 1, name[i], kind[2]);
                else
                    insert(i + 1, name[i],  kind[3]);
            else
                continue;
        }
    }
Here is the insert method. Here we first create a Knowledge instance, then call the set method to set it up, and finally use save to save the data to the database.
    public void insert(int id, String name, String kind) {
        Knowledge knowledge = new Knowledge();
        knowledge.setId(id);
        knowledge.setName(name);
        knowledge.setKind(kind);
        knowledge.save();
    }
}
In this way, we can successfully embed the important garbage data in the app into the app database.
In this interface, the interfaces and functions of these four buttons are similar. We use the "recyclable" button for analysis.

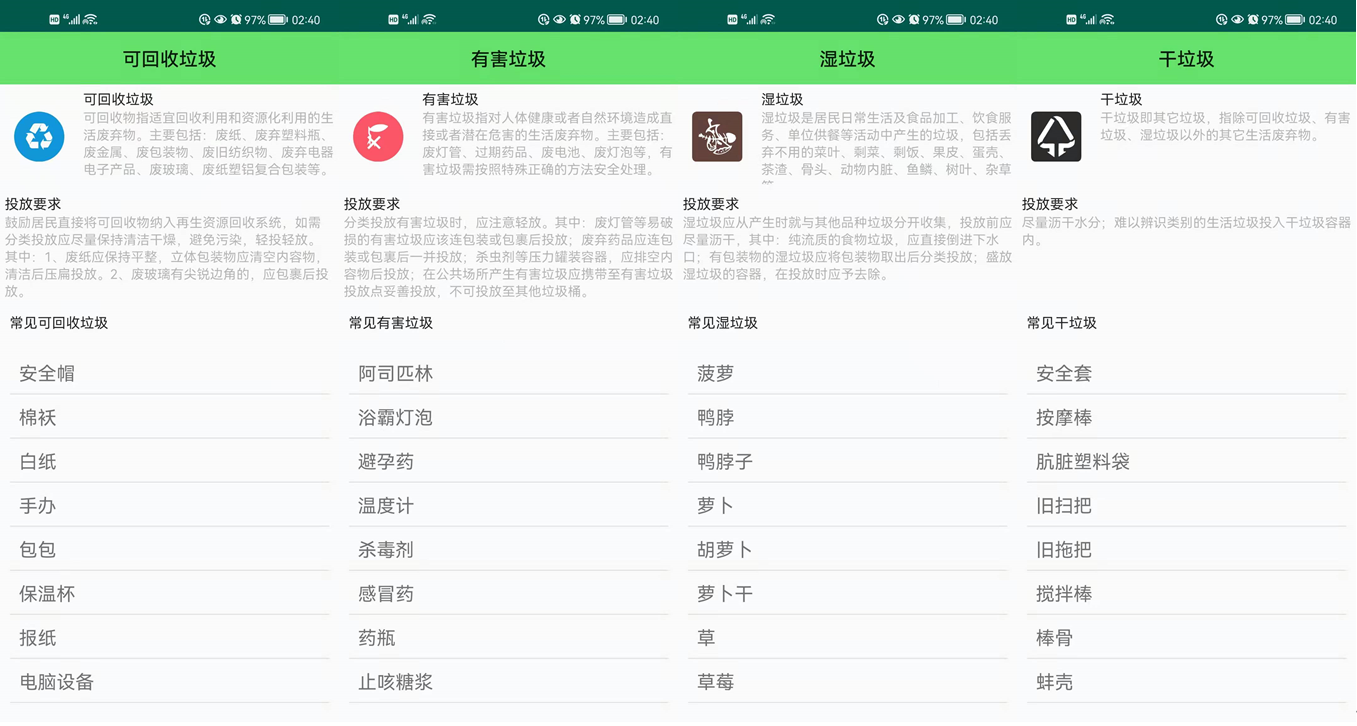
Create a new activity RecyclableActivity and layout activity_recyclable, first write the layout. The layout is a linear layout, which first includes a toolbar for displaying the title.
<LinearLayout
    xmlns:android="http://schemas.android.com/apk/res/android"
    android:layout_width="match_parent"
    android:layout_height="match_parent"
    android:orientation="vertical">

    <androidx.appcompat.widget.Toolbar
        android:id="@+id/recyclable_toolbar"
        android:layout_width="match_parent"
        android:layout_height="?attr/actionBarSize"
        android:background="#64E269" />
Next is a horizontal linear layout. First place an ImageView and use scaleType to ensure that the image is not stretched.
    <LinearLayout
        android:layout_width="match_parent"
        android:layout_height="0dp"
        android:layout_weight="1"
        android:orientation="horizontal">
        <ImageView
            android:layout_width="0dp"
            android:layout_height="match_parent"
            android:layout_weight="1"
            android:scaleType="fitCenter"
            android:layout_margin="15dp"
            android:src="@drawable/recyclable"/>
        <LinearLayout
            android:layout_width="0dp"
            android:layout_height="match_parent"
            android:layout_weight="5"
            android:orientation="vertical"
            android:layout_margin="5dp">
On the right side of the picture is a vertically arranged linear layout, which is composed of two textviews. The content is the definition that the title can be returned to garbage.
            <TextView
                android:layout_width="wrap_content"
                android:layout_height="wrap_content"
                android:textColor="#D8000000"
                android:text="Recyclable waste"
                android:textSize="15sp"/>
            <TextView
                android:layout_width="wrap_content"
                android:layout_height="wrap_content"
                android:textColor="#45000000"
                android:text="Recyclables refer to domestic wastes suitable for recycling and resource utilization. It mainly includes: waste paper, waste plastic bottles, waste metals, waste packaging materials, waste textiles, waste electrical and electronic products, waste glass, waste paper plastic aluminum composite packaging, etc." />
        </LinearLayout>
    </LinearLayout>
Below this linear layout is another vertically arranged linear layout, which is also composed of two textviews. The content is the specific content of delivery requirements and delivery requirements.
    <LinearLayout
        android:layout_width="match_parent"
        android:layout_height="0dp"
        android:layout_weight="1"
        android:orientation="vertical"
        android:layout_margin="5dp">
        <TextView
            android:layout_width="wrap_content"
            android:layout_height="wrap_content"
            android:textColor="#D8000000"
            android:text="Launch requirements"
            android:textSize="15sp"/>
        <TextView
            android:layout_width="wrap_content"
            android:layout_height="wrap_content"
            android:textColor="#45000000"
            android:text="Residents are encouraged to directly incorporate recyclables into the renewable resource recovery system. If classified release is required, they should be kept clean and dry as far as possible to avoid pollution. They should be put into operation with care. Among them: 1. The waste paper shall be kept flat, and the contents of three-dimensional packaging shall be emptied, flattened and put into use after cleaning. 2. If the waste glass has sharp edges and corners, it shall be wrapped and put into use." />
    </LinearLayout>
Finally, there is a vertical linear layout, which is composed of a title and a RecyclerView, which is used to store common recyclable garbage.
    <LinearLayout
        android:layout_width="match_parent"
        android:layout_height="0dp"
        android:layout_weight="4"
        android:orientation="vertical">
        <TextView
            android:layout_width="wrap_content"
            android:layout_height="wrap_content"
            android:textColor="#D8000000"
            android:text="Common recyclable waste"
            android:textSize="15sp"
            android:layout_margin="10dp"/>
        <androidx.recyclerview.widget.RecyclerView
            android:id="@+id/recyclable_recyclerView"
            android:layout_width="match_parent"
            android:layout_height="match_parent"
            android:layout_margin="10dp"/>
    </LinearLayout>
</LinearLayout>
RecyclerView is composed of sub item items, so the sub item layout needs to be written. Here, the relative layout is adopted. The garbage name is placed on the left of the sub item, the type is placed on the right of the sub item, and a dividing line is at the bottom.
<RelativeLayout
    xmlns:android="http://schemas.android.com/apk/res/android"
    android:layout_width="match_parent"
    android:layout_height="match_parent"
    android:layout_margin="10dp">
    <TextView
        android:id="@+id/name"
        android:layout_width="wrap_content"
        android:layout_height="wrap_content"
        android:layout_alignParentLeft="true"
        android:textSize="20sp"
        android:layout_margin="10dp"/>
    <TextView
        android:id="@+id/kind"
        android:layout_width="wrap_content"
        android:layout_height="wrap_content"
        android:layout_alignParentRight="true"
        android:textSize="20sp"
        android:layout_margin="10dp"/>
    <LinearLayout
        android:layout_width="match_parent"
        android:layout_height="1dp"
        android:background="#1B000000"
        android:layout_alignParentBottom="true"/>
</RelativeLayout>
Next, write recycleactivity. First, we define some controls that need to be used and the adapter of RecyclerView, then set the title bar content in the main method, call the where query statement with litepal to obtain the database content and get the knowledges list. Then we instantiate the adapter and adapt the adapter and layout manager to RecyclerView.
public class RecyclableActivity extends BaseActivity {

    private Toolbar toolbar;
    private RecyclerView recyclerView;
    private List<Knowledge> knowledges = new ArrayList<>();
    private MyAdapter myAdapter;

    @Override
    protected void onCreate(Bundle savedInstanceState) {
        super.onCreate(savedInstanceState);
        setContentView(R.layout.activity_recyclable);
        toolbar = (Toolbar) findViewById(R.id.recyclable_toolbar);
        toolbar.setTitle("Recyclable waste");
        new setTitleCenter().setTitleCenter(toolbar);
        // Write list content
        recyclerView = findViewById(R.id.recyclable_recyclerView);
        knowledges = LitePal.where("kind = ?", "Recyclable").find(Knowledge.class);
        myAdapter = new MyAdapter();
        recyclerView.setAdapter(myAdapter);
        LinearLayoutManager manager = new LinearLayoutManager(RecyclableActivity.this);
        recyclerView.setLayoutManager(manager);
    }
As shown in the figure, we create an adapter internal class in the main class of the activity, load the item layout in the onCreateViewHolder method, and then create a ViewHolder instance and return it; In the onBindViewHolder method, we assign values to children; Finally, the number of children is returned in getItemCount.
    private class MyAdapter extends RecyclerView.Adapter<MyViewHolder> {

        @NonNull
        @Override
        public MyViewHolder onCreateViewHolder(@NonNull ViewGroup parent, int viewType) {
            View view = View.inflate(RecyclableActivity.this, R.layout.item_recyclerview, null);
            MyViewHolder myViewHolder = new MyViewHolder(view);
            return myViewHolder;
        }

        @Override
        public void onBindViewHolder(@NonNull MyViewHolder holder, int position) {
            Knowledge knowledge = knowledges.get(position);
            holder.name.setText(knowledge.getName());
            //holder.kind.setText((knowledge.getKind()));
        }

        @Override
        public int getItemCount() {
            return knowledges.size();
        }
    }
This class is used to adapt ViewHolder and instantiate name and kind.
    private class MyViewHolder extends RecyclerView.ViewHolder {

        TextView name;
        TextView kind;

        public MyViewHolder(@NonNull View itemView) {
            super(itemView);
            name = itemView.findViewById(R.id.name);
            kind = itemView.findViewById(R.id.kind);
        }
    }
}
The final effect is as follows:
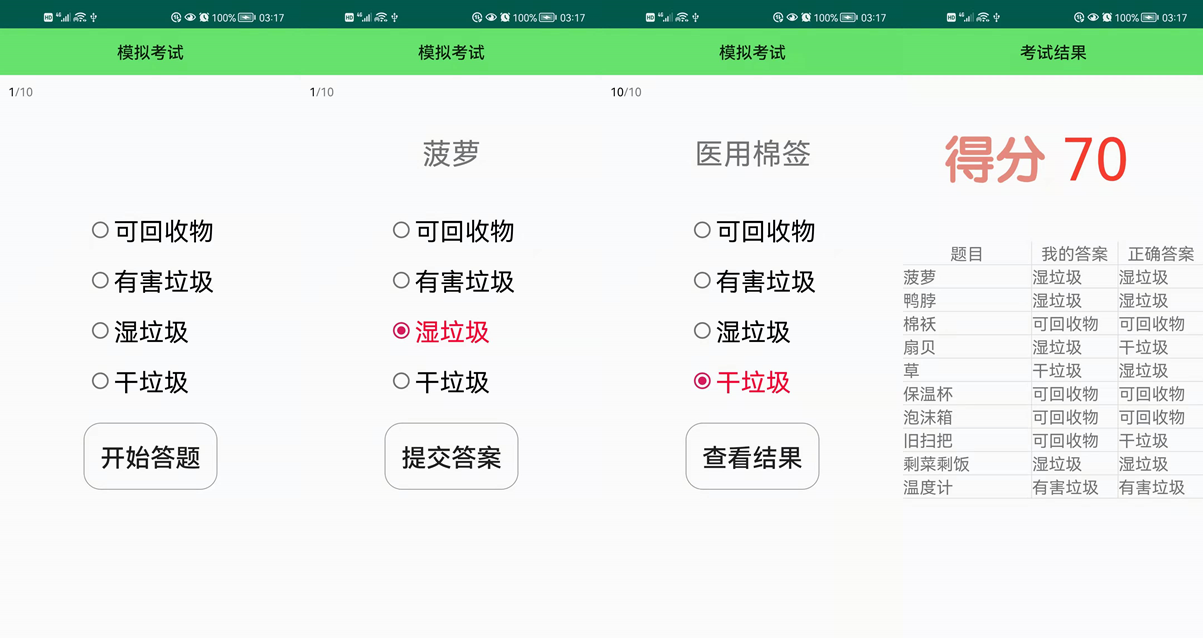
On the home page, the functions of the activities corresponding to these five buttons are also similar. Here, we analyze them with a simulated exam.
New activity_test.xml, writing interface. The interface is first a linear layout arranged vertically. The first control is toolbar, which has been mentioned many times to set the title bar.
<LinearLayout
    xmlns:android="http://schemas.android.com/apk/res/android"
    android:layout_width="match_parent"
    android:layout_height="match_parent"
    android:orientation="vertical">

    <androidx.appcompat.widget.Toolbar
        android:id="@+id/test_toolbar"
        android:layout_width="match_parent"
        android:layout_height="?attr/actionBarSize"
        android:background="#64E269" />
Next is a horizontally arranged linear layout, which is composed of two textviews to display the number of questions, including question_num will dynamically change the value in the activity method to achieve the effect of answering questions and then changing the number of questions.
    <LinearLayout
        android:layout_width="match_parent"
        android:layout_height="wrap_content"
        android:orientation="horizontal"
        android:layout_margin="10dp">
        <TextView
            android:id="@+id/question_num"
            android:layout_width="wrap_content"
            android:layout_height="wrap_content"
            android:text="1"
            android:textColor="#000000" />
        <TextView
            android:layout_width="wrap_content"
            android:layout_height="wrap_content"
            android:text="/10"
            android:textColor="#88000000" />
    </LinearLayout>
The next layout consists of a large vertical linear layout.
The first is an eye-catching TextView, which is used to display the current topic. It will also refresh in the method to display different topics. Then there is a RadioGroup, which contains four RadioButton s, representing four options: recyclables, hazardous waste, wet waste and dry waste.
    <LinearLayout
        android:layout_width="match_parent"
        android:layout_height="match_parent"
        android:orientation="vertical">
        <TextView
            android:id="@+id/question"
            android:layout_width="wrap_content"
            android:layout_height="wrap_content"
            android:layout_gravity="center_horizontal"
            android:layout_margin="30dp"
            android:textSize="35sp" />
        <RadioGroup
            android:id="@+id/radioGroup"
            android:layout_width="wrap_content"
            android:layout_height="wrap_content"
            android:layout_gravity="center_horizontal"
            android:layout_marginTop="10dp">
            <RadioButton
                android:id="@+id/answer1"
                android:text="Recyclable"
                android:textSize="30sp"
                android:layout_margin="10dp"
                android:layout_width="match_parent"
                android:layout_height="wrap_content" />
            <RadioButton
                android:id="@+id/answer2"
                android:text="Harmful Waste"
                android:textSize="30sp"
                android:layout_margin="10dp"
                android:layout_width="match_parent"
                android:layout_height="wrap_content"
                android:checked="false"/>
            <RadioButton
                android:id="@+id/answer3"
                android:text="Wet waste  "
                android:textSize="30sp"
                android:layout_margin="10dp"
                android:layout_width="match_parent"
                android:layout_height="wrap_content" />
            <RadioButton
                android:id="@+id/answer4"
                android:text="Dry garbage  "
                android:textSize="30sp"
                android:layout_margin="10dp"
                android:layout_width="match_parent"
                android:layout_height="wrap_content" />
        </RadioGroup>
Finally, a Button is used to prompt the user to start answering questions. When the user clicks the Button, it will become "submit answer" to prompt the user to answer.
        <Button
            android:id="@+id/submit"
            android:layout_width="wrap_content"
            android:layout_height="wrap_content"
            android:text="Start answering questions"
            android:textSize="30sp"
            android:layout_margin="20dp"
            android:background="@drawable/button_circle"
            android:padding="20dp"
            android:layout_gravity="center_horizontal" />
    </LinearLayout>
</LinearLayout>
Next, write the code of TextActivity. Here, we'll first define some controls and garbage knowledge lists, as well as scores and counters.
public class TestActivity extends BaseActivity{

    private Toolbar toolbar;
    private TextView question_num;
    private TextView question;
    private Button submit;
    private RadioGroup radiogroup;
    private RadioButton answer1;
    private RadioButton answer2;
    private RadioButton answer3;
    private RadioButton answer4;
    private List<Knowledge> knowledges = new ArrayList<>();
    private String answer = "";
    private int score = 0;
    private int count;
Here is to introduce layout, initialize toolbar and counter, and then use math Random () method to get the random number and add it to a collection. The reason why we use the set to store random numbers is that the elements in the set are not repeated. In this way, we can get 10 numbers of 0 ~ 99 that are not repeated, so as to randomly select topics from the database.
    @Override
    protected void onCreate(Bundle savedInstanceState) {
        super.onCreate(savedInstanceState);
        setContentView(R.layout.activity_test);
        toolbar = (Toolbar) findViewById(R.id.test_toolbar);
        toolbar.setTitle("Mock examination");
        count = -1;
        new setTitleCenter().setTitleCenter(toolbar);// Initialize ToolBar
        // Initialize the random number list, 10 numbers from 1 to 100
        Set<Integer> hashSet = new HashSet<Integer>();
        while (hashSet.size() != 10) {
            int number = (int) (Math.random() * 100);
            hashSet.add(number);
        }
Here we use the random number set hashSet mentioned earlier. We use the iterator to convert the data into an int id. according to this random id, we use the query statement of LitePal to obtain the knowledge object of the corresponding id in the database and add this object to the list of knowledge objects of this activity. Then is the instantiation of the control.
        // Initialize problem list
        Iterator it = hashSet.iterator();
        while (it.hasNext()) {
            int id = Integer.parseInt(it.next().toString());
            Knowledge knowledge = LitePal.find(Knowledge.class, id);
            knowledges.add(knowledge);
        }
        // Set topic
        question = findViewById(R.id.question);
        question_num = findViewById(R.id.question_num);
        radiogroup = findViewById(R.id.radioGroup);
        answer1 = findViewById(R.id.answer1);
        answer2 = findViewById(R.id.answer2);
        answer3 = findViewById(R.id.answer3);
        answer4 = findViewById(R.id.answer4);
        submit = findViewById(R.id.submit);
Here, we set up a listener for radioGroup to listen to the user's selection and select the corresponding answer. Answer will be assigned as the corresponding answer to store the user's answer. When the user selects an option, the color of the option is red.
        radiogroup.setOnCheckedChangeListener(new RadioGroup.OnCheckedChangeListener() {
            @Override
            public void onCheckedChanged(RadioGroup group, int checkedId) {
                // The selected text is displayed in red, and the unselected text is displayed in black
                if(answer1.isChecked()) {
                    answer = "Recyclable";
                    answer1.setTextColor(Color.parseColor("#FF0033"));
                }else{
                    answer1.setTextColor(Color.parseColor("#000000"));
                }
                if(answer2.isChecked()) {
                    answer = "Harmful Waste";
                    answer2.setTextColor(Color.parseColor("#FF0033"));
                }else{
                    answer2.setTextColor(Color.parseColor("#000000"));
                }
                if(answer3.isChecked()) {
                    answer = "Wet waste";
                    answer3.setTextColor(Color.parseColor("#FF0033"));
                }else{
                    answer3.setTextColor(Color.parseColor("#000000"));
                }
                if(answer4.isChecked()) {
                    answer = "Dry garbage";
                    answer4.setTextColor(Color.parseColor("#FF0033"));
                }else{
                    answer4.setTextColor(Color.parseColor("#000000"));
                }
            }
        });
Next, set the listener of the button. When the user has not clicked, the count is - 1. At this time, the button text has not changed. Only after clicking, it will become "submit answer". Every time the user clicks the button, count + +, compare the answer with the correct answer, record the score and save the user's answer.
        submit.setOnClickListener(new View.OnClickListener() {
            @Override
            public void onClick(View v) {
                radiogroup.clearCheck();
                if (count == -1) {
                    count++;
                    question_num.setText(Integer.toString(count + 1));
                    question.setText(knowledges.get(count).getName());
                    submit.setText("Submit answers");
                }
                else if (count < 10) {
                    if (!answer.equals("")) {
                        if (answer.equals(knowledges.get(count).getKind())) {
                            score += 10;
                        }
                        Knowledge knowledge = knowledges.get(count);
                        knowledge.setAnswer(answer);
                        knowledges.set(count, knowledge);
                    }
When the user answers the last question, the button changes to view the result.
                    count = count + 1;
                    if (count != 10)
                    {
                        question_num.setText(Integer.toString(count + 1));
                        question.setText(knowledges.get(count).getName());
                    }
                    else {
                        submit.setText("View results");
                    }
                }
Finally, when we click the button, we jump to a new activity and use intent and bundle to pass data, knowledges list and score. Since we need to store answer in the list, we need to modify the Knowledge class and add the answer element and the corresponding set and get methods. Because using bundle to transfer object list is different from transferring general data, you need to sequence the list. Just let the class inherit the interface Serializable. Then start a new activity and end it.
                else {
                    Intent intent = new Intent(TestActivity.this,
                            AnswerActivity.class);
                    Bundle bundle = new Bundle();
                    bundle.putSerializable("knowledges", (Serializable) knowledges);
                    bundle.putInt("score", score);
                    intent.putExtra("message", bundle);
                    startActivity(intent);
                    finish();// Destruction activities
                }
            }
        });
    }
}
Let's write the activity AnswerActivity that will jump after the answer is completed. Here, the first is still the vertical linear layout and toolbar.
<LinearLayout
    xmlns:android="http://schemas.android.com/apk/res/android"
    android:layout_width="match_parent"
    android:layout_height="match_parent"
    android:orientation="vertical">

    <androidx.appcompat.widget.Toolbar
        android:id="@+id/test_toolbar"
        android:layout_width="match_parent"
        android:layout_height="?attr/actionBarSize"
        android:background="#64E269" />
Then there is a horizontal linear layout, including an ImageView and a TextView, which are used to prompt the user and display the final score.
    <LinearLayout
        android:layout_width="match_parent"
        android:layout_height="0dp"
        android:layout_weight="1"
        android:orientation="horizontal"
        android:layout_margin="40dp">
        <ImageView
            android:layout_width="0dp"
            android:layout_height="match_parent"
            android:layout_weight="1"
            android:src="@drawable/score"
            android:layout_margin="10dp"
            android:scaleType="fitCenter" />
        <TextView
            android:id="@+id/score"
            android:layout_width="0dp"
            android:textSize="70sp"
            android:textColor="#F73C2E"
            android:layout_height="match_parent"
            android:layout_weight="1"
            android:layout_margin="10dp" />
    </LinearLayout>
Next is a vertical layout, which is used to display the results of users' answers. The first horizontal linear layout included is the header of the answer, which uses the TextView and split line centered relative to the layout.
    <LinearLayout
        android:layout_width="match_parent"
        android:layout_height="0dp"
        android:layout_weight="4"
        android:orientation="vertical">
        <LinearLayout
            android:layout_width="match_parent"
            android:layout_height="wrap_content"
            android:orientation="horizontal">
            <RelativeLayout
                android:layout_width="0dp"
                android:layout_height="match_parent"
                android:layout_weight="3">
                <TextView
                    android:layout_width="wrap_content"
                    android:layout_height="wrap_content"
                    android:text="subject"
                    android:textSize="20sp"
                    android:layout_centerInParent="true" />
            </RelativeLayout>
            <LinearLayout
                android:layout_width="1dp"
                android:layout_height="match_parent"
                android:background="#1B000000" />
            <RelativeLayout
                android:layout_width="0dp"
                android:layout_height="match_parent"
                android:layout_weight="2">
                <TextView
                    android:layout_width="wrap_content"
                    android:layout_height="wrap_content"
                    android:text="My answer"
                    android:textSize="20sp"
                    android:layout_centerInParent="true" />
            </RelativeLayout>
            <LinearLayout
                android:layout_width="1dp"
                android:layout_height="match_parent"
                android:background="#1B000000" />
            <RelativeLayout
                android:layout_width="0dp"
                android:layout_height="match_parent"
                android:layout_weight="2">
                <TextView
                    android:layout_width="wrap_content"
                    android:layout_height="wrap_content"
                    android:text="right key"
                    android:textSize="20sp"
                    android:layout_centerInParent="true" />
            </RelativeLayout>
        </LinearLayout>
Finally, the RecyclerView that displays the final answer.
        <LinearLayout
            android:layout_width="match_parent"
            android:layout_height="1dp"
            android:background="#1B000000" />

        <androidx.recyclerview.widget.RecyclerView
            android:id="@+id/answer_recyclerView"
            android:layout_width="match_parent"
            android:layout_height="match_parent" />
    </LinearLayout>
</LinearLayout>
Now that we have RecyclerView, we need to write the sub item layout. Write item_answer.xml, which is similar to the header of the answer in the previous layout. Textlayout and RelativeLayout are mainly used to display split lines.
<?xml version="1.0" encoding="utf-8"?>
<LinearLayout
    xmlns:android="http://schemas.android.com/apk/res/android"
    android:layout_width="match_parent"
    android:layout_height="match_parent"
    android:orientation="vertical">
    <LinearLayout
        android:layout_width="match_parent"
        android:layout_height="match_parent"
        android:orientation="horizontal">
        <RelativeLayout
            android:layout_width="0dp"
            android:layout_height="match_parent"
            android:layout_weight="3">
            <TextView
                android:id="@+id/question_done"
                android:layout_width="match_parent"
                android:layout_height="match_parent"
                android:textSize="20sp"
                android:layout_centerInParent="true" />
        </RelativeLayout>
        <LinearLayout
            android:layout_width="1dp"
            android:layout_height="match_parent"
            android:background="#1B000000" />
        <RelativeLayout
            android:layout_width="0dp"
            android:layout_height="match_parent"
            android:layout_weight="2">
            <TextView
                android:id="@+id/my_answer"
                android:layout_width="match_parent"
                android:layout_height="match_parent"
                android:textSize="20sp"
                android:layout_centerInParent="true" />
        </RelativeLayout>
        <LinearLayout
            android:layout_width="1dp"
            android:layout_height="match_parent"
            android:background="#1B000000" />
        <RelativeLayout
            android:layout_width="0dp"
            android:layout_height="match_parent"
            android:layout_weight="2">
            <TextView
                android:id="@+id/right_answer"
                android:layout_width="match_parent"
                android:layout_height="match_parent"
                android:textSize="20sp"
                android:layout_centerInParent="true" />
        </RelativeLayout>
    </LinearLayout>
    <LinearLayout
        android:layout_width="match_parent"
        android:layout_height="1dp"
        android:background="#1B000000" />
</LinearLayout>
Finally, let's write AnswerActivity. The control is still defined here.
public class AnswerActivity extends BaseActivity {

    private Toolbar toolbar;
    private TextView score_view;
    private List<Knowledge> knowledges = new ArrayList<>();
    private int score;
    private RecyclerView recyclerView;
    private MyAdapter myAdapter;
Main method here, we first initialize the control, and then use Intent and Bundle to obtain the answers and scores from the last active user, and then display and adapt them to the control. Adapt data and adapters to RecyclerView, which will not be repeated here.
    @Override
    protected void onCreate(Bundle savedInstanceState) {
        super.onCreate(savedInstanceState);
        setContentView(R.layout.activity_answer);
        toolbar = (Toolbar) findViewById(R.id.test_toolbar);
        toolbar.setTitle("Examination results");
        new setTitleCenter().setTitleCenter(toolbar);// Initialize ToolBar
        score_view = findViewById(R.id.score);
        // get data
        Intent intent = getIntent();
        Bundle bundle = intent.getBundleExtra("message");
        knowledges = (List<Knowledge>) bundle.getSerializable("knowledges");
        score = bundle.getInt("score");
        score_view.setText(String.valueOf(score));
        // Adaptation
        recyclerView = findViewById(R.id.answer_recyclerView);
        myAdapter = new MyAdapter();
        recyclerView.setAdapter(myAdapter);
        LinearLayoutManager manager = new LinearLayoutManager(AnswerActivity.this);
        recyclerView.setLayoutManager(manager);
    }

    private class MyAdapter extends RecyclerView.Adapter<MyViewHolder> {

        @NonNull
        @Override
        public MyViewHolder onCreateViewHolder(@NonNull ViewGroup parent, int viewType) {
            View view = View.inflate(AnswerActivity.this, R.layout.item_answer, null);
            MyViewHolder myViewHolder = new MyViewHolder(view);
            return myViewHolder;
        }

        @Override
        public void onBindViewHolder(@NonNull MyViewHolder holder, int position) {
            Knowledge knowledge = knowledges.get(position);
            holder.question_done.setText(knowledge.getName());
            holder.right_answer.setText(knowledge.getKind());
            holder.my_answer.setText(knowledge.getAnswer());
        }

        @Override
        public int getItemCount() {
            return knowledges.size();
        }
    }

    private class MyViewHolder extends RecyclerView.ViewHolder {

        TextView question_done;
        TextView my_answer;
        TextView right_answer;

        public MyViewHolder(@NonNull View itemView) {
            super(itemView);
            question_done = itemView.findViewById(R.id.question_done);
            my_answer = itemView.findViewById(R.id.my_answer);
            right_answer = itemView.findViewById(R.id.right_answer);
        }
    }
}
The results are shown in the figure:
Finally, we implement the two remaining functions of the home page: search box and speech recognition.
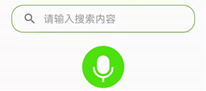
First, we set the search box EditText to lose focus and set click events in the home page interface, so that users can click the search box to jump to the search activity SearchActivity.
search = (EditText) view.findViewById(R.id.searchHome);
        search.setFocusable(false);//Lose focus
        search.setOnClickListener(new View.OnClickListener() {
            @Override
            public void onClick(View v) {
                Intent intent = new Intent(getActivity(), SearchActivity.class);
                startActivity(intent);
            }
        });
First write the layout activity of the search activity_search.xml. The layout is linear, with the title bar Toolbar at the top, then the search bar EditText, and the RecyclerView showing the search results below the search bar.
<?xml version="1.0" encoding="utf-8"?>
<LinearLayout
    xmlns:android="http://schemas.android.com/apk/res/android"
    android:layout_width="match_parent"
    android:layout_height="match_parent"
    android:orientation="vertical">

    <androidx.appcompat.widget.Toolbar
        android:id="@+id/search_toolbar"
        android:layout_width="match_parent"
        android:layout_height="?attr/actionBarSize"
        android:background="#64E269" />

    <EditText
        android:id="@+id/search"
        android:layout_width="match_parent"
        android:layout_height="50dp"
        android:layout_marginLeft="20dp"
        android:layout_marginRight="20dp"
        android:layout_marginTop="10dp"
        android:hint=" 🔍 Please enter the search content"
        android:paddingLeft="20dp"
        android:background="@drawable/searchview_circle"/>

    <androidx.recyclerview.widget.RecyclerView
        android:id="@+id/search_recyclerView"
        android:layout_width="match_parent"
        android:layout_height="match_parent"
        android:layout_margin="20dp"/>

</LinearLayout>
Then we write the search activity SearchActivity. First, define the control, knowledge list and an adapter to be used in the main function.
public class SearchActivity extends BaseActivity {

    private Toolbar toolbar;
    private EditText editText;
    private RecyclerView recyclerView;
    List<Knowledge> knowledges = new ArrayList<>();
    private MyAdapter myAdapter;
Then, load the layout just written in the main function onCreate, set the title bar to search, and then set it to be displayed in the middle; Then initialize the data list, load all data in the database into the knowledges list with SQLite statement, initialize recyclerView and adapter myAdapter, and finally specify the layout as linear layout with LinearLayoutManager.
    @Override
    protected void onCreate(Bundle savedInstanceState) {
        super.onCreate(savedInstanceState);
        setContentView(R.layout.activity_search);
        toolbar = (Toolbar) findViewById(R.id.search_toolbar);
        toolbar.setTitle("search");
        new setTitleCenter().setTitleCenter(toolbar);
        // Initialize data list
        knowledges = LitePal.findAll(Knowledge.class);
        recyclerView = findViewById(R.id.search_recyclerView);
        myAdapter = new SearchActivity.MyAdapter();
        recyclerView.setAdapter(myAdapter);
        LinearLayoutManager manager = new LinearLayoutManager(SearchActivity.this);
        recyclerView.setLayoutManager(manager);
Then we instantiate EditText. Because we want to use the speech recognition function, we need to use intent to transfer the speech recognition results to the current activity. First, use the if statement to judge whether there is an incoming recognition result. If so, the recognized result will be displayed in EditText; Then empty the list, re-use the SQLite statement to obtain the content containing the identification results in the database, and then update the adapter to refresh the search results displayed by recyclerView.
        // Instantiate EditText
        editText = findViewById(R.id.search);
        Intent intent = getIntent();
        String record = intent.getStringExtra("record");
        if (record != null) {
            editText.setText(record);
            knowledges.clear();
            knowledges = LitePal.where("name like ?", "%" + record + "%").
                    find(Knowledge.class);
            myAdapter = new SearchActivity.MyAdapter();
            recyclerView.setAdapter(myAdapter);
        }
Set a listener for our EditText user. Set up the adapter before the user enters the text; When the user's input box containing the current content in SQLite is used to obtain the search results in the dynamic input box of SQLite.
        editText.addTextChangedListener(new TextWatcher() {
            // Status before entering text
            @Override
            public void beforeTextChanged(CharSequence s, int start, int count, int after) {
                if(myAdapter != null){
                    recyclerView.setAdapter(myAdapter);
                }
            }
            // Status when entering text
            @Override
            public void onTextChanged(CharSequence s, int start, int before, int count) {
                String str = s.toString();
                knowledges.clear();
                knowledges = LitePal.where("name like ?", "%" + str + "%").
                        find(Knowledge.class);
                myAdapter = new SearchActivity.MyAdapter();
                recyclerView.setAdapter(myAdapter);
            }
            // Status after entering text
            @Override
            public void afterTextChanged(Editable s) {

            }
        });
    }
The rest is the implementation of the adapter class and ViewHolder, which has been introduced earlier and will not be repeated here.
    private class MyAdapter extends RecyclerView.Adapter<MyViewHolder> {

        @NonNull
        @Override
        public MyViewHolder onCreateViewHolder(@NonNull ViewGroup parent, int viewType) {
            View view = View.inflate(SearchActivity.this, R.layout.item_recyclerview, null);
            MyViewHolder myViewHolder = new MyViewHolder(view);
            return myViewHolder;
        }

        @Override
        public void onBindViewHolder(@NonNull MyViewHolder holder, int position) {
            Knowledge knowledge = knowledges.get(position);
            holder.name.setText(knowledge.getName());
            holder.kind.setText((knowledge.getKind()));
        }

        @Override
        public int getItemCount() {
            return knowledges.size();
        }
    }

    private class MyViewHolder extends RecyclerView.ViewHolder {

        TextView name;
        TextView kind;

        public MyViewHolder(@NonNull View itemView) {
            super(itemView);
            name = itemView.findViewById(R.id.name);
            kind = itemView.findViewById(R.id.kind);
        }
    }
}
The results are as follows: the user will refresh when entering a word, display the search content, and realize dynamic search; Content is all the content that contains the user's search content, so as to realize fuzzy search.
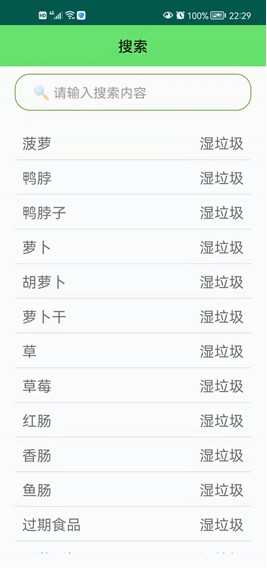
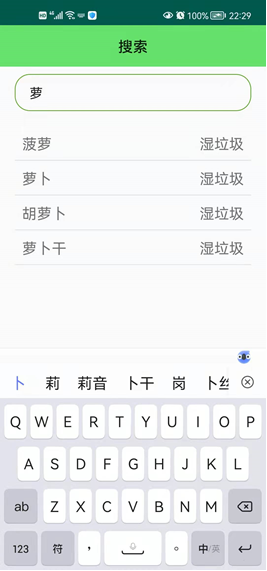
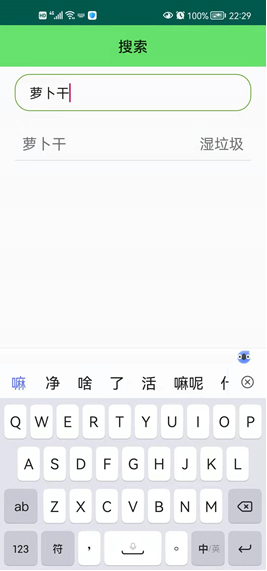
Write the last button of the protagonist interface - speech recognition. How to import api? I refer to this blog https://blog.csdn.net/qq_38436214/article/details/106636277#comments_19582555 .
After importing Baidu speech recognition library api according to the above blog, first define the speech recognition core library in HomeFragment.
    private EventManager asr;//Speech recognition core library
    private String result;
Next, start writing the speech recognition function. First, add the following permissions in the Manifest.
    <uses-permission android:name="android.permission.RECORD_AUDIO" />
    <uses-permission android:name="android.permission.ACCESS_NETWORK_STATE" />
    <uses-permission android:name="android.permission.INTERNET" />
    <uses-permission android:name="android.permission.WRITE_EXTERNAL_STORAGE" />
    <uses-permission android:name="android.permission.ACCESS_NETWORK_STATE" />
    <uses-permission android:name="android.permission.GET_TASKS" /> <!-- Bluetooth recording can be removed if not required -->
    <uses-permission android:name="android.permission.BROADCAST_STICKY" />
    <uses-permission android:name="android.permission.BLUETOOTH" />
    <uses-permission android:name="android.permission.MODIFY_AUDIO_SETTINGS" />
    <uses-permission android:name="android.permission.BLUETOOTH_ADMIN" />
Then add id and key to the Manifest file in the core folder. The value corresponding to value is generated after self registration. Everyone is different. Only in this way can you use the api.
    <application>
        <meta-data
            android:name="com.baidu.speech.APP_ID"
            android:value="25415468"/>
        <meta-data
                android:name="com.baidu.speech.API_KEY"
                android:value="iCYsEmwScqNGAlzDbZcl7vh4"/>
        <meta-data
                android:name="com.baidu.speech.SECRET_KEY"
                android:value="WakD4dM6hykhHreHjQ5uNayIXnP3BSSp"/>
    </application>
First, in the main function of HomeFragment, initialize the permissions to be used later.
        // Initialize permissions
        initPermission();
This microphone is naturally used for speech recognition. This permission needs to be applied dynamically. The initPermission method is as follows.
    private void initPermission() {
        String permissions[] = {Manifest.permission.RECORD_AUDIO,
                Manifest.permission.ACCESS_NETWORK_STATE,
                Manifest.permission.INTERNET,
                Manifest.permission.WRITE_EXTERNAL_STORAGE
        };

        ArrayList<String> toApplyList = new ArrayList<String>();

        for (String perm : permissions) {
            if (PackageManager.PERMISSION_GRANTED != ContextCompat.checkSelfPermission(getContext(), perm)) {
                toApplyList.add(perm);
            }
        }
        String tmpList[] = new String[toApplyList.size()];
        if (!toApplyList.isEmpty()) {
            ActivityCompat.requestPermissions(getActivity(), toApplyList.toArray(tmpList), 123);
        }
    }
Next, bind the press and release events to the recording button. When the button is pressed, the recording starts, and when the button is released, the recording ends.
        recording_button = (ImageButton) view.findViewById(R.id.recording_button);
        recording_button.setOnTouchListener(new View.OnTouchListener() {
            @Override
            public boolean onTouch(View v, MotionEvent event) {
                int action = event.getAction();
                if (action == MotionEvent.ACTION_DOWN) {
                    // Press to process the relevant logic
                    asr.send(SpeechConstant.ASR_START, "{}", null, 0, 0);
                } else if (action == MotionEvent.ACTION_UP) {
                    // Release processing related logic
                    asr.send(SpeechConstant.ASR_STOP, "{}", null, 0, 0);
                }
                return false;
            }
        });
Then initialize the speech recognition core library object and set the listener.
        //Initialize EventManager object
        asr = EventManagerFactory.create(getContext(), "asr");
        //Register your own output event class
        asr.registerListener(this); // onEvent method in EventListener
Since the speech recognition result obtained after parsing is a JSON string and cannot be searched directly, we need to process the result and convert it into a character recognition result that can be searched directly. Define the ASRresponse entity bean as follows.
package com.example.refuseclassification;

import java.util.List;

public class ASRresponse {

    /**
     * results_recognition : ["Hello, "]
     * result_type : final_result
     * best_result : Hello,
     * origin_result : {"asr_align_begin":80,"asr_align_end":130,"corpus_no":6835867007181645805,"err_no":0,"raf":133,"result":{"word":["Hello, "]}," sn":"82d975e0-6eb4-43ac-a0e7-850bb149f28e "}
     * error : 0
     */

    private String result_type;
    private String best_result;
    private OriginResultBean origin_result;
    private int error;
    private List<String> results_recognition;

    public String getResult_type() {
        return result_type;
    }

    public void setResult_type(String result_type) {
        this.result_type = result_type;
    }

    public String getBest_result() {
        return best_result;
    }

    public void setBest_result(String best_result) {
        this.best_result = best_result;
    }

    public OriginResultBean getOrigin_result() {
        return origin_result;
    }

    public void setOrigin_result(OriginResultBean origin_result) {
        this.origin_result = origin_result;
    }

    public int getError() {
        return error;
    }

    public void setError(int error) {
        this.error = error;
    }

    public List<String> getResults_recognition() {
        return results_recognition;
    }

    public void setResults_recognition(List<String> results_recognition) {
        this.results_recognition = results_recognition;
    }

    public static class OriginResultBean {
        /**
         * asr_align_begin : 80
         * asr_align_end : 130
         * corpus_no : 6835867007181645805
         * err_no : 0
         * raf : 133
         * result : {"word":["Hello, "]}
         * sn : 82d975e0-6eb4-43ac-a0e7-850bb149f28e
         */

        private int asr_align_begin;
        private int asr_align_end;
        private long corpus_no;
        private int err_no;
        private int raf;
        private ResultBean result;
        private String sn;

        public int getAsr_align_begin() {
            return asr_align_begin;
        }

        public void setAsr_align_begin(int asr_align_begin) {
            this.asr_align_begin = asr_align_begin;
        }

        public int getAsr_align_end() {
            return asr_align_end;
        }

        public void setAsr_align_end(int asr_align_end) {
            this.asr_align_end = asr_align_end;
        }

        public long getCorpus_no() {
            return corpus_no;
        }

        public void setCorpus_no(long corpus_no) {
            this.corpus_no = corpus_no;
        }

        public int getErr_no() {
            return err_no;
        }

        public void setErr_no(int err_no) {
            this.err_no = err_no;
        }

        public int getRaf() {
            return raf;
        }

        public void setRaf(int raf) {
            this.raf = raf;
        }

        public ResultBean getResult() {
            return result;
        }

        public void setResult(ResultBean result) {
            this.result = result;
        }

        public String getSn() {
            return sn;
        }

        public void setSn(String sn) {
            this.sn = sn;
        }

        public static class ResultBean {
            private List<String> word;

            public List<String> getWord() {
                return word;
            }

            public void setWord(List<String> word) {
                this.word = word;
            }
        }
    }
}
Then add GSON dependency to gradle, and we use GSON to process JSON data.
implementation 'com.squareup.retrofit2:converter-gson:2.4.0'
Later, we can directly use GSON for parsing in the processed results.
Next, we implement the core library interface EventListener.
public class HomeFragment extends Fragment implements EventListener {...}
We rewrite the callback method of the interface. Parameter params is the unprocessed json string after recognition. If params is empty, it means it is not recognized, and we skip the processing; Otherwise, we use GSON to parse the parameters and remove the "," to ensure the continuity of the string; Finally, use intent to pass the result to the next activity SearchActivity.
    @Override
    public void onEvent(String name, String params, byte[] data, int offset, int length) {
        if (name.equals(SpeechConstant.CALLBACK_EVENT_ASR_PARTIAL)) {
            // The results of identification are here
            if (params == null || params.isEmpty()) {
                return;
            }
            if (params.contains("\"final_result\"")) {
                // The final recognition result of a sentence
                Gson gson = new Gson();
                ASRresponse asRresponse = gson.fromJson(params, ASRresponse.class);//Data parsing to entity bean
                if(asRresponse.getBest_result().contains(",")){
                    // If it contains a comma, replace the comma with a space
                    // After replacing with spaces, remove the leading and trailing spaces of the string through trim
                    setResult(asRresponse.getBest_result().replace(',',' ').trim());
                }else {// Not included
                    setResult(asRresponse.getBest_result().trim());
                }
                Intent intent = new Intent(getActivity(), SearchActivity.class);
                if (result.contains(". ")) {
                    setResult(result.replaceAll(". ", ""));
                }
                intent.putExtra("record", result);
                startActivity(intent);
            }
        }
    }
Finally, we need to rewrite the end event and exit listening.
    @Override
    public void onDestroy() {
        super.onDestroy();
        //Send cancel event
        asr.send(SpeechConstant.ASR_CANCEL, "{}", null, 0, 0);
        //Exit event manager
        // It must be paired with registerListener, otherwise it may cause memory leakage
        asr.unregisterListener(this);
    }
The results are as follows: press the recording key to start speech recognition, release the recording key to jump to the search interface and display the search results.
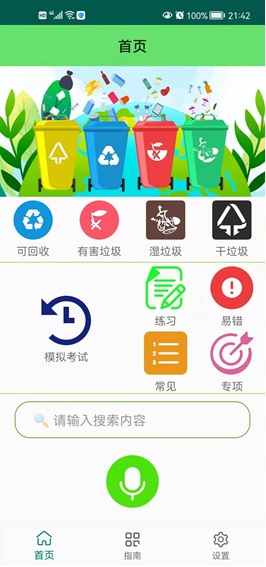
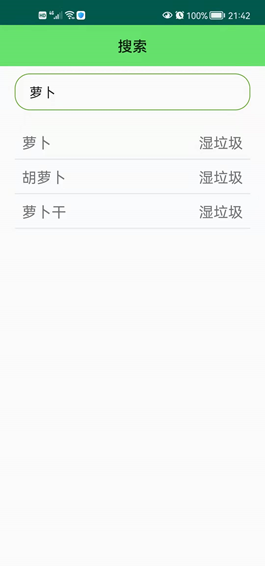
(5) Guide interface preparation
Next, write the second interface (guide interface). Open the previously created fragment layout frag_guide.xml and write the layout. Like the previous home fragment, you need a Toolbar as the title bar; Next is a top navigation bar, where TabLayout is used as the top navigation bar; Finally, a ViewPager container fills the rest of the screen to display fragments.
<?xml version="1.0" encoding="utf-8"?>
<LinearLayout
    xmlns:android="http://schemas.android.com/apk/res/android"
    android:layout_width="match_parent"
    android:layout_height="match_parent"
    android:orientation="vertical">

    <androidx.appcompat.widget.Toolbar
        android:id="@+id/guide_toolbar"
        android:layout_width="match_parent"
        android:layout_height="?attr/actionBarSize"
        android:background="#64E269" />

    <com.google.android.material.tabs.TabLayout
        android:id="@+id/guide_tab"
        android:layout_width="match_parent"
        android:layout_height="wrap_content" />

    <androidx.viewpager.widget.ViewPager
        android:id="@+id/viewPagerGuide"
        android:layout_width="match_parent"
        android:layout_height="0dp"
        android:layout_weight="1"/>

</LinearLayout>
Just as the BottomNavigationView mentioned above uses the ViewPager container to store fragments, TabLayout is the same. Both of them need an Adapter, because the pageradapter is written earlier Java, just reuse it directly here, so you don't need to rewrite it.
We directly write guidefragmet java. Like the previous BottomNavigationView, here are some components to be used.
public class GuideFragment extends Fragment {

    private TabLayout tabLayout;
    private List<Fragment> fragmentList;
    private ViewPager viewPager;
    private PagerAdapter adapter;
    private Toolbar toolbar;
Then, after initializing the fragment interface, instantiate the toolbar and call the method to set the title bar as "guide". Then we call the class method to instantiate TabLayout and viewPager, and click and slide events.
    @Override
    public View onCreateView(LayoutInflater inflater, ViewGroup container, Bundle savedInstanceState) {
        View view = inflater.inflate(R.layout.frag_guide, container, false);
        toolbar = (Toolbar) view.findViewById(R.id.guide_toolbar);
        toolbar.setTitle("guide");
        new setTitleCenter().setTitleCenter(toolbar);
        // Initialize tabLayout and viewPager and bind sliding and clicking events
        initMenuTabs(view);
        initViewPager(view);
        bindTabAndPager(view);
        return view;
    }
In the initMenuTabs method, instantiate tabLayout and set the corresponding tab title.
    public void initMenuTabs(View view) {
        tabLayout = (TabLayout) view.findViewById(R.id.guide_tab);
        tabLayout.setSelectedTabIndicatorColor(0);
        tabLayout.addTab(tabLayout.newTab().setText("Recyclable"));
        tabLayout.addTab(tabLayout.newTab().setText("Harmful Waste"));
        tabLayout.addTab(tabLayout.newTab().setText("Wet waste"));
        tabLayout.addTab(tabLayout.newTab().setText("Dry garbage"));
    }
Like the previous BottomNavigationView, this method adds four fragment s corresponding to the menu to the list, instantiates the adapter, and finally calls ViewPager The setAdapter() method is passed into PagerAdapter to achieve the effect of sliding the interface from left to right.
    public void initViewPager(View view) {
        viewPager = (ViewPager) view.findViewById(R.id.viewPagerGuide);
        fragmentList = new ArrayList<>();
        fragmentList.add(new RecyclableFragment());
        fragmentList.add(new HarmfulFragment());
        fragmentList.add(new WetFragment());
        fragmentList.add(new DryFragment());
        adapter = new PagerAdapter(getFragmentManager(), this, fragmentList);
        viewPager.setAdapter(adapter);
    }
This bindTabAndPager completes the linkage between ViewPager and TabLayout. We set up a listener for ViewPager to listen for changes in the TabLayout menu. When the TabLayout changes, ViewPager also changes. The last important point is to set the cache page of ViewPager to 3, because we have four fragments, and the default cache page of ViewPager is 1, resulting in continuous jump fragments to be reloaded.
    public void bindTabAndPager(View view) {
        tabLayout = (TabLayout) view.findViewById(R.id.guide_tab);
        viewPager = (ViewPager) view.findViewById(R.id.viewPagerGuide);
        viewPager.addOnPageChangeListener(new TabLayout.TabLayoutOnPageChangeListener(tabLayout));
        viewPager.setOffscreenPageLimit(3); // Set cache page to 3
        tabLayout.addOnTabSelectedListener(new TabLayout.OnTabSelectedListener() {
            @Override
            public void onTabSelected(TabLayout.Tab tab) {
                int position = tab.getPosition();
                viewPager.setCurrentItem(position);
            }

            @Override
            public void onTabUnselected(TabLayout.Tab tab) {

            }

            @Override
            public void onTabReselected(TabLayout.Tab tab) {

            }
        });
    }
}
Next, implement the fragments inside. The functions of the four fragments are the same. They are all used to popularize the four kinds of garbage. Here is an example of the interface of recyclable garbage. First, write frag_recyclable.xml file, which is very simple and contains only a WebView.
<?xml version="1.0" encoding="utf-8"?>
<LinearLayout
    xmlns:android="http://schemas.android.com/apk/res/android"
    android:orientation="vertical"
    android:layout_width="match_parent"
    android:layout_height="match_parent">

    <WebView
        android:id="@+id/recyclable_web"
        android:layout_width="match_parent"
        android:layout_height="match_parent" />

</LinearLayout>
Then write recyclablefragment Java, load the fragment layout just written, instantiate WebView, call getSettings method and setjavascript enabled (true) to make WebView support JavaScript scripts, then use setWebViewClient method to ensure that the web page is displayed in the app, and finally pass in the address url of Baidu Baike recyclable garbage.
public class RecyclableFragment extends Fragment {

    private WebView webView;

    @Override
    public View onCreateView(LayoutInflater inflater, ViewGroup container, Bundle savedInstanceState) {
        View view = inflater.inflate(R.layout.frag_recyclable, container, false);
        webView = (WebView) view.findViewById(R.id.recyclable_web);
        webView.getSettings().setJavaScriptEnabled(true);
        webView.setWebViewClient(new WebViewClient());
        // Baidu Encyclopedia
        webView.loadUrl("https://baike.baidu.com/item/%E5%8F%AF%E5%9B%9E%E6%94%B6%E7%89%A9");
        return view;
    }
}
The same is true for other documents.
Finally, apply for network permission in Manifest before you can access the network.
The results are as follows:
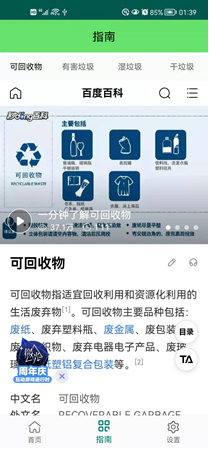
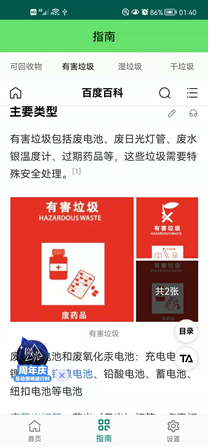
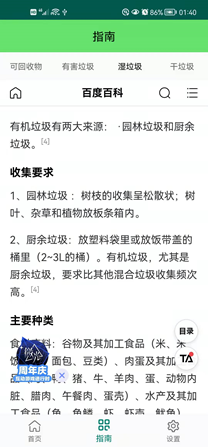
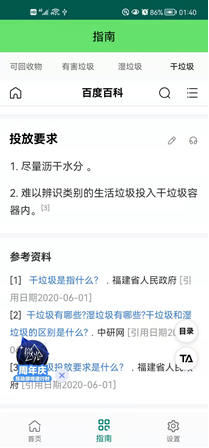
(6) Setting interface writing
Next, write the last interface (setting interface). Open the previously created fragment layout frag_setting.xml and write the layout. Like the previous home and guide fragments, you need a Toolbar as the title bar; Then there is a linear layout with ImageButton, due to changing the avatar; Finally, there are six textviews displayed in the middle, which are used to view notifications, contact, log out and other functions.
<?xml version="1.0" encoding="utf-8"?>
<LinearLayout
    xmlns:android="http://schemas.android.com/apk/res/android"
    xmlns:app="http://schemas.android.com/apk/res-auto"
    android:layout_width="match_parent"
    android:layout_height="match_parent"
    android:orientation="vertical">

    <androidx.appcompat.widget.Toolbar
        android:id="@+id/setting_toolbar"
        android:layout_width="match_parent"
        android:layout_height="?attr/actionBarSize"
        android:background="#64E269" />

    <LinearLayout
        android:layout_width="match_parent"
        android:layout_height="140dp"
        android:orientation="horizontal">
        <ImageButton
            android:id="@+id/person_photo"
            android:layout_margin="20dp"
            android:layout_width="100dp"
            android:layout_height="100dp"
            android:scaleType="fitCenter"
            android:background="@drawable/image_circle"
            android:src="@drawable/person_default" />
    </LinearLayout>

    <LinearLayout
        android:layout_width="match_parent"
        android:layout_height="1dp"
        android:background="#A3DD53" />

    <LinearLayout
        android:layout_width="match_parent"
        android:layout_height="wrap_content">
        <TextView
            android:id="@+id/text_notification"
            android:layout_width="match_parent"
            android:layout_height="wrap_content"
            android:layout_marginStart="8dp"
            android:layout_marginEnd="8dp"
            android:textAlignment="center"
            android:textSize="20sp"
            android:text="View notifications"
            android:paddingTop="15dp"
            android:paddingBottom="15dp"
            app:layout_constraintEnd_toEndOf="parent"
            app:layout_constraintStart_toStartOf="parent"
            app:layout_constraintTop_toTopOf="parent" />
    </LinearLayout>

    <LinearLayout
        android:layout_width="match_parent"
        android:layout_height="1dp"
        android:background="#A3DD53" />

    <LinearLayout
        android:layout_width="match_parent"
        android:layout_height="wrap_content">
        <TextView
            android:id="@+id/text_contact"
            android:layout_width="match_parent"
            android:layout_height="wrap_content"
            android:layout_marginStart="8dp"
            android:layout_marginEnd="8dp"
            android:textAlignment="center"
            android:textSize="20sp"
            android:text="contact us"
            android:paddingTop="15dp"
            android:paddingBottom="15dp"
            app:layout_constraintEnd_toEndOf="parent"
            app:layout_constraintStart_toStartOf="parent"
            app:layout_constraintTop_toTopOf="parent" />
    </LinearLayout>

    <LinearLayout
        android:layout_width="match_parent"
        android:layout_height="1dp"
        android:background="#A3DD53" />

    <LinearLayout
        android:layout_width="match_parent"
        android:layout_height="wrap_content">
        <TextView
            android:id="@+id/text_about"
            android:layout_width="match_parent"
            android:layout_height="wrap_content"
            android:layout_marginStart="8dp"
            android:layout_marginEnd="8dp"
            android:textAlignment="center"
            android:textSize="20sp"
            android:text="About us"
            android:paddingTop="15dp"
            android:paddingBottom="15dp"
            app:layout_constraintEnd_toEndOf="parent"
            app:layout_constraintStart_toStartOf="parent"
            app:layout_constraintTop_toTopOf="parent" />
    </LinearLayout>

    <LinearLayout
        android:layout_width="match_parent"
        android:layout_height="1dp"
        android:background="#A3DD53" />

    <LinearLayout
        android:layout_width="match_parent"
        android:layout_height="wrap_content">
        <TextView
            android:id="@+id/text_agreement"
            android:layout_width="match_parent"
            android:layout_height="wrap_content"
            android:layout_marginStart="8dp"
            android:layout_marginEnd="8dp"
            android:textAlignment="center"
            android:textSize="20sp"
            android:text="User agreement and privacy"
            android:paddingTop="15dp"
            android:paddingBottom="15dp"
            app:layout_constraintEnd_toEndOf="parent"
            app:layout_constraintStart_toStartOf="parent"
            app:layout_constraintTop_toTopOf="parent" />
    </LinearLayout>

    <LinearLayout
        android:layout_width="match_parent"
        android:layout_height="1dp"
        android:background="#A3DD53" />

    <LinearLayout
        android:layout_width="match_parent"
        android:layout_height="wrap_content">
        <TextView
            android:id="@+id/text_version"
            android:layout_width="match_parent"
            android:layout_height="wrap_content"
            android:layout_marginStart="8dp"
            android:layout_marginEnd="8dp"
            android:textAlignment="center"
            android:textSize="20sp"
            android:text="current version"
            android:paddingTop="15dp"
            android:paddingBottom="15dp"
            app:layout_constraintEnd_toEndOf="parent"
            app:layout_constraintStart_toStartOf="parent"
            app:layout_constraintTop_toTopOf="parent" />
    </LinearLayout>

    <LinearLayout
        android:layout_width="match_parent"
        android:layout_height="1dp"
        android:background="#A3DD53" />

    <LinearLayout
        android:layout_width="match_parent"
        android:layout_height="wrap_content">
        <TextView
            android:id="@+id/text_logout"
            android:layout_width="match_parent"
            android:layout_height="wrap_content"
            android:layout_marginStart="8dp"
            android:layout_marginEnd="8dp"
            android:textAlignment="center"
            android:textSize="20sp"
            android:text="Log out"
            android:paddingTop="15dp"
            android:paddingBottom="15dp"
            app:layout_constraintEnd_toEndOf="parent"
            app:layout_constraintStart_toStartOf="parent"
            app:layout_constraintTop_toTopOf="parent" />
    </LinearLayout>

    <LinearLayout
        android:layout_width="match_parent"
        android:layout_height="1dp"
        android:background="#A3DD53" />

</LinearLayout>
Finally, the setting interface is as follows.
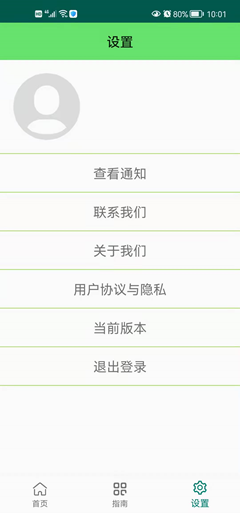
First, define the controls to be used in SettingFragment. Then set toolbar in the main function.
public class SettingFragment extends Fragment {

    private Toolbar toolbar;
    private ImageButton imageButton;
    private TextView notification;
    private TextView contact;
    private TextView about;
    private TextView agreement;
    private TextView version;
    private TextView logout;
    private Bitmap head;// Avatar Bitmap
    private static String path = "/sdcard/myHead/";// sd path

    @RequiresApi(api = Build.VERSION_CODES.JELLY_BEAN_MR2)
    @Override
    public View onCreateView(LayoutInflater inflater, ViewGroup container, Bundle savedInstanceState) {
        View view = inflater.inflate(R.layout.frag_setting, container, false);
        toolbar = (Toolbar) view.findViewById(R.id.setting_toolbar);
        toolbar.setTitle("set up");
        new setTitleCenter().setTitleCenter(toolbar);
First, let's realize the function of changing avatar. First instantiate the imageButton, then convert the avatar file in the album into a bitmap and display it on the imageButton. Then set the listener for imageButton, and call showTypeDialog() method when clicking.
        //API24 above systems share support starting with file: / / /
        StrictMode.VmPolicy.Builder builder = new StrictMode.VmPolicy.Builder();
        StrictMode.setVmPolicy(builder.build());
        builder.detectFileUriExposure();

        imageButton = (ImageButton) view.findViewById(R.id.person_photo);
        Bitmap bt = BitmapFactory.decodeFile(path + "head.jpg");// Find the avatar from the SD card and convert it into Bitmap
        if (bt != null) {
            @SuppressWarnings("deprecation")
            Drawable drawable = new BitmapDrawable(bt);// Convert to drawable
            imageButton.setImageDrawable(drawable);
        } else {
            /**
             * If there is no one in SD, you need to take the avatar from the server and save the retrieved avatar in SD
             *
             */
        }
        imageButton.setOnClickListener(new View.OnClickListener() {
            @Override
            public void onClick(View v) {
                switch (v.getId()) {
                    case R.id.person_photo:// change the avatar
                        showTypeDialog();
                        break;
                }
            }
        });
The showTypeDialog() method is implemented as follows. First, a dialog box is displayed. The layout of the dialog box is in dialog_select_photo.xml. Then get the instance of TextView of the dialog box respectively, and set the click event respectively. One is set to open the album, and the other is set to open the camera.
    private void showTypeDialog() {
        //display a dialog box
        AlertDialog.Builder builder = new AlertDialog.Builder(getActivity());
        final AlertDialog dialog = builder.create();
        View view = View.inflate(getActivity(), R.layout.dialog_select_photo, null);
        TextView tv_select_gallery = (TextView) view.findViewById(R.id.tv_select_gallery);
        TextView tv_select_camera = (TextView) view.findViewById(R.id.tv_select_camera);
        tv_select_gallery.setOnClickListener(new View.OnClickListener() {// Select in album
            @Override
            public void onClick(View v) {
                Intent intent1 = new Intent(Intent.ACTION_PICK, null);
                //Open file
                intent1.setDataAndType(MediaStore.Images.Media.EXTERNAL_CONTENT_URI, "image/*");
                startActivityForResult(intent1, 1);
                dialog.dismiss();
            }
        });
        tv_select_camera.setOnClickListener(new View.OnClickListener() {// Call camera
            @Override
            public void onClick(View v) {
                Intent intent2 = new Intent(MediaStore.ACTION_IMAGE_CAPTURE);
                intent2.putExtra(MediaStore.EXTRA_OUTPUT,
                        Uri.fromFile(new File(Environment.getExternalStorageDirectory(), "head.jpg")));
                startActivityForResult(intent2, 2);// Open with ForResult
                dialog.dismiss();
            }
        });
        dialog.setView(view);
        dialog.show();
    }
The layout of the dialog box is in dialog_select_photo.xml.
<?xml version="1.0" encoding="utf-8"?>
<RelativeLayout xmlns:android="http://schemas.android.com/apk/res/android"
    android:layout_width="match_parent"
    android:layout_height="match_parent"
    android:paddingLeft="60dp"
    android:paddingRight="60dp">
    <TextView
        android:id="@+id/tv_select_gallery"
        android:layout_width="match_parent"
        android:layout_height="wrap_content"
        android:paddingTop="20dp"
        android:padding="20dp"
        android:gravity="center"
        android:text="Select from album" />
    <TextView
        android:layout_below="@id/tv_select_gallery"
        android:id="@+id/tv_select_camera"
        android:layout_width="match_parent"
        android:layout_height="wrap_content"
        android:paddingBottom="20dp"
        android:gravity="center"
        android:text="Take photos" />
</RelativeLayout>
Next, we rewrite the onActivityResult() method and execute the cropPhoto() method after selecting the image.
    @Override
    public void onActivityResult(int requestCode, int resultCode, Intent data) {
        switch (requestCode) {
            case 1:
                if (resultCode == RESULT_OK) {
                    cropPhoto(data.getData());// Crop picture
                }
                break;
            case 2:
                if (resultCode == RESULT_OK) {
                    File temp = new File(Environment.getExternalStorageDirectory() + "/head.jpg");
                    cropPhoto(Uri.fromFile(temp));// Crop picture
                }
                break;
            case 3:
                if (data != null) {
                    Bundle extras = data.getExtras();
                    head = extras.getParcelable("data");
                    if (head != null) {
                        /**
                         * Upload server code
                         */
                        imageButton.setImageBitmap(head);// Display with ImageButton
                    }
                }
                break;
            default:
                break;

        }
        super.onActivityResult(requestCode, resultCode, data);
    }
Here, the clipping function of the system is called to specify the width and height to achieve the effect of clipping.
    /**
     * Call the clipping function of the system
     *
     * @param uri
     */
    public void cropPhoto(Uri uri) {
        Intent intent = new Intent("com.android.camera.action.CROP");
        intent.setDataAndType(uri, "image/*");
        intent.putExtra("crop", "true");
        // aspectX aspectY is the ratio of width to height
        intent.putExtra("aspectX", 1);
        intent.putExtra("aspectY", 1);
        // outputX outputY is the width and height of the cropped picture
        intent.putExtra("outputX", 250);
        intent.putExtra("outputY", 250);
        intent.putExtra("return-data", true);
        startActivityForResult(intent, 3);
    }
}
The effect is as follows.
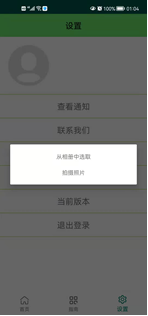
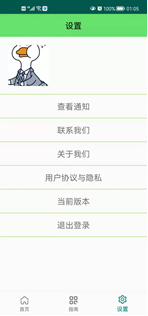
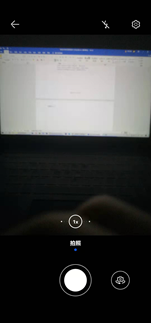
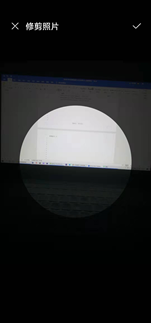
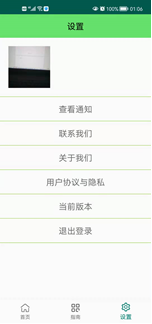
Next, let's implement the view notification function. After instantiating the TextView of the notification, we bind the listening event to it. First, create a new activity NotificationActivity, and click the notification bar to jump to the activity; Then use the notification manager to manage the notification. Finally, set some settings for the notification, such as title, content icon, activity and so on.
        notification = view.findViewById(R.id.text_notification);
        notification.setOnClickListener(new View.OnClickListener() {
            @Override
            public void onClick(View v) {
                Intent intent = new Intent(getActivity(), NotificationActivity.class);
                PendingIntent pi = PendingIntent.getActivities(getContext(),
                        0, new Intent[]{intent}, 0);
                NotificationManager manager = (NotificationManager)
                        getContext().getSystemService(NOTIFICATION_SERVICE);
                //Code to be added
                if (Build.VERSION.SDK_INT >= Build.VERSION_CODES.O){
                    String channelId = "default";
                    String channelName = "Default notification";
                    manager.createNotificationChannel(new NotificationChannel
                            (channelId, channelName, NotificationManager.IMPORTANCE_HIGH));
                }
                Notification notification = new NotificationCompat.
                        Builder(getContext(), "default")
                        .setContentTitle("notice")
                        .setContentText("Click to view the message content")
                        .setWhen(System.currentTimeMillis())
                        .setSmallIcon(R.mipmap.ic_launcher)
                        .setLargeIcon(BitmapFactory.decodeResource(getResources(), R.mipmap.ic_launcher))
                        .setContentIntent(pi)
                        .setAutoCancel(true)
                        .build();
                manager.notify(1, notification);
            }
        });
The activity and layout files of NotificationActivity are as follows. They are very simple, so they will not be repeated.
public class NotificationActivity extends BaseActivity {

    private Toolbar toolbar;

    @Override
    protected void onCreate(Bundle savedInstanceState) {
        super.onCreate(savedInstanceState);
        setContentView(R.layout.activity_notification);
        toolbar = (Toolbar) findViewById(R.id.notification_toolbar);
        toolbar.setTitle("notice");
        new setTitleCenter().setTitleCenter(toolbar);
    }
}
<?xml version="1.0" encoding="utf-8"?>
<RelativeLayout
    xmlns:android="http://schemas.android.com/apk/res/android"
    android:layout_width="match_parent"
    android:layout_height="match_parent">

    <androidx.appcompat.widget.Toolbar
        android:id="@+id/notification_toolbar"
        android:layout_width="match_parent"
        android:layout_height="?attr/actionBarSize"
        android:background="#64E269" />

    <TextView
        android:layout_width="wrap_content"
        android:layout_height="wrap_content"
        android:layout_centerInParent="true"
        android:textSize="24sp"
        android:text="No notice" />

</RelativeLayout>
The effect is as follows.
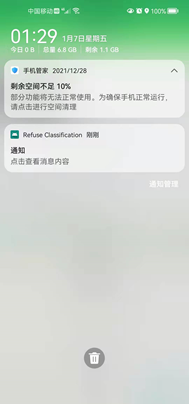
Next, let's implement "contact us", "about us" and "user agreement and privacy". First, instantiate the contact. When the user clicks it, it will jump to the interface of dialing the phone number. Here, a uri is passed in, which is a mobile phone number. The user can directly dial the changed phone by jumping to the dialing page; About is to click and jump to an AboutActivity; The agreement also jumps to the AgreementActivity.
        contact = view.findViewById(R.id.text_contact);
        contact.setOnClickListener(new View.OnClickListener() {
            @Override
            public void onClick(View v) {
                Intent intent = new Intent(Intent.ACTION_DIAL);
                intent.setData(Uri.parse("tel:15767064234"));
                startActivity(intent);
            }
        });

        about = view.findViewById(R.id.text_about);
        about.setOnClickListener(new View.OnClickListener() {
            @Override
            public void onClick(View v) {
                Intent intent = new Intent(getActivity(), AboutActivity.class);
                startActivity(intent);
            }
        });

        agreement = view.findViewById(R.id.text_agreement);
        agreement.setOnClickListener(new View.OnClickListener() {
            @Override
            public void onClick(View v) {
                Intent intent = new Intent(getActivity(), AgreementActivity.class);
                startActivity(intent);
            }
        });
The activities and layout of AboutActivity are as follows.
public class AboutActivity extends BaseActivity {

    private Toolbar toolbar;

    @Override
    protected void onCreate(Bundle savedInstanceState) {
        super.onCreate(savedInstanceState);
        setContentView(R.layout.activity_about);
        toolbar = (Toolbar) findViewById(R.id.about_toolbar);
        toolbar.setTitle("About us");
        new setTitleCenter().setTitleCenter(toolbar);
    }
}
<?xml version="1.0" encoding="utf-8"?>
<LinearLayout
    xmlns:android="http://schemas.android.com/apk/res/android"
    xmlns:app="http://schemas.android.com/apk/res-auto"
    xmlns:tools="http://schemas.android.com/tools"
    android:layout_width="match_parent"
    android:layout_height="match_parent"
    android:orientation="vertical"
    tools:context=".AboutActivity">

    <androidx.appcompat.widget.Toolbar
        android:id="@+id/about_toolbar"
        android:layout_width="match_parent"
        android:layout_height="?attr/actionBarSize"
        android:background="#64E269" />

    <LinearLayout
        android:layout_width="match_parent"
        android:layout_height="30dp" />

    <TextView
        android:layout_width="wrap_content"
        android:layout_height="wrap_content"
        android:text="Chen Honglong"
        android:textSize="20sp"
        android:padding="15dp"
        android:layout_gravity="center_horizontal" />

    <TextView
        android:layout_width="wrap_content"
        android:layout_height="wrap_content"
        android:text="2019151027"
        android:textSize="20sp"
        android:padding="15dp"
        android:layout_gravity="center_horizontal" />

    <TextView
        android:layout_width="wrap_content"
        android:layout_height="wrap_content"
        android:text="School of computer and software engineering"
        android:textSize="20sp"
        android:padding="15dp"
        android:layout_gravity="center_horizontal" />
    <TextView
        android:layout_width="wrap_content"
        android:layout_height="wrap_content"
        android:text="2019 Class III soft worker"
        android:textSize="20sp"
        android:padding="15dp"
        android:layout_gravity="center_horizontal" />
</LinearLayout>
The activities and layout of AgreementActivity are as follows. The content of privacy and agreement is directly presented in the text content of TextView.
public class AgreementActivity extends BaseActivity {

    private Toolbar toolbar;

    @Override
    protected void onCreate(Bundle savedInstanceState) {
        super.onCreate(savedInstanceState);
        setContentView(R.layout.activity_agreement);
        toolbar = (Toolbar) findViewById(R.id.agreement_toolbar);
        toolbar.setTitle("User agreement and privacy");
        new setTitleCenter().setTitleCenter(toolbar);
    }
}
<?xml version="1.0" encoding="utf-8"?>
<LinearLayout
    xmlns:android="http://schemas.android.com/apk/res/android"
    xmlns:app="http://schemas.android.com/apk/res-auto"
    xmlns:tools="http://schemas.android.com/tools"
    android:layout_width="match_parent"
    android:layout_height="match_parent"
    android:orientation="vertical"
    tools:context=".AgreementActivity">

    <androidx.appcompat.widget.Toolbar
        android:id="@+id/agreement_toolbar"
        android:layout_width="match_parent"
        android:layout_height="?attr/actionBarSize"
        android:background="#64E269" />

    <ScrollView
        android:layout_width="match_parent"
        android:layout_height="match_parent">
        <TextView
            android:id="@+id/agreement"
            android:layout_width="wrap_content"
            android:layout_height="wrap_content"
            android:scrollbarAlwaysDrawVerticalTrack="true"
            android:text="User agreement and privacy agreement\n... />

    </ScrollView>

</LinearLayout>
The effect is as follows.

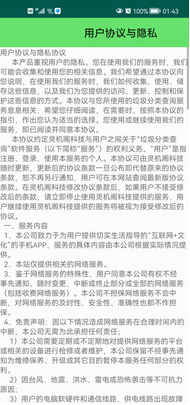
Next, let's implement the function of viewing the current version. The click event set for version here uses a Toast to display "currently the latest version".
        version = view.findViewById(R.id.text_version);
        version.setOnClickListener(new View.OnClickListener() {
            @Override
            public void onClick(View v) {
                Toast.makeText(getContext(), "The current version is the latest", Toast.LENGTH_SHORT).show();
            }
        });
The effect is as follows.
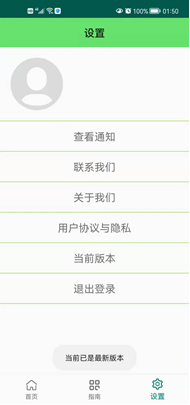
Finally, we implement the function of forced offline. Set the click event for logout. When the user clicks, a broadcast will be sent.
        logout = view.findViewById(R.id.text_logout);
        logout.setOnClickListener(new View.OnClickListener() {
            @Override
            public void onClick(View v) {
                Intent intent = new Intent("com.example.refuseclassification.FORCE_OFFLINE");
                getActivity().sendBroadcast(intent);
            }
        });
Then we write a BaseActivity that inherits from AppCompatActivity. All activities use the rewritten BaseActivity instead of AppCompatActivity. Register a broadcast listener in BaseActivity to receive the broadcast sent by the user. After the user sends the broadcast, a prompt box will pop up, and the user will jump to the login interface after clicking. Finally, we will unregister the broadcast.
package com.example.refuseclassification;

import android.app.ActivityManager;
import android.app.AlertDialog;
import android.content.BroadcastReceiver;
import android.content.Context;
import android.content.DialogInterface;
import android.content.Intent;
import android.content.IntentFilter;
import android.net.ConnectivityManager;
import android.net.NetworkInfo;
import android.os.Bundle;
import android.widget.Toast;

import androidx.appcompat.app.AppCompatActivity;

public class BaseActivity extends AppCompatActivity {

    private ForceOfflineReceiver receiver;

    @Override
    protected void onCreate(Bundle savedInstanceState) {
        super.onCreate(savedInstanceState);
        ActivityCollector.addActivity(this);
    }

    @Override
    protected void onResume() {
        super.onResume();
        IntentFilter intentFilter = new IntentFilter();
        intentFilter.addAction("com.example.refuseclassification.FORCE_OFFLINE");
        receiver = new ForceOfflineReceiver();
        registerReceiver(receiver, intentFilter);
    }

    @Override
    protected void onPause() {
        super.onPause();
        if (receiver != null) {
            unregisterReceiver(receiver);
            receiver = null;
        }
    }

    @Override
    protected void onDestroy() {
        super.onDestroy();
        ActivityCollector.removeActivity(this);
    }

    class ForceOfflineReceiver extends BroadcastReceiver {

        @Override
        public void onReceive(final Context context, Intent intent) {
            AlertDialog.Builder builder = new AlertDialog.Builder(context);
            builder.setTitle("Warning");
            builder.setMessage("You have exited. Please log in again");
            builder.setCancelable(false);
            builder.setPositiveButton("OK", new DialogInterface.OnClickListener() {
                @Override
                public void onClick(DialogInterface dialog, int which) {
                    ActivityCollector.finishAll();  //Destroy all activities
                    Intent i = new Intent(context, LoginActivity.class);
                    context.startActivity(i);   //Restart LoginActivity
                }
            });
            builder.show();
        }
    }
}
The results are as follows.
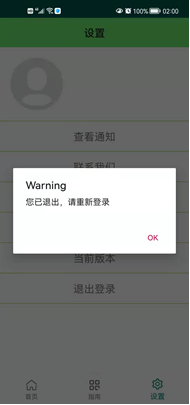
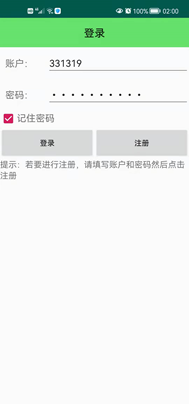
2. Please specify the functions, key problems and solutions of "my garbage classification APP"
Function display
sure Click here to download , browse function.
Problems and Solutions
(1) fragment loading problem
If you load the Fragment directly with BottomNavigation, the Fragment will not be displayed normally. You need to use ViewPager to cache the Fragment.
(2) Set button background transparency
When zooming the button icon, I found that the surrounding of the button was gray, and I didn't know how to solve it. Later, I found that setting the background color to white can achieve the transparent effect.
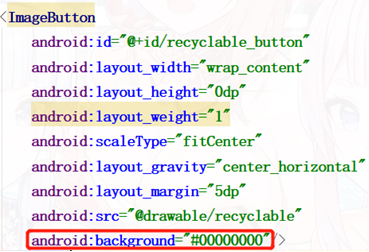
(3) Cache of TabLayout interface
When there was no cache at first, I found that moving the interface activity and sliding it back would cause the interface to reload, and there was no place I just saw, so I set the cache interface to 3 to ensure that there was no need to reload.

(4) Declaration of authority
This app needs to apply for the following permissions, including network permission, recording permission, etc.
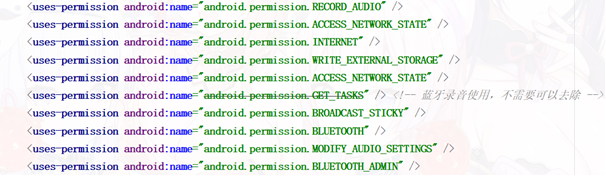
(5) Generation of non repeating random numbers
When randomly generating questions, in order to ensure that the questions are not repeated, the java class object Set is used. It is a collection, and the elements in the collection are not repeated, so as to ensure that the questions are not repeated.
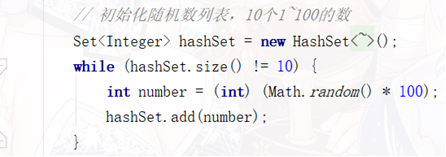
(6) Value transfer of object list
When intent passes the object list, it cannot pass the value as usual. It needs to serialize the object before it can pass the value normally.
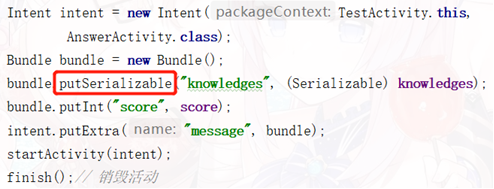

(7) EditText focus lost
If you don't lose focus, the user will jump out of the input method when clicking the input box on the home page; After losing focus, you can jump to the next page smoothly.
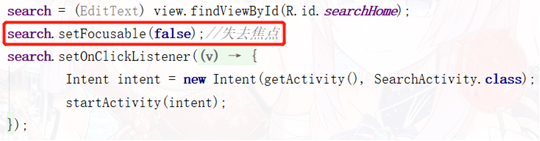
(8) Application and call of Baidu speech recognition api
Reference https://blog.csdn.net/qq_38436214/article/details/106636277#comments_19582555 , the speech recognition function is successfully realized.
3, Experimental summary
This experiment is the most difficult experiment I have ever done. It comprehensively applies a lot of knowledge learned in the classroom, basically covers what the teacher said, and also needs to explore and learn some new knowledge and apply it to the experiment. Although this experiment is difficult, because the previous experiments have laid some foundation for me, I won't be at a loss when I start this experiment. The process of building an app is smooth. If you encounter difficulties, you can find them online and study them yourself. Due to the problem of time, I only spent less than a week to complete this experiment. Finally, I am very satisfied that I can achieve this effect. I would also like to thank my teachers and classmates for teaching me a lot of things, so that I can basically master Android and make such a project.