○ reference links 🔗
Windows agent installation from MSI
1, Introduction to Zabbix 🔊
🏆 Zabbix is an enterprise class open source solution that provides distributed system monitoring and network monitoring functions based on WEB interface.
🌈 It can monitor various network parameters to ensure the safe operation of the server system; And provide flexible notification mechanism to enable system administrators to quickly locate / solve various problems.

2, Zabbix functional features and architecture diagram 🥇
summary 🥇
Zabbix is an enterprise level distributed open source monitoring solution. A software package contains multiple functions..
data acquisition
- Availability and performance inspection;
- Support SNMP (including active polling and passive capture), IPMI, JMX and VMware monitoring;
- Custom check;
- Collect the required data according to the user-defined time interval;
- Perform data collection through Server/Proxy and Agents.
Flexible threshold definition
You can refer to the backend database to define a very flexible alarm threshold, that is, trigger
Highly configurable alarm
-
The alarm notification can be customized according to the incremental plan, receiver and media type;
-
Using macro variables can make alarm notification more efficient and useful;
-
Automatic operation includes remote execution commands.
Real time graphics
Using the built-in graphics function, the monitoring items can be drawn into graphics in real time.
Web monitoring function
Zabbix can track the click operation of the simulated mouse on the Web site to check the function and response time of the Web site.
Rich visualization options
- You can combine multiple monitoring items into a single view to create custom charts;
- Network topology;
- Display custom aggregate graphics and slide presentations in dashboard style;
- report form;
- Higher level presentation view (business view) of monitoring resources.
Historical data storage
- Data stored in the database;
- Historical configuration;
- Built in data management mechanism (housekeeping).
Simple configuration
- Add the monitored equipment as the host;
- Once the host is added to the database, it will collect data for monitoring;
- Use templates for monitoring equipment.
Network discovery
- Automatic discovery of network equipment;
- Zabbix Agent automatically registers after discovering the device;
- Automatically discover file systems, network interfaces, and SNMP OIDs values.
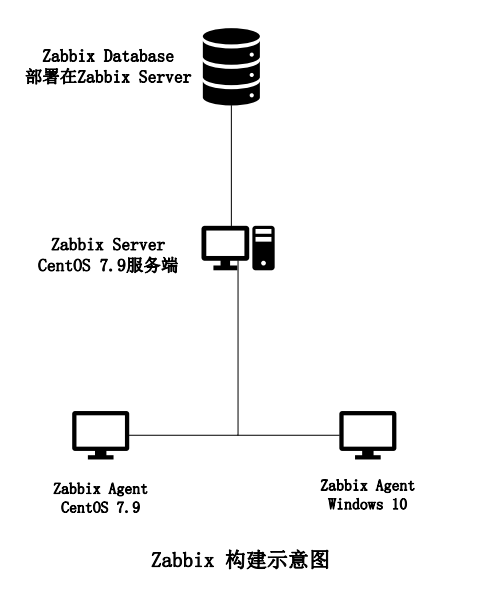
3, Zabbix node planning 🎨
| host name | IP address | operating system | Service role | remarks |
|---|---|---|---|---|
| 💻zabbix-server | 192.168.200.60 | CentOS 7.9 | Zabbix-Server | |
| 💻zabbix-agent-centos | 192.168.200.70 | CentOS 7.9 | Zabbix-Agent | |
| 💻xyb | 192.168.200.80 | Windows 10 | Zabbix-Agent |
4, Zabbix installation steps 📌
I. ZABBIX server server deployment 🔴
1. Basic environment configuration 📖
(1) Configure host name 📚
[root@localhost ~]# hostnamectl set-hostname zabbix-server
[root@localhost ~]# bash
[root@zabbix-server ~]# hostname
zabbix-server
(2) Turn off firewall and SELINUX security mode 📴
#Turn off the firewall and set startup not to start
[root@zabbix-server ~]# systemctl disable firewalld
Removed symlink /etc/systemd/system/multi-user.target.wants/firewalld.service.
Removed symlink /etc/systemd/system/dbus-org.fedoraproject.FirewallD1.service.

close SElinux safe mode
[root@zabbix-server ~]# setenforce 0
[root@zabbix-server ~]# getenforce
Permissive
[root@zabbix-server ~]# vi /etc/selinux/config
 Modify the following:
SELINUX=disabled
 Press:wq Save and exit. Restart takes effect.
[root@zabbix-server ~]# reboot
(3) Configure network information 📝
[root@zabbix-server ~]# vi /etc/sysconfig/network-scripts/ifcfg-ens32
[root@zabbix-server ~]# cat /etc/sysconfig/network-scripts/ifcfg-ens32
TYPE=Ethernet
PROXY_METHOD=none
BROWSER_ONLY=no
BOOTPROTO=static
DEFROUTE=yes
IPV4_FAILURE_FATAL=no
IPV6INIT=yes
IPV6_AUTOCONF=yes
IPV6_DEFROUTE=yes
IPV6_FAILURE_FATAL=no
IPV6_ADDR_GEN_MODE=stable-privacy
NAME=ens32
DEVICE=ens32
ONBOOT=yes
IPADDR=192.168.200.60
PREFIX=24
GATEWAY=192.168.200.1
DNS1=8.8.8.8
DNS2=192.168.200.1
[root@zabbix-server ~]# systemctl restart network
[root@zabbix-server ~]# systemctl status network
(4) Configure update YUM source 📝
-
Backup system YUM source
[root@zabbix-server ~]# cd /etc/yum.repos.d/
[root@zabbix-server yum.repos.d]# mkdir bak
[root@zabbix-server yum.repos.d]# cp -r CentOS-* bak/
[root@zabbix-server yum.repos.d]# cd bak
[root@zabbix-server bak]# ll
total 40
-rw-r--r-- 1 root root 1664 Feb  9 15:56 CentOS-Base.repo
-rw-r--r-- 1 root root 1309 Feb  9 15:56 CentOS-CR.repo
-rw-r--r-- 1 root root  649 Feb  9 15:56 CentOS-Debuginfo.repo
-rw-r--r-- 1 root root  314 Feb  9 15:56 CentOS-fasttrack.repo
-rw-r--r-- 1 root root  630 Feb  9 15:56 CentOS-Media.repo
-rw-r--r-- 1 root root 1331 Feb  9 15:56 CentOS-Sources.repo
-rw-r--r-- 1 root root 8515 Feb  9 15:56 CentOS-Vault.repo
-rw-r--r-- 1 root root  616 Feb  9 15:56 CentOS-x86_64-kernel.repo
-
Configure alicloud YUM image source
🔔 Reference link: [Alibaba cloud image] change the image of Alibaba open source image station - CentOS
[root@zabbix-server yum.repos.d]# curl -o /etc/yum.repos.d/CentOS-Base.repo https://mirrors.aliyun.com/repo/Centos-7.repo % Total % Received % Xferd Average Speed Time Time Time Current Dload Upload Total Spent Left Speed 100 2523 100 2523 0 0 20183 0 --:--:-- --:--:-- --:--:-- 20184 [root@zabbix-server yum.repos.d]# ll total 4 drwxr-xr-x 2 root root 220 Feb 9 15:56 bak -rw-r--r-- 1 root root 2523 Feb 9 16:05 CentOS-Base.repo -
Update YUM source
[root@zabbix-server ~]# yum clean all
Loaded plugins: fastestmirror
Cleaning repos: base extras updates
Cleaning up list of fastest mirrors
[root@zabbix-server ~]# yum makecache
Loaded plugins: fastestmirror
Determining fastest mirrors
 * base: mirrors.aliyuncs.com
 * extras: mirrors.aliyuncs.com
 * updates: mirrors.aliyuncs.com
base                                      | 3.6 kB  00:00:00
extras                                    | 2.9 kB  00:00:00
updates                                   | 2.9 kB  00:00:00
(1/10): base/7/x86_64/group_gz            | 153 kB  00:00:00
(2/10): base/7/x86_64/primary_db          | 6.1 MB  00:00:00
(3/10): base/7/x86_64/other_db            | 2.6 MB  00:00:00
(4/10): extras/7/x86_64/filelists_db      | 259 kB  00:00:00
(5/10): extras/7/x86_64/primary_db        | 243 kB  00:00:00
(6/10): extras/7/x86_64/other_db          | 145 kB  00:00:00
(7/10): base/7/x86_64/filelists_db        | 7.2 MB  00:00:01
(8/10): updates/7/x86_64/filelists_db     | 7.4 MB  00:00:01
(9/10): updates/7/x86_64/other_db         | 960 kB  00:00:00
(10/10): updates/7/x86_64/primary_db      |  13 MB  00:00:01
Metadata Cache Created
[root@zabbix-server ~]# yum repolist
Loaded plugins: fastestmirror
Loading mirror speeds from cached hostfile
 * base: mirrors.aliyuncs.com
 * extras: mirrors.aliyuncs.com
 * updates: mirrors.aliyuncs.com
repo id                 repo name                  status
base/7/x86_64    CentOS-7 - Base - mirrors.aliyun.com    10,072
extras/7/x86_64  CentOS-7 - Extras - mirrors.aliyun.com   500
updates/7/x86_64 CentOS-7 - Updates - mirrors.aliyun.com  3,411
repolist: 13,983
[root@zabbix-server ~]# yum update
2. Install Zabbix image source 📔
rpm -Uvh https://mirrors.aliyun.com/zabbix/zabbix/5.0/rhel/7/x86_64/zabbix-release-5.0-1.el7.noarch.rpm

sed -i 's#http://repo.zabbix.com#https://mirrors.aliyun.com/zabbix#' /etc/yum.repos.d/zabbix.repo
[root@zabbix-server yum.repos.d]# rpm -Uvh https://mirrors.aliyun.com/zabbix/zabbix/5.0/rhel/7/x86_64/zabbix-release-5.0-1.el7.noarch.rpm
Retrieving https://mirrors.aliyun.com/zabbix/zabbix/5.0/rhel/7/x86_64/zabbix-release-5.0-1.el7.noarch.rpm
warning: /var/tmp/rpm-tmp.lQMN6g: Header V4 RSA/SHA512 Signature, key ID a14fe591: NOKEY
Preparing...                          ################################# [100%]
Updating / installing...
   1:zabbix-release-5.0-1.el7         ################################# [100%]
[root@zabbix-server yum.repos.d]# ll
total 8
drwxr-xr-x 2 root root  220 Feb  9 15:56 bak
-rw-r--r-- 1 root root 1759 Feb  9 16:35 CentOS-Base.repo
-rw-r--r-- 1 root root  853 May 11  2020 zabbix.repo
[root@zabbix-server yum.repos.d]# sed -i 's#http://repo.zabbix.com#https://mirrors.aliyun.com/zabbix#' /etc/yum.repos.d/zabbix.repo
[root@zabbix-server yum.repos.d]# yum makecache
Loaded plugins: fastestmirror
Loading mirror speeds from cached hostfile
base                                       | 3.6 kB  00:00:00
extras                                     | 2.9 kB  00:00:00
updates                                    | 2.9 kB  00:00:00
zabbix                                     | 2.9 kB  00:00:00
zabbix-non-supported                       | 2.9 kB  00:00:00
(1/6): zabbix/x86_64/primary_db            | 140 kB  00:00:00
(2/6): zabbix/x86_64/other_db              | 215 kB  00:00:00
(3/6): zabbix-non-supported/x86_64/filelists_db  | 1.7 kB  00:00:00
(4/6): zabbix-non-supported/x86_64/other_db      | 3.3 kB  00:00:00
(5/6): zabbix/x86_64/filelists_db                |  49 kB  00:00:01
(6/6): zabbix-non-supported/x86_64/primary_db    | 3.7 kB  00:00:01
Metadata Cache Created
[root@zabbix-server yum.repos.d]# yum repolist
Loaded plugins: fastestmirror
Loading mirror speeds from cached hostfile
repo id                repo name          status
base/7/x86_64     CentOS-7 - Base - mirrors.aliyun.com       10,072
extras/7/x86_64   CentOS-7 - Extras - mirrors.aliyun.com     500
updates/7/x86_64  CentOS-7 - Updates - mirrors.aliyun.com    3,411
zabbix/x86_64     Zabbix Official Repository - x86_64        233
zabbix-non-supported/x86_64 Zabbix Official Repository non-supported - x86_64           5
repolist: 14,221
[root@zabbix-server yum.repos.d]#
3. Install Zabbix server 📕
[root@zabbix-server ~]# yum install zabbix-server-mysql
[root@zabbix-server ~]# rpm -qa | grep zabbix
zabbix-release-5.0-1.el7.noarch
zabbix-server-mysql-5.0.20-1.el7.x86_64
4. Install SCL repository 📗
Reference link: RHEL/CentOS 7 front end installation
Starting with Zabbix version 5.0, the Zabbix front end requires PHP version 7.2 or higher. Unfortunately, RHEL/CentOS 7 only provides PHP version 5.4 by default This experiment introduces the recommended method of installing Zabbix front end on RHEL/CentOS 7.
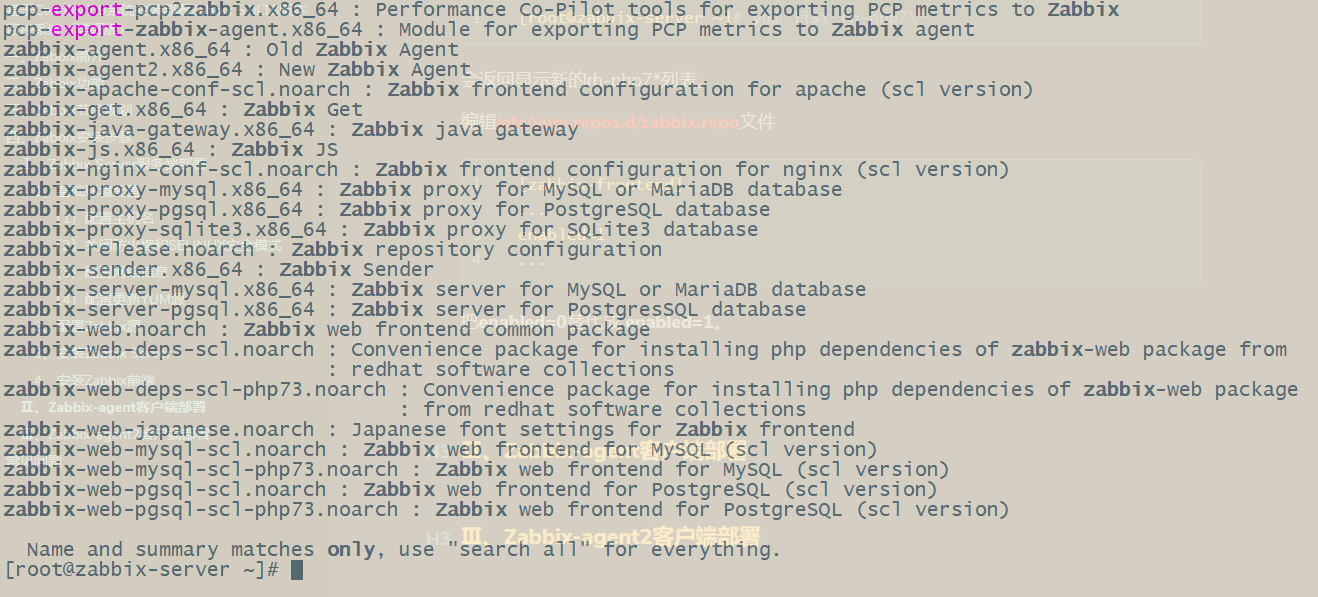
From the official installation package repo.zabbix.com The clean installation of Zabbix 5.0 has been completed. When searching for Zabbix using yum, the front-end package may be missing.
use yum search Zabbix
[root@zabbix-server ~]# yum search all zabbix
Loaded plugins: fastestmirror
Loading mirror speeds from cached hostfile
============================================== Matched: zabbix ==============================================
zabbix-agent.x86_64 : Old Zabbix Agent
zabbix-agent2.x86_64 : New Zabbix Agent
zabbix-get.x86_64 : Zabbix Get
zabbix-js.x86_64 : Zabbix JS
zabbix-proxy-mysql.x86_64 : Zabbix proxy for MySQL or MariaDB database
zabbix-proxy-pgsql.x86_64 : Zabbix proxy for PostgreSQL database
zabbix-proxy-sqlite3.x86_64 : Zabbix proxy for SQLite3 database
zabbix-release.noarch : Zabbix repository configuration
zabbix-sender.x86_64 : Zabbix Sender
zabbix-server-mysql.x86_64 : Zabbix server for MySQL or MariaDB database
zabbix-server-pgsql.x86_64 : Zabbix server for PostgresSQL database
pcp-export-pcp2zabbix.x86_64 : Performance Co-Pilot tools for exporting PCP metrics to Zabbix
pcp-export-zabbix-agent.x86_64 : Module for exporting PCP metrics to Zabbix agent
zabbix-java-gateway.x86_64 : Zabbix java gateway
Because the front-end package is moved to a dedicated front terminal directory frontend.
However, the Zabbix front end can be installed, provided that PHP 7.2 dependencies are provided.
For convenience, any direct dependencies on PHP have been removed from the main ZABBIX web package. This is to solve php7 The dependency approach provides greater flexibility.
It is recommended to use the PHP package in the Red Hat software collection.
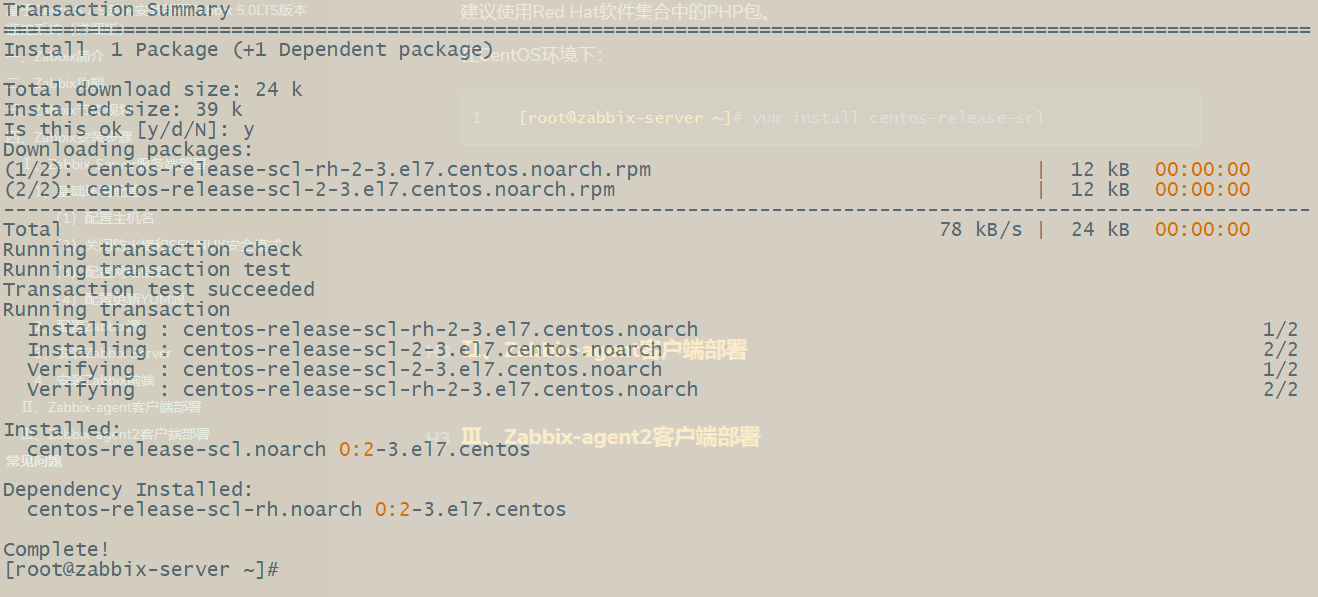
In CentOS environment:
[root@zabbix-server ~]# yum install centos-release-scl
View PHP 7 X version
[root@zabbix-server ~]# yum list rh-php7\*
A new rh-php7 * list is returned.
Edit / etc / yum.com repos. d/zabbix. Repo file
[zabbix-frontend]
...
enabled=1
...
Replace enabled=0 with enabled=1.
At this stage, searching for Zabbix through yum will return the Zabbix web package and four new packages. The four packages are:
- Zabbix-nginx-conf-scl. Noarch: the Zabbix front-end configuration of nginx (SCL version)
- zabbix-web-deps-scl.noarch: a convenience package for installing PHP dependencies required by the ZABBIX web package from the redhat software collection
- zabbix-web-mysql-scl.noarch: Zabbix web front-end package for MySQL database (SCL version)
- zabbix-web-pgsql-scl.noarch: Zabbix web front end package for PostgreSQL database (SCL version)
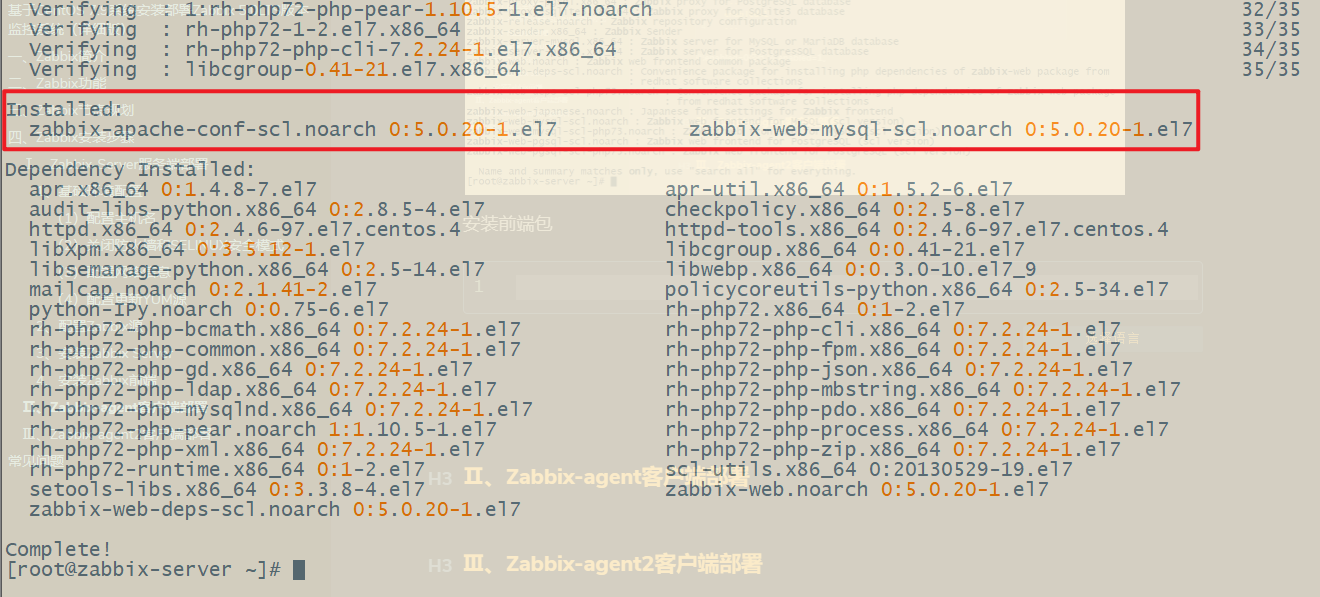
5. Install zabbix front end package 📘
[root@zabbix-server ~]# yum install -y zabbix-web-mysql-scl zabbix-apache-conf-scl zabbix-nginx-conf-scl
[root@zabbix-server ~]# rpm -qa | grep zabbix
zabbix-web-mysql-scl-5.0.20-1.el7.noarch
zabbix-apache-conf-scl-5.0.20-1.el7.noarch
zabbix-nginx-conf-scl-5.0.20-1.el7.noarch
zabbix-web-5.0.20-1.el7.noarch
zabbix-release-5.0-1.el7.noarch
zabbix-web-deps-scl-5.0.20-1.el7.noarch
zabbix-server-mysql-5.0.20-1.el7.x86_64
6. Install and configure the database 📙
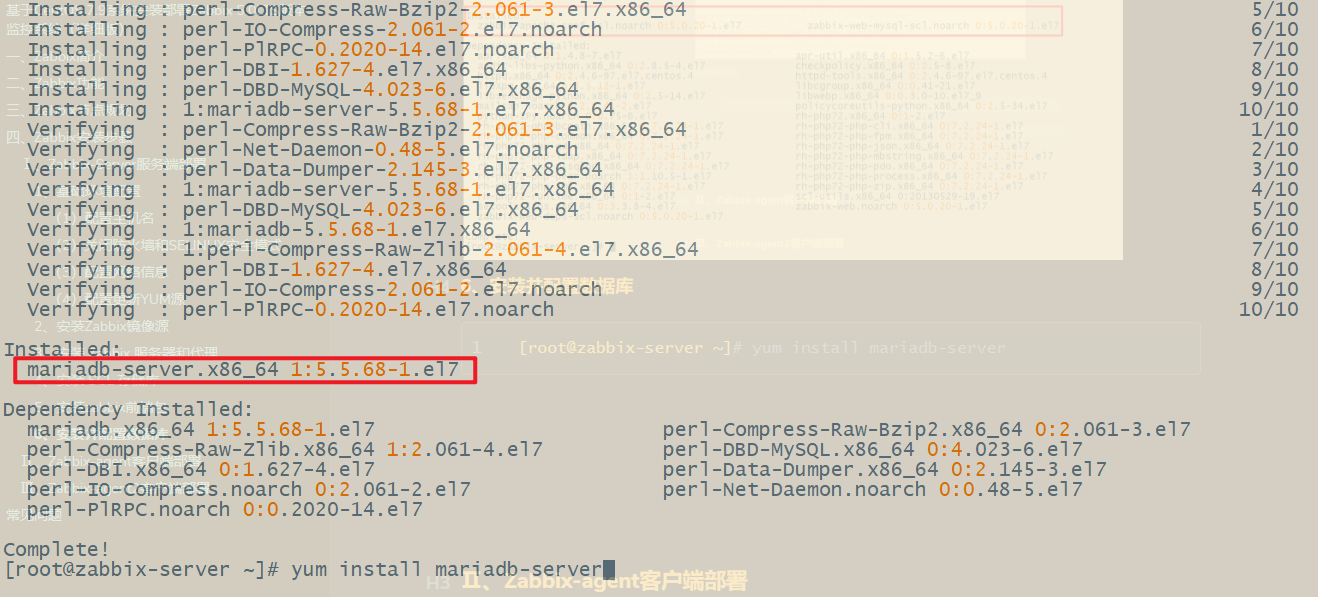
Install mariadb database
[root@zabbix-server ~]# yum install mariadb-server
Start the database and set the startup self startup
[root@zabbix-server ~]# systemctl start mariadb
[root@zabbix-server ~]# systemctl enable mariadb
[root@zabbix-server ~]# systemctl status mariadb
Initialize the database and set the database login password 🔐
[root@zabbix-server ~]# mysql_secure_installation

NOTE: RUNNING ALL PARTS OF THIS SCRIPT IS RECOMMENDED FOR ALL MariaDB
      SERVERS IN PRODUCTION USE!  PLEASE READ EACH STEP CAREFULLY!

In order to log into MariaDB to secure it, we'll need the current
password for the root user.  If you've just installed MariaDB, and
you haven't set the root password yet, the password will be blank,
so you should just press enter here.

Enter current password for root (enter for none):
OK, successfully used password, moving on...

Setting the root password ensures that nobody can log into the MariaDB
root user without the proper authorisation.

Set root password? [Y/n] y
New password:
Re-enter new password:
Password updated successfully!
Reloading privilege tables..
 ... Success!


By default, a MariaDB installation has an anonymous user, allowing anyone
to log into MariaDB without having to have a user account created for
them.  This is intended only for testing, and to make the installation
go a bit smoother.  You should remove them before moving into a
production environment.

Remove anonymous users? [Y/n] y
 ... Success!

Normally, root should only be allowed to connect from 'localhost'.  This
ensures that someone cannot guess at the root password from the network.

Disallow root login remotely? [Y/n] n
 ... skipping.

By default, MariaDB comes with a database named 'test' that anyone can
access.  This is also intended only for testing, and should be removed
before moving into a production environment.

Remove test database and access to it? [Y/n] y
 - Dropping test database...
 ... Success!
 - Removing privileges on test database...
 ... Success!

Reloading the privilege tables will ensure that all changes made so far
will take effect immediately.

Reload privilege tables now? [Y/n] y
 ... Success!

Cleaning up...

All done!  If you've completed all of the above steps, your MariaDB
installation should now be secure.

Thanks for using MariaDB!
Enter the database and create the zabbix database. Note: set the encoding format to utf-8.
mysql -uroot -ppassword
mysql> create database zabbix character set utf8 collate utf8_bin;
mysql> create user zabbix@localhost identified by 'password';
mysql> grant all privileges on zabbix. to zabbix@localhost;*
mysql> flush privileges;
mysql> quit;
[root@zabbix-server ~]# mysql -uroot -p
Enter password:
Welcome to the MariaDB monitor.  Commands end with ; or \g.
Your MariaDB connection id is 11
Server version: 5.5.68-MariaDB MariaDB Server

Copyright (c) 2000, 2018, Oracle, MariaDB Corporation Ab and others.

Type 'help;' or '\h' for help. Type '\c' to clear the current input statement.

MariaDB [(none)]> create database zabbix character set utf8 collate utf8_bin;
Query OK, 1 row affected (0.00 sec)

MariaDB [(none)]> create user zabbix@localhost identified by '000000';
Query OK, 0 rows affected (0.00 sec)

MariaDB [(none)]> grant all privileges on zabbix.* to zabbix@localhost;
Query OK, 0 rows affected (0.00 sec)

MariaDB [(none)]> flush privileges;
Query OK, 0 rows affected (0.00 sec)

MariaDB [(none)]> quit
Bye
After importing the initial schema and data, you will be prompted to enter the newly created password.
[root@zabbix-server ~]# zcat /usr/share/doc/zabbix-server-mysql*/create.sql.gz | mysql -uzabbix -p zabbix
Enter password:
[root@zabbix-server ~]#
7. Modify zabbix_server.conf configuration file 📚
Configuring the database for Zabbix server
Modify the configuration file / etc/zabbix/zabbix_server.conf to change the database password.
[root@zabbix-server ~]# vim /etc/zabbix/zabbix_server.conf
Modification content
DBPassword=password
 Save exit
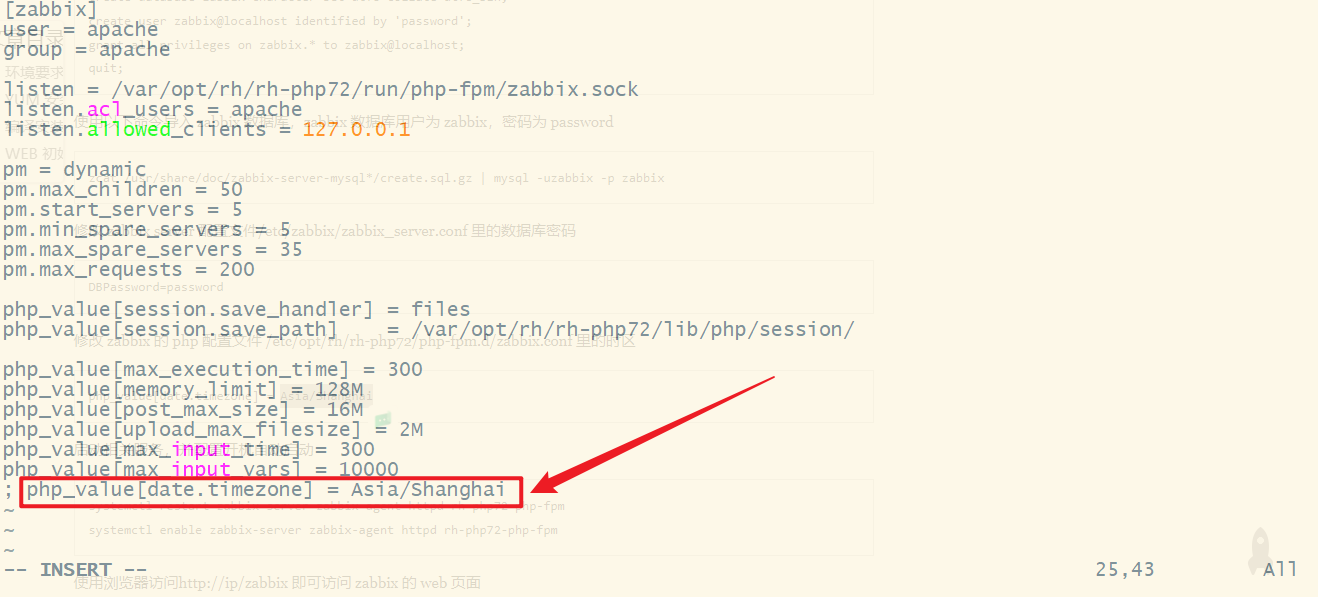
8. Modify the php configuration file of zabbix 📓
[root@zabbix-server ~]# vim /etc/opt/rh/rh-php72/php-fpm.d/zabbix.conf
 Modification content
#Add notes; Remove and amend to read
php_value[date.timezone] = Asia/Shanghai
 Press:wq Save exit
9. Start Zabbix server and agent process 📒
🎈 Start the Zabbix server and agent processes, and set the boot auto start for them 🎈
[root@zabbix-server ~]# systemctl start zabbix-server zabbix-agent httpd rh-php72-php-fpm
[root@zabbix-server ~]# systemctl enable zabbix-server zabbix-agent httpd rh-php72-php-fpm
[root@zabbix-server ~]# systemctl status zabbix-server zabbix-agent httpd rh-php72-php-fpm
[root@zabbix-server ~]# netstat -ntpl

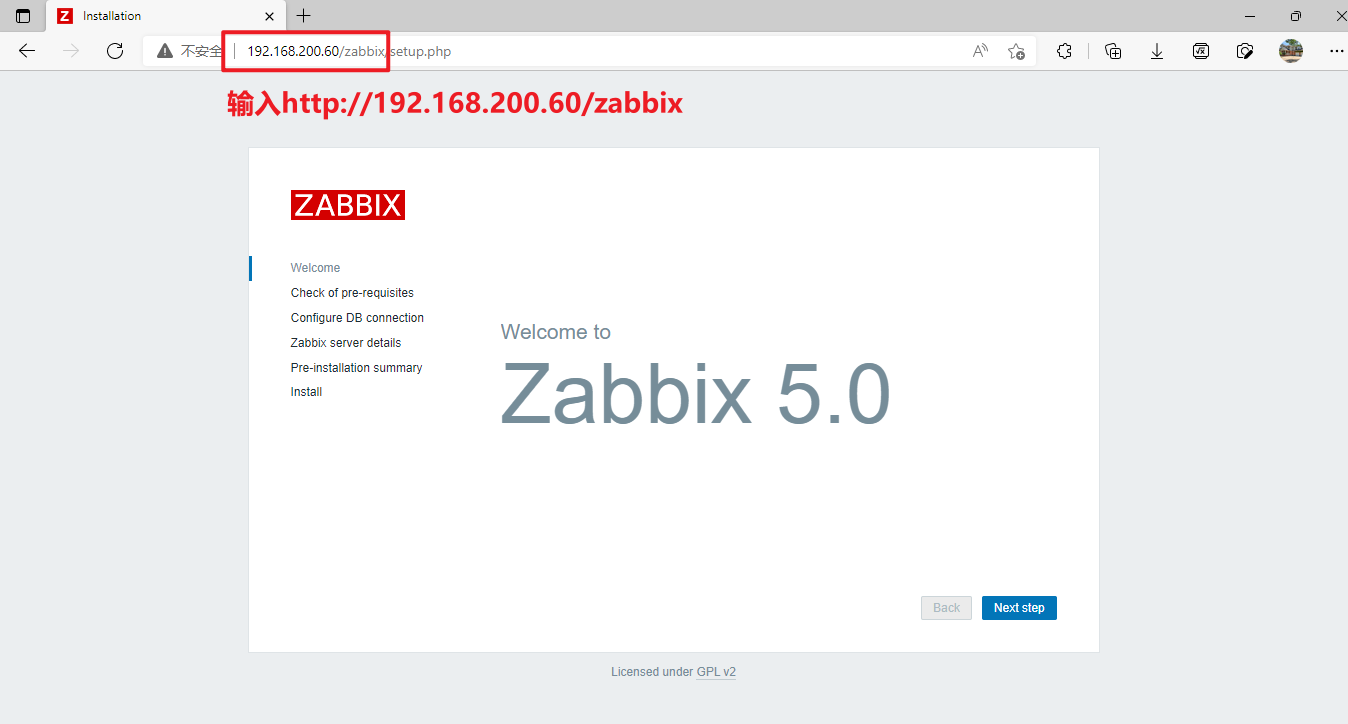
10. Configure Zabbix front-end WEB interface installation 📃
Connect to the newly installed Zabbix front end: http://server_ip_or_name/zabbix
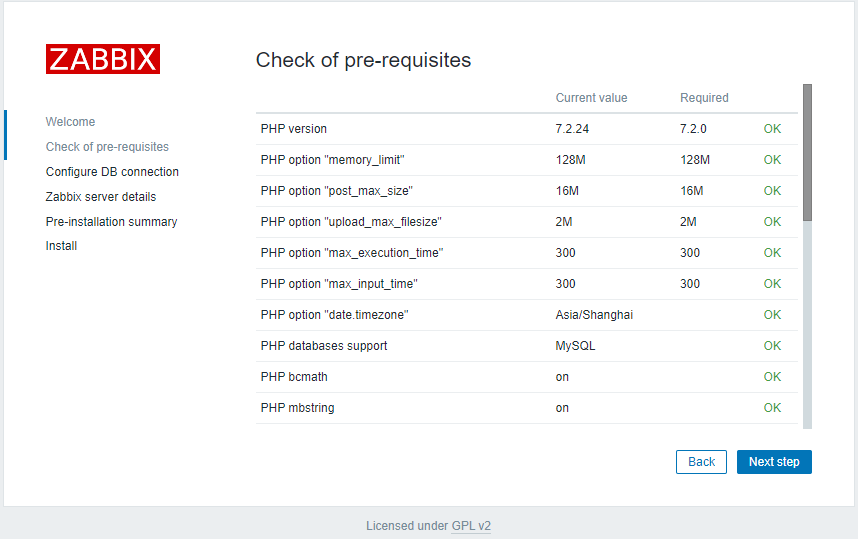
Start Web interface setup
Check prerequisites
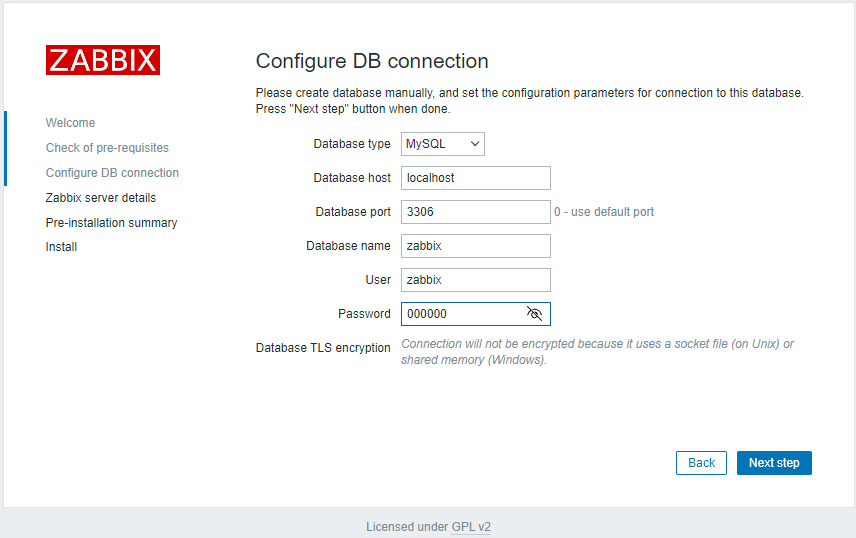
Configure database connection information
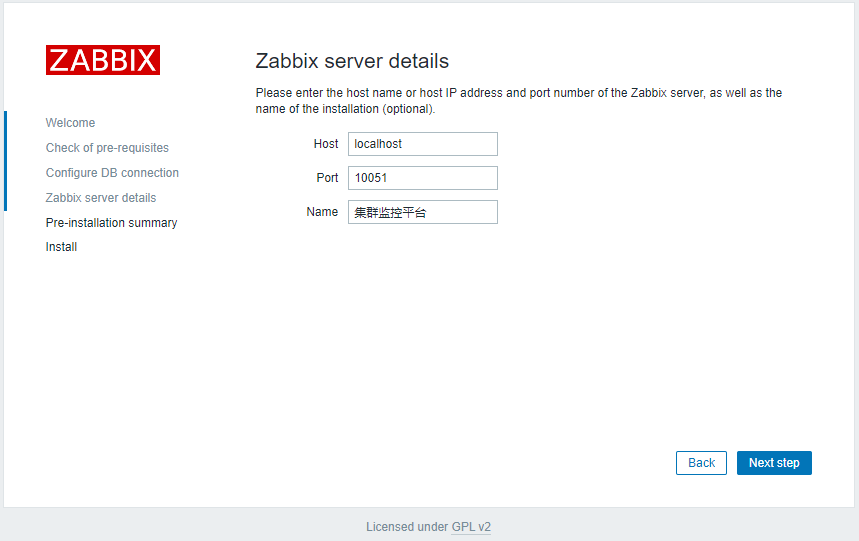
Server details
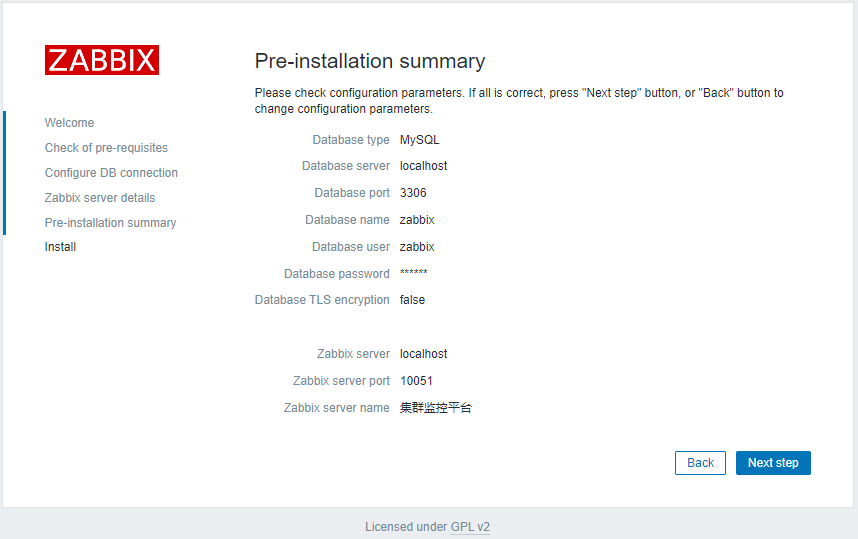
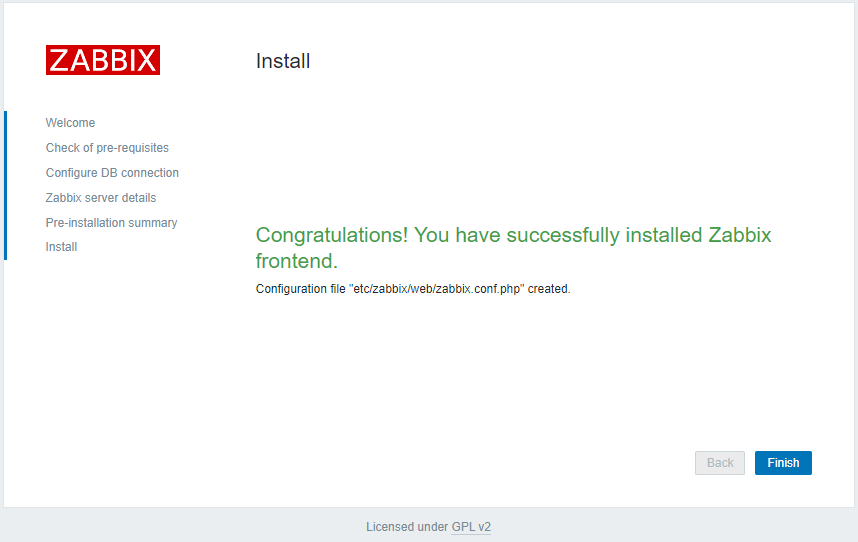
Confirmation information before installation
installation is complete
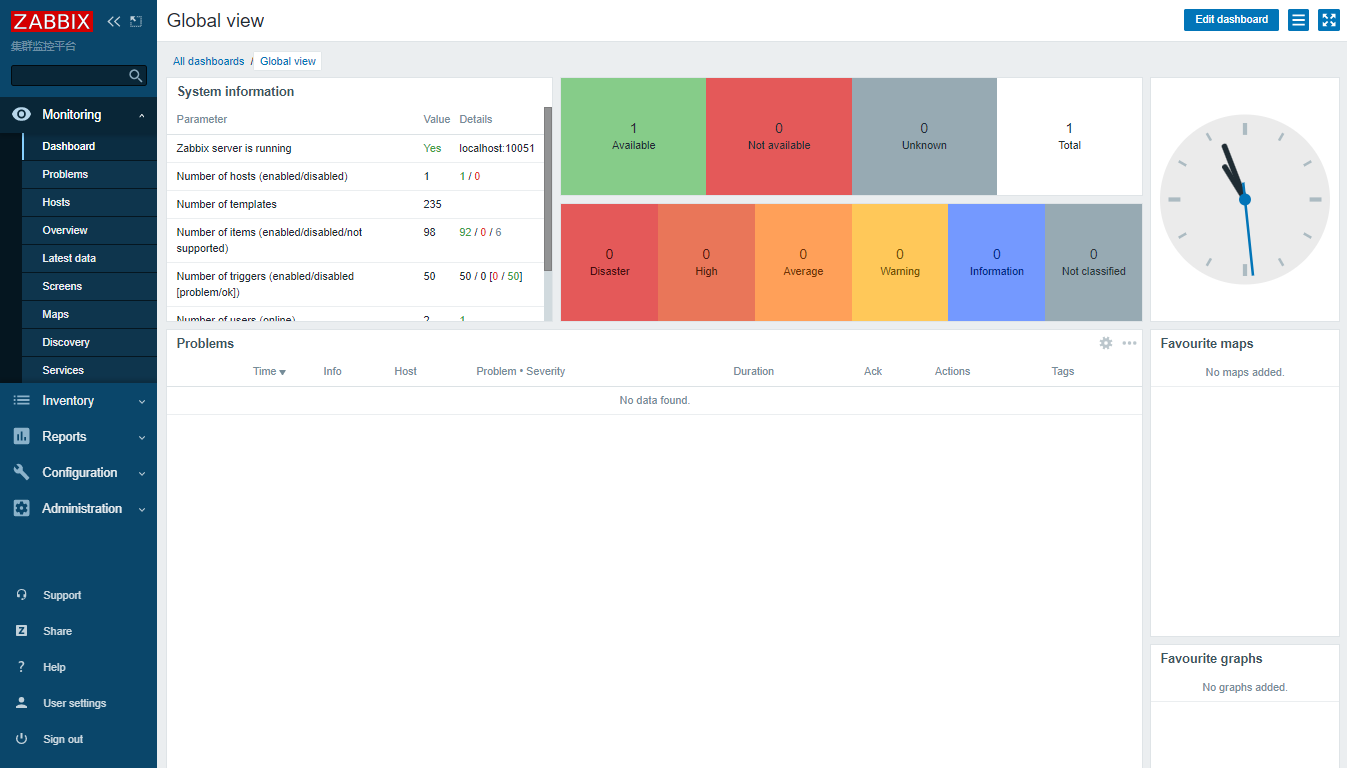
11. Log in to Zabbix cluster control panel 📜
Enter the system default user name and password Admin/zabbix.

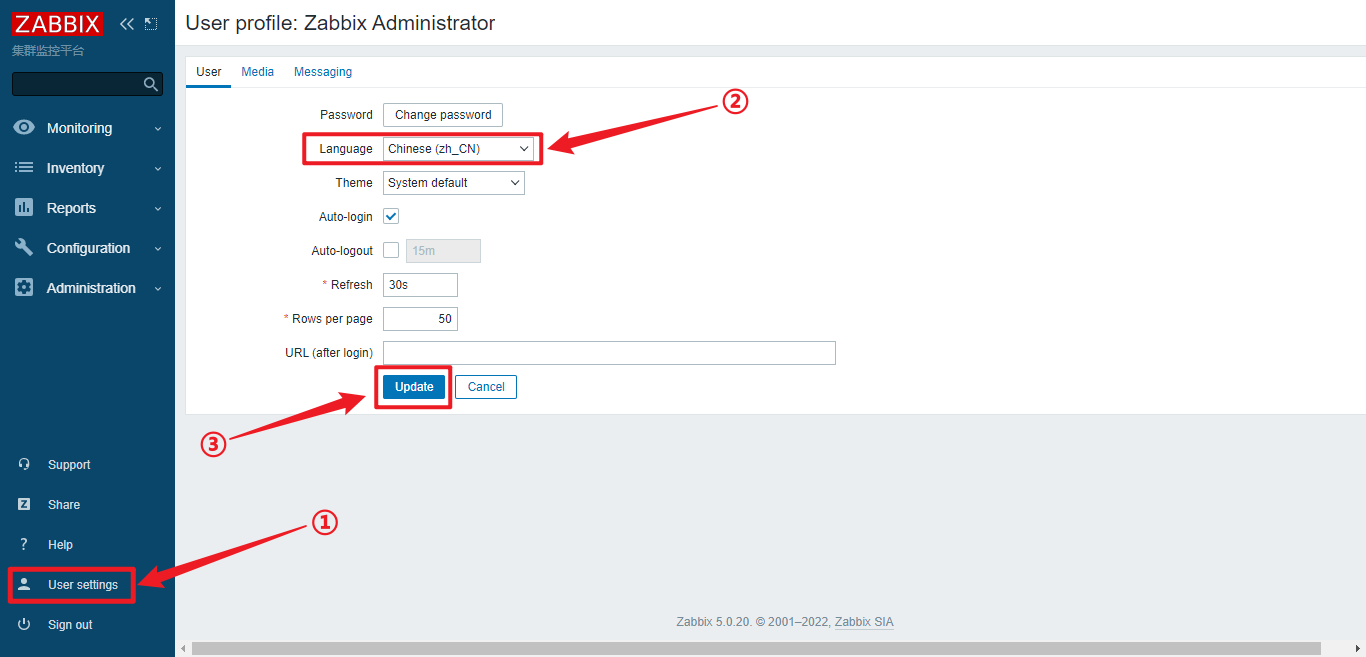
12. Set to Chinese interface 📄
II. ZABBIX Agent Client Deployment - add a centos monitoring host 🟡
🎨 Reference link: New host (zabbix.com)
Note: the monitored host needs to be under the same network as the server; The modified hostname needs to be consistent.
1. Complete basic environment configuration 🆗
-
Modify the host name;
-
Turn off firewall and SElinux security mode;
-
Configure network card information and test network connectivity;
-
Configure and update YUM source (including CentOS source and Zabbix source)
2. Installing and configuring Agent ✅
- Install ZABBIX agent
rpm -Uvh https://mirrors.aliyun.com/zabbix/zabbix/5.0/rhel/7/x86_64/zabbix-release-5.0-1.el7.nsoarch.rpm

sed -i 's#http://repo.zabbix.com#https://mirrors.aliyun.com/zabbix#' /etc/yum.repos.d/zabbix.repo
- Configure ZABBIX agent
[root@zabbix-agent-centos ~]# vim /etc/zabbix/zabbix_agentd.conf
The amendments are as follows
# Server bbzaix address
Server=192.168.200.60
# zabbix active server address
ServerActive=192.168.200.60
# The host name should be set the same when adding a host on the web page
Hostname=zabbix-agent-centos
 Press:wq Save and exit.
- Start ZABBIX agent
[root@zabbix-agent-centos ~]# systemctl start zabbix-agent
[root@zabbix-agent-centos ~]# systemctl enable zabbix-agent
[root@zabbix-agent-centos ~]# systemctl status zabbix-agent
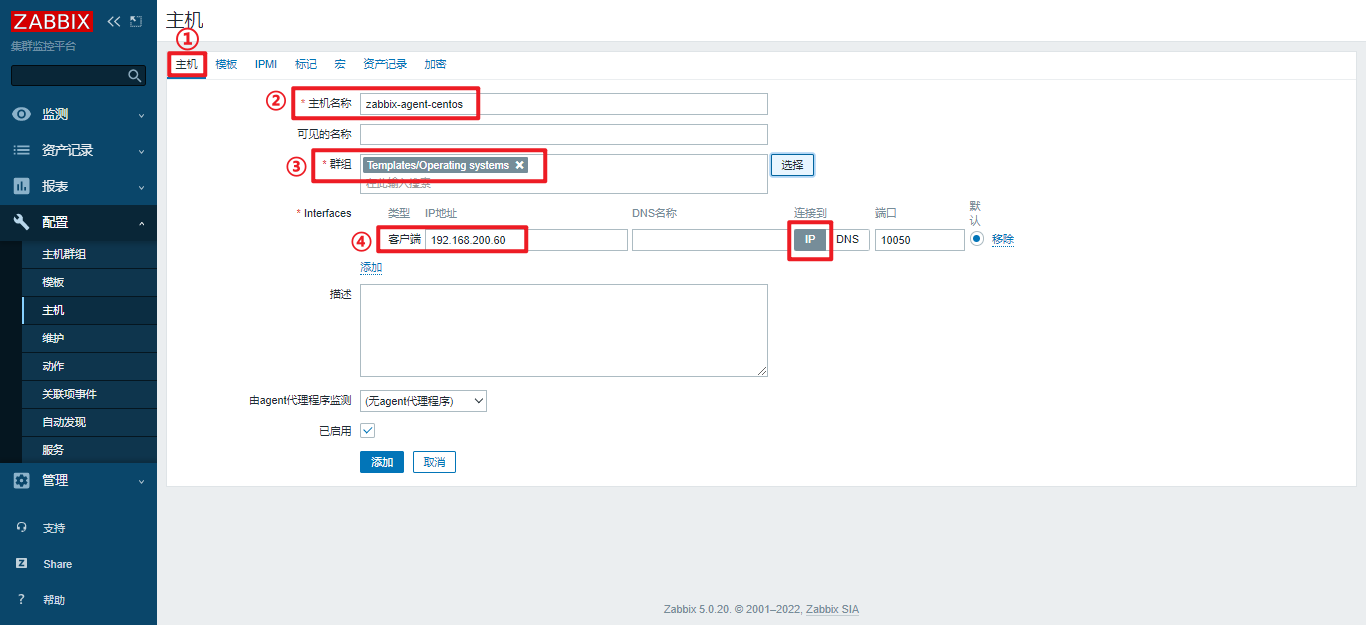
3. Web page creation host ⏩
Create host
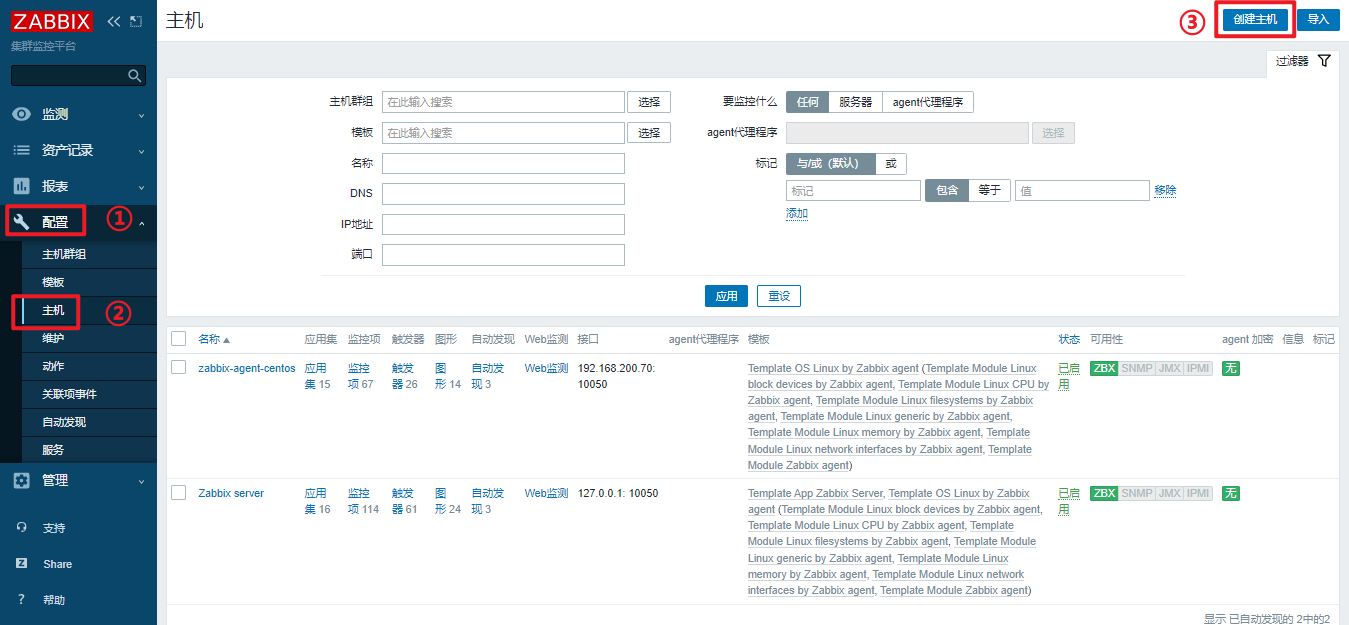
Fill in the host related information, as shown in the figure.
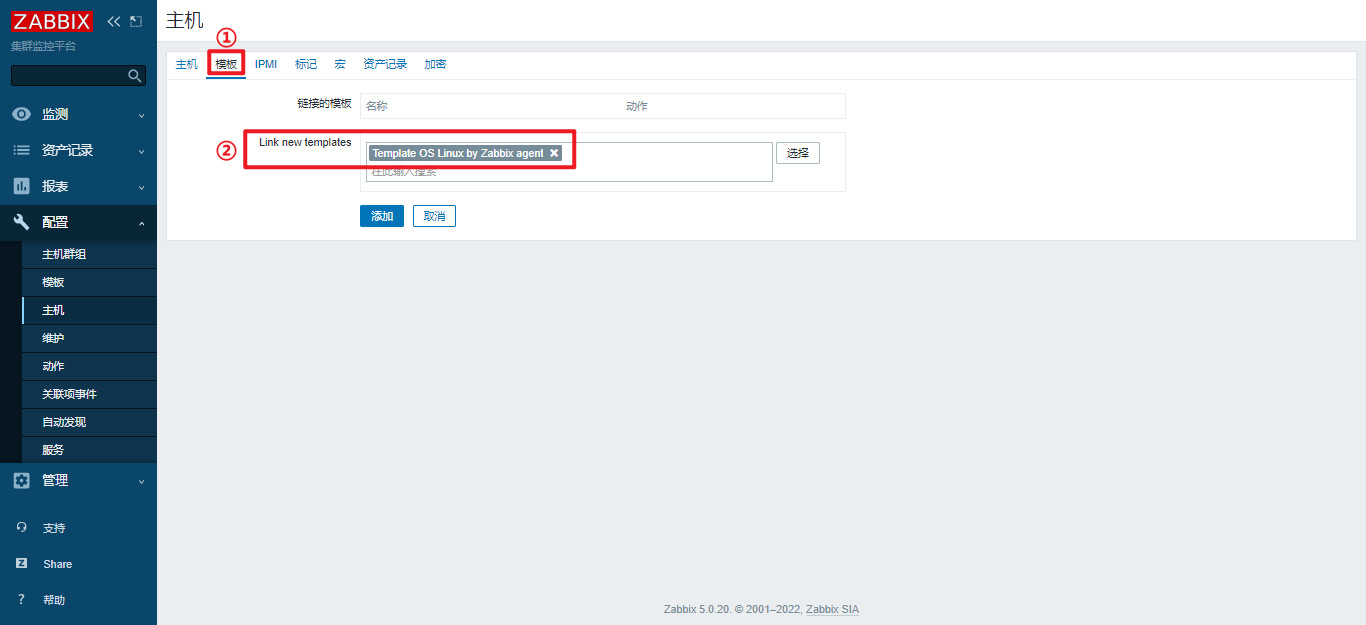
Add monitoring host template
Check whether the monitored host is connected and enabled 🔗
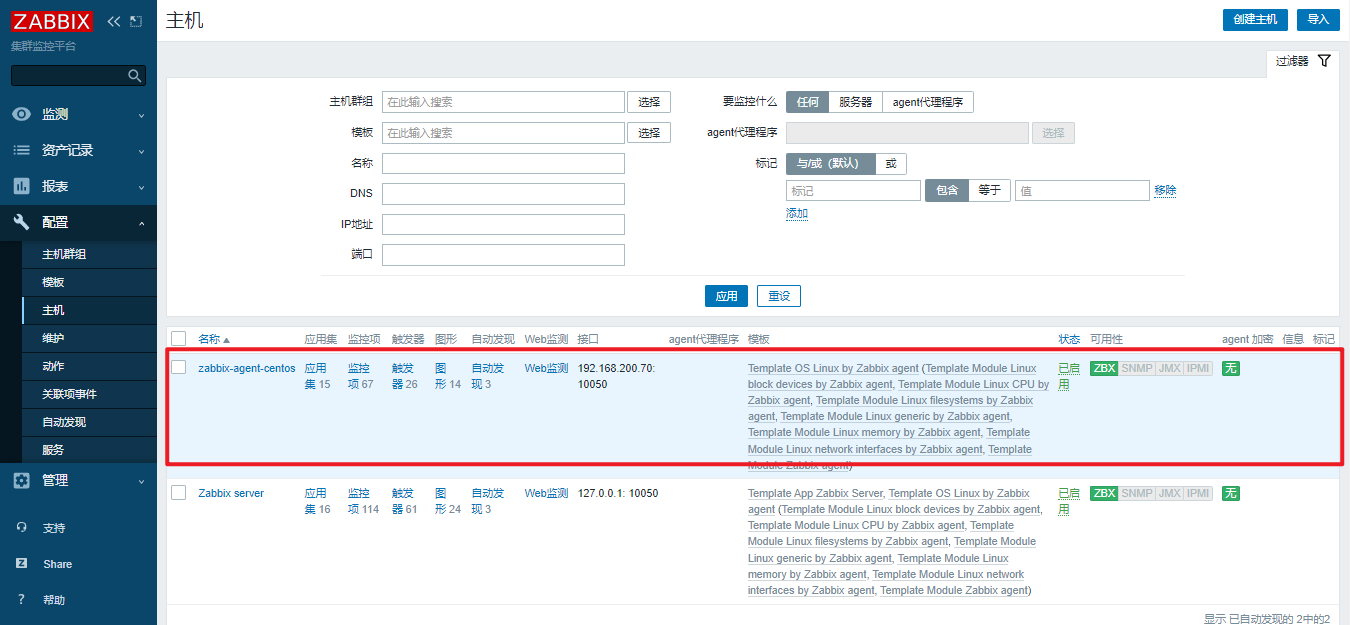
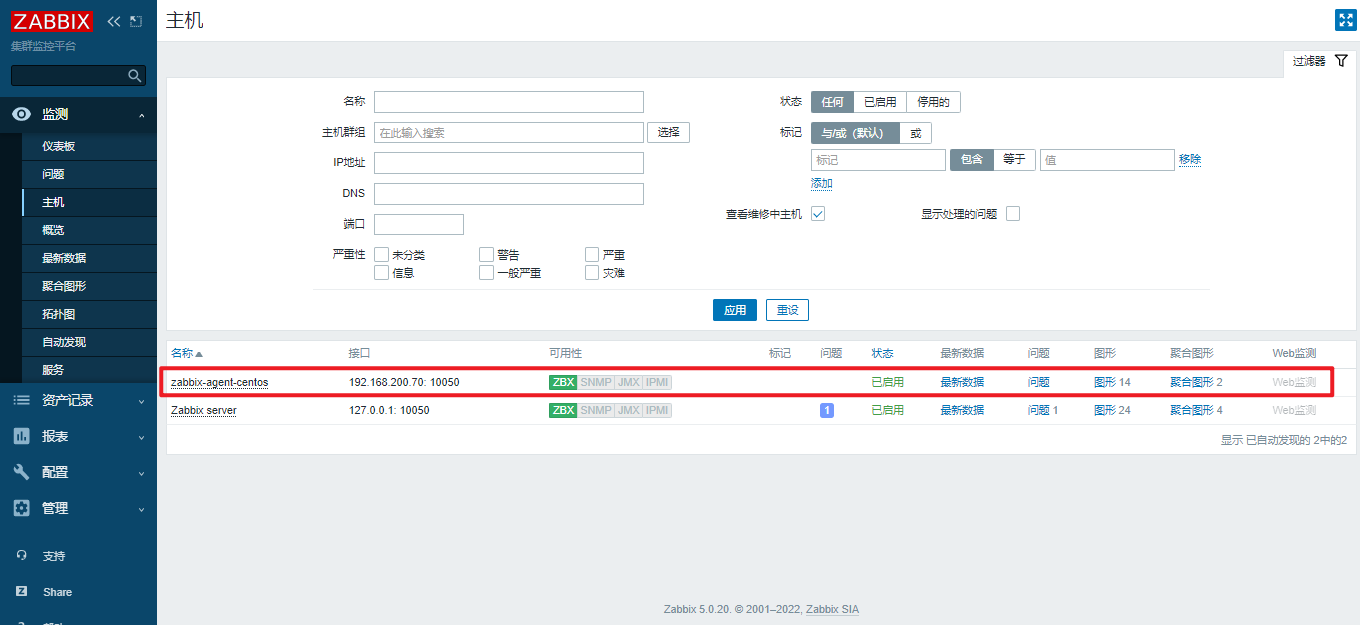
So far, the CentOS system monitoring host has been added.
III. ZABBIX Agent Client Deployment - add a Windows monitoring host 🟢
📣 Reference link: 4 Windows agent installation from MSI (zabbix.com)
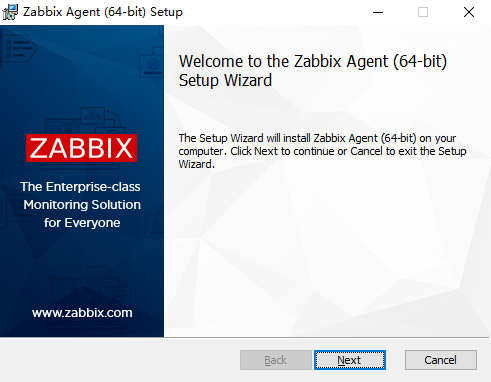
1. Install Zabbix Agent package 💖
On the monitored Host Windows host, install the zabbix installation package.
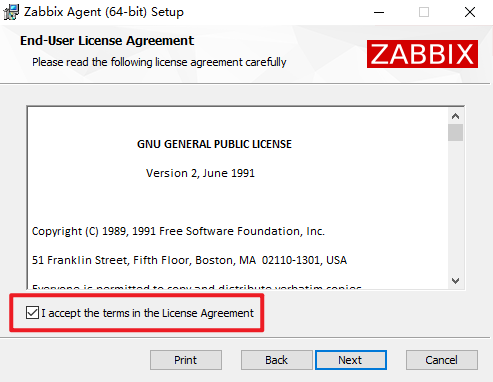
Receive license agreement
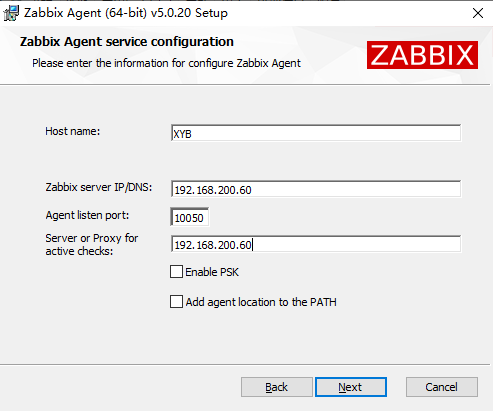
Fill in the configuration information of Zabbix Agent client. Host name or DNS address of Zabbix server.
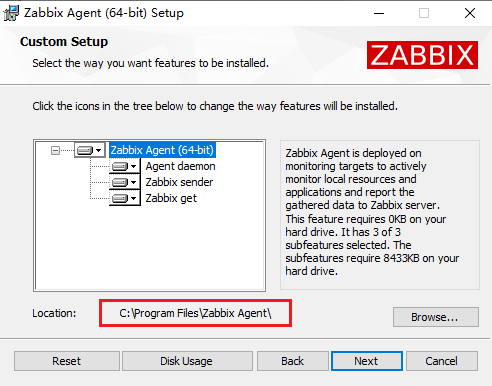
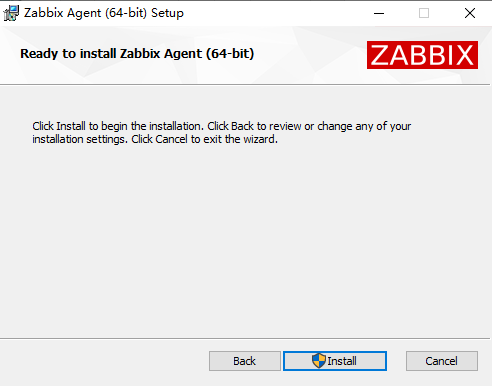
Select the installation path and location where the program is installed on the Windows client
Click Install to install
After the installation is completed, click "Finish".
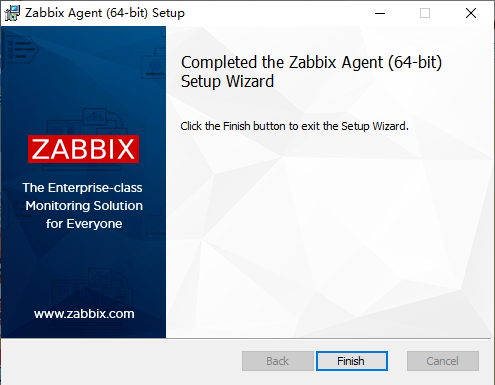
Start the task manager and check whether the Zabbix Agent service process is started.

So far, the installation and deployment of Zabbix Agent client on Windows 10 system is completed.
2. Add configuration firewall rule 💛
Configure the firewall to allow the release of zabbix ports
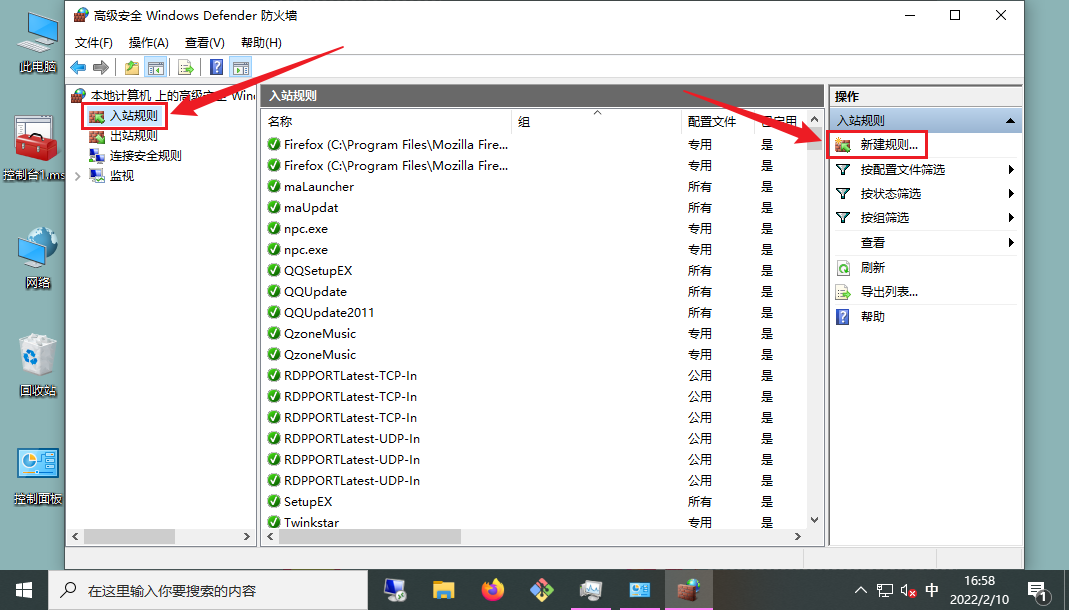
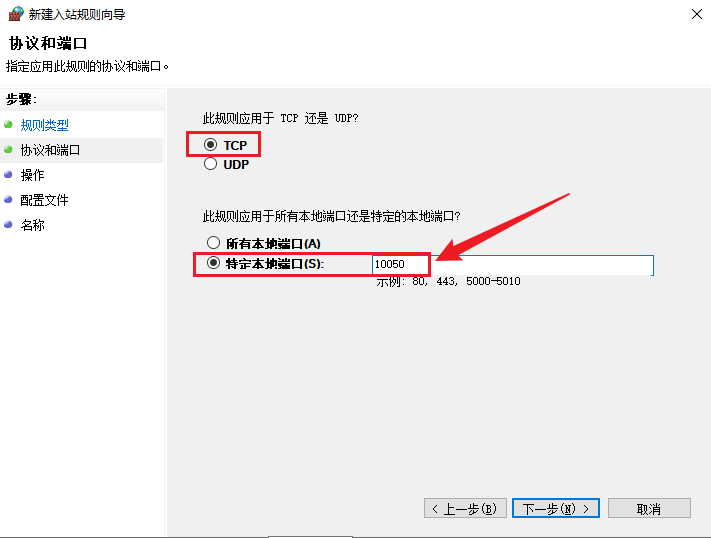
Select port
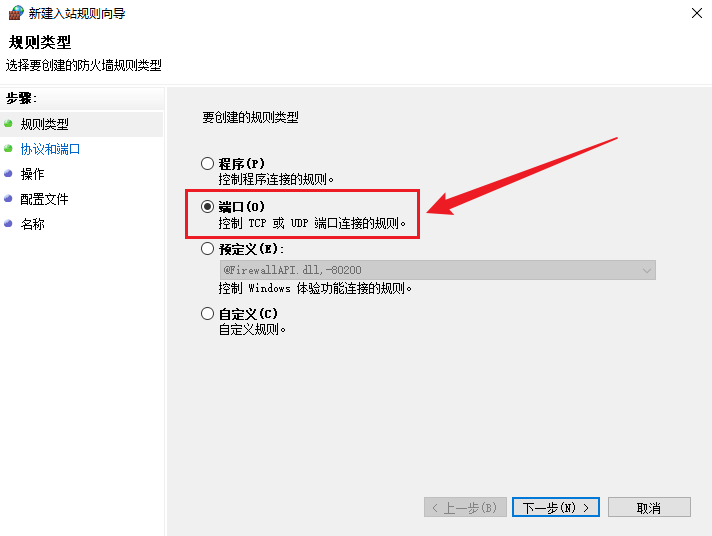
Select "TCP" and enter the specific local port "10050"
Select allow connections

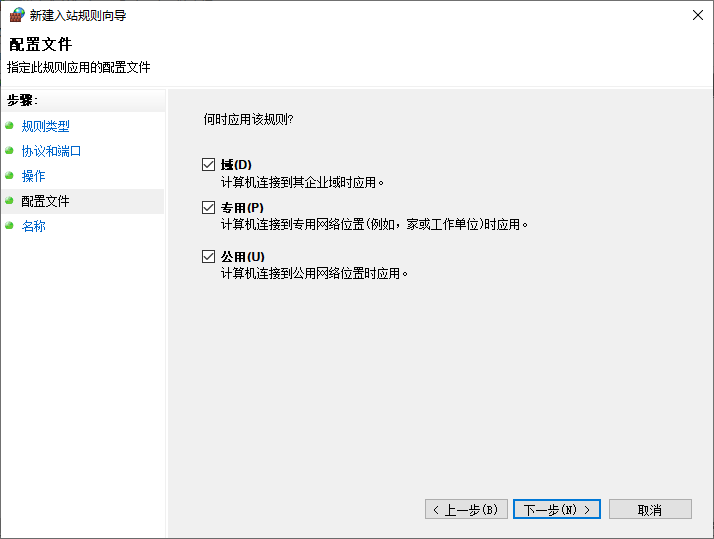
By default, click next
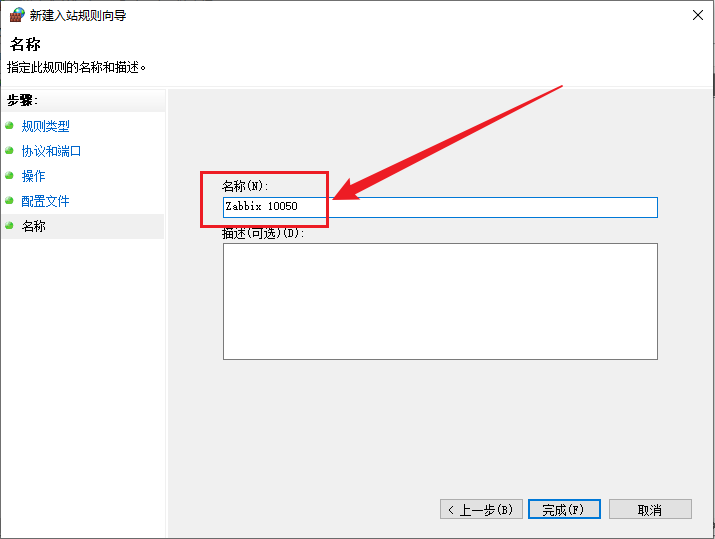
Command the name of this rule, for example, "Zabbix 10050"
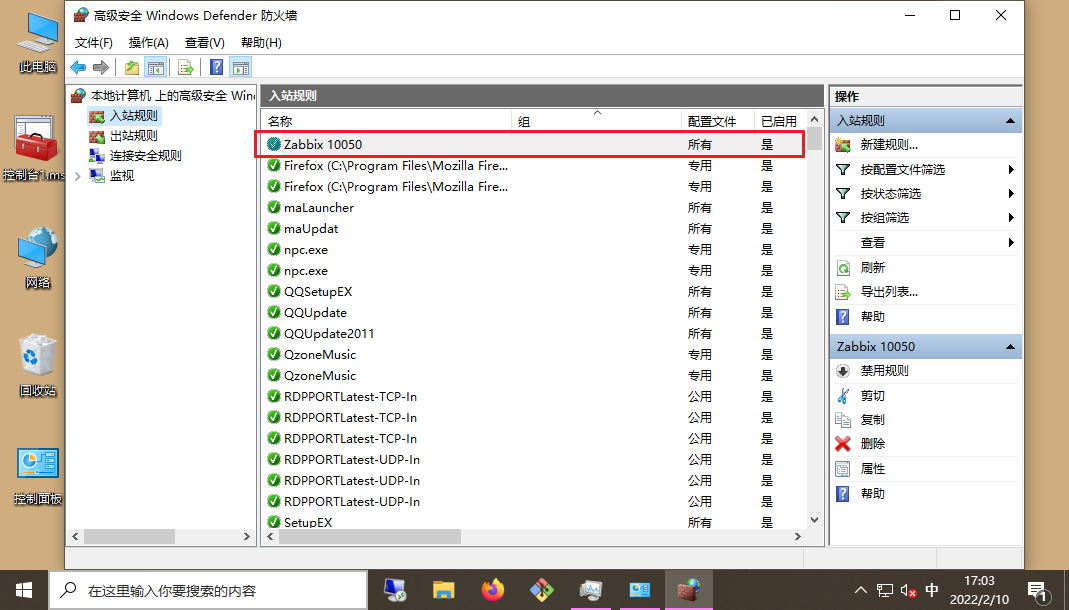
See if this inbound rule has been added
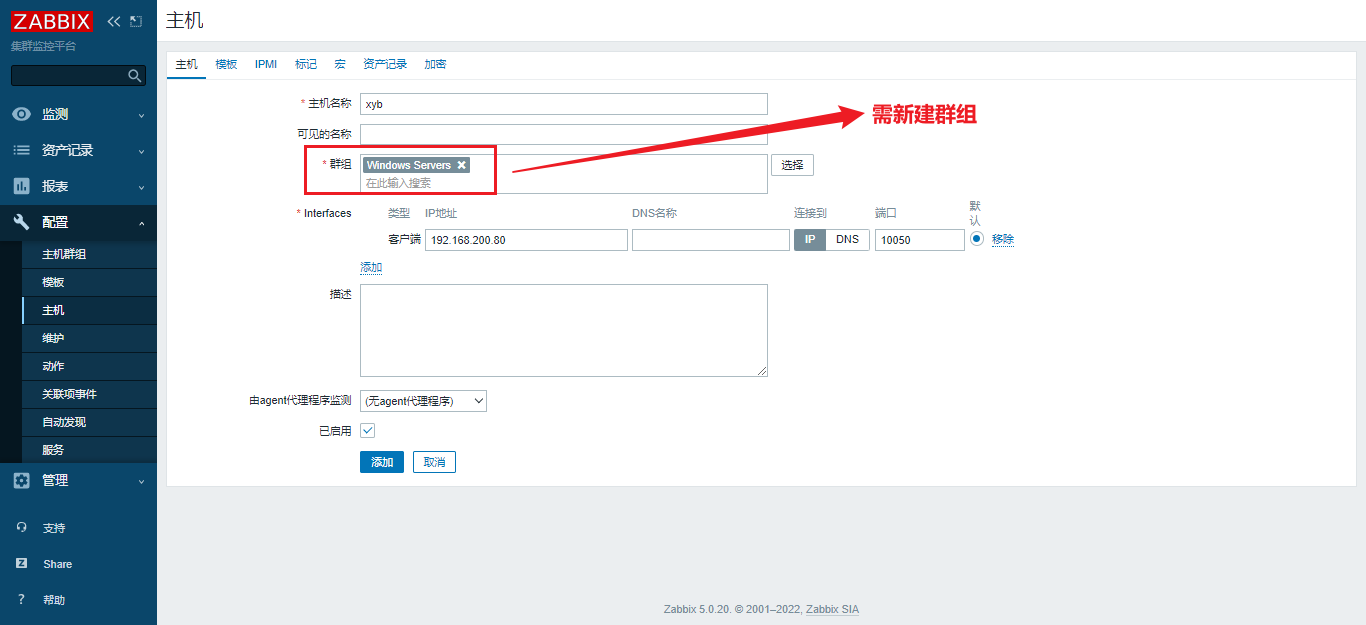
3. Web page creation host 💙
Create a host, as shown.
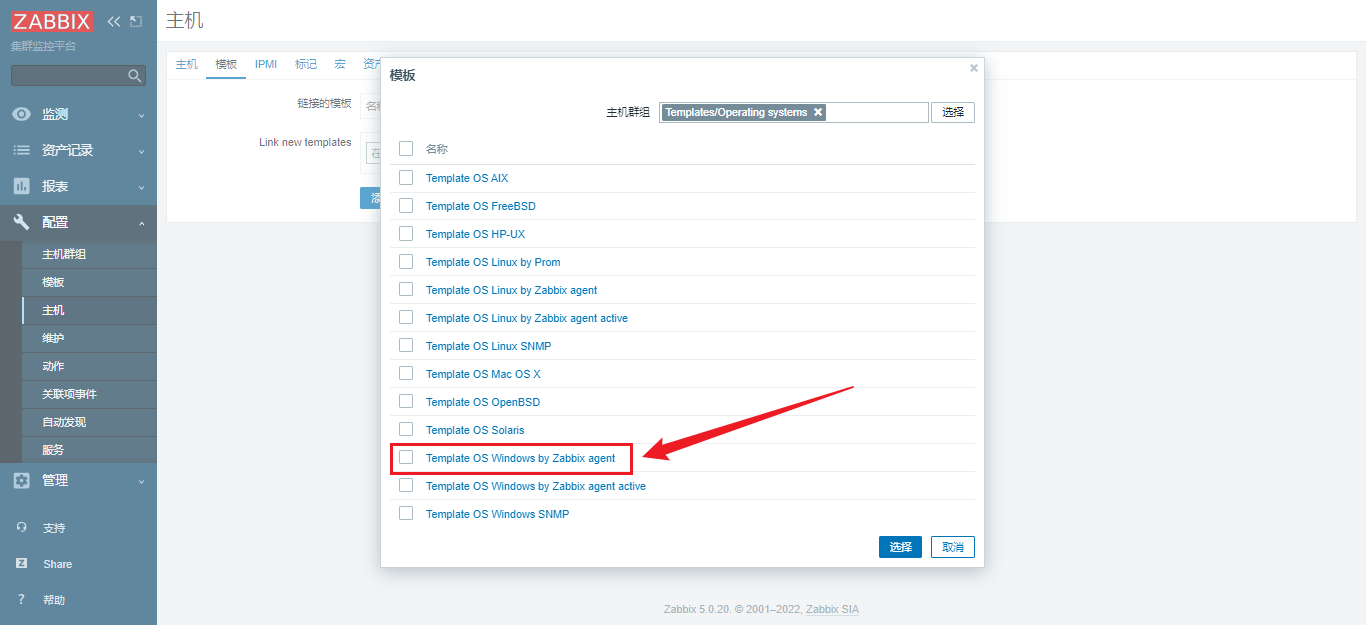
Select the corresponding template
Check to see if you are connected.
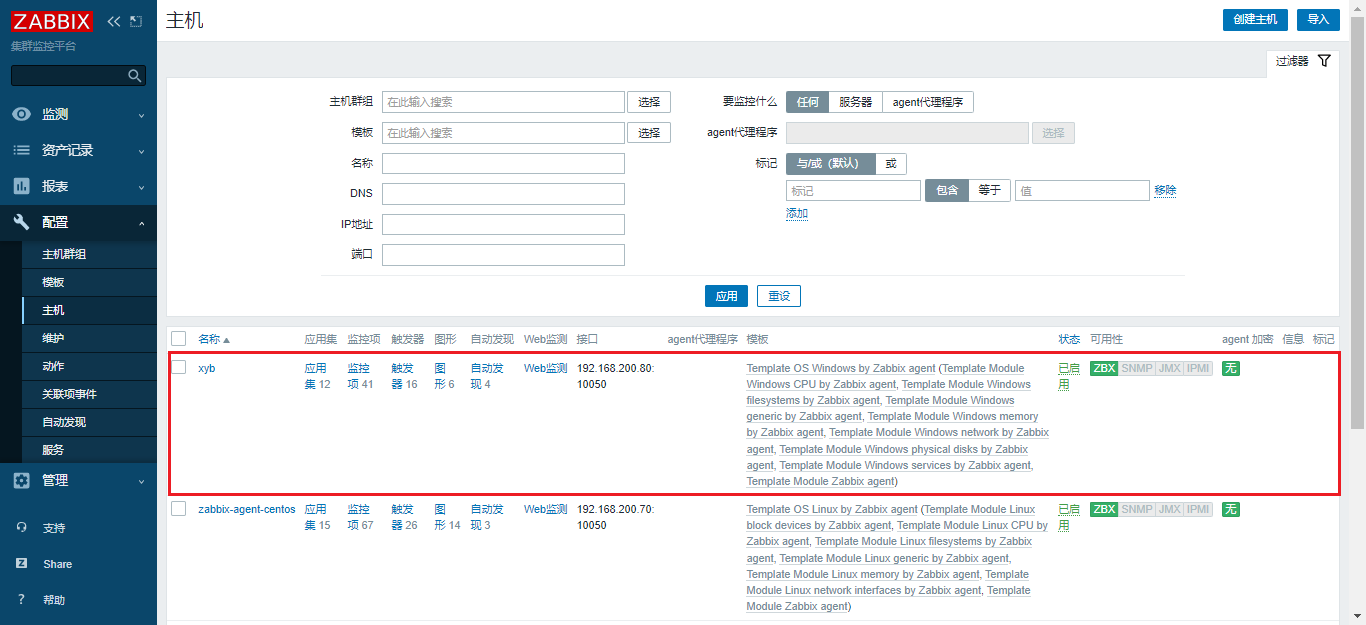
Check whether the host is properly connected and whether the availability "ZBX" option turns green
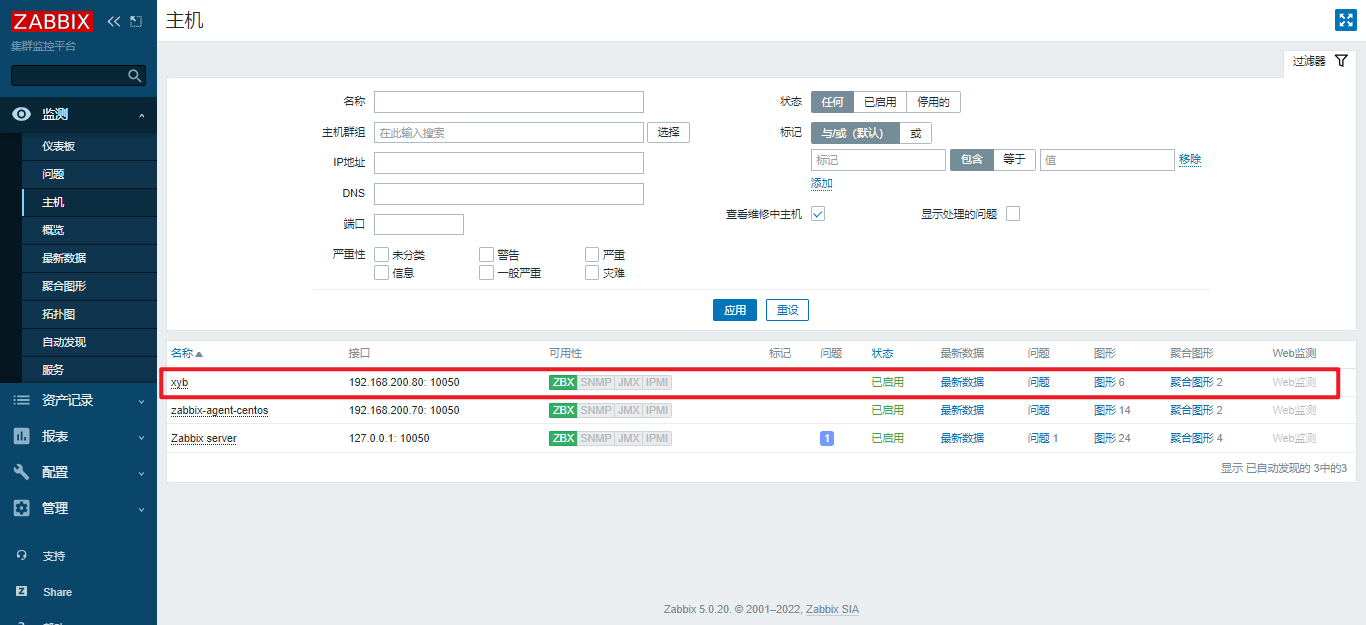
At this point, the Windows system monitoring host is added.
IV. add monitoring items
1. Create application set
- Click "application set";
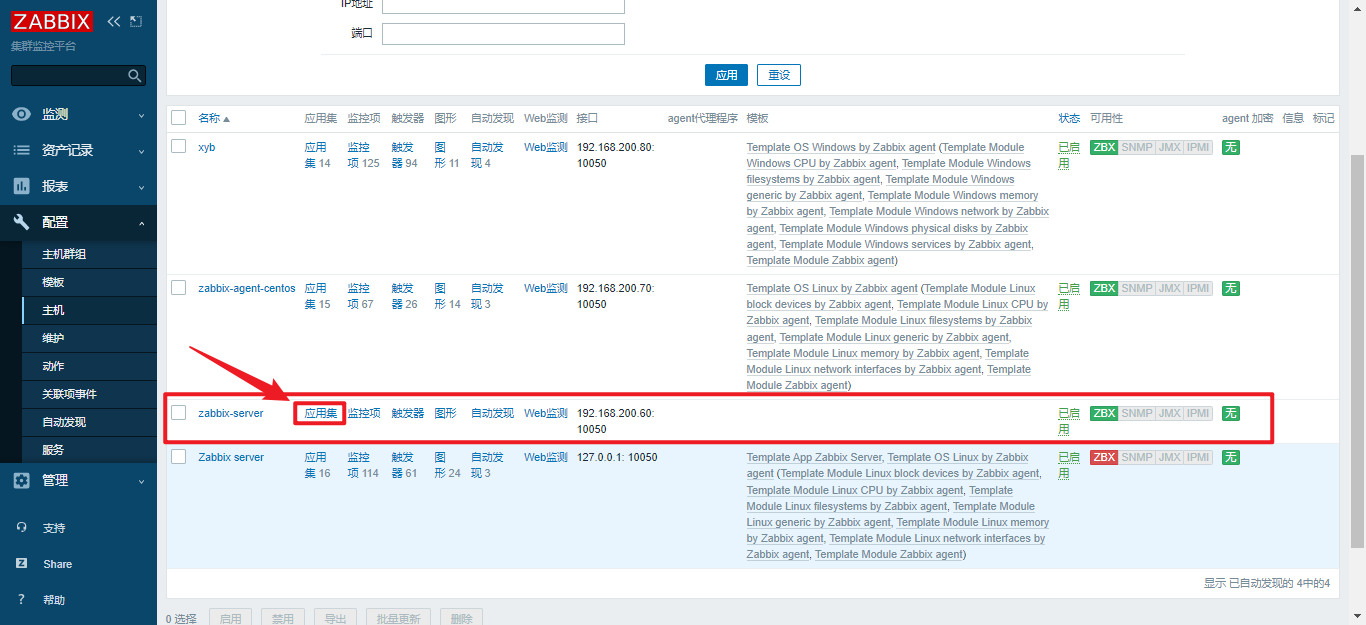
- Click "create application set"

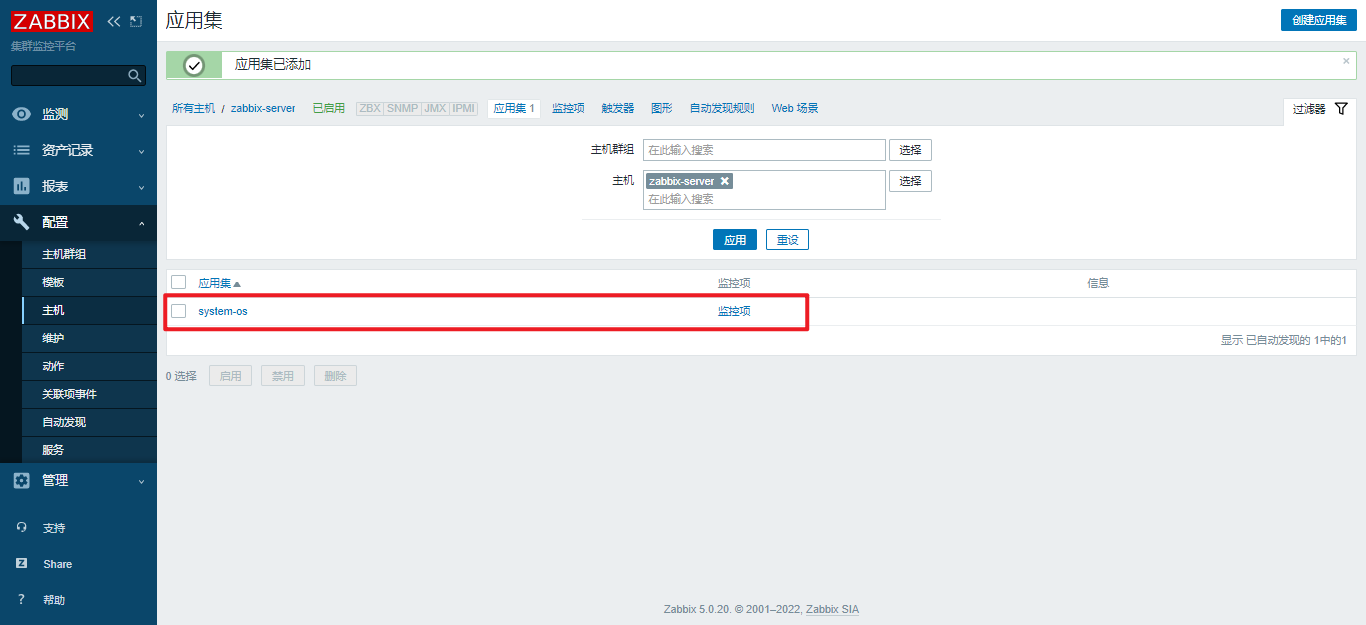
- Fill in "name"
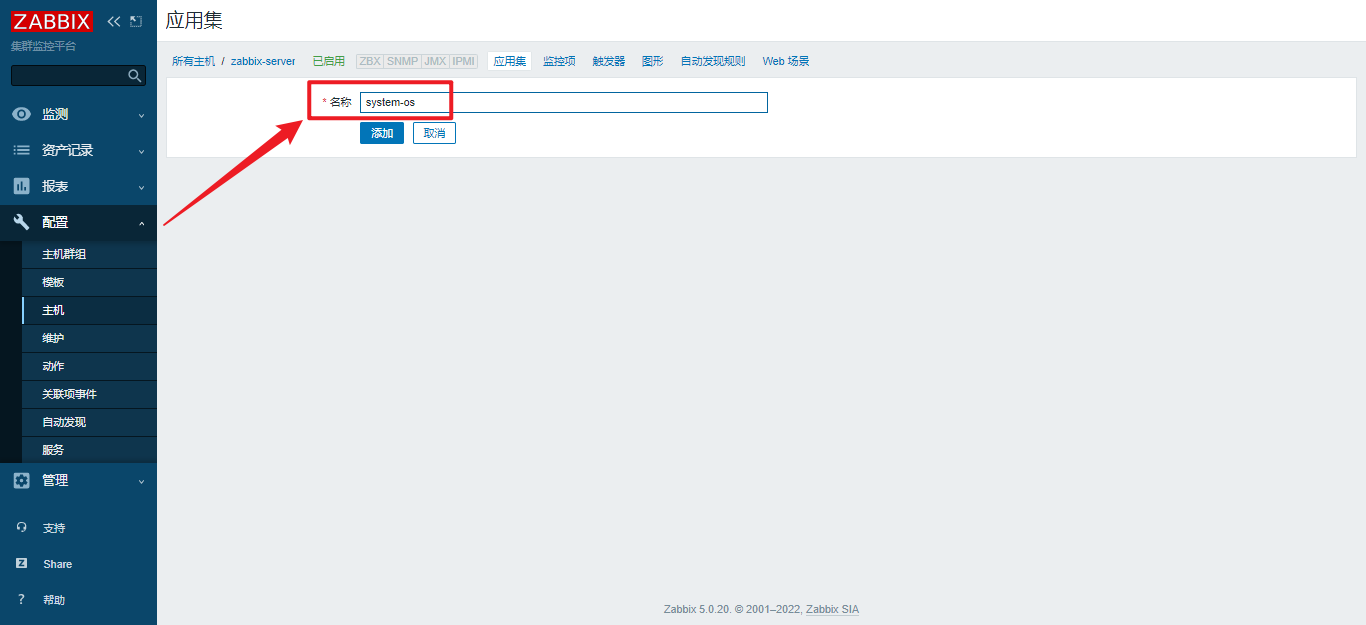
- Add complete
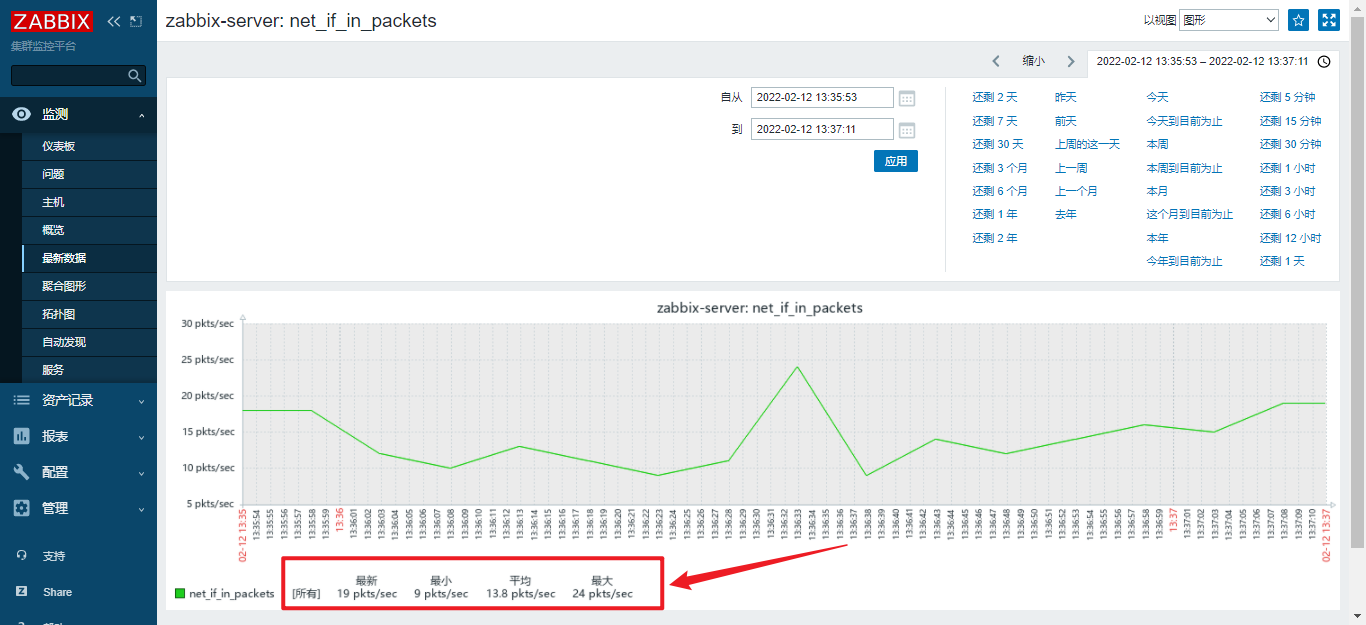
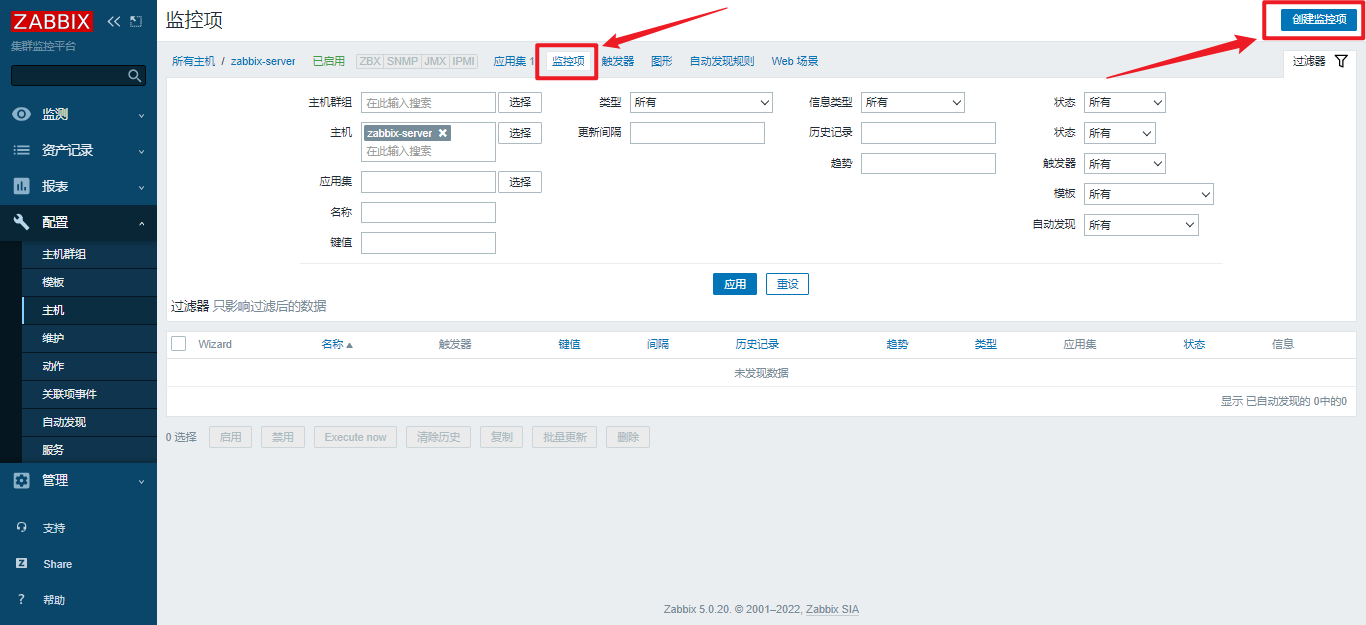
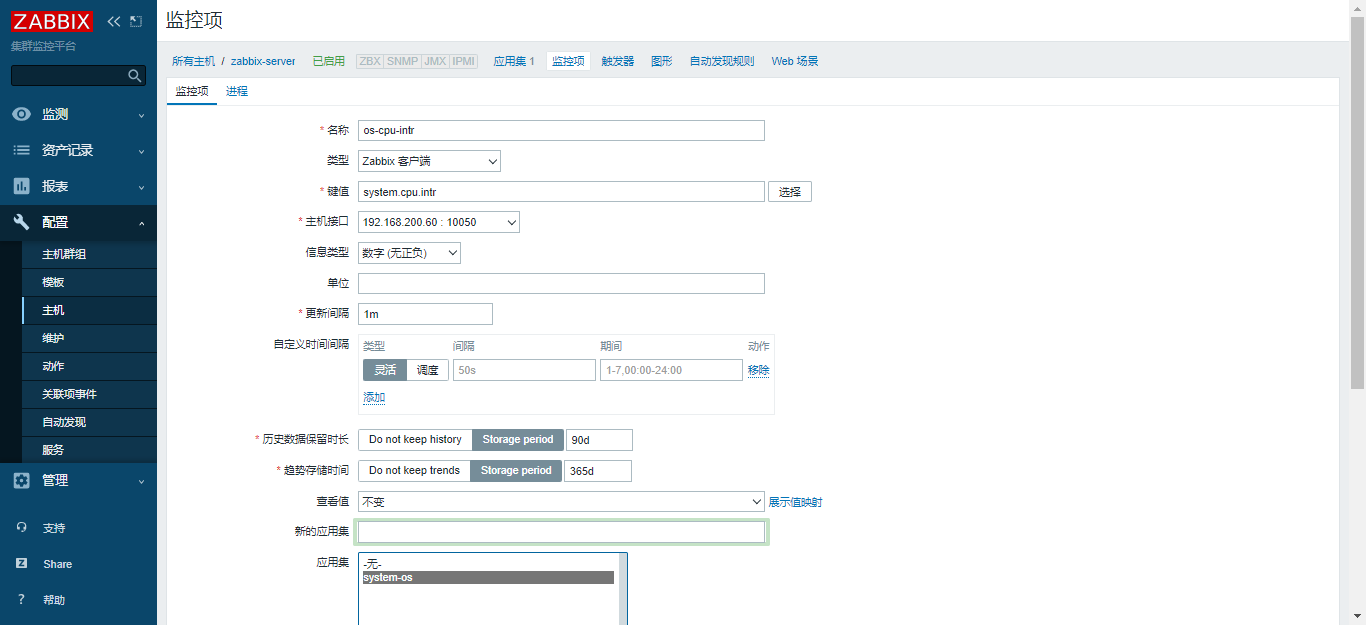
2. Create monitor item
-
Click "create monitor item"
-
Monitor the number of CPU interrupts of the server and the number of interrupts of the device. Returns an integer. Fill in relevant parameters
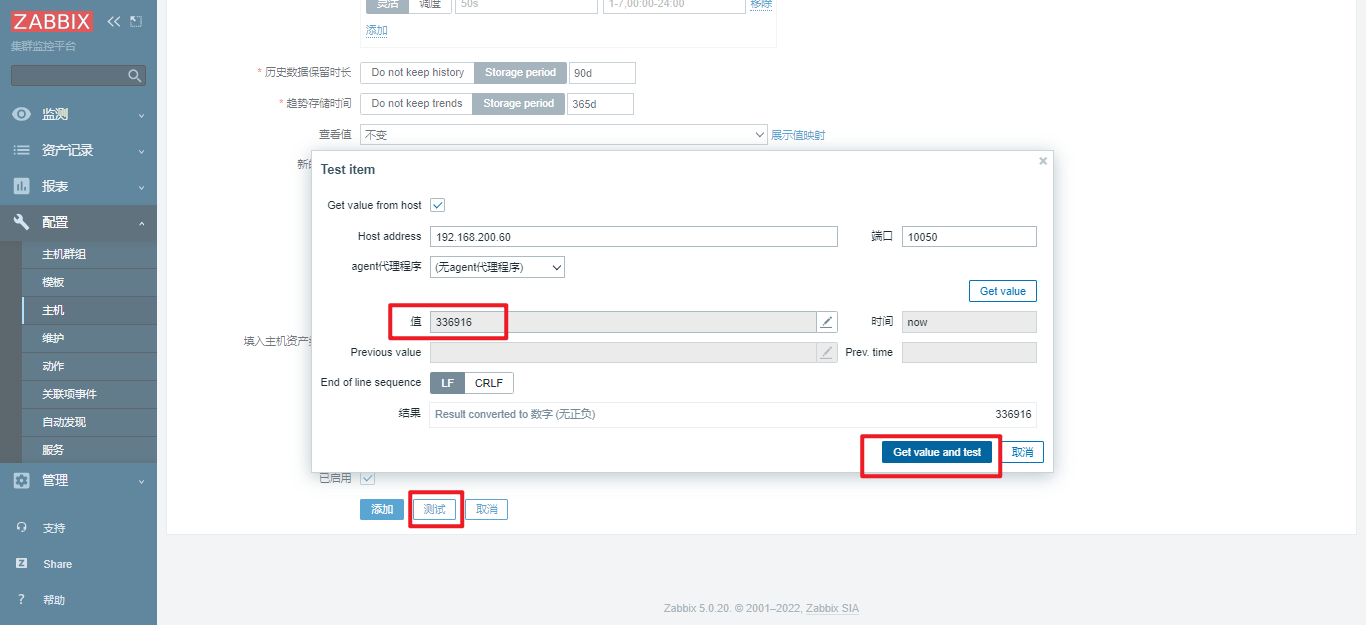
-
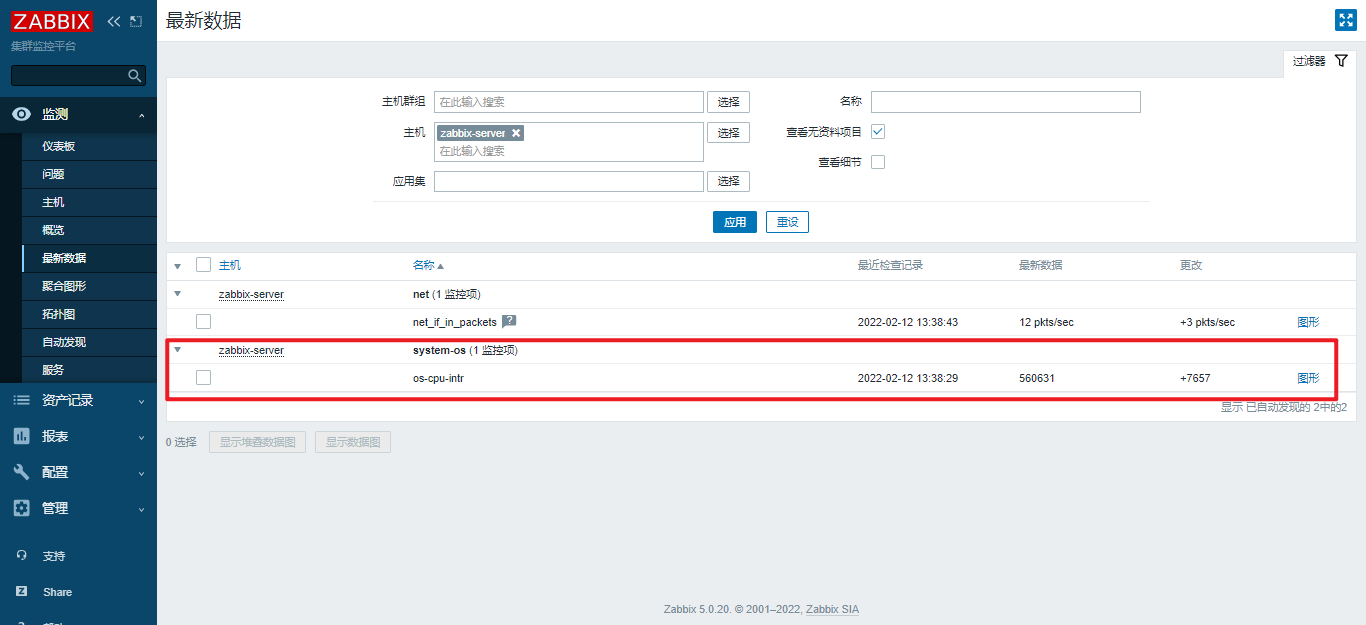
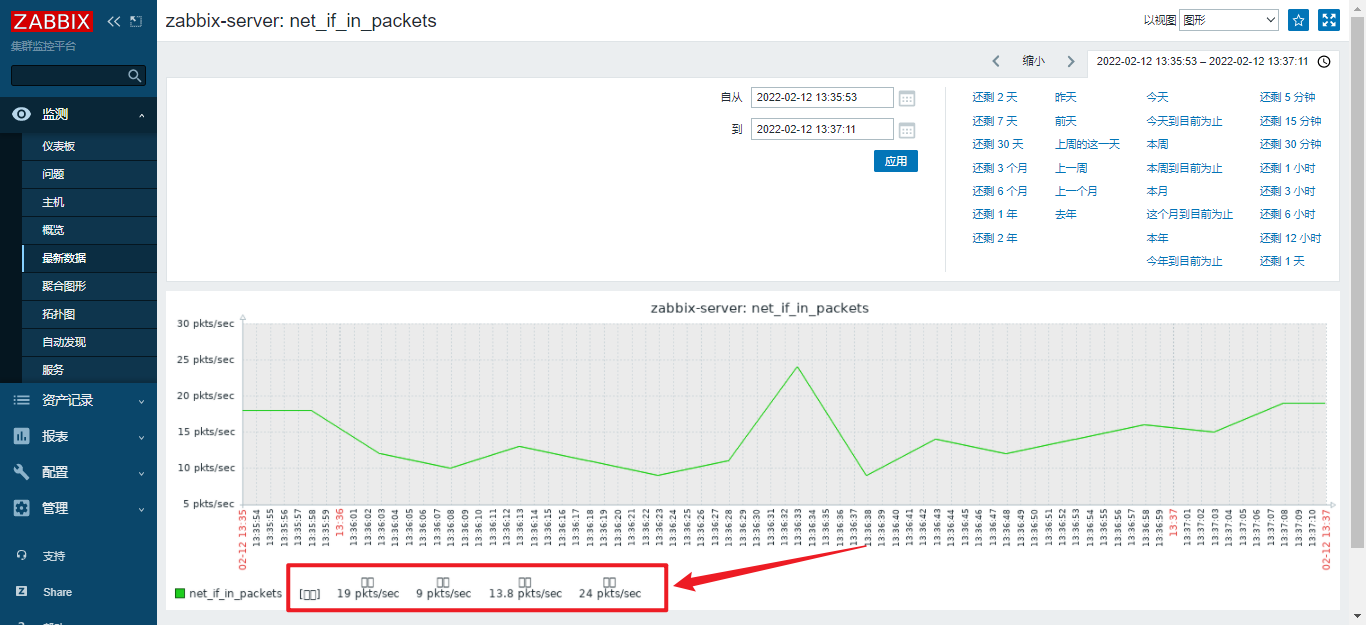
Test whether the monitoring data can be obtained
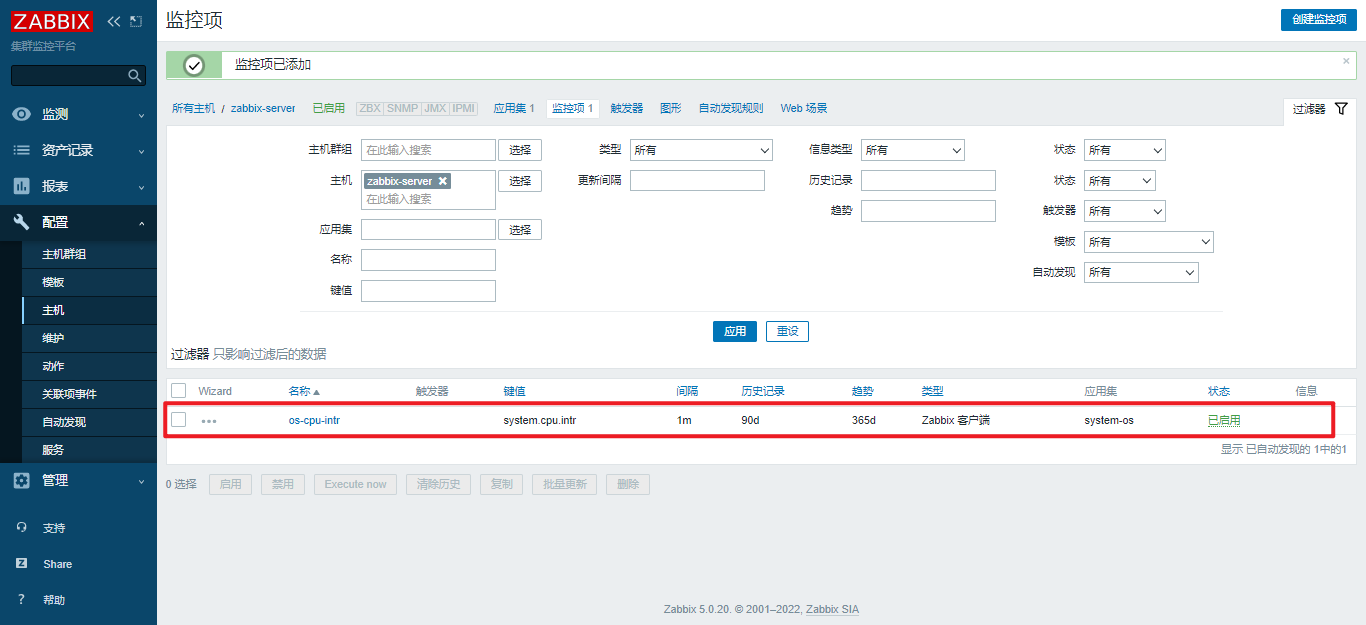
-
Monitoring item added
The key value can be set directly on the web page (automatically executed by the server) or obtained by using the command line command (manually executed):
❌❗ The following error message appears:
[root@zabbix-agent-centos ~]# zabbix_get -s 192.168.200.60 -p 10050 -k 'system.cpu.intr'
-bash: zabbix_get: command not found
 not installed zabbix_get Tools, execution yum Command to install.
[root@zabbix-agent-centos ~]# yum install -y zabbix-get-5.0.20-1.el7.x86_64
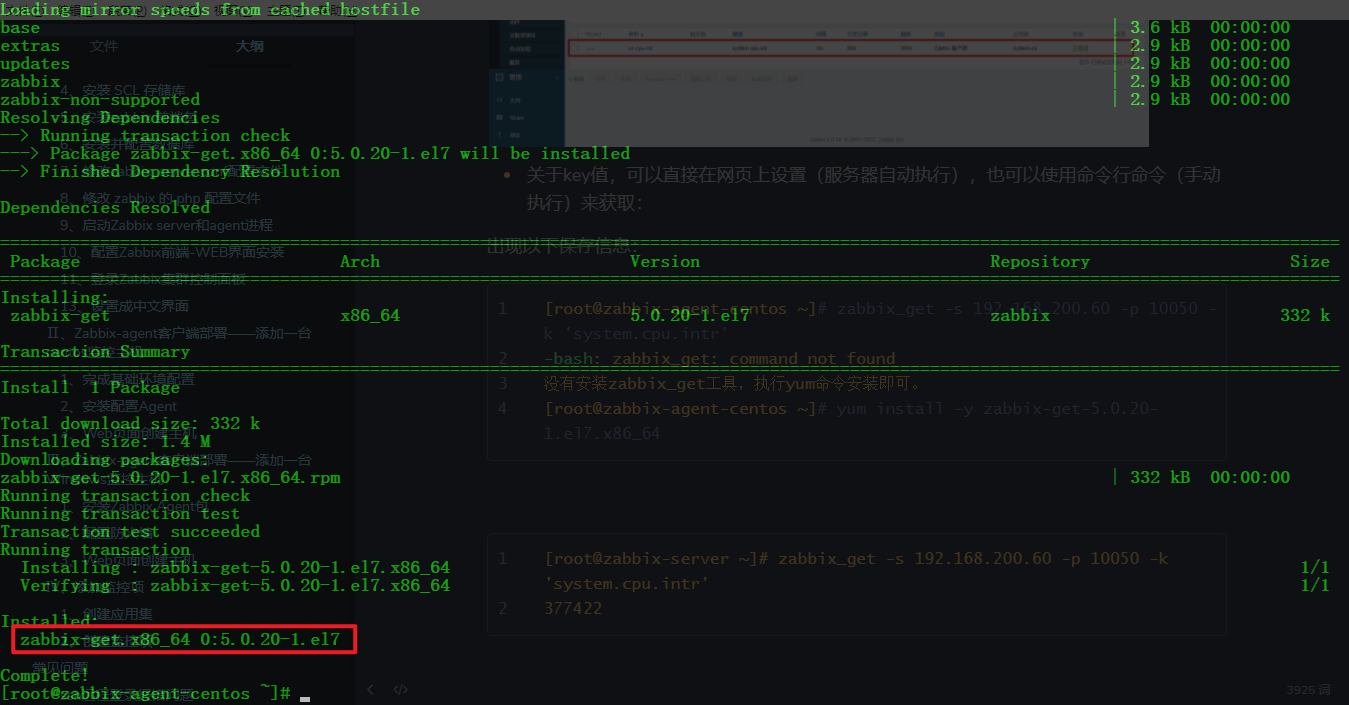
[root@zabbix-server ~]# zabbix_get -s 192.168.200.60 -p 10050 -k 'system.cpu.intr'
377422
- On the ZABBIX agent client, use the command to view the rate change of intr:
[root@zabbix-agent-centos ~]# vmstat 1
procs -----------memory---------- ---swap-- -----io---- -system-- ------cpu-----
 r  b   swpd   free   buff  cache   si   so    bi    bo   in   cs us sy id wa st
 2  0      0 1636652   2108 260304    0    0    85     5   54  119  0  0 99  0  0
 0  0      0 1636652   2108 260336    0    0     0     0   81  122  0  0 100  0  0
 0  0      0 1636652   2108 260336    0    0     0     0   67  102  0  0 100  0  0
 0  0      0 1636652   2108 260336    0    0     0     0   74  114  0  1 99  0  0
 0  0      0 1636652   2108 260336    0    0     0     0   64  101  0  0 100  0  0
5, Frequently asked questions ❓❌
1. ssh Remote Login error 💥
C:\Users\xybdiy>ssh root@192.168.200.60
@@@@@@@@@@@@@@@@@@@@@@@@@@@@@@@@@@@@@@@@@@@@@@@@@@@@@@@@@@@
@    WARNING: REMOTE HOST IDENTIFICATION HAS CHANGED!     @
@@@@@@@@@@@@@@@@@@@@@@@@@@@@@@@@@@@@@@@@@@@@@@@@@@@@@@@@@@@
IT IS POSSIBLE THAT SOMEONE IS DOING SOMETHING NASTY!
Someone could be eavesdropping on you right now (man-in-the-middle attack)!
It is also possible that a host key has just been changed.
The fingerprint for the ECDSA key sent by the remote host is
SHA256:dLKCGuPVvBAqv4F6zitccxVsxbZHwMoeqcH6/HFZ05c.
Please contact your system administrator.
Add correct host key in C:\\Users\\xybdiy/.ssh/known_hosts to get rid of this message.
Offending ECDSA key in C:\\Users\\xybdiy/.ssh/known_hosts:15
ECDSA host key for 192.168.200.60 has changed and you have requested strict checking.
Host key verification failed.

# terms of settlement
 After clearing the local cache key, restart SSH Remote connection
C:\Users\xybdiy>ssh-keygen -R 192.168.200.60
# Host 192.168.200.60 found: line 15
C:\Users\xybdiy/.ssh/known_hosts updated.
Original contents retained as C:\Users\xybdiy/.ssh/known_hosts.old
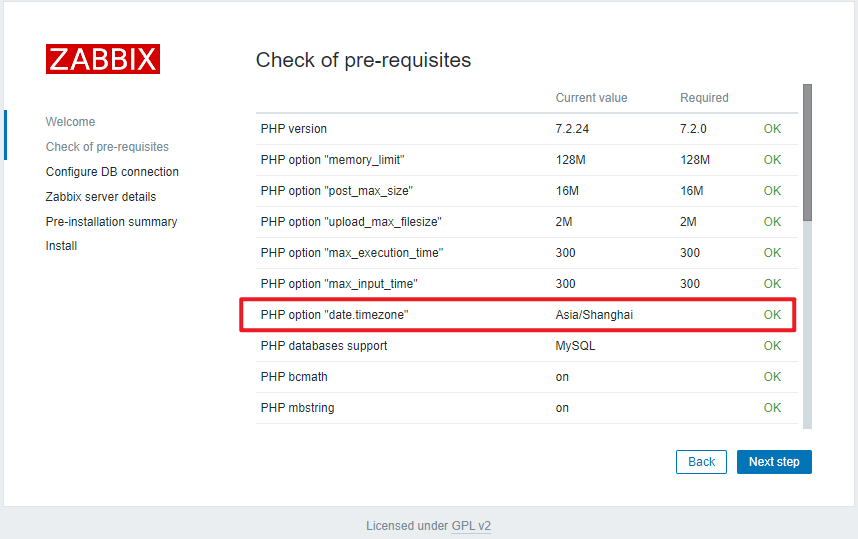
2. PHP option "date.timezone" unknown fail error message 💢
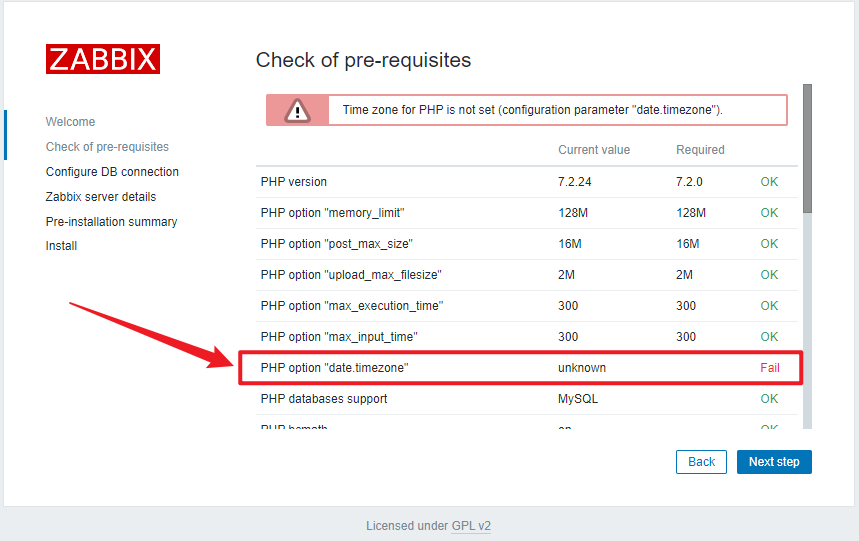
terms of settlement:
[root@zabbix-server ~]# vim /etc/opt/rh/rh-php72/php-fpm.d/zabbix.conf
 Modification content
#Add notes; Remove and amend to read
php_value[date.timezone] = Asia/Shanghai
 Press:wq Save exit
 Restart relevant services.
3. Chinese garbled code problem 💥
Upload Microsoft YaHei font 📌
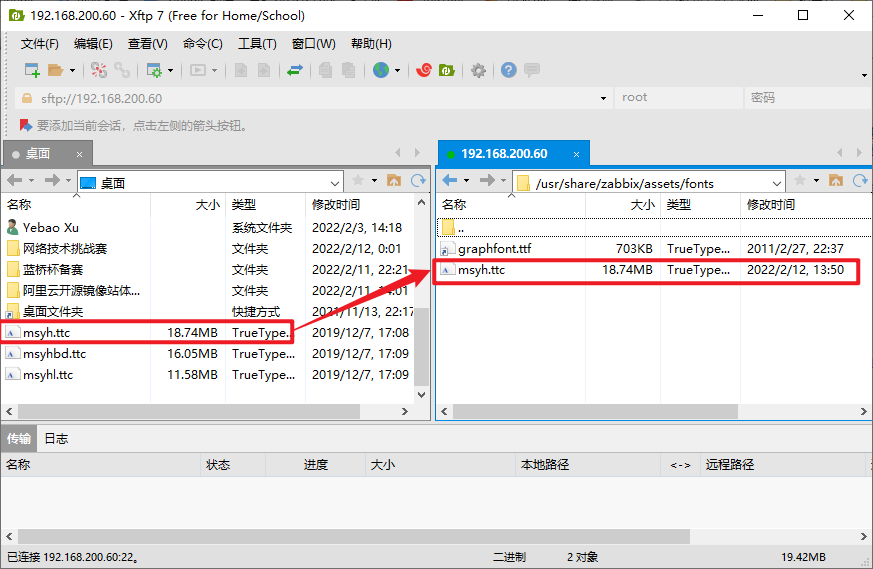
terms of settlement:
1️⃣#Query the location of the zabbix directory
[root@zabbix-server ~]# whereis zabbix
zabbix: /usr/lib/zabbix /etc/zabbix /usr/share/zabbix

2️⃣#Search the location of the fonts directory through the find command
[root@zabbix-server ~]# find / -name fonts
/boot/grub2/fonts
/etc/fonts
/usr/share/fonts
/usr/share/zabbix/assets/fonts
/usr/share/httpd/noindex/css/fonts

3️⃣#View the fonts in the fonts directory
[root@zabbix-server ~]# ls /usr/share/zabbix/assets/fonts
graphfont.ttf

4️⃣#Enter the fonts directory to view the soft link of the font
[root@zabbix-server ~]# cd /usr/share/zabbix/assets/fonts/
[root@zabbix-server fonts]# ll
total 0
lrwxrwxrwx 1 root root 33 Feb  9 21:23 graphfont.ttf -> /etc/alternatives/zabbix-web-font

5️⃣#Check whether the font is uploaded
[root@zabbix-server fonts]# ls
graphfont.ttf  msyh.ttc

6️⃣# Delete old soft links
[root@zabbix-server fonts]# rm -f /etc/alternatives/zabbix-web-font

7️⃣# New soft link
[root@zabbix-server fonts]# ln -s /usr/share/zabbix/assets/fonts/msyh.ttc /etc/alternatives/zabbix-web-font

8️⃣#Restart ZABBIX server service
[root@zabbix-server fonts]# systemctl restart zabbix-server
[root@zabbix-server fonts]# systemctl status zabbix-server
Successfully solved