stay Introduction to PyTorch's deep learning practice notes 12 - Fundamentals of circular neural network RNN is briefly introduced in. In the next 13 lectures, we introduce an application of neural network: implementing a classifier of cyclic neural network.

1 RNN Classifier – Name Classification
Use RNN as a classifier.
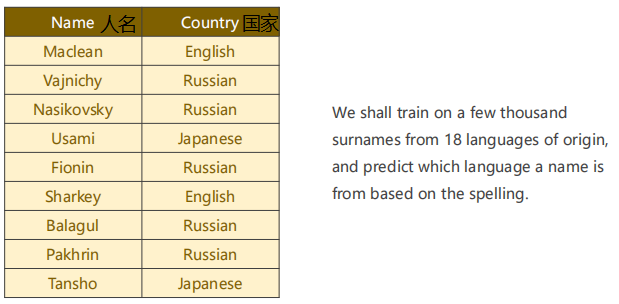
Look at this question first. Now there is a data set, in which there are people's names and corresponding countries. We need to train a model and input a new name. The model can predict which language the name is based on (18 different languages, 18 classifications).
2 Revision
Review the previous lecture.
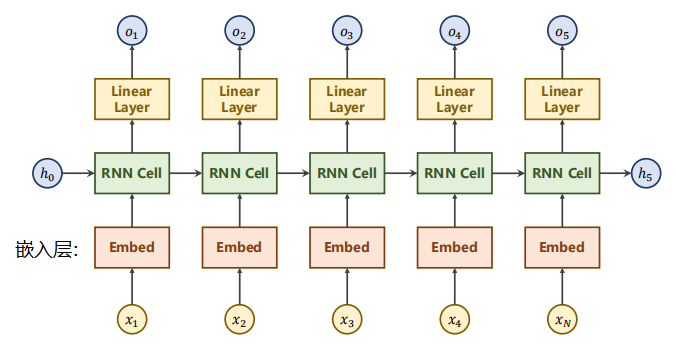
In natural language processing, the usual way is: ① first turn the word or word into a one hot vector. The one hot vector has a high dimension and is too sparse. Therefore, generally speaking, first convert the one hot vector into a low-dimensional dense vector through the embedded layer, and then through RNN, the output of the hidden layer is not necessarily consistent with the final required goal, So we need to use a linear layer to map the output to be consistent with our requirements.
3 Our Model
Our requirement is the language classification to which the output name belongs. We have no requirements for O1-O5 outputs, that is, we do not need to make linear transformation for all hidden layer outputs. In order to solve this problem, we can simplify the network, as shown in the figure below.
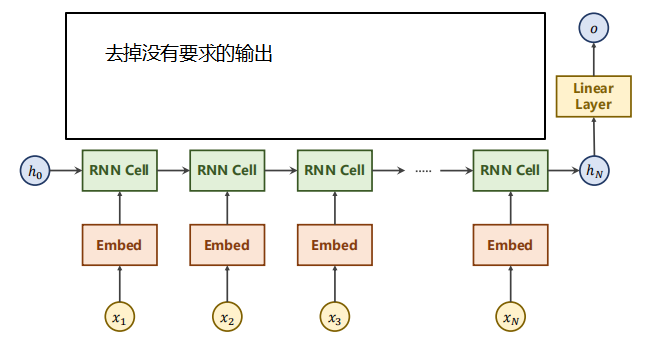
After the input vector passes through the embedded layer, it is input to RNN to output the final hidden layer state. The final hidden layer state passes through a linear layer. We can divide it into 18 categories to realize the task of name classification.
The model used in this lecture is as follows:
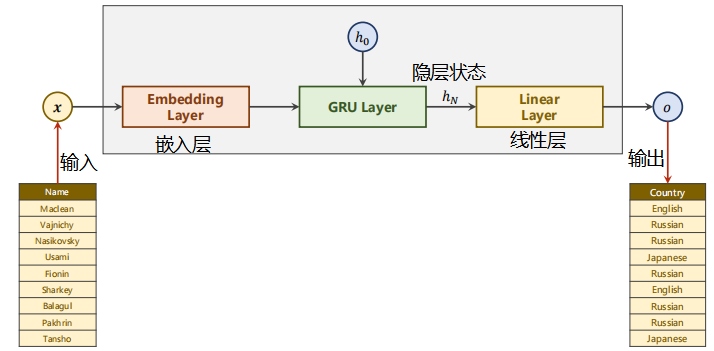 The input first passes through the embedded layer, then uses the GRU model, and then uses the linear layer. Note that the input is the output of the last hidden state, which is transformed into an 18 dimensional output.
Look at the data. There are only two columns: Name and Country. Note that each Name entered is a sequence (x1,x2,...xN), and the length of the sequence is different.
4 Implementation
First, let's look at how the main loop is written.
4.1 Implementation – Main Cycle
The code is as follows:
if __name__ == '__main__':
#N_CHARS: number of characters (English letters are input, and each character must be transformed into one hot vector, which is the size of the alphabet set by yourself)
#HIDDEN_SIZE: number of hidden layers (dimension of hidden layers output by GRU)
#N_COUNTRY: how many categories are there altogether
#N_LAYER: layer setting
#Instantiated classification model
classifier = RNNClassifier(N_CHARS, HIDDEN_SIZE, N_COUNTRY, N_LAYER)
#Determine whether to use GPU training model
if USE_GPU:
device = torch.device("cuda:0")
classifier.to(device)
#Construct loss function and optimizer
criterion = torch.nn.CrossEntropyLoss()
optimizer = torch.optim.Adam(classifier.parameters(), lr=0.001)
start = time.time() #Calculate the time
print("Training for %d epochs..." % N_EPOCHS)
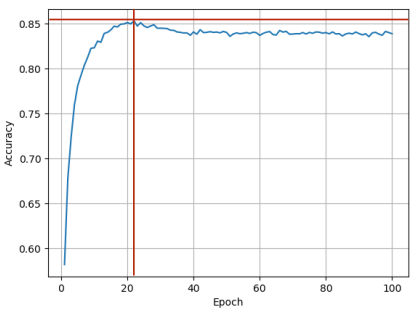
acc_list = []
#Each epoch is trained and tested
for epoch in range(1, N_EPOCHS + 1):
# Train cycle
trainModel()
acc = testModel()
#Add test results to acc_list, can draw, etc
acc_list.append(acc)Function to calculate runtime time_ The code of since() is as follows:
def time_since(since):
    s = time.time() - since
    m = math.floor(s / 60)
    s -= m * 60
    return '%dm %ds' % (m, s)
Record the accuracy of the test. The code is as follows:
import matplotlib.pyplot as plt
import numpy as np


epoch = np.arange(1, len(acc_list) + 1, 1)

acc_list = np.array(acc_list)

plt.plot(epoch, acc_list)

plt.xlabel('Epoch')

plt.ylabel('Accuracy')

plt.grid()

plt.show()
Basic process of recall training (four steps):
Prepare data – define model – construct loss function and optimizer – training process
4.2 Implementation – Preparing Data
First, let's take a look at the data preparation.
4.2.1 Name handling
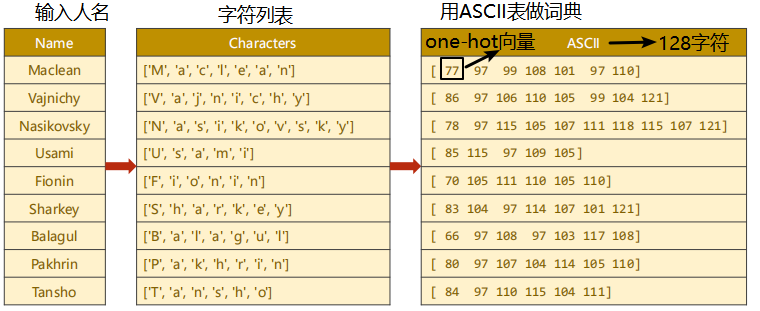
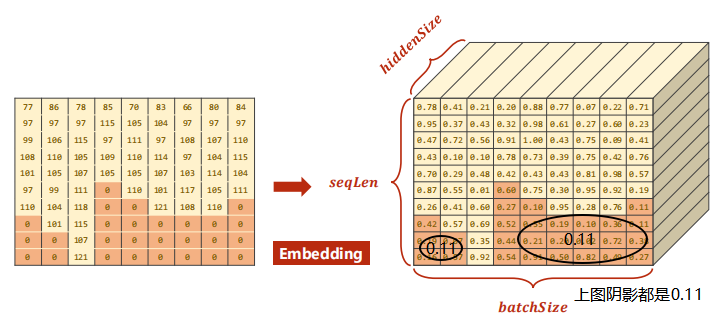
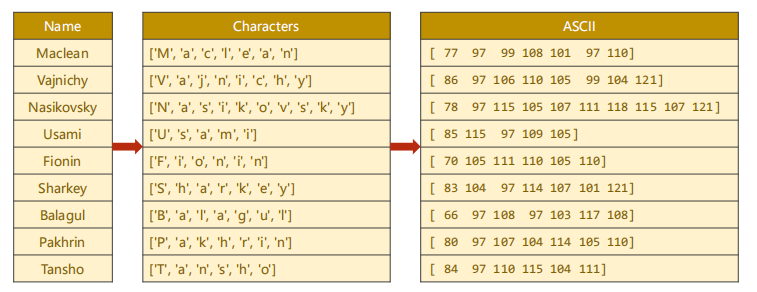
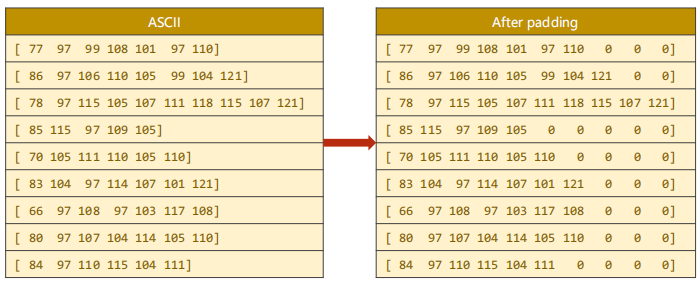
① What you get is a string, which is first transformed into a sequence and into a character list. Each number in the list is each character in the name.
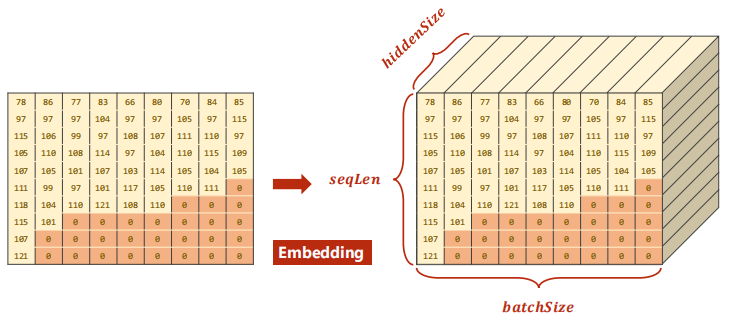
② Next, we can use the ASCII table to make a dictionary. The ASCII table has 128 characters. We set the length of the dictionary to 128, find the ASCII value corresponding to each character, and spell the sequence we want. Each number in the rightmost table in the figure above is not a number, but a one hot vector. For example, 77 is a 128 dimensional vector. The value of the 77th number is 1 and the other values are 0. For embedding (embedded layer), just tell the embedded layer which dimension is 1, so just put the ASCII value here.
How should the length of the sequence be solved?
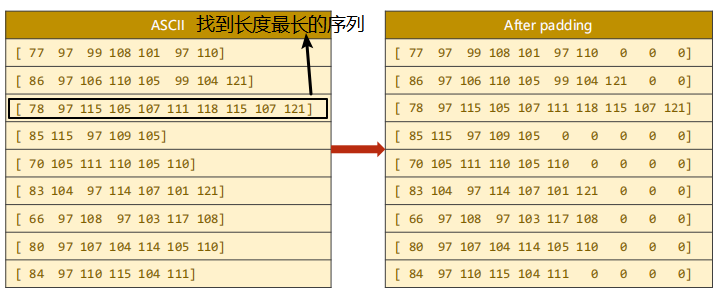
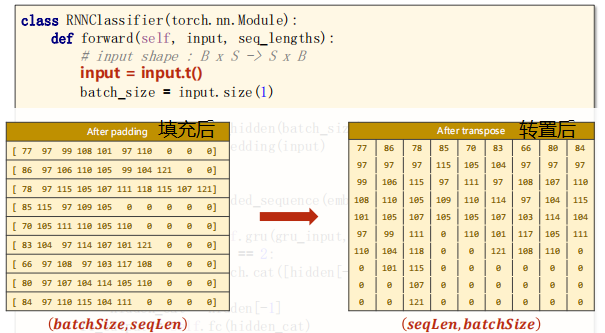
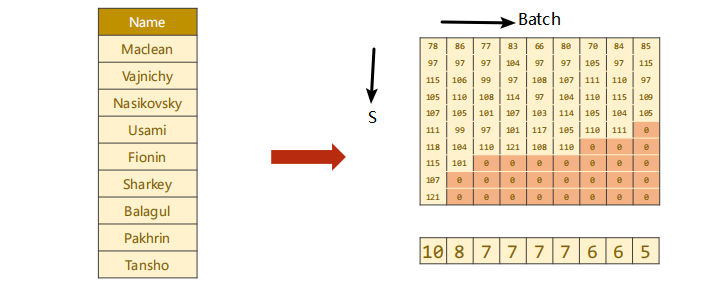
③ As shown on the left of the figure above, each line is a sequence. Our method to solve the difference in sequence length is padding (because the tensor must ensure that all data are filled, otherwise it is not a tensor). As shown on the right of the figure above, when making a batch, we look at which string in the batch has the longest length, and then fill other strings with the same length, In this way, we can ensure that we can form a tensor, because there is no way to form a tensor because the number of each dimension is different.
4.2.2 Country processing
We need to convert each classification (country) into a classification index. The classification index must be an integer starting from 0. We can't directly use the string as our classification label.
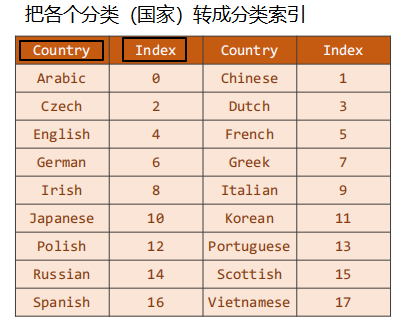
The whole data set is made into a dictionary from 18 countries.
The code is as follows:
import gzip
import csv
class NameDataset(Dataset):
def __init__(self, is_train_set=True):
#Read data from gz
filename = 'data/names_train.csv.gz' if is_train_set else 'data/names_test.csv.gz'
with gzip.open(filename, 'rt') as f:
reader = csv.reader(f) #Each row is a tuple of (name,country)
rows = list(reader)
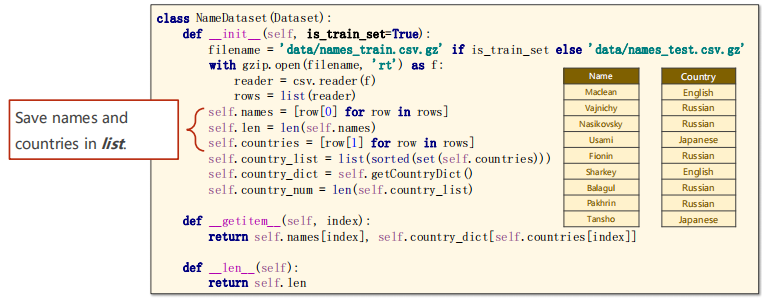
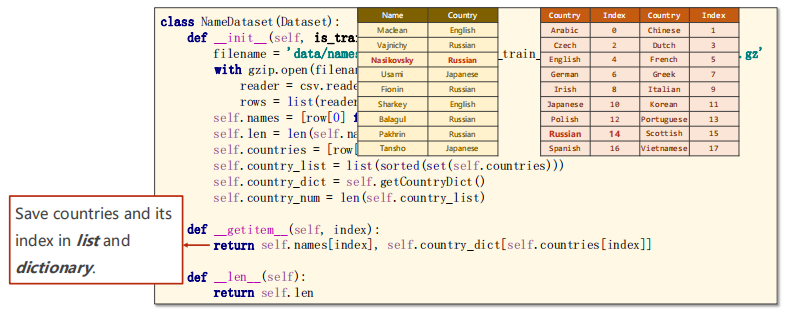
#Save names and countries in the list
self.names = [row[0] for row in rows]
self.len = len(self.names)
self.countries = [row[1] for row in rows]
#Save the countries and its index in the list and dictionary
self.country_list = list(sorted(set(self.countries)))
self.country_dict = self.getCountryDict()
self.country_num = len(self.country_list)#Number of countries
#Provide index access
def __getitem__(self, index):
return self.names[index], self.country_dict[self.countries[index]]
#Returns the length of the dataset
def __len__(self):
return self.len
#Convert list to dictionary
def getCountryDict(self):
country_dict = dict()
for idx, country_name in enumerate(self.country_list, 0):
country_dict[country_name] = idx
return country_dict
#Given the index, the country is returned for display
def idx2country(self, index):
return self.country_list[index]
#Returns the number of countries
def getCountriesNum(self):
return self.country_num
#Prepare Dataset and DataLoader
# Parameters
HIDDEN_SIZE = 100
BATCH_SIZE = 256
N_LAYER = 2
N_EPOCHS = 100
N_CHARS = 128
USE_GPU = False
#Training data
trainset = NameDataset(is_train_set=True)
trainloader = DataLoader(trainset, batch_size=BATCH_SIZE, shuffle=True)
#test data
testset = NameDataset(is_train_set=False)
testloader = DataLoader(testset, batch_size=BATCH_SIZE, shuffle=False)
#N_COUNTRY is the output size of our model
N_COUNTRY = trainset.getCountriesNum()Note that the above code reads the data set. Why not use Numpy? Because there are many ways to read data sets. If it is pickle/HDFS/HD5 data, you need to use the corresponding package.
Find the index corresponding to his country according to the person's name:
4.3 Implementation – Model Design
4.3.1 Implementation – Model Design
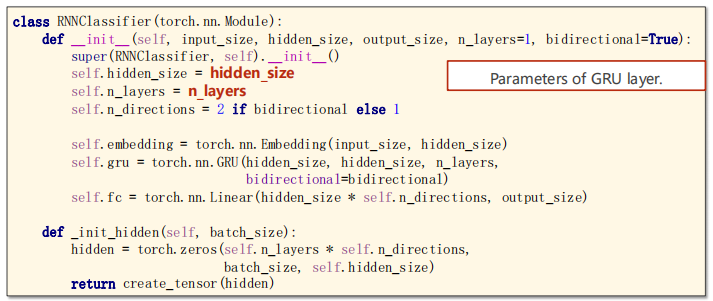
Let's take a look at the GRU related parameter: hidden_size and n_layers.
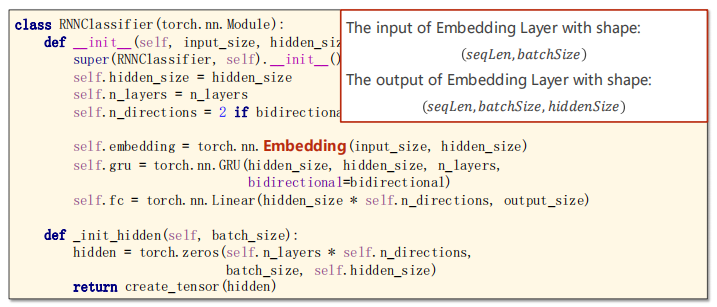
Note the input and output dimensions of the Embedding layer:
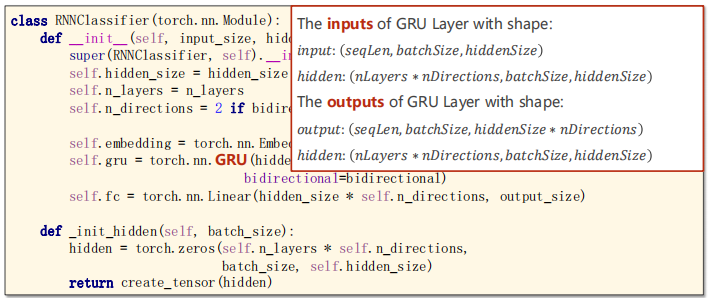
There are also the input and output dimensions of GRU:
Here n_directions to set one-way or two-way:
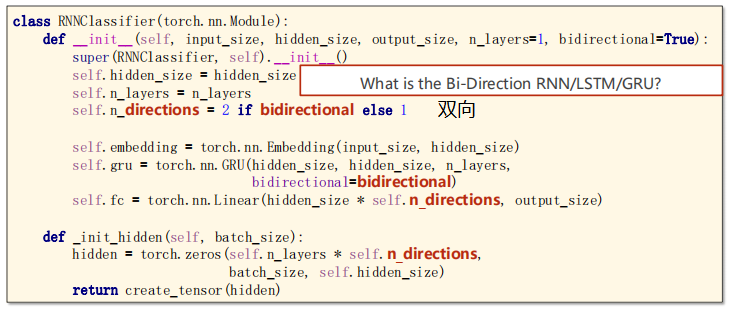
The code is as follows:
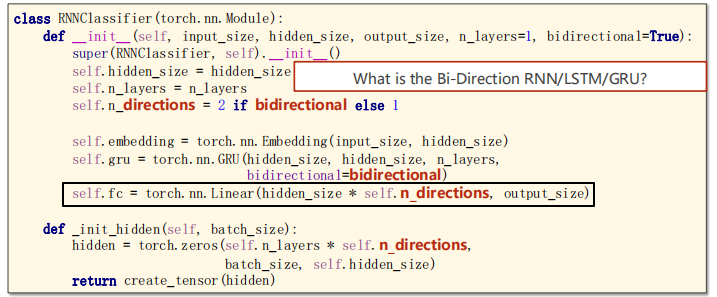
class RNNClassifier(torch.nn.Module):
    def __init__(self, input_size, hidden_size, output_size, n_layers=1, bidirectional=True):
    	super(RNNClassifier, self).__init__()
     	#parameters of GRU layer
    	self.hidden_size = hidden_size
    	self.n_layers = n_layers
     	#What is the Bi-Direction RNN/LSTM/GRU?
    	self.n_directions = 2 if bidirectional else 1

     	#The input of Embedding Layer with shape:𝑠𝑒𝑞𝐿𝑒𝑛, 𝑏𝑎𝑡𝑐ℎ𝑆𝑖𝑧𝑒
        #The output of Embedding Layer with shape:𝑠𝑒𝑞𝐿𝑒𝑛, 𝑏𝑎𝑡𝑐ℎ𝑆𝑖𝑧𝑒, ℎ𝑖𝑑𝑑𝑒𝑛𝑆𝑖𝑧𝑒
     	self.embedding = torch.nn.Embedding(input_size, hidden_size)
    	#The inputs of GRU Layer with shape:
    	#𝑖𝑛𝑝𝑢𝑡: 𝑠𝑒𝑞𝐿𝑒𝑛, 𝑏𝑎𝑡𝑐ℎ𝑆𝑖𝑧𝑒, ℎ𝑖𝑑𝑑𝑒𝑛𝑆𝑖𝑧𝑒
    	#ℎ𝑖𝑑𝑑𝑒𝑛: 𝑛𝐿𝑎𝑦𝑒𝑟𝑠 ∗ 𝑛𝐷𝑖𝑟𝑒𝑐𝑡𝑖𝑜𝑛𝑠, 𝑏𝑎𝑡𝑐ℎ𝑆𝑖𝑧𝑒, ℎ𝑖𝑑𝑑𝑒𝑛𝑆𝑖𝑧𝑒
    	#The outputs of GRU Layer with shape:
    	#𝑜𝑢𝑡𝑝𝑢𝑡: 𝑠𝑒𝑞𝐿𝑒𝑛, 𝑏𝑎𝑡𝑐ℎ𝑆𝑖𝑧𝑒, ℎ𝑖𝑑𝑑𝑒𝑛𝑆𝑖𝑧𝑒 ∗ 𝑛𝐷𝑖𝑟𝑒𝑐𝑡𝑖𝑜𝑛𝑠
    	#ℎ𝑖𝑑𝑑𝑒𝑛: 𝑛𝐿𝑎𝑦𝑒𝑟𝑠 ∗ 𝑛𝐷𝑖𝑟𝑒𝑐𝑡𝑖𝑜𝑛𝑠, 𝑏𝑎𝑡𝑐ℎ𝑆𝑖𝑧𝑒, ℎ𝑖𝑑𝑑𝑒𝑛𝑆𝑖𝑧𝑒
     	self.gru = torch.nn.GRU(hidden_size, hidden_size, n_layers,bidirectional=bidirectional)
    	self.fc = torch.nn.Linear(hidden_size * self.n_directions, output_size)


    def _init_hidden(self, batch_size):
    	hidden = torch.zeros(self.n_layers * self.n_directions,batch_size, self.hidden_size)
    	return create_tensor(hidden)
Let's take a look at what is a two-way neural network.
4.3.2 Implementation – Bi-direction RNN/LSTM/GRU
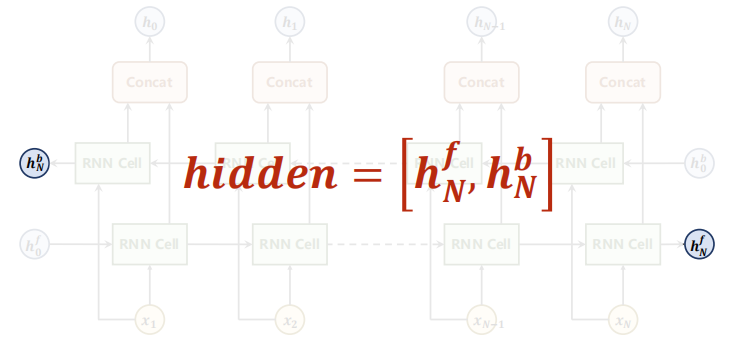
Flow chart of forward direction of sequence (note that forward is not forward propagation):
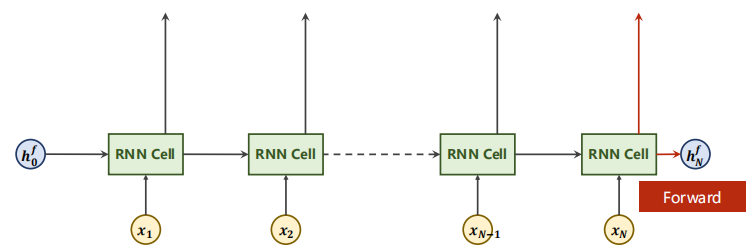
Case X in the above figure_ (n-1) only contains past information, but sometimes future information needs to be considered in NLP.
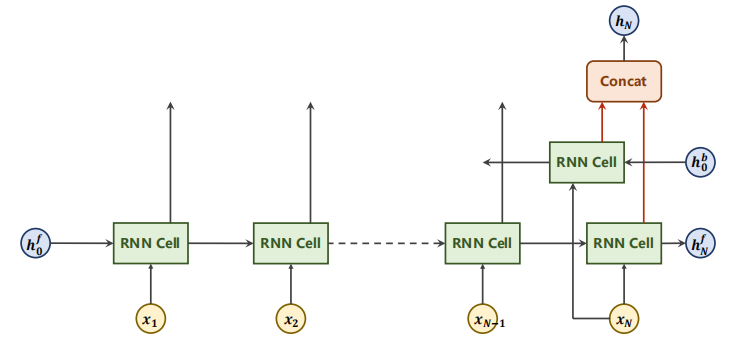
Flow chart of backward direction of sequence (note that backward is not back propagation):
next

Finally
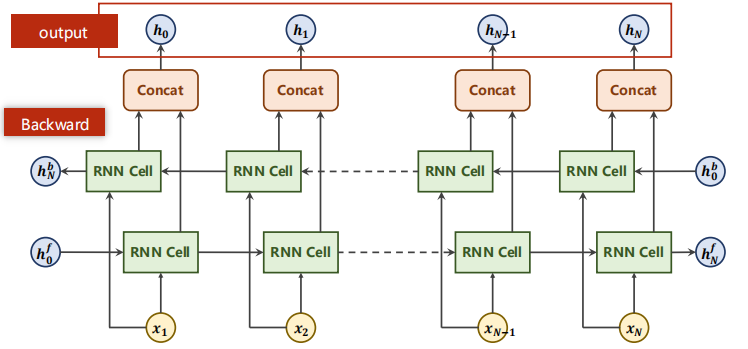
Such a neural network is called bidirectional neural network, and backward finally gets h_N^b, the output is h0, H1 above hN.
There are only two hidden in the final output. The formula is as follows:
4.3.3 Implementation – Model Design
Then look, this place needs to be multiplied by n_directions:
Then look at the forward process.
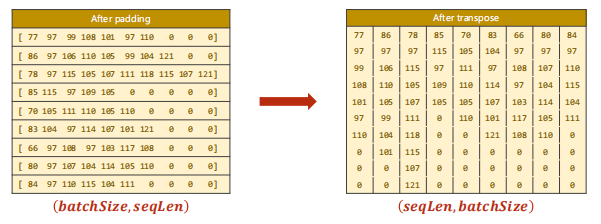
First, we do matrix transpose: input = input t(). Then save batch_ The value of size is then used to construct h0.
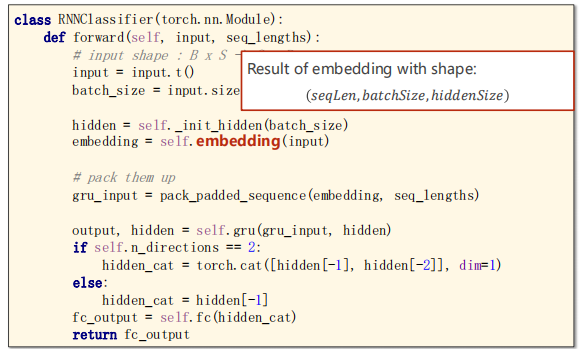
Then embed the layer: embedding = self Embedding (input), the dimension becomes the dimension in the figure below.
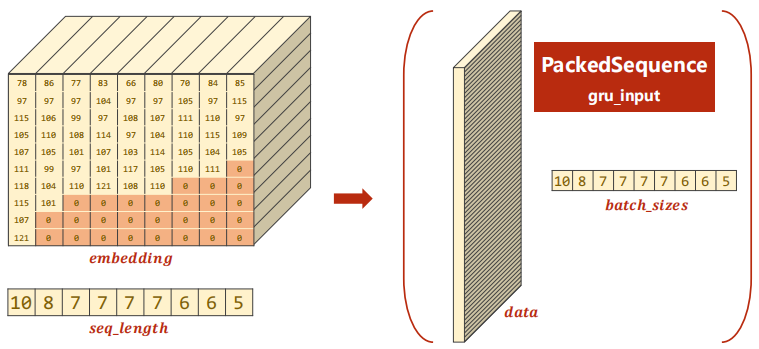
Note the following figure. If the padding is 0, it is not necessary to participate in the operation. pytorch provides the following functions to speed up the operation.
Use this line of code gru_input = pack_padded_sequence(embedding, seq_lengths), input and output are as follows:
Source code:
If it's still not clear, look down:
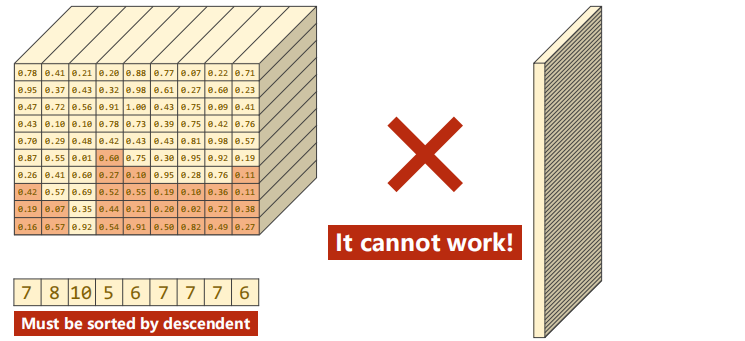
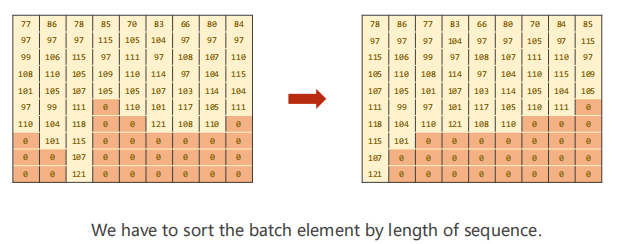
Directly arrange the non-0 columns on the left to the right and remove the filled 0. GRU can process data sequences of different lengths (data length saving), but it cannot use the packaging function. If you want to package, you must arrange them in descending order of length. The descending order is shown in the following figure:
After arranging, recalculate:
After doing so, the work efficiency is higher.
The overall code is as follows:
class RNNClassifier(torch.nn.Module):
def __init__(self, input_size, hidden_size, output_size, n_layers=1, bidirectional=True):
super(RNNClassifier, self).__init__()
self.hidden_size = hidden_size
self.n_layers = n_layers
self.n_directions = 2 if bidirectional else 1
self.embedding = torch.nn.Embedding(input_size, hidden_size)
#The inputs of GRU Layer with shape:
#𝑖𝑛𝑝𝑢𝑡: 𝑠𝑒𝑞𝐿𝑒𝑛, 𝑏𝑎𝑡𝑐ℎ𝑆𝑖𝑧𝑒, ℎ𝑖𝑑𝑑𝑒𝑛𝑆𝑖𝑧𝑒
#ℎ𝑖𝑑𝑑𝑒𝑛: 𝑛𝐿𝑎𝑦𝑒𝑟𝑠 ∗ 𝑛𝐷𝑖𝑟𝑒𝑐𝑡𝑖𝑜𝑛𝑠, 𝑏𝑎𝑡𝑐ℎ𝑆𝑖𝑧𝑒, ℎ𝑖𝑑𝑑𝑒𝑛𝑆𝑖𝑧𝑒
#The outputs of GRU Layer with shape:
#𝑜𝑢𝑡𝑝𝑢𝑡: 𝑠𝑒𝑞𝐿𝑒𝑛, 𝑏𝑎𝑡𝑐ℎ𝑆𝑖𝑧𝑒, ℎ𝑖𝑑𝑑𝑒𝑛𝑆𝑖𝑧𝑒 ∗ 𝑛𝐷𝑖𝑟𝑒𝑐𝑡𝑖𝑜𝑛𝑠
#ℎ𝑖𝑑𝑑𝑒𝑛: 𝑛𝐿𝑎𝑦𝑒𝑟𝑠 ∗ 𝑛𝐷𝑖𝑟𝑒𝑐𝑡𝑖𝑜𝑛𝑠, 𝑏𝑎𝑡𝑐ℎ𝑆𝑖𝑧𝑒, ℎ𝑖𝑑𝑑𝑒𝑛𝑆𝑖𝑧𝑒
self.gru = torch.nn.GRU(hidden_size, hidden_size, n_layers,bidirectional=bidirectional)
self.fc = torch.nn.Linear(hidden_size * self.n_directions, output_size)
def _init_hidden(self, batch_size):
hidden = torch.zeros(self.n_layers * self.n_directions,batch_size, self.hidden_size)
return create_tensor(hidden)
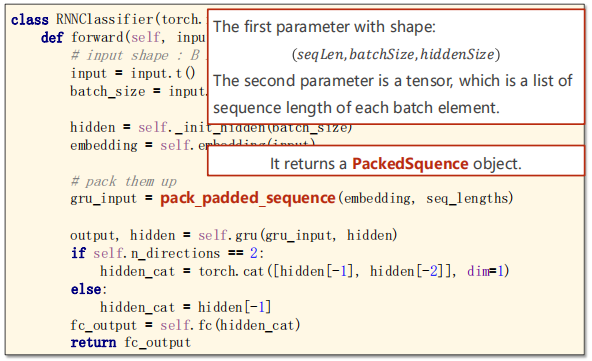
def forward(self, input, seq_lengths):
# input shape : B x S -> S x B
input = input.t()
#Save batch-size for make initial hidden
batch_size = input.size(1)
#Initial hidden with shape:
#(𝑛𝐿𝑎𝑦𝑒𝑟 ∗ 𝑛𝐷𝑖𝑟𝑒𝑐𝑡𝑖𝑜𝑛𝑠, 𝑏𝑎𝑡𝑐ℎ𝑆𝑖𝑧𝑒, ℎ𝑖𝑑𝑑𝑒𝑛𝑆𝑖𝑧𝑒)
hidden = self._init_hidden(batch_size)
#Result of embedding with shape:
#(𝑠𝑒𝑞𝐿𝑒𝑛, 𝑏𝑎𝑡𝑐ℎ𝑆𝑖𝑧𝑒, ℎ𝑖𝑑𝑑𝑒𝑛𝑆𝑖𝑧𝑒)
embedding = self.embedding(input)
# pack them up
#The first parameter with shape:
#(𝑠𝑒𝑞𝐿𝑒𝑛, 𝑏𝑎𝑡𝑐ℎ𝑆𝑖𝑧𝑒, ℎ𝑖𝑑𝑑𝑒𝑛𝑆𝑖𝑧𝑒)
#The second parameter is a tensor, which is a list of sequence length of each batch element.
#Result of embedding with shape:(𝑠𝑒𝑞𝐿𝑒𝑛, 𝑏𝑎𝑡𝑐ℎ𝑆𝑖𝑧𝑒, ℎ𝑖𝑑𝑑𝑒𝑛𝑆𝑖𝑧𝑒)
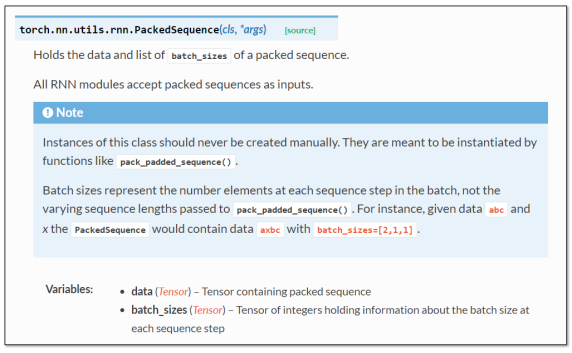
#It returns a PackedSquence object.
gru_input = pack_padded_sequence(embedding, seq_lengths)
#The output is a PackedSequence object, actually it is a tuple.
#the shape of hidden, which we concerned, with shape:
#(𝑛𝐿𝑎𝑦𝑒𝑟𝑠 ∗ 𝑛𝐷𝑖𝑟𝑒𝑐𝑡𝑖𝑜𝑛, 𝑏𝑎𝑡𝑐ℎ𝑆𝑖𝑧𝑒, ℎ𝑖𝑑𝑑𝑒𝑛𝑆𝑖𝑧𝑒)
output, hidden = self.gru(gru_input, hidden)
if self.n_directions == 2:
hidden_cat = torch.cat([hidden[-1], hidden[-2]], dim=1)
else:
hidden_cat = hidden[-1]
fc_output = self.fc(hidden_cat)
return fc_outputThe above contents are the corresponding settings of the model.
4.4 Implementation – Convert name to tensor
Next, let's take a look at the process of converting name into tensor.
The conversion process is as follows:
① name is converted into a character by character and into the corresponding ASCII value.
② Fill:
③ Transpose:
④ Descending order:
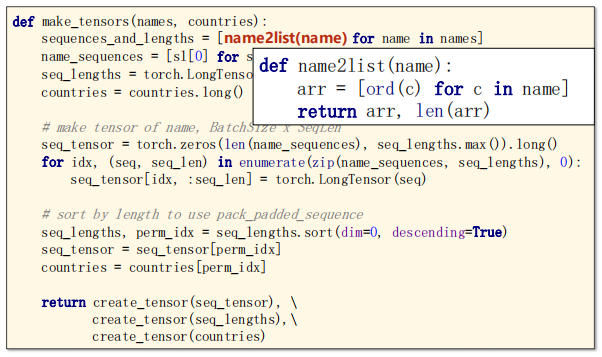
Look at make_tensors function.
Turn each character into a list. The code is as follows:
4.5 Implementation – One Epoch Training
Training:
The code is as follows:
def create_tensor(tensor):
if USE_GPU:
device = torch.device("cuda:0")
tensor = tensor.to(device)
return tensor
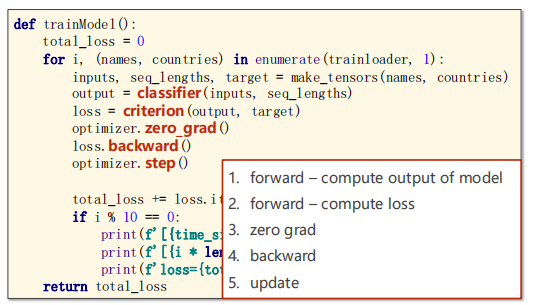
def trainModel():
total_loss = 0
for i, (names, countries) in enumerate(trainloader, 1):
inputs, seq_lengths, target = make_tensors(names, countries)
output = classifier(inputs, seq_lengths)
loss = criterion(output, target)
optimizer.zero_grad()
loss.backward()
optimizer.step()
total_loss += loss.item()
if i % 10 == 0:
print(f'[{time_since(start)}] Epoch {epoch} ', end='')
print(f'[{i * len(inputs)}/{len(trainset)}] ', end='')
print(f'loss={total_loss / (i * len(inputs))}')
return total_loss4.6 Implementation – Testing
The test code is as follows:
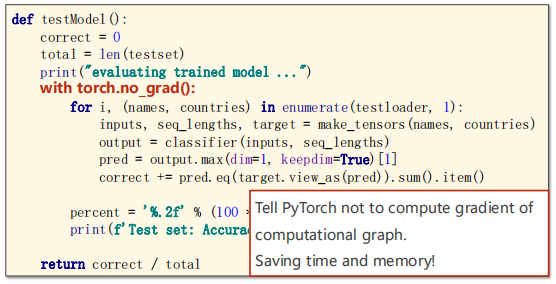
def testModel():
    correct = 0
    total = len(testset)
    print("evaluating trained model ...")
    with torch.no_grad():
        for i, (names, countries) in enumerate(testloader, 1):
            inputs, seq_lengths, target = make_tensors(names, countries)
            output = classifier(inputs, seq_lengths)
            pred = output.max(dim=1, keepdim=True)[1]
            correct += pred.eq(target.view_as(pred)).sum().item()
        percent = '%.2f' % (100 * correct / total)
        print(f'Test set: Accuracy {correct}/{total} {percent}%')
    return correct / total
The output results are shown as follows:
5 Exercise 13-1 Sentiment Analysis on Movie Reviews
Emotional analysis of film reviews.
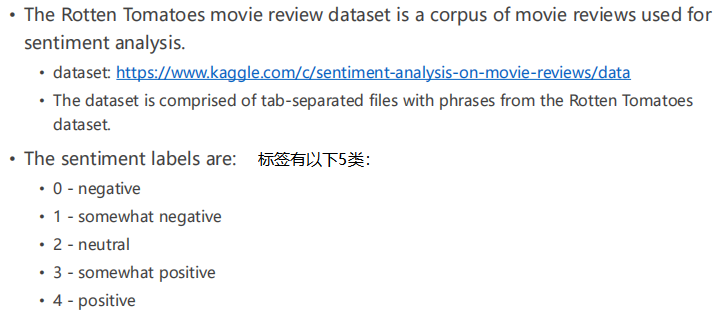
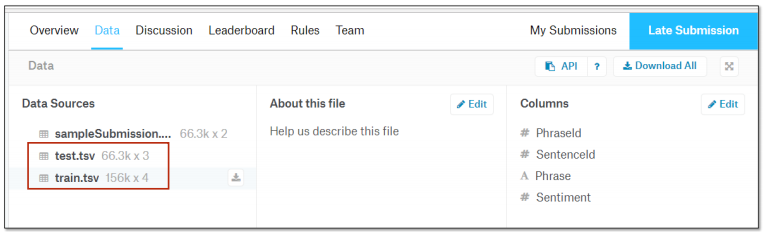
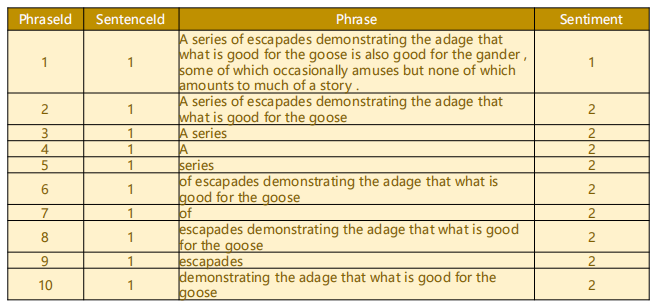
ref:https://www.kaggle.com/c/sentiment-analysis-on-movie-reviews/data
The data sets are as follows:
The answer will be given after practice.
Note: take study notes. If you make mistakes, please correct them! It's not easy to write an article. Please contact me for reprint.