System tutorial Take pytoch in 20 days
Recently and Middle brother,Huige Carry out a small punch in activity, 20 days pytorch, which is the fourth day. Welcome to triple click.
The outbreak of the novel coronavirus pneumonia in 2020 has caused many aspects of the lives of people of all countries.
Some students are income, some students are emotional, some students are psychological, and some students are weight.
China's novel coronavirus pneumonia outbreak is predicted based on China's March 2020 epidemic data and time series RNN model.
import os
import datetime
import torchkeras

#Print time
def printbar():
    nowtime = datetime.datetime.now().strftime('%Y-%m-%d %H:%M:%S')
    print("\n"+"=========="*8 + "%s"%nowtime)

#On the mac system, pytorch and matchlotlib run in jupyter at the same time. You need to change the environment variable
os.environ["KMP_DUPLICATE_LIB_OK"]="TRUE"
1, Prepare data
The data set of this paper is taken from tushare
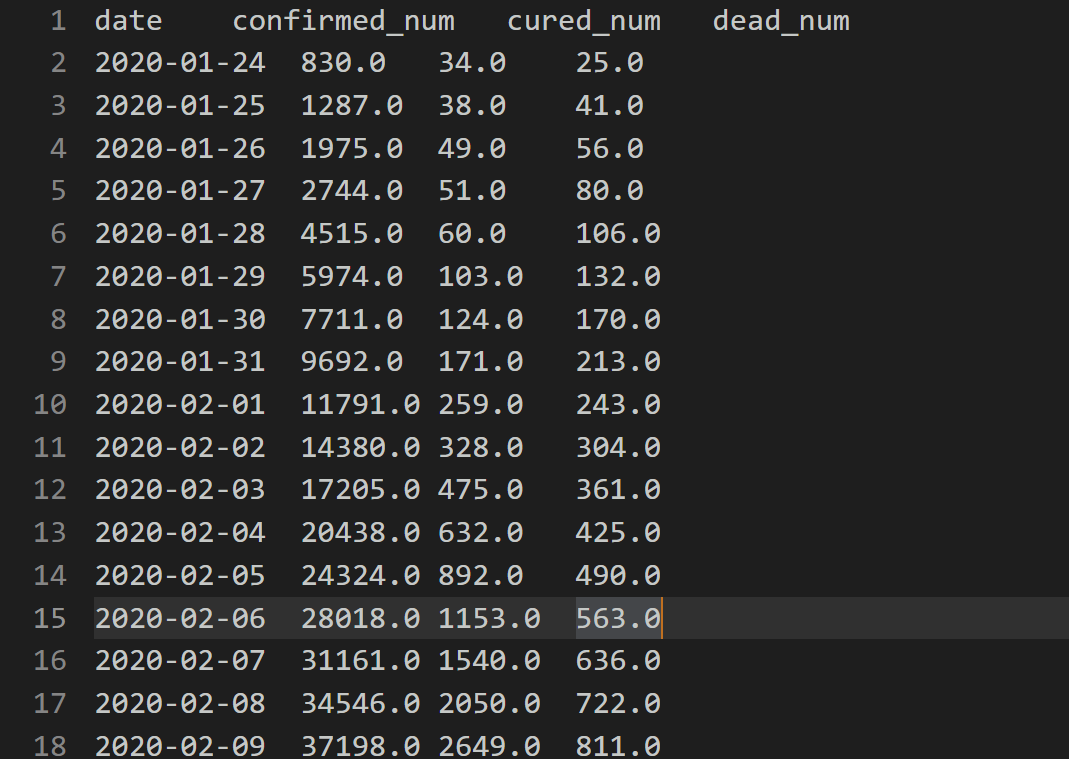
Dataset overview
import numpy as np
import pandas as pd
import matplotlib.pyplot as plt
%matplotlib inline
%config InlineBackend.figure_format = 'svg'

df = pd.read_csv("/home/mw/input/data6936/eat_pytorch_data/data/covid-19.csv",sep = "\t")
df.plot(x = "date",y = ["confirmed_num","cured_num","dead_num"],figsize=(10,6))
plt.xticks(rotation=60) # Abscissa rotation 60 °

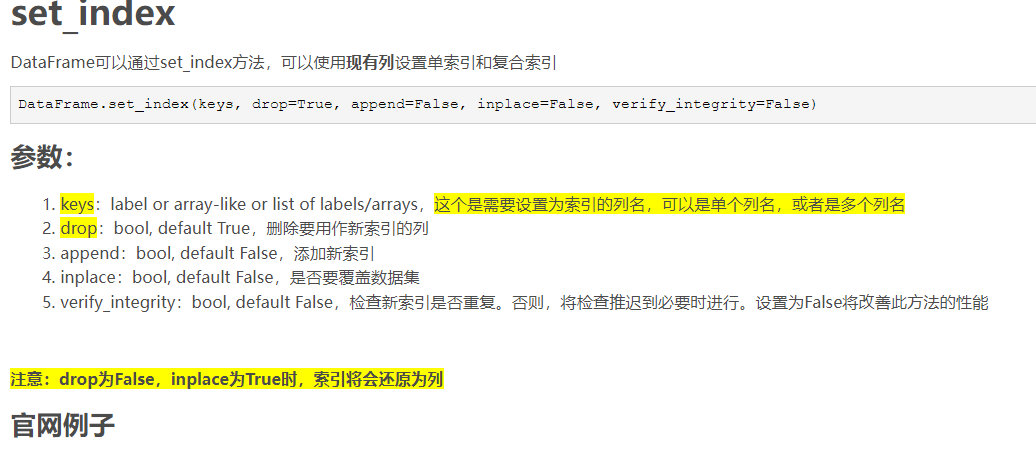
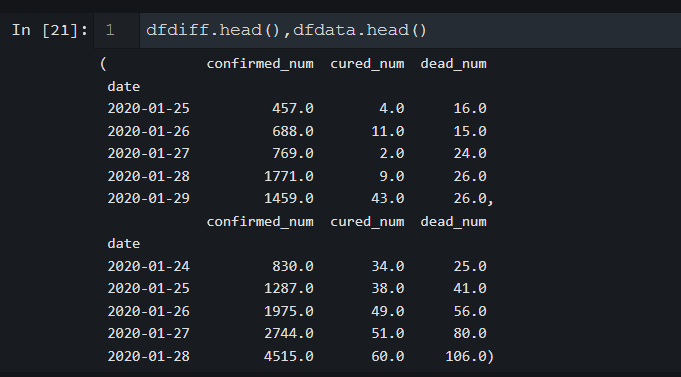
dfdata = df.set_index("date")
dfdiff = dfdata.diff(periods=1).dropna()  # After the first-order difference, delete the null value, which is actually the first line
dfdiff = dfdiff.reset_index("date") # Cancel date index identity

dfdiff.plot(x = "date",y = ["confirmed_num","cured_num","dead_num"],figsize=(10,6))
plt.xticks(rotation=60)
dfdiff = dfdiff.drop("date",axis = 1).astype("float32") # Delete the time column and convert to floating point

tips:
df = pd.DataFrame({'month': [1, 4, 7, 10],
                   'year': [2012, 2014, 2013, 2014],
                   'sale': [55, 40, 84, 31]})


#Set single column as index
df.set_index('month')
'''
       year  sale
month
1      2012    55
4      2014    40
7      2013    84
10     2014    31
'''
Let's inherit torch utils. data. Dataset implements a custom time series dataset.
torch.utils.data.Dataset is an abstract class. If you want to load customized data, you only need to inherit this class and override two methods:
Len: implement len(dataset) to return the size of the entire dataset.
getitem: used to obtain some index data and make dataset[i] return the ith sample in the dataset.
Not overriding these two methods will directly return an error.
import torch
from torch import nn
from torch.utils.data import Dataset,DataLoader,TensorDataset


#Use the window data of the first 8 days of a day as the input to predict the data of that day
WINDOW_SIZE = 8

class Covid19Dataset(Dataset):

    def __len__(self):
        return len(dfdiff) - WINDOW_SIZE

    def __getitem__(self,i):
        x = dfdiff.loc[i:i+WINDOW_SIZE-1,:]
        feature = torch.tensor(x.values)
        y = dfdiff.loc[i+WINDOW_SIZE,:]
        label = torch.tensor(y.values)
        return (feature,label)

ds_train = Covid19Dataset()

#The data is small. You can put all the training data into one batch to improve the performance
dl_train = DataLoader(ds_train,batch_size = 38)
Data processing summary
- Time series data is to use the previous time data to predict the subsequent data
- Perform first-order difference on the data, and then remove the NaN value to build a dataset (use the data of the first eight days as the training set)
2, Define model
There are usually three ways to build models using pytoch:
- Use NN Sequential builds models in layer order
- Inherit NN Module base class to build custom model
- Inherit NN The module base class builds the model and assists in the encapsulation of the application model container.
Choose the second way to build the model here.
Since the training loop in the form of class is used next, we further encapsulate the Model into the Model class in torchkeras to obtain functions similar to the high-order Model interface in Keras.
The Model class actually inherits from NN Module class.
import torch
from torch import nn
import importlib
import torchkeras
torch.random.seed()
class Block(nn.Module):
def __init__(self):
super(Block,self).__init__()
def forward(self,x,x_input):
x_out = torch.max((1+x)*x_input[:,-1,:],torch.tensor(0.0))
return x_out
class Net(nn.Module):
def __init__(self):
super(Net, self).__init__()
# 3-layer lstm
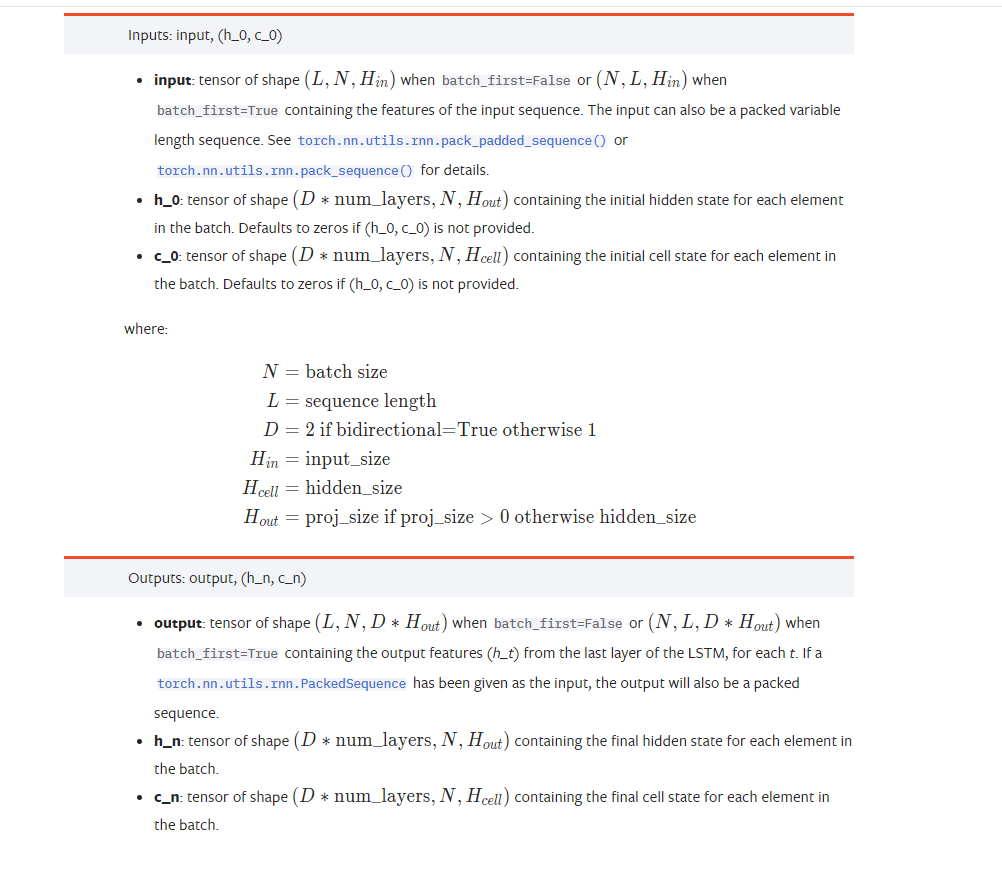
self.lstm = nn.LSTM(input_size = 3,hidden_size = 3,num_layers = 5,batch_first = True)
self.linear = nn.Linear(3,3)
self.block = Block()
def forward(self,x_input):
x = self.lstm(x_input)[0][:,-1,:] # Do not the length dimension of the sequence
x = self.linear(x)
y = self.block(x,x_input)
return y
net = Net()
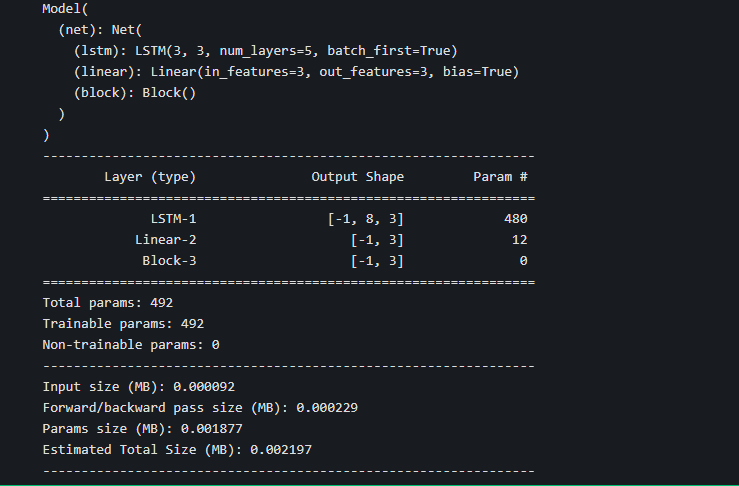
model = torchkeras.Model(net) # Devil details
print(model)
model.summary(input_shape=(8,3),input_dtype = torch.FloatTensor)
3, Training model
Training Pytorch usually requires users to write custom training cycles, and the code style of training cycles varies from person to person.
There are three typical training cycle code styles: script form training cycle, function form training cycle and class form training cycle.
Here is a form of training cycle.
We define a high-level Model interface Model following Keras, and implement fit, validate, predict and summary methods, which is equivalent to user-defined high-level API.
Note: it is difficult to debug the cyclic neural network, so it is necessary to set multiple different learning rates and try many times to achieve better results.
def mspe(y_pred,y_true):
    err_percent = (y_true - y_pred)**2/(torch.max(y_true**2,torch.tensor(1e-7)))
    return torch.mean(err_percent)

model.compile(loss_func = mspe,optimizer = torch.optim.Adagrad(model.parameters(),lr = 0.1))
def mspe(y_pred,y_true):
    err_percent = (y_true - y_pred)**2/(torch.max(y_true**2,torch.tensor(1e-7)))
    return torch.mean(err_percent)

model.compile(loss_func = mspe,optimizer = torch.optim.Adagrad(model.parameters(),lr = 0.1))
dfhistory = model.fit(100,dl_train,log_step_freq=10)
4, Evaluation model
Generally, the verification set or test set should be set for the evaluation model. Due to the small amount of data in this example, we only visualize the iteration of the loss function on the training set.
%matplotlib inline
%config InlineBackend.figure_format = 'svg'

import matplotlib.pyplot as plt

def plot_metric(dfhistory, metric):
    train_metrics = dfhistory[metric]
    epochs = range(1, len(train_metrics) + 1)
    plt.plot(epochs, train_metrics, 'bo--')
    plt.title('Training '+ metric)
    plt.xlabel("Epochs")
    plt.ylabel(metric)
    plt.legend(["train_"+metric])
    plt.show()
plot_metric(dfhistory,"loss")

5, Use model
Here, we use the model to predict the end time of the epidemic, that is, the time when the newly confirmed case is 0.
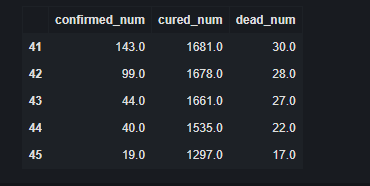
#Use dfresult to record the existing data and the predicted epidemic data thereafter
dfresult = dfdiff[["confirmed_num","cured_num","dead_num"]].copy()
dfresult.tail()
#Predict the new trend in the next 500 days and add the results to dfresult
for i in range(500):
arr_input = torch.unsqueeze(torch.from_numpy(dfresult.values[-38:,:]),axis=0)
arr_predict = model.forward(arr_input)
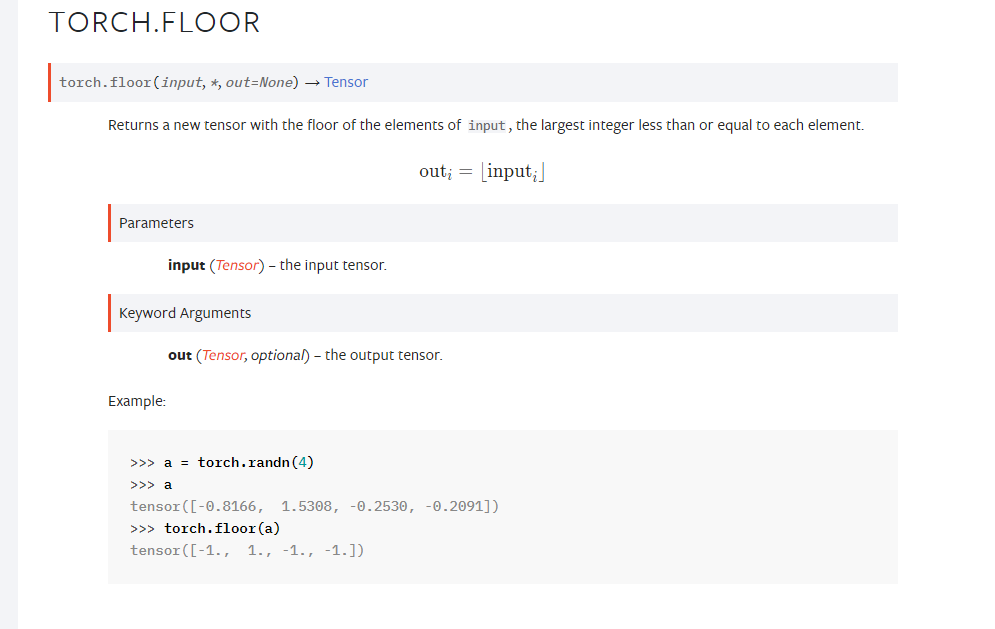
dfpredict = pd.DataFrame(torch.floor(arr_predict).data.numpy(),
columns = dfresult.columns)
dfresult = dfresult.append(dfpredict,ignore_index=True)
tips:
torch.unsqueeze(torch.from_numpy(dfresult.values[-38:,:]),axis=0) adds one dimension to dimension 0
torch.floor rounded down
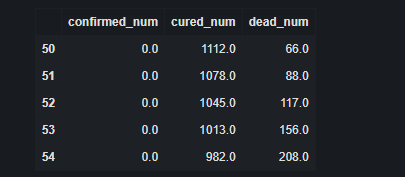
dfresult.query("confirmed_num==0").head()

# From the 50th day, the new diagnosis will be reduced to 0, and the 45th day corresponds to March 10, that is, five days later, that is, it is expected that the new diagnosis will be reduced to 0 on March 15
# Note: the forecast is optimistic
dfresult.query("cured_num==0").head()

# On the 186th day, the new cure was reduced to 0, that is, about one year later.
# Note: the forecast is pessimistic and has problems. If the number of new patients cured every day is added up, it will exceed the cumulative number of confirmed patients.

6, Save model
# Save model parameters

torch.save(model.net.state_dict(), "./data/model_parameter.pkl")

net_clone = Net()
net_clone.load_state_dict(torch.load("./data/model_parameter.pkl"))
model_clone = torchkeras.Model(net_clone)
model_clone.compile(loss_func = mspe)

# Evaluation model
model_clone.evaluate(dl_train)
tips
Here's a devil detail,
net_clone = Net()
net_clone.load_state_dict(torch.load("./data/model_parameter.pkl"))
model_clone = torchkeras.Model(net_clone)
You can't reverse the order, otherwise an error will be reported. In fact, you don't need to train and save like torchkeras
summary
-
There is nothing about data preprocessing. It just uses the data of the first 8 days to predict the data of the next day
-
When building the model, the input and output of LSTM is very important
-
When using torchkeras, pay attention to the loading order of the model
There's a hole here. I don't understand

I don't understand why this layer is designed like this
Dig a hole for later filling