Redis cluster mode
redis Cluster has three modes: master-slave synchronization / replication, sentinel mode and Cluster
In Redis, high availability technologies mainly include persistence, master-slave replication, sentinel and cluster
Persistence
Persistence is the simplest high availability method (sometimes even classified as high availability method). Its main function is data backup, that is, data is stored on the hard disk to ensure that data will not be lost due to process exit
Master-slave replication
Master-slave replication is the basis of highly available Redis. Sentinels and clusters achieve high availability on the basis of master-slave replication. Master-slave replication mainly realizes multi machine backup of data, load balancing for read operation and simple fault recovery.
Defect: failure recovery cannot be automated; The write operation cannot be load balanced; Storage capacity is limited by a single machine
sentry
On the basis of master-slave replication, sentry realizes automatic fault recovery
Defect: write operation cannot be load balanced; The storage capacity is limited by a single machine
colony
Through clustering, Redis solves the problems that the write operation cannot be load balanced and the storage capacity is limited by a single machine, and realizes a relatively perfect high availability scheme
Introduction to Redis cluster
1. redis is an open source key
value storage system is favored by the majority of Internet companies. redis3. Before version 0, only single instance mode is supported, and cluster mode is supported only after version 3.0 and later
redis cluster adopts p2p mode, which is completely decentralized, and there is no central node or proxy node
==2. In order to realize the high availability of the cluster, that is, to judge whether the nodes are healthy (whether they can be used normally), redis cluster has a voting fault-tolerant mechanism: to judge whether the cluster is normal
If any node in the cluster hangs, and the node does not have a slave node (backup node), the cluster hangs. This is the way to judge whether the cluster is hung
So why does any node hang up (no slave node) and the cluster hang up
Because the cluster has built-in 16384 slots (hash slots), and all physical nodes are mapped to these 16384 [0-16383] slots, or these slots are equally allocated to each node. When a key value needs to be stored in the redis cluster, redis will first perform the crc16 algorithm on the key, and then get a result. This result is then summed to 16384, which corresponds to one of [0-16383] slots, and then determines which node the key value is stored in. Therefore, once a node hangs, the slot corresponding to the node cannot be used, and the cluster will not work normally
Example (three nodes)
Node A covers 0-5460
Node B covers 5461-10922
Node C covers 10923-16383
That is, each node has 5460 hash slots
Add a new node:
Node A covers 1365-5460
Node B covers 6827-10922
Node C covers 12288-16383
Node D covers 0-13645461-682610923-12287
That is, each node has 4095 hash slots
Redis master-slave replication
Redis master-slave replication concept
Through the persistence function, redis ensures that even when the server restarts, it will not lose (or lose a small amount of) data, because persistence will save the data in memory to the hard disk, and restart will load the data from the hard disk. However, because the data is stored on a server, if the server has problems such as hard disk failure, it will also lead to data loss. In order to avoid single point of failure, the common practice is to replicate multiple copies of the database to deploy on different servers, so that even if one server fails, other servers can continue to provide services. Therefore, redis provides replication function, which can realize that when the data in one database is updated, Automatically synchronize updated data to other databases.
In the concept of replication, databases are divided into two types: master database and slave database. The master data can be read and written. When the write operation causes data changes, the data will be automatically synchronized to the slave database, which is generally read-only and accepts the data synchronized from the master data. A master database can have multiple slave databases, while a slave database can only have one master database
Role of Redis master-slave replication
● hot backup is a way to realize the redundancy of data, i.e. data from the master is redundant.
● fault recovery: when the master node has problems, the slave node can provide services to realize rapid fault recovery; In fact, it is a kind of redundancy of services.
● load balancing: on the basis of master-slave replication, combined with read-write separation, the master node can provide write services, and the slave node can provide read services (that is, the application connects the master node when writing Redis data, and the application connects the slave node when reading Redis data), sharing the server load; Especially in the scenario of less writing and more reading, the concurrency of Redis server can be greatly improved by sharing the reading load among multiple slave nodes.
● cornerstone of high availability: in addition to the above functions, master-slave replication is also the basis for sentinels and clusters to implement. Therefore, master-slave replication is the basis for high availability of Redis.
Redis master-slave replication process
● [1] if a Slave machine process is started, it will send a "sync command" command to the Master machine to request synchronous connection.
● [2] whether it is the first connection or reconnection, the Master machine will start a background process to save the data snapshot to the data file (execute rdb operation). At the same time, the Master will record all commands to modify the data and store them in the data file.
● [3] after the background process completes the cache operation, the Master machine will send the data file to the Slave machine. The Slave machine will save the data file to the hard disk and then load it into the memory. Then the Master machine will send all operations of modifying the data to the Slave machine. If the Slave goes down due to failure, it will automatically reconnect after it returns to normal.
● [4] after the Master machine receives the connection from the Slave machine, it sends its complete data file to the Slave machine. If Mater receives synchronization requests from multiple Slave machines at the same time, the Master will start a process in the background to save the data file, and then send it to all Slave machines to ensure that all Slave machines are normal.
Establishment of Redis master-slave replication
Environment configuration / installation package
Installation package connection redis-5.0.7.tar.gz
| host | operating system | IP address | Software / installation package / tools |
|---|---|---|---|
| Master | CentOS7 | 192.168.80.10 | redis-5.0.7.tar.gz |
| Slave1 | CentOS7 | 192.168.80.20 | redis-5.0.7.tar.gz |
| Slave2 | CentOS7 | 192.168.80.30 | redis-5.0.7.tar.gz |
Install Redis (all hosts)
systemctl stop firewalld
setenforce 0

yum install -y gcc gcc-c++ make

tar zxvf redis-5.0.7.tar.gz -C /opt/

cd /opt/redis-5.0.7/
make && make PREFIX=/usr/local/redis install

cd /opt/redis-5.0.7/utils
./install_server.sh

Press enter four times. The next step requires manual input

Please select the redis executable path [] /usr/local/redis/bin/redis-server

ln -s /usr/local/redis/bin/* /usr/local/bin/
All three servers are installed in the same way
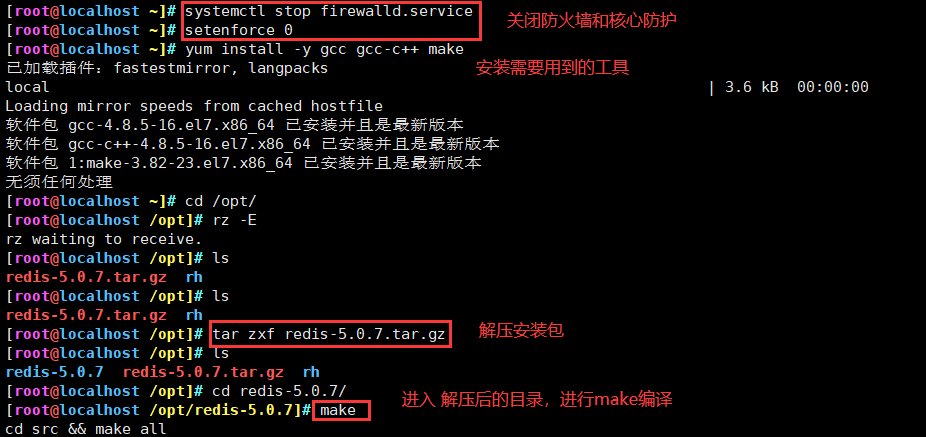

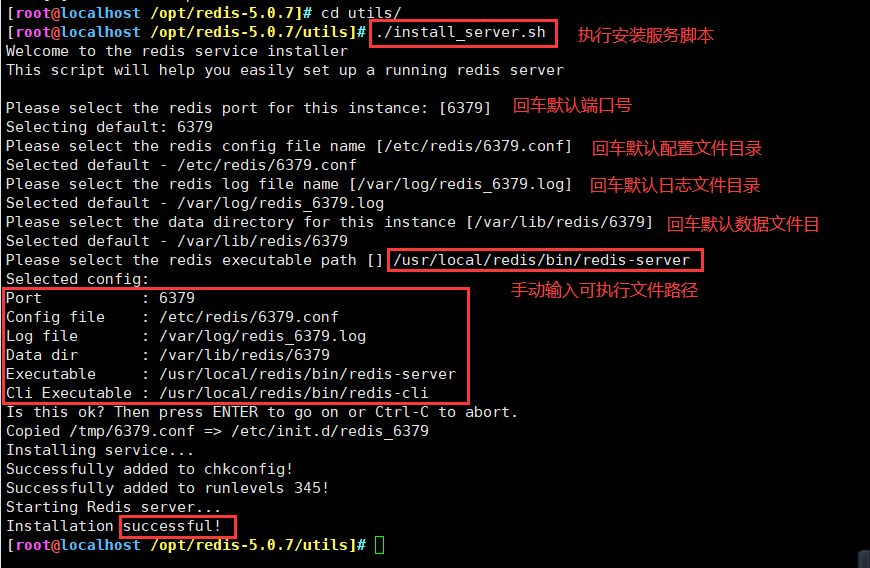
Note: the commands in the redis/bin directory must be recognized by the system
Modify the master configuration file (192.168.80.10)
vim /etc/redis/6379.conf
bind 0.0.0.0						#Line 70, modify the bind item, and listen to all network segments with 0.0.0.0
daemonize yes						#Line 137, start the daemon
logfile /var/log/redis_6379.log		#172 line, specify the log file directory
dir /var/lib/redis/6379				#264 line, specify working directory
appendonly yes						#700 lines, enable AOF persistence function

/etc/init.d/redis_6379 restart
Just modify 70 lines and 700 lines


Restart service
Modify the slave node configuration file (192.168.80.20, 192.168.80.30)
vim /etc/redis/6379.conf
bind 0.0.0.0						#Line 70, modify the bind item, 0.0.0.0 monitor all network cards
daemonize yes						#Line 137, start the daemon
logfile /var/log/redis_6379.log		#172 line, specify the log file directory
dir /var/lib/redis/6379				#264 line, specify working directory
replicaof 192.168.80.10 6379		#Line 288, specifying the IP and port of the Master node to be synchronized
appendonly yes						#700 lines, enable AOF persistence function

/etc/init.d/redis_6379 restart
Just modify lines 70 and 700, and add the IP address of the master in line 288


Restart service

Verify master-slave effect
View log on master
tail -f /var/log/redis_6379.log
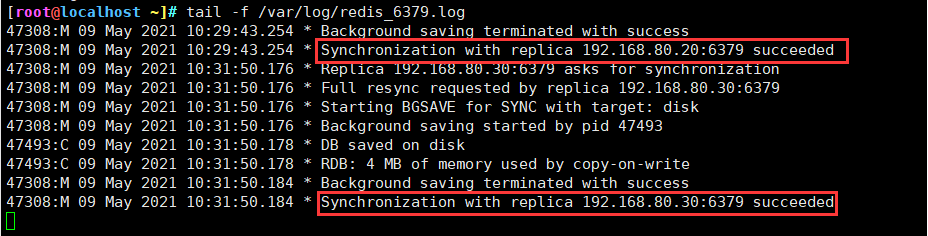
Verify the slave node on the master
[root@localhost ~]# redis-cli info replication
# Replication
role:master
connected_slaves:2
slave0:ip=192.168.80.20,port=6379,state=online,offset=700,lag=1
slave1:ip=192.168.80.30,port=6379,state=online,offset=700,lag=1
master_replid:ca4375ffdc50107581e76fe46bae38a278786c05
master_replid2:0000000000000000000000000000000000000000
master_repl_offset:700
second_repl_offset:-1
repl_backlog_active:1
repl_backlog_size:1048576
repl_backlog_first_byte_offset:1
repl_backlog_histlen:700

Redis sentinel mode
Core function of sentinel: Based on master-slave replication, sentinel introduces automatic failover of master node
Principle of sentinel mode
Sentry: it is a distributed system used to monitor each server in the Master-slave structure. In case of failure, it selects a new Master through the voting mechanism and connects all slaves to the new Master. Therefore, the number of clusters running sentinels shall not be less than 3 nodes.
Main functions of sentry mode
① Cluster monitoring: responsible for monitoring whether Redis master and slave processes work normally
② Message notification: if a Redis example fails, the sentinel load sends a message as an alarm notification to the administrator
③ Failover: if the master node fails, it will be automatically transferred to the slave node
④ Configuration center: if failover occurs, notify the client of the new master address
The system composed of one or more sentinel instances is used to monitor the redis node. When the master node fails, one of the slave nodes can be upgraded to the master node for failover to ensure the availability of the system
Failover in sentinel mode
Subjective offline
The sentinel node will send a PING command to the instance that has established the command connection once per second. If no effective response is made within the down after milliseconds, including responses other than (Pong / loading / nathardonn), the sentinel will mark the state of the instance in the structure as Sri s donnn
Objective offline
When a sentinel node finds that the primary node is subjectively offline, it will ask other sentinel nodes whether the node has been subjectively offline. If more than the configuration parameter quorum nodes are considered as subjective offline, the sentinel node will mark the master node in the structure maintained by itself as SRI_o DON objective offline
Query command sentinel is master down by addr
master election
When the primary node is considered to be offline objectively, an election will be initiated between sentinel nodes. The command is: Sentinel is master down by addr
, but the run id will change its own run this time_ ID is brought in, and the recipient is expected to set itself as the master node. If more than half of the nodes return and mark the node as a leader, the leader will migrate the fault
Construction of sentinel mode
Environment configuration
Master slave replication has been set up
| host | operating system | IP address | Software / installation package / tools |
|---|---|---|---|
| Master | CentOS7 | 192.168.80.10 | redis-5.0.7.tar.gz |
| Slave1 | CentOS7 | 192.168.80.20 | redis-5.0.7.tar.gz |
| Slave2 | CentOS7 | 192.168.80.30 | redis-5.0.7.tar.gz |
Modify Redis configuration file (all node operations)
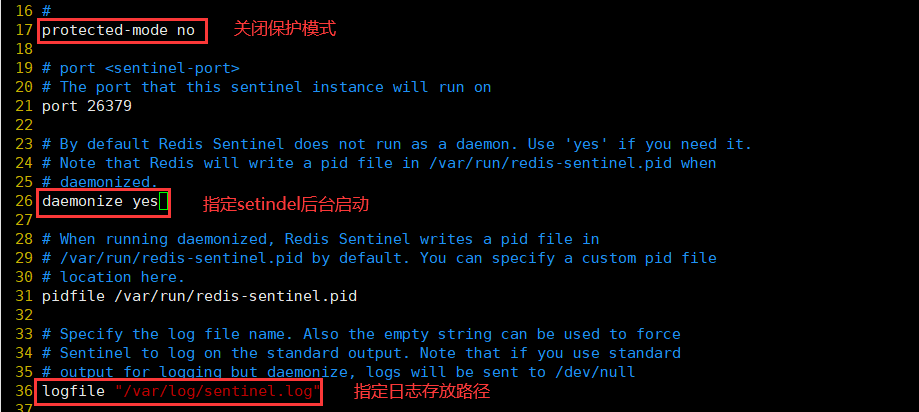
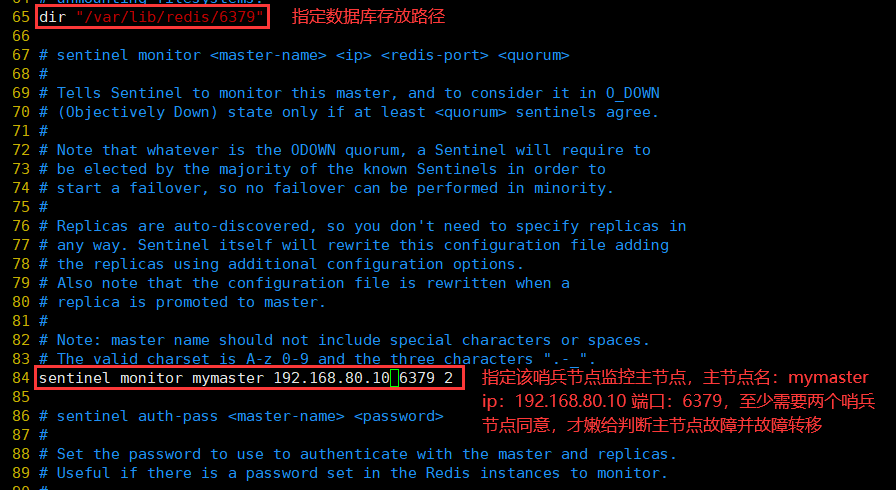
systemctl stop firewalld
setenforce 0

vim /opt/redis-5.0.7/sentinel.conf
protected-mode no								#Line 17, turn off protection mode
port 26379										#Line 21, the default listening port of Redis sentry
daemonize yes									#Line 26, specify sentinel as the background startup
logfile "/var/log/sentinel.log"					#Line 36, specify the log storage path
dir "/var/lib/redis/6379"						#Line 65, specify the storage path of the database
sentinel monitor mymaster 192.168.80.10 6379 2	#In line 84, modify and specify the sentinel node to monitor the master node 192.168.80.10:6379. The name of the master node is mymaster. The meaning of the last 2 is related to the fault determination of the master node: at least two sentinel nodes need to agree to determine the failure of the master node and carry out failover
sentinel down-after-milliseconds mymaster 30000	#In line 113, determine the time period of server down. The default is 30000 milliseconds (30 seconds)
sentinel failover-timeout mymaster 180000		#146 lines, the maximum timeout time of the failed node is 180000 (180 seconds)
Start sentinel mode
Start the master first, and then start the slave
cd /opt/redis-5.0.7/
redis-sentinel sentinel.conf &
be careful! Start the master server first and then the slave server


fault simulation
View redis server process number
ps aux | grep redis
root      47308  0.0  0.4 156404  7748 ?        Ssl  10:15   0:16 /usr/local/redis/bin/redis-server 0.0.0.0:6379
root      49945  0.1  0.4 153844  7532 ?        Ssl  14:45   0:00 redis-sentinel *:26379 [sentinel]
root      49991  0.0  0.0 112676   980 pts/1    R+   14:49   0:00 grep --color=auto redis

Kill the process number of redis server on the Master node
kill -9 47308

Verification results
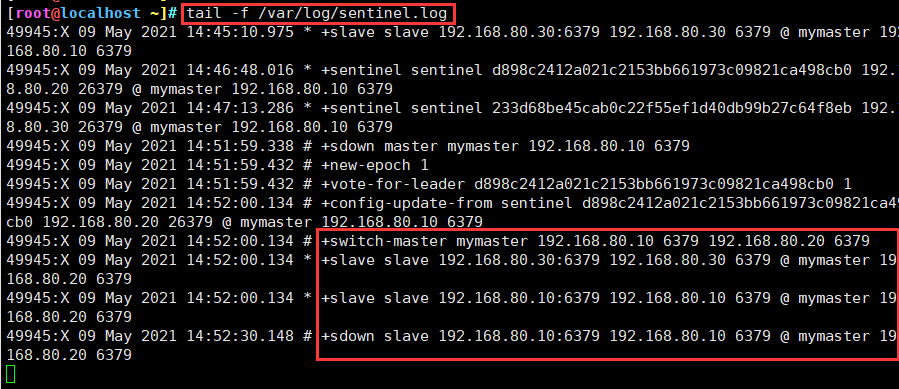
tail -f /var/log/sentinel.log
redis-cli -p 26379 INFO Sentinel

Redis cluster mode
Redis Cluster is a distributed storage scheme introduced by Redis 3.0.
The cluster is composed of multiple nodes in which Redis data is distributed. Nodes in the cluster are divided into master nodes and slave nodes: only the master node is responsible for reading and writing requests and maintaining cluster information; The slave node only copies the data and status information of the master node.
Role of clusters
(1) Data partition: data partition (or data partition) is the core function of the cluster.
The cluster distributes data to multiple nodes. On the one hand, it breaks through the limitation of Redis single machine memory size and greatly increases the storage capacity; On the other hand, each master node can provide external read and write services, which greatly improves the response ability of the cluster.
The problem of limited memory size of Redis stand-alone is mentioned when introducing persistence and master-slave replication; For example, if the stand-alone memory is too large, the fork operations of bgsave and bgrewriteaof may lead to the blocking of the master process. In the master-slave environment, the slave node may be unable to provide services for a long time when the host switches. In the full replication phase, the replication buffer of the master node may overflow.
(2) High availability: the cluster supports master-slave replication and automatic failover of the master node (similar to sentinel); When any node fails, the cluster can still provide external services.
Set up Redis cluster mode
Environment construction
redis clusters generally need 6 nodes, 3 master and 3 slave. For convenience, all nodes here are simulated on 6 servers:
Distinguish by IP and port number: three master node port numbers: 7001, 7003 and 7005, and the corresponding slave node port numbers: 7002, 7004 and 7006.
| host | operating system | IP: Port | Software / installation package / tools |
|---|---|---|---|
| Master1 | CentOS7 | 192.168.184.10:7001 | redis-5.0.7.tar.gz |
| Slave1 | CentOS7 | 192.168.184.20:7002 | redis-5.0.7.tar.gz |
| Master2 | CentOS7 | 192.168.184.30:7003 | redis-5.0.7.tar.gz |
| Slave2 | CentOS7 | 192.168.184.40:7004 | redis-5.0.7.tar.gz |
| Master3 | CentOS7 | 192.168.184.50:7005 | redis-5.0.7.tar.gz |
| Slave3 | CentOS7 | 192.168.184.60:7006 | redis-5.0.7.tar.gz |
All nodes should be configured
cd /etc/redis/
mkdir -p redis-cluster/redis6379
cp /opt/redis-5.0.7/redis.conf /etc/redis/redis-cluster/redis6379/
cp /opt/redis-5.0.7/src/redis-cli /opt/redis-5.0.7/src/redis-server /etc/redis/redis-cluster/redis6379/

Configuration on Master node (192.168.80.10)
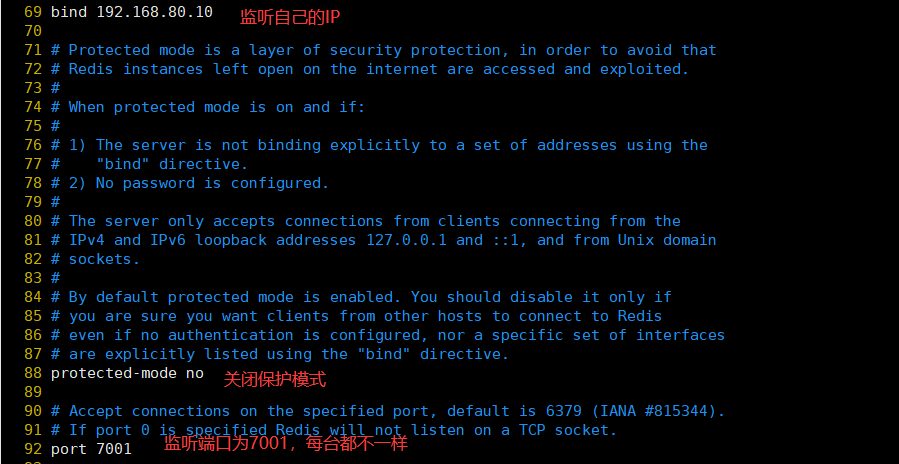
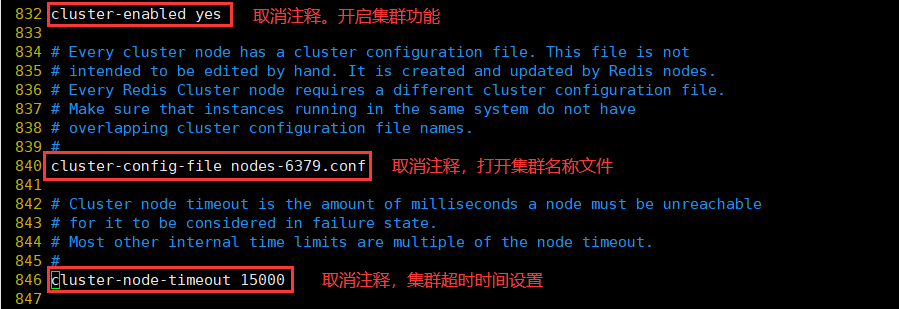
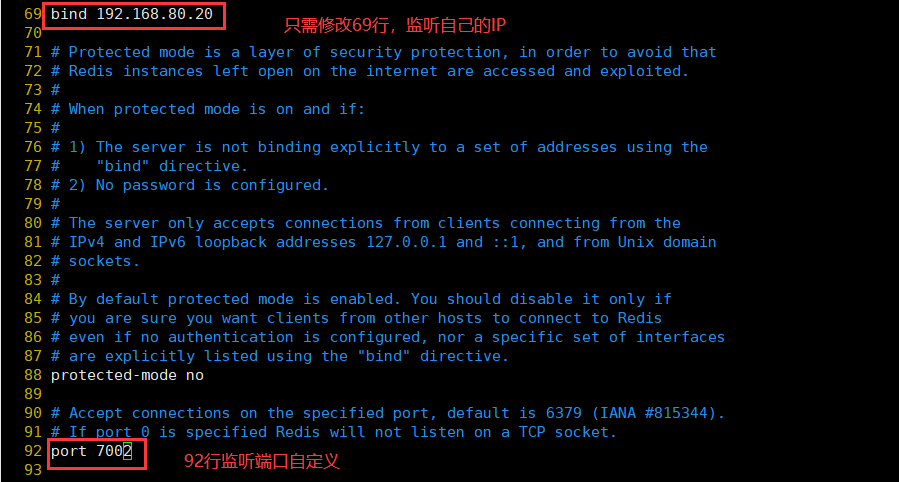
#The configuration files of the other five folders are modified by analogy. Note that the six ports are different.
cd /etc/redis/redis-cluster/redis6379
vim redis.conf

bind 192.168.80.10						#Line 69, modify the bind item and listen to your own IP address
protected-mode no						#Line 88, modify, turn off protection mode
port 7001								#Line 92, modify, redis listening port,
daemonize yes							#136 lines, starting as a separate process
cluster-enabled yes						#Line 832, uncomment and turn on the cluster function
cluster-config-file nodes-6379.conf		#840 line, uncomment, cluster name, file setting, no need to modify
cluster-node-timeout 15000				#Line 846, uncomment the cluster timeout setting
appendonly yes							#Line 699, modify and enable AOF persistence


Use scp on the Master1 node to upload to other node servers and overwrite the configuration files of other servers
scp /etc/redis/redis-cluster/redis6379/redis.conf root@192.168.80.20:/etc/redis/redis-cluster/redis6379/redis.conf
scp /etc/redis/redis-cluster/redis6379/redis.conf root@192.168.80.30:/etc/redis/redis-cluster/redis6379/redis.conf
scp /etc/redis/redis-cluster/redis6379/redis.conf root@192.168.80.40:/etc/redis/redis-cluster/redis6379/redis.conf
scp /etc/redis/redis-cluster/redis6379/redis.conf root@192.168.80.50:/etc/redis/redis-cluster/redis6379/redis.conf
scp /etc/redis/redis-cluster/redis6379/redis.conf root@192.168.80.60:/etc/redis/redis-cluster/redis6379/redis.conf

Other nodes (master1 node out)
vim /etc/redis/redis-cluster/redis6379/redis.conf
Configuration of all nodes
Start redis node
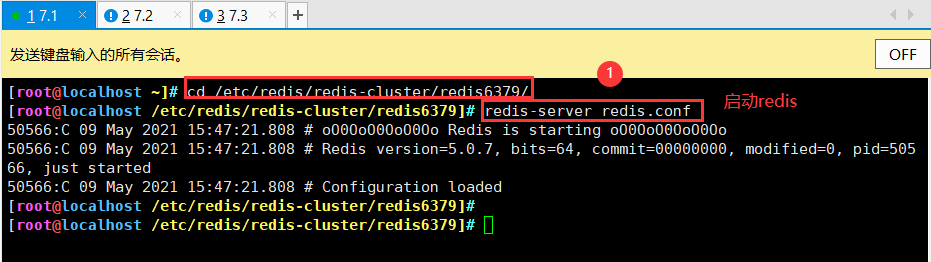
cd /etc/redis/redis-cluster/redis6379/
redis-server redis.conf
Start the cluster (192.168.80.10)
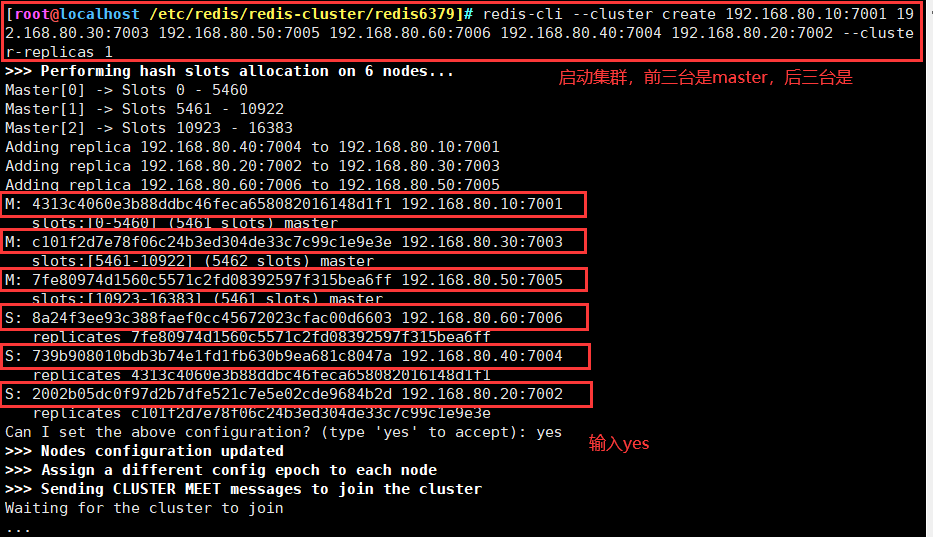
redis-cli --cluster create 192.168.80.10:7001 192.168.80.30:7003 192.168.80.50:7005 192.168.80.60:7006 192.168.80.40:7004 192.168.80.20:7002 --cluster-replicas 1
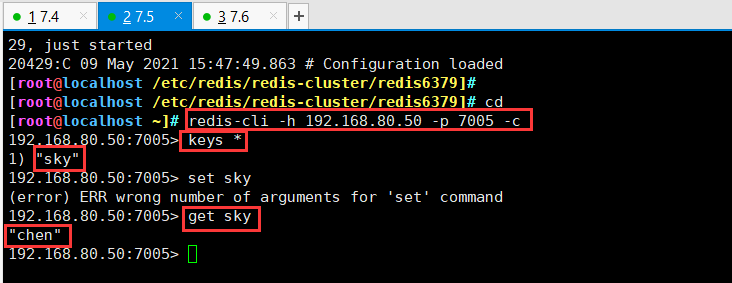
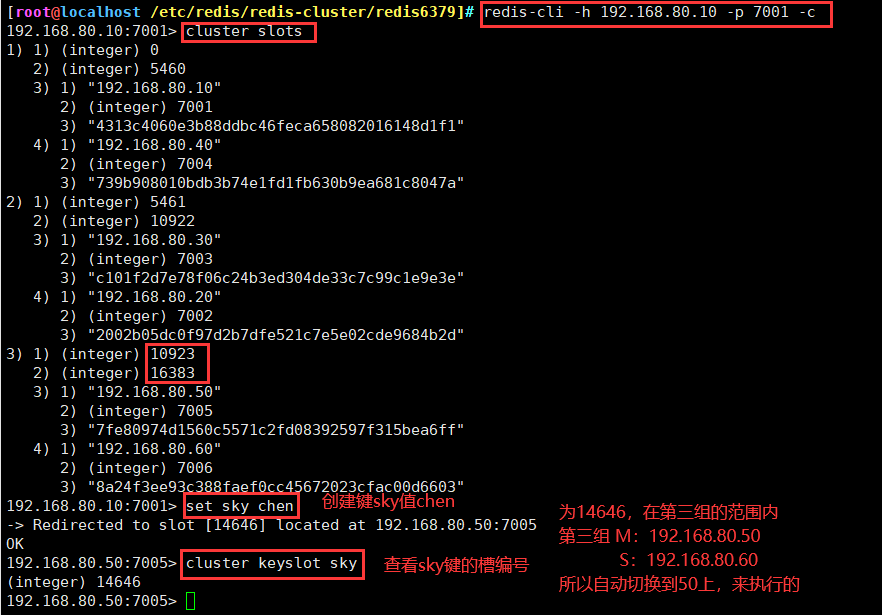
redis-cli -h 192.168.80.10 -p 7001 -c        #Add the - c parameter and the nodes can jump to each other
cluster slots			#View the hash slot number range of the node
set sky blue
cluster keyslot sky	#View the slot number of the name key
Verify on 192.168.80.50