1, Basic command
1.1. Startup and login
Boot will start many programs. They are called "service s" in Windows and "daemon s" in Linux.
After successful startup, the text login interface will be displayed, which will not be displayed when entering the password.
Generally speaking, there are three ways for users to log in:
- Command line login
- ssh login
- Graphical interface login
The highest authority is root, which can operate everything
1.2 shutdown
Linux is mostly used on servers and rarely encounters shutdown.
Shutdown command: shutdown
	sync # Synchronize data from memory to hard disk.
	shutdown # Shutdown instructions, you can man shutdown to see the help document. For example, you can run the following command to shut down:
	shutdown –h 10 # This command tells you that the computer will shut down in 10 minutes
	shutdown –h now # Turn it off immediately
	shutdown –h 20:25 # The system will shut down at 20:25 today
	shutdown –r now # The system restarts immediately
	shutdown –r 10 # The system will restart in ten minutes
	reboot # Is to restart, which is equivalent to shutdown – r now
	halt # Shut down the system, equivalent to shutdown – h now and poweroff
Whether you shut down or restart, first run the sync command to write the data in memory to disk.
1.3 system directory structure
After logging into the system, enter the command ls / in the current window to view all files in the directory:

Tree structure:
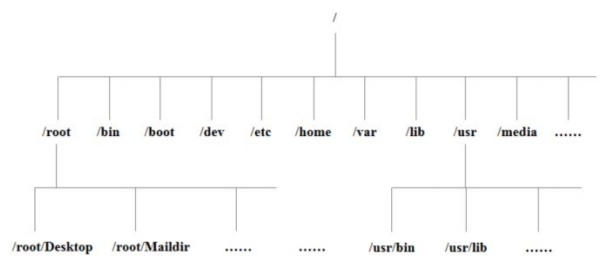
/Bin: bin is the abbreviation of Binary. This directory stores the most frequently used commands
/etc: this directory is used to store all configuration files and subdirectories required by the management system
/Home: the user's home directory. In Linux, each user has its own directory. Generally, this directory is named after the user's account
/opt: the directory where additional software is installed for the host
/root: the user home directory of the system administrator
/usr: many applications and files are placed in this directory
/var: this directory stores things that are constantly expanding. We are used to putting those directories that are often modified in this directory, including various log files
/www: store the resources, environment and website items related to the server website
2, Common commands
2.1. Directory management
-
Absolute path and relative path
The directory structure of Linux is a tree structure, and the top-level directory is the root directory /.
Absolute path:
The path is written from the root directory, such as: / usr/share/doc
Relative path:
The path is not written from /. For example, when it is written from / usr/share/doc to / usr/share/man, it can be written as: cd... / man
Common commands for working with directories
- ls: list directories
- cd: switch directories
- pwd: displays the current directory
- mkdir: create a new directory
- rmdir: delete an empty directory
- cp: copy files or directories
- rm: remove file or directory
- mv: move files and directories, or modify the names of files and directories
- LS (list directory)
ls -a: view all files, including hidden files
ls -l: list all files, including the attributes and permissions of the file, and there is no hidden file
ls -al: list all files in the directory (including attributes and hidden files)
You can also follow the directory name - CD (switch directory)
The path used to transform the working directory
cd [absolute path or relative path] - PWD (displays the current directory)
pwd: displays the current working directory
pwd -p: if it is a link, the real address is displayed - MKDIR (create new directory)
mkdir directory name: creates a single-layer directory
mkdir -m 777: permissions for configuration files
mkdir -p: create multi tier directory - Rmdir (delete empty directory)
rmdir directory name: deletes the specified directory
rmdir -p: deleted together with the empty directory of the upper level - CP (copy file or directory)
cp source file destination pathParameters: -a: amount to -pdr As for pdr Please refer to the following instructions(Commonly used) -p: Instead of using the default properties, copy it with the properties of the file(Backup common) -d: If the source file is a linked file attribute(link file),The link file properties are copied instead of the file itself -r: Recursive continuous replication is used for directory replication behavior(Commonly used) -f: For mandatory(force)If the target file already exists and cannot be opened, remove it and try again -i: If target file(destination)If it already exists, you will first ask about the progress of the action when overwriting(Commonly used) -l: Hard link(hard link)Create a link file instead of copying the file itself -s: Copy as symbolic link file (symbolic link),Namely『shortcut』file -u: Upgrade only if the file in the destination path is older than the source file
- RM (remove file or directory)
rm [-fir] file or directory-f : namely force Ignore nonexistent files and no warning message will appear; -i : Interactive mode, the user will be asked whether to delete before deleting -r : Recursive deletion! Most commonly used in directory deletion! This is a very dangerous option!!!
- MV (move files and directories, or change names)
mv [-fiu] source file destination path-f : force Mandatory means that if the target file already exists, it will not be queried but directly overwritten; -i : If target file (destination) When it already exists, you will be asked whether to overwrite it! -u : If the target file already exists, and source It will be upgraded only if it is relatively new (update)
2.2 basic attributes
-
Detailed explanation of file attributes
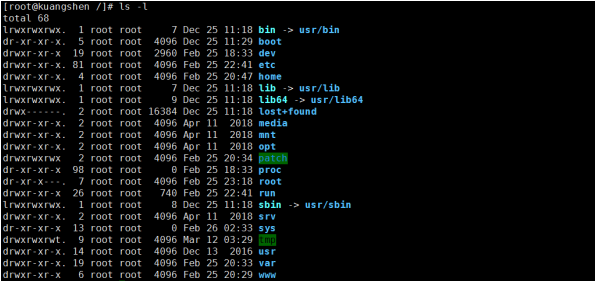
The first column is the file attribute,
First character:- d stands for directory
- -It's a file
- l linked documents
The following three characters are a group, and they are all a combination of "rws":
- r stands for readable,
- w stands for writable
- x stands for executable
If you don't have permission, it's -.
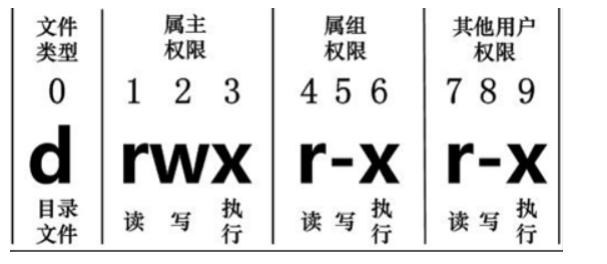
The attributes of each file are determined by these ten characters. The numbers 0-9 are used from left to right
Bit 0 determines the file type;
Determine the owner of the document (1-3);
Bits 4-6 confirm that the belonging group (the same group user of the owner) has the permission of the file;
Bits 7-9 determine that other users have permissions on the file.
Of which:
1. 4 and 7 bits indicate the read permission, which is represented by "r"
2. 5. 8 bits indicate write permission, which is represented by "w"
3. 6. 9 digits indicate the executable right, and "x" indicates it
Above, if a person is represented by "-", it means that the user does not have the corresponding permission -
Modify file properties
chgrp: change the file group
chgrp [-R] generic group name file name
R: Recursively changing the file group means that when changing the group of a directory file, if the - R parameter is added, the group of all files in the directory will be changed.chown: change the file owner or the file group at the same time
chown [-R] primary name file name
chown [-R] primary name: group name file namechomd: change 9 attributes of the file
chomd [-R] xyz file or directory
There are two methods for setting file attributes: numbers or symbols
Change the corresponding permission symbol to a number:r: 4 w: 2 x: 1
Therefore, you can use the method of number accumulation when changing attributes. If you do not have permission, it is 0:
chomd 770 filename
2.3. File content viewing
- summary
In Linux, you can use the following command to view the contents of the file:
cat: displays the contents of the file from the first line
tac: starting from the last line, tac is the reverse of cat
nl: add the line number when displaying the content
more: page by page display, turning pages with spaces
less: similar to more, but it can turn the page forward
head: just look at the first few lines
tail only looks at the last few lines - cat
cat absolute path / relative path
For example: cat / etc / sysconfig / network scripts / ifcfg-eth0 - tac
tac is the opposite of cat, which starts from the last line of the file
The syntax is the same as cat - nl
set number
nl file name - more
Display content page by page
Space: next page
Enter: turn down one line
/String: in this display, search down for the keyword "string"
: f: immediately display the file name and the number of lines currently displayed
q: Leave more now and don't show the contents of the file again
b or [ctrl]-b: turn back the page, but it only works on the file, not on the pipeline - less
Display content page by page
Space: next page
pagedown: next page
pageup: Previous page
/String: drill down for "string"
? String: search up for "string"
n: Repeat the previous search (related to / or?)
N: Reverse repeat previous search
q: Quit - head
Take out the first few lines of the file
head [-n lines] file name
The number of rows is displayed. 10 lines are displayed by default - tail
Take out the last few lines of the file
tail [-n lines] file name
The number of rows is displayed. 10 lines are displayed by default - Links to Linux
Linux links are divided into hard links and soft links:
Hard link: suppose B is the hard link of A, then they both point to the same file. This mechanism allows users to establish hard links to multiple important files to prevent them from being deleted by mistake
Soft link: similar to the shortcut under windows, the shortcut cannot be accessed when deleting files
After deleting the original file f1, the hard link f2 is not affected, but the soft link f1 file is invalid[root@kuangshen /]# cd /home [root@kuangshen home]# touch f1 # Create a test file f1 [root@kuangshen home]# ls f1 [root@kuangshen home]# ln f1 f2 # Create a hard link file f2 for f1 [root@kuangshen home]# ln -s f1 f3 # Create a symbolic connection file f3 for f1 [root@kuangshen home]# ls -li # -The i parameter displays the inode node information of the file 397247 -rw-r--r-- 2 root root 0 Mar 13 00:50 f1 397247 -rw-r--r-- 2 root root 0 Mar 13 00:50 f2 397248 lrwxrwxrwx 1 root root 2 Mar 13 00:50 f3 -> f1 # echo string output > > f1 output to f1 file [root@kuangshen home]# echo "I am f1 file" >>f1 [root@kuangshen home]# cat f1 I am f1 file [root@kuangshen home]# cat f2 I am f1 file [root@kuangshen home]# cat f3 I am f1 file [root@kuangshen home]# rm -f f1 [root@kuangshen home]# cat f2 I am f1 file [root@kuangshen home]# cat f3 cat: f3: No such file or directory
2.4 Vim editor
vim is a text editor developed from vi.
vi / vim has three usage modes: command mode, input mode and bottom line command mode.
Command mode:
Start vi/vim to enter the command mode. If the file does not exist, an empty file will be created
At this time, the input of the keyboard is recognized as a command rather than a character.
- i: Switch to input mode
- x: Deletes the character at the current cursor
- :: switch to the bottom line command mode
Input mode:
- Character keys and shift keys to enter characters
- Backspace key to delete the character before the cursor
- Enter, line feed
- del key to delete the next character after the cursor
- Direction keys to move the cursor in the text
- Press home/end to move the cursor to the beginning / end of the line
- page up/down key to page up and down
- insert key, switch the cursor to the input / replace mode, and the cursor will become a vertical line / underline
- esc key to exit the input mode and switch to the command mode
Baseline command mode:
- :: baseline command mode
- q: Exit program
- w: Save file
- set nu: sets the line number
- set nonu: cancel line number
2.5 account management
Introduction:
Linux system is a multi-user and multi task time-sharing operating system. You must apply to the system administrator for an account and enter the system as this account in order to use system resources.
The system administrator can track the users using the system according to the account and control the users' access to system resources. At the same time, it can also help users organize files and provide security protection for users
User account management:
Including the addition, modification and deletion of user accounts
-
Add account: useradd
useradd option usernameoption : -c comment Specify an annotative description. -d Directory specifies the user's home directory. If this directory does not exist, it will be used at the same time-m Option to create a home directory. -g User group specifies the user group to which the user belongs. -G User group. User group specifies the additional group to which the user belongs. -m If the user directory does not exist, it will be created automatically. -s Shell File specifies the login of the user Shell. -u User number specifies the user number of the user, if there are both-o Option, you can reuse the identification numbers of other users
# This command creates a user user, where the - m option is used to generate a home directory for the login user
/home/user
[root@kuangshen home]# useradd -m user
Adding a user account is to add a record for a new user in the / etc/passwd file and update other system files, such as / etc/shadow,/etc/group, etc.
-
Delete account: userdel
userdel option username# -r: Delete the user's home directory together [root@kuangshen home]# userdel -r user
This command deletes the records of user kuangshen in system files (mainly / etc/passwd, /etc/shadow, /etc/group, etc.), and deletes the user's home directory at the same time.
-
Modify account: usermod
usermod option username
Common options include - c, -d, -m, -g, -G, -s, -u and - o. the meaning of these options is the same as that in the useradd command. You can specify new resource values for users.# Change the user's home directory of / ksh / developer to the user's home directory of / ksh, and change this command to the user's home directory of / ksh Shell. usermod -s /bin/ksh -d /home/z –g developer sam
-
Management of user password
The user account has no password when it was first created, but it is locked by the system and cannot be used. It can only be used after a password is specified, even if an empty password is specified.
passwd option usernameOptions: -l Lock the password, that is, disable the account. -u Password unlock. -d Make the account no password. -f Force the user to change the password at the next login. If the default user name is, the password of the current user will be modified.
Assuming that the current user is sam, the following command modifies the user's own password:
$ passwd
Old password:******
New password:*******
Re-enter new password:*******
If you are a super user, you can specify the password of any user in the following form:
# passwd sam
New password:*******
Re-enter new password:*******
2.7 user group management
Each user has a user group. The system can centrally manage all users in a user group.
The management of user groups is the update of / etc/group files.
-
Add user group: groupadd
groupadd option user groupOptions: -g GID Specifies the group identification number of the new user group( GID). -o General and-g Options are used together to indicate the name of the new user group GID It can be connected with existing user groups in the system GID Same.
# Add a new group group1 to the system. The group ID number of the new group is 1 added to the current maximum group ID number.
groupadd group1

# Add a new group group2 to the system and specify that the group ID number of the new group is 101.
groupadd -g 101 group2
-
Delete user group: groupdel
groupdel user group# groupdel group1
-
Modify user group: groupmod
groupmod option user groupOptions: -g GID Assign a new group ID to the user group. -o And-g Options are used at the same time, and the user group's new GID It can be connected with existing user groups in the system GID Same. -n New user group changes the name of the user group to a new name
# This command changes the group ID number of group group2 to 102.
groupmod -g 102 group2
# Change the identification number of group group2 to 10000 and the group name to group3.
groupmod –g 10000 -n group3 group2
-
Switch group
If a user belongs to multiple user groups at the same time, the user can switch between user groups to have the permissions of other user groups.# Switch the current user to the root user group, provided that the root user group is indeed the user's primary group or additional group. $ newgrp root
-
expand
The operation of user management is to modify the relevant system files.
The information related to users and user groups is stored in some system files, including / etc/passwd, /etc/shadow, /etc/group, etc./etc/passwd file is the most important file in user management.
Each Linux user has a corresponding record line in the / etc/passwd file, which records the basic attributes of the user.
This file is readable to all users# cat /etc/passwd root:x:0:0:Superuser:/: daemon:x:1:1:System daemons:/etc: bin:x:2:2:Owner of system commands:/bin: sys:x:3:3:Owner of system files:/usr/sys: adm:x:4:4:System accounting:/usr/adm: uucp:x:5:5:UUCP administrator:/usr/lib/uucp: auth:x:7:21:Authentication administrator:/tcb/files/auth: cron:x:9:16:Cron daemon:/usr/spool/cron: listen:x:37:4:Network daemon:/usr/net/nls: lp:x:71:18:Printer administrator:/usr/spool/lp: sam:x:200:50:Sam san:/home/sam:/bin/sh
As can be seen from the above example, one line corresponds to one user, and each line is divided into seven fields. The meaning and format are as follows:
user name:Password:User identification number:Group identification number:Annotative description:home directory:Sign in Shell
1)User name: usually no more than eight characters, consisting of upper and lower case letters, numbers\Composition, but cannot have:, because: is a separator here
2)Password: encrypt password. For security, use shadow Technology, put the real encrypted password into/etc/shadow In the file
3)User ID number: identifies the user and corresponds to the user name one by one. If the user ID numbers of several user names are the same, the system will treat them as the same user
	0 yes root User, 1~99 The system keeps the account as an administrator, and ordinary users start from 100
4)Group ID: identifies the user group to which the user belongs. corresponding/etc/group A record in a file
5)Annotative Description: record the user's personal situation
6)Home directory: the user's starting working directory, that is, the directory entered after login
7)Sign in Shell: After the user logs in, a process should be started to transfer the user's operation to the kernel,
	This process is the command interpreter or a specific program that the user runs after logging in to the system Shell.
	Shell Are users and Linux Interface between systems.
	Linux of Shell There are many kinds, each with different characteristics.
	Commonly used are sh(Bourne Shell), csh(C Shell), ksh(Korn Shell), tcsh(TENEX/TOPS-20 type C Shell), bash(BourneAgainShell)Wait.
/etc/shadow
/The record lines in / etc/shadow correspond to those in / etc/passwd one by one. It is automatically generated by pwconv command according to the data in / etc/passwd.
The file format is similar to / etc/passwd. It consists of several fields separated by "::Login name:encrypted password:Last modification time:Minimum time interval:Maximum time interval:Warning time:Inactive time:Failure time:sign 1) Last modification time: refers to the number of days from a certain time to the last time the user modifies the password 2)Minimum time interval: refers to the minimum number of days between two password changes. 3)Maximum time interval: the maximum number of days the password remains valid 4)Warning time: the number of days between the system warning the user and the official expiration of the user's password 5)Inactive time: the maximum number of days that a user is not logged in but his account remains valid 6)Expiration time: an absolute number of days, that is, the validity period of the account
/etc/group
All information about user groups is stored in the / etc/group file.
When a user is a member of multiple groups at the same time, the main group to which the user belongs is recorded in the / etc/passwd file, that is, the default group to which the user belongs when logging in, while other groups are called additional groups.
When a user wants to access a file belonging to an additional group, he must first use the newgrp command to make himself a member of the group he wants to access.
The format of the file is also similar to that of the / etc/passwd file, with several fields separated by colons (:):Group name:Password:Group identification number:List of users in the group Password: the general user group has no password, so it is empty or empty*
2.8 disk management
- summary
The three commands commonly used in Linux disk management are df, du and fdisk.
df: lists the overall disk usage of the file system
du: check disk space usage - df
Check the disk space usage of the file systemdf [parameter] [Directory or file name] If no option is added, all the data in the system will be deleted by default (File system and without special memory swap) All with 1 Kbytes List the capacity of Parameters: -a : List all file systems, including those specific to the system /proc And other file systems; -k : with KBytes Display the capacity of each file system; -m : with MBytes Display the capacity of each file system; -h : People are easier to read GBytes, MBytes, KBytes Self display in other formats; -H : with M=1000K replace M=1024K Carry mode of; -T : Displays the file system type, Together with the partition of filesystem name (for example ext3) Also listed; -i : No hard disk capacity, but inode To display the quantity of
- du
View of the space used by file and directory disksdu [-ahskm] File or directory name If no options are added, then du It will analyze the files in the current directory and the hard disk space occupied by the directory Parameters: -a : List the capacity of all files and directories, because only the amount of files under the directory is counted by default. -h : In a more readable capacity format (G/M) Display; -s : List the total amount instead of the occupied capacity of each individual directory; -S : Excluding totals under subdirectories, and -s A little different. -k : with KBytes List capacity display; -m : with MBytes List capacity display;
- Disk mounting and dismounting
mount command is used for mounting and umount command is used for unloading
Mount syntax:
Uninstall syntax:mount [-t file system] [-L Label name] [-o Additional options] [-n] Device file name mount point
umount [-fn] Device file name or mount point
 Parameters:
	-f : Forced removal! Can be used in similar network file systems (NFS) When it cannot be read;
	-n : Do not upgrade /etc/mtab Remove if necessary.
2.9 process management
In Linux, each program has its own process, and each process has an ID number.
Every process has a parent process.
Processes can exist in two ways: foreground and background.
Generally, services are run in the background, and basic programs are run in the foreground.
-
View process
Use the ps instruction to view the process information in the current system.ps -option Options: -a: Displays all process information of the current terminal -u: Display process information as a user -x: Displays the parameters of the background process ps -aux|grep xxx ,View the progress of a service |: stay Linux In, this is called the pipe symbol. A|B: hold A The result of the command is output to B command grep: Find qualified strings in the file use ps -ef You can view the parent process ps -ef Is to display all current processes in full format -e Show all processes. -f Full format. • UID: user ID • PID: process ID
-
Terminate process
Just like terminating tasks in windowskill [option] Process number: kill the process through the process number killall Process name: kill the process through the process name. Wildcards are also supported, which is very useful when the system becomes very slow due to excessive load) Options: -9 :Indicates that the process is forced to stop immediately
-
View process tree
pstree [option]
option;
	-p :Displays the of the process PID
	-u :Displays the user to which the process belongs