1. Control node - environment configuration and basic installation environment configuration
More steps: OpenStack Victoria installation and deployment series tutorials
OpenStack deployment series
Openstack deployment tutorial series
OpenStack Ussuri offline installation and deployment series tutorial (full)
OpenStack Train offline installation and deployment series tutorial (full)
Welcome to leave messages for communication and common progress.
Environment configuration
1. Replace with domestic sources
Download alicloud source files
wget -O /etc/yum.repos.d/CentOS-Base.repo https://mirrors.aliyun.com/repo/Centos-8.repo
Replace alicloud image address
sed -i -e '/mirrors.cloud.aliyuncs.com/d' -e '/mirrors.aliyuncs.com/d' /etc/yum.repos.d/CentOS-Base.repo
Build cache
yum makecache
2.SSH login configuration
Install openssh and openssh server
dnf -y install openssh
dnf -y install openssh-server

systemctl enable sshd
systemctl start sshd
systemctl status sshd

netstat -lntp
Uninstall openssh and openssh server
dnf -y remove openssh
dnf -y remove openssh-server
The configuration allows root to log in through SSH. If root remote login is prohibited, set it to no:
vim /etc/ssh/sshd_config
PermitRootLogin yes
Esc, wq save and restart the ssh service.
systemctl enable sshd
systemctl start sshd
systemctl status sshd
Password free login
3. Host basic network configuration
(1) Replace network service
When installing and deploying OpenStack, the Network service of OpenStack will conflict with the NetworkManager service. They cannot work together normally and need to use Network.
Installing Network services
dnf install network-scripts -y
Disable NetworkManager and disable booting
systemctl stop NetworkManager && systemctl disable NetworkManager
Enable the Network and set the startup and self startup
systemctl start network && systemctl enable network
systemctl start network
(2) Static IP configuration
- Management network card
Back up ifcfg-ens33 files
cp /etc/sysconfig/network-scripts/ifcfg-ens33 /etc/sysconfig/network-scripts/ifcfg-ens33.bak
Modify and confirm the following contents
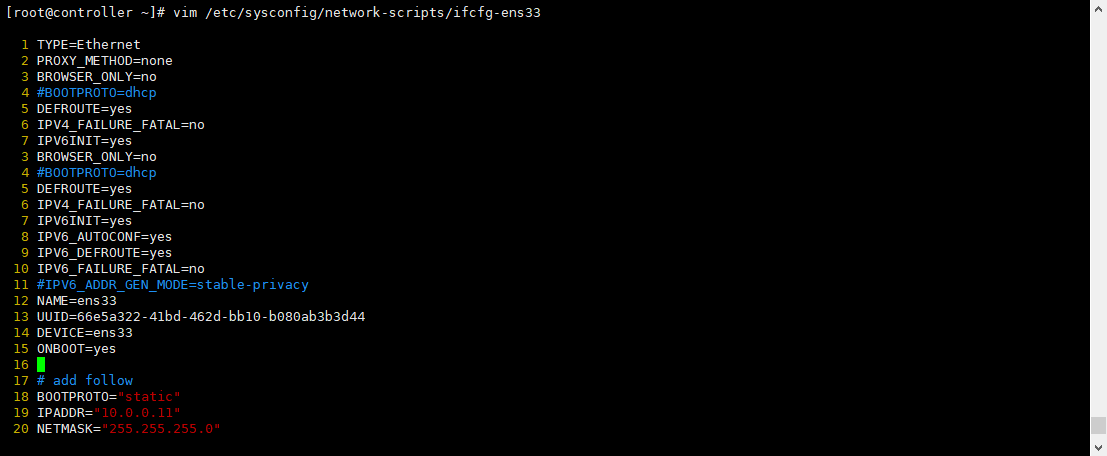
# Set to static
BOOTPROTO=static
# Set as automatic connection after startup
ONBOOT=yes

# Add IP, subnet mask, gateway, DNS, etc
# add follow
BOOTPROTO="static"
IPADDR="10.0.0.11"
NETMASK="255.255.255.0"
GATEWAY="10.0.0.2"
DNS1="1.1.1.1"
vim /etc/sysconfig/network-scripts/ifcfg-ens33
The following are some examples
[root@controller ~]# cat /etc/sysconfig/network-scripts/ifcfg-ens33
ifcfg-ens33      ifcfg-ens33.bak
[root@controller ~]# cat /etc/sysconfig/network-scripts/ifcfg-ens33
TYPE=Ethernet
PROXY_METHOD=none
BROWSER_ONLY=no
#BOOTPROTO=dhcp
DEFROUTE=yes
IPV4_FAILURE_FATAL=no
IPV6INIT=yes
IPV6_AUTOCONF=yes
IPV6_DEFROUTE=yes
IPV6_FAILURE_FATAL=no
#IPV6_ADDR_GEN_MODE=stable-privacy
NAME=ens33
UUID=66e5a322-41bd-462d-bb10-b080ab3b3d44
DEVICE=ens33
ONBOOT=yes

# add follow
BOOTPROTO="static"
IPADDR="10.0.0.11"
NETMASK="255.255.255.0"
GATEWAY="10.0.0.2"
DNS1="1.1.1.1"
[root@controller ~]#
- Vendor network card ens34
Back up ifcfg-ens34 files
cp /etc/sysconfig/network-scripts/ifcfg-ens34 /etc/sysconfig/network-scripts/ifcfg-ens34.bak
Modify and confirm the following contents
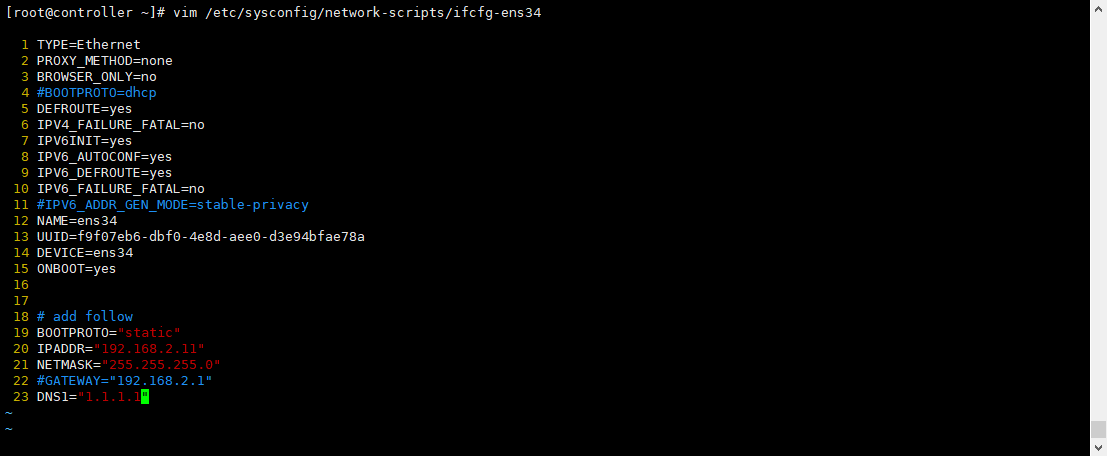
# Set to static
BOOTPROTO=static
# Set as automatic connection after startup
ONBOOT=yes

# Add IP, subnet mask, gateway, DNS, etc
# add follow
BOOTPROTO="static"
IPADDR="192.168.2.11"
NETMASK="255.255.255.0"
#GATEWAY="192.168.2.1"
DNS1="1.1.1.1"
vim /etc/sysconfig/network-scripts/ifcfg-ens34
The following is an example
[root@controller ~]# cat /etc/sysconfig/network-scripts/ifcfg-ens34
TYPE=Ethernet
PROXY_METHOD=none
BROWSER_ONLY=no
#BOOTPROTO=dhcp
DEFROUTE=yes
IPV4_FAILURE_FATAL=no
IPV6INIT=yes
IPV6_AUTOCONF=yes
IPV6_DEFROUTE=yes
IPV6_FAILURE_FATAL=no
#IPV6_ADDR_GEN_MODE=stable-privacy
NAME=ens34
UUID=f9f07eb6-dbf0-4e8d-aee0-d3e94bfae78a
DEVICE=ens34
ONBOOT=yes

# add follow
BOOTPROTO="static"
IPADDR="192.168.2.11"
NETMASK="255.255.255.0"
#GATEWAY="192.168.2.1"
DNS1="1.1.1.1"
[root@controller ~]#
Restart Network service
systemctl restart network
(3) Gateway configuration
You can also configure the gateway as the supplier's network here. At the same time, note that only one gateway is reserved in the above two network card configurations, and note the gateways of other network cards.
cp /etc/networks /etc/networks.bak
vim /etc/networks
Examples are as follows
[root@controller ~]# cat /etc/networks
default 0.0.0.0
loopback 127.0.0.0
link-local 169.254.0.0

#add follow
NETWORKING=yes
GATEWAY=10.0.0.2
[root@controller ~]#
(4) hostname host name configuration
- Control node
hostnamectl set-hostname controller
exec bash

echo 10.0.0.11 controller >> /etc/hosts
echo 10.0.0.31 compute1 >> /etc/hosts
echo 10.0.0.32 compute2 >> /etc/hosts
After configuration, you can directly overwrite the hosts file of another node with the command scp -rp /etc/hosts 10.0.0.31:/etc/hosts.
- Calculation node 1
hostnamectl set-hostname compute1
exec bash

echo 10.0.0.11 controller >> /etc/hosts
echo 10.0.0.31 compute1 >> /etc/hosts
echo 10.0.0.32 compute2 >> /etc/hosts
- Calculation node 2
hostnamectl set-hostname compute2
exec bash

echo 10.0.0.11 controller >> /etc/hosts
echo 10.0.0.31 compute1 >> /etc/hosts
echo 10.0.0.32 compute2 >> /etc/hosts
Verify connectivity
ping -c 4 controller
ping -c 4 compute1
ping -c 4 compute2
ping -c 4 qq.com
4. Password free login
Control node execution
ssh-keygen -t rsa
ssh-copy-id controller1
ssh controller1
If there is a computing node, continue the following command at the control node to log in to each other without secret.
ssh-copy-id compute1
scp -r .ssh compute1:~/
ssh-copy-id compute2
scp -r .ssh compute2:~/
5. Disable the firewall and turn off selinux
(1) Disable firewall
systemctl stop firewalld.service
systemctl disable firewalld.service
systemctl status firewalld.service
(2) Close selinux
CentOS 8 disable SELinux tutorial , be sure to check the status of SELinux before starting to disable SELinux on CentOS 8.
sestatus
To temporarily disable SELinux, run command.
setenforce 0
In addition, you can run commands.
setenforce Permissive
Any of these commands will temporarily disable SELinux until the next restart.
Permanently disable SELinux on CentOS 8
sed -i 's#SELINUX=enforcing#SELINUX=disabled#g' /etc/selinux/config
CentOS7 is:
sed -i 's#SELINUX=enforcing#SELINUX=disabled#g' /etc/sysconfig/selinux
Then restart CentOS 8 using any of the following commands
reboot
init 0
telinit 0
Check selinux status again
sestatus
Installation and configuration of system basic software tools
1. Foundation
yum install net-tools lsof wget git vim bash-completion lrzsz unzip zip -y
dnf install openssh openssh-server vim git wget net-tools bash-completion -y
dnf install crudini -y
2.NTP time synchronization
rpm -qa |grep chrony
dnf install chrony -y
If installed, edit the chrony configuration file and modify the following two pieces of information
Control node
vim /etc/chrony.conf
# Please consider joining the pool (http://www.pool.ntp.org/join.html).
server ntp1.aliyun.com iburst
server ntp2.aliyun.com iburst
# Allow NTP client access from local network.
allow 10.0.0.0/24
example

Note: in the computing node, only one piece of information is modified to server controller iburst, which is directly synchronized with the control node.
Calculation node
vim /etc/chrony.conf
# Please consider joining the pool (http://www.pool.ntp.org/join.html).
#pool 2.centos.pool.ntp.org iburst

server controller iburst


systemctl restart chronyd.service
systemctl status chronyd.service
systemctl enable chronyd.service
systemctl list-unit-files |grep chronyd.service
timedatectl set-timezone Asia/Shanghai
chronyc sources
timedatectl status
OpenStack basic software installation
1. Install OpenStack storage warehouse
On CentOS, the extras repository provides the RPM that enables the OpenStack repository. CentOS includes the extras repository by default, so you can simply install the package to enable the OpenStack repository. For CentOS8, you will also need to enable the PowerTools repository.
dnf config-manager --enable powertools
dnf install centos-release-openstack-victoria -y
yum clean all
yum makecache
yum repolist
2.OpenStack client related software
dnf install python3-openstackclient openstack-selinux -y
3. Basic service: SQL database
Install Mariadb database or MySQL database
yum install -y mariadb mariadb-server python3-PyMySQL
Create and edit files and add the following information
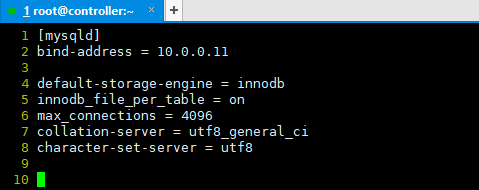
touch /etc/my.cnf.d/openstack.cnf
vim   /etc/my.cnf.d/openstack.cnf
The contents of the document are as follows
[mysqld]
bind-address = 10.0.0.11

default-storage-engine = innodb
innodb_file_per_table = on
max_connections = 4096
collation-server = utf8_general_ci
character-set-server = utf8
Start the database and set it to start automatically
systemctl enable mariadb.service
systemctl start mariadb.service
systemctl status mariadb.service
systemctl list-unit-files |grep mariadb.service
Protect database services
/usr/bin/mysql_secure_installation
In the test environment, set the password to root,
Note: the production environment can use pwgen tool to generate database password
openssl rand -hex 10
# After entering the command, press enter for the first time, y, set the password, then enter the root account, set the password to root, and then press y all the way until the installation is successful.
# Enter the root password of the current user. If it is blank, enter directly
Enter current password for root (enter for none):
OK, successfully used password, moving on...
# Set root password
Set root password? [Y/n] y
# Enter new password
New password:
# Enter the new password again
Re-enter new password:
# Delete anonymous user
Remove anonymous users? [Y/n] y
# Disable remote login
Disallow root login remotely? [Y/n] n
# Delete the database and access it
Remove test database and access to it? [Y/n] y
# Reload permission table
Reload privilege tables now? [Y/n] y

# The above steps can be configured according to the actual situation, and do not have to be consistent with here
systemctl restart mariadb.service
systemctl status mariadb.service
Test database, and relevant databases are created separately when necessary
mysql -uroot -proot
flush privileges;
show databases;
select user,host from mysql.user;
exit
4. Basic service: Message queue
Install package
dnf install rabbitmq-server -y
Start the Message Queuing service and set it to start automatically
systemctl enable rabbitmq-server.service
systemctl start rabbitmq-server.service
systemctl status rabbitmq-server.service
Add the openstack user and set the password to 111111
rabbitmqctl add_user openstack 111111
Give openstack users readable, writable and configurable permissions
rabbitmqctl set_permissions openstack ".*" ".*" ".*"
rabbitmqctl list_users
rabbitmq-plugins list
To facilitate monitoring, enable the Web interface management plug-in
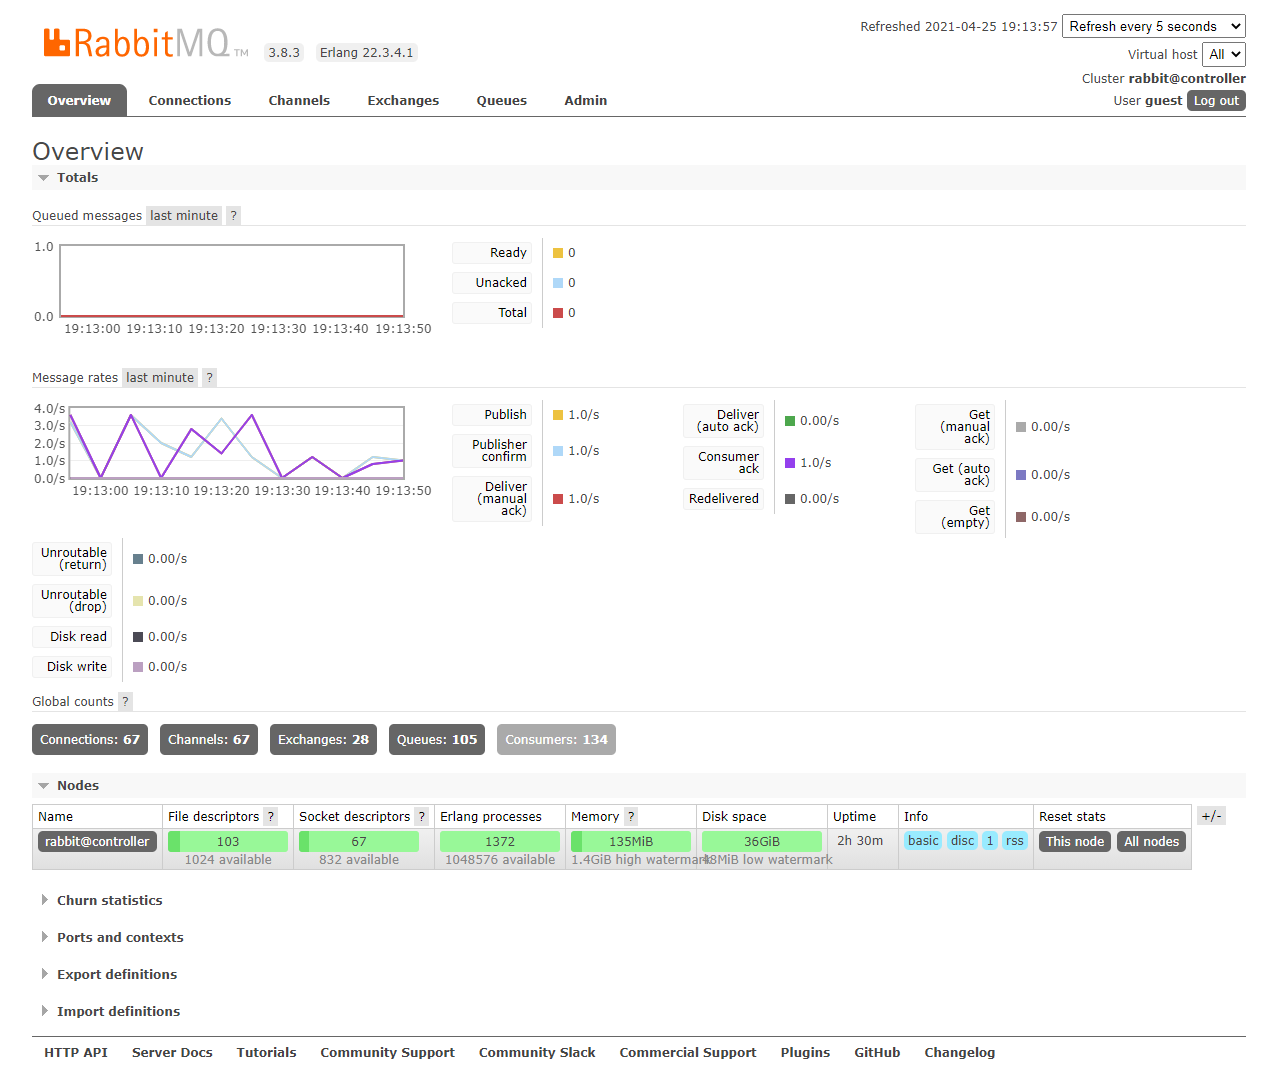
rabbitmq-plugins enable rabbitmq_management
rabbitmq-plugins list
netstat -lntup
lsof -i:15672
After the installation is successful, check the additional 15672 service port through the command netstat -lntup. You can successfully log in to RabbitMQ through the browser. The default administrator account is guest and password is guest. The login success page is shown in the figure below
5. Basic service: Memcached cache
The authentication mechanism of the authentication service uses Memcached to cache tokens. The Memcached service usually runs on the control node.
Install package
For CentOS 8 and RHEL 8
dnf install memcached python3-memcached -y
Edit the vim /etc/sysconfig/memcached file and modify the OPTTONS line to the following information
OPTIONS="-l 127.0.0.1,::1,controller"
cp /etc/sysconfig/memcached /etc/sysconfig/memcached.bak
cat /etc/sysconfig/memcached
sed -i 's|127.0.0.1,::1|127.0.0.1,::1,controller|g' /etc/sysconfig/memcached
cat /etc/sysconfig/memcached
Start the Memcached service and set the startup self startup
systemctl restart memcached.service
systemctl status memcached.service
netstat -anptl|grep memcached

systemctl enable memcached.service
systemctl list-unit-files |grep memcached.service
6. Basic services: Etcd cluster
Install package
dnf install etcd -y
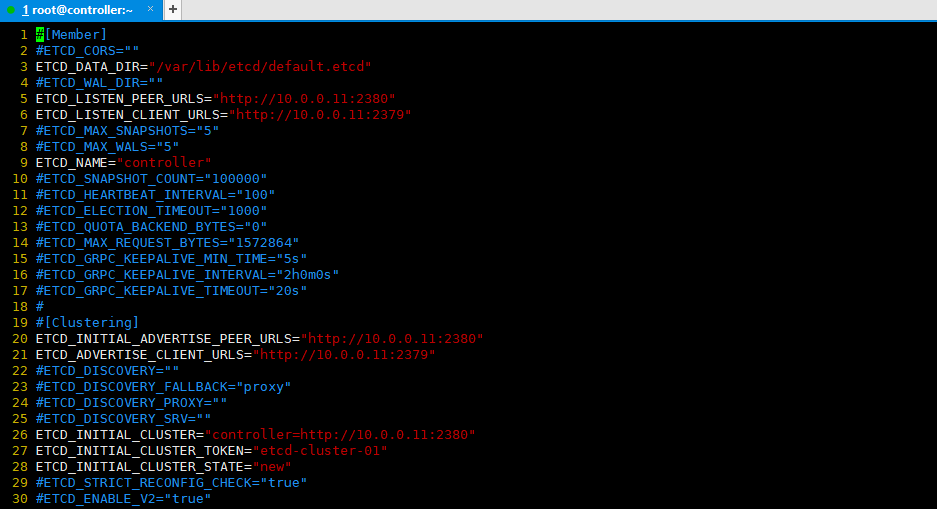
Edit VIM / etc / etcd / etcd Conf file, modify the following information
cp /etc/etcd/etcd.conf /etc/etcd/etcd.conf.bak
vim /etc/etcd/etcd.conf
[root@controller ~]# cat /etc/etcd/etcd.conf
#[Member]
ETCD_DATA_DIR="/var/lib/etcd/default.etcd"
ETCD_LISTEN_PEER_URLS="http://10.0.0.11:2380"
ETCD_LISTEN_CLIENT_URLS="http://10.0.0.11:2379"
ETCD_NAME="controller"
#[Clustering]
ETCD_INITIAL_ADVERTISE_PEER_URLS="http://10.0.0.11:2380"
ETCD_ADVERTISE_CLIENT_URLS="http://10.0.0.11:2379"
ETCD_INITIAL_CLUSTER="controller=http://10.0.0.11:2380"
ETCD_INITIAL_CLUSTER_TOKEN="etcd-cluster-01"
ETCD_INITIAL_CLUSTER_STATE="new"
Start the Etcd service and set the automatic startup
systemctl restart etcd.service
systemctl status etcd.service
netstat -anptl|grep etcd

systemctl enable etcd.service
systemctl list-unit-files |grep etcd.service
Complete control node environment preparation
Shut down the virtual machine of the control node. Now you can shut down for snapshot, and then turn on the virtual machine.
poweroff