Implementation of Spring AOP
-
XML + interface mode enabled
-
XML + custom class implementation
-
Annotation mode on
Import dependency: (although this project is not a springboot project, you only need to import the following dependency)
<dependency>
  <groupId>org.springframework.boot</groupId>
  <artifactId>spring-boot-starter-aop</artifactId>
  <version>2.4.4</version>
</dependency>
① Open XML + interface mode (spring API)
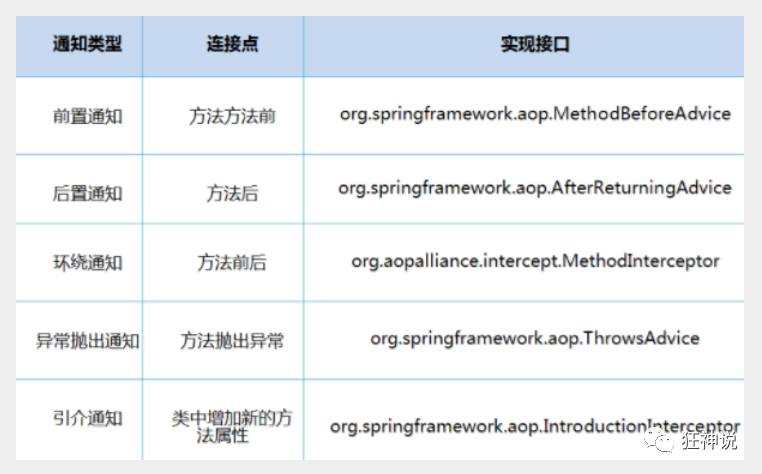
First of all, we need to know which interfaces we can implement:
The first step is to configure the class, including the facet class and the class to cut in
Cut in class: (cut in content and cut in time)
package com.offcn.aop;

import org.springframework.aop.MethodBeforeAdvice;
import java.lang.reflect.Method;
/**
 * method:Pointcut method name
 * args: Pointcut method parameters
 * target: Class object of pointcut method
 */
//Implement the pre notification class interface, and execute the pre notification before the execution of the pointcut method
public class AopBefore implements MethodBeforeAdvice {
  @Override
  public void before(Method method, Object[] args, Object target) throws Throwable {
    System.out.println("Before advice ..........");
  }
}
package com.offcn.aop;

import org.springframework.aop.AfterReturningAdvice;
import java.lang.reflect.Method;
/**
 *  returnValue:Pointcut method return value
 *  method:Method name of the pointcut
 *  args:Tangent point method parameters
 *  target:The object of the class where the pointcut method is located
 */
//Implement the post notification class interface, and execute the post notification after the pointcut method is executed
public class AopAfterReturning implements AfterReturningAdvice {
  @Override
  public void afterReturning(Object returnValue, Method method, Object[] args, Object target) throws Throwable {
    System.out.println("Post notification.......");
  }
}
Cut in target class:
package com.offcn.service;
public class UserService {
  public void add(){
    System.out.println("Added a user...");
  }
}
Secondly, introduce aop constraints into xml files and register bean s. Choose one of the following two methods:
<?xml version="1.0" encoding="UTF-8"?>
<beans xmlns="http://www.springframework.org/schema/beans"
       xmlns:xsi="http://www.w3.org/2001/XMLSchema-instance"
       xmlns:context="http://www.springframework.org/schema/context"
       xmlns:aop="http://www.springframework.org/schema/aop"
       xsi:schemaLocation="
        http://www.springframework.org/schema/beans
        http://www.springframework.org/schema/beans/spring-beans.xsd
        http://www.springframework.org/schema/context
        http://www.springframework.org/schema/context/spring-context.xsd
        http://www.springframework.org/schema/aop
        http://www.springframework.org/schema/aop/spring-aop.xsd">

    <bean id="userService" class="com.offcn.service.UserService"></bean>
    <bean id="aopAfter" class="com.offcn.aop.AopAfterReturning"></bean>
    <bean id="aopBefore" class="com.offcn.aop.AopBefore"></bean>

</beans>
If it is troublesome to configure bean s for each class, you can add the annotation @ Component on each class, and then add the scanning package in the configuration file:
<?xml version="1.0" encoding="UTF-8"?>
<beans xmlns="http://www.springframework.org/schema/beans"
       xmlns:xsi="http://www.w3.org/2001/XMLSchema-instance"
       xmlns:context="http://www.springframework.org/schema/context"
       xmlns:aop="http://www.springframework.org/schema/aop"
       xsi:schemaLocation="
        http://www.springframework.org/schema/beans
        http://www.springframework.org/schema/beans/spring-beans.xsd
        http://www.springframework.org/schema/context
        http://www.springframework.org/schema/context/spring-context.xsd
        http://www.springframework.org/schema/aop
        http://www.springframework.org/schema/aop/spring-aop.xsd">

   <context:component-scan base-package="com.offcn"></context:component-scan>
    <!--such nbcb Each annotated class under the package will be registered in the container——>
</beans>
After registration, you need to define the cut plane and cut point through the label < AOP: config > < / AOP: config >. Open AOP under bean.
- Configure the pointcut name id: pointcut (take any name), and the pointcut position expression: execution(* com.offcn.service.UserService. * (...)) means that all methods under the UserService package are pointcuts. If you only want to cut into a specific method, just replace the * sign with the corresponding method. (...) indicates that the parameters of all methods are uncertain, and there can be multiple.
- Configuration notification: next, we need to configure the aspect and the pointcut mapping relationship, that is, tell where the aspect cuts in.
  <aop:config>
      	<!-- Configure pointcuts, that is, where to cut in. You can configure multiple pointcuts, just id Different can be-->
        <aop:pointcut id="pointcut" expression="execution(* com.xxx.service.UserService.*(..))"/>

        <!--
        <aop:pointcut id="pointcut1" expression="execution(* com.xxx.service.xxx.*(..))"/>
        <aop:pointcut id="pointcut2" expression="execution(* com.xxx.service.xxx.*(..))"/>
        -->

        <!--Configure the facet and pointcut mapping relationship, and tell each facet where to cut in-->
        <aop:advisor advice-ref="aopAfter" pointcut-ref="pointcut"></aop:advisor>
        <aop:advisor advice-ref="aopBefore" pointcut-ref="pointcut"></aop:advisor>

  </aop:config>
test
package com.offcn.main;

import com.offcn.service.UserService;
import org.springframework.context.ApplicationContext;
import org.springframework.context.support.ClassPathXmlApplicationContext;

public class Test {
  public static void main(String[] args) {
    ApplicationContext context = new ClassPathXmlApplicationContext("application.xml");
    UserService userService = context.getBean("userService", UserService.class);
    userService.add();
  }
}
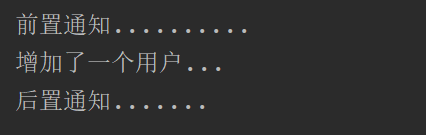
result:
be careful
There is a problem to note here. Assuming that the UserService mentioned above is not a class, but an interface, and we register its implementation class in the spring container, then we call context When using the getBean () method, the second parameter cannot be written as the class of the implementation class, but only the class of the interface.
public interface UserService {
  public void add();
}
public class UserServiceImpl implements UserService{
  @Override
  public void add() {
    System.out.println("Added a user........");
  }
}
<bean id="userServiceImpl" class="com.offcn.service.UserServiceImpl"></bean>
Correct writing:
    ApplicationContext context = new ClassPathXmlApplicationContext("application.xml");
    UserService userService = context.getBean("userServiceImpl", UserService.class);
    userService.add();
    //Or we don't write the second parameter and turn it directly
    //ApplicationContext context = new ClassPathXmlApplicationContext("application.xml");
    //UserService userService = (UserService)context.getBean("userServiceImpl");
    //serviceImpl.add();
Incorrect writing:
    ApplicationContext context = new ClassPathXmlApplicationContext("application.xml");
    UserServiceImpl serviceImpl = context.getBean("userServiceImpl", UserServiceImpl.class);
    serviceImpl.add();
report errors:

The error reason is the spring dynamic agent, which is the interface!
② XML + custom class implementation
In the first way, we use the API interface provided by spring. If we want to implement some kind of notification, we also need to remember the corresponding interface, and an interface can only implement one kind of notification. We need a variety of implementation classes to complete multiple notifications, which is a little troublesome. The second allows us to customize classes and methods to implement notifications.
First register the bean with the configuration file:
<?xml version="1.0" encoding="UTF-8"?>
<beans xmlns="http://www.springframework.org/schema/beans"
       xmlns:xsi="http://www.w3.org/2001/XMLSchema-instance"
       xmlns:context="http://www.springframework.org/schema/context"
       xmlns:aop="http://www.springframework.org/schema/aop"
       xsi:schemaLocation="
        http://www.springframework.org/schema/beans
        http://www.springframework.org/schema/beans/spring-beans.xsd
        http://www.springframework.org/schema/context
        http://www.springframework.org/schema/context/spring-context.xsd
        http://www.springframework.org/schema/aop
        http://www.springframework.org/schema/aop/spring-aop.xsd">

    <bean id="userServiceImpl" class="com.offcn.service.UserServiceImpl"></bean>
    <!--register bean We just need to register the section class-->
    <bean id="myAdvice" class="com.offcn.aop.MyAdvice"></bean>


</beans>
public class UserServiceImpl implements UserService{
  @Override
  public void add() {
    System.out.println("Added a user........");
  }
}
Custom facet class, including various notification methods:
public class MyAdvice {

  public void before(){
    System.out.println("Before advice .....");
  }

  public void after(){
    System.out.println("Post notification.....");
  }

  public void throwing(){
    System.out.println("Exception notification.....");
  }

}
Configure AOP:
<aop:config>
         <!--Configure the pointcut first to determine the cut in position-->
        <aop:pointcut id="pointcut" expression="execution(* com.offcn.service.UserServiceImpl.*(..))"/>
         <!--Configure custom facet class mapping-->
        <aop:aspect  ref="myAdvice">
         <!--Configuring pointcut mapping relationships in facet classes-->
            <aop:before method="before" pointcut-ref="pointcut"></aop:before>
            <aop:after-returning method="after" pointcut-ref="pointcut"></aop:after-returning>
            <aop:after-throwing method="throwing" pointcut-ref="pointcut"></aop:after-throwing>
          </aop:aspect>
    </aop:config>
test
package com.offcn.main;

import com.offcn.service.UserService;
import org.springframework.context.ApplicationContext;
import org.springframework.context.support.ClassPathXmlApplicationContext;

public class Test {
  public static void main(String[] args) {
    ApplicationContext context = new ClassPathXmlApplicationContext("application.xml");
    UserService userService = context.getBean("userService", UserService.class);
    userService.add();
  }
}
result:
be careful:
-
Exception notification will only be notified when a method exception occurs, and will not work at other times.
-
When using surround notification, you must add the parameter proceed ingjoinpoint in the method and call the processed method. The method of the pointcut is userservice Add() can run, otherwise the pointcut method will not run. Please test by yourself:
public void around(ProceedingJoinPoint pjp){
    System.out.println("Surround notification 1.....");
    try {
      pjp.proceed();
    } catch (Throwable throwable) {
      throwable.printStackTrace();
    }
    System.out.println("Surround notification 2.....");
  }
- The difference between < AOP: after > and < AOP: after returning >:
after will be notified whether an exception occurs or not.
After returning works only when no exception occurs.
③ Enable AOP in annotation mode (common)
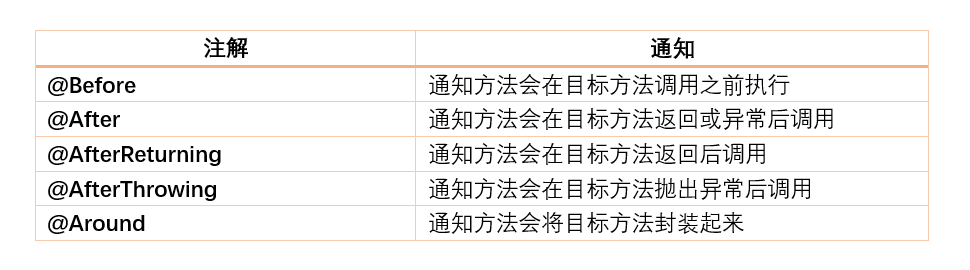
The above two methods need to inject mapping relationship into the configuration file to work, which is a little cumbersome. Through annotation, we can get rid of the configuration file. Common annotations are as follows:
First, we still register bean s. Through annotation, we choose the second way, that is, to register in the form of scanning package:
<?xml version="1.0" encoding="UTF-8"?>
<beans xmlns="http://www.springframework.org/schema/beans"
       xmlns:xsi="http://www.w3.org/2001/XMLSchema-instance"
       xmlns:context="http://www.springframework.org/schema/context"
       xmlns:aop="http://www.springframework.org/schema/aop"
       xsi:schemaLocation="
        http://www.springframework.org/schema/beans
        http://www.springframework.org/schema/beans/spring-beans.xsd
        http://www.springframework.org/schema/context
        http://www.springframework.org/schema/context/spring-context.xsd
        http://www.springframework.org/schema/aop
        http://www.springframework.org/schema/aop/spring-aop.xsd">

    <context:component-scan base-package="com.offcn"></context:component-scan>
    <!--adopt<aop:aspectj-autoproxy />Declaration is automatically spring Which configurations are in the container@Aspect Tangential bean Create a proxy and weave in the cut. If you want to start by annotation aop,It must be written, otherwise      Section will not take effect-->
    <aop:aspectj-autoproxy/>
</beans>
Next, we need to add the annotation @ Component on the pointcut class:
@Component
public class UserServiceImpl implements UserService{

  @Override
  public void add() {
    System.out.println("Added a user........");
  }

}
In addition to @ Component, the facet class also needs to add annotation @ Aspect:
package com.offcn.aop;

import org.aspectj.lang.annotation.AfterReturning;
import org.aspectj.lang.annotation.Aspect;
import org.aspectj.lang.annotation.Before;
import org.aspectj.lang.annotation.Pointcut;
import org.springframework.stereotype.Component;

@Component
@Aspect
public class MyAdviceComponent {

  //Use the @ Pointcut annotation to declare Pointcut expressions and avoid using expressions frequently. Otherwise, the tangent point expression must be marked on each annotation!
  @Pointcut(value = "execution(* com.offcn.service.UserServiceImpl.*(..))")
  public void qiedian(){};

  @Before("qiedian()")
  public void before(){
    System.out.println("Before advice .....");
  }

  @AfterReturning("qiedian()")
  public void afterReturning(){
    System.out.println("Post return notification.....");
  }

}
test
package com.offcn.main;

import com.offcn.service.UserService;
import org.springframework.context.ApplicationContext;
import org.springframework.context.support.ClassPathXmlApplicationContext;

public class Test {
  public static void main(String[] args) {
    ApplicationContext context = new ClassPathXmlApplicationContext("application.xml");
     //Use annotation to register bean s. When getBean, you only need to lowercase the first letter of the class to be injected, and you can get the class object without changing the others
    UserService service = (UserService)context.getBean("userServiceImpl");
    service.add();
  }
}
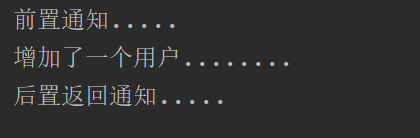
result:
be careful
When using annotations, you must indicate < AOP: AspectJ AutoProxy / > in the configuration file, otherwise the annotations will not work! Unless the project is a springboot project, there is no need to write it!
The above is my summary of spring aop. You are welcome to correct it. If I can help you, please give me a compliment.