summary
In the actual production environment, the reading and writing of the database are in the same database server, which can not meet the actual needs. Therefore, master-slave replication is used to synchronize data, and then read-write separation is used to improve the concurrent load capacity of the database. It is a bit similar to rsync, but the difference is that rsync backs up disk files, while mysql master-slave replication backs up data and statements in the database.
MySQL master-slave replication principle
The master-slave replication of MySQL and the read-write separation of MySQL are closely related. First, deploy the master-slave replication. Only after the master-slave replication is completed, can the data read-write separation be carried out on this basis.
Replication principles supported by MySQL
- STATEMENT based replication: SQL statements executed on the master server and statements executed on the slave server. MySQL adopts STATEMENT based replication by default, which is more efficient.
- ROW based replication (ROW): copy the changed content, instead of executing another article of fame and wealth from the server.
- MIXED replication: by default, it adopts the replication of opportunity and statement. Once it is found that the replication based on statement cannot be accurately replicated, it will be applied to the replication based on row.
MySQL only copies the working process from
Main Mysql server: Master
From Mysql server: Slave
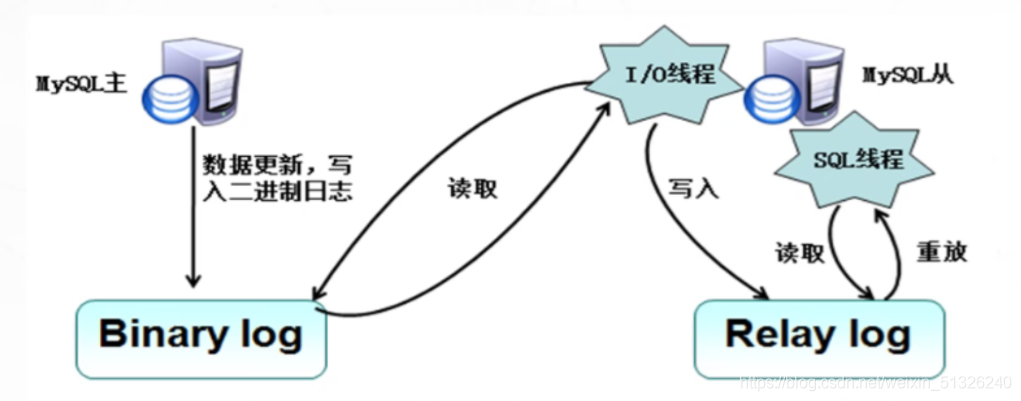
Master server saves records to binary log
Before each transaction updates the data, the Master server records these changes in the Binary log. After writing the Binary log, the Master server notifies the storage engine to commit the transaction.
The Slave server copies the logs of the Master server
- The Slave server copies the binary log of the Master server to the Relay log.
- First, the Slave server starts a working thread (I/O). The I/O thread opens a common connection on the Master server, and then starts the Binlog dump process.
- Binlog dump process reads events from the binary log of the Master server. If the Slave server has kept up with the Master server, it will sleep and wait for the Master server to generate new events, and the I/O thread will write these events to the relay log.
The Slave server replays the copied logs
- SQL slave thread is the last step of this process. The SQL thread reads events from the relay log, replays the events, and updates the data of the Slave server to make it consistent with the data in the Master server. As long as the thread is consistent with the I/O thread, the relay log will usually be located in the OS cache, so the overhead of the relay log is very small.
Note: there is a very important limitation in the replication process, that is, the replication is serialized on the Slave server, that is, the parallel update operation on the Master server cannot be operated in parallel on the Slave server.
MySQL read / write separation
1. The concept of separation of reading and writing
The basic principle of read-write separation is to let the main database handle transactional addition, modification and deletion operations (INSERT, UPDATE and DELETE), while the SELECT query operation is handled from the database. Database replication is used to synchronize the changes caused by transactional operations to the slave database in the cluster.
2. Significance of separation of reading and writing
Because the "write" (writing 10000 pieces of data may take 3 minutes) operation of the database is time-consuming.
But the "read" of the database (it may take only 5 seconds to read 10000 pieces of data).
Therefore, the separation of reading and writing solves the problem that the writing of the database affects the efficiency of query
3. When should I separate reading and writing
The database does not have to be read-write separated. If the program uses more databases, it will be considered when there are less updates and more queries. The use of database master-slave synchronization and read-write separation can share the pressure of the database and improve the performance.
4. MySQL read-write separation principle
Read write separation is to write only on the master server and read only on the slave server.
The basic principle is to let the master database handle transactional queries and the slave database handle select queries.
Database replication is used to synchronize the changes caused by transactional queries on the master database to the slave database in the cluster.
5. Common MySQL read / write separation
1) Internal implementation based on program code
In the code, routing is classified according to select and insert. This kind of method is also the most widely used in production environment at present.
Advantages and disadvantages:
The advantage is better performance, because it is implemented in program code, and there is no need to add additional equipment for hardware expenditure;
The disadvantage is that it needs developers to implement it, and the operation and maintenance personnel have no way to start.
Not all applications are suitable for realizing read-write separation in program code. For example, some large and complex Java applications, if reading-write separation is realized in program code, the code will be greatly changed.
2) Implementation based on intermediate agent layer
The proxy is generally located between the client and the server. After receiving the request from the client, the proxy server forwards it to the back-end database through judgment. There are the following representative programs:
MySQL proxy: MySQL proxy is an open source project of MySQL. SQL judgment is made through its own lua script.
Atlas: it is a data middle tier project based on MySQL protocol developed and maintained by the infrastructure team of Qihoo 360's Web Platform Department. Based on MySQL proxy version 0.8.2, it optimizes it and adds some new features. The MySQL service run by atlas in 360 carries billions of read and write requests every day. Support things and stored procedures.
Amoeba: developed by Chen Siru. The author once worked for Alibaba. The program is developed by the Java language and Alibaba uses it in the production environment. However, it does not support transactions and stored procedures.
Since a large number of lua scripts need to be written to use MySQL Proxy, these Lua scripts are not ready-made, but need to be written by themselves, which is very difficult for people who are not familiar with MySQL Proxy built-in variables and MySQL Protocol.
Amoeba is a very easy-to-use and highly portable software, so it is widely used in the agent layer of database in the production environment.
Experimental deployment of MySQL master-slave replication and read-write separation
Experimental ideas
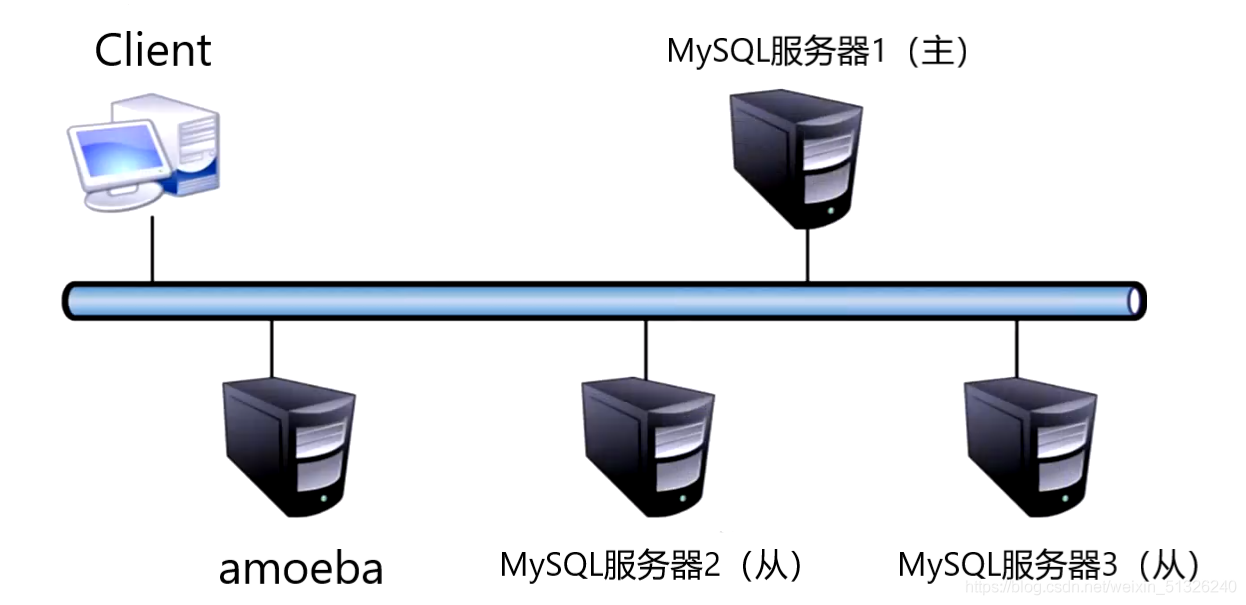
Step 1: the client accesses the proxy server amoeba
Step 2: proxy server read / write judgment
Write operation: write to the primary server
Step 3: the master server overwrites the additions and deletions into its own binary log
Step 4: the slave server synchronizes the binary log of the master server to its own relay log
Step 5: replay the relay log from the server to the database
Read operation: direct access from the server
Final result: reduce the load and play the role of load balancing
| host | IP address | This tool is required |
|---|---|---|
| Amoeba | 192.168.50. | jdk-6u14-linux-x64.bin,amoeba-mysql-binary-2.2.0.tar.gz |
| Master | 192.168.50.20 | ntp , mysql-boost-5.7.20.tar.gz |
| Slave1 | 192.168.50. | ntp ,ntpdate , mysql-boost-5.7.20.tar.gz |
| Slave2 | 192.168.50. | ntp ,ntpdate , mysql-boost-5.7.20.tar.gz |
| client | 192.168.50. |
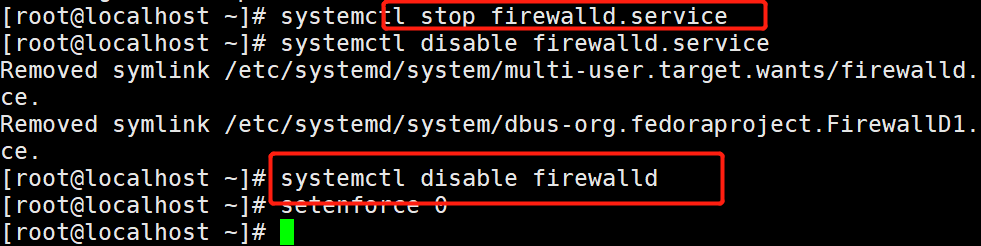
Turn off the firewall and security mechanism of all hosts
Build MySQL master-slave service
Mysql master-slave server synchronization time
master server: 192.168.50.20
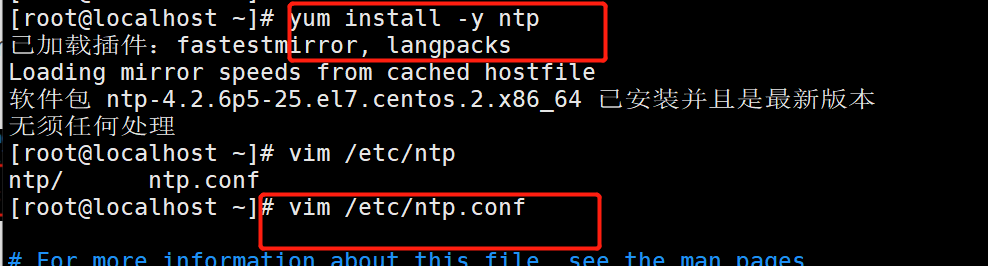
yum -y install ntp
vim /etc/ntp.conf
##---------Add at the end---------
server 127.127.163.0 # sets the local clock source. Pay attention to modifying the network segment
fudge 127.127.163.0 stratum 8 # set the time level to 8 (limited to 15)
service ntpd start

slave 1 server: 192.168.50.22
slave 2 server: 192.168.50.12
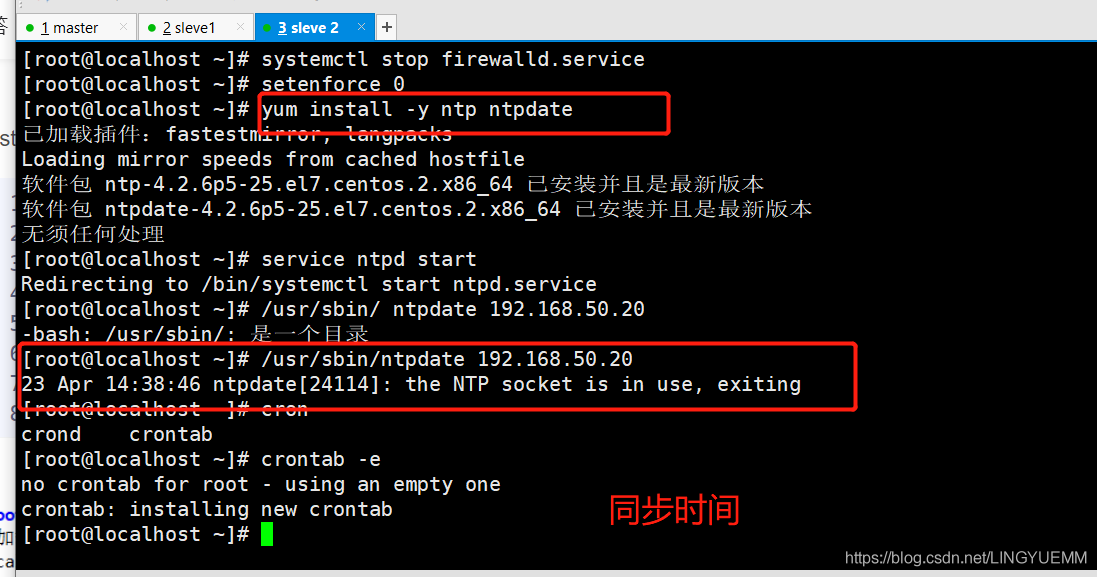
yum -y install ntp ntpdate

service ntpd start

/usr/sbin/ntpdate 192.168.50.20  #Time synchronization, pointing to the Master server IP

crontab -e
*/30 * * * * /usr/sbin/ntpdate 192.168.50.20
mysql configuration of master server
Master server: 192.168.50.20
vim /etc/my.cnf
server-id = 1
log-bin=master-bin      #Add, and the primary server opens the binary log
log-slave-updates=true  #Added to allow binary logs to be updated from the server

systemctl restart mysqld

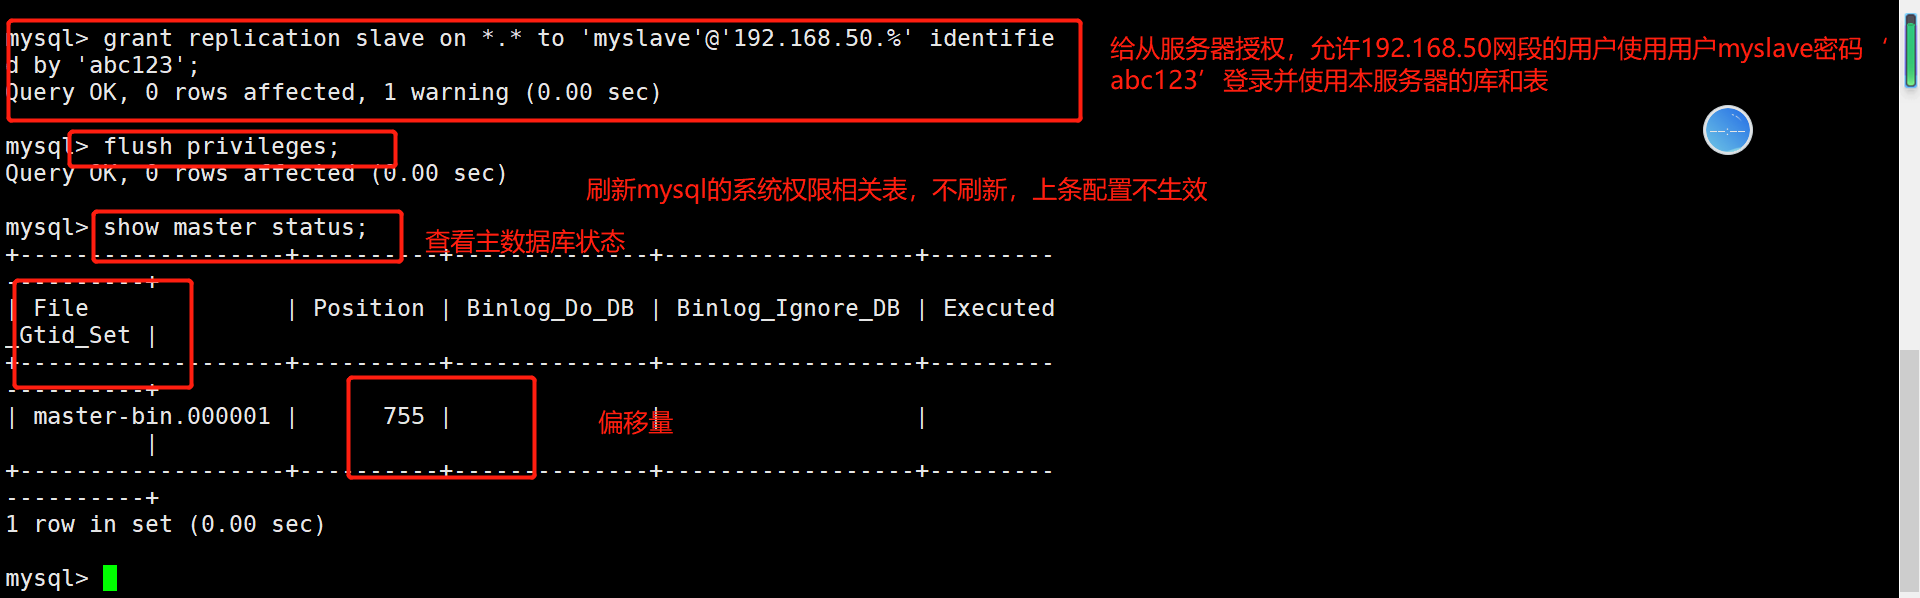
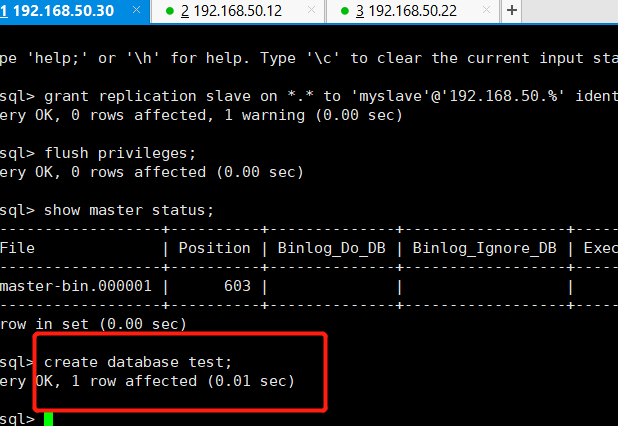
mysql -u root -p
#Authorize slave servers
grant replication slave on *.* to 'myslave'@'192.168.50.%' identified by 'abc123';
flush privileges;

show master status;
#The File column displays the log name and the position column displays the offset
Configure from server
Slave1 server: 192.168.50.12
Slave2 server: 192.168.50.22
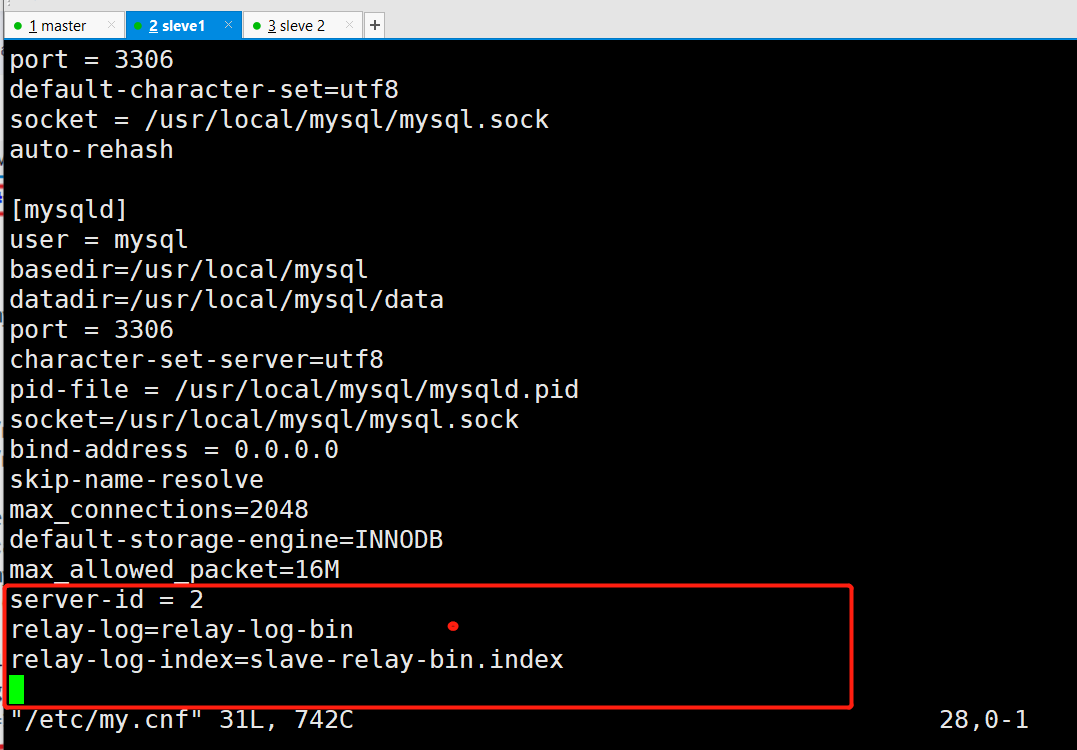
vim /etc/my.cnf
#Modify. Note that the id is different from that of the Master, and the IDs of the two Slave should also be different
server-id = 2
#Add, enable the relay log, and synchronize the log file records from the primary server to the local server
relay-log=relay-log-bin
#Add and define the location and name of the relay log file
relay-log-index=slave-relay-bin.index

systemctl restart mysqld
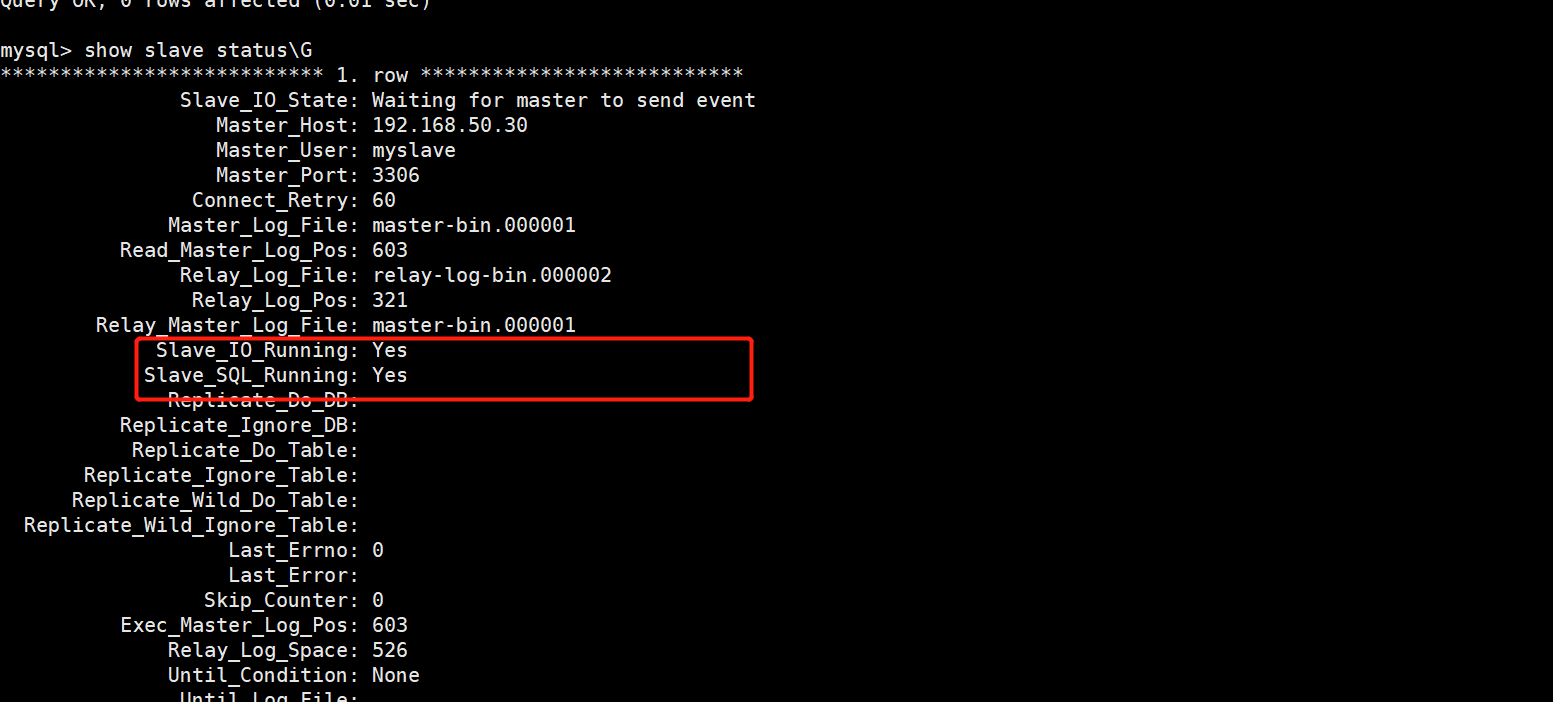
mysql -u root -p
#Configure synchronization, pay attention to master_log_file and Master_ log_ The value of POS should be consistent with that of Master query,
change master to master_host='192.168.163.20' , master_user='myslave',master_password='abc123',master_log_file='master-bin.000002',master_log_pos=603;

start slave;					#Start synchronization, and execute reset slave in case of error;
show slave status\G				#View Slave status
//Ensure that both IO and SQL threads are Yes, which means the synchronization is normal.
Slave_IO_Running: Yes			#Responsible for io communication with host
Slave_SQL_Running: Yes			#Be responsible for your own slave mysql process
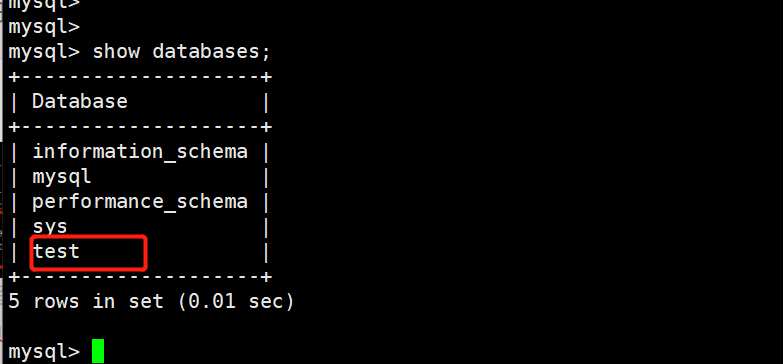
Verify master-slave replication effect
create database test on the master server;
Build Mysql read-write separation
1) Amoeba server configuration: 192.168.50.20
Install java environment
Because Amoeba is based on jdk1 5, so it is officially recommended to use jdk1 Version 5 or 1.6, and higher versions are not recommended.
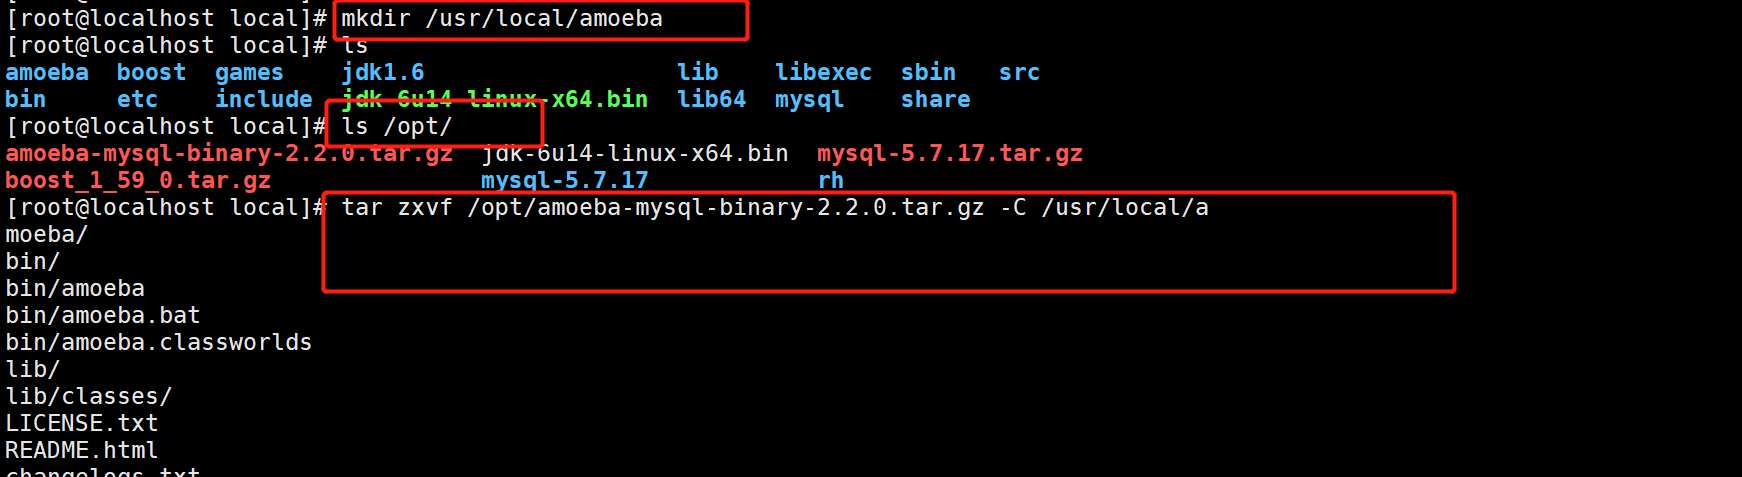
Add jdk-6u14-linux-x64 Bin and amoeba-mysql-binary-2.2.0 tar. gz. 0 is uploaded to the / opt directory.
cd /opt/
cp jdk-6u14-linux-x64.bin /usr/local/

cd /usr/local/
chmod +x jdk-6u14-linux-x64.bin
./jdk-6u14-linux-x64.bin
 Press space to the last line
 Press yes,Press enter

mv jdk1.6.0_14/ /usr/local/jdk1.6

vim /etc/profile
export JAVA_HOME=/usr/local/jdk1.6
export CLASSPATH=$CLASSPATH:$JAVA_HOME/lib:$JAVA_HOME/jre/lib
export PATH=$JAVA_HOME/lib:$JAVA_HOME/jre/bin/:$PATH:$HOME/bin
export AMOEBA_HOME=/usr/local/amoeba
export PATH=$PATH:$AMOEBA_HOME/bin

source /etc/profile
java -version

Install Amoeba software
mkdir /usr/local/amoeba
tar zxvf /opt/amoeba-mysql-binary-2.2.0.tar.gz -C /usr/local/amoeba/
chmod -R 755 /usr/local/amoeba/
/usr/local/amoeba/bin/amoeba
//If amoeba start|stop is displayed, the installation is successful

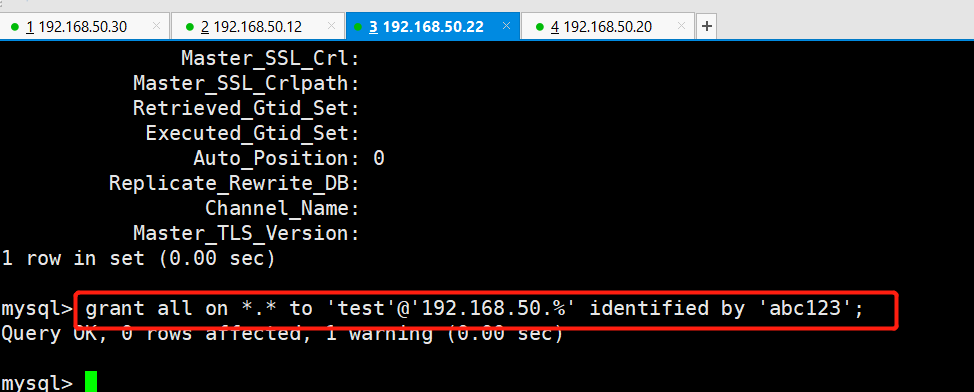
Authorize on mysql of master-slave server
Master server: 192.168.50.30
slave 1 server: 192.168.50.12
slave 2 server: 192.168.50.22
First, open the permission to Amoeba on the mysql of master, Slave 1 and slave 2
grant all on *.* to 'test'@'192.168.50.%' identified by 'abc123'
Configure Amorba read-write separation and load balancing of two Slave reads
Amoeba server: 192.168.50.20
Modify amoeba configuration file
cd /usr/local/amoeba/conf/

cp amoeba.xml amoeba.xml.bak
vim amoeba.xml           #Modify amoeba configuration file
#---------30 modification------------------------------
<property name="user">amoeba</property>
#---------32 modification------------------------------
<property name="password">123456</property>
#---------115 modification-----------------------------
<property name="defaultPool">master</property>
#---------117 remove note –------------------------
<property name="writePool">master</property>
<property name="readPool">slaves</property>


Modify database configuration file
cp dbServers.xml dbServers.xml.bak

vim dbServers.xml
#---------23 comment out--------------------------------------
Function: default entry test Library in case mysql Not in test An error will be reported when the library is
<!-- mysql schema
<property name="schema">test</property>
-->
#---------26 modification-----------------------------------------
<!-- mysql user -->
<property name="user">test</property>
#---------28-30 remove notes----------------------------------
<property name="password">abc123</property>
#---------45 modify and set the name of the Master server Master------------------
<dbServer name="master"  parent="abstractServer">
#---------48 modify and set the address of the main server----------------------
<property name="ipAddress">192.168.50.30</property>
#---------52 modify and set the slave server name slave1-----------------
<dbServer name="slave1"  parent="abstractServer">
#---------55 modify and set the address of slave server 1---------------------
<property name="ipAddress">192.168.50.12</property>
#---------58 copy and paste the above six lines, and set the name slave2 and address of slave server 2---
<dbServer name="slave2"  parent="abstractServer">
<property name="ipAddress">192.168.50.22</property>
#---------Modified 65 or 66-------------------------------------
<dbServer name="slaves" virtual="true">
#---------71 modification----------------------------------------
<property name="poolNames">slave1,slave2</property>

/usr/local/amoeba/bin/amoeba start&	 #Start Amoeba software and press ctrl+c to return
netstat -anpt | grep java		   	 #Check whether port 8066 is enabled. The default port is TCP 8066


Test read write separation
Client 192.168.50.60
Quickly install Mysql virtual client using yum or up2date
yum install -y mysql mysql-server


musql -u amoeba -pabc123 -h 192.168.50.20 -p8066