This paper introduces how to use alicloud File Storage NAS to replace K8S native NFS system, so as to realize the flexible expansion, high availability and high-performance deployment of the storage system out of the cluster
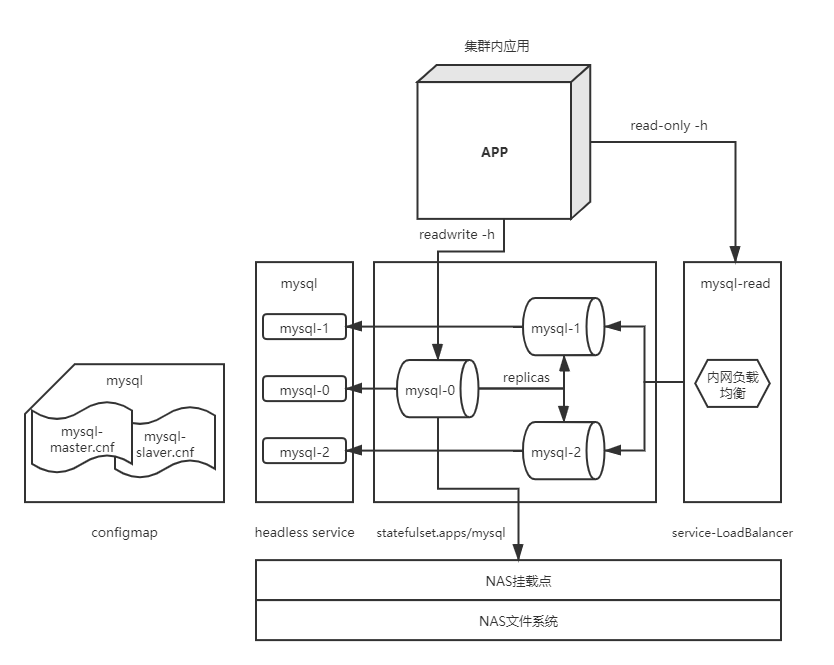
Built structure
- A master node and multiple slave nodes that asynchronously copy data from the master are composed, that is, a master-slave replication model. Among them, the master node can be used to process the user's read and write requests, and the slave node can only be used to process the user's read and write requests.
- mysql deployed through statefullset can discover each other through the domain name of headless service and realize the synchronization of master-slave tables.
- In addition to this, we also need to store mysql data in the nas file storage system
- Put the configuration of master-slave table in configMap
- Through the load balancing of the intranet, print the read-only query request through polling or other rules on the slave Table 1 and 2. Read and write requests can directly access the main table.
Building ideas
-
Apply for alicloud NAS file system and use NAS storage system;
-
Create a Storage class;
-
Create configMap configuration dictionary;
-
Deploy headless headless service;
-
Deploy statefullset application;
-
View status;
-
Deploy external Read-Only service read only;
-
Deploy external Read-Write service Read-Write
Let's start to build and deploy step by step
Specific steps
-
Creating and using NAS storage systems
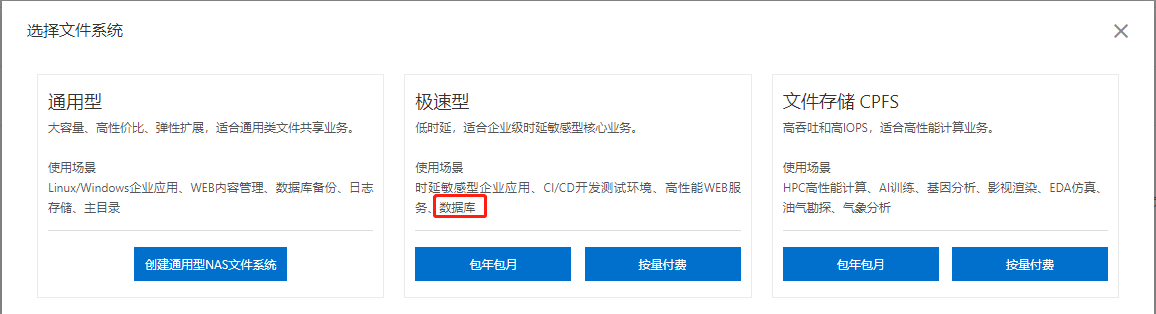
- Create nas file system
In fact, the extremely fast type is recommended here, which is more suitable for databases with frequent reading and writing, because it has a low delay, about 3ms
-
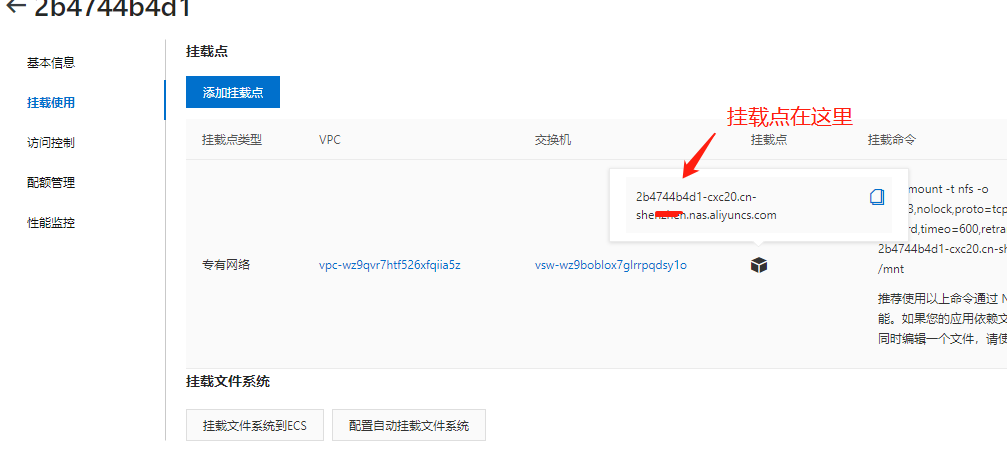
Mount and use. I only demonstrate the general type here
Mount point: 0 c28c4801a-l***5.cn-hangzhou.nas.aliyuncs.com
-
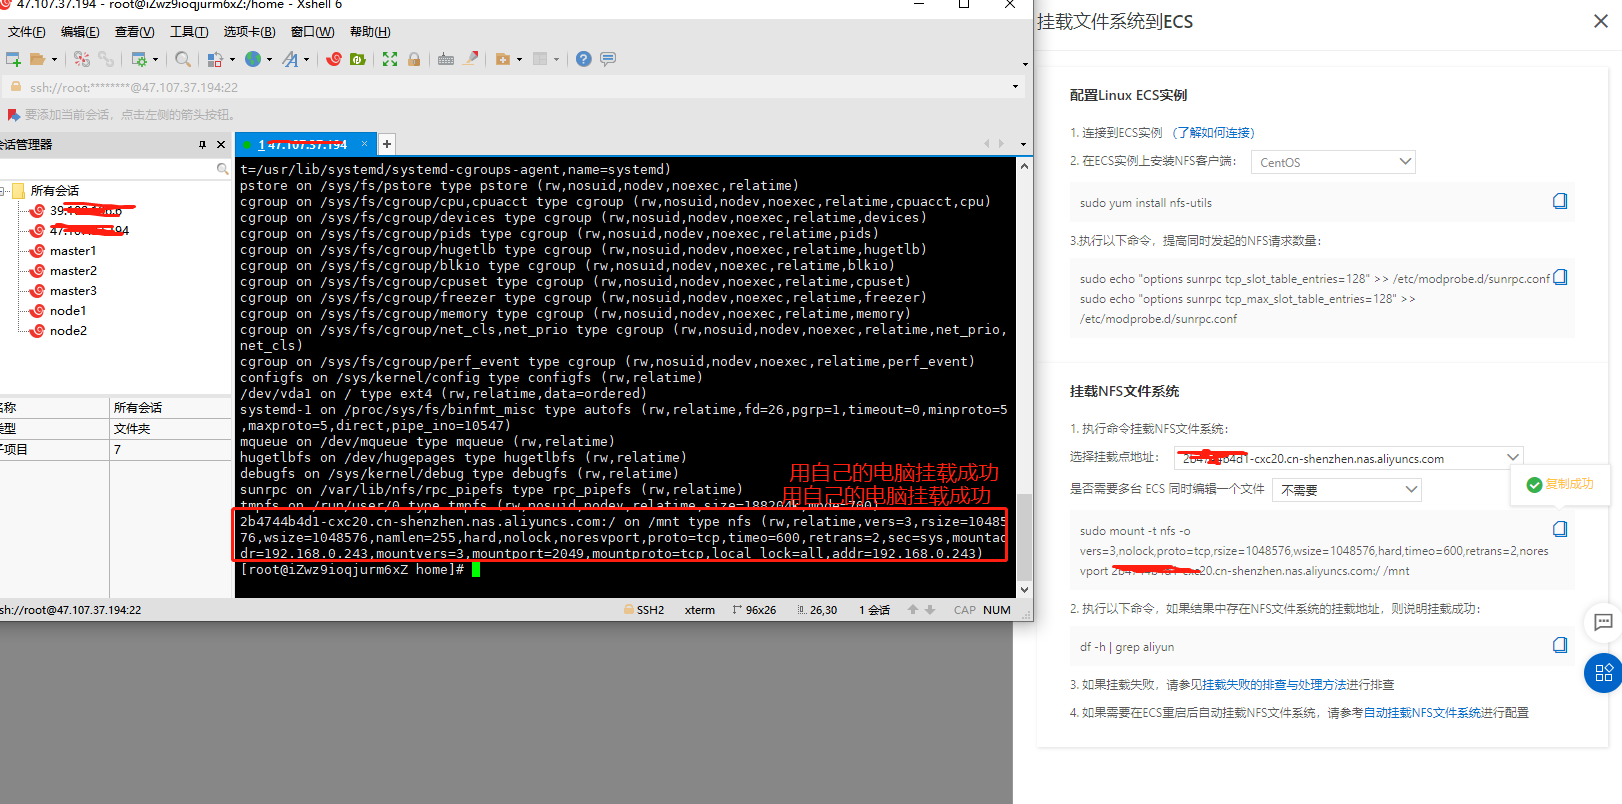
Mount and use on linux to facilitate management
-
#If you use CentOS, Redhat, Aliyun Linux operating systems, please execute the following commands sudo yum install nfs-utils #Increase the number of simultaneous NFS requests. #Please execute the following command to modify the number of simultaneous NFS requests to 128 sudo echo "options sunrpc tcp_slot_table_entries=128" >> /etc/modprobe.d/sunrpc.conf sudo echo "options sunrpc tcp_max_slot_table_entries=128" >> /etc/modprobe.d/sunrpc.conf see mount -l View the capacity information of the current file system df -h
-
Now start to mount the NAS into the cluster
Create StorageClass
First create a namespace of mysql, which will not be demonstrated in detail here;
The sc created here can dynamically help us create a persistent storage volume declaration (PVC) using the storage class, and then the storage persistence declaration notifies the system that it needs a persistent storage volume (PV) created using the storage class. It will automatically help us find a piece of available space and bind it in the mounted NAS system
kind :StorageClass
name:data
apiVersion: storage.k8s.io/v1
kind: StorageClass
metadata:
  name: data
mountOptions:
- nolock,tcp,noresvport
- vers=3
parameters:
  server: "2b474***-cxc20.cn-shenzhen.nas.aliyuncs.com:/nasroot1/"
  driver: flexvolume
provisioner: alicloud/nas
reclaimPolicy: Delete
Official document link: https://help.aliyun.com/document_detail/27518.html
Create configMap configuration dictionary
kind :ConfigMap
Create mysql configuration item
apiVersion: v1
kind: ConfigMap

metadata:
  name: mysql
  labels:
    app: mysql
data:
  master.cnf: |
    # Apply this config only on the master.
    [mysqld]
    log-bin
  slave.cnf: |
    # Apply this config only on slaves.
    [mysqld]
    super-read-only
Create mysql account password configuration
apiVersion: v1
kind: ConfigMap
metadata:
  name: mconfig
  labels:
    app: mconfig
data:
  passwd.cnf: |
    [mysql]
    user=root
    password=123456
    [mysqladmin]
    user=root
    password=123456
Deploy headless headless service
kind: Service
clusterIP: None
apiVersion: v1
kind: Service
metadata:
  name: mysql-headless
  labels:
    app: mysql
spec:
  ports:
  - name: mysql
    port: 3306
  clusterIP: None
  selector:
    app: mysql
#Service name + namespace + cluster domain name + @ coredns IP address
mysql-master-svc.mysql.svc.cluster.local @10.27.0.80
Deploy statefullset application
For details, please refer to the article of international slag man: https://blog.csdn.net/qq_38900565/article/details/114832445
apiVersion: apps/v1
kind: StatefulSet
metadata:
  name: mysql-ss
spec:
  selector:
    matchLabels:
      app: mysql
  serviceName: mysql-headless
  replicas: 3
  template:
    metadata:
      labels:
        app: mysql
    spec:
      initContainers:
      - name: init-mysql
        image: mysql:5.7
        imagePullPolicy: IfNotPresent
        command:
        - bash
        - "-c"
        - |
          set ex
          # Get the index from hostname. For example, (mysql-1) will get (1)
          [[ `hostname` =~ -([0-9]+)$ ]] || exit 1
          ordinal=${BASH_REMATCH[1]}
          echo [mysqld] > /mnt/conf.d/server-id.cnf
          # Increase the offset to prevent server id = 0
          echo server-id=$((100 + $ordinal)) >> /mnt/conf.d/server-id.cnf
          # Copy the corresponding file to the / mnt/conf.d / folder
          if [[ $ordinal -eq 0 ]]; then
            cp /mnt/config-map/master.cnf /mnt/conf.d/
          else
            cp /mnt/config-map/slave.cnf /mnt/conf.d/
          fi
        volumeMounts:
        - name: conf
          mountPath: /mnt/conf.d
        - name: config-map
          mountPath: /mnt/config-map
      - name: clone-mysql
        image: ist0ne/xtrabackup
        imagePullPolicy: IfNotPresent
        command:
        - bash
        - "-c"
        - |
          set -ex
          # Overall meaning:
          # 1. If it's xtrabackup in the main mysql, you don't need to clone yourself. Just exit
          # 2. If it is xtrabackup from mysql, first judge whether it is created for the first time, because there is a local database after the second restart, and there is no need to clone. If it is created for the first time (judging by whether the / var/lib/mysql/mysql file exists), you need to clone the database locally.
          # If there is data, you don't need to clone the data, just exit ()
          [[ -d /var/lib/mysql/mysql ]] && exit 0
          # If it is master data, there is no need to clone it
          [[ `hostname` =~ -([0-9]+)$ ]] || exit 1
          ordinal=${BASH_REMATCH[1]}
          [[ $ordinal -eq 0 ]] && exit 0
          # Clone data from a database with a smaller serial number than yourself. For example, mysql-2 will clone data from mysql-1
          ncat --recv-only mysql-ss-$(($ordinal-1)).mysql-headless 3307 | xbstream -x -C /var/lib/mysql
          # Compare data, login
          xtrabackup --user=root --password=123456 --prepare --target-dir=/var/lib/mysql
        volumeMounts:
        - name: data
          mountPath: /var/lib/mysql
          subPath: mysql
        - name: conf
          mountPath: /etc/mysql/conf.d
      containers:
      - name: mysql
        image: mysql:5.7
        imagePullPolicy: IfNotPresent
        args: ["--default-authentication-plugin=mysql_native_password"]
        env:
        - name: MYSQL_ROOT_PASSWORD
          value: "123456"
        ports:
        - name: mysql
          containerPort: 3306
        volumeMounts:
        - name: mconfig
          mountPath: /var/passwd.cnf
          subPath: var/passwd.cnf
        - name: data
          mountPath: /var/lib/mysql
          subPath: mysql
        - name: conf
          mountPath: /etc/mysql/conf.d
        resources:
          requests:
            cpu: 50m
            memory: 50Mi
        livenessProbe:
          exec:
            command: ["mysqladmin", "--defaults-extra-file=/var/passwd.cnf", "ping"]
          initialDelaySeconds: 30
          periodSeconds: 10
          timeoutSeconds: 5
        readinessProbe:
          exec:
            # Check we can execute queries over TCP (skip-networking is off).
            command: ["mysql", "--defaults-extra-file=/var/passwd.cnf","-h", "127.0.0.1", "-e", "SELECT 1"]
          initialDelaySeconds: 5
          periodSeconds: 2
          timeoutSeconds: 1
      - name: xtrabackup
        image: ist0ne/xtrabackup
        imagePullPolicy: IfNotPresent
        ports:
        - name: xtrabackup
          containerPort: 3307
        command:
        - bash
        - "-c"
        - |
          set -ex
          # Determine the location of binlog clone data (if binlog exists)
          cd /var/lib/mysql
          # If the file exists, the xrabackup is cloned from an existing slave node.
          if [[ -s xtrabackup_slave_info ]]; then
            mv xtrabackup_slave_info change_master_to.sql.in
            rm -f xtrabackup_binlog_info
          elif [[ -f xtrabackup_binlog_info ]]; then
            [[ `cat xtrabackup_binlog_info` =~ ^(.*?)[[:space:]]+(.*?)$ ]] || exit 1
            rm xtrabackup_binlog_info
            echo "CHANGE MASTER TO MASTER_LOG_FILE='${BASH_REMATCH[1]}',\
                  MASTER_LOG_POS=${BASH_REMATCH[2]}" > change_master_to.sql.in
          fi
          # Check if we need to complete a clone by starting replication.
          if [[ -f change_master_to.sql.in ]]; then
            echo "Waiting for mysqld to be ready (accepting connections)"
            until mysql -h 127.0.0.1 -p123456 -e "SELECT 1"; do sleep 1; done
            echo "Initializing replication from clone position"
            mv change_master_to.sql.in change_master_to.sql.orig
            mysql -h 127.0.0.1 -p123456 <<EOF
          $(<change_master_to.sql.orig),
            MASTER_HOST='mysql-ss-0.mysql-headless',
            MASTER_USER='root',
            MASTER_PASSWORD='123456',
            MASTER_CONNECT_RETRY=10;
          START SLAVE;
          EOF
          fi
          exec ncat --listen --keep-open --send-only --max-conns=1 3307 -c \
            "xtrabackup --backup --slave-info --stream=xbstream --host=127.0.0.1 --user=root --password=123456"
        volumeMounts:
        - name: data
          mountPath: /var/lib/mysql
          subPath: mysql
        - name: conf
          mountPath: /etc/mysql/conf.d
        resources:
          requests:
            cpu: 10m
            memory: 10Mi
      volumes:
      - name: mconfig
        configMap:
          name: mconfig
          items:
          - key: passwd.cnf
            path: var/passwd.cnf
      - name: conf
        emptyDir: {}
      - name: config-map
        configMap:
          name: mysql
  volumeClaimTemplates:
  - metadata:
      name: data
    spec:
      accessModes:
        - ReadWriteOnce
      storageClassName: data
      resources:
        requests:
          storage: 2Gi
View status
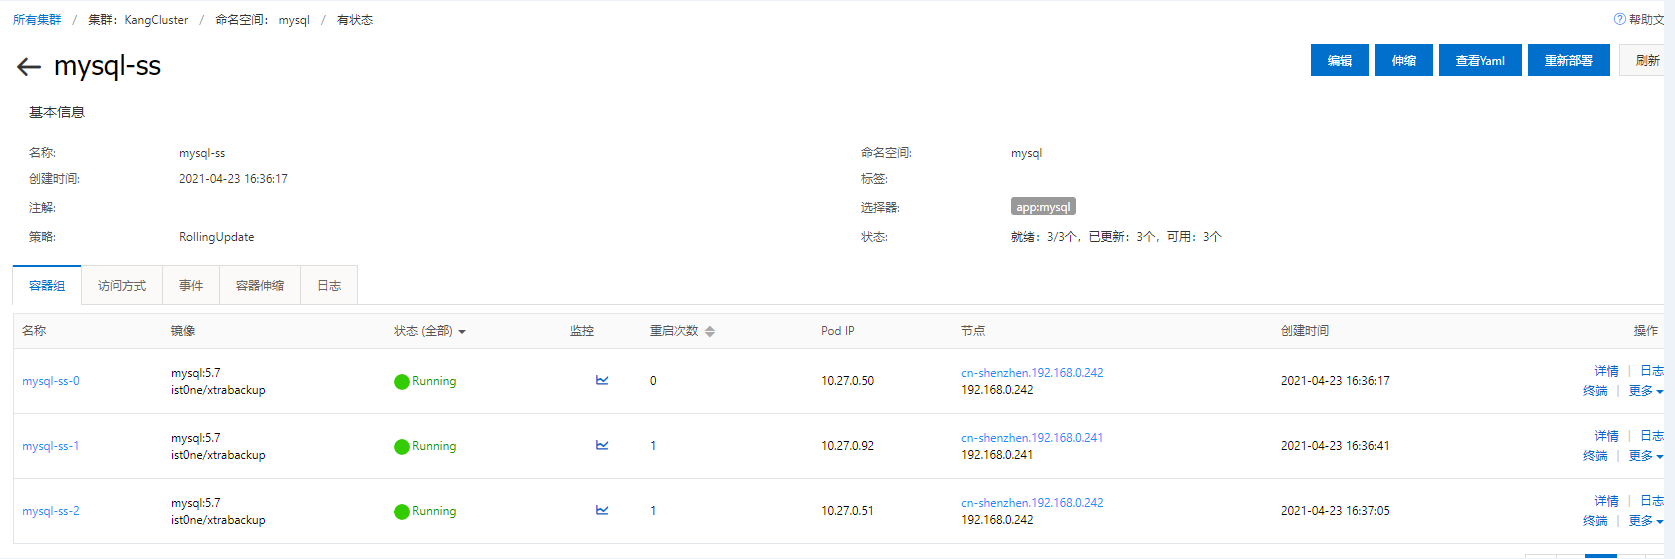
Test and see
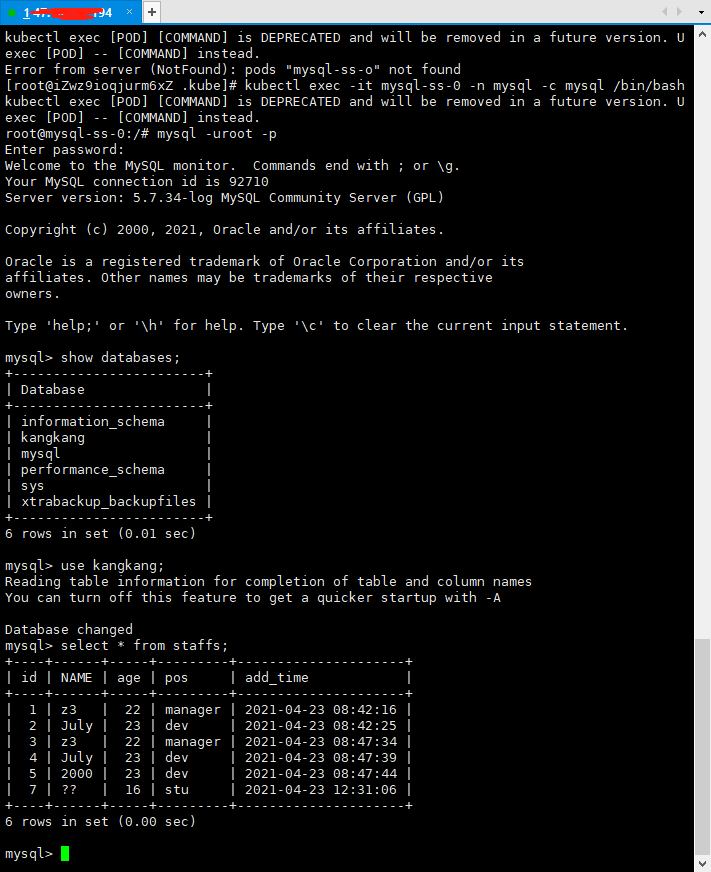
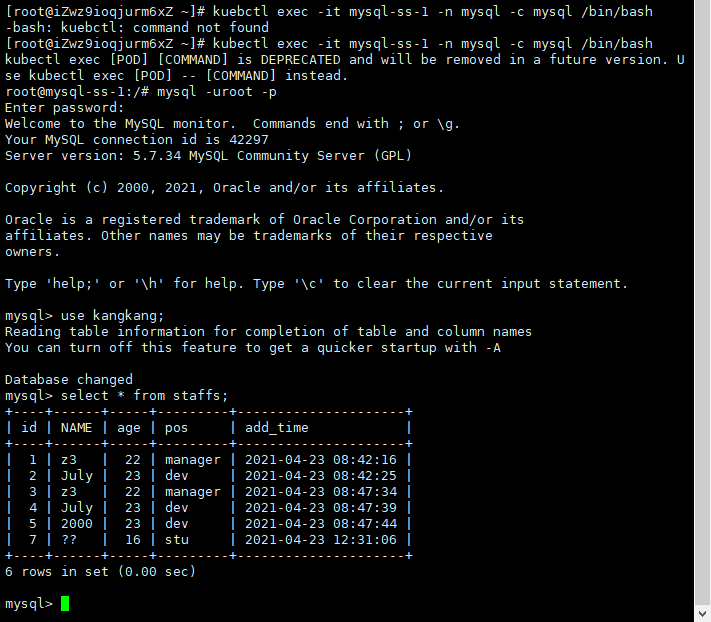
kubectl get pods -n mysql -o wide

kubectl exec -it mysql-ss-0 -n mysql -c mysql /bin/bash
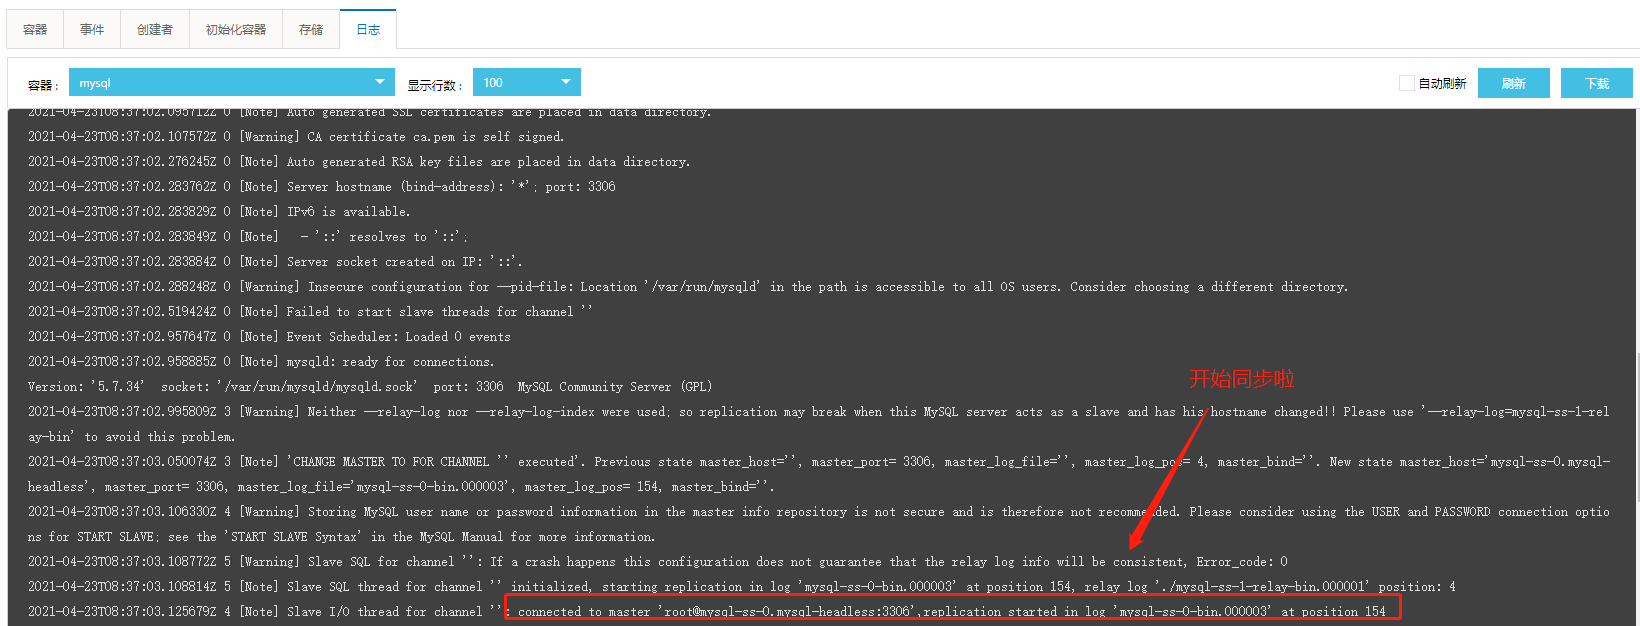
Create tables in the main database, insert data, query from table 1 and query from table 2 respectively
MySQL master creates a staffsde table
You can also see it in mysql-slave-1
In this way, mysql will be deployed. We also need to talk about application exposure for testing
Deploy external read-only service (only read)
Here, the read-only service can be used for both master and slave tables. There are two methods
kind: NodePort
Deploy in nodeport mode, expose mysql in node port mode, and conduct read-only connection test locally (connect with any node IP:nodePort of the cluster)
apiVersion: v1
kind: Service
metadata:
  name: mysql-Read
  labels:
    app: mysql
spec:
  ports:
  - name: mysql
    port: 3306
    targetPort: 3306
    nodePort: 30036
  type: NodePort
  selector:
    app: mysql
kind: LoadBalancer
The LoadBalancer load balancing method exposes mysql
apiVersion: v1
kind: Service
metadata:
name: mysql
namespace: mysql
spec:
ports:
- port: 80
protocol: 30036
targetPort: 3306
selector:
run: nginx
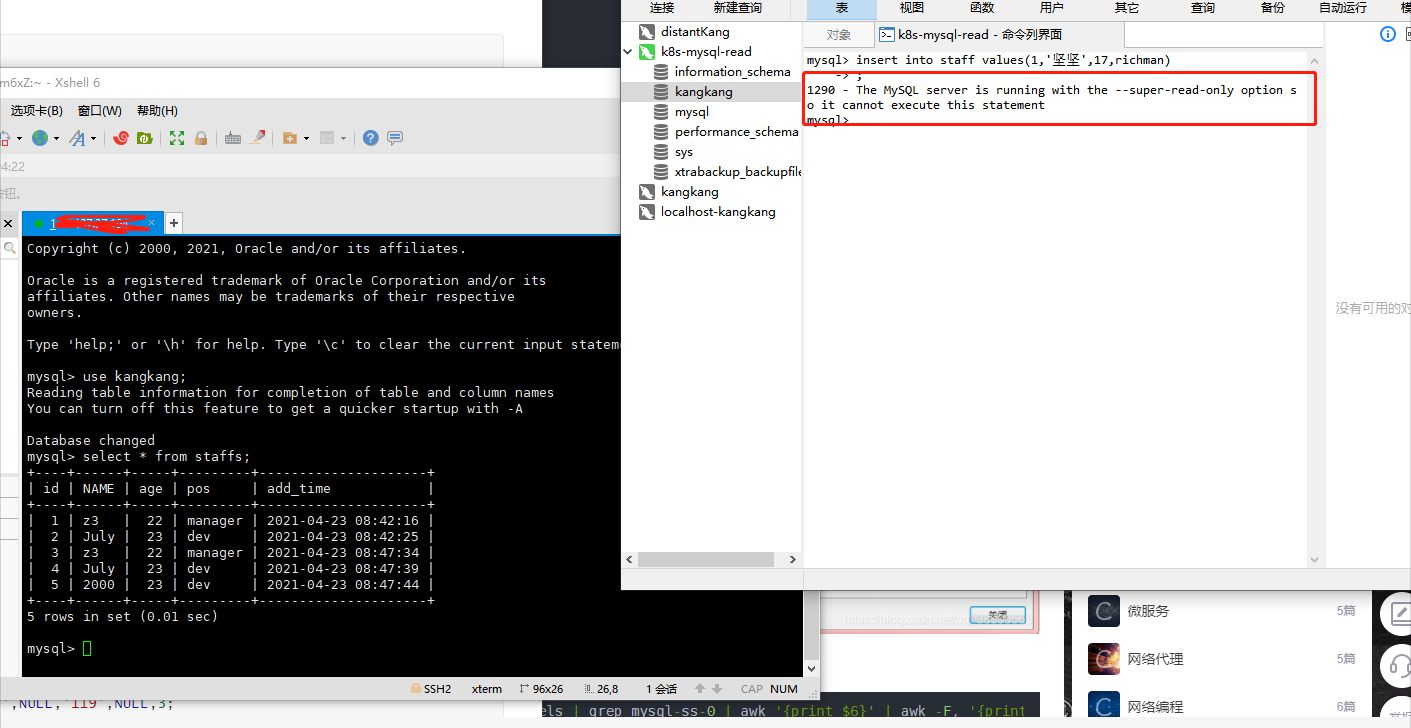
type: LoadBalancerConnect mysql in navicat for testing, try to insert data, display read-only, and the deployment is completed
Deploy external Read-Write service (Read-Write)
Here, the read-write service only allows the main table to be used. Select the tag: statefullset kubernetes. io/pod-name: mysql-ss-0
kind: NodePort
apiVersion: v1
kind: Service
metadata:
  name: mysql-Read
  labels:
    app: mysql
spec:
  ports:
  - name: mysql
    port: 3306
    targetPort: 3306
    nodePort: 30036
  type: NodePort
  selector:
    statefulset.kubernetes.io/pod-name: mysql-ss-0
kind: LoadBalancer
The LoadBalancer load balancing method exposes mysql
apiVersion: v1
kind: Service
metadata:
  name: mysql
  namespace: mysql
spec:
  ports:
  - port: 80
    protocol: 30036
    targetPort: 3306
  selector:
    statefulset.kubernetes.io/pod-name: mysql-ss-0
  type: LoadBalancer
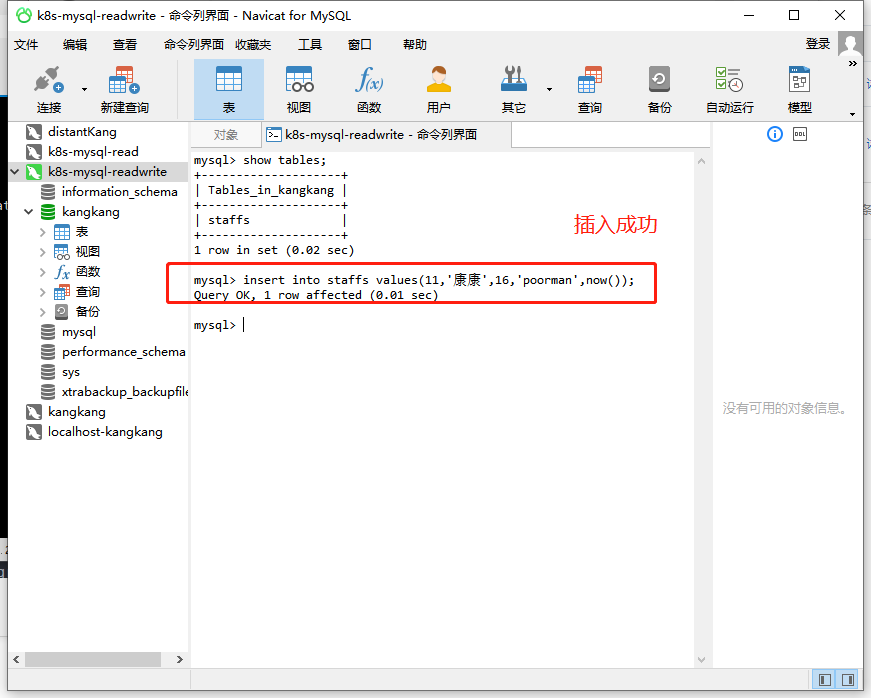
At this time, you can pass the read-write connection test (connect using any node IP:nodePort of the cluster)
So far, the deployment has been completed;
Let's look at the nas mounted data through the hosts outside the cluster
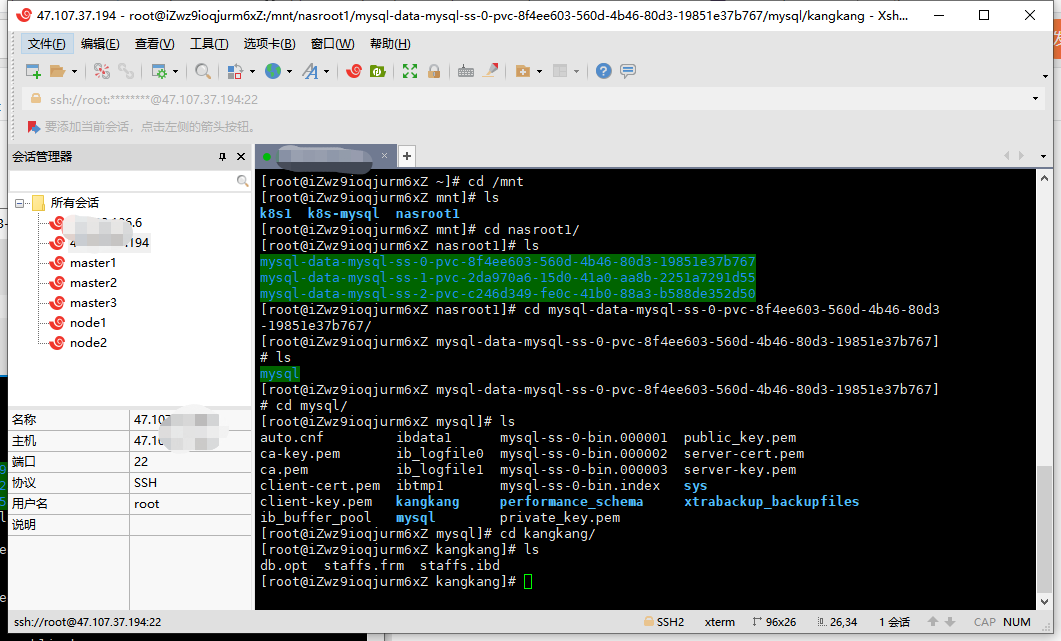
The created staffs table can be seen to be within the storage volume. So far, the deployment is completed, ha ha