abstract
The commodity search function in the mall project has never done real-time data synchronization. Recently, it was found that Alibaba's open source canal can synchronize the data in MySQL to Elasticsearch in real time, which can well solve the problem of data synchronization. Today, let's talk about the use of canal, hoping to help you!
Introduction to canal
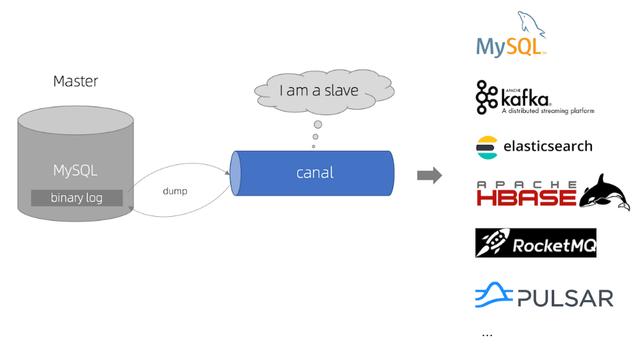
canal is mainly used to parse the incremental log of MySQL database and provide subscription and consumption of incremental data. In short, it can synchronize the incremental data of MySQL in real time and support synchronization to MySQL, Elasticsearch, HBase and other data stores.
How canal works
Canal will simulate the interaction protocol between MySQL master database and slave database, so as to disguise as MySQL slave database, and then send dump protocol to MySQL master database. MySQL master database will push binlog to canal after receiving dump request, and canal will synchronize the data to other stores by parsing binlog.
canal use
Next, let's learn about the use of canal. Take MySQL real-time synchronization of data to Elasticsearch as an example.
Component download
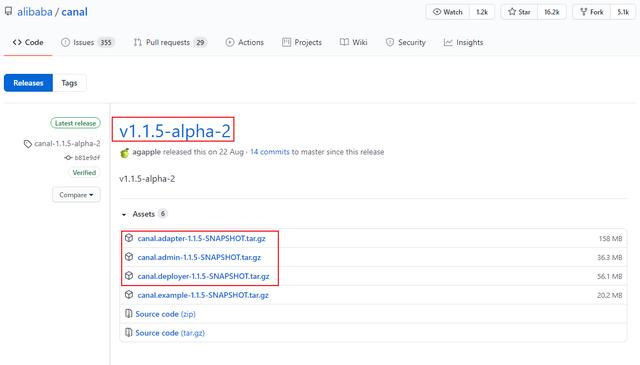
First of all, we need to download the components of canal, including canal server, canal adapter and canal admin. The download address is: https://github.com/alibaba/canal/releases

Each component of canal has different purposes, which are described below:
- Canal server (canal deploy): you can directly monitor MySQL binlog and disguise yourself as a slave of MySQL. It is only responsible for receiving data without processing.
- Canadian adapter: it is equivalent to the Canadian client. It will get data from the Canadian server and synchronize the data. It can be synchronized to MySQL, Elasticsearch, HBase and other storage.
- Canal admin: provide canal with overall configuration management, node operation and maintenance and other operation and maintenance oriented functions, and provide a relatively friendly WebUI operation interface to facilitate more users to operate quickly and safely.
Since different versions of MySQL, Elasticsearch and canal will have compatibility problems, let's make an agreement on their versions first.
Application port version mysql33065 7Elasticsearch92007. 6.2Kibanba56017. 6.2canal-server111111. 1.15canal-adapter80811. 1.15canal-admin80891. one point one five
MySQL configuration
Since canal realizes data synchronization by subscribing to MySQL's binlog, we need to turn on MySQL's binlog writing function and set binlog format to ROW mode. My configuration file is / mydata / MySQL / conf / my CNF, change to the following:
bash
[mysqld]
## Set up server_id, which needs to be unique in the same LAN
server_id=101
## Specify the name of the database that does not need to be synchronized
binlog-ignore-db=mysql
## Enable binary log function
log-bin=mall-mysql-bin
## Set the memory size used by binary log (transaction)
binlog_cache_size=1M
## Set the binary log format used (mixed,statement,row)
binlog_format=row
## Binary log expiration cleanup time. The default value is 0, which means no automatic cleaning.
expire_logs_days=7
## Skip all errors encountered in master-slave replication or specified types of errors to avoid the interruption of slave side replication.
## For example, the 1062 error refers to the duplication of some primary keys, and the 1032 error is due to the inconsistency of data between the master and slave databases
slave_skip_errors=1062
After configuration, you need to restart MySQL. After successful restart, check whether binlog is enabled through the following command;
show variables like '%log_bin%'
+---------------------------------+-------------------------------------+
| Variable_name                   | Value                               |
+---------------------------------+-------------------------------------+
| log_bin                         | ON                                  |
| log_bin_basename                | /var/lib/mysql/mall-mysql-bin       |
| log_bin_index                   | /var/lib/mysql/mall-mysql-bin.index |
| log_bin_trust_function_creators | OFF                                 |
| log_bin_use_v1_row_events       | OFF                                 |
| sql_log_bin                     | ON                                  |
+---------------------------------+-------------------------------------+
Then check the binlog mode of MySQL;
show variables like 'binlog_format%';
+---------------+-------+
| Variable_name | Value |
+---------------+-------+
| binlog_format | ROW   |
+---------------+-------+
Next, you need to create an account with slave database permission to subscribe to binlog. The account created here is canal:canal;
CREATE USER canal IDENTIFIED BY 'canal';
GRANT SELECT, REPLICATION SLAVE, REPLICATION CLIENT ON *.* TO 'canal'@'%';
FLUSH PRIVILEGES;
- Create the database canal test for testing, and then create a product table. The table creation statement is as follows.
CREATE TABLE `product`  (
  `id` bigint(20) NOT NULL AUTO_INCREMENT,
  `title` varchar(255) CHARACTER SET utf8 COLLATE utf8_general_ci NULL DEFAULT NULL,
  `sub_title` varchar(255) CHARACTER SET utf8 COLLATE utf8_general_ci NULL DEFAULT NULL,
  `price` decimal(10, 2) NULL DEFAULT NULL,
  `pic` varchar(255) CHARACTER SET utf8 COLLATE utf8_general_ci NULL DEFAULT NULL,
  PRIMARY KEY (`id`) USING BTREE
) ENGINE = InnoDB AUTO_INCREMENT = 2 CHARACTER SET = utf8 COLLATE = utf8_general_ci ROW_FORMAT = Dynamic;
Canal server usage
Download the compressed package canal deployer-1.1.5-SNAPSHOT. tar. Upload GZ to the Linux server, and then extract it to the specified directory / mydata / Canadian server. You can use the following command to extract it;
tar -zxvf canal.deployer-1.1.5-SNAPSHOT.tar.gz
After decompression, the directory structure is as follows;
├── bin
│   ├── restart.sh
│   ├── startup.bat
│   ├── startup.sh
│   └── stop.sh
├── conf
│   ├── canal_local.properties
│   ├── canal.properties
│   └── example
│       └── instance.properties
├── lib
├── logs
│   ├── canal
│   │   └── canal.log
│   └── example
│       ├── example.log
│       └── example.log
└── plugin
Modify the configuration file conf / example / instance Properties, which can be configured as follows, mainly to modify the database related configuration;
# MySQL address where data needs to be synchronized
canal.instance.master.address=127.0.0.1:3306
canal.instance.master.journal.name=
canal.instance.master.position=
canal.instance.master.timestamp=
canal.instance.master.gtid=
# Database account used to synchronize data
canal.instance.dbUsername=canal
# Database password for synchronizing data
canal.instance.dbPassword=canal
# Database connection code
canal.instance.connectionCharset = UTF-8
# Regular expressions for filtering tables that need to subscribe to binlog
canal.instance.filter.regex=.*\\..*
Use startup The SH script starts the canal server service;
sh bin/startup.sh
After successful startup, you can use the following commands to view the service log information;
tail -f logs/canal/canal.log
2020-10-26 16:18:13.354 [main] INFO  com.alibaba.otter.canal.deployer.CanalController - ## start the canal server[172.17.0.1(172.17.0.1):11111]
2020-10-26 16:18:19.978 [main] INFO  com.alibaba.otter.canal.deployer.CanalStarter - ## the canal server is running now ......
After successful startup, you can use the following commands to view the instance log information;
tail -f logs/example/example.log
2020-10-26 16:18:16.056 [main] INFO  c.a.o.c.i.spring.support.PropertyPlaceholderConfigurer - Loading properties file from class path resource [canal.properties]
2020-10-26 16:18:16.061 [main] INFO  c.a.o.c.i.spring.support.PropertyPlaceholderConfigurer - Loading properties file from class path resource [example/instance.properties]
2020-10-26 16:18:18.259 [main] INFO  c.a.otter.canal.instance.spring.CanalInstanceWithSpring - start CannalInstance for 1-example
2020-10-26 16:18:18.282 [main] WARN  c.a.o.canal.parse.inbound.mysql.dbsync.LogEventConvert - --> init table filter : ^.*\..*$
2020-10-26 16:18:18.282 [main] WARN  c.a.o.canal.parse.inbound.mysql.dbsync.LogEventConvert - --> init table black filter : ^mysql\.slave_.*$
2020-10-26 16:18:19.543 [destination = example , address = /127.0.0.1:3306 , EventParser] WARN  c.a.o.c.p.inbound.mysql.rds.RdsBinlogEventParserProxy - ---> begin to find start position, it will be long time for reset or first position
2020-10-26 16:18:19.578 [main] INFO  c.a.otter.canal.instance.core.AbstractCanalInstance - start successful....
2020-10-26 16:18:19.912 [destination = example , address = /127.0.0.1:3306 , EventParser] WARN  c.a.o.c.p.inbound.mysql.rds.RdsBinlogEventParserProxy - prepare to find start position just last position
 {"identity":{"slaveId":-1,"sourceAddress":{"address":"localhost","port":3306}},"postion":{"gtid":"","included":false,"journalName":"mall-mysql-bin.000006","position":2271,"serverId":101,"timestamp":1603682664000}}
2020-10-26 16:18:22.435 [destination = example , address = /127.0.0.1:3306 , EventParser] WARN  c.a.o.c.p.inbound.mysql.rds.RdsBinlogEventParserProxy - ---> find start position successfully, EntryPosition[included=false,journalName=mall-mysql-bin.000006,position=2271,serverId=101,gtid=,timestamp=1603682664000] cost : 2768ms , the next step is binlog dump
If you want to stop the canal server service, you can use the following command.
sh bin/stop.sh
Use of Canadian adapter
Download the compressed package canal adapter-1.1.5-SNAPSHOT. tar. Upload GZ to the Linux server, and then unzip it to the specified directory / mydata / Canadian adapter. After unzipping, the directory structure is as follows;
├── bin
│   ├── adapter.pid
│   ├── restart.sh
│   ├── startup.bat
│   ├── startup.sh
│   └── stop.sh
├── conf
│   ├── application.yml
│   ├── es6
│   ├── es7
│   │   ├── biz_order.yml
│   │   ├── customer.yml
│   │   └── product.yml
│   ├── hbase
│   ├── kudu
│   ├── logback.xml
│   ├── META-INF
│   │   └── spring.factories
│   └── rdb
├── lib
├── logs
│   └── adapter
│       └── adapter.log
└── plugin
Modify the configuration file conf / application YML can be configured as follows, mainly to modify the configuration of canal server, data source and client adapter;
canal.conf:
  mode: tcp # Client mode, tcp kafka rocketMQ optional
  flatMessage: true # The flat message switch, whether to post data in json string, is only valid in kafka/rocketMQ mode
  zookeeperHosts:    # Corresponding zk address in cluster mode
  syncBatchSize: 1000 # Number of batches per synchronization
  retries: 0 # Number of retries, - 1 is infinite retry
  timeout: # Synchronization timeout in milliseconds
  accessKey:
  secretKey:
  consumerProperties:
    # canal tcp consumer
    canal.tcp.server.host: 127.0.0.1:11111 #Set the address of the canal server
    canal.tcp.zookeeper.hosts:
    canal.tcp.batch.size: 500
    canal.tcp.username:
    canal.tcp.password:

  srcDataSources: # Source database configuration
    defaultDS:
      url: jdbc:mysql://127.0.0.1:3306/canal_test?useUnicode=true
      username: canal
      password: canal
  canalAdapters: # Adapter list
  - instance: example # canal instance name or MQ topic name
    groups: # Group list
    - groupId: g1 # Group id, which will be used in MQ mode
      outerAdapters:
      - name: logger # Log print adapter
      - name: es7 # ES synchronization adapter
        hosts: 127.0.0.1:9200 # ES connection address
        properties:
          mode: rest # The mode can be transport(9300) or rest(9200)
          # security.auth: test:123456 #  only used for rest mode
          cluster.name: elasticsearch # ES cluster name
Add the configuration file Canadian adapter / conf / ES7 / product YML, which is used to configure the mapping relationship between the table in MySQL and the index in Elasticsearch;
dataSourceKey: defaultDS # The key of the source data source corresponds to the value in srcDataSources configured above
destination: example  # instance of canal or topic of MQ
groupId: g1 # Corresponding to the groupId in MQ mode, only the data of the corresponding groupId will be synchronized
esMapping:
  _index: canal_product # Index name of es
  _id: _id  # Es_ id. if this item is not configured, the following pk item must be configured_ id will be automatically assigned by es
  sql: "SELECT
        	p.id AS _id,
        	p.title,
        	p.sub_title,
        	p.price,
        	p.pic
        FROM
        	product p"        # sql mapping
  etlCondition: "where a.c_time>={}"   #Conditional parameters of etl
  commitBatch: 3000   # Submit batch size
Using startup The SH script starts the Canadian adapter service;
sh bin/startup.sh
After successful startup, you can use the following commands to view the service log information;
tail -f logs/adapter/adapter.log
20-10-26 16:52:55.148 [main] INFO  c.a.o.canal.adapter.launcher.loader.CanalAdapterLoader - Load canal adapter: logger succeed
2020-10-26 16:52:57.005 [main] INFO  c.a.o.c.client.adapter.es.core.config.ESSyncConfigLoader - ## Start loading es mapping config ...
2020-10-26 16:52:57.376 [main] INFO  c.a.o.c.client.adapter.es.core.config.ESSyncConfigLoader - ## ES mapping config loaded
2020-10-26 16:52:58.615 [main] INFO  c.a.o.canal.adapter.launcher.loader.CanalAdapterLoader - Load canal adapter: es7 succeed
2020-10-26 16:52:58.651 [main] INFO  c.alibaba.otter.canal.connector.core.spi.ExtensionLoader - extension classpath dir: /mydata/canal-adapter/plugin
2020-10-26 16:52:59.043 [main] INFO  c.a.o.canal.adapter.launcher.loader.CanalAdapterLoader - Start adapter for canal-client mq topic: example-g1 succeed
2020-10-26 16:52:59.044 [main] INFO  c.a.o.canal.adapter.launcher.loader.CanalAdapterService - ## the canal client adapters are running now ......
2020-10-26 16:52:59.057 [Thread-4] INFO  c.a.otter.canal.adapter.launcher.loader.AdapterProcessor - =============> Start to connect destination: example <=============
2020-10-26 16:52:59.100 [main] INFO  org.apache.coyote.http11.Http11NioProtocol - Starting ProtocolHandler ["http-nio-8081"]
2020-10-26 16:52:59.153 [main] INFO  org.apache.tomcat.util.net.NioSelectorPool - Using a shared selector for servlet write/read
2020-10-26 16:52:59.590 [main] INFO  o.s.boot.web.embedded.tomcat.TomcatWebServer - Tomcat started on port(s): 8081 (http) with context path ''
2020-10-26 16:52:59.626 [main] INFO  c.a.otter.canal.adapter.launcher.CanalAdapterApplication - Started CanalAdapterApplication in 31.278 seconds (JVM running for 33.99)
2020-10-26 16:52:59.930 [Thread-4] INFO  c.a.otter.canal.adapter.launcher.loader.AdapterProcessor - =============> Subscribe destination: example succeed <=============
If you need to stop the Canadian adapter service, you can use the following command.
sh bin/stop.sh
Data synchronization demonstration
After the above series of steps, the data synchronization function of canal is basically available. Let's demonstrate the data synchronization function.
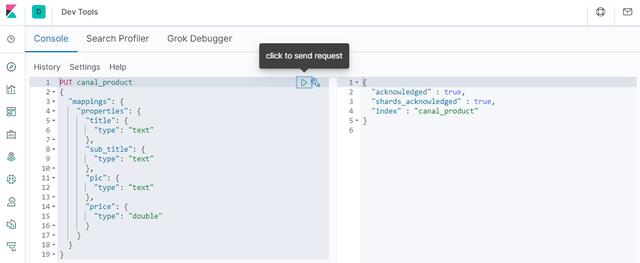
First, we need to create an index in Elasticsearch, which corresponds to the product table in MySQL. We can directly create it in Kibana Dev Tools with the following command;
PUT canal_product
{
  "mappings": {
    "properties": {
      "title": {
        "type": "text"
      },
      "sub_title": {
        "type": "text"
      },
      "pic": {
        "type": "text"
      },
      "price": {
        "type": "double"
      }
    }
  }
}
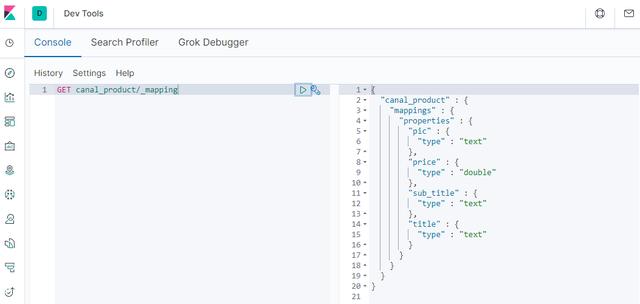
After creation, you can view the structure of the next index;
GET canal_product/_mapping
Then use the following SQL statement to create a record in the database;
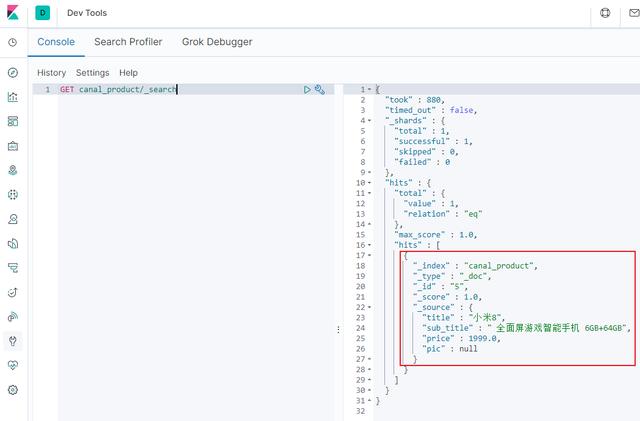
INSERT INTO product ( id, title, sub_title, price, pic ) VALUES ( 5, 'Xiaomi 8', ' Full screen game smartphone 6 GB+64GB', 1999.00, NULL );
After the creation is successful, search in Elasticsearch and find that the data has been synchronized;
GET canal_product/_search
Then use the following SQL to modify the data;
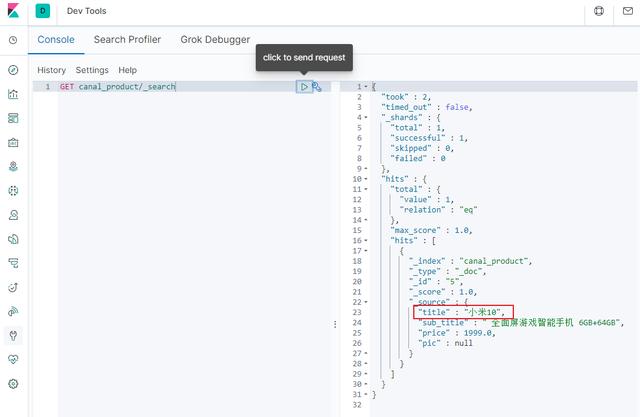
UPDATE product SET title='Xiaomi 10' WHERE id=5
After the modification is successful, search in Elasticsearch and find that the data has been modified;
Then use the following SQL to delete the data;
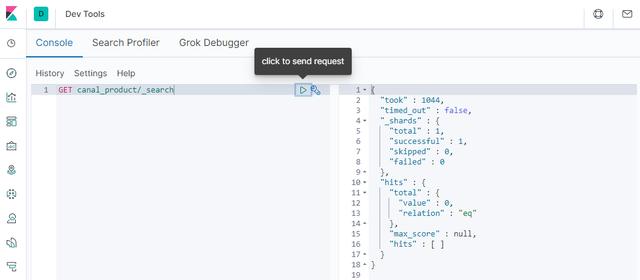
DELETE FROM product WHERE id=5
After the deletion is successful, search in Elasticsearch and find that the data has been deleted. So far, the function of synchronizing MySQL to Elasticsearch has been completed!
Using canal admin
- Download the compressed package canal admin-1.1.5-SNAPSHOT. tar. Upload GZ to the Linux server, and then unzip it to the specified directory / mydata / Canadian admin. After unzipping, the directory structure is as follows;
├── bin
│   ├── restart.sh
│   ├── startup.bat
│   ├── startup.sh
│   └── stop.sh
├── conf
│   ├── application.yml
│   ├── canal_manager.sql
│   ├── canal-template.properties
│   ├── instance-template.properties
│   ├── logback.xml
│   └── public
│       ├── avatar.gif
│       ├── index.html
│       ├── logo.png
│       └── static
├── lib
└── logs
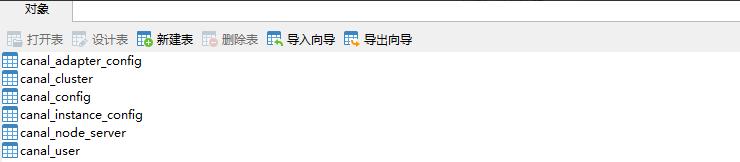
Database needed to create canal admin_ Manager, create SQL script as / mydata / canal admin / conf / canal_manager. SQL, the following table will be created;
Modify the configuration file conf / application YML can be configured as follows, mainly to modify the data source configuration and the management account configuration of canal admin. Note that a database account with read-write permission is required, such as the management account root:root;
server:
  port: 8089
spring:
  jackson:
    date-format: yyyy-MM-dd HH:mm:ss
    time-zone: GMT+8

spring.datasource:
  address: 127.0.0.1:3306
  database: canal_manager
  username: root
  password: root
  driver-class-name: com.mysql.jdbc.Driver
  url: jdbc:mysql://${spring.datasource.address}/${spring.datasource.database}?useUnicode=true&characterEncoding=UTF-8&useSSL=false
  hikari:
    maximum-pool-size: 30
    minimum-idle: 1

canal:
  adminUser: admin
  adminPasswd: admin
Next, the conf / canal of the previously built canal server_ local. Configure the properties file, mainly to modify the configuration of canal admin. After modification, use sh bin / startup SH local restart canal server:
# register ip
canal.register.ip =

# canal admin config
canal.admin.manager = 127.0.0.1:8089
canal.admin.port = 11110
canal.admin.user = admin
canal.admin.passwd = 4ACFE3202A5FF5CF467898FC58AAB1D615029441
# admin auto register
canal.admin.register.auto = true
canal.admin.register.cluster =
Using startup The SH script starts the canal admin service;
sh bin/startup.sh
After successful startup, you can use the following commands to view the service log information;
tail -f logs/admin.log
020-10-27 10:15:04.210 [main] INFO  org.apache.coyote.http11.Http11NioProtocol - Starting ProtocolHandler ["http-nio-8089"]
2020-10-27 10:15:04.308 [main] INFO  org.apache.tomcat.util.net.NioSelectorPool - Using a shared selector for servlet write/read
2020-10-27 10:15:04.534 [main] INFO  o.s.boot.web.embedded.tomcat.TomcatWebServer - Tomcat started on port(s): 8089 (http) with context path ''
2020-10-27 10:15:04.573 [main] INFO  com.alibaba.otter.canal.admin.CanalAdminApplication - Started CanalAdminApplication in 31.203 seconds (JVM running for 34.865)
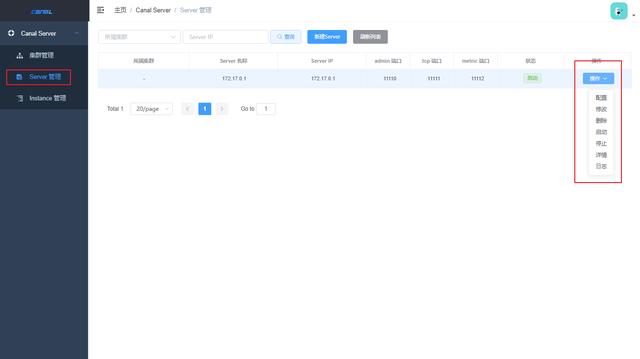
Access the Web interface of canal admin and enter the account password admin:123456 to log in. Access address: http://192.168.3.101:8089
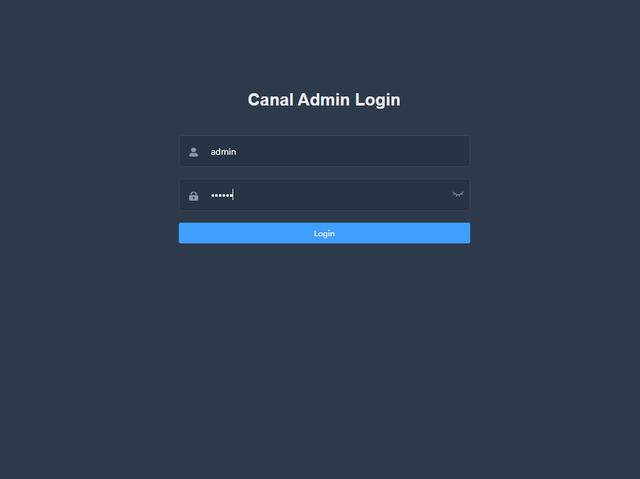
After successful login, you can use the Web interface to operate the canal server.
reference material
Official canal documents: https://github.com/alibaba/canal/wiki
Profile address
github.com/macrozheng/...
Code words are not easy. If you think this article is useful to you, please give me one button three times! Pay attention to the author, there will be more dry goods to share in the future, please continue to pay attention!
Author: a fool is not a fool
Link: https://www.jianshu.com/p/137ed4e71f38
Source: Jianshu