Author: Lao Jiu
Computer major
Controllable things are heavy, calm, uncontrollable things are optimistic
85180586@qq.com
😄 😆 😵 😭 😰 😅 😢 😤 😍 ☺️ 😎 😩
👍 👎 💯 👏 🔔 🎁 ❓ 💣 ❤️ ☕️ 🌀 🙇 💋 🙏 💦 💩 ❗️ 💢
--------
Copyright notice: This article is the original article of CSDN blogger "Pushang Qingtian"
Knowledge points
Introduction to maven
- Maven is a tool for software project management, which is used to manage the functions of project construction, reporting and document generation
- Dependency management
Maven warehouse is similar to an App Store on a mobile phone. There will be various third-party jar packages uploaded by people all over the world for us to use. When our project needs to use the contents, it can be easily found and installed like aunt who installed mobile APP
One of our jar packages needs another jar package, which is called dependency. A project often needs a lot of dependencies, so the concept of dependency management was born
maven action
maven's goal is to complete the project construction and solve all cumbersome affairs. We focus on the following functions:
1. Provide a standard project catalogue
2. Provide project description
3. Provide powerful version management tools
4. The construction process can be carried out in stages
5. It provides a rich plug-in library
Create a maven project using IDEA
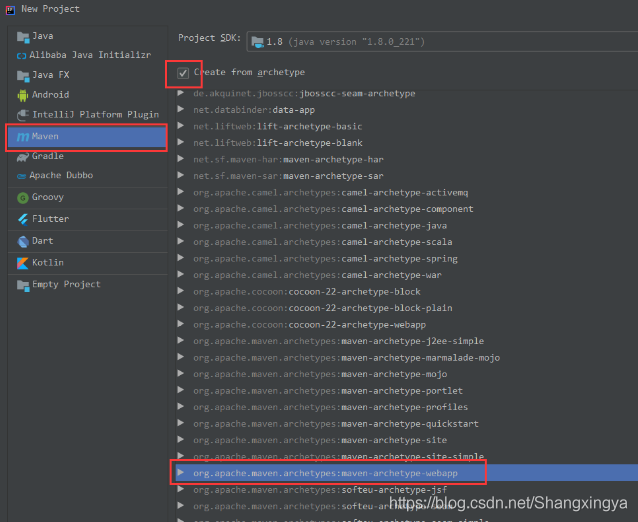
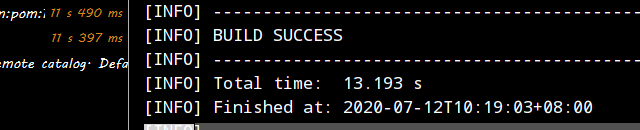
- Then finish all the way until the following page appears, indicating that the creation is successful
main file configuration
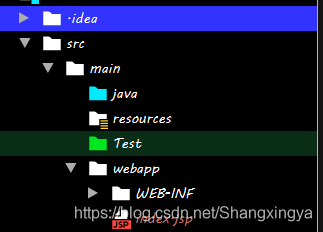
- Test is used to test code, resources is used to provide files of resources, and java is used to write source code
pom.xml file configuration
- Import the jar package of HttpServlet
    <!-- https://mvnrepository.com/artifact/javax.servlet/javax.servlet-api -->
    <dependency>
      <groupId>javax.servlet</groupId>
      <artifactId>javax.servlet-api</artifactId>
      <version>3.1.0</version>
      <scope>provided</scope>
    </dependency>
- Import MySQL package
    <!-- https://mvnrepository.com/artifact/javax.servlet/javax.servlet-api -->
    <dependency>
      <groupId>javax.servlet</groupId>
      <artifactId>javax.servlet-api</artifactId>
      <version>3.1.0</version>
      <scope>provided</scope>
    </dependency>
- This is the configuration of the war package we exported at last
  <groupId>org.example</groupId>
  <artifactId>20200712</artifactId>
  <version>1.0-SNAPSHOT</version>
  <packaging>war</packaging>
- These are some plug-ins. The finalName in the first line is the name of the war package
<build>
    <finalName>listen</finalName>
    <pluginManagement><!-- lock down plugins versions to avoid using Maven defaults (may be moved to parent pom) -->
      <plugins>
        <plugin>
          <artifactId>maven-clean-plugin</artifactId>
          <version>3.1.0</version>
        </plugin>
        <!-- see http://maven.apache.org/ref/current/maven-core/default-bindings.html#Plugin_bindings_for_war_packaging -->
        <plugin>
          <artifactId>maven-resources-plugin</artifactId>
          <version>3.0.2</version>
        </plugin>
        <plugin>
          <artifactId>maven-compiler-plugin</artifactId>
          <version>3.8.0</version>
        </plugin>
        <plugin>
          <artifactId>maven-surefire-plugin</artifactId>
          <version>2.22.1</version>
        </plugin>
        <plugin>
          <artifactId>maven-war-plugin</artifactId>
          <version>3.2.2</version>
        </plugin>
        <plugin>
          <artifactId>maven-install-plugin</artifactId>
          <version>2.5.2</version>
        </plugin>
        <plugin>
          <artifactId>maven-deploy-plugin</artifactId>
          <version>2.8.2</version>
        </plugin>
      </plugins>
    </pluginManagement>
  </build>
</project>
Write implementation code
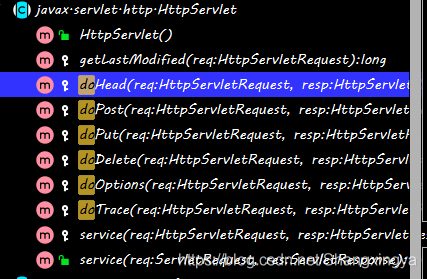
- Create a java file in the main file and inherit the HttpServlet
- Rewrite the doXX method according to the request message method (if the request is a get method, rewrite the doGet method)
import javax.servlet.ServletException;
import javax.servlet.http.HttpServlet;
import javax.servlet.http.HttpServletRequest;
import javax.servlet.http.HttpServletResponse;
import java.io.IOException;

public class HttpServletCal extends HttpServlet{

    @Override
    protected void doGet(HttpServletRequest req, HttpServletResponse resp) throws ServletException, IOException {
        //Get data in request
        //getParameter gets String type. Used to read the value in the submitted key value pair( http://a.jsp?id=123 (123 in)
        String aStr = req.getParameter("a");
        String bStr = req.getParameter("b");
        int ret = Integer.parseInt(aStr) + Integer.parseInt(bStr);
        //Write the result back to the response message
        resp.getWriter().write("<h1>ret=" + ret + "</h1>");
    }
}
Configure web XML file
<?xml version="1.0" encoding="UTF-8"?>
<web-app xmlns="http://xmlns.jcp.org/xml/ns/javaee"
         xmlns:xsi="http://www.w3.org/2001/XMLSchema-instance"
         xsi:schemaLocation="http://xmlns.jcp.org/xml/ns/javaee
                      http://xmlns.jcp.org/xml/ns/javaee/web-app_3_1.xsd"
         version="3.1"
         metadata-complete="true">

  <servlet>
    <servlet-name>HttpServletCal</servlet-name>
    <servlet-class>package.HttpServletCal</servlet-class>
  </servlet>
  <servlet-mapping>
    <servlet-name>HttpServletCal</servlet-name>
    //Pay special attention to adding "/" before this pattern
    <url-pattern>/cal</url-pattern>
  </servlet-mapping>

</web-app>
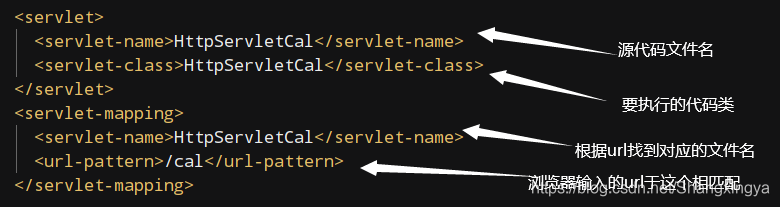
The purpose of these four is to associate the servlet class with the url, so that after tomcat receives the HTTP request, it will find that the path in the url is different from the web If the XML path matches, the corresponding servlet code will be found
Generate war package
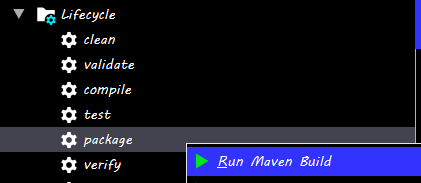
- maven's life cycle
clean: clear the temporary files generated by previous compilation
validate: verify legitimacy
Compile: compile, automatically compile java files into bytecode files with javac
Test: test unit, usually completed with junit
Package: package
verify: confirmation can also be regarded as a verification action
Install: install, deploy the program to a local directory for other programs to use
Deploy: deploy to the central warehouse
- The successful war package can be found in taget

Deploy to Tomcat
- Directly copy the war package to Tomcat's webapps directory (generally, Tomcat will automatically detect your war package)

This indicates that the deployment is successful
Basic principles of tomcat
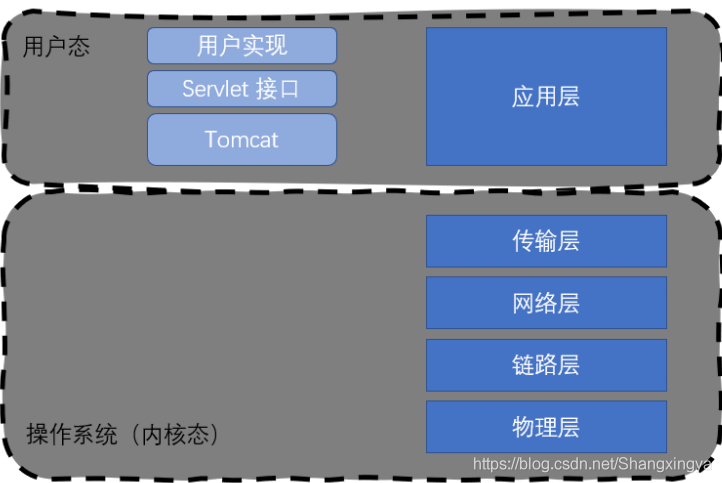
Tomcat startup / initialization
- Create a Socket object binding port number (generally 8080), and then scan webapps (load each webapp into memory)
- This is mainly to load the corresponding web XML file
- Create a separate thread to monitor the changes of webapps in webapps. If any, it will be loaded automatically
Processing process
- Receive the GET request processing URL, such as mine (lmp is the name of war package, corresponding to finalname in pom.xml)

- Confirm which directory is in webapp according to the first level path
- Then find the class name of the corresponding servlet according to the secondary path / cala
- Load the class according to the name of the class, that is, get the class through the reflection mechanism
- After the initial loading, the init method will be called (if it has been loaded, it will not need to be loaded later)
- Call the service method of this class. The service method will decide to call the doXX method according to the method in the Http request (this is why we need to rewrite the doXX method)
Praise first and then watch, form a habit!!! ^^ ♥♥♥
Update your knowledge every day!!!
The code word is not easy. Your support is the driving force for me to stick to it. Don't forget to pay attention to me after you like it!