3 RabbitMQ seven message sending and receiving methods
In most cases, we may use RabbitMQ in Spring Boot or Spring Cloud environment
3.1 introduction to rabbitmq architecture
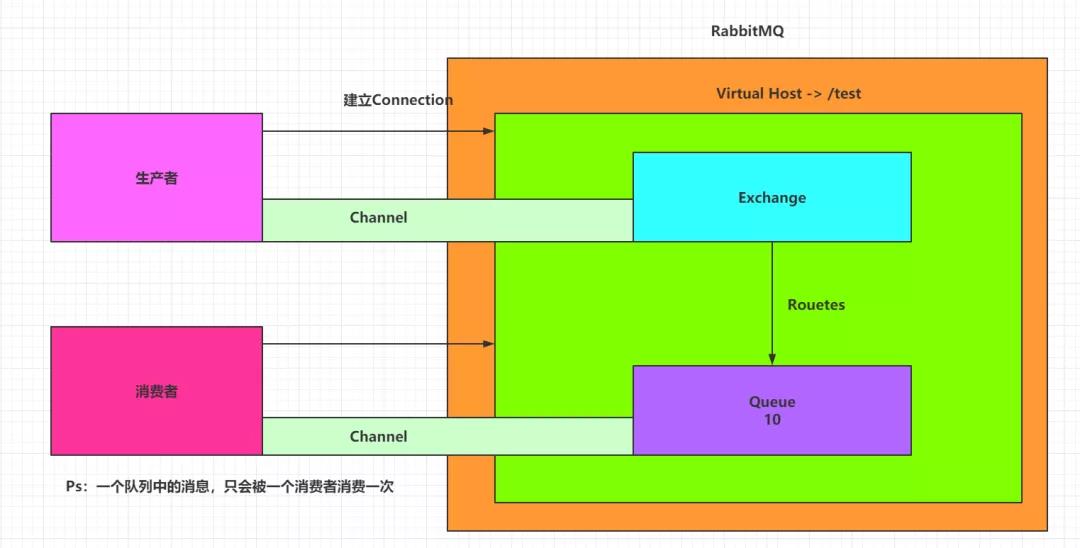
This picture involves the following concepts:
- Producer (Publisher): publish messages to the switch (Exchange) in RabbitMQ
- Exchange: establish and receive messages from producers
- Consumer: listen for messages in Que in RabbitMQ
- Queue: Exchange distributes messages to the designated queue, which interacts with consumers
- Routes: Rules for the switch to forward information to the queue
3.2 preparation
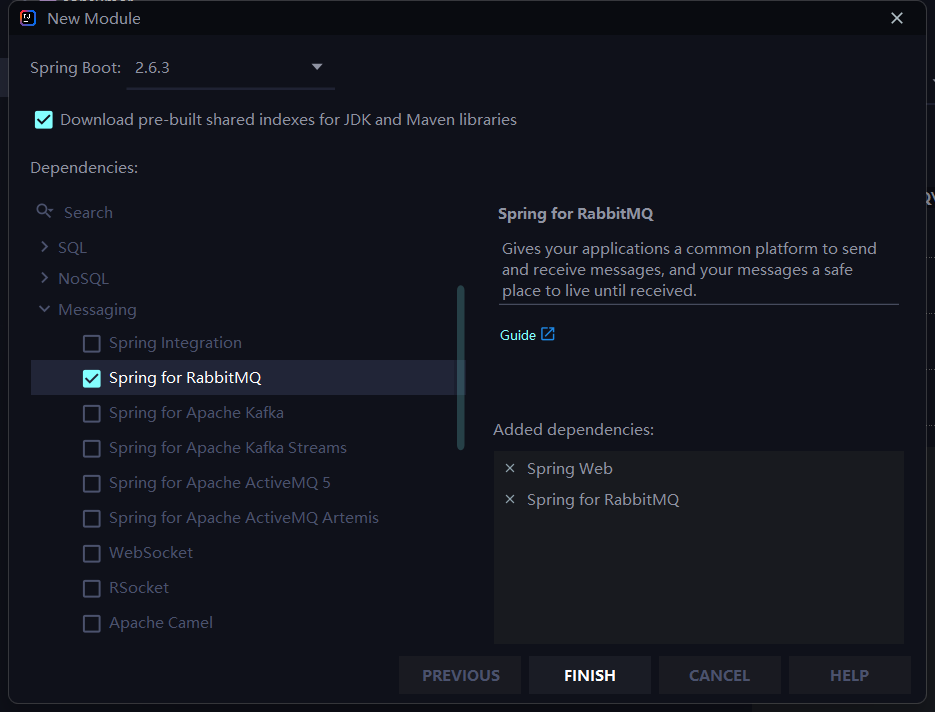
RabbitMQ is a product in the AMQP camp. Spring Boot provides AMQP with automatic configuration dependency Spring Boot starter AMQP. Therefore, first create the Spring Boot project and add the dependency, as follows:
After the project is created successfully, in application Configure the basic connection information of RabbitMQ in YML, as follows“
spring:
  rabbitmq:
    host: localhost
    username: guest
    password: guest
    port: 5672
Next, configure RabbitMQ. In RabbitMQ, all messages submitted by message producers will be handed over to Exchange for redistribution, and Exchange will distribute messages to different queues according to different policies.
RabbitMQ official website introduces the following forms of message distribution:
Seven are given here. The seventh is message confirmation
3.3 messaging
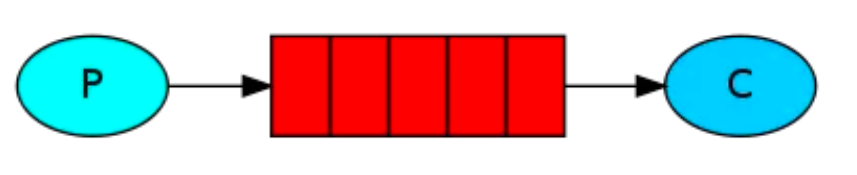
3.3.1 Hello World
Without a switch (the default switch), we need to provide a producer, a queue and a consumer. The message propagation diagram is as follows:
Code implementation:
Definition of queue:
@Configuration
public class HelloWorldConfig {

    public static final String YUE_ZHI_QUEUE = "yue_zhi_queue";

    @Bean
    Queue queue() {
        return new Queue(YUE_ZHI_QUEUE);
    }
}
Definition of message consumer:
@Component
public class HelloWorldConsumer {

    @RabbitListener(queues = HelloWorldConfig.YUE_ZHI_QUEUE)
    public void receive(String msg) {
        System.out.println("Consumption message:[" + msg + "]");
    }
}
Message sending:
@SpringBootTest
class ConsumerApplicationTests {

    @Autowired
    RabbitTemplate rabbitTemplate;

    @Test
    void contextLoads() {
        rabbitTemplate.convertAndSend(HelloWorldConfig.YUE_ZHI_QUEUE,"I go away with the breeze and return when the fog clears");
    }

}
The default direct exchange is actually used at this time. The routing strategy of direct exchange is to bind the message Queue to a direct exchange. When a message arrives at direct exchange, it will be forwarded to the Queue with the same routing key as the message, such as the message Queue name "Hello Queue", Then the message with routingkey "Hello Queue" will be received by the message Queue.
3.3.2 Work queues
DirectExchange has two queues, one for the producer and one for the consumer:
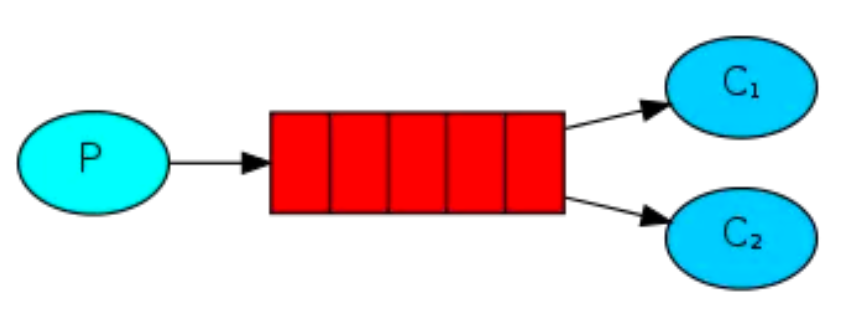
A queue corresponds to multiple consumers. By default, the queue distributes messages evenly, and messages will be distributed to different consumers. Consumers can configure their concurrency ability to improve message consumption ability, or configure manual ack to decide whether to consume a message
The configuration of concurrency capability is as follows:
@Component
public class HelloWorldConsumer {

    @RabbitListener(queues = HelloWorldConfig.YUE_ZHI_QUEUE)
    public void receive(String msg) {
        System.out.println("Consumption message:[" + msg + "]");
    }

    @RabbitListener(queues = HelloWorldConfig.YUE_ZHI_QUEUE, concurrency = "10")
    public void receive2(String msg) {
        System.out.println("Consumption message:[" + msg + "] == Thread Name:[" + Thread.currentThread().getName() + "]");
    }
}
The second consumer is configured with concurrency of 10. At this time, for the second consumer, there will be 10 sub threads to consume messages at the same time.
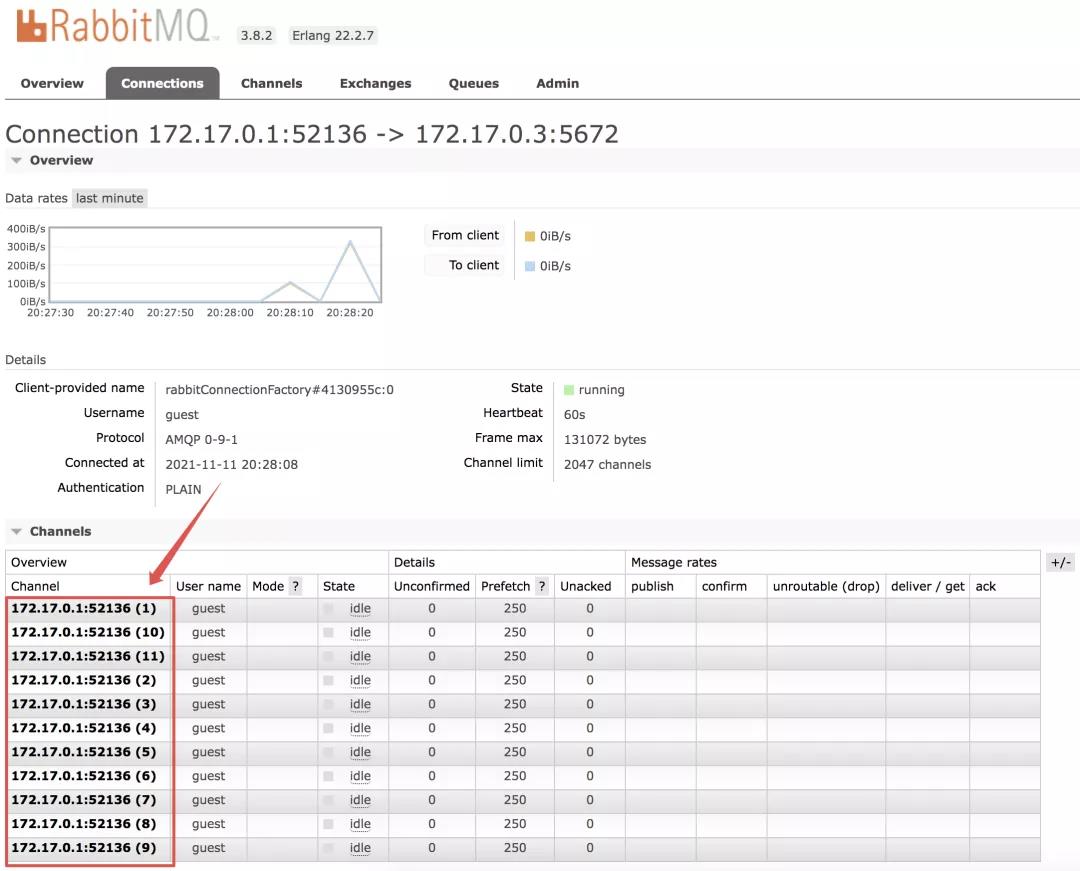
Start the project, and you can also see a total of 11 consumers in the background of RabbitMQ.
At this point, if the producer sends 10 messages, they will be consumed at once
The message sending method is as follows:
@SpringBootTest
class ConsumerApplicationTests {

    @Autowired
    RabbitTemplate rabbitTemplate;

    @Test
    void contextLoads() {
        for (int i = 0; i < 10; i++) {
            rabbitTemplate.convertAndSend(HelloWorldConfig.YUE_ZHI_QUEUE,"I go away with the breeze and return when the fog clears");
        }
    }

}
The message consumption log is as follows:
Consumption message:[I go away with the breeze and return when the fog clears] == Thread Name:[org.springframework.amqp.rabbit.RabbitListenerEndpointContainer#0-8]
Consumption message:[I go away with the breeze and return when the fog clears] == Thread Name:[org.springframework.amqp.rabbit.RabbitListenerEndpointContainer#0-3]
Consumption message:[I go away with the breeze and return when the fog clears] == Thread Name:[org.springframework.amqp.rabbit.RabbitListenerEndpointContainer#0-6]
Consumption message:[I go away with the breeze and return when the fog clears] == Thread Name:[org.springframework.amqp.rabbit.RabbitListenerEndpointContainer#0-1]
Consumption message:[I go away with the breeze and return when the fog clears] == Thread Name:[org.springframework.amqp.rabbit.RabbitListenerEndpointContainer#0-5]
Consumption message:[I go away with the breeze and return when the fog clears] == Thread Name:[org.springframework.amqp.rabbit.RabbitListenerEndpointContainer#0-4]
Consumption message:[I go away with the breeze and return when the fog clears] == Thread Name:[org.springframework.amqp.rabbit.RabbitListenerEndpointContainer#0-7]
Consumption message:[I go with the wind blowing the clouds and return when the fog is dispersed] == Thread Name:[org.springframework.amqp.rabbit.RabbitListenerEndpointContainer#0-2]
Consumption message:[I go away with the breeze and return when the fog clears] == Thread Name:[org.springframework.amqp.rabbit.RabbitListenerEndpointContainer#0-9]
Consumption message:[I go away with the breeze and return when the fog clears] == Thread Name:[org.springframework.amqp.rabbit.RabbitListenerEndpointContainer#0-10]
It can be seen that all messages are consumed by the second consumer. This is because the second consumer has ten threads running together, so the second consumer consumes a larger proportion of messages. You can see the difference by trying several times, and the messages may also be consumed by the first consumer.
Message consumers can also enable manual ACK, so that they can decide to consume messages sent by RabbitMQ. The way to configure manual ack is as follows:
spring.rabbitmq.listener.simple.acknowledge-mode=manual
The consumption code is as follows:
@Component
public class HelloWorldConsumer {

    /**
     * Specify the message queue that this method listens to through the @ RabbitListener annotation. The parameter of this annotation is the name of the message queue
     * @param message news
     */
    @RabbitListener(queues = HelloWorldConfig.YUE_ZHI_QUEUE)
    public void receive(Message<String> message, Channel channel) throws IOException {
        System.out.println("Consumption message:[" + message.getPayload() + "]");
        channel.basicAck(((Long)message.getHeaders().get(AmqpHeaders.DELIVERY_TAG)),true);
    }

    @RabbitListener(queues = HelloWorldConfig.YUE_ZHI_QUEUE, concurrency = "10")
    public void receive2(Message<String> message, Channel channel) throws IOException {
        System.out.println("Concurrent consumption message:[" + message.getPayload() + "] == Thread Name:[" + Thread.currentThread().getName() + "]");
        //The second parameter, true, will be put back in the queue, so you need to judge when to use rejection according to the business logic
        channel.basicReject(((Long) message.getHeaders().get(AmqpHeaders.DELIVERY_TAG)), true);
    }
}
At this time, the second consumer receives the message without consumption and puts it back in the queue until the first consumer consumes all the messages
3.3.3 Publish/Subscribe
Publish subscribe mode:
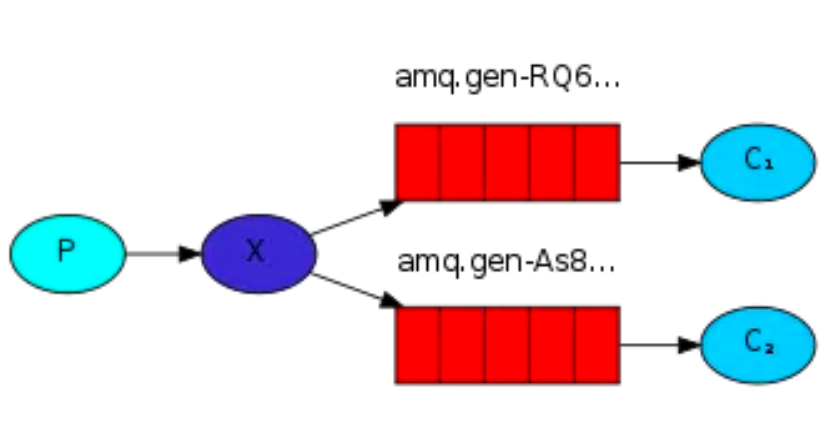
A producer has multiple consumers. Each consumer has its own queue. The producer does not send the message directly to the queue, but to the switch. Each queue is bound to the switch. The message sent by the producer reaches the queue through the switch to achieve the purpose of obtaining a message by multiple consumers. It should be noted that if a message is sent to an Exchange without binding in the queue, the message will be lost. This is because Exchange does not have the ability to store messages in RabbitMQ, and only the queue has the ability to store messages, as shown in the following figure:
In this case, we have four types of switches to hang, namely:
- Direct
- Fanout
- Topic
- Header
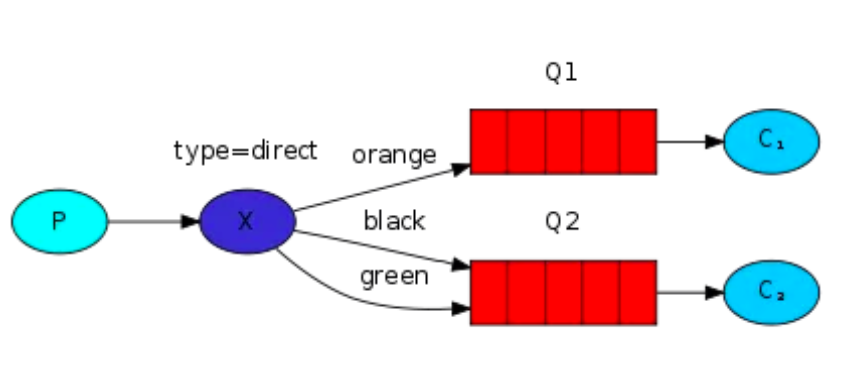
3.3.3.1 Direct
The routing policy of DirectExchange is to bind the message Queue to a DirectExchange. When a message arrives at DirectExchange, it will be forwarded to the Queue with the same routing key as the message. For example, if the message Queue name is "Hello Queue", the message with the routingkey of "Hello Queue" will be received by the message Queue. DirectExchange is configured as follows:
/**
 * Publish subscribe mode
 * Direct Switch configuration
 */
@Configuration
public class RabbitDirectConfig {

    @Bean
    Queue queue() {
        return new Queue(QueueConstant.DIRECT_QUEUE);
    }

    @Bean
    DirectExchange directExchange() {
        return new DirectExchange(QueueConstant.DIRECT_EXCHANGE, true, false);
    }

    @Bean
    Binding binding() {
        return BindingBuilder.bind(queue())
                .to(directExchange()).with("direct");
    }
}
- First, provide a message Queue, and then create a DirectExchange object. The three parameters are name, whether it is still valid after restart, and whether it is deleted if it has not been used for a long time
- Create a Binding object to bind Exchange and Queue together
- The configuration of DirectExchange and Binding beans can be omitted. That is, if DirectExchange is used, only one instance of Queue can be configured.
consumer:
/**
* In publish subscribe mode
* Consumer (Direct switch)
*/
@Component
public class DirectReceiver {
@RabbitListener(queues = QueueConstant.DIRECT_QUEUE)
public void handler(Message<String> message) {
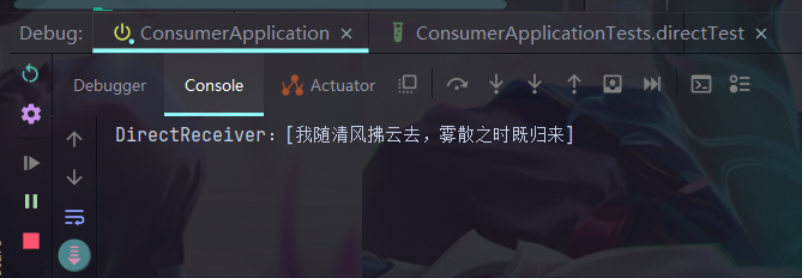
System.out.println("DirectReceiver: [" + message.getPayload() + "]");
}
}
Specify a method as a message consumption method through the @ RabbitListener annotation. The method parameter is the received message, and then inject a RabbitTemplate object into the unit test class to send the message, as follows:
@Test
    void directTest() {
        rabbitTemplate.convertAndSend(QueueConstant.DIRECT_QUEUE,"I go away with the breeze and return when the fog clears");
    }
Execution result:
3.3.3.2 Fanout
The data exchange policy of FanoutExchange is to forward all messages arriving at FanoutExchange to all queues bound to it. In this policy, routingkey will not play any role. The configuration of FanoutExchange is as follows:
/**
 * Publish subscribe mode
 * Fanout Switch configuration
 */
@Configuration
public class RabbitFanoutConfig {

    @Bean
    Queue fanoutOne() {
        return new Queue(QueueConstant.FANOUT_QUEUE_ONE);
    }

    @Bean
    Queue fanoutTwo() {
        return new Queue(QueueConstant.FANOUT_QUEUE_TWO);
    }

    @Bean
    FanoutExchange fanoutExchange() {
        return new FanoutExchange(QueueConstant.FANOUT_EXCHANGE, true , false);
    }

    @Bean
    Binding bindingOne() {
        return BindingBuilder.bind(fanoutOne()).to(fanoutExchange());
    }

    @Bean
    Binding bindingTwo() {
        return BindingBuilder.bind(fanoutTwo()).to(fanoutExchange());
    }
}
Here, first create FanoutExchange, and the meaning of the parameter is consistent with that of the DirectExchange parameter. Then create two queues, bind both queues to FanoutExchange, and then create two consumers, as follows:
/**
* Publish subscribe mode (Fanout switch)
* consumer
*/
@Component
public class FanoutReceiver {
@RabbitListener(queues = QueueConstant.FANOUT_QUEUE_ONE)
public void handlerOne(Message<String> message) {
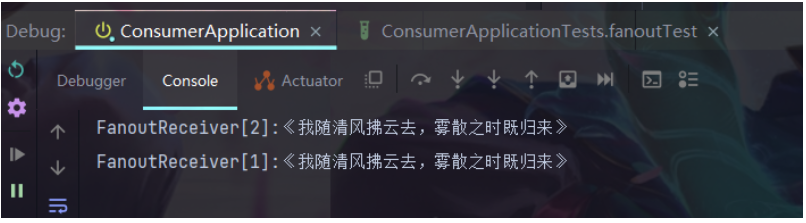
System.out.println("FanoutReceiver[1]:<" + message.getPayload() +">");
}
@RabbitListener(queues = QueueConstant.FANOUT_QUEUE_TWO)
public void handlerTwo(Message<String> message) {
System.out.println("FanoutReceiver[2]:<" + message.getPayload() +">");
}
}
Two consumers consume messages in two message queues respectively, and then send messages in the unit test, as follows:
@Test
    void fanoutTest() {
        rabbitTemplate.convertAndSend(QueueConstant.FANOUT_EXCHANGE, null,"I go away with the breeze and return when the fog clears");
    }
Note that there is no need for a routingkey when sending messages here. You can specify exchange, and the routingkey can directly pass a null.
Execution result:
3.3.3.3 Topic
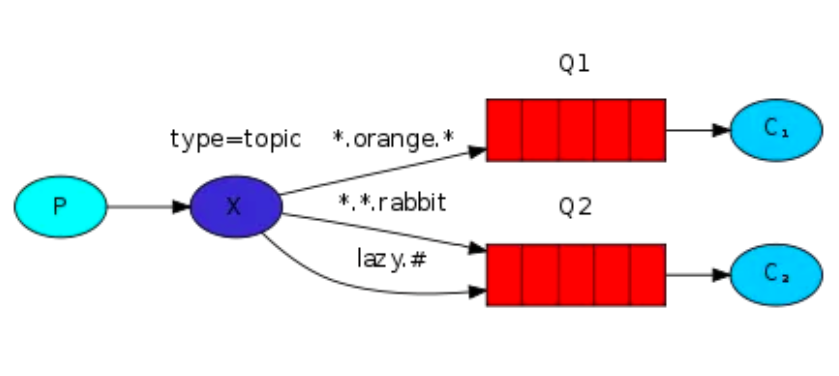
TopicExchange is a complex but flexible routing strategy. In TopicExchange, the Queue is bound to TopicExchange through the routingkey. When the message arrives at TopicExchange, TopicExchange routes the message to one or more queues according to the routingkey of the message. TopicExchange is configured as follows:
/**
 * Publish subscribe mode
 *  Topic Switch configuration
 */
@Configuration
public class RabbitTopicConfig {

    @Bean
    Queue topicOne() {
        return new Queue(QueueConstant.TOPIC_QUEUE_ONE);
    }

    @Bean
    Queue topicTwo() {
        return new Queue(QueueConstant.TOPIC_QUEUE_TWO);
    }

    @Bean
    Queue topicThree() {
        return new Queue(QueueConstant.TOPIC_QUEUE_THREE);
    }

    @Bean
    TopicExchange topicExchange() {
        return new TopicExchange(QueueConstant.TOPIC_EXCHANGE, true, false);
    }

    @Bean
    Binding bindingOne() {
        return BindingBuilder.bind(topicOne()).to(topicExchange()).with("topicOne.#");
    }

    @Bean
    Binding bindingTwo() {
        return BindingBuilder.bind(topicTwo()).to(topicExchange()).with("topicTwo.#");
    }

    @Bean
    Binding bindingThree() {
        return BindingBuilder.bind(topicThree()).to(topicExchange()).with("#.topicThree.#");
    }
}
- First, create TopicExchange with the same parameters as before, and then create three queues. The first Queue is used to store messages related to "topicOne", the second Queue is used to store messages related to "topicTwo", and the third Queue is used to store messages related to "topictree"
- Bind the three queues to TopicExchange respectively. "topicOne. #" in the first Binding indicates that the routingkey of the message starting with "topicOne" will be routed to the Queue named "topic Queue one"; "topicTwo. #" in the second Binding indicates that the routingkey of the message, which starts with "topicTwo", will be routed to the Queue named "topic Queue two"; "#. topicThree. #" in the third Binding indicates that all messages containing "topicThree" in the routingkey of the message will be routed to the Queue named "topic Queue three";
Next, create three consumers for three queues, as follows:
/**
 * Topic subscription mode (publish switch)
 * consumer
 */
@Component
public class TopicReceiver {

    @RabbitListener(queues = QueueConstant.TOPIC_QUEUE_ONE)
    public void handlerOne(Message<String> message) {
        System.out.println("TopicReceiver[1]:<" + message.getPayload() +">");
    }

    @RabbitListener(queues = QueueConstant.TOPIC_QUEUE_TWO)
    public void handlerTwo(Message<String> message) {
        System.out.println("TopicReceiver[2]:<" + message.getPayload() +">");
    }

    @RabbitListener(queues = QueueConstant.TOPIC_QUEUE_THREE)
    public void handlerThree(Message<String> message) {
        System.out.println("TopicReceiver[3]:<" + message.getPayload() +">");
    }
}
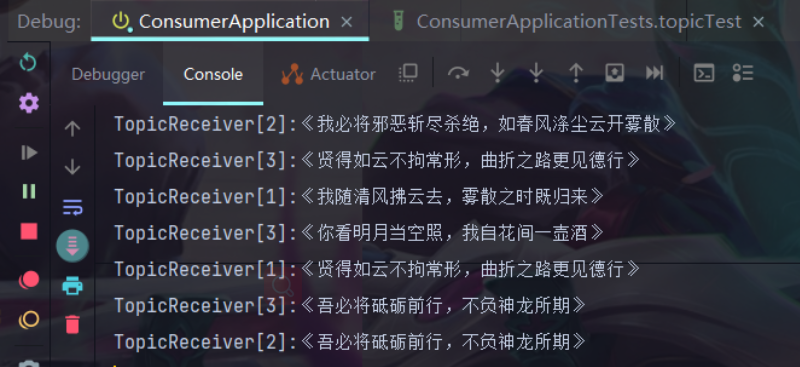
Send the message for unit test as follows:
@Test
    void topicTest() {
        rabbitTemplate.convertAndSend(QueueConstant.TOPIC_EXCHANGE,"topicOne.topicTwo","I go away with the breeze and return when the fog clears");
        rabbitTemplate.convertAndSend(QueueConstant.TOPIC_EXCHANGE,"topicTwo.topicOne","I will wipe out all evil, like the spring breeze washing away the dust clouds and dispersing the fog");
        rabbitTemplate.convertAndSend(QueueConstant.TOPIC_EXCHANGE,"topicOne.topicThree","Virtue is like a cloud, regardless of its normal form, and virtue is more evident in the tortuous road");
        rabbitTemplate.convertAndSend(QueueConstant.TOPIC_EXCHANGE,"topicTwo.topicThree","I will forge ahead and live up to the expectations of the dragon");
        rabbitTemplate.convertAndSend(QueueConstant.TOPIC_EXCHANGE,"topicThree.topicTwo","You see, the moon is shining in the sky. I have a pot of wine in the flower room");
    }
According to the configuration in RabbitTopicConfig, the first message will be routed to the Queue named "topicOne"; The second message will be routed to the Queue of "topicTwo"; The third message will be routed to the Queue named "topicOne" and "topicThree"; The fourth message will be routed to the Queue named "topicTwo" and "topicThree"; The fifth message will be routed to a Queue named "topicThree".
Execution result:
3.3.3.4 Header
HeadersExchange is a less used routing strategy. HeadersExchange routes messages to different queues according to the Header of the message. This strategy is also independent of routingkey. The configuration is as follows:
@Configuration
public class RabbitHeaderConfig {

    @Bean
    Queue headerOne() {
        return new Queue(QueueConstant.HEADER_QUEUE_ONE);
    }

    @Bean
    Queue headerTwo() {
        return new Queue(QueueConstant.HEADER_QUEUE_TWO);
    }

    @Bean
    HeadersExchange headersExchange() {
        return new HeadersExchange(QueueConstant.HEADER_EXCHANGE, true, false);
    }

    @Bean
    Binding bindingHeaderOne() {
        Map<String, Object> map = new HashMap<>();
        map.put("headerOne","sang");
        return BindingBuilder.bind(headerOne()).to(headersExchange()).whereAny(map).match();
    }

    @Bean
    Binding bindingHeaderTwo() {
        return BindingBuilder.bind(headerTwo()).to(headersExchange()).where("headerTwo").exists();
    }
}
Most of the configurations here are the same as the previous ones. The difference is mainly reflected in the Binding configuration. In the first BindingHeaderOne() method, where any means that as long as one Header in the Header of the message matches the key/value in the map, the message will be routed to the Queue named "Header Queue one". Here, you can also use the whereALL() method, Indicates that all headers of the message should match. whereAny and WhereAll actually correspond to an attribute named x-match; The configuration in the bindingHeaderTwo() method means that as long as the Header of the message contains "headerTwo", no matter what the value of headerTwo is, the message will be routed to the Queue named "Header Queue two"
Create two message consumers:
@Component
public class HeaderReceiver {

    @RabbitListener(queues = QueueConstant.HEADER_QUEUE_ONE)
    public void handlerOne(byte[] msg) {
        System.out.println("HeaderReceiver[1]:<" +new String(msg , 0, msg.length) + ">");
    }

    @RabbitListener(queues = QueueConstant.HEADER_QUEUE_TWO)
    public void handlerTwo(byte[] msg) {
        System.out.println("HeaderReceiver[2]:<" +new String(msg , 0, msg.length) + ">");
    }
}
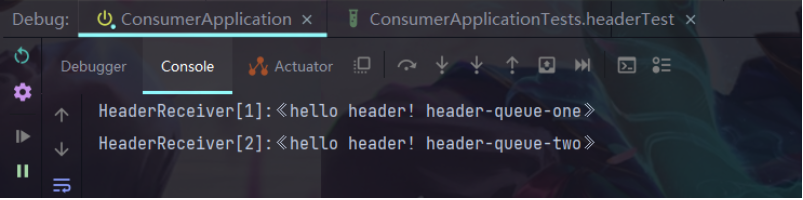
The parameters here are received in byte array, and then the message sending method is created in the unit test. The message sending here is also independent of routingkey, as follows:
@Test
    void headerTest() {
        Message one = MessageBuilder.withBody("hello header! header-queue-one".getBytes()).setHeader("headerOne", "sang").build();
        Message two = MessageBuilder.withBody("hello header! header-queue-two".getBytes()).setHeader("headerTwo", "gg").build();
        rabbitTemplate.send(QueueConstant.HEADER_EXCHANGE,null, one);
        rabbitTemplate.send(QueueConstant.HEADER_EXCHANGE,null, two);
    }
Here, two messages are created. The two messages have different headers. Messages with different headers will be sent to different queues.
Execution result:
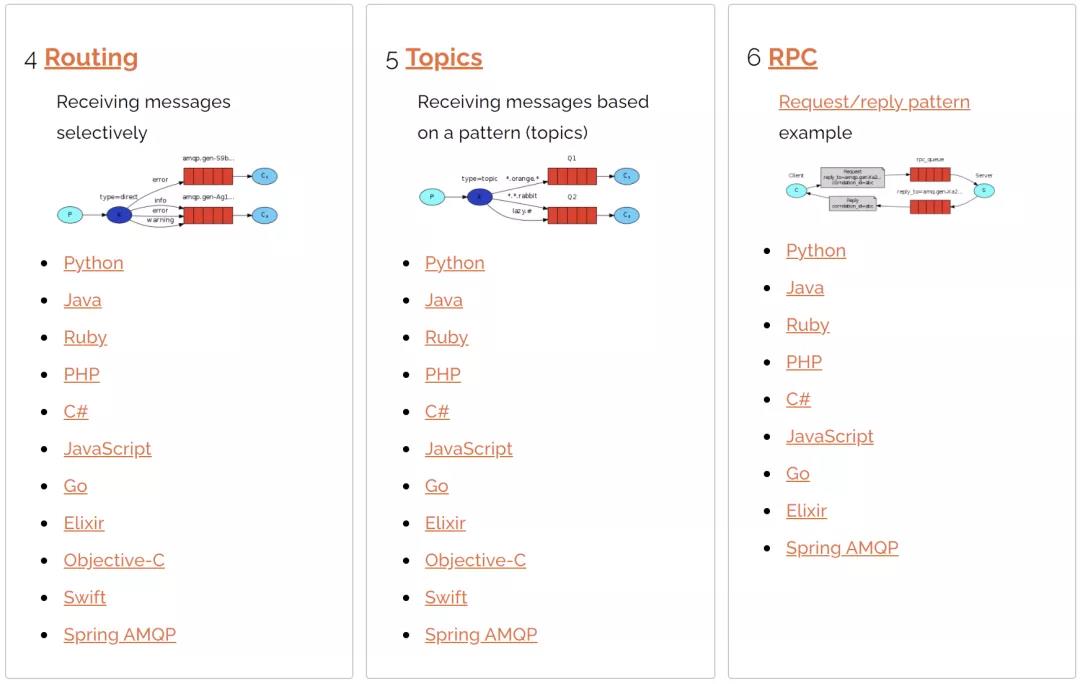
3.3.4 Routing
One producer, one switch, two queues and two consumers. After creating the Exchange, the producer binds the corresponding queue according to the routingkey, and specifies the specific routingkey of the message when sending the message
As shown below:
Route messages according to the routingkey
3.3.5 Topics
One producer, one switch, two queues and two consumers. The producer creates the Exchange of the Topic and binds it to the queue. This binding can use * and # keywords to specify the routingkey content. Pay attention to the format XXX when writing xxx. XXX to write
As shown below:
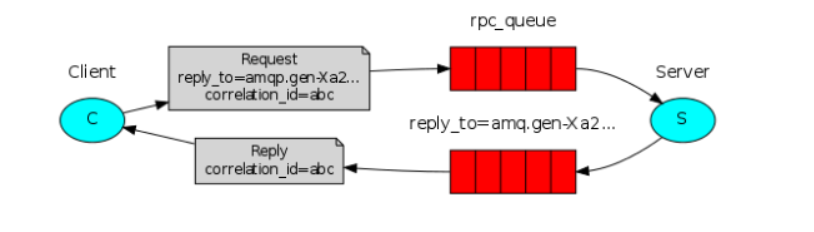
3.3.6 RPC