In this era when inner volume is the king, inner volume culture has penetrated into all aspects of work and life. If you don't soar in the ocean of knowledge, you will drown in the ocean of knowledge. As a new generation of migrant workers, while IQ and diligence have been double crushed by the bosses of workers, in the face of the ever-changing brick moving (programming) skills, the speed of learning has not kept up with the speed of forgetting, but we still have to endure tears, embrace change and constantly fight strange upgrades.
Recently, I sorted out the relevant development experience of previous webpack, and sorted out and summarized an introductory note. Welcome to watch, criticize and correct.

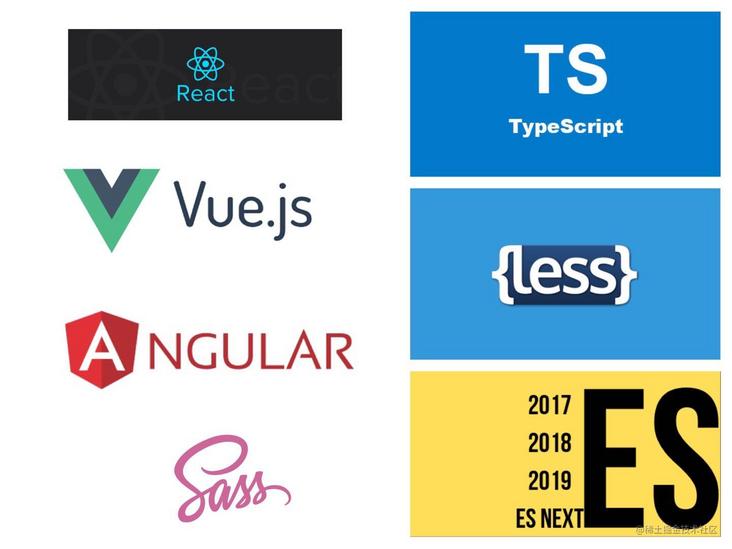
As the web application becomes more and more complex and huge, the front-end technology develops rapidly, each God shows his magic power, and a variety of excellent front-end frameworks, new languages and other related technologies (as shown in the figure below) continue to emerge, which have greatly improved our development efficiency
However, we all know that these technologies have one thing in common, that is, the source code can not run directly on the browser. At this point, we need to convert these codes into browser executable JS, CSS and HTML through construction tools. This has higher requirements for front-end construction tools.
There have also been a series of construction tools in history, some of which are common as follows:
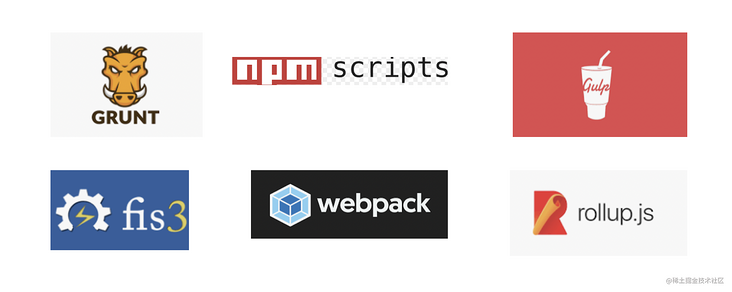
Among them, with its powerful functions, good use experience and huge community support, Webpack stands out among many construction tools and has become the most popular construction tool at present.
Before we get back to business, let's take a brief look at webpack.

Introduction to Webpack
According to the official website, webpack is a static module packaging tool for modern JavaScript applications. When webpack processes an application, it will build a dependency graph internally from one or more entry points, and then combine each module required in your project into one or more bundles, which are static resources for displaying your content.
Some core concepts of Webpack:
- Entry: an entry that indicates which module Webpack should use as a starting point for building its internal dependency graph.
- Output: output the results, telling Webpack where to output the bundle s it created and how to name these files.
- Module: module. In webpack, everything is a module. A module corresponds to a file. Webpack will recursively find out all dependent modules from the configured Entry.
- Chunk: code block. A chunk is composed of multiple modules and is used for code merging and segmentation.
- Loader: module code converter, which enables webpack to process other types of files except JS and JSON, convert them into valid modules for application use, and add them to the dependency graph.
- Plugin: extension. Many events will be broadcast in the life cycle of webpack operation. Plugin can listen to these events and change the output results through the api provided by webpack at the right time. Common are: Packaging Optimization, resource management, and injecting environment variables.
- Mode: mode, which tells webpack to use the built-in optimization of the corresponding mode
- Browser Compatibility: Browser Compatibility. Webpack supports all ES5 compliant browsers (IE8 or above)
Role of Webpack
Webpack has many functions. The following are some simple examples:
<div align=center><img src="https://p1-juejin.byteimg.com/tos-cn-i-k3u1fbpfcp/fca3177d53eb4f98b60612cd544dfe45~tplv-k3u1fbpfcp-watermark.image"/></div>
We can further expand our capabilities through loader and plugin mechanisms and realize personalized functions according to the needs of the project.
*So much has been paved, now return to the theme*
Webpack is a front-end resource loading / packaging tool written by nodejs, which provides powerful file processing and IO capabilities.
Loader and Plugin are pillar capabilities in Webpack. In the whole construction process, loader and Plugin play a decisive role in the compilation results. Here are some commonly used loaders and plugins in Webpack.
Loader
brief introduction
webpack provides a mechanism to deal with multiple file formats, which is Loader. We can regard Loader as a converter, which can convert files of a certain format into modules that Wwebpack supports packaging.
In Webpack, everything is a module. Our common Javascript, CSS, Less, Typescript, Jsx, pictures and other files are modules. The loading of different modules is managed uniformly through the module Loader. When we need to use different loaders to parse different types of files, we can use the module Configure relevant rules under the rules field.
loader features
- Loader is essentially a function. output=loader(input) // input can be the string of the project source file or the result of the conversion of the previous loader;
- The first loader has only one incoming parameter: the content of the resource file;
- The loader supports chain calling. When the webpack is packaged, the resources are handed over to the loader for processing in the order of the array from the back to the front.
- Support synchronous or asynchronous functions.
Code structure
The code structure is usually as follows:
// source: resource input. For the first executed loader, it is the content of the resource file; Subsequent loaders are the execution results of the previous loader
// sourcemap: optional parameter, sourcemap structure of code
// data: optional parameter. Other information that needs to be passed in the Loader chain, such as postml / postml Loader, will pass the AST object of the parameter through this parameter
const loaderUtils = require('loader-utils');

module.exports = function(source, sourceMap?, data?) {
  // Get the options passed in by the user to the current Loader
  const options = loaderUtils.getOptions(this);
  // TODO: here is the logic of converting source
  return source;
};
Common loaders
1. babel-loader
babel loader is based on babel and is used to parse JavaScript files. babel has rich presets and plug-ins. The configuration of babel can be written directly into options or separately into the configuration file.
Babel is a Javscript compiler, which can compile high-level syntax (mainly ECMAScript 2015 +) into low version syntax supported by the browser. It can help you write code with the latest version of Javascript and improve development efficiency.
webpack uses Babel through Babel loader.
Usage:
# Environmental requirements:
webpack 4.x || 5.x | babel-loader 8.x | babel 7.x

# Install dependent packages:
npm install -D babel-loader @babel/core @babel/preset-env webpack
Then, we need to create a Babel configuration file to specify the Compilation Rules.
There are two cores in Babel configuration: plugins and presets.
Babel preset can be regarded as a set of Babel plug-ins, which is composed of a series of plug-ins.
Common presets:
- @Babel / preset env # ES2015 + syntax
- @babel/preset-typescript TypeScript
- @babel/preset-react React
- @babel/preset-flow Flow
Plug in and preset execution order:
- The plug-in executes before the preset
- The plug-in execution order is that the plug-in array is executed from front to back
- The preset execution order is that the preset array is executed from back to front
webpack configuration code:
// webpack.config.js
module: {
  rules: [
    {
      test: /\.m?js$/,
      exclude: /node_modules/,
      use: {
        loader: 'babel-loader',
        options: {
          presets: [
            ['@babel/preset-env', { targets: "defaults" }]
          ],
          plugins: ['@babel/plugin-proposal-class-properties'],
          // Cache the execution results of the loader to the specified directory. The default is node_ modules/. Cache / Babel loader, after the webpack build, will try to read the cache
          cacheDirectory: true,
        }
      }
    }
  ]
}
The above options parameters can also be written to the configuration file separately. Many other tools have similar configuration files: ESLint (.eslintrc), prettier (. Pretierrc).
Generally, we only need to configure presets (preset array) and plugins (plug-in array), and others are not used. The code example is as follows:
// babel.config.js
module.exports = (api) => {
    return {
        presets: [
            '@babel/preset-react',
            [
                '@babel/preset-env', {
                    useBuiltIns: 'usage',
                    corejs: '2',
                    targets: {
                        chrome: '58',
                        ie: '10'
                    }
                }
            ]
        ],
        plugins: [
            '@babel/plugin-transform-react-jsx',
            '@babel/plugin-proposal-class-properties'
        ]
    };
};
Recommended reading:
2. ts-loader
TypeScript loader provided for webpack, package and compile typescript
Installation dependency:
npm install ts-loader --save-dev
npm install typescript --dev
The configuration of webpack is as follows:
// webpack.config.json
module.exports = {
  mode: "development",
  devtool: "inline-source-map",
  entry: "./app.ts",
  output: {
    filename: "bundle.js"
  },
  resolve: {
    // Add `.ts` and `.tsx` as a resolvable extension.
    extensions: [".ts", ".tsx", ".js"]
  },
  module: {
    rules: [
      // all files with a `.ts` or `.tsx` extension will be handled by `ts-loader`
      { test: /\.tsx?$/, loader: "ts-loader" }
    ]
  }
};
You also need the configuration file tsconfig. For the typescript compiler json:
{
  "compilerOptions": {
    // Version of the target language
    "target": "esnext",
    // Template standard for generating code
    "module": "esnext",
    "moduleResolution": "node",
    // Allow the compiler to compile JS and JSX files
    "allowJS": true,
    // It is allowed to report errors in JS files. It is usually used with allowJS
    "checkJs": true,
    "noEmit": true,
    // Generate source map file
    "sourceMap": true,
    // Specify jsx mode
    "jsx": "react"
  },
  // Compile the files or directories that need to be compiled
  "include": [
    "src",
    "test"
  ],
  // Files or folders that the compiler needs to exclude
  "exclude": [
    "node_modules",
    "**/*.spec.ts"
  ]
}
For more configurations, see Official website
3. markdown-loader
markdown compiler and parser
Usage:
Just add the loader to your configuration and set options.
Import markdown file into js code:
// file.js

import md from 'markdown-file.md';

console.log(md);
webpack configuration:
// wenpack.config.js
const marked = require('marked');
const renderer = new marked.Renderer();

module.exports = {
  // ...
  module: {
    rules: [
      {
        test: /\.md$/,
        use: [
            {
                loader: 'html-loader'
            },
            {
                loader: 'markdown-loader',
                options: {
                    pedantic: true,
                    renderer
                }
            }
        ]
      }
    ],
  },
};
4. raw-loader
You can import files as strings
// app.js
import txt from './file.txt';
// webpack.config.js
module.exports = {
  module: {
    rules: [
      {
        test: /\.txt$/,
        use: 'raw-loader'
      }
    ]
  }
}
5. file-loader
Used to process file type resources, such as jpg, png and other pictures. The return value is subject to publicPath
// file.js
import img from './webpack.png';
console.log(img); // After compilation: https://www.tencent.com/webpack_605dc7bf.png
// webpack.config.js
module.exports = {
  module: {
    rules: [
      {
        test: /\.(png|jpe?g|gif)$/i,
        loader: 'file-loader',
        options: {
          name: '[name]_[hash:8].[ext]',
          publicPath: "https://www.tencent.com",
        },
      },
    ],
  },
};
The image path in the css file becomes as follows:
/* index.less */
.tag {
  background-color: red;
  background-image: url(./webpack.png);
}
/* After compilation:*/
background-image: url(https://www.tencent.com/webpack_605dc7bf.png);
6. url-loader:
It is similar to the function of file loader. It also processes images, but URL loader can set a different operation according to the image size. If the image size is greater than the specified size, the image will be packaged as resources, otherwise the image will be converted into base64 string and merged into js file.
module.exports = {
  module: {
    rules: [
      {
        test: /\.(png|jpg|jpeg)$/,
        use: [
          {
            loader: 'url-loader',
            options: {
              name: '[name]_[hash:8].[ext]',
              // The unit here is (b) 10240 = > 10KB
              // Here, if it is less than 10kb, it will be converted to base64 and packaged into js files. If it is greater than 10kb, it will be packaged into the corresponding directory
              limit: 10240,
            }
          }
        ]
      }
    ]
  }
}
7. svg-sprite-loader
The referenced svg files will be stuffed into symbols and merged into a large SVG sprite. When in use, the icon id will be passed in through \ < use > of svg and the icon will be rendered. Finally, put the large svg into the body. If the id of the symbol is not specified, it is your file name.
The loader can be used together with svgo loader. Svgo loader is the optimizer of SVG. It can delete and modify SVG elements, fold contents, move attributes, etc. it will not be described in detail. Those who are interested can move Official introduction.
*Purpose: it can be used to develop a unified icon management library*
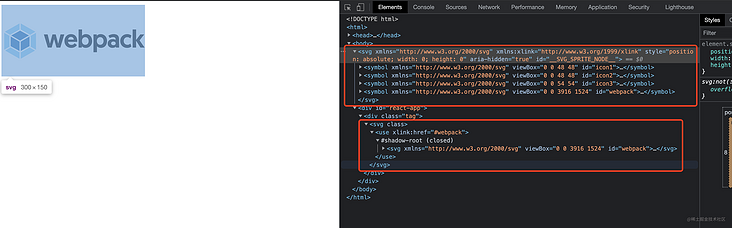
*Example code:*
// Usage in js file
import webpack from './webpack/webpack.svg';
const type = 'webpack';
const svg =  `<svg>
    <use xlink:href="#${type}"/>
  </svg>`;
const dom = `<div class="tag">
  ${svg}
  </div>`;
document.getElementById('react-app').innerHTML = dom;
// webpack.config.js
module.exports = {
  module: {
    rules: [
      {
        test: /\.(png|jpg|jpeg)$/,
        use: [
          {
            test: /\.svg$/,
            use: [
                {
                  loader: 'svg-sprite-loader'
                },
                'svgo-loader'
            ]
          },
        ]
      }
    ]
  }
}
Principle: use the symbol element of svg to wrap each icon in a symbol, and use the symbol through use.
8. style-loader
Insert CSS into DOM by injecting \ < style \ > tags
be careful:
- If you need to extract CSS as a file for some reason (that is, don't store CSS in JS module), you need to use the plug-in Mini CSS extract plugin (which will be introduced in Pugin later);
- For development mode (including webpack dev server), you can use style loader, because it introduces CSS through \ < style > \ < / style > tags, which will load faster;
- Do not use style loader and mini CSS extract plugin for the same CSS module together!
See postcss loader below for code examples
9. css-loader
Only handle various loading syntax of css (@ import and url() functions, etc.), just like js parsing import/require()
See postcss loader below for code examples
10. postcss-loader
PostCSS is a tool that allows you to convert styles using JS plug-ins. These plug-ins can lint your CSS, support CSS Variables and Mixins, compile advanced CSS syntax, inline images, and many other excellent functions that have not been widely supported by browsers.
PostCSS is widely used in the industry. The autoprefixer plug-in for PostCSS is one of the most popular CSS processing tools.
autoprefixer adds a browser prefix, which uses the data above Can I Use.
install
npm install postcss-loader autoprefixer --save-dev
Code example:
// webpack.config.js
const MiniCssExtractPlugin = require('mini-css-extract-plugin');
const isDev = process.NODE_ENV === 'development';
module.exports = {
  module: {
    rules: [
      {
        test: /\.(css|less)$/,
        exclude: /node_modules/,
        use: [
          isDev ? 'style-loader' : MiniCssExtractPlugin.loader,
          {
            loader: 'css-loader',
            options: {
              importLoaders: 1,
            }
          },
          {
            loader: 'postcss-loader'
          },
          {
              loader: 'less-loader',
              options: {
                  lessOptions: {
                      javascriptEnabled: true
                  }
              }
          }
        ]
      }
    ]
  }
}
Then create postcss. Net in the project root directory config. JS, and set which browsers are supported. Only when you set the supported browsers can you automatically add compatible browsers
module.exports = {
  plugins: [
    require('precss'),
    require('autoprefixer')({
      'browsers': [
        'defaults',
        'not ie < 11',
        'last 2 versions',
        '> 1%',
        'iOS 7',
        'last 3 iOS versions'
      ]
    })
  ]
}
So far, PostCSS has more than 200 plug-ins. You can Plug in list or search for directory Find them
To learn more, move on link
11. less-loader
Parse less and convert to css
See postcss loader above for a code example
To learn more, move on link
Plugin
Plugin introduction
Webpack is like a production line. It needs a series of processing processes before it can convert the source file into the output result. The responsibility of each processing process in this production line is single. There are dependencies between multiple processes. Only after the current processing is completed can it be handed over to the next process. A plug-in is like a function inserted into the production line. It processes the resources on the production line at a specific time.
Webpack organizes this complex production line through Tapable. Webpack will broadcast events during operation. The plug-in only needs to listen to the events it cares about, and then it can join the production line to change the operation of the production line. The event flow mechanism of webpack ensures the order of plug-ins and makes the whole system extensible.
——"Webpack in simple terms"
Common Plugin
1. copy-webpack-plugin
Copy an existing single file or entire directory to the build directory.
const CopyPlugin = require("copy-webpack-plugin");

module.exports = {
  plugins: [
    new CopyPlugin({
      patterns: [
        {
          from: './template/page.html',
          to: `${__dirname}/output/cp/page.html`
        },
      ],
    }),
  ],
};
2. html-webpack-plugin
The basic function is to generate html files
- Single page applications can generate one html entry, and multi page applications can configure multiple html webpack plugin instances to generate multiple page entries
- Introduce external resources such as script and link for html, and insert the css file extracted from the relevant entry chunk configured by the entry and the mini css extract plugin into the html file generated based on the template file set by the plug-in. The specific way is to insert link into the head and script into the head or body.
const HtmlWebpackPlugin = require('html-webpack-plugin');

module.exports = {
  entry: {
    news: [path.resolve(__dirname, '../src/news/index.js')],
    video: path.resolve(__dirname, '../src/video/index.js'),
  },
  plugins: [
    new HtmlWebpackPlugin({
      title: 'news page',
      // The generated file name is relative to webpackconfig output. Path path
      filename: 'pages/news.html',
      // Generate file template for filename
      template: path.resolve(__dirname, '../template/news/index.html'),
      chunks: ['news']

    }),
    new HtmlWebpackPlugin({
      title: 'video page',
      // Generated file name
      filename: 'pages/video.html',
      // Generate file template for filename
      template: path.resolve(__dirname, '../template/video/index.html'),
      chunks: ['video']
    }),
  ]
};
3. clean-webpack-plugin
By default, this plug-in will delete the output of webpack All files in path and all unused resources after each successful rebuild.
This plug-in is frequently used in the production environment, because the production environment often generates many bundle files through hash. If it is not cleaned, it will generate new files every time, resulting in a very large folder.
const { CleanWebpackPlugin } = require('clean-webpack-plugin');
module.exports = {
    plugins: [
        new CleanWebpackPlugin(),
    ]
};
4. mini-css-extract-plugin
This plug-in will extract CSS into a separate file and create a CSS file for each JS file containing CSS.
// It is recommended to use mini CSS extract plugin with CSS loader
// Add the loader and plugin to the webpack configuration file
const MiniCssExtractPlugin = require('mini-css-extract-plugin');

module.exports = {
  plugins: [new MiniCssExtractPlugin()],
  module: {
    rules: [
      {
        test: /\.css$/i,
        use: [MiniCssExtractPlugin.loader, 'css-loader'],

      }
    ],
  },
};
You can learn about the plug-in in combination with the introduction of style loader above.
5. webpack.HotModuleReplacementPlugin
The module hot replacement plug-in is also called HMR.
This function will replace, add or delete modules during the operation of the application without reloading the whole page. Mainly through the following ways to significantly accelerate the development speed:
- Retain the application state lost during a full reload of the page.
- Only update changes to save valuable development time.
- When CSS/JS is modified in the source code, it will be updated in the browser immediately, which is almost equivalent to changing the style directly in the browser devtools.
There are two startup modes:
- Introduce the plug-in webpack Hotmodulereplacementplugin and set devserver hot: true
- Add -- hot parameter to the command line
package.json configuration:
{
  "scripts": {
    "start": "NODE_ENV=development webpack serve --progress --mode=development --config=scripts/dev.config.js --hot"
  }
}
The configuration of webpack is as follows:
// scripts/dev.config.js file
const webpack = require('webpack');
const path = require('path');
const outputPath = path.resolve(__dirname, './output/public');

module.exports = {
  mode: 'development',
  entry: {
    preview: [
      './node_modules/webpack-dev-server/client/index.js?path=http://localhost:9000',
      path.resolve(__dirname, '../src/preview/index.js')
    ],
  },
  output: {
    filename: 'static/js/[name]/index.js',
    // The file name of the dynamically generated chunk at the time of output
    chunkFilename: 'static/js/[name]/chunk_[chunkhash].js',
    path: outputPath
  },
  plugins: [
    // In most cases, no configuration is required
    new webpack.HotModuleReplacementPlugin(),
  ],
  devServer: {
        // Configure only when you need to provide a static file
        contentBase: outputPath,
        // publicPath: '', / / the default value is' / '
        compress: true,
        port: 9000,
        watchContentBase: true,
        hot: true,
        // Open the browser after the server starts
        open: true,
        // Specifies the page to browse when you open the browser
        openPage: ['pages/preview.html'],
        // Write the generated file to the hard disk. The write position is output Path configuration directory
        writeToDisk: true,
    }
}
Note: HMR must not be used in production environment.
6. webpack.DefinePlugin
Create a global constant that can be configured at compile time. This can be useful for building development and production patterns that allow different behaviors.
Because the plug-in performs text substitution directly, the given value must contain the actual quotation marks within the string itself.
Usually, there are two ways to achieve this effect, using 'production', or using JSON stringify('production')
// webpack.config.js
const isProd = process.env.NODE_ENV === 'production';
module.exports = {
  plugins: [
    new webpack.DefinePlugin({
      PAGE_URL: JSON.stringify(isProd
        ? 'https://www.tencent.com/page'
        : 'http://testsite.tencent.com/page'
      )
    }),
  ]
}

// Use the code directly
console.log(PAGE_URL);
7. webpack-bundle-analyzer
You can see the size of each module of the project, which can be optimized as needed A webpack bundle file analysis tool displays bundle files in the form of interactively scalable treemap.
const BundleAnalyzerPlugin = require('webpack-bundle-analyzer').BundleAnalyzerPlugin;

module.exports = {
  plugins: [
    new BundleAnalyzerPlugin()
  ]
}
Start service:
- Production environment view: NODE_ENV=production npm run build
- Development environment view: NODE_ENV=development npm run start
Final effect:
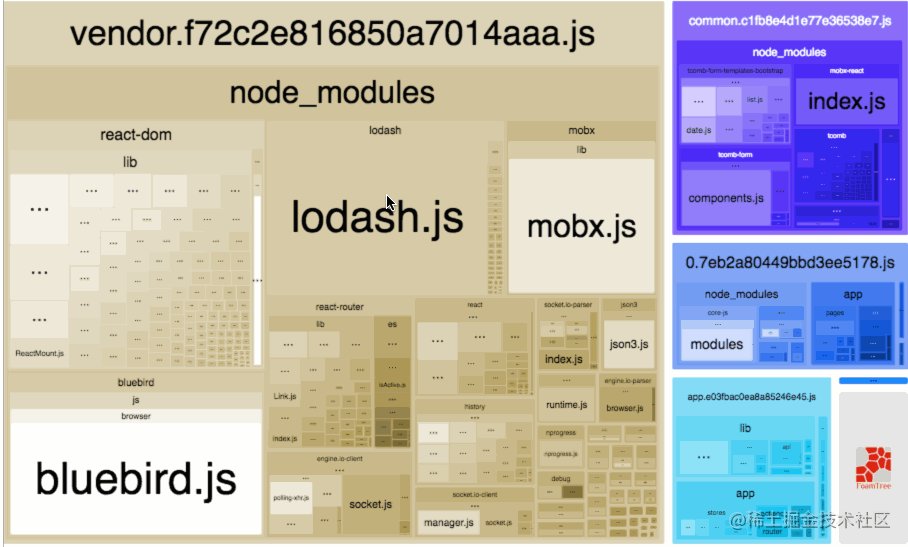
To learn more, move on link
8. SplitChunksPlugin
Code segmentation.
const BundleAnalyzerPlugin = require('webpack-bundle-analyzer').BundleAnalyzerPlugin;

module.exports = {
  optimization: {
    splitChunks: {
      // Separator
      // automaticNameDelimiter: '~',
      // all, async, and initial
      chunks: 'all',
      // It can inherit / override all the parameter values in splitChunks above. In addition, it also provides three additional configurations: test, priority and reuseExistingChunk
      cacheGroups: {
        vendors: {
          // It means to filter modules. It defaults to all modules. It can match the module path or chunk name. When the chunk name is matched, all modules in it will be selected
          test: /[\\/]node_modules\/antd\//,
          // Priority: indicates the extraction weight. The larger the number, the higher the priority. Because a module may satisfy the conditions of multiple cacheGroups, then has the final say which is the highest weight.
          // priority: 3,
          // reuseExistingChunk: indicates whether to use the existing chunk. If true, it means that if the module contained in the current chunk has been extracted, the new chunk will not be regenerated.
          reuseExistingChunk: true,
          name: 'antd'
        }
      }
    }
  },
}