Explain the data interaction between the front and back of Ajax springboot in detail
1. Ajax overview
The full English name of Ajax is "Asynchronous JavaScript and XML", namely "Asynchronous JavaScript and XML". Its core is to send data requests to the server in an asynchronous way through the XMLHttpRequest object of JavaScript, and receive the data returned by the request through the object, so as to realize the data interaction between the client and the server.
Advantages: Ajax can refresh the specified page area (local refresh), rather than the whole page, so as to reduce the interactive transmission of data between the client and the server, improve the page speed and make the user experience better.
Initial experience: dynamic binding event submission based on jQuery
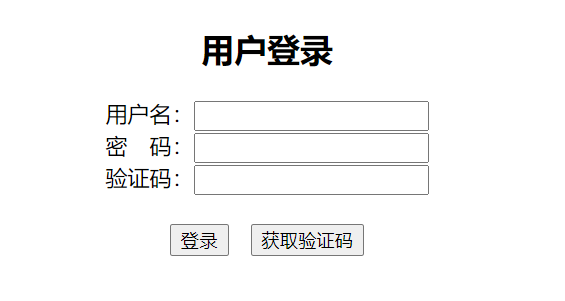
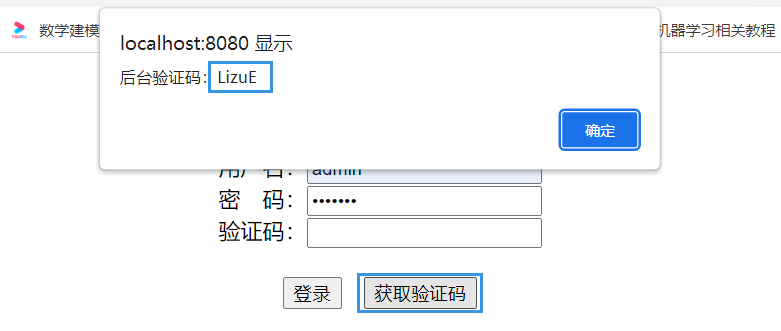
Bind the click event to the [get verification code] button. When the user clicks the button, send AJAX request to the background server to obtain a random verification code. The whole login page will not be reloaded, but only the local page will be refreshed.
<!DOCTYPE html>
<html lang="en">
<head>
<meta charset="UTF-8">
<title>Asynchronous request</title>
<script type="text/javascript" src="/static/js/jquery-2.0.0.min.js"></script>
<script type="text/javascript">
$(function () {
var btn = $("#flush");
btn.click(function () {
$.ajax({
url: '/getCode',
type:'get',
data:'id=1', //character string
dataType:'text',
success:function (data) {
console.log(data);
alert("Background verification code:" + data);
}
})
})
})
</script>
</head>
<body>
<div style="text-align: center;">
<h2>User login</h2>
<form>
user name:<input type="text" name="username"><br>
dense Code:<input type="password" name="password"><br>
Verification Code:<input type="text" name="code"><br><br>
<input type="button" value="Sign in"> <input type="button" id="flush" value="Get verification code">
</form>
</div>
</body>
</html>
When the background of SpringBoot receives an AJAX request, first obtain the parameter id=1 carried by the request (this parameter has no practical significance and is only used for demonstration), and then respond to the result according to the request business. The success callback function displays the response results.
import javax.servlet.http.HttpServletRequest;
import java.util.Random;

@Controller
public class TestController {

    @GetMapping("/ajax")
    public String index(){
        return "form";
    }

    //How spring boot receives ajax requests
    //Method 1: use HttpServletRequest request to receive request parameters
    @GetMapping("/getCode")
    @ResponseBody
    public String getCode(HttpServletRequest request){
        String id = request.getParameter("id");
        System.out.println("AJAX Parameters passed:" + id);
        //Obtain 5-digit verification code
        return randomCodes();
    }

    //Method 2: map a single value with @ Param
    @GetMapping("/getCode1")
    @ResponseBody
    public String getCode1(@Param("id") Integer id){
        System.out.println(id);
        //Obtain 5-digit verification code
        return randomCodes();
    }

    public String randomCodes(){
        String str="ABCDEFGHIJKLMNOPQRSTUVWXYZabcdefghijklmnopqrstuvwxyz0123456789";
        StringBuilder code=new StringBuilder(5);
        for(int i=0;i<5;i++)
        {
            char ch=str.charAt(new Random().nextInt(str.length()));
            code.append(ch);
        }
        return code.toString();
    }
}
The above describes two ways for SpringBoot to receive request parameters:
- public String getCode(HttpServletRequest request): use HttpServletRequest request to receive request parameters;
- public String getCode1(@Param("id") Integer id): use @ Param to map a single value;
A typical application of Ajax asynchronous request is to refresh the verification code locally when the user enters the form without affecting the information entered by other form items.
Comparison between traditional WEB data interaction and AJAX data interaction:
- The client requests in different ways: the traditional WEB uses the browser to send synchronous data requests (form, a link), and AJAX is an asynchronous engine object to send asynchronous requests;
- The server responds in different ways: each time the traditional WEB responds to a complete HTML page, that is, the view, AJAX is a local refresh and returns the JSON data required for the response;
- The client processing methods are different: the traditional WEB needs to wait for the server to complete the response and reload the whole page before the user can carry out subsequent operations. AJAX dynamically updates the local content in the page without affecting the user's other operations;
2. AJAX syntax based on JQuery
Common attribute parameters of $. ajax({attribute}):
| parameter | describe |
|---|---|
| url | Request the address of the back-end server |
| type | The request method is get by default |
| data | Request parameters |
| dataType | The data type returned by the server, such as text/json/xml |
| success | Callback function for successful request |
| error | Callback function for request failure |
| complete | Callback function for request completion (it will be called whether it succeeds or fails) |
Usage example (the data interaction type between server and client is JSON):
$.ajax({
	url:'/search',
	type:'post',
	data:{
		'id':$("#sid").val(),
		'username':$("#uname").val(),
		'password':$("#pwd").val()
	},
	dataType:'json',
	success:function (data) {
		console.log(data);
		$("#sid").val(data.id);
		$("#uname").val(data.name);
		$("#score").val(data.score);
	}
})
JSON(JavaScript Object Notation), a lightweight data interaction format, completes the conversion between js and object data of back-end development languages such as Java/Python/PHP. When transferring object data between client and server, JSON format is required.
Case: use AJAX to verify the information entered by the user, and write a query system for the scores of the 2022 postgraduate entrance examination;

1. Create a blank SpringBoot project and create it in POM XML import related dependencies;
<dependency>
    <groupId>org.springframework.boot</groupId>
    <artifactId>spring-boot-starter-thymeleaf</artifactId>
</dependency>
<dependency>
    <groupId>org.springframework.boot</groupId>
    <artifactId>spring-boot-starter-web</artifactId>
</dependency>
<dependency>
    <groupId>com.baomidou</groupId>
    <artifactId>mybatis-plus-boot-starter</artifactId>
    <version>3.4.2</version>
</dependency>

<dependency>
    <groupId>mysql</groupId>
    <artifactId>mysql-connector-java</artifactId>
    <version>5.1.46</version>
</dependency>
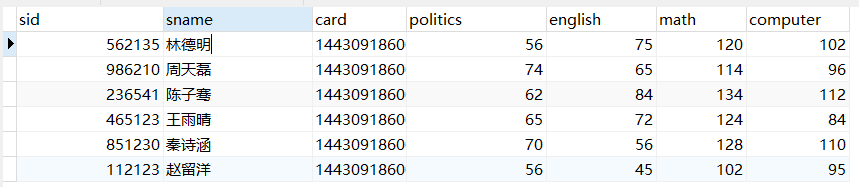
2. Create a stu_score in MySQL database and enter several test data;
3. In the global configuration file resources / application Configure data source information, view parser, port number and other related configurations in YML;
spring:
  thymeleaf:
    prefix: classpath:/templates/
    suffix: .html
    mode: HTML5
    encoding: UTF-8
  datasource:
    url: jdbc:mysql://localhost:3306/user?useUnicode=true&characterEncoding=UTF-8
    username: root
    password: 123456
    driver-class-name: com.mysql.jdbc.Driver
  mvc:
    static-path-pattern: /static/**
server:
  port: 8181
# Configure SQL log
mybatis-plus:
  configuration:
    log-impl: org.apache.ibatis.logging.stdout.StdOutImpl
4. Create the entity class Student corresponding to the data table;
package com.trainingl.entity;

import com.baomidou.mybatisplus.annotation.TableName;
import lombok.AllArgsConstructor;
import lombok.Data;
import lombok.NoArgsConstructor;

@Data
@NoArgsConstructor
@AllArgsConstructor
@TableName(value = "stu_score")
public class Student {
    @TableId(type = IdType.ASSIGN_ID)
    private Long sid;
    private String sname;
    private String card;
    private Integer politics;
    private Integer english;
    private Integer math;
    private Integer computer;
}
5. Create the interface StudentMapper under the path com > trainingl > mapper;
package com.trainingl.mapper;

import com.baomidou.mybatisplus.core.mapper.BaseMapper;
import com.trainingl.entity.Student;
import org.springframework.stereotype.Repository;

@Repository
public interface StudentMapper extends BaseMapper<Student> {
    //All CRUD operations have been written
}
Note: due to the small scale of the system, the Service layer is omitted here.
6. Create a SearchController controller, which is mainly responsible for receiving AJAX requests and responses from the client browser.
package com.trainingl.controller;

import com.baomidou.mybatisplus.core.conditions.query.QueryWrapper;
import com.trainingl.entity.Student;
import com.trainingl.mapper.StudentMapper;
import org.apache.ibatis.annotations.Param;
import org.springframework.beans.factory.annotation.Autowired;
import org.springframework.stereotype.Controller;
import org.springframework.web.bind.annotation.*;
import org.springframework.web.servlet.ModelAndView;

import javax.servlet.http.HttpServletRequest;
import java.util.HashMap;
import java.util.Map;

@Controller
@RequestMapping("/suda")
public class SearchController {
    @Autowired
    private StudentMapper studentMapper;

    @GetMapping("/search")
    public String home(){
        return "login";
    }

    @PostMapping("/login")
    @ResponseBody
    public Map<String,String> login(HttpServletRequest request){
        String id = request.getParameter("id");
        String username = request.getParameter("username");
        String card = request.getParameter("password");
        //Query judgment
        QueryWrapper<Student> wrapper = new QueryWrapper<>();
        wrapper
                .eq("sid",id)
                .eq("sname", username)
                .eq("card", card);
        Integer count = studentMapper.selectCount(wrapper);
        //Return value
        HashMap<String, String> map = new HashMap<>();
        if (count == 1){
            //Login verification is successful. Query the examinee's score through id (id is unique)
            map.put("result", id);
            map.put("code","100");
        }else {
            map.put("result","Login failed! Incorrect input information!");
            map.put("code","200");
        }
        return map;
    }

    @GetMapping("/searchById/{id}")
    public ModelAndView searchById(@PathVariable Long id){
        ModelAndView modelAndView = new ModelAndView();
        modelAndView.setViewName("person");
        Student student = studentMapper.selectById(id);
        System.out.println(student);
        Integer total = student.getPolitics() + student.getEnglish() + student.getMath() + student.getComputer();
        modelAndView.addObject("student", student);
        modelAndView.addObject("totalScore", total);
        return modelAndView;
    }
}
7. View layer (system login page, score query page)
7.1 system login page (the format of data interaction between client and server is JSON, and the request method is AJAX, not through form form)
<!DOCTYPE html>
<html lang="en">
<head>
    <meta charset="UTF-8">
    <title>System login</title>
    <script type="text/javascript" src="/static/js/jquery-2.0.0.min.js"></script>
    <script type="text/javascript">
        $(function () {
            var btn = $("#btn");
            // Click event
            btn.click(function () {
                $.ajax({
                    url:'/suda/login',
                    type:'post',
                    data:{
                        'id':$("#sid").val(),
                        'username':$("#uname").val(),
                        'password':$("#pwd").val()
                    },
                    dataType:'json',
                    success:function (data) {
                        if(data.code == "100"){
                            //If the login is successful, skip to the score query page
                            window.location.href = "/suda/searchById/" + data.result;
                        }else{
                            //If the login fails, a prompt message will be given
                            var msg = $("#btn");
                            msg.after("<br><br><span style='color:red;'>Tips:"+data.result+"</span>")
                        }
                    }
                })
            })
        })
    </script>
</head>
<body>
    <div style="text-align:center;">
        <img src="/static/img/brand.png" style="width: 280px;height: 100px;"/>
        <h3>2022 Postgraduate entrance examination score query system</h3>
        <img src="/static/img/logo.jpeg" style="width: 500px;height: 300px;"/>
        <!--It doesn't pass here form Form submission client request-->
        <form>
            Admission No.:<input type="text" name="id" id="sid"><br>
            Candidate name:<input type="text" name="username" id="uname"><br>
            ID number:<input type="text" name="password" id="pwd"><br/>
            <br/>
            <input type="button" value="query" id="btn">
        </form>
    </div>
</body>
</html>

Note: if the verification of the entered information fails, a prompt will be given in red font. If the verification of the information is successful, it will jump to the detailed interface of the preliminary examination results.
7.2 score details page (render data through thymeleaf template)

<!DOCTYPE html>
<html lang="en" xmlns:th="http://www.w3.org/1999/xhtml">
<html xmlns:th="http://www.thymeleaf.org"></html>
<head>
    <meta charset="UTF-8">
    <title>Query of initial examination results of Postgraduates</title>
</head>
<body>
    <div style="text-align: center;">
        <div style="border: 1px solid;">
            <h3>2022 Inquiry of initial score of postgraduate examination in</h3>
            <br>
            Admission No.:<span th:text="${student.sid}"></span><br>
            full name:<span th:text="${student.sname}"></span><br>
            ID number:<span th:text="${student.card}"></span><br>
            <hr/>
            Ideological and Political Theory:<span th:text="${student.politics}"></span><br>
            English(one): <span th:text="${student.english}"></span><br>
            mathematics(one): <span th:text="${student.math}"></span><br>
            Fundamentals of Computer Science(408): <span th:text="${student.computer}"></span><br>
            Total score:<span th:text="${totalScore}"></span><br>
        </div>
        <p>Note: if the query result is negative,It indicates absence from the exam, violation of discipline, etc. If you still have questions about the query results,Please consult the corresponding enrollment unit.
        </p>
    </div>
</body>
</html>
Summary: this project is used to demonstrate the data interaction between AJAX and the front and back of SpringBoot project. It introduces the transmission mode of asynchronous request front and back data in the development of SpringBoot project in the way of case + project driven.