Official Chinese documents
Zabbix user manual
catalogue
- Solve the problem of no network after centos7 installation
- Install MySQL
- Installing zabbix
- p3 common monitoring commands
- Custom monitor
- Custom trigger
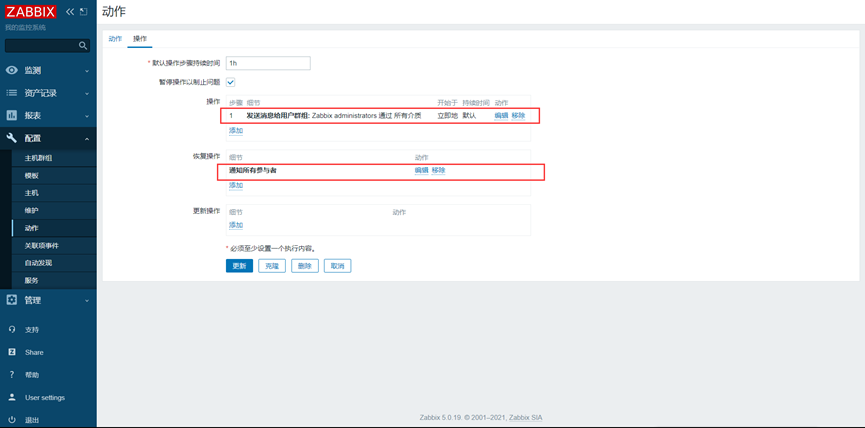
- Mail alarm
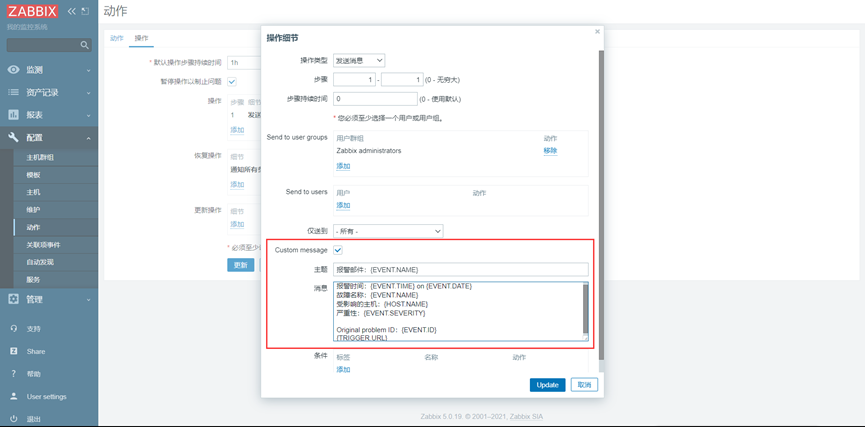
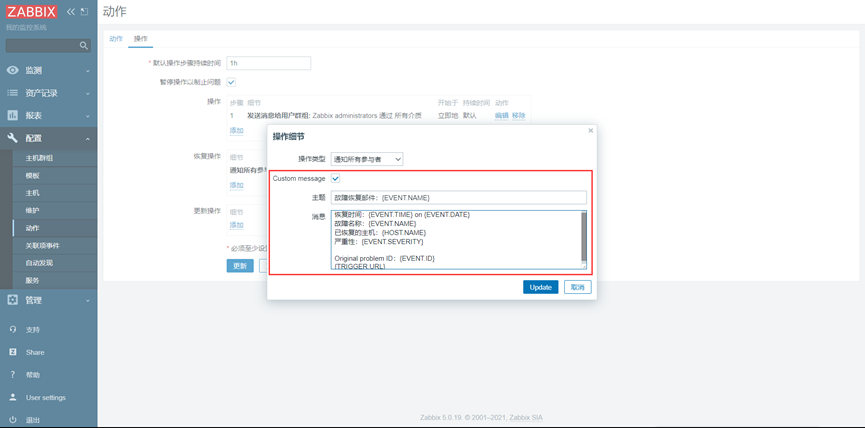
- Modify email content
- Vx alarm
- Secondary development
Customize menu
Modify footer
Replace logo - Monitor network traffic
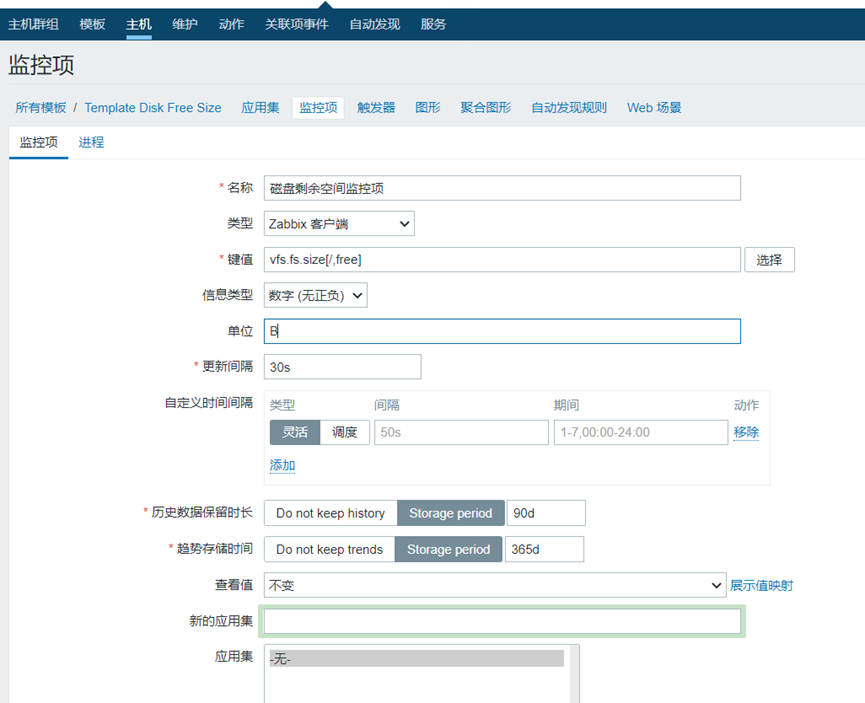
- Monitoring disk
- Monitor CPU temperature
Solve the problem of no network after centos7 installation
cd /etc/sysconfig/network-scripts
vi ifcfg-ens33 (not necessarily 33)
Change ONBOOT=no to yes
systemctl restart network
Install MySQL
wget https://mirror.tuna.tsinghua.edu.cn/mysql/downloads/MySQL-5.7/mysql-5.7.35-1.el7.x86_64.rpm-bundle.tar --no-check-certificate
rpm -qa | grep mysql
Delete mariadb
rpm -qa | grep mariadb
rpm -e --nodeps mariadb
Create the extraction directory and extract it
mkdir mysql
tar xvf mysql-5.7.35-1.el7.x86_64.rpm-bundle.tar -C ./mysql
Decompress in sequence
rpm -ivh   community-common
rpm -ivh   community-libs
rpm -ivh   community-client
rpm -ivh   communityrp-server
(install and unzip mysql-community-libs-compat-5.7.37-1.el7.x86_64 to prevent bug s)
wget https://mirror.tuna.tsinghua.edu.cn/mysql/downloads/MySQL-5.7/mysql-community-libs-compat-5.7.37-1.el7.x86_64.rpm --no-check-certificate
rpm -ivh mysql-community-libs-compat-5.7.37-1.el7.x86_64.rpm
Start MySQL
systemctl start mysqld
View automatically generated passwords
cat /var/log/mysqld.log | grep password
Modify the configuration to change the password
vim /etc/my.cnf stay[mysql]Add next validate_password=off
Restart MySQL
systemctl restart mysqld
Sign in
mysql -uroot -p
xxx
exit
Change Password
After logging in mysql
alter user 'root'@'localhost' identified by 'root';
Installing zabbix
1. System environment preparation
a. Turn off the firewall:
systemctl stop firewalld && systemctl disable firewalld
b. Close selinux
setenforce 0
vim /etc/selinux/config take enforcing Change to disabled
c. Restart
reboot
2. Install and configure zabbix
a. Install zabbix rpm source
rpm -Uvh https://mirrors.aliyun.com/zabbix/zabbix/4.0/rhel/7/x86_64/zabbix-release-4.0-2.el7.noarch.rpm
yum clean all && yum makecache fast
b. Install zabbix server-side components and zabbix server and agent
yum install zabbix-server-mysql zabbix-agent -y
c. Installing the zabbix front end assembly
yum install centos-release-scl -y
d. Edit configuration file VI / etc / yum.com repos. d/zabbix. repo
Change enable under {ZABBIX fronted} to 1 (enabled)
e. Install zabbix front-end page, initial database, php and httpd components
yum install zabbix-server-mysql zabbix-web-mysql zabbix-agent
3. Install and configure MySQL
...
mysql> create database zabbix character set utf8 collate utf8_bin;
mysql> create user zabbix@localhost identified by 'root';
mysql> grant all privileges on zabbix.* to zabbix@localhost;
mysql> quit;
Import zabbix database. The user of zabbix database is zabbix and the password is password
zcat /usr/share/doc/zabbix-server-mysql*/create.sql.gz | mysql -uzabbix -p zabbix
4. zabbix configuration initialization
a. Modify zabbix server configuration file VI / etc / ZABBIX / ZABBIX_ server. Database password in conf
DBPassword=root
b. Configure time zone information
vi  /etc/httpd/conf.d/zabbix.conf
php_value date.timezone Asia/Shanghai
c. Configure font to avoid Chinese garbled code of foreground monitoring graphics
yum -y install wqy-microhei-fonts
cp /usr/share/fonts/wqy-microhei/wqy-microhei.ttc /usr/share/fonts/dejavu/DejaVuSans.ttf
d. Start the zabbix service and set the startup self startup
systemctl restart zabbix-server zabbix-agent httpd
systemctl enable zabbix-server zabbix-agent httpd
Visit localhost/zabbix
5. Optimize configuration
//TODO
p3 common monitoring commands
free -m Monitor memory usage
df -h Monitoring hard disk
top
htop
uptime
iftop
iostat,
iotop
vmstat
netstat -antp|grep 80
nethogs
pkill -kill -t pts/2 Exit user
Custom monitor
1. Command line, manual value
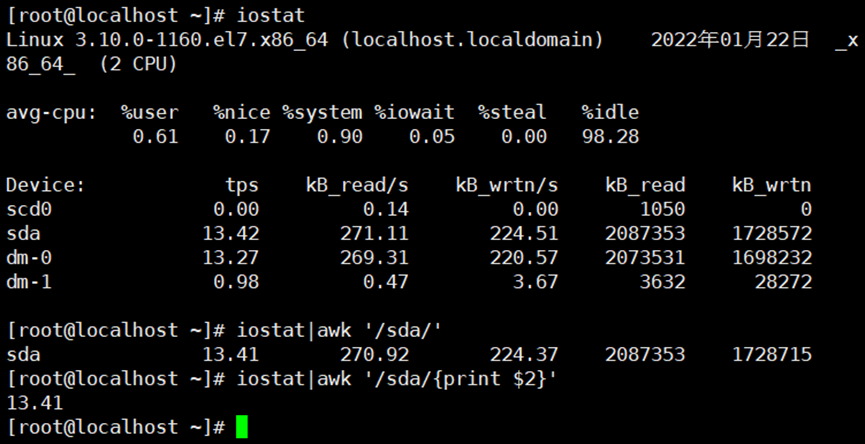
iostat|awk '/sda/{print $2}'
2. Modify ZABBIX agent configuration file


Vim /etc/zabbix/zabbix_agentd.conf
Systemctl restart zabbix-agent.service
3. ZABBIX server test monitoring item value

4. Add custom monitoring items in the web interface
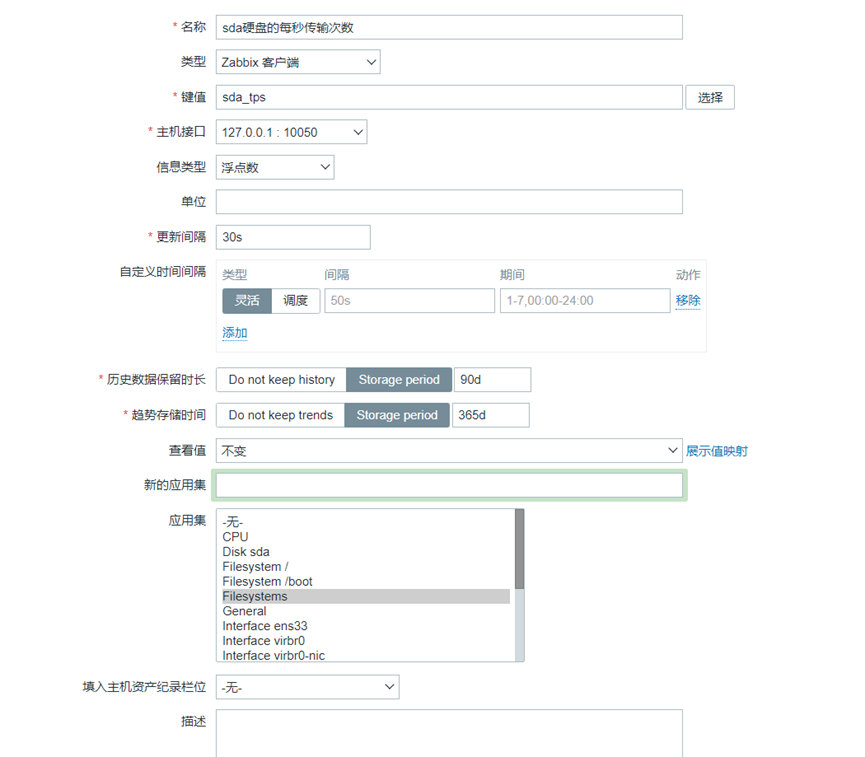
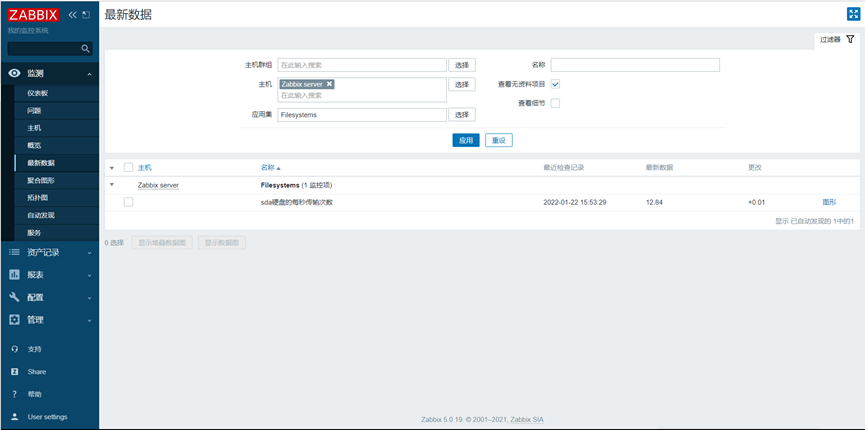
Custom trigger
{Zabbix server:system.users.num.last()}>3
{hostname: name of key. Function name (parameter)} comparison..

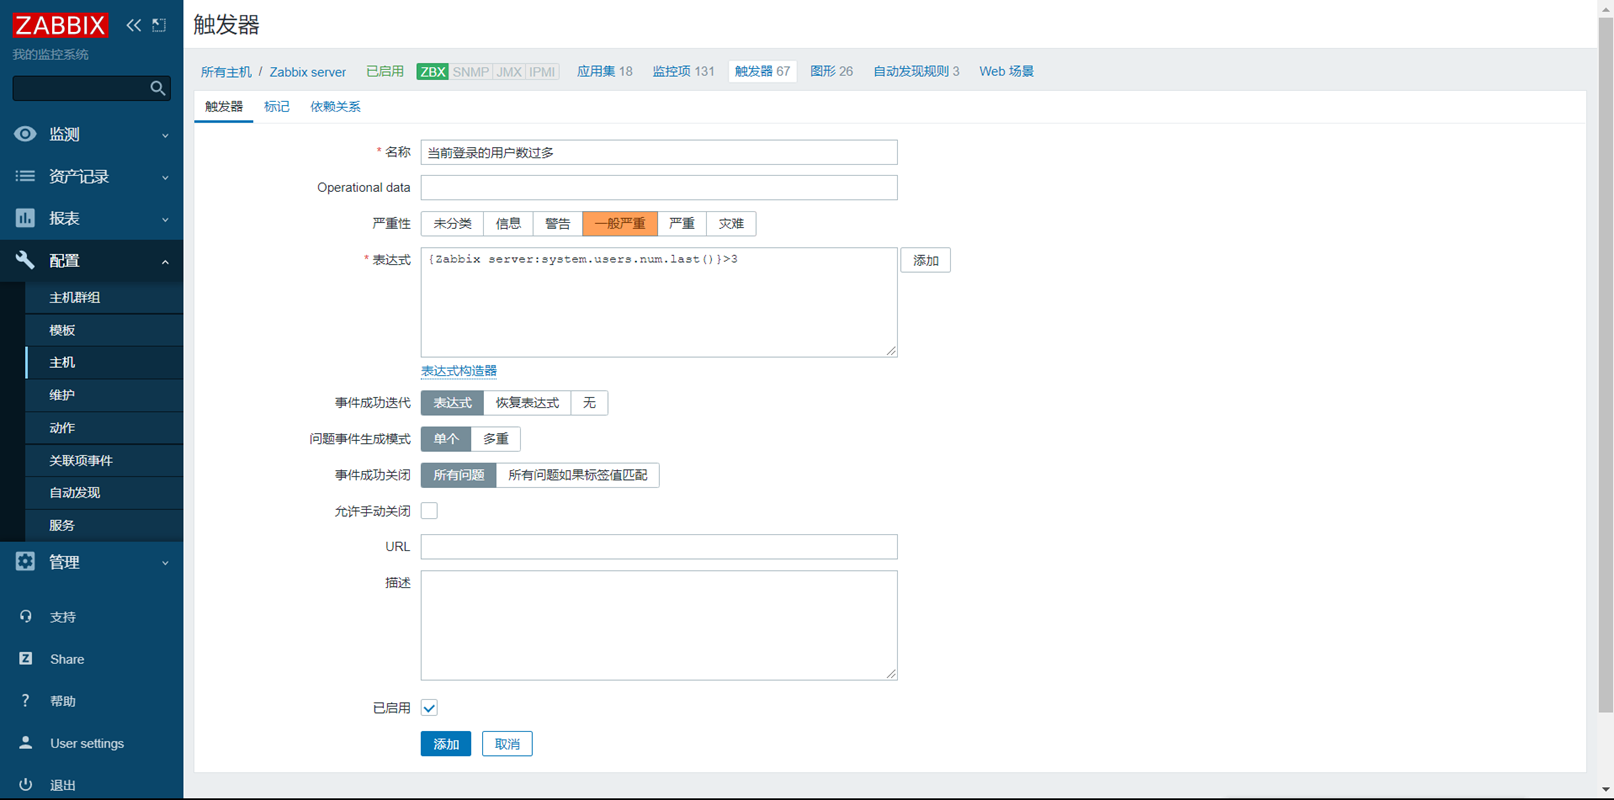

Mail alarm
1. Define sender
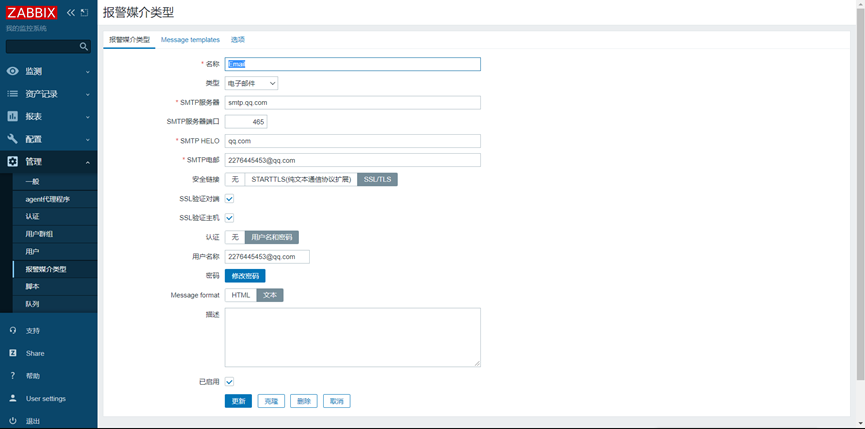
2. Addressee
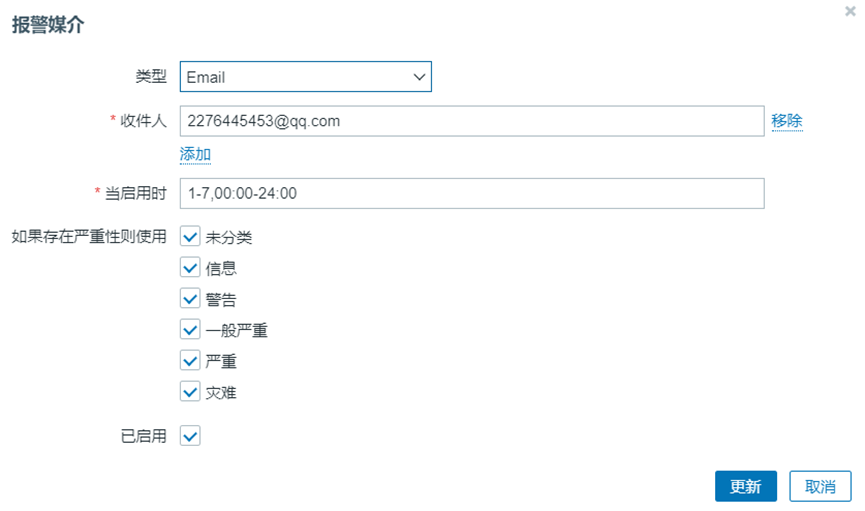
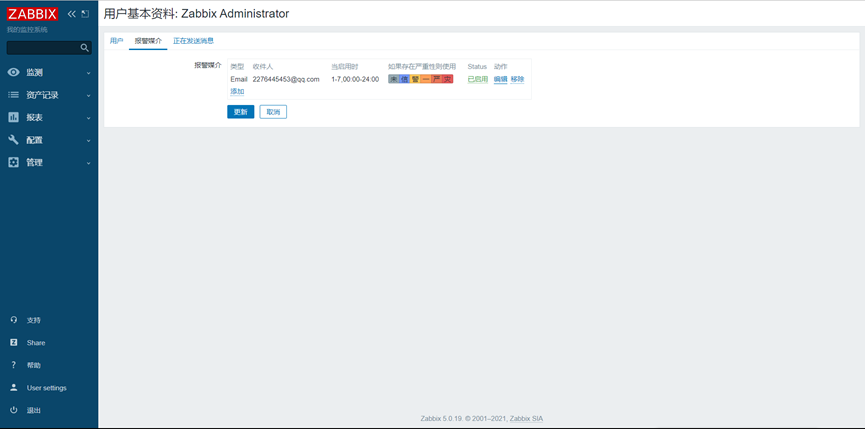
3. Start action
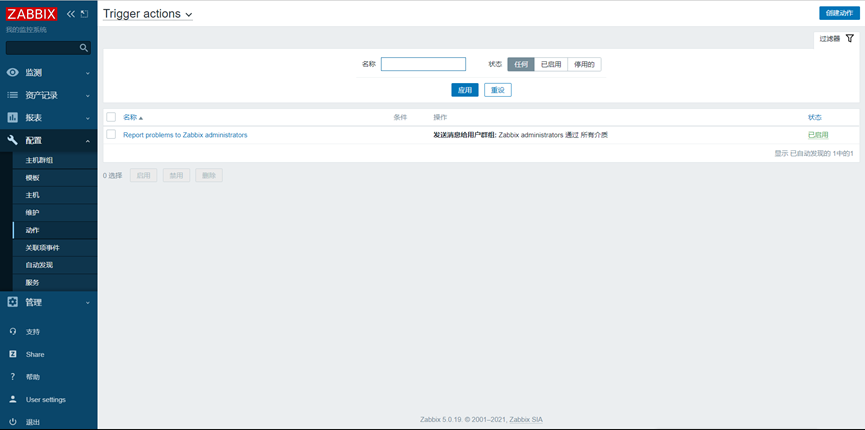
Modify email content
Vx alarm
0. Enterprise wechat terminal settings
...
1. Realize the command line to send wechat information
a. Enter the directory: cd /usr/lib/zabbix/alertscripts
b. Create Weixin Py and zabbix_alter.sh two scripts:
weixin.py:
#!usr/bin/env python2
#-*- coding: utf-8 -*-
import requests
import sys
import os
import json
import logging
logging.basicConfig(level = logging.DEBUG, format = '%(asctime)s, %(filename)s, %(levelname)s, %(message)s',
datefmt = '%a, %d %b %Y %H:%M:%S',
filename = os.path.join('/tmp','weixin.log'),
filemode = 'a')
corpid='ww71b86ecf6a371a1a' ####Need modification
appsecret='JXliNS88GZtJyMC-NobFvKAYmEDuW6tgC4t1zX7mdu4' ####Need modification
agentid=1000002 ####Need modification
#Get accesstoken
token_url='https://qyapi.weixin.qq.com/cgi-bin/gettoken?corpid=' + corpid + '&corpsecret=' + appsecret
req=requests.get(token_url)
accesstoken=req.json()['access_token']
#send message
msgsend_url='https://qyapi.weixin.qq.com/cgi-bin/message/send?access_token=' + accesstoken
touser=sys.argv[1]
subject=sys.argv[2]
#toparty='3|4|5|6'
message=sys.argv[2] + "\n\n" +sys.argv[3]
params={
"touser": touser,
# "toparty": toparty,
"msgtype": "text",
"agentid": agentid,
"text": {
"content": message
},
"safe":0
}
req=requests.post(msgsend_url, data=json.dumps(params))
logging.info('sendto:' + touser + ';;subject:' + subject + ';;message:' + message)
zabbix_alter.sh:
#!/bin/bash
python /usr/lib/zabbix/alertscripts/send_message.py "$1" "$2" "$3"
c. Increase execution authority
chmod +x zabbix_alter.sh
chmod +x weixin.py
d. Test run
./zabbix_alter.sh 'XiaoYi' 'xx' 'yy'
2. zabbix alarm settings
a. Set alarm media and sender
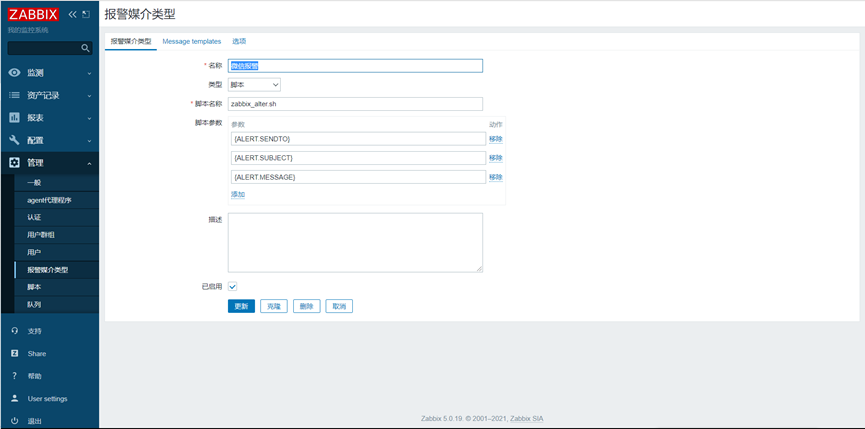
Script parameters:
{ALERT.SENDTO}
{ALERT.SUBJECT}
{ALERT.MESSAGE}
When pemission deny occurs during the test:

Cause analysis: zabbix user cannot operate the file of root user, so the permission is not enough
Solution: use the command RM - FR / TMP / Weixin Log delete Weixin Log, or change the group

b. Set recipient
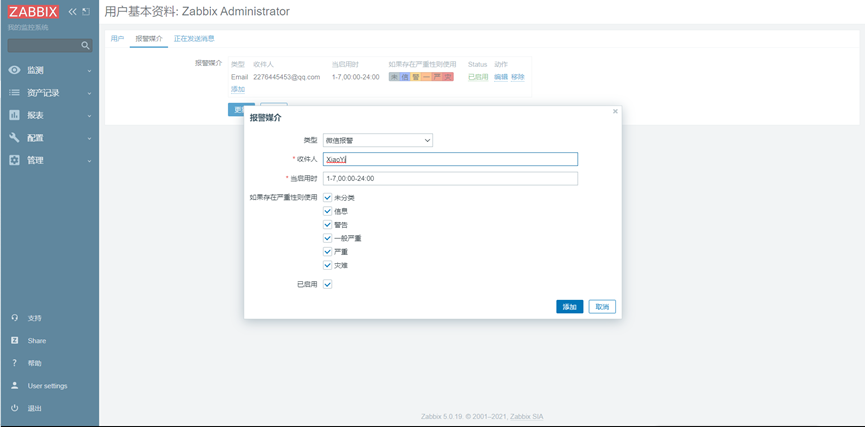
c. Set action
. . .
Secondary development
Personalization reference
https://blog.51cto.com/u_11555417/2327073
https://blog.csdn.net/baidu_29679655/article/details/117413442
Customize menu
vim /usr/share/zabbix/include/menu.inc.php
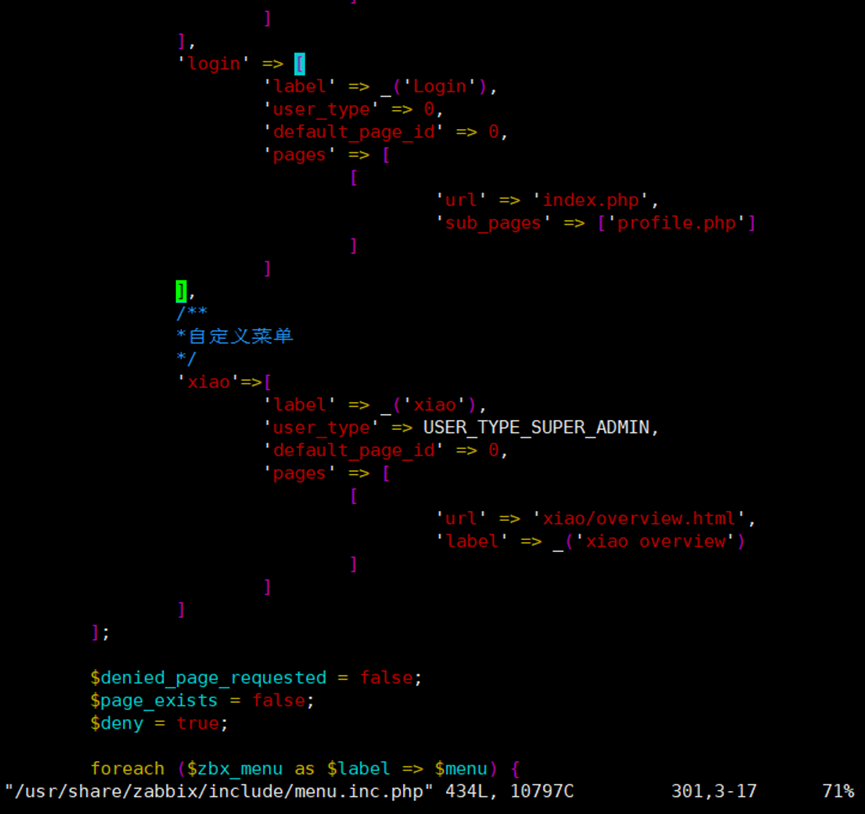
],
                /**
                *Customize menu
                */
                'xiao'=>[
                        'label' => _('xiao'),
                        'user_type' => USER_TYPE_SUPER_ADMIN,
                        'default_page_id' => 0,
                        'pages' => [
                                [
                                        'url' => 'xiao/overview.html',
                                        'label' => _('xiao overview')
                                ]
                        ]
                ]

(xiao is changed to lowercase)

cd /usr/share/zabbix
mkdir xiao
cd xiao
vim overview.html
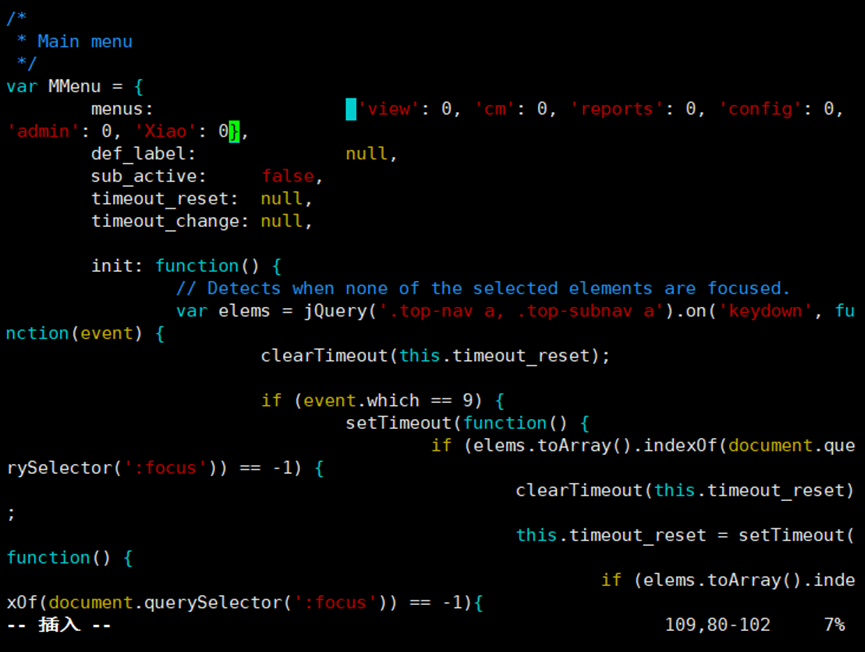
vim /usr/share/zabbix/js/main.js

Modify footer
Modify file
cd /usr/share/zabbix/include/classes/helpers/
vim CBrandHelper.php
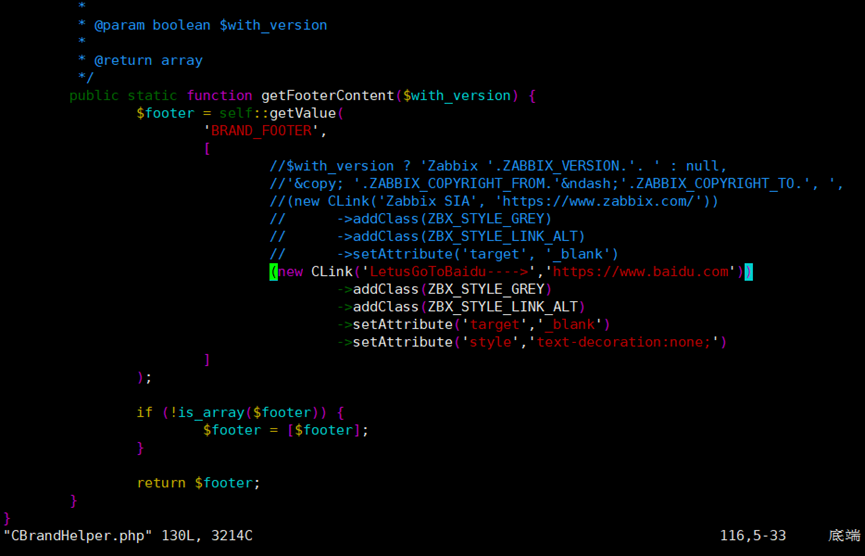
(new CLink('LetusGoToBaidu---->','https://www.baidu.com'))
                                        ->addClass(ZBX_STYLE_GREY)
                                        ->addClass(ZBX_STYLE_LINK_ALT)
                                        ->setAttribute('target','_blank')
                                        ->setAttribute('style','text-decoration:none;')

Replace logo
svg online editor:
http://www.zuohaotu.com/svg/
cd /usr/share/zabbix/assets/img
Replace logo file: icon sprite svg
Backup first
cp icon-sprite.svg icon-sprite.svg.bak
Then modify icon sprite online on the website SVG, note that the size and position of the modified logo should be consistent with the original one
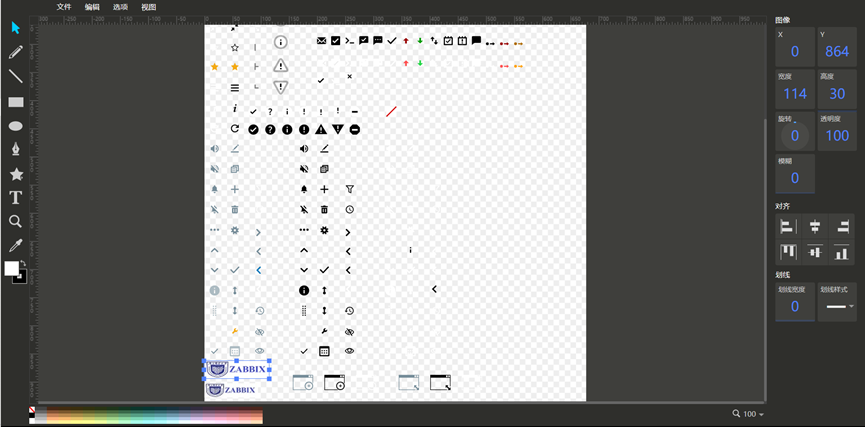
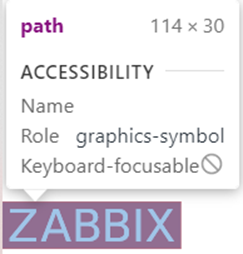
The above is the login interface logo
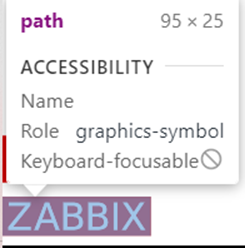
The following is the logo after login
The position of the picture above is x: 0, y: 864
The size of the picture above: width: 114, height: 30
The position of the following picture is x: 0, y: 903
The size of the following image: width: 95, height: 25
Finally, save and replace the original file

The final effect is as follows:


Monitor network traffic
The average load value of CPU in 1 minute, 5 minutes and 15 minutes shall not be greater than the number of CPUs
Create template
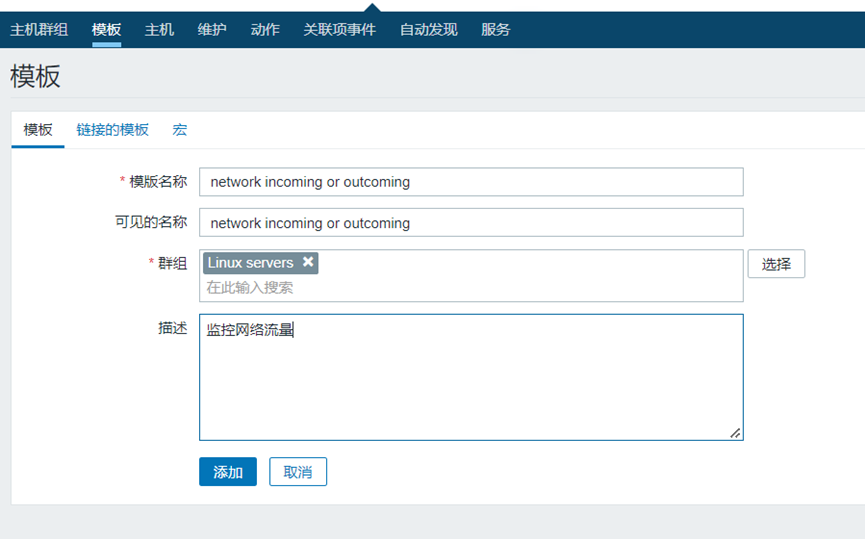
Create flow inflow monitoring item: Network incoming
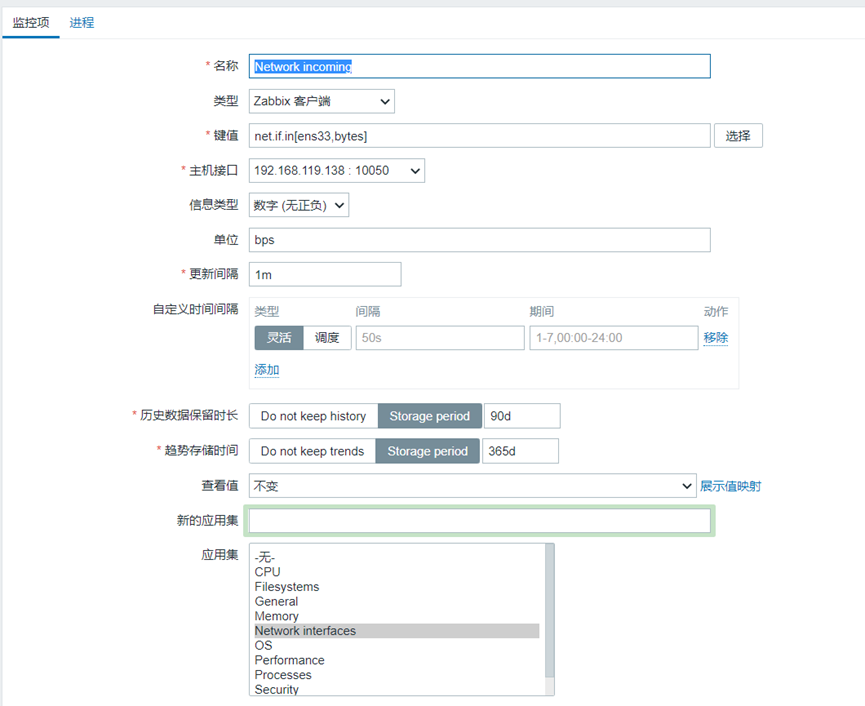
Create flow outflow monitoring item: network outsourcing
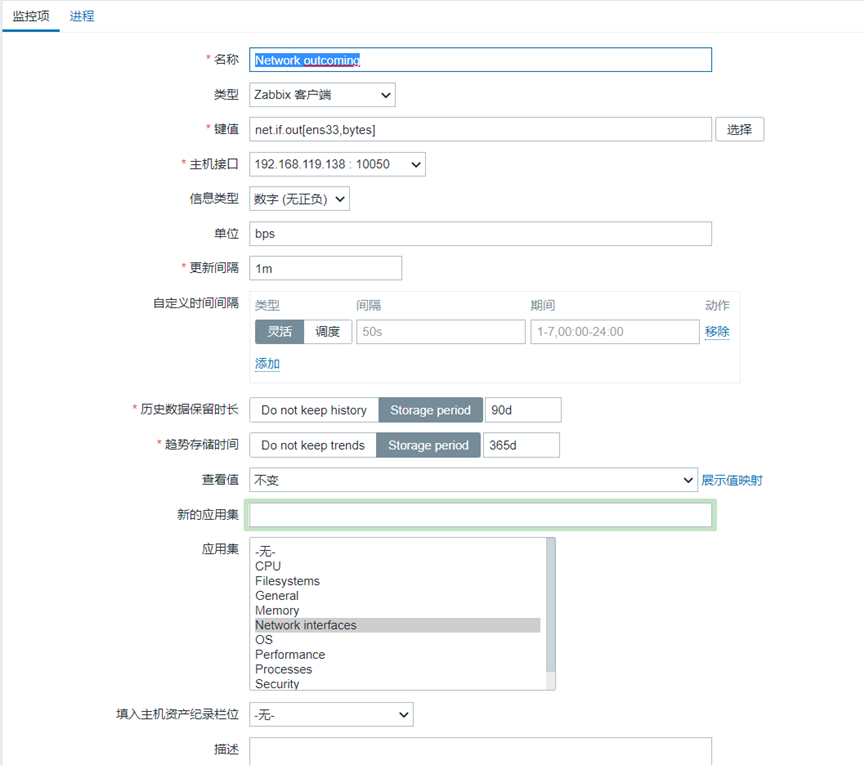
Create a graph
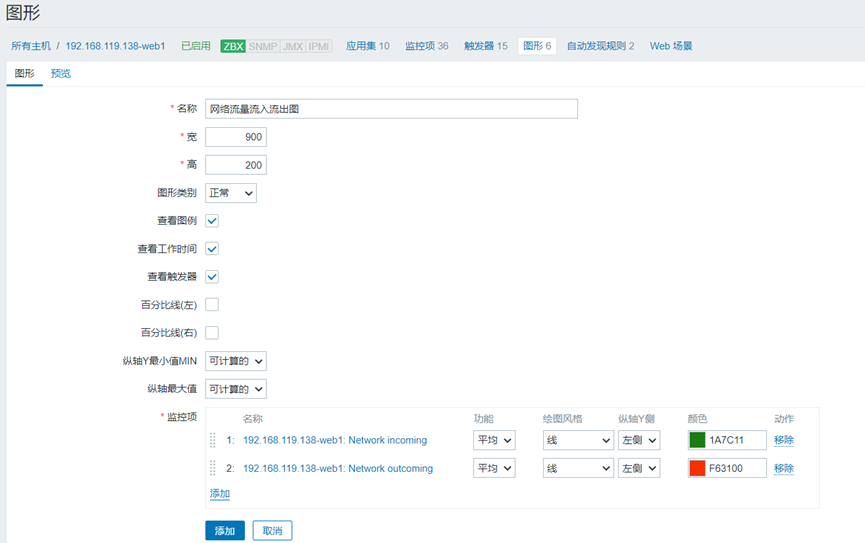
Application template: configure the empty template created before, and assign the graphics just created to the empty template created before
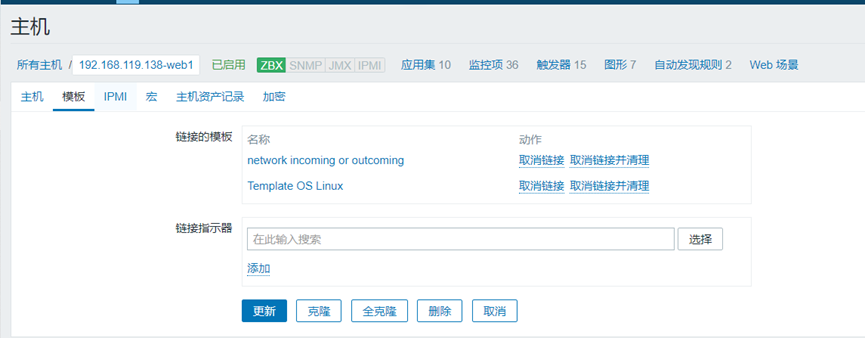
Pressure test:
wget http://mirrors.aliyun.com/centos/7/isos/x86_64/CentOS-7-x86_64-DVD-2009.iso
Add trigger network incoming > 50K network outgoing > 50K
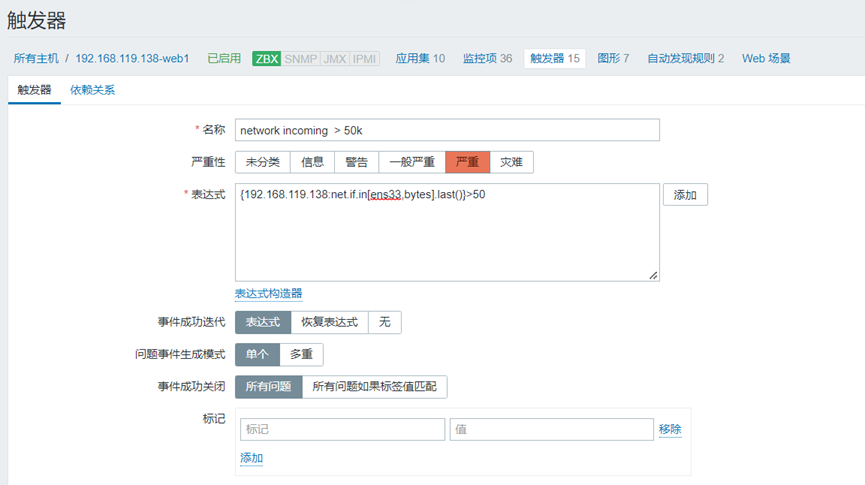
Monitoring disk
New template
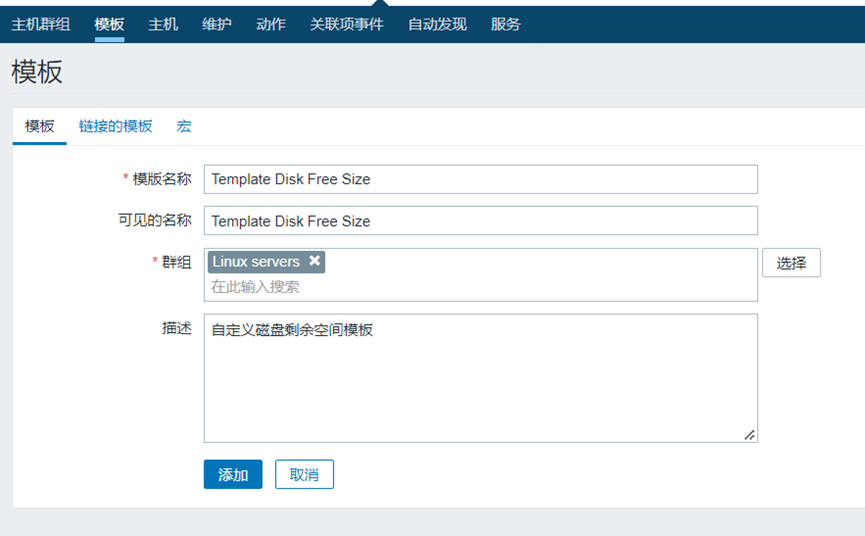
Create a custom disk monitoring item

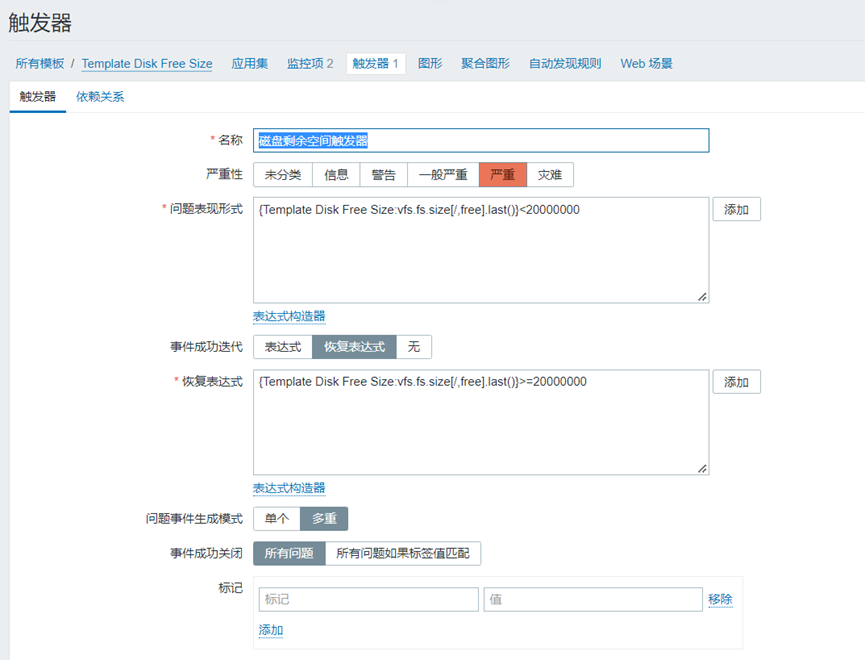
Configure trigger

Monitor CPU temperature
https://blog.51cto.com/jonathan/2068915