preface
Environment deployment reference:
Docker deploying Nacos-2.0.3 stand-alone environment
Docker deploying Nacos-2.0.3 cluster environment
Deploying Nacos-2.0.3 stand-alone environment for Linux
Deploying Nacos-2.0.3 cluster environment for Linux
1. Overview
Nacos is committed to the discovery, configuration and management of micro services, and quickly realize dynamic service discovery, service configuration, service metadata and traffic management.
Use Nacos to simplify the solution of service discovery, configuration management, service governance and management, and make the discovery, management, sharing and composition of micro services easier.
Key features of Nacos include:
- Service discovery and service health monitoring: Nacos supports DNS based and RPC based service discovery. Nacos provides real-time health inspection of services and prevents sending requests to unhealthy hosts or service instances. There are two health check modes: agent reporting mode and server active detection mode.
- Dynamic configuration service: dynamic configuration eliminates the need to redeploy applications and services when configuration changes, making configuration management more efficient and agile.
- Dynamic DNS Service: Dynamic DNS service makes it easier to realize service discovery based on DNS protocol, supports weight routing, and easier to realize middle-layer load balancing, more flexible routing strategy, flow control and simple DNS resolution service in the intranet of data center.
- Service and metadata management: all services and metadata can be managed through the Nacos visual platform, including service description, life cycle, static dependency analysis of services, health status of services, traffic management of services, routing and security policies, SLA of services, etc.
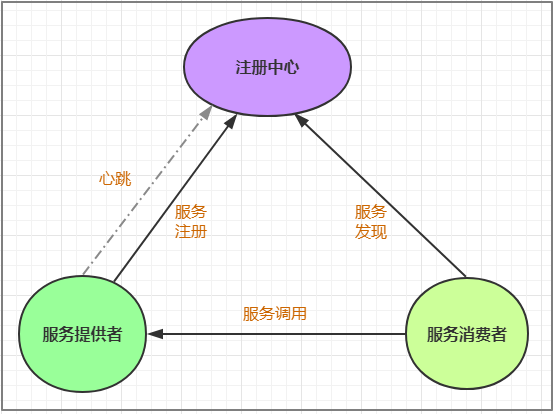
2. Service registration discovery
Service discovery is one of the most critical components in microservice architecture. If you try to manually configure the service list of all service providers for each client, it is very difficult, and it is not conducive to the dynamic expansion and contraction of services. Nacos Discovery Starter can help you automatically register services with the Nacos server, and can dynamically perceive and refresh the service list of a service instance. In addition, Nacos Discovery Starter also registers some metadata information of the service instance itself - such as host, port, health check URL and other information to Nacos.
2.1 opening the registration center
1. Dependency in pom
<!--nacos client-->
<dependency>
    <groupId>com.alibaba.cloud</groupId>
    <artifactId>spring-cloud-starter-alibaba-nacos-discovery</artifactId>
</dependency>
2. @ EnableDiscoveryClient annotation
@SpringBootApplication
// Open registry
@EnableDiscoveryClient
public class XxxApplication {
    public static void main(String[] args) {
        SpringApplication.run(XxxApplication .class, args);
    }
}
3. Configure yml
spring:
  cloud:
    nacos:
     discovery:
      #If it is a nacos cluster environment, point to the address + end of nginx (port 80 can be omitted)
      server-addr: 127.0.0.1:8848
      # Services under the same project can only communicate with each other under the same group
      group: xxxx
      # Command space other than public
	  namespace: xxx.xxx.xxx.xxx
4. Successfully registered

5. Inter service call
Calling WageService through UserService
User service code:
// 1. In the startup class, add the configuration of RestTemplate
@SpringBootApplication
@EnableDiscoveryClient
public class DemoWageServiceApplication {
    public static void main(String[] args) {
        SpringApplication.run(DemoWageServiceApplication.class, args);
    }
   @Bean(name="remoteRestTemplate")
    public RestTemplate restTemplateRemote() {
        return new RestTemplate();
   }
}

// 2. UserController coding
@RestController
public class UserController {
    @Resource(name = "remoteRestTemplate")
    @LoadBalanced
    private RestTemplate remoteRestTemplate;

    @Resource
    private DiscoveryClient discoveryClient;

    /**
     * Calling the WageService service through nacos
     *
     * @return
     */
    @GetMapping("wage")
    public Wage userWage() {
        System.out.println("call Wage-Service service");
        //Get service address from nacos
        ServiceInstance serviceInstance = discoveryClient.getInstances("wage-service").get(0);
        String url = serviceInstance.getHost() + ":" + serviceInstance.getPort();

        //Inter service call through rest
        return remoteRestTemplate.getForObject("http://" + url + "/wage/list", Wage.class);
    }
}
Water service code:
@RestController
public class WageController {
    @GetMapping("list")
    public String listUser() throws InterruptedException {
        System.out.println("Payroll list");
        return "success";
    }
}
2.2 more configuration items
| Configuration item | key | Default value | explain |
|---|---|---|---|
| Server address | spring.cloud.nacos.discovery.server-addr | ||
| service name | spring.cloud.nacos.discovery.service | spring.application.name | |
| weight | spring.cloud.nacos.discovery.weight | 1 | The value range is 1 to 100. The larger the value, the greater the weight |
| adapter name | spring.cloud.nacos.discovery.network-interface | When the IP is not configured, the registered IP is the IP address corresponding to the network card. If this item is not configured, the address of the first network card is taken by default | |
| Registered IP address | spring.cloud.nacos.discovery.ip | Highest priority | |
| Registered port | spring.cloud.nacos.discovery.port | -1 | By default, it is not configured and will be detected automatically |
| Namespace | spring.cloud.nacos.discovery.namespace | One of the common scenarios is the separation and isolation of registrations in different environments, such as the isolation of resources (such as configuration and service) between development and test environments and production environments. | |
| AccessKey | spring.cloud.nacos.discovery.access-key | ||
| SecretKey | spring.cloud.nacos.discovery.secret-key | ||
| Metadata | spring.cloud.nacos.discovery.metadata | Use Map format configuration | |
| Log file name | spring.cloud.nacos.discovery.log-name | ||
| Access point | spring.cloud.nacos.discovery.endpoint | UTF-8 | The entry domain name of a service in the region. Through this domain name, you can dynamically get the server address |
| Is Ribbon integrated | ribbon.nacos.enabled | true |
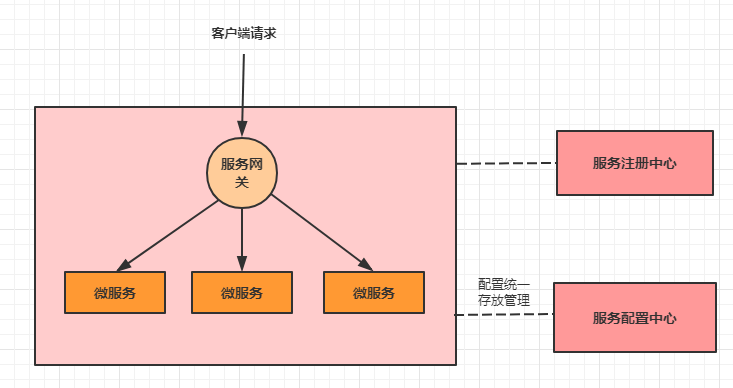
3. Service configuration center
When there are too many micro service configuration files, it is difficult to maintain, and the configuration files cannot be updated in real time. After we modify the configuration file, we must restart the microservice to make the configuration take effect. This is very unfriendly to a running project. We need the configuration center to solve these problems.
Note: after enabling the configuration center, you need to write the configuration file to the bootstrap file.
The idea of the configuration center is:
- Firstly, all configurations in the project are placed in a centralized place for unified management, and a set of standard interfaces are provided.
- When each service needs to obtain configuration, it comes to the interface of the configuration center to pull its own configuration.
- When various parameters in the configuration center are updated, each service can also be notified to synchronize the latest information in real time to make it dynamic
Status update.
Namespace
Different projects can be divided into different namespaces.
Configure group
According to the different environment of the project, it can be grouped into one group.
Configuration set (Data ID)
Different configurations of different service environments are a configuration set.
3.1 open configuration center
The configuration file configured to the nacos configuration center can only be ` bootstrap YML or bootstrap properties
Priority: bootstrap properties -> bootstrap. yml -> application. properties -> application. yml
pom
<dependency>
    <groupId>com.alibaba.cloud</groupId>
    <artifactId>spring-cloud-starter-alibaba-nacos-config</artifactId>
</dependency>
We will use the original application The contents of the YML file are migrated to the configuration. The steps are as follows:
1. Original application yml:
# Actual content
server:
  port: 8083
  servlet:
    context-path: /user
spring:
  application:
    name: user-service
  # nacos registry configuration
  cloud:
    nacos:
      discovery: #nacos registry
        server-addr: 162.14.115.18:8848
        group: cloud-dev
# Custom configuration parameters
sys:
  test: 123456
2. Establish bootstrap yaml
spring:
  application:
    name: user-service
  cloud:
    nacos:
      config:
      	#If it is a nacos cluster environment, point to the address + port of nginx (80 can not be written)
        server-addr: 111.229.160.175:8848 # Server address of nacos
        file-extension: yaml
		group: cloud-dev
		# Namespace: Specifies the namespace value of the grouped space
  # If there is a multi environment configuration, you can create different configuration files for different environments in the configuration center, such as user service dev / test Yaml, no writing without multi environment
  profiles:
    active: dev
Be sure to configure spring application. Name, because it is part of the Nacos configuration management dataId field.
In the Nacos Spring Cloud, the complete format of dataId is as follows:
${prefix}-${spring.profiles.active}.${file-extension}
- prefix defaults to spring application. The value of name can also be set through the configuration item spring cloud. nacos. config. prefix to configure.
- spring.profiles.active is the profile corresponding to the current environment. Note: when spring profiles. When active is empty, the corresponding connector - will not exist, and the splicing format of dataId will become ${prefix}$ {file extension}, which is equivalent to a global configuration file
- File exception is the data format of the configuration content, which can be configured through the configuration item spring cloud. nacos. config. File extension. Currently, only properties and yaml types are supported.
3. Add profile in nacos
Click the configuration list and the + sign on the right to create a new configuration:

In the new configuration process, pay attention to the following details:
1) The Data ID cannot be written casually. It should correspond to the in the configuration file, as shown in the figure.
2) The format of the configuration file should correspond to that of the service configuration file.
3) The configuration content is the configuration content of the local service (for example: application.yaml content)
Configuration center content:
server:
  port: 8083
  servlet:
    context-path: /user
spring:
  cloud:
    nacos:
      discovery: #nacos registry
        server-addr: 162.14.115.18
        group: cloud-dev
# Custom configuration parameters
sys:
  test: 123456
4. Verification:
In the user service, we write an interface to obtain the parameters of the configuration center. If it is printed successfully, it means that the configuration is successful. The code is as follows:
@RestController
public class UserController {

    @Value("${sys.test}")
    private String test;

    @GetMapping("config")
    public void config() {
        System.out.println("Custom parameter content:" + test);
    }
}

3.2 dynamic refresh configuration
The configuration is stored remotely through the nacos configuration center, but if the configuration is modified at this time, the program cannot read it. We need to restart the service or turn on the dynamic refresh function of the configuration.
To enable configuration refresh, you need to annotate @ RefreshScope on the class that modifies the configuration parameters, and then modify the configuration file in naocs. When you request the interface, you can get the latest configuration information.
Configure dynamic refresh interface:
@RestController
// You only need to add this annotation to the class that needs to dynamically read the configuration
@RefreshScope
public class NewConfigController {
    // Configuration key to be modified
    @Value("${sys.test}")
    private String testStr;

    // Step 1: go to the nacos configuration center first and install sys Change the value of the test parameter to 123321 (or any value)
    // Step 2: request the interface to load the latest configuration information locally. If it returns success, it indicates that the modification is successful
    @GetMapping("/updateConifg")
    public String updateConifg() {
    	System.out.println("Content after modifying user-defined parameters:" + testStr);
        return testStr;
    }
}

3.3 configuration sharing
When there are more and more configurations, we will find that many configurations are repeated. At this time, we can extract the public configuration file and share it.
3.3.1 sharing the same service in different environments
Just extract one to spring application. Name, and then put the public configuration of all environments in it; The file will be loaded automatically after the project is started, and no specified operation is required.
For example: spring application. name: user-sevice
Then the public configuration file name of the configuration micro service is user sevice Yaml, and different environment configurations are put into the corresponding environment file user sevice dev (Prod...) Yaml
3.3.2. Direct shared configuration of different micro services
1. Create a public configuration file in nacos: all service Yaml (name prefix arbitrary), the content is:
sys:
  all: this is all-service
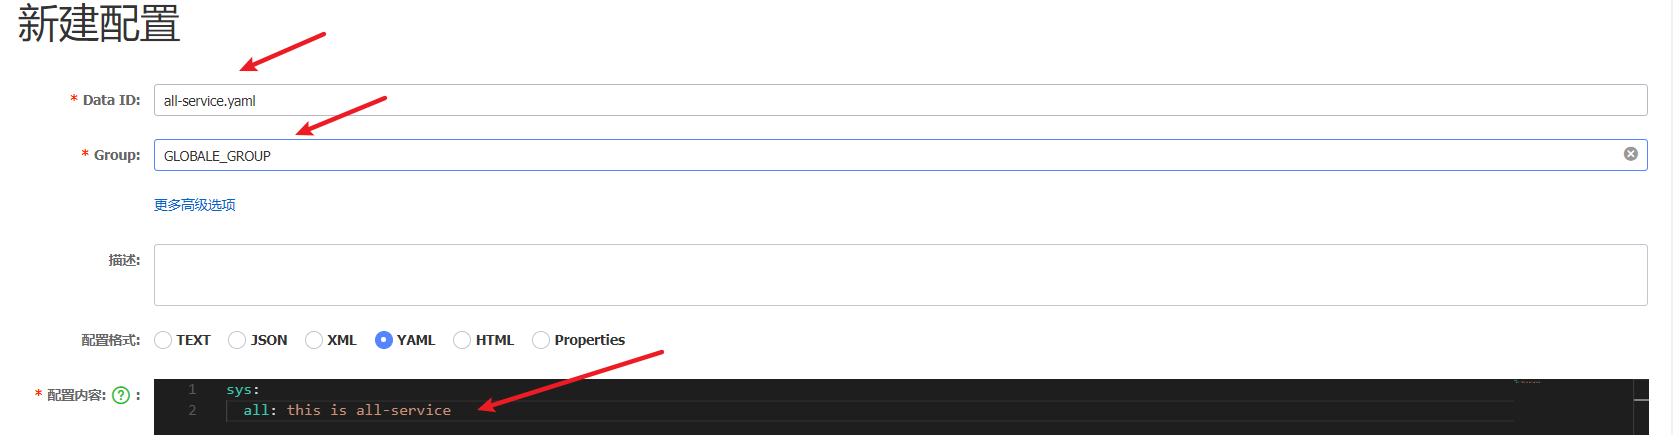
2. Modify bootstrap Yaml file, add the following configuration shared configs:
spring:
  cloud:
    nacos:
      config:
        #If it is a nacos cluster environment, point to the address + port of nginx (80 can not be written)
        # Server address of nacos
        server-addr: 162.14.115.18
        # Profile suffix
        file-extension: yaml
        # The default is DEFAULT_GROUP
        group: cloud-dev
        # Reading public configuration takes precedence over reading the configuration file next to the array
		shared-configs:
          - data-id: all-service.yaml
            group: GLOBALE_GROUP
            refresh: true
   ....
   ....
3. Verification:
@RestController
public class UserController {

    @Value("${sys.all}")
    private String all;

    @GetMapping("config")
    public void config() {
        System.out.println("Get custom parameter content:" + all);
    }
}

3.4 more configuration items
| Configuration item | key | Default value | explain |
|---|---|---|---|
| Server address | spring.cloud.nacos.config.server-addr | Server ip and port | |
| DataId prefix | spring.cloud.nacos.config.prefix | spring.application.name | |
| Group | spring.cloud.nacos.config.group | DEFAULT_GROUP | |
| dataID suffix and content file format | spring.cloud.nacos.config.file-extension | properties | The suffix of dataId is also the file format of configuration content. At present, only properties are supported |
| Configure content encoding | spring.cloud.nacos.config.encode | UTF-8 | Configured encoding |
| Gets the configured timeout | spring.cloud.nacos.config.timeout | 3000 | Unit: ms |
| Configured namespace | spring.cloud.nacos.config.namespace | One of the common scenarios is to distinguish and isolate the configurations of different environments, such as resource isolation of development and test environment and production environment. | |
| AccessKey | spring.cloud.nacos.config.access-key | ||
| SecretKey | spring.cloud.nacos.config.secret-key | ||
| Relative path | spring.cloud.nacos.config.context-path | Relative path of server API | |
| Access point | spring.cloud.nacos.config.endpoint | The entry domain name of a service in the region. Through this domain name, you can dynamically get the server address | |
| Enable listening and automatic refresh | spring.cloud.nacos.config.refresh-enabled | true | |
| Cluster service name | spring.cloud.nacos.config.cluster-name |
4. Namespace
When there are more and more projects, in order to realize the isolation between projects, we need to use the namespace and add it in the namespace menu, as follows:
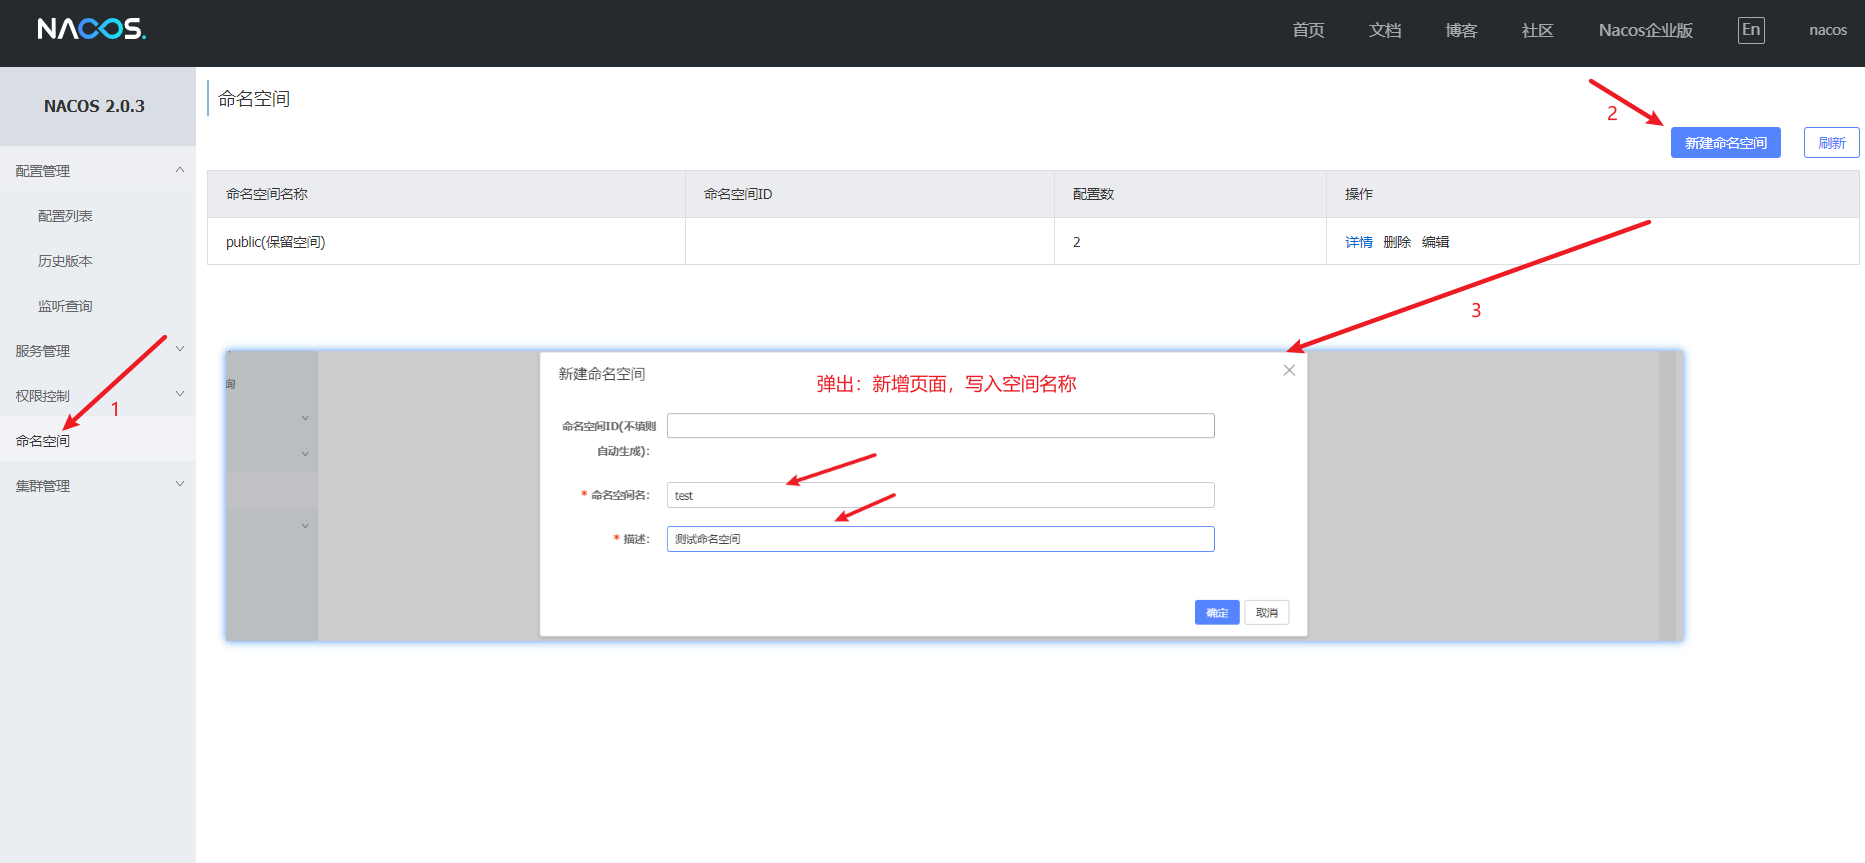
After adding a new space, you can see in configuration management and service management:


During configuration, it is specified through the namespace parameter, such as:
spring:
  cloud:
    nacos:
      discovery:
      	server-addr: 162.14.115.18:8848
      	namespace:  c85cdfe5-95e2-4a8a-b983-8972a2580d55
5. User management and connection authentication
5.1 user management
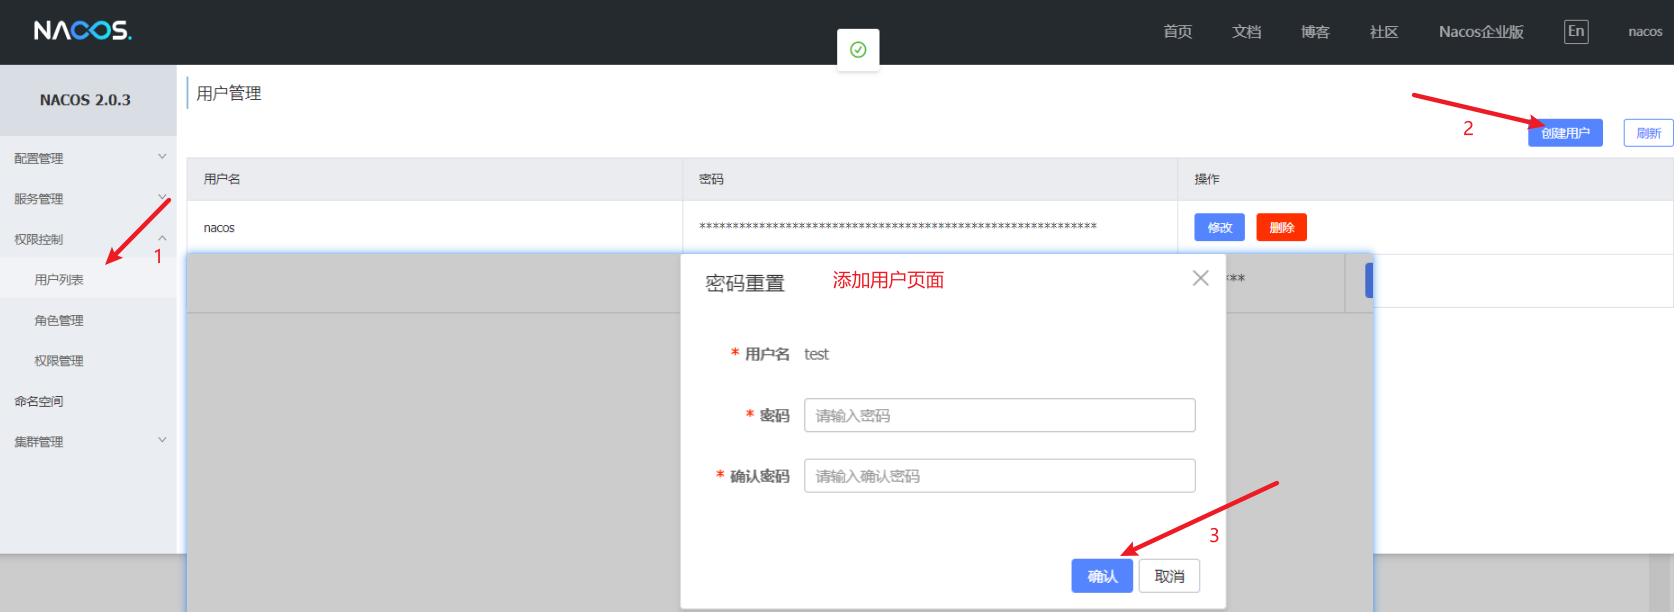
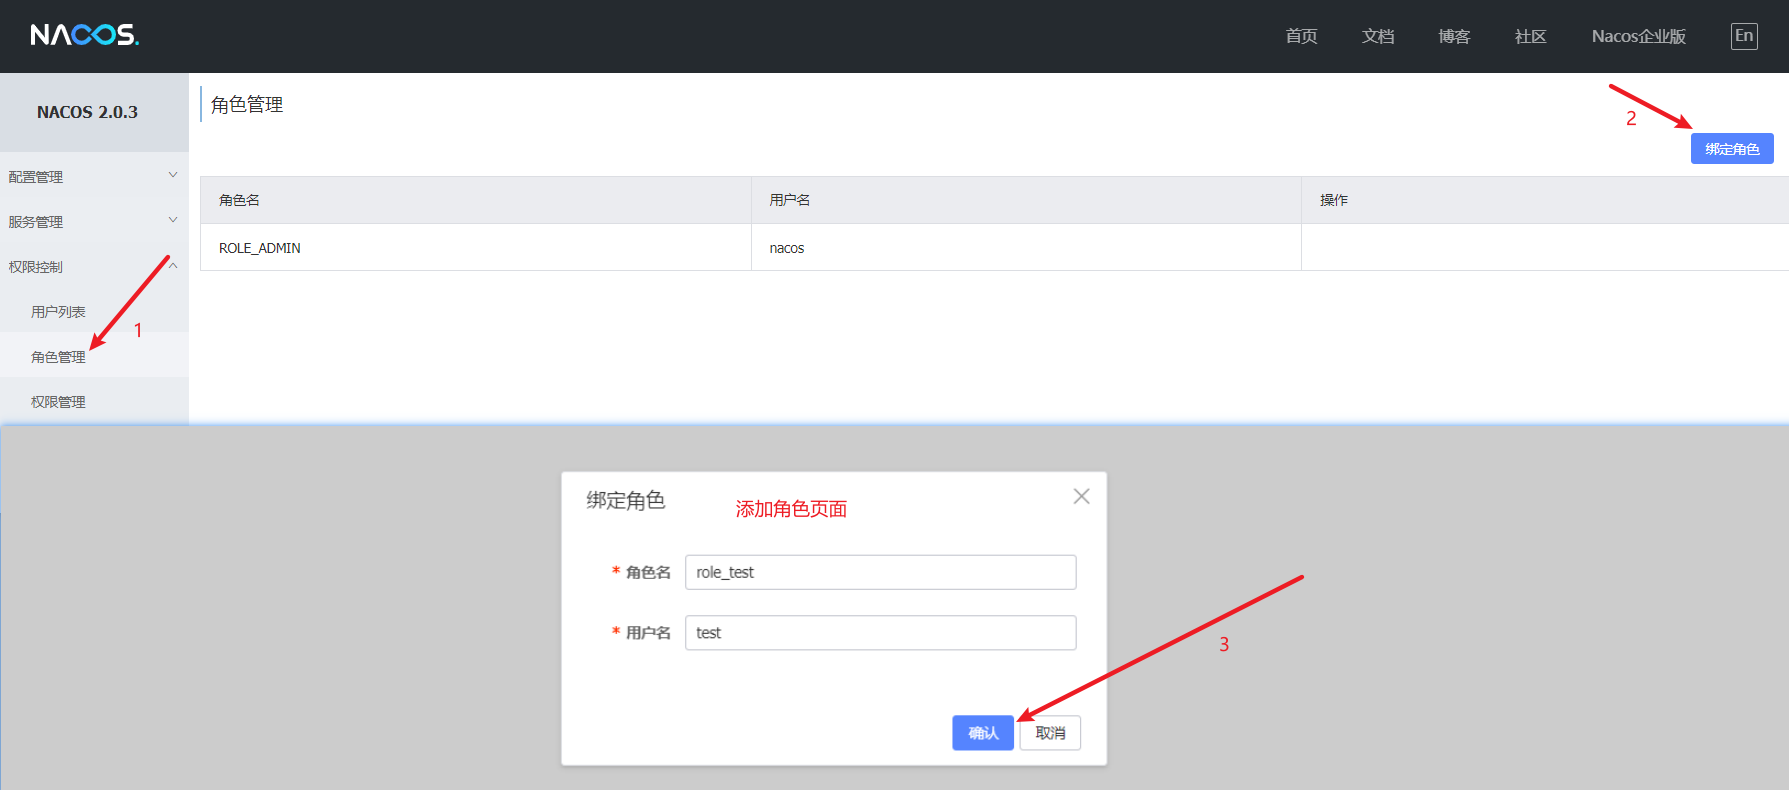
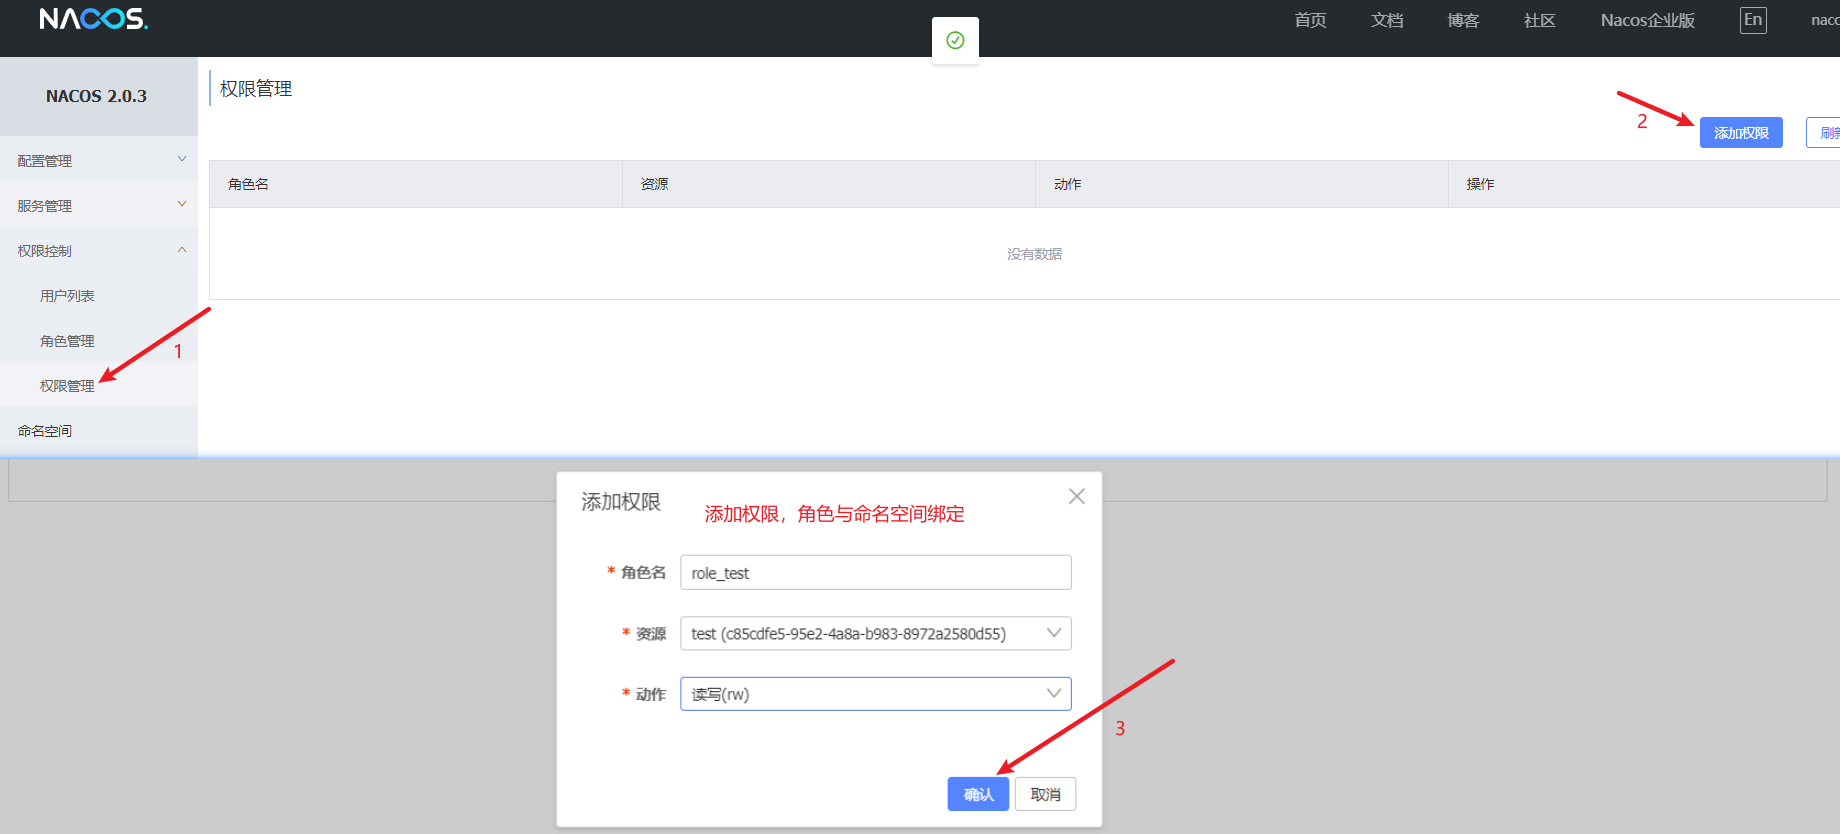
nacos does not need to log in by default, which will lead to the direct exposure of the configuration center. After enabling authentication, you need to log in with your user name and password before you can use nacos normally. We can establish exclusive users, roles and namespaces for each project, bind these three, and ensure that when connecting to nacos, we can verify the account password to prevent business misuse.
Create user:
Create role:
Role and namespace binding:
5.2 connection authentication
Step 1:
Application in nacos Add authentication configuration to the properties file as follows:
nacos.core.auth.enabled=true
Step 2:
When connecting to nacos, we set the namespace to the test created above, and connect according to the set user and password, as follows:
spring:
  cloud:
    nacos:
      discovery: #nacos registry
        server-addr: 192.168.0.111:8848
        namespace: c85cdfe5-95e2-4a8a-b983-8972a2580d55
        group: cloud-dev
        # Account and password for connecting nacos
        username: test
        password: 123456
If login authentication fails:
