Task 2: Spring MVC advanced
Main contents of course tasks:
- ajax asynchronous interaction
- RESTful
- File upload
- exception handling
- Interceptor
An ajax asynchronous interaction
By default, spring MVC uses MappingJackson2HttpMessageConverter to convert json data, which needs to be added to jackson's package; Use < MVC: annotation driven / >
Project tip: Spring MVC in the previous phase_ Continue writing in the QuickStart project
        <dependency>
            <groupId>com.fasterxml.jackson.core</groupId>
            <artifactId>jackson-databind</artifactId>
            <version>2.9.8</version>
        </dependency>
        <dependency>
            <groupId>com.fasterxml.jackson.core</groupId>
            <artifactId>jackson-core</artifactId>
            <version>2.9.8</version>
        </dependency>
        <dependency>
            <groupId>com.fasterxml.jackson.core</groupId>
            <artifactId>jackson-annotations</artifactId>
            <version>2.9.0</version>
        </dependency>
1.1 @RequestBody
This annotation is used for the formal parameter declaration of the Controller's method. When the content type is submitted using ajax and specified as json, it is converted to the corresponding POJO object through the HttpMessageConverter interface.
Create Ajax jsp
<%@ page contentType="text/html;charset=UTF-8" language="java" %>
<html>
<head>
    <title>Title</title>
</head>
<body>
<script src="${pageContext.request.contextPath}/js/jquery-3.5.1.js"></script>
    <%--ajax Asynchronous interaction--%>
    <button id="btn1">ajax Asynchronous commit</button>

    <script>
        $("#btn1").click(function () {

            let url = '${pageContext.request.contextPath}/user/ajaxRequest';
            let data = '[{"id":1,"username":"Zhang San"},{"id":2,"username":"Li Si"}]';

            $.ajax({
                type: 'POST',
                url: url,
                data : data,
                contentType : 'application/json;charset=utf-8',
                success: function (resp) {
                    alert(JSON.stringify(resp));
                }
            })
        })
    </script>
</body>
</html>
@RequestMapping(value = "/ajaxRequest")
public void ajaxRequest(@RequestBody List<User>list) {
 System.out.println(list);
}
1.2 @ResponseBody
This annotation is used to convert the object returned by the Controller method into data in the specified format through the HttpMessageConverter interface, such as json,xml, etc., and respond to the client through Response.
	/*
	@RequestMapping
	produces = "application/json;charset=utf-8"
	The mime type and code of the data returned by the response. The default is json
	*/
	@RequestMapping(value = "/ajaxRequest")
	@ResponseBody
	public List<User> ajaxRequest(@RequestBody List<User> list) {
	 System.out.println(list);
	 return list;
	}
II. RESTful
2.1 what is RESTful
Restful is a software architecture style and design style, not a standard, but provides a set of design principles and constraints. It is mainly used for the interactive software between client and server. The software designed based on this style can be more concise, more hierarchical, and easier to implement the cache mechanism.
Restful style requests use "url + request method" to indicate the purpose of a request. The four verbs in the HTTP protocol indicating the operation method are as follows:
- GET: Read
- POST: Create
- PUT: Update
- Delete: delete
| client request | Original style URL address | RESTful style URL address |
|---|---|---|
| Query all | /user/findAll | GET /user |
| Query by ID | /user/findById?id=1 | GET /user/{1} |
| newly added | /user/save | POST /user |
| modify | /user/update | PUT /user |
| delete | /user/delete?id=1 | DELETE /user/{1} |
If you want to test, modify and delete operations, Download postman to simulate
2.2 code implementation
@PathVariable
Used to receive the value of the placeholder in the RESTful style request address
@RestController
RESTful style is mostly used for front-end and back-end separated project development. The front end interacts asynchronously with the server through ajax. Our processor usually returns json data, so @ RestController is used to replace the two annotations @ Controller and @ ResponseBody.
@RestController //Combined PK: combined @ Controller + @ResponseBody
@RequestMapping("/restful")
public class RestfulController {

    /*
        Query by id
        localhost:8080/Project name / restful/user/2 + get request method 404 findbyid: 2
     */

    @GetMapping("/user/{id}") // @RequestMapping(value = "/user/{id}",method = RequestMethod.GET)
    public String findById(@PathVariable Integer id){
        // Call the service method to query the record with id 2
        // Question: how can I get the value of placeholder in url in restful programming style in findById method
        return "findById: "+ id ;
    }

    /*
        New method
     */
    @PostMapping("/user") // @RequestMapping(value = "/user",method = RequestMethod.POST)
    public String post(){
        // newly added
        return "post";
    }

    /*
        Update method
     */
    @PutMapping("/user")
    public String put(){
        // update operation
        return "put";
    }

    /*
        Delete method
     */
    @DeleteMapping("/user/{id}")
    public String delete(@PathVariable Integer id){

        return "delete" + id;
    }

}
III. file upload
3.1 three elements of file upload
- Form item type = "file"
- Submission method of form method = "POST"
- The enctype attribute of a form is a multi part form, enctype = "multipart / form data"“

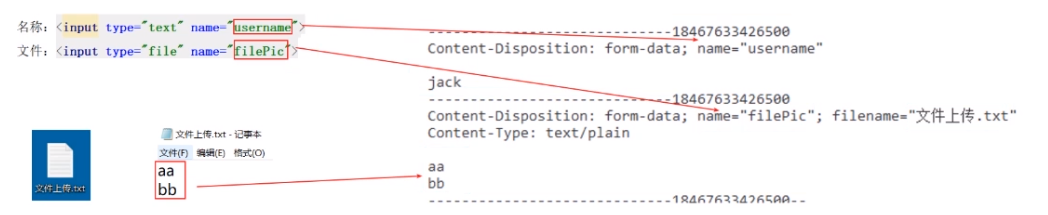
3.2 file upload principle
- When the form is modified to a multi part form, request Getparameter() will fail.
- When the enctype value of the form is application/x-www-form-urlencoded,
- The format of the body content of the form is: name = value & name = value
- When the enctype value of the form is mutilpart / form data, the content of the request body becomes multi part:
3.3 single file upload
Step analysis
- Import fileupload and io coordinates
- Profile upload parser
- Write file upload code
1) Import fileupload and io coordinates
		<!--Import fileupload and io coordinate-->
  		<dependency>
            <groupId>commons-fileupload</groupId>
            <artifactId>commons-fileupload</artifactId>
            <version>1.3.3</version>
        </dependency>
        <dependency>
            <groupId>commons-io</groupId>
            <artifactId>commons-io</artifactId>
            <version>2.6</version>
        </dependency>
        <dependency>
            <groupId>junit</groupId>
            <artifactId>junit</artifactId>
            <version>4.12</version>
            <scope>compile</scope>
        </dependency>
2) Profile upload parser
spring-mvc.xml
    <!--Profile upload parser-->
    <bean id="multipartResolver" class="org.springframework.web.multipart.commons.CommonsMultipartResolver">
        <!-- Set the maximum value of file upload to 5 MB,5*1024*1024 -->
        <property name="maxUploadSize"  value="5242880"></property>
        <!-- Set the maximum value to be written into memory during file upload. If it is less than this parameter, no temporary file will be generated. The default value is 10240 -->
        <property name="maxInMemorySize" value="40960"></property>
    </bean>
3) Write file upload code
Create fileUpload jsp
<%@ page contentType="text/html;charset=UTF-8" language="java" %>
<html>
<head>
    <title>Title</title>
</head>
<body>
    <%--Write a form that meets the three elements of file upload
        1.The form must be submitted by post
        2.Tabular enctype Property must be modified to multipart/form-data
        3.There must be a file upload item in the form
    --%>
    <form action="${pageContext.request.contextPath}/fileupload" method="post" enctype="multipart/form-data">

        name:<input type="text" name="username"> <br>
        File:<input type="file" name="filePic"> <br>
            <input type="submit" value="Single file upload">
    </form>
</body>
</html>
controller.FileUploadController.java
@Controller
public class FileUploadController {

    /*
        Single file upload
     */
    @RequestMapping("/fileupload")
    public String fileUpload(String username, MultipartFile filePic) throws IOException {

        //Obtain the submission parameters of the form and complete the file upload
        System.out.println(username);

        // Get the original file upload name a.txt ABC
        String originalFilename = filePic.getOriginalFilename();
        filePic.transferTo(new File("D:/upload/"+originalFilename));

        return "success";
    }
}
3.4 multi file upload
fileupload.jsp
 <%--Realize multi file upload--%>
    <form action="${pageContext.request.contextPath}/filesupload" method="post" enctype="multipart/form-data">

        name:<input type="text" name="username"> <br>
        Document 1:<input type="file" name="filePic"> <br>
        Document 2:<input type="file" name="filePic"> <br>
        <input type="submit" value="Multi file upload">
    </form>
controller.FileUploadController.java
 /*
      Multi file upload
   */
    @RequestMapping("/filesupload")
    public String filesUpload(String username, MultipartFile[] filePic) throws IOException {

        //Obtain the submission parameters of the form and complete the file upload
        System.out.println(username);

        // Get the original file upload name a.txt ABC
        for (MultipartFile multipartFile : filePic) {
            String originalFilename = multipartFile.getOriginalFilename();
            multipartFile.transferTo(new File("D:/upload/"+originalFilename));
        }
        return "success";
    }
IV. exception handling
4.1 ideas for exception handling
In Java, there are generally two ways to handle exceptions:
- One is the current method capture processing (try catch), which will cause the coupling of business code and exception handling code.
- The other is not to deal with it, but to throw it to the caller. The caller then throws it to its caller, that is, to throw it up all the time.
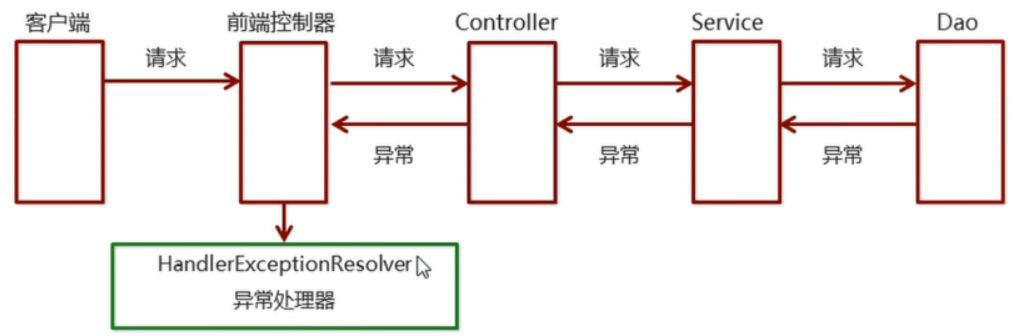
Based on this method, the exception handling mechanism of spring MVC is derived.
The dao, service and controller of the system are thrown upward through the throws Exception. Finally, the spring MVC front-end controller is handed over to the exception handler for exception handling, as shown in the following figure:
4.2 custom exception handler
Step analysis
- Create an exception handler class to implement HandlerExceptionResolver
- Configure exception handler
- Write exception page
- Test abnormal jump
1) Create an exception handler class to implement HandlerExceptionResolver
exception/GlobalExceptionResolver.java
public class GlobalExceptionResolver implements HandlerExceptionResolver {
    /*
        Exception e:Exception object actually thrown
     */

    @Override
    public ModelAndView resolveException(HttpServletRequest httpServletRequest, HttpServletResponse httpServletResponse, Object handler, Exception e) {
        //After the specific exception handling generates an exception, jump to a final exception page
        ModelAndView modelAndView = new ModelAndView();
        modelAndView.addObject("error",e.getMessage());
        modelAndView.setViewName("error");

        return modelAndView;
    }
}
2) Configure exception handler
Method 1:
Method of annotation:
@Component
public class GlobalExecptionResovler implements HandlerExceptionResolver {}
Method 2:
XML Configuration method:
<bean id="globalExecptionResovler" class="com.lagou.exception.GlobalExecptionResovler">
</bean>
3) Write exception page
WEB-INF/pages/error.jsp
<%@ page contentType="text/html;charset=UTF-8" language="java" %>
<html>
<head>
    <title>error</title>
</head>
<body>
<h3>This is a final exception display page</h3>
<p>${error}</p>
</body>
</html>
4) Test abnormal jump
com.lagou.controller.ExceptionController
@Controller
public class ExceptionController {

    @RequestMapping("/testException")
    public String testException(){
        int i=1/0;
        return "success";
    }
}
4.3 exception handling mechanism of Web
newly build:
404.jsp and 500 jsp
<%@ page contentType="text/html;charset=UTF-8" language="java" %>
<html>
<head>
    <title>Title</title>
</head>
<body>
    The resource you requested has been deleted
</body>
</html>
web.xml
 <!--Handling 404 exceptions-->
    <error-page>
        <error-code>404</error-code>
        <location>/404.jsp</location>
    </error-page>

    <!--Handling 500 exceptions-->
    <error-page>
        <error-code>500</error-code>
        <location>/500.jsp</location>
    </error-page>
Five interceptors
5.1 function of interceptor
The interceptor of Spring MVC is similar to the Filter in Servlet development, which is used to preprocess and post process the processor.
The interceptors are connected into a chain in a certain order, which is called interceptor chain. When accessing the intercepted method or field, the interceptors in the interceptor chain will be called in the order they were previously defined. Interceptor is also the concrete implementation of AOP idea.
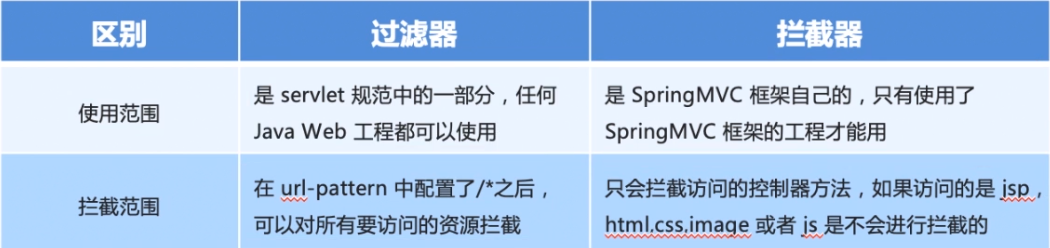
5.2 difference between interceptor and filter
The difference between interceptor and filter is shown in the figure:
5.3 quick start
Step analysis
- Create an interceptor class to implement the HandlerInterceptor interface
- Configuring Interceptors
- Test the interception effect of the interceptor
1) Create an interceptor class to implement the HandlerInterceptor interface
com.lagou.interceptor.MyInterceptor1
public class MyInterceptor1 implements HandlerInterceptor {
/*
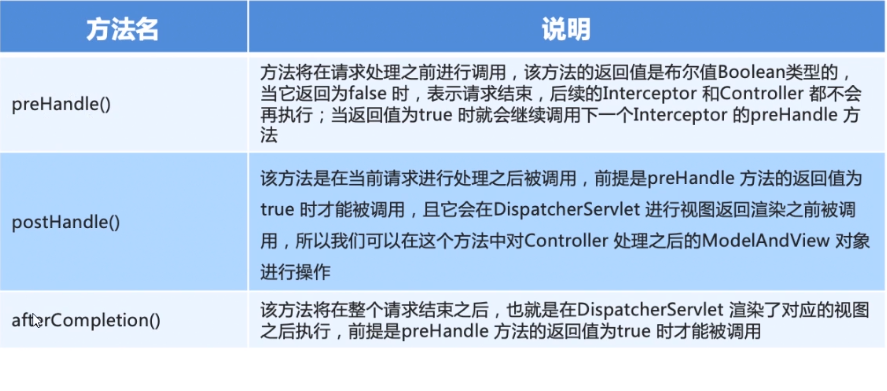
preHandle: Intercept before the target method is executed return false: do not release
*/
@Override
public boolean preHandle(HttpServletRequest request, HttpServletResponse response, Object handler) throws Exception {
System.out.println("preHandle....1");
return true;
}
/*
postHandle: The method executed after the target method is executed and before the view object returns
*/
@Override
public void postHandle(HttpServletRequest request, HttpServletResponse response, Object handler, ModelAndView modelAndView) throws Exception {
System.out.println("postHandle....1");
}
/*
afterCompletion: The method to be executed after all processes are executed
*/
@Override
public void afterCompletion(HttpServletRequest request, HttpServletResponse response, Object handler, Exception ex) throws Exception {
System.out.println("afterCompletion....1");
}
}
2) Configure interceptor
spring-mvc.xml
 <!--Configuring Interceptors -->
    <mvc:interceptors>
        <mvc:interceptor>
            <mvc:mapping path="/**"/><!--For all controller All methods in the class are intercepted-->
            <bean class="com.lagou.interceptor.MyInterceptor1"></bean>
        </mvc:interceptor>
    </mvc:interceptors>
3) Test the interception effect of the interceptor
Write the controller, send the request to the controller and jump to the page
com.lagou.controller.TargetController
@Controller
public class TargetController {

    @RequestMapping("/target")
    public String targetMethod(){
        System.out.println("The target method is executed...");
        return "success";
    }
}
Writing jsp pages
<%@ page contentType="text/html;charset=UTF-8" language="java" %>
<html>
<head>
    <title>Title</title>
</head>
<body>
    <h3>success... </h3>

    <% System.out.println("View executed....");%>
</body>
</html>
Output printing effect:
preHandle
 The target method is executed...
postHandle...
View executed....
afterCompletion...
5.4 interceptor chain
In development, interceptors can be used alone or multiple interceptors can be used at the same time to form an interceptor chain. The development steps are the same as that of a single interceptor, except that multiple interceptors are registered during registration. Note that the registration order here represents the execution order of the interceptor.
As above, write another MyHandlerInterceptor2 operation to test the execution sequence:
<!--Configuring Interceptors -->
    <mvc:interceptors>
        <mvc:interceptor>
            <mvc:mapping path="/**"/> <!--For all controller All methods in the class are intercepted-->
            <bean class="com.lagou.interceptor.MyInterceptor1"></bean>
        </mvc:interceptor>
        <mvc:interceptor>
            <mvc:mapping path="/**"/> <!--For all controller All methods in the class are intercepted-->
            <bean class="com.lagou.interceptor.MyInterceptor2"></bean>
        </mvc:interceptor>
    </mvc:interceptors>
Execution effect:
preHandle...1
preHandle...2
 The target method is executed...
postHandle....2
postHandle...1
 View executed....
afterCompletion....2
afterCompletion...1
##Bold style # 5.5 knowledge summary
The method in the interceptor is described as follows: