1, Foreword
In our daily development, we cannot avoid parameter verification. Some people say that the front end will verify in the form? In the back-end, we can directly judge the filtering regardless of how the front-end judges it. Our back-end needs to judge again for security. Because the front end is easy to request. When the test uses PostMan to test, if the back end is not verified, it will be messy? There must be a lot of exceptions. Today, Xiaobian will learn from you that JSR303 is specially used for parameter verification. It can be regarded as a tool!
2, Introduction to JSR303
Bean validator 6 is a sub reference of the official JAVA implementation of the java-validator.
Hibernate Validator provides the implementation of all built-in constraints in JSR 303 specification. In addition, there are some additional constraints.
Introduction to the official website:
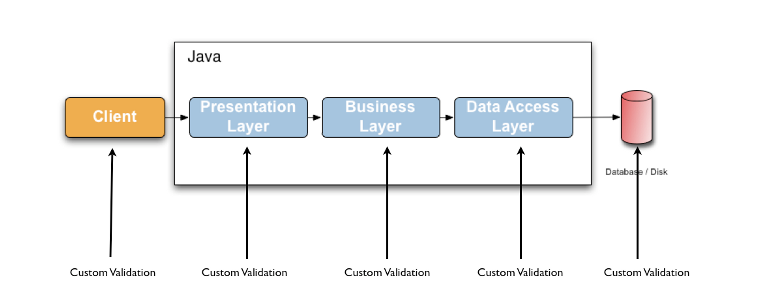
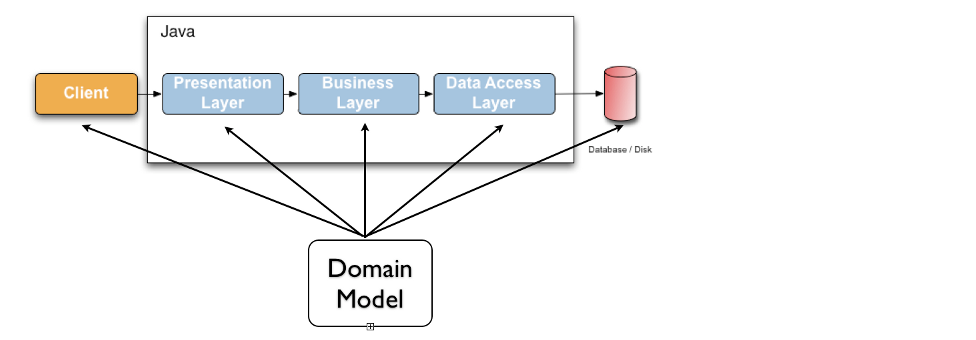
Validating data is a common task that occurs in all application layers, from the presentation layer to the persistence layer. Usually, the same verification logic is implemented at each layer, which is time-consuming and error prone. In order to avoid repeating these verifications, developers often bundle the verification logic directly into the domain model and mix the domain class with the verification code, which is actually the metadata about the class itself.
Jakarta Bean Validation 2.0 - defines metadata models and APIs for entity and method validation. The default metadata source is annotations, which can overwrite and extend metadata by using XML. The API does not depend on a specific application layer or programming model. In particular, it does not rely on the Web or persistence layer, and can be used for server-side application programming and rich client Swing application developers.
3, Import dependency
<dependency>
   <groupId>org.springframework.boot</groupId>
    <artifactId>spring-boot-starter-validation</artifactId>
</dependency>
4, Common notes
| Constraint annotation name | Constraint annotation description |
|---|---|
| @Null | The object used to verify is null |
| @NotNull | The object used cannot be null, and the string with length 0 cannot be checked |
| @NotBlank | It is only used on String type, cannot be null, and the size after trim() is > 0 |
| @NotEmpty | Used for collection class, String class cannot be null, and size > 0. But the String with spaces cannot be verified |
| @Size | Used to check whether the length of the object (Array,Collection,Map,String) is within the given range |
| @Length | The size used for the String object must be within the specified range |
| @Pattern | Rules for whether String objects conform to regular expressions |
| Used to check whether the String object conforms to the mailbox format | |
| @Min | Used to determine whether the Number and String objects are greater than or equal to the specified value |
| @Max | Used to determine whether the Number and String objects are less than or equal to the specified value |
| @AssertTrue | Used to check whether the Boolean object is true |
| @AssertFalse | Used to determine whether the Boolean object is false |
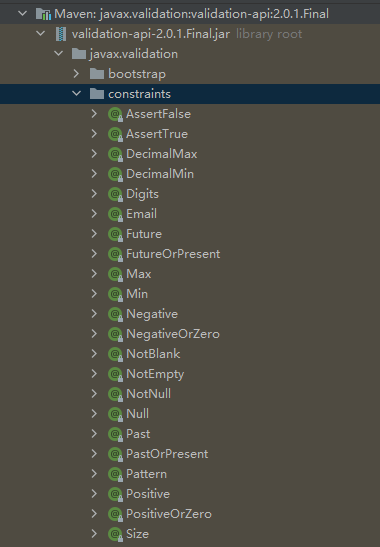
All of you refer to the jar package
5, The difference between @ Validated and @ Valid
@Validated:
- Provided by Spring
- Support group verification
- Can be used on types, methods, and method parameters. However, it cannot be used on member properties (fields)
- Because it cannot be added to the member attribute (field), the cascade verification cannot be completed alone. It needs to be combined with @ Valid
@Valid:
- Provided by JDK (standard JSR-303 specification)
- Group verification is not supported
- Can be used on methods, constructors, method parameters, and member properties (fields)
- It can be added to member attributes (fields) and can complete cascading verification alone
Summary: @ Validated is used when grouping. There are many student objects in a school object. You need to add @ Validated before the Controller method parameter, @ Valid is added to the student attribute in the school. If it is not added, the attribute in the student object cannot be verified!
Differential reference blog address
example:
@Data
public class School{

    @NotBlank
    private String id;
    private String name;
    @Valid                // It needs to be added, otherwise the verification annotation in the student class will not be verified
    @NotNull 			  // And the nested validation can only be performed when the validation of this field is triggered.
    private List<Student> list;
}

@Data
public class Student {

    @NotBlank
    private String id;
    private String name;
    private int age;

}

@PostMapping("/test")
public Result test(@Validated @RequestBody School school){

}
6, Common use test
1. Add verification for entity class
import lombok.Data;

import javax.validation.constraints.Min;
import javax.validation.constraints.NotBlank;
import javax.validation.constraints.NotNull;
import javax.validation.constraints.Pattern;
import java.io.Serializable;

@Data
public class BrandEntity implements Serializable {
	private static final long serialVersionUID = 1L;

	/**
	 * Brand id
	 */
	@NotNull(message = "Modification must have brand id")
	private Long brandId;
	/**
	 * Brand name F
	 */
	@NotBlank(message = "Brand name must be submitted")
	private String name;
	/**
	 * Brand logo address
	 */
	@NotBlank(message = "Address must not be empty")
	private String logo;
	/**
	 * introduce
	 */
	private String descript;

	/**
	 * Retrieve initials
	 */
	//regular expression
	@Pattern(regexp = "^[a-zA-Z]$",message = "The first letter of the search must be a letter")
	private String firstLetter;
	/**
	 * sort
	 */
	@Min(value = 0,message = "Sort must be greater than or equal to 0")
	private Integer sort;

}
2. Unified return type
import com.alibaba.druid.util.StringUtils;
import io.swagger.annotations.ApiModel;
import io.swagger.annotations.ApiModelProperty;
import lombok.AllArgsConstructor;
import lombok.Data;
import lombok.NoArgsConstructor;

//Unified return results
@Data
@NoArgsConstructor
@AllArgsConstructor
@ApiModel
public class Result<T> {
    @ApiModelProperty("Response code")
    private Integer code;
    @ApiModelProperty("Corresponding information")
    private String msg;
    @ApiModelProperty("Returns an object or collection")
    private T data;

    //Success code
    public static final Integer SUCCESS_CODE = 200;
    //Success message
    public static final String SUCCESS_MSG = "SUCCESS";

    //fail
    public static final Integer ERROR_CODE = 201;
    public static final String ERROR_MSG = "System abnormality,Please contact the administrator";
    //Response code without permission
    public static final Integer NO_AUTH_COOD = 999;

    //Successful execution
    public static <T> Result<T> success(T data){
        return new Result<>(SUCCESS_CODE,SUCCESS_MSG,data);
    }
    //Execution failed
    public static <T> Result failed(String msg){
        msg = StringUtils.isEmpty(msg)? ERROR_MSG : msg;
        return new Result(ERROR_CODE,msg,"");
    }
    //Method of passing in error code
    public static <T> Result failed(int code,String msg){
        msg = StringUtils.isEmpty(msg)? ERROR_MSG : msg;
        return new Result(code,msg,"");
    }
    //Data of incoming error code
    public static <T> Result failed(int code,String msg,T data){
        msg = StringUtils.isEmpty(msg)? ERROR_MSG : msg;
        return new Result(code,msg,data);
    }
}
3. Testing
@PostMapping("/add")
public Result add(@Valid @RequestBody BrandEntity brandEntity)  {

    return Result.success("success");
}
What's wrong: Xiaobian has no problem adding it to the company's project, but it just can't trigger the verification. What we see is that the Springboot version is too high, so we need to add the following dependencies to trigger it.
<dependency>
    <groupId>org.hibernate.validator</groupId>
    <artifactId>hibernate-validator</artifactId>
    <version>6.0.18.Final</version>
</dependency>
4. General test results

5. We return the exception to the page
@PostMapping("/add")
public Result add(@Valid @RequestBody BrandEntity brandEntity, BindingResult bindingResult){

    if (bindingResult.hasErrors()){
        Map<String,String> map = new HashMap<>();
        bindingResult.getFieldErrors().forEach(item ->{
            map.put(item.getField(),item.getDefaultMessage());
        });
        return Result.failed(400,"The data submitted is not standard",map);
    }

    return Result.success("success");
}
6. Exception handling results
{
    "code": 400,
    "data": {
        "name": "Brand name must be submitted",
        "logo": "Address must not be empty"
    },
    "msg": "The data submitted is not standard"
}
7, Extract global exception handling
1. Experience
Above, we need to write on each verification interface, so we need to pull it out and make a global exception. And it needs to be improved. The original is to put the error information into data, but under normal circumstances, data is the data returned to the front end. If we put the abnormal data in this way, the data of data will be ambiguous. In this way, the front-end does not know whether it is data or error information. In this way, you can directly display the tips in msg on the front-end!
2. Write ExceptionControllerAdvice
import com.wang.test.demo.response.Result;
import lombok.extern.slf4j.Slf4j;
import org.springframework.validation.BindingResult;
import org.springframework.web.bind.MethodArgumentNotValidException;
import org.springframework.web.bind.annotation.ExceptionHandler;
import org.springframework.web.bind.annotation.RestControllerAdvice;

@Slf4j
@RestControllerAdvice(basePackages = "com.wang.test.demo.controller")
public class ExceptionControllerAdvice {

    @ExceptionHandler(value = MethodArgumentNotValidException.class)
    public Result handleVaildException(MethodArgumentNotValidException e){

        log.error("Problem in data verification:{},Exception type:{}",e.getMessage(),e.getClass());
        BindingResult bindingResult = e.getBindingResult();
        StringBuffer stringBuffer = new StringBuffer();
        bindingResult.getFieldErrors().forEach(item ->{
            //Get error information
            String message = item.getDefaultMessage();
            //Get wrong property name
            String field = item.getField();
            stringBuffer.append(field + ":" + message + " ");
        });
        return Result.failed(400, stringBuffer + "");

    }

    @ExceptionHandler(value = Throwable.class)
    public Result handleException(Throwable throwable){

        log.error("error",throwable);
        return Result.failed(400, "System abnormality");
    }
}
3. Test results
{
    "code": 400,
    "data": "",
    "msg": "logo:Address must not be empty name:Brand name must be submitted "
}
8, Group check
1. Demand
When doing verification, we usually encounter the addition and modification of an entity class. Their verification rules are different, so grouping is particularly important. It can help us build less redundant entity classes, so we must be able to.
2. Create a grouping interface (no need to write anything)
public interface EditGroup {
}
public interface AddGroup {
}
3. Add a group to the field that needs ambiguity
/**
 * Brand id
 */
@NotNull(message = "Modification must have brand id",groups = {EditGroup.class})
@Null(message = "New cannot be specified id",groups = {AddGroup.class})
private Long brandId;
// Other properties remain unchanged
4. Add verification rules for different controllers
Note: we need to group, so @ Valid cannot be used. Use @ Validated instead. I believe you have seen the difference between them!
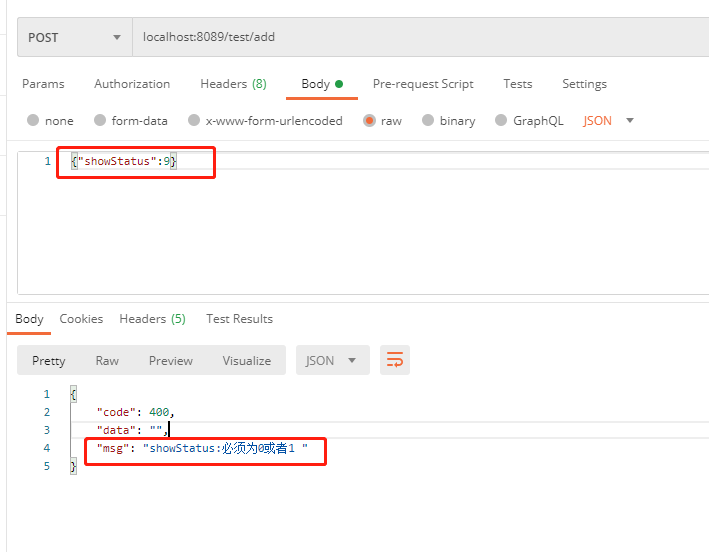
@PostMapping("/add")
public Result add(@Validated({AddGroup.class}) @RequestBody BrandEntity brandEntity){
return Result.success("success");
}
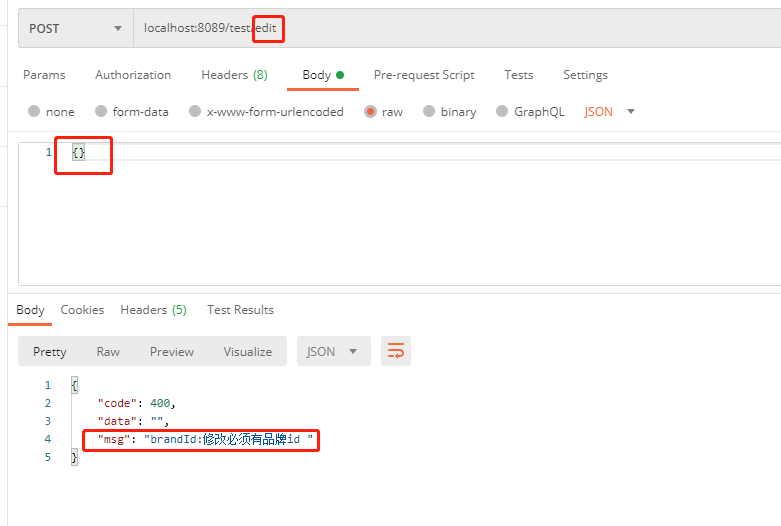
@PostMapping("/edit")
public Result edit(@Validated({EditGroup.class}) @RequestBody BrandEntity brandEntity){
return Result.success("success");
}
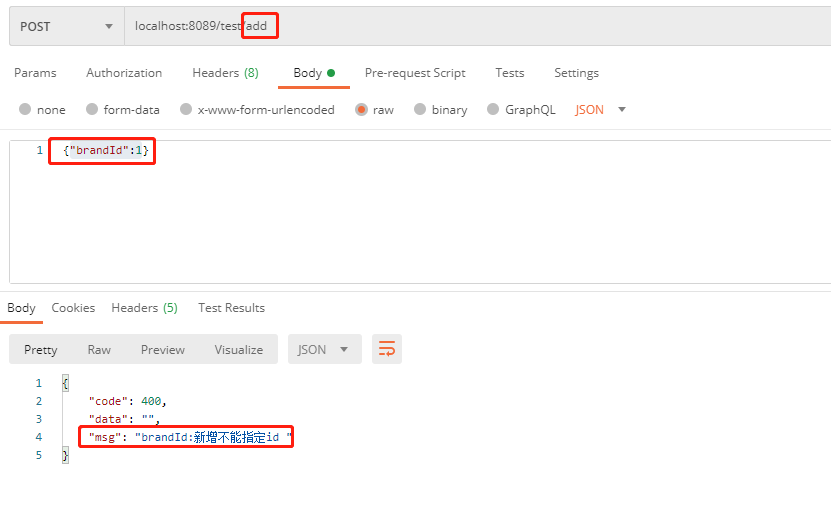
5. Test
9, Custom verification
1. Define a user-defined verifier
import javax.validation.ConstraintValidator;
import javax.validation.ConstraintValidatorContext;
import java.util.HashSet;
import java.util.Set;

//Write a custom validator
public class ListValueConstraintValidator implements ConstraintValidator<ListValue,Integer> {

    private Set<Integer> set=new HashSet<Integer>();

    //Initialization method
    @Override
    public void initialize(ListValue constraintAnnotation) {
        int[] value = constraintAnnotation.vals();
        for (int i : value) {
            set.add(i);
        }
    }
    /**
     * Judge whether the verification is successful
     * @param value  Value to be verified
     * @param context
     * @return
     */
    @Override
    public boolean isValid(Integer value, ConstraintValidatorContext context) {
        return  set.contains(value);
    }
}
2. Define an annotation for use with the verifier
@Documented
@Constraint(validatedBy = { ListValueConstraintValidator.class })
@Target({ METHOD, FIELD, ANNOTATION_TYPE, CONSTRUCTOR, PARAMETER, TYPE_USE })
@Retention(RUNTIME)
public @interface ListValue {
    // Use this attribute to validate Properties
    String message() default "{com.atguigu.common.valid.ListValue.message}";

    Class<?>[] groups() default { };

    Class<? extends Payload>[] payload() default { };

    int[] vals() default {};

}
3. Add a new verification attribute to the entity class
Note: we have made grouping above. If the attribute does not specify grouping, it will not take effect. Now some of our attribute verification has not worked. Now only brandId and showStatus work.
/**
* Display status [0-not displayed; 1-displayed]
*/
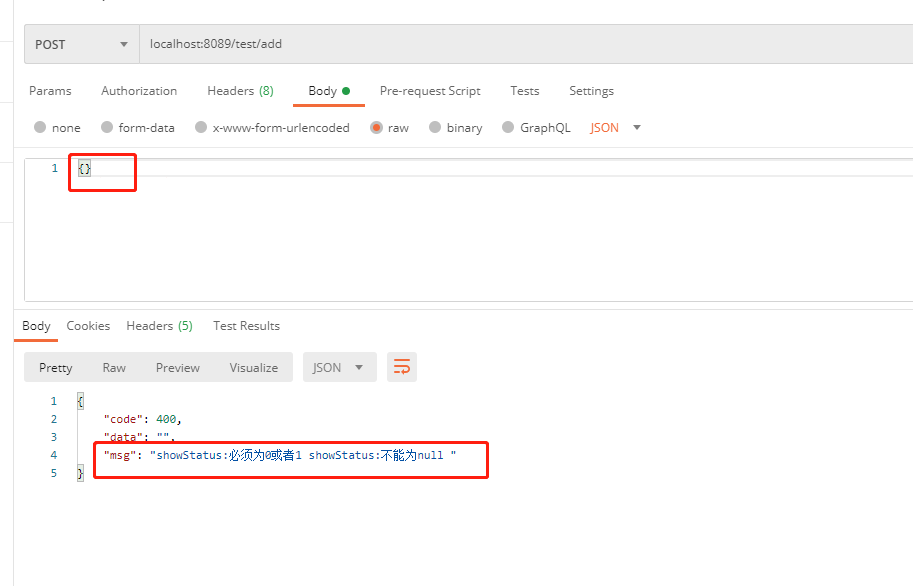
@NotNull(groups = {AddGroup.class, EditGroup.class})
@ListValue(vals = {0,1},groups = {AddGroup.class, EditGroup.class},message = "Must be 0 or 1")
private Integer showStatus;
4. Test
10, Summary
In this way, I almost have a basic understanding of JSR303, and there is no problem to meet the basic development! See here, collect and praise it. It's been sorted out for nearly a day!! Thank you!!
Only those who are destined to see their own website, welcome to visit!!!
Click to visit! Welcome to visit, there are many good articles in it!