introduce
A project developed by using vite + vue3 + pinia + ant design Vue + typescript complete technical route, with the launch of second level development update, the new vue3 composition api combined with setup to enjoy the silky development experience, the new pinia state manager and excellent design experience (1k size), the barrier free transition of antd to UI component library Ant Design Vue Safe and efficient typescript type support, code specification verification and multi-level permission management~
preface
I received a request two days ago, that is to extract the permission system of the main function modules and user modules of the original project to make a new background project, and iteratively add some new functions. It seems that there is nothing
Get the source code and look at the project. Good guy, the original project is a micro application project. The main application user module is react technology stack and the sub application module is vue2 technology stack. This direct CV method seems to be out of order??, After all, what I need to do is a single page application. Just determine a technical route. Look at the code logic and run
After running and trying, the two projects are basically started in about one minute. Look at the code vue project, and the whole business logic code is written in one piece
When I thought of asking the boss for the source code, I said it was an old project. It should be faster to build a new one
There's nothing wrong with that. I don't say much. I'll open it directly. This time, I'll go directly to vite + vue3

characteristic
- Scaffolding tools: efficient and fast Vite
- ?? Front end frame: the most fashionable Vue3 at present
- ?? State Manager: vue3 rookie Pinia, like react zustand, friendly api and asynchronous processing
- ?? Development language: politically correct TypeScript
- ?? UI components: Ant Design Vue is used by antd developers without obstacles, with familiar formula and familiar taste
- ?? css Style: less, postcss
- ?? Code specification: Eslint, Prettier, Commitlint
- ?? Permission management: page level, menu level, button level and interface level
- Dependency on demand loading: unplugin auto import, which can automatically import the used vue, vue router and other dependencies
- ?? Component on-demand import: unplugin Vue components. Whether it is a third-party UI component or a custom component, it can realize automatic on-demand import and TS syntax prompt
Project directory
├── .husky                              // husky git hooks configuration directory
    ├── _                               // Directory file generated by husky script
    ├── commit-msg                      // The commit MSG hook is used to verify the message format
    ├── pre-commit                      // The pre commit hook is mainly used to cooperate with eslint
├── config                              // Global profile
    ├── vite                            // vite related configuration
    ├── constant.ts                     // Project configuration
    ├── themeConfig.ts                  // Theme configuration
├── dist                                // Default build output directory
├── mock                                // Front end data mock
├── public                              // Static directory under vite project
└── src                                 // Source directory
    ├── api                             // Interface related
    ├── assets                          // Public files (such as image, css, font, etc.)
    ├── components                      // Project components
    ├── directives                      // Custom instruction
    ├── enums                           // Custom constant (enumeration)
    ├── hooks                           // Customize hooks
    ├── layout                          // Global layout
    ├── router                          // route
    ├── store                           // Status manager
    ├── utils                           // Tool library
    ├── views                           // Page module directory
        ├── login                       // login page module
        ├── ...
    ├── App.vue                         // vue top level file
    ├── auto-imports.d.ts               // Unplugin auto import plug-in generation
    ├── components.d.d.ts               // Unplugin Vue components plug-in generation
    ├── main.ts                         // Project entry file
    ├── shimes-vue.d.ts                 // vite default ts type file
    ├── types                           // Project type definition folder
├── .editorconfig                       // IDE format specification
├── .env                                // environment variable
├── .eslintignore                       // eslint ignore
├── .eslintrc                           // eslint configuration file
├── .gitignore                          // git ignore
├── .npmrc                              // npm profile
├── .prettierignore                     // prettierc ignored
├── .prettierrc                         // prettierc configuration file
├── index.html                          // Entry file
├── LICENSE.md                          // LICENSE
├── package.json                        // package
├── pnpm-lock.yaml                      // pnpm-lock
├── postcss.config.js                   // postcss
├── README.md                           // README
├── tsconfig.json                       // typescript configuration file
└── vite.config.ts                      // vite
development
Project initialization
If you use the vscode editor to develop vue3, be sure to install the Volar plug-in. It is better to use it with vue3 (incompatible with the original Vetur)
use vite cli Quickly create a project
yarn create vite project-name --template vue-ts
Installation related dependencies
Recommend new generation of performance and PN management tools_ Modules dependency management is excellent
Cooperation is recommended npmrc configuration usage
# Upgrade some dependent packages to node_modules
# Solve the problem that some package modules are not found
# For pnpm
shamefully-hoist = true

# Node sass download problem
# sass_binary_site="https://npm.taobao.org/mirrors/node-sass/"
Code specification
Tools: husky, eslint, prettier
There are many specific ways to use it online. I also said it in another article before. I won't repeat it here~
a Vite2 + Typescript + React + Antd + Less + Eslint + Prettier + Precommit template
It is mainly the concept of automation to complete the specified things at an appropriate time
- Combined with VsCode editor (format is automatically executed when saving: editor.formatOnSave: true)
- Cooperate with Git hooks hook (execute before commit or commit: pre commit = > NPM run lint: Lint staged)
be careful:
commitlint is installed differently for different systems commitlint , the installation error may be invalid~
# Install commitlint cli and conventional config
npm install --save-dev @commitlint/{config-conventional,cli}
# For Windows:
npm install --save-dev @commitlint/config-conventional @commitlint/cli
function
vue capability support
Template syntax with jsx syntax is very convenient and flexible to use~
Some required plug-ins
{
    // "@ vitejs / plugin legacy": "^ 1.6.2"
    "@vitejs/plugin-vue": "^1.9.3", // vue support
    "@vitejs/plugin-vue-jsx": "^1.2.0", // jsx support
}
Status manager Pinia
vue is a new generation of state manager. Students who have used react zustand should feel familiar with it
Pinia is a wrapper around the Vue 3 Composition API. Therefore, you don't have to initialize it as a plug-in unless you need Vue devtools support, SSR support and webpack code segmentation
-
Very lightweight, only 1 KB
-
Intuitive API, intuitive and easy to learn
-
Modular design, easy to split state
-
Comprehensive TS support
//... introduce related dependencies
interface IUserInfoProps{
name: string;
avatar: string;
mobile: number;
auths: string[]
}interface UserState {
userInfo: Nullable;
}//Create store
export const useUserStore = defineStore({
ID: 'app user', / / unique ID, which can be used with Vue devtools
state: (): UserState => ({
// userInfo
userInfo: null,
}),
getters: {
getUserInfo(): Nullable {
return this.userInfo || null;
},
},
actions: {
setUserInfo(info: Nullable) {
this.userInfo = info ?? null;
},
resetState() {
this.userInfo = null;
},/** * @description: fetchUserInfo */ async fetchUserInfo(params: ReqParams) { const res = await fetchApi.userInfo(params); if (res) { this.setUserInfo(res); } },},
})
Used in components
// TS type inference and asynchronous functions are very convenient to use
import { useHomeStore } from '/@/store/modules/home';

const store = useHomeStore();
const userInfo = computed(() => store.getUserInfo);

onMounted(async () => {
  await store.fetchInfo(); // Asynchronous function
  // ...
});
UI components are loaded on demand and imported automatically
Understand the basic concept: vite comes with on-demand loading (for js). Here we mainly do on-demand loading for styles
Scheme 1: vite plugin style import
import styleImport from 'vite-plugin-style-import'

//
plugins:[
  styleImport({
    libs: [
      {
        libraryName: 'ant-design-vue',
        esModule: true,
        resolveStyle: (name) => {
          return `ant-design-vue/es/${name}/style/index`
        },
      }
    ]
  })
]
Scheme 2: unplugin Vue components
Recommended use unplugin-vue-components plug-in unit
The plug-in only needs to add the corresponding AntDesignVueResolver in the vite plugin. It also supports the automatic registration of customized components, which is very convenient
import { AntDesignVueResolver } from 'unplugin-vue-components/resolvers';
import Components from 'unplugin-vue-components/vite';

// vite. config. Add the following configuration to TS plugins
export default defineConfig({
  plugins: [
    Components({
      resolvers: [
        AntDesignVueResolver(), // ant-design-vue
        // ElementPlusResolver(), // Element Plus
        // VantResolver(), // Vant
      ]
    })
  ]
})
Of course, it doesn't matter if you don't have the Resolver loader of the corresponding UI framework. It also supports custom configuration
Components({
  resolvers: [
    // example of importing Vant
    (name) => {
      // where `name` is always CapitalCase
      if (name.startsWith('Van'))
        return { importName: name.slice(3), path: 'vant' }
    }
  ]
})
Another powerful function: the plug-in supports not only on-demand import of UI framework components, but also automatic on-demand import of project components
For example, when we use the Card component of Ant Design Vue or other components defined by ourselves, we don't need to import them. We can use them directly. The plug-in will automatically import them for us on demand. Combined with the TS syntax prompt, we can improve the development efficiency~
The configuration is as follows:
Components({
  // allow auto load markdown components under `./src/components/`
  extensions: ['vue'],

  // allow auto import and register components
  include: [/.vue$/, /.vue?vue/],

  dts: 'src/components.d.ts',
})
You need to add components. In the src directory d. TS file, which will be automatically updated by the plug-in
- components.d.ts action
The direct function is to generate correspondence under the project d.tstype type file is used for syntax prompt and type detection
- be careful
"unplugin-vue-components": "^0.17.2"
Known issues with current version: issues 174
For the notification / message component of Ant Design Vue, when used in js, the plug-in will not perform automatic import capability (styles will not be imported)
The final effect is: message Success ('xx ') can create DOM elements, but there is no relevant style code
Because the design principle of the plug-in is processed according to the use of components in vue template template, the plug-in cannot be queried during function call
Solution:
- Use the vite plugin style import plug-in instead
- Manually introduce the message component style globally, import 'ant design Vue / ES / message / style'
- Manually add < a-message / > in the template of vue component for plug-in index dependency
Dependency auto import on demand
- unplugin-auto-import
vue related defineComponent, computed, watch and other modules depend on the use, and the plug-ins are imported automatically. You don't need to care about import, you can use it directly
The plug-in supports:
- vue
- vue-router
- vue-i18n
- @vueuse/head
- @vueuse/core
- ...
Of course, you can also customize the configuration unplugin-auto-import
The usage is as follows:
import AutoImport from 'unplugin-auto-import/vite'

export default defineConfig({
  // ...
  plugins: [
    AutoImport({
      imports: [
        'vue',
        'vue-router',
        'vue-i18n',
        '@vueuse/head',
        '@vueuse/core',
      ],
      dts: 'src/auto-imports.d.ts',
    })
  ]
})
You need to add auto imports d. TS file, which will be automatically updated by the plug-in
The final effect is:
For example, the ref method can be used directly with corresponding TS syntax prompt, instead of manually importing {ref} from 'Vue'
Custom theme
For custom theme settings, refer to the official document configuration. There are two general methods
- Load on demand and modify variables with webpack/vite loader attribute
- Full introduction, with variables Less custom style overrides frame theme style
Here, we use the first method to load food on demand through loader configuration
Under vite project, please manually install less, pnpm add less -D
css: {
  preprocessorOptions: {
    less: {
      modifyVars: { 'primary-color': 'red' },
      javascriptEnabled: true, // This is necessary
    },
  },
}
Note: after using the plugin Vue components for on-demand loading configuration, the settings of relevant less variables need to be opened synchronously. importStyle: 'less', unplugin-vue-components issues 160
AntDesignVueResolver({ importStyle: 'less' }) // It's important here
mock data
- Vite plugin mock plug-in
vite plugin configuration
viteMockServe({
  ignore: /^_/,
  mockPath: 'mock',
  localEnabled: true,
  prodEnabled: false,
  // The development environment does not need to be concerned
  // injectCode is only affected by prodEnabled
  // https://github.com/anncwb/vite-plugin-mock/issues/9
  // The following code will be injected into main ts
  injectCode: `
      import { setupProdMockServer } from '../mock/_createProductionServer';

      setupProdMockServer();
      `,
})
Create under root directory_ createProductionServer.ts file
import { createProdMockServer } from 'vite-plugin-mock/es/createProdMockServer';

// Batch loading
const modules = import.meta.globEager('./**/*.ts');

const mockModules: any[] = [];
Object.keys(modules).forEach((key) => {
  if (key.includes('/_')) {
    return;
  }
  mockModules.push(...modules[key].default);
});

/**
 * Used in a production environment. Need to manually import all modules
 */
export function setupProdMockServer() {
  createProdMockServer(mockModules);
}
In this way, the non_ The first file will be automatically loaded into a mock file
For example:
import Mock from 'mockjs';

const data = Mock.mock({
  'items|30': [
    {
      id: '@id',
      title: '@sentence(10, 20)',
      account: '@phone',
      true_name: '@name',
      created_at: '@datetime',
      role_name: '@name',
    },
  ],
});

export default [
  {
    url: '/table/list',
    method: 'get',
    response: () => {
      const items = data.items;
      return {
        code: 0,
        result: {
          total: items.length,
          list: items,
        },
      };
    },
  },
];
After configuring the proxy, you can directly request / api/table/list to get the data
Proxy proxy
import proxy from './config/vite/proxy';

export default defineConfig({
  // server
  server: {
    hmr: { overlay: false }, // Disable or configure HMR connection settings server hmr. Overlay is false to disable the server error mask layer
    // Service configuration
    port: VITE_PORT, // Type: number specifies the server port;
    open: false, // Type: boolean | string automatically opens the application in the browser when the server starts;
    cors: false, // Type: boolean | CorsOptions configure CORS for the development server. Enable and allow any source by default
    host: '0.0.0.0', // Support IP initiated access
    proxy,
  },
})
The proxy is as follows
import {
  API_BASE_URL,
  API_TARGET_URL,
} from '../../config/constant';
import { ProxyOptions } from 'vite';

type ProxyTargetList = Record<string, ProxyOptions>;

const ret: ProxyTargetList = {
  // test
  [API_BASE_URL]: {
    target: API_TARGET_URL,
    changeOrigin: true,
    rewrite: (path) => path.replace(new RegExp(`^${API_BASE_URL}`), ''),
  },
  // mock
  // [MOCK_API_BASE_URL]: {
  //   target: MOCK_API_TARGET_URL,
  //   changeOrigin: true,
  //   rewrite: (path) => path.replace(new RegExp(`^${MOCK_API_BASE_URL}`), '/api'),
  // },
};

export default ret;
Environment variables env
I put the system configuration in config / constant TS management
In order to facilitate the management of interfaces and parameter configurations in different environments, environment variables can be used Env, e.g env,. env.local,. env.development,. env.production
It is very convenient to use with dotenv library
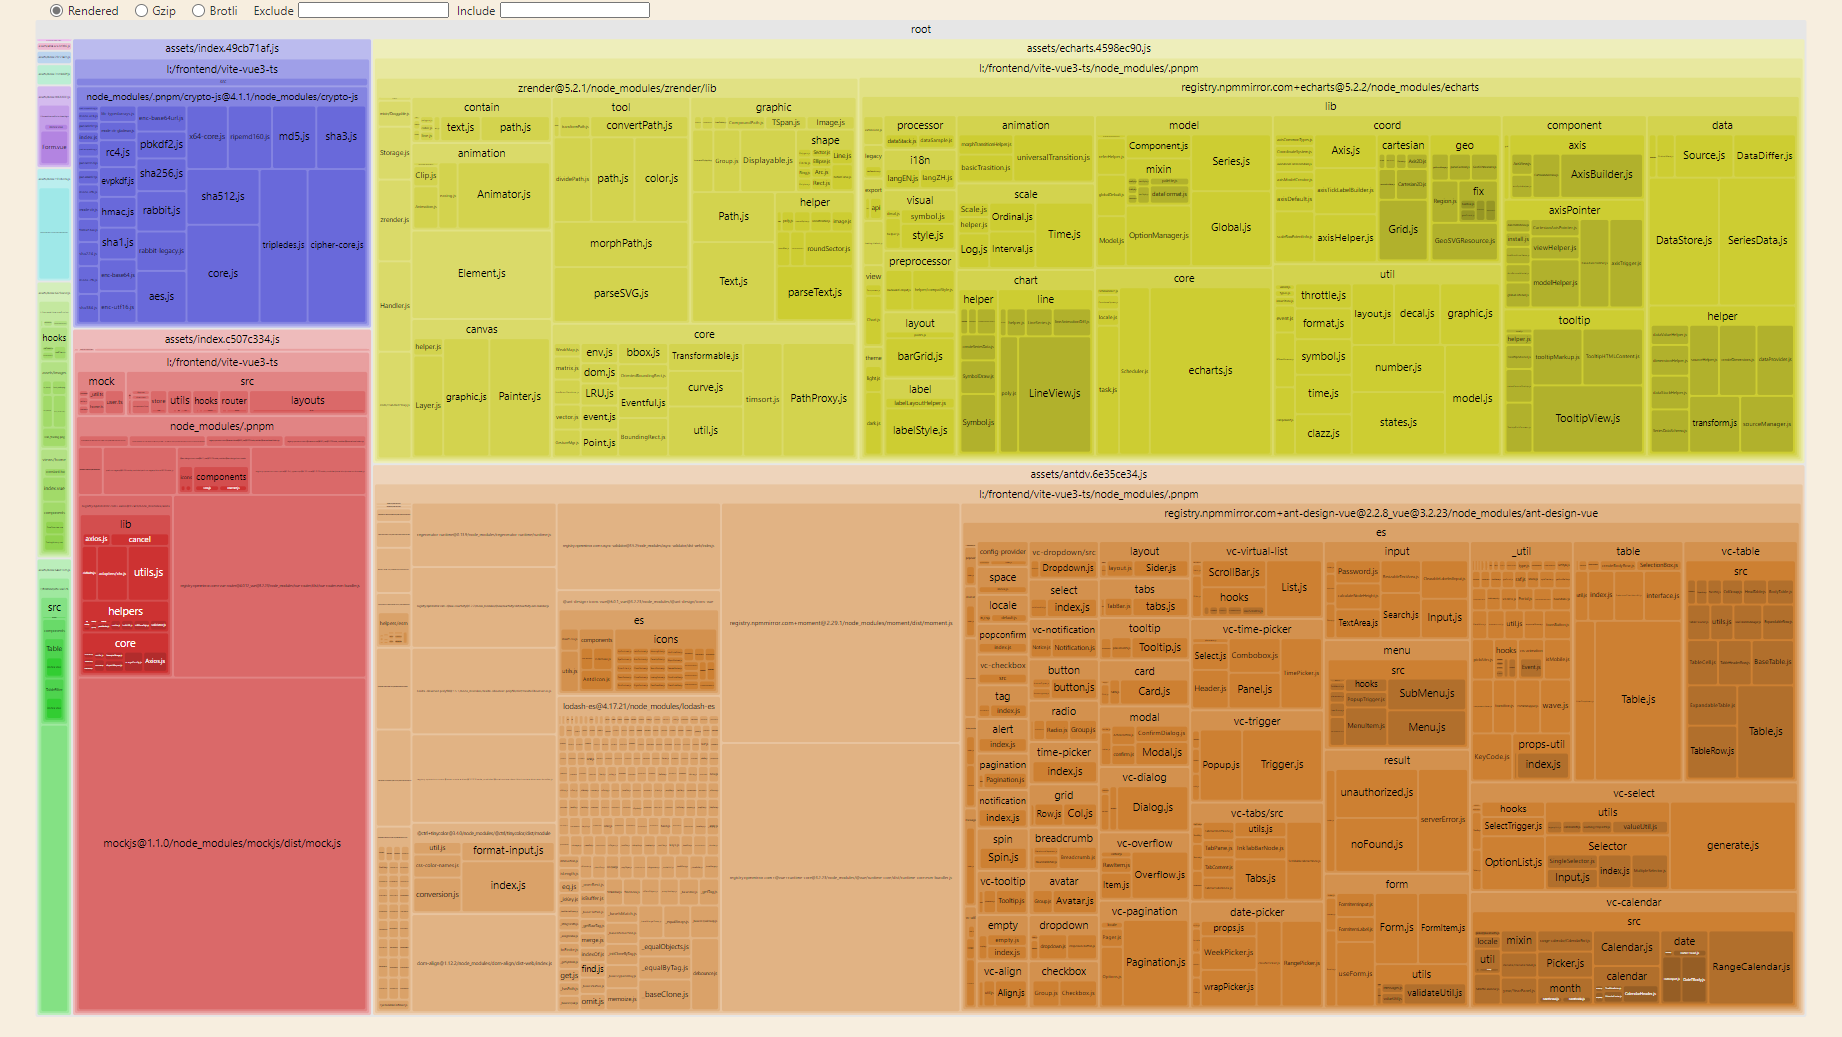
Package dependency analysis visualization
Plug in: rollup plugin visualizer
import visualizer from 'rollup-plugin-visualizer';

visualizer({
  filename: './node_modules/.cache/visualizer/stats.html',
  open: true,
  gzipSize: true,
  brotliSize: true,
})
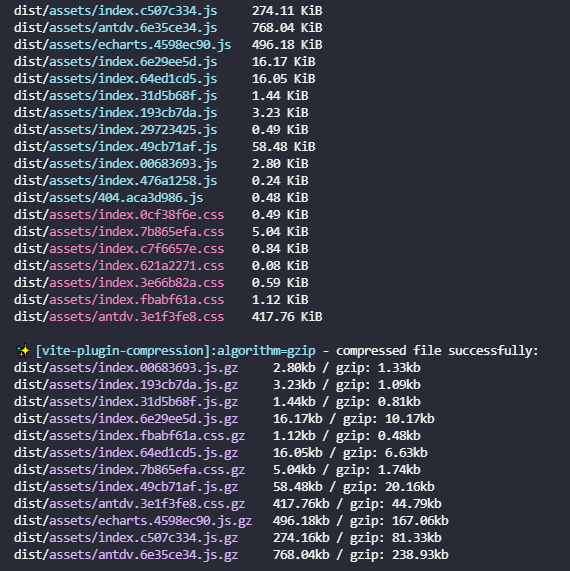
Code compression
Plug in: vite plugin compression
import compressPlugin from 'vite-plugin-compression';

compressPlugin({
  ext: '.gz',
  deleteOriginFile: false,
})
Chunk unpacking
If you want to separate package dependencies such as ant design Vue, you can also manually configure the manualChunks property
// vite.config.ts
build: {
  rollupOptions: {
    output: {
      manualChunks: configManualChunk
    }
  }
}


// optimizer.ts
const vendorLibs: { match: string[]; output: string }[] = [
  {
    match: ['ant-design-vue'],
    output: 'antdv',
  },
  {
    match: ['echarts'],
    output: 'echarts',
  },
];

export const configManualChunk = (id: string) => {
  if (/[\/]node_modules[\/]/.test(id)) {
    const matchItem = vendorLibs.find((item) => {
      const reg = new RegExp(`[\/]node_modules[\/]_?(${item.match.join('|')})(.*)`, 'ig');
      return reg.test(id);
    });
    return matchItem ? matchItem.output : null;
  }
};
Compatible processing
Plug in: @ vitejs / plugin legacy
Compatible with browsers that do not support the < script type = "module" > feature, or IE browsers
// Native ESM
legacy({
  targets: ['defaults', 'not IE 11']
})

// IE11
// Regenerator runtime required
legacy({
  targets: ['ie >= 11'],
  additionalLegacyPolyfills: ['regenerator-runtime/runtime']
})
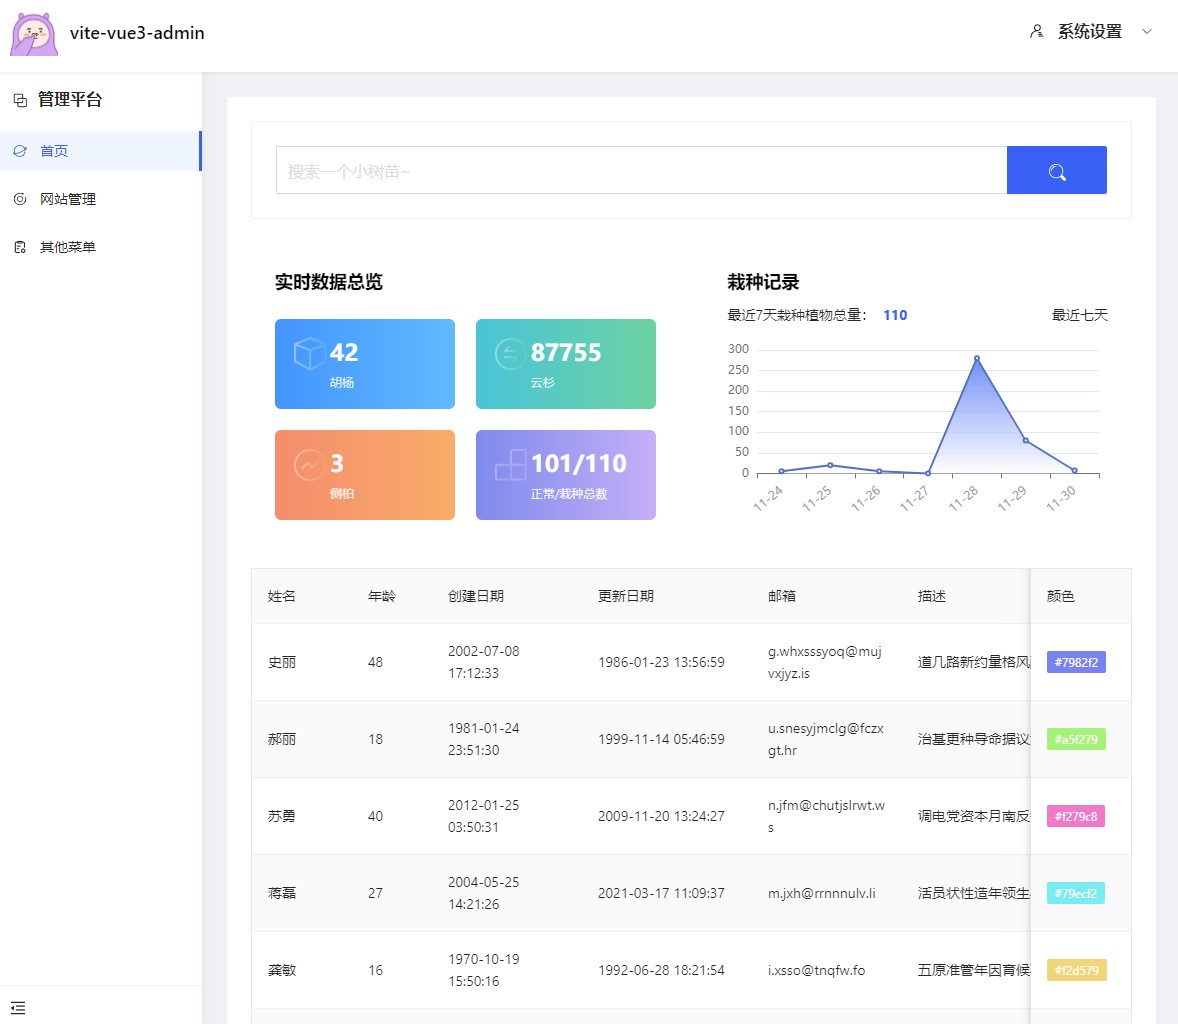
design sketch
home page
Visualization of package dependency analysis, partial screenshot
Start compression and compatibility to produce packaged products
Routing and layout
// router/index.ts
import { createRouter, createWebHashHistory } from 'vue-router'
import routes from './router.config'

const router = createRouter({
  history: createWebHashHistory(), //
  routes,
})

// main.ts
app.use(router); // Real columns can be used globally after mounting, such as < div @ Click = "$router. Push ('xx ')" > < / div >
The usage is as follows:
// router.config.ts
import BasicLayout from '/@/layouts/BasicLayout/index.vue'; // Basic layout
import BlankLayout from '/@/layouts/BlankLayout.vue'; // Empty layout
import type { RouteRecordRaw } from 'vue-router';

const routerMap: RouteRecordRaw[] = [
  {
    path: '/app',
    name: 'index',
    component: BasicLayout,
    redirect: '/app/home',
    meta: { title: 'home page' },
    children: [
      {
        path: '/app/home',
        component: () => import('/@/views/home/index.vue'),
        name: 'home',
        meta: {
          title: 'home page',
          icon: 'liulanqi',
          auth: ['home'],
        },
      },
      {
        path: '/app/others',
        name: 'others',
        component: BlankLayout,
        redirect: '/app/others/about',
        meta: {
          title: 'Other menus',
          icon: 'xitongrizhi',
          auth: ['others'],
        },
        children: [
          {
            path: '/app/others/about',
            name: 'about',
            component: () => import('/@/views/others/about/index.vue'),
            meta: { title: 'about', keepAlive: true, hiddenWrap: true },
          },
          {
            path: '/app/others/antdv',
            name: 'antdv',
            component: () => import('/@/views/others/antdv/index.vue'),
            meta: { title: 'assembly', keepAlive: true, breadcrumb: true },
          },
        ],
      },
    ]
  }
  ...
]
jurisdiction
- Support page and menu level permission management and routing management
- Support button level permission management
- Support interface level permission management
Several key words: router Addroutes dynamic routing, v-auth instruction, axios interception
Use router Beforeeach global routing hook
The core logic is as follows. For details, see the warehouse code router / permission ts
// Failed to get, requested data
await permissioStore.fetchAuths();
// Filter permission routing
const routes = await permissioStore.buildRoutesAction();
// 404 route must be placed behind permission route
routes.forEach((route) => {
  router.addRoute(route);
});
// hack method
// next() is not used because after executing router After addroute,
// Routes that have not been added to the original routing table will No match
// replace enables the route to enter again and match it
next({ ...to, replace: true });
Use the v-auth command to control button level permissions
function isAuth(el: Element, binding: any) {
  const { hasPermission } = usePermission();

  const value = binding.value;
  if (!value) return;
  if (!hasPermission(value)) {
    el.parentNode?.removeChild(el);
  }
}
axios interception
Request interceptors in axios request. Use add
// Interface permission interception
const store = usePermissioStoreWithOut();
const { url = '' } = config;
if (!WhiteList.includes(url) && store.getIsAdmin === 0) {
  if (!store.getAuths.includes(url)) {
    return Promise.reject('No operation permission');
  }
}
summary
When vite + vue3 was first used, it was also a process of learning and developing while stepping on the pit. Fortunately, the community is more active now, and there are corresponding solutions to many problems. It is basically ok to eat together with documents and github issue. This project also refers to some implementations and code management of Vue vben admin. This paper is used as a learning record of vue3~
After using it, you will find that vue3 and vue2 have completely different development experiences. Now vue3 has excellent support for TS, the development efficiency and quality have increased to a higher level, and it also supports JSX syntax. Development in the form of React is also feasible. Of course, it also has great flexibility when used with Vue template, You can customize your own code according to the scene. In combination with the current script setup development, it's cool to take off~
When using the composition api development mode of vue3, we must abandon the development logic of the previous options api. With hooks, we can freely combine and split the code, which is highly flexible and convenient for maintenance and management. There will be no more screwing of the whole code in the era of vue2
In a word: vite + vue3 + setup + ts + vscode volar plug-in, who uses who knows, cool batch~
Warehouse address: https://github.com/JS-banana/vite-vue3-ts