Hello, everyone. I'm xy???. It has been a year since I first came into contact with vue3 version. Due to vue3 With the release of version 2, the experimental mark of < script setup > has been removed, and many companies have started to use vue3 2 development project. This article is to help you how to quickly use vue3 x. typeScript, vite build a set of enterprise level development scaffolding??. Don't talk too much nonsense, just start doing it??
Preparation before construction
- Vscade: a necessary code writing artifact for front-end people
- Chrome: a developer friendly browser (I rely on it anyway)
- Nodejs & npm: configure the local development environment. After installing Node, you will find that npm will be installed together
- Vue.js devtools: Browser debugging plug-in
- Vue language features (vol): the vue3 essential plug-in developed by vscade provides syntax highlighting tips, which is very easy to use
- Vue 3 Snippets: vue3 quick input
Due to Vue JS devtools needs to be extended to Google expansion store. The intimate xy has already prepared crx files for everyone. The official account reply: VueDevTools can automatically get it?
The difference between Vue2 and Vue3
Because Vue3 is completely rewritten by TS, it has a strong performance in the definition and use of type judgment in applications. Multiple key return values of the same object must be typed by defining the corresponding interface. Otherwise, an error will be reported in ESLint.
The bidirectional data binding of vue2 uses an API object of ES5 Defineproperty () hijacks data in combination with publish subscribe mode. Vue3 uses the ProxyAPI of es6 for data broker.
Vue3 supports fragments
The biggest difference between Vue2 and Vue3: Vue2 uses the Options API while Vue3 uses the Composition API
Life cycle hook changes:
Vue2 ~~~~~~~~~~~ vue3
beforeCreate  -> setup()
created       -> setup()
beforeMount   -> onBeforeMount
mounted       -> onMounted
beforeUpdate  -> onBeforeUpdate
updated       -> onUpdated
beforeDestroy -> onBeforeUnmount
destroyed     -> onUnmounted
activated     -> onActivated
deactivated   -> onDeactivated
Introduce vite
Vite: the next generation front-end development and construction tool
- ?? Fast development server startup
- Lightweight and fast thermal module overload (HMR)
- ?? Rich functions
- ?? Built in optimization
- ?? Universal plug-in interface
- ?? Fully typed API
Vite (French for "fast", pronounced / vit /) is a new front-end construction tool that greatly improves the front-end development experience.
It mainly consists of two parts:
-
A development server that provides rich built-in functions based on native ES modules, such as amazing module hot update (HMR).
-
A set of build instructions that use Rollup to package your code, and it is pre configured to output optimized static resources for the production environment.
-
Vite provides a high degree of extensibility and configurability of JavaScript plug-ins.
Using vite to quickly create scaffolding
Compatibility Note: Vite requires node JS version > = 12.0.0.
-
Step 1: open cmd in the directory where the project file needs to be created and run the following command
npm 6.x
npm init @vitejs/app vite_vue3_ts --template
npm 7 +, additional double horizontal lines are required:
npm init @vitejs/app vite_vue3_ts – --template
yarn
yarn create @vitejs/app vite_vue3_ts --template
Here I use yarn to install
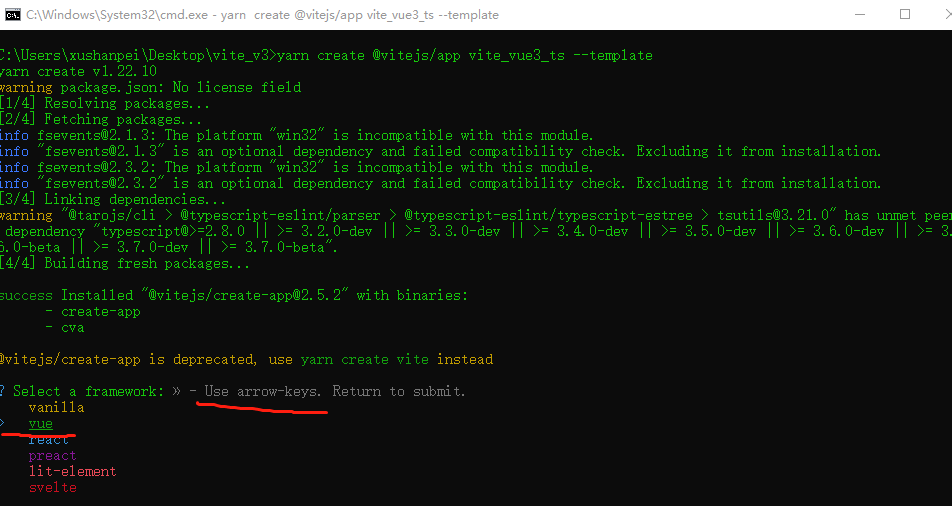
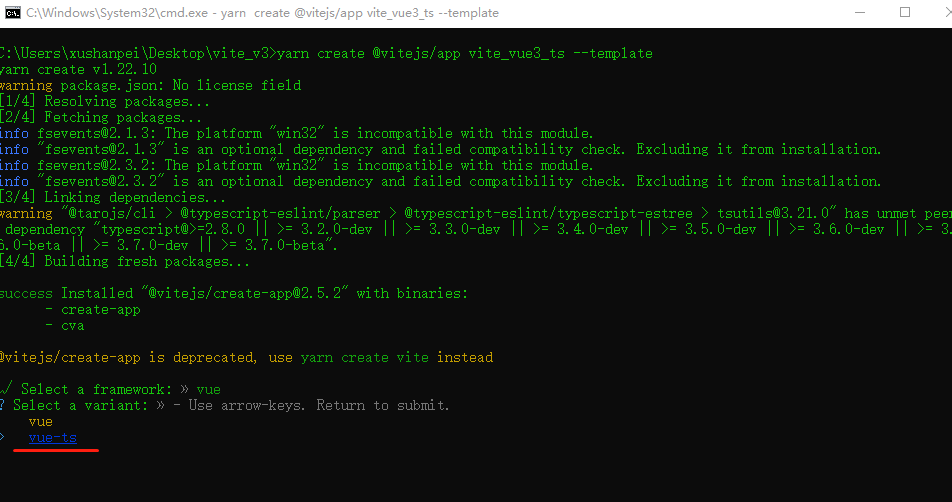
- Step 2: select vue enter = > vue TS enter
-
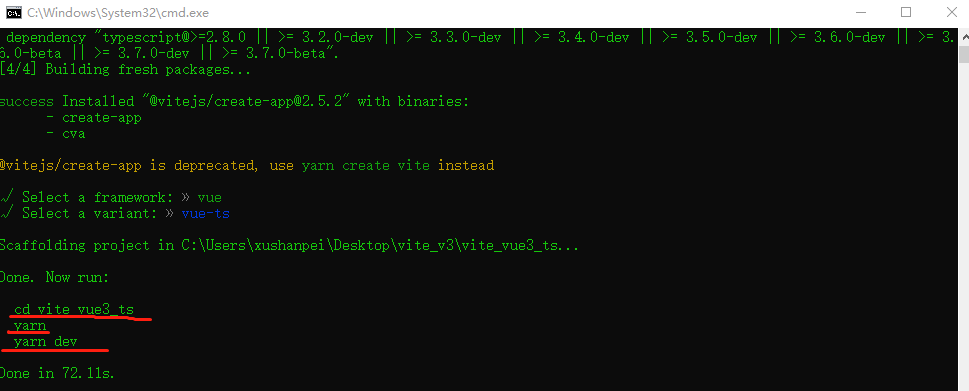
Step 3: cd to the project folder, install dependencies, and start the project
Enter project folder
cd vite_vue3_ts
Installation dependency
yarn
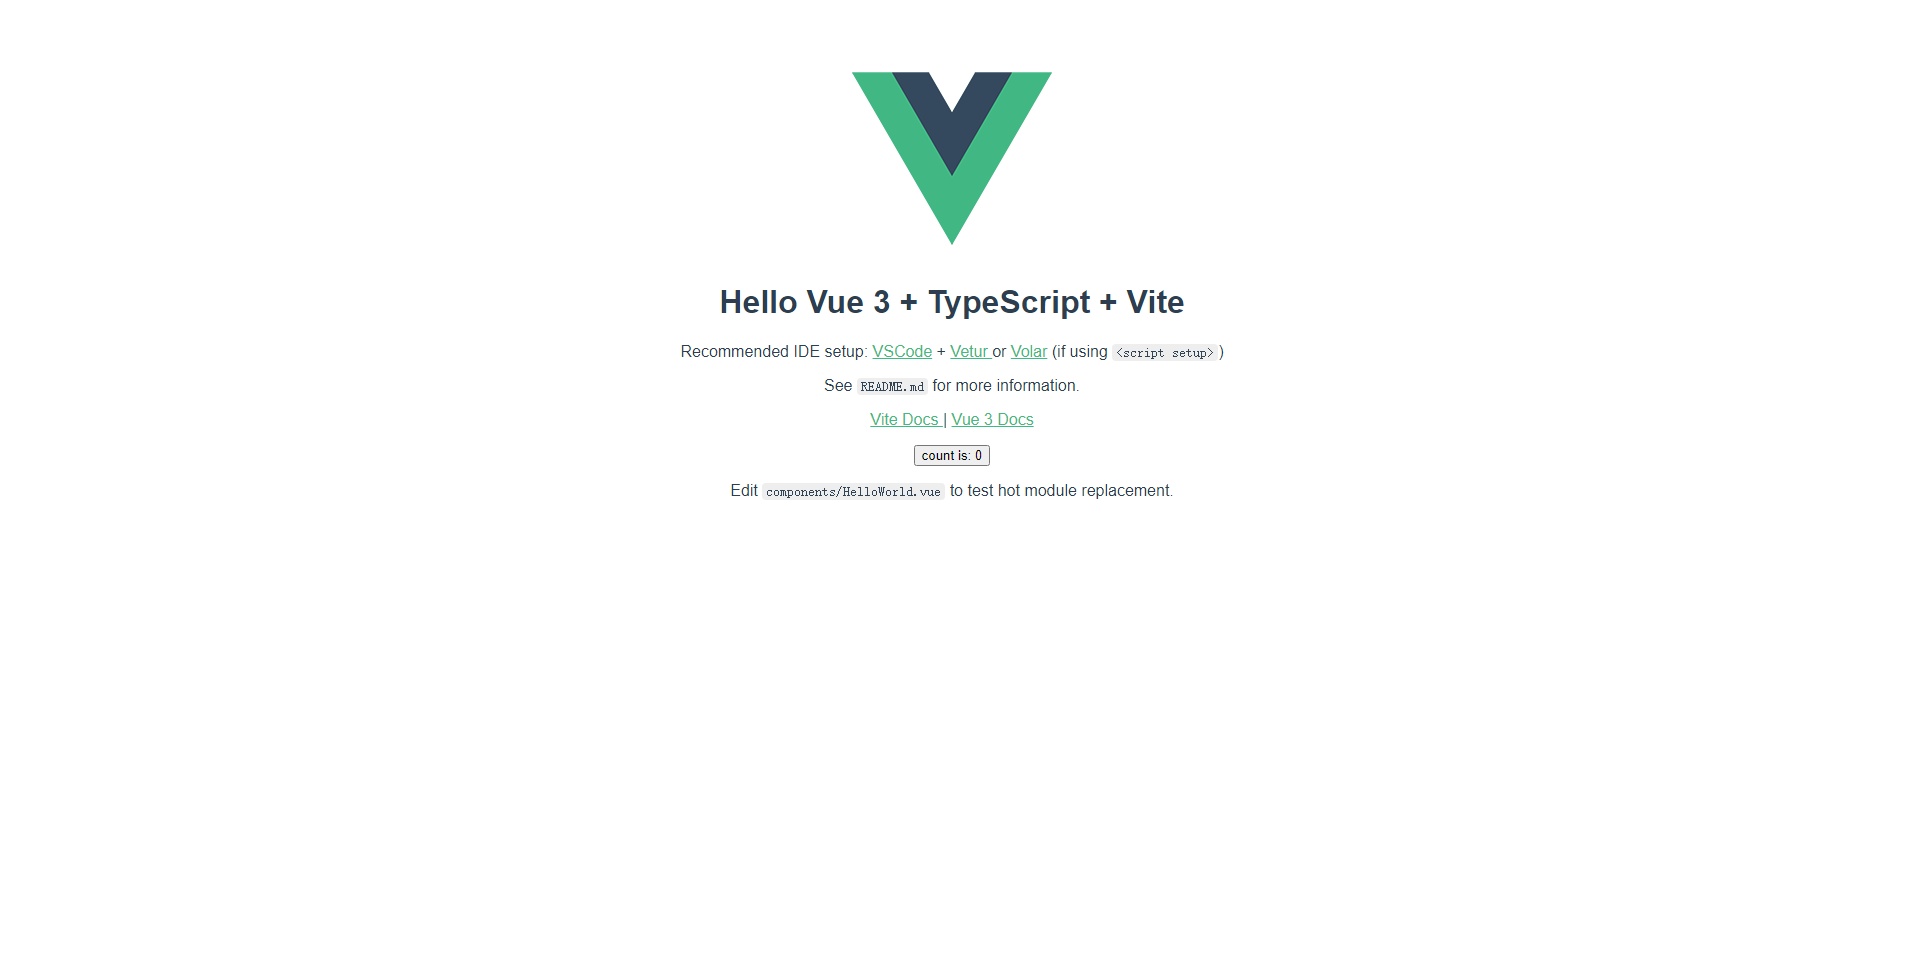
start-up
yarn dev
Constraint code style
Eslint support
# eslint installation
yarn add eslint --dev
# eslint plug-in installation
yarn add eslint-plugin-vue --dev

yarn add @typescript-eslint/eslint-plugin --dev

yarn add eslint-plugin-prettier --dev

# typescript parser
yarn add @typescript-eslint/parser --dev
Note: if the eslint installation reports an error:

You can try the following command:
yarn config set ignore-engines true
After successful installation, run the linkest command again
New under project eslintrc.js
Configure eslint verification rules:
module.exports = {
  root: true,
  env: {
    browser: true,
    node: true,
    es2021: true,
  },
  parser: 'vue-eslint-parser',
  extends: [
    'eslint:recommended',
    'plugin:vue/vue3-recommended',
    'plugin:@typescript-eslint/recommended',
    'plugin:prettier/recommended',
    // Abbreviation for eslint config prettier
    'prettier',
  ],
  parserOptions: {
    ecmaVersion: 12,
    parser: '@typescript-eslint/parser',
    sourceType: 'module',
    ecmaFeatures: {
      jsx: true,
    },
  },
  // Eslint plugin Vue @ typescript eslint / eslint plugin short for eslint plugin prettier
  plugins: ['vue', '@typescript-eslint', 'prettier'],
  rules: {
    '@typescript-eslint/ban-ts-ignore': 'off',
    '@typescript-eslint/no-unused-vars': 'off',
    '@typescript-eslint/explicit-function-return-type': 'off',
    '@typescript-eslint/no-explicit-any': 'off',
    '@typescript-eslint/no-var-requires': 'off',
    '@typescript-eslint/no-empty-function': 'off',
    '@typescript-eslint/no-use-before-define': 'off',
    '@typescript-eslint/ban-ts-comment': 'off',
    '@typescript-eslint/ban-types': 'off',
    '@typescript-eslint/no-non-null-assertion': 'off',
    '@typescript-eslint/explicit-module-boundary-types': 'off',
    'no-var': 'error',
    'prettier/prettier': 'error',
    // Disable console
    'no-console': 'warn',
    // Disable debugger
    'no-debugger': 'warn',
    // Duplicate case labels are prohibited
    'no-duplicate-case': 'warn',
    // Empty statement blocks are prohibited
    'no-empty': 'warn',
    // Unnecessary parentheses are prohibited
    'no-extra-parens': 'off',
    // Re assignment of function declarations is prohibited
    'no-func-assign': 'warn',
    // Unreachable code is prohibited after return, throw, continue and break statements
    'no-unreachable': 'warn',
    // Force all control statements to use a consistent bracket style
    curly: 'warn',
    // The default branch is required in the switch statement
    'default-case': 'warn',
    // Force point numbers to be used whenever possible
    'dot-notation': 'warn',
    // Requires = = = and==
    eqeqeq: 'warn',
    // Disable else block after return statement in if statement
    'no-else-return': 'warn',
    // Null functions are prohibited
    'no-empty-function': 'warn',
    // Disable unnecessary nested blocks
    'no-lone-blocks': 'warn',
    // Multiple spaces are prohibited
    'no-multi-spaces': 'warn',
    // Multiple declarations of the same variable are prohibited
    'no-redeclare': 'warn',
    // Assignment statements are prohibited in return statements
    'no-return-assign': 'warn',
    // Disable unnecessary return await
    'no-return-await': 'warn',
    // Prohibit self assignment
    'no-self-assign': 'warn',
    // Prohibit self comparison
    'no-self-compare': 'warn',
    // Prohibit unnecessary catch clauses
    'no-useless-catch': 'warn',
    // Prohibit redundant return statements
    'no-useless-return': 'warn',
    // Prohibit variable declarations from having the same name as variables in the outer scope
    'no-shadow': 'off',
    // Allow delete variable
    'no-delete-var': 'off',
    // Force consistent spaces in array square brackets
    'array-bracket-spacing': 'warn',
    // Force consistent brace style in code blocks
    'brace-style': 'warn',
    // Enforce camel spelling naming conventions
    camelcase: 'warn',
    // Force consistent indentation
    indent: 'off',
    // Force the consistent use of double or single quotation marks in JSX properties
    // 'jsx-quotes': 'warn',
    // Forces the maximum depth of nested blocks 4
    'max-depth': 'warn',
    // Force maximum number of rows 300
    // "max-lines": ["warn", { "max": 1200 }],
    // The maximum number of lines of code for the forced function is 50
    // 'max-lines-per-function': ['warn', { max: 70 }],
    // Forces the maximum number of statements allowed for a function block to be 20
    'max-statements': ['warn', 100],
    // Force maximum nesting depth of callback function
    'max-nested-callbacks': ['warn', 3],
    // Forces the maximum number of parameters allowed in a function definition
    'max-params': ['warn', 3],
    // Force the maximum number of statements allowed in each row
    'max-statements-per-line': ['warn', { max: 1 }],
    // Each call in the method chain is required to have a newline character
    'newline-per-chained-call': ['warn', { ignoreChainWithDepth: 3 }],
    // Prohibit if from appearing in else statements as the only statement
    'no-lonely-if': 'warn',
    // Mixed indentation of spaces and tab s is prohibited
    'no-mixed-spaces-and-tabs': 'warn',
    // Multiple blank lines are prohibited
    'no-multiple-empty-lines': 'warn',
    // Prohibited;
    semi: ['warn', 'never'],
    // Force consistent spaces before blocks
    'space-before-blocks': 'warn',
    // Force a consistent space before the left parenthesis of function
    // 'space-before-function-paren': ['warn', 'never'],
    // Force consistent spaces within parentheses
    'space-in-parens': 'warn',
    // Space around operator is required
    'space-infix-ops': 'warn',
    // Force consistent spaces before and after unary operators
    'space-unary-ops': 'warn',
    // Force consistent spaces / / or / * in comments
    // "spaced-comment": "warn",
    // Force a space around the colon of the switch
    'switch-colon-spacing': 'warn',
    // Force the arrow function to use consistent spaces before and after the arrow
    'arrow-spacing': 'warn',
    'no-var': 'warn',
    'prefer-const': 'warn',
    'prefer-rest-params': 'warn',
    'no-useless-escape': 'warn',
    'no-irregular-whitespace': 'warn',
    'no-prototype-builtins': 'warn',
    'no-fallthrough': 'warn',
    'no-extra-boolean-cast': 'warn',
    'no-case-declarations': 'warn',
    'no-async-promise-executor': 'warn',
  },
  globals: {
    defineProps: 'readonly',
    defineEmits: 'readonly',
    defineExpose: 'readonly',
    withDefaults: 'readonly',
  },
}
New under project eslintignore
# eslint ignore the check (add it yourself according to the needs of the project)
node_modules
dist
prettier support
# Installing prettier
yarn add prettier --dev
Resolve eslint and prettier conflicts
Resolve the conflict between the style specification in ESLint and the style specification in prettier, and the style specification in prettier shall prevail, so that the style specification in ESLint will automatically become invalid
# Install the plug-in eslint config prettier
yarn add eslint-config-prettier --dev
New under project prettier.js
To configure prettier formatting rules:
module.exports = {
  tabWidth: 2,
  jsxSingleQuote: true,
  jsxBracketSameLine: true,
  printWidth: 100,
  singleQuote: true,
  semi: false,
  overrides: [
    {
      files: '*.json',
      options: {
        printWidth: 200,
      },
    },
  ],
  arrowParens: 'always',
}
New under project prettierignore
# Ignore the format file (add it yourself according to the needs of the project)
node_modules
dist
package.json configuration:
{
  "script": {
    "lint": "eslint src --fix --ext .ts,.tsx,.vue,.js,.jsx",
    "prettier": "prettier --write ."
  }
}
After the above configuration is completed, you can run the following command to test the following code and check the formatting effect:
# eslint check
yarn lint
# prettier auto format
yarn prettier
Configure husky + lint staged
Use husky + lint staged to assist the team coding specification. mrm is recommended for husky & lint staged installation, which will be based on package JSON relies on the code quality tools in the to install and configure husky and lint staged, so make sure to install and configure all code quality tools, such as Prettier and ESlint, before doing so
Install mrm first
npm i mrm -D --registry=https://registry.npm.taobao.org
husky is a tool for adding hooks to git clients. After installation, it will be automatically in the warehouse Add corresponding hooks in Git / directory; For example, the pre commit hook will trigger when you execute git commit.
Then we can implement some operations in pre commit, such as lint check, unit test, code beautification and so on. Of course, the speed of commands executed in the pre commit phase should not be too slow. It is not a good experience to wait for a long time for each commit.
Lint staged, a tool that only filters out Git code temporary storage files (files added by Git); This is very practical, because if we check the code of the whole project, it may take a long time. If it is an old project, we need to check and modify the code specification of the previous code, which may be troublesome and may lead to great changes in the project.
Therefore, this lint staged is a good tool for team projects and open source projects. It is a specification and constraint on the code to be submitted by individuals
Installing lint staged
mrm installation lint staged will automatically install husky together
npx mrm lint-staged
After successful installation, you will find package The following configurations are added to JSON:
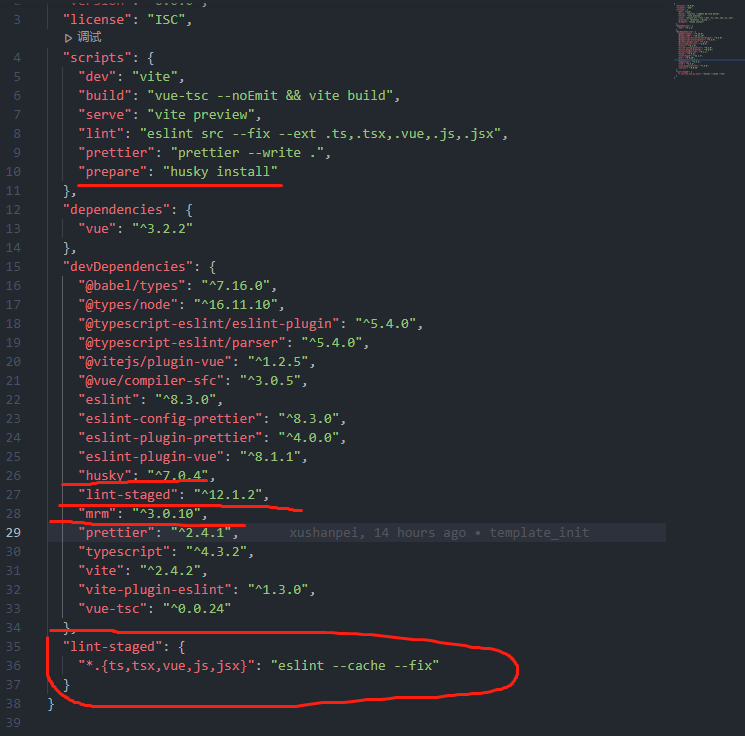
Because we need to combine the prettier code format, modify the following configuration:
"husky": {
    "hooks": {
      "pre-commit": "lint-staged"
    }
  },
  "lint-staged": {
    "*.{js,jsx,vue,ts,tsx}": [
      "yarn lint",
      "prettier --write",
      "git add"
    ]
  }
Well, here's the code format configuration, basically completed!!!
You can modify some code and try git commit. You will find that the code will be formatted automatically:
Code before submission (found that the editor is red):

Execute the commit operation, and the console can see the following processes:

Has the code after commit been formatted

Configuration file reference alias
Directly modify vite config. TS file configuration:
import { defineConfig } from 'vite'
import vue from '@vitejs/plugin-vue'
import path from 'path'

// https://vitejs.dev/config/
export default defineConfig({
  plugins: [vue()],
  resolve: {
    alias: {
      '@': path.resolve(__dirname, 'src'),
    },
  },
})
Modify tsconfig json
{
  "compilerOptions": {
    "target": "esnext",
    "module": "esnext",
    "moduleResolution": "node",
    "strict": true,
    "jsx": "preserve",
    "sourceMap": true,
    "resolveJsonModule": true,
    "esModuleInterop": true,
    "lib": ["esnext", "dom"],
    "baseUrl": ".",
    "paths": {
      "@/*":["src/*"]
    }
  },
  "include": ["src/**/*.ts", "src/**/*.d.ts", "src/**/*.tsx", "src/**/*.vue"]
}
Configure css preprocessor scss
Although vite natively supports less/sass/scss/stylus, you must manually install their preprocessor dependencies
install
yarn add dart-sass --dev
yarn add sass --dev
Configure global scss style file
Add a new style folder under src/assets to store global style files
New main SCSS, set a color variable for testing:
$test-color: red;
How to globally inject this global style file into the project? Configure Vite:
css:{
    preprocessorOptions:{
      scss:{
        additionalData:'@import "@/assets/style/mian.scss";'
      }
    }
  },
Used in components
There is no need to introduce any variables that can be defined directly using the global scss
.test{
  color: $test-color;
}
route
# Install routing
yarn add vue-router@4
Add a router folder under src file = > router TS file, as follows:
import { createRouter, createWebHistory, RouteRecordRaw } from 'vue-router'

const routes: RouteRecordRaw[] = [
  {
    path: '/',
    name: 'Login',
    component: () => import('@/pages/login/Login.vue'), // Note that the file suffix should be added here vue
  },
]

const router = createRouter({
  history: createWebHistory(),
  routes,
})

export default router
Modify the entry file Mian ts :
import { createApp } from 'vue'
import App from './App.vue'
import router from './router/index'

const app = createApp(App)

app.use(router)

app.mount('#app')
Here, the basic configuration of routing has been completed. For more configuration information, please see the official Vue router document:
vue-router: https://next.router.vuejs.org/zh/guide/
vue-router4.x supports typescript. The type of configured route is RouteRecordRaw. Here, meta can give us more room to play. Here are some references:
- title:string; Page title, usually required.
- icon?:string; Icons are generally used with menus.
- auth?:boolean; Whether login permission is required.
- ignoreAuth?:boolean; Whether to ignore permissions.
- roles?:RoleEnum[]; Accessible roles
- keepAlive?:boolean; Whether to enable page caching
- hideMenu?:boolean; For example, we don't want to display some routes in the edit menu.
- order?:number; Menu sorting.
- frameUrl?:string; Nested outer chain.
Only some ideas are provided here. There will be some differences in the business involved in each project. There will be no detailed explanation here. You can configure it according to your own business needs.
Unified request encapsulation
Used vue2 Students of X should be familiar with axios. Here we directly use axios for encapsulation:
# Install axios
yarn add axios
# Install nprogress to request loading
# You can also customize other loading according to project requirements
yarn add nprogress
# Type declaration, or add one containing ` declare module 'nprogress'
yarn add @types/nprogress --dev
In actual use, it can be modified according to the project. For example, put and delete requests can be added in the RESTful api, and the ResType can also be dynamically modified according to the general return value of the back end
Add a new service folder, and add http TS files and api folders:

http.ts: for axios packaging
//http.ts
import axios, { AxiosRequestConfig } from 'axios'
import NProgress from 'nprogress'

// Set request header and request path
axios.defaults.baseURL = '/api'
axios.defaults.timeout = 10000
axios.defaults.headers.post['Content-Type'] = 'application/json;charset=UTF-8'
axios.interceptors.request.use(
  (config): AxiosRequestConfig<any> => {
    const token = window.sessionStorage.getItem('token')
    if (token) {
      //@ts-ignore
      config.headers.token = token
    }
    return config
  },
  (error) => {
    return error
  }
)
// Response interception
axios.interceptors.response.use((res) => {
  if (res.data.code === 111) {
    sessionStorage.setItem('token', '')
    // token expiration operation
  }
  return res
})

interface ResType<T> {
  code: number
  data?: T
  msg: string
  err?: string
}
interface Http {
  get<T>(url: string, params?: unknown): Promise<ResType<T>>
  post<T>(url: string, params?: unknown): Promise<ResType<T>>
  upload<T>(url: string, params: unknown): Promise<ResType<T>>
  download(url: string): void
}

const http: Http = {
  get(url, params) {
    return new Promise((resolve, reject) => {
      NProgress.start()
      axios
        .get(url, { params })
        .then((res) => {
          NProgress.done()
          resolve(res.data)
        })
        .catch((err) => {
          NProgress.done()
          reject(err.data)
        })
    })
  },
  post(url, params) {
    return new Promise((resolve, reject) => {
      NProgress.start()
      axios
        .post(url, JSON.stringify(params))
        .then((res) => {
          NProgress.done()
          resolve(res.data)
        })
        .catch((err) => {
          NProgress.done()
          reject(err.data)
        })
    })
  },
  upload(url, file) {
    return new Promise((resolve, reject) => {
      NProgress.start()
      axios
        .post(url, file, {
          headers: { 'Content-Type': 'multipart/form-data' },
        })
        .then((res) => {
          NProgress.done()
          resolve(res.data)
        })
        .catch((err) => {
          NProgress.done()
          reject(err.data)
        })
    })
  },
  download(url) {
    const iframe = document.createElement('iframe')
    iframe.style.display = 'none'
    iframe.src = url
    iframe.onload = function () {
      document.body.removeChild(iframe)
    }
    document.body.appendChild(iframe)
  },
}
export default http
api: the interfaces in the project are managed uniformly and divided according to modules
Add a login folder under the api file, which is used to store the request interface of the login module. Under the login folder, add login ts types. ts :
login.ts:
import http from '@/service/http'
import * as T from './types'

const loginApi: T.ILoginApi = {
    login(params){
        return http.post('/login', params)
    }

}
export default loginApi
types.ts:
export interface ILoginParams {
    userName: string
    passWord: string | number
}
export interface ILoginApi {
    login: (params: ILoginParams)=> Promise<any>
}
So far, a simple request encapsulation is completed!!!
In addition to manually encapsulating axios, we also recommend a vue3 request Library: VueRequest, which is very easy to use. Let's take a look at the easy-to-use functions of VueRequest!!!
- ?? All data is responsive
- ?? poll request
- ?? Automatic error handling retry
- ?? Built in request cache
- ?? Throttling request and anti shake request
- ?? Automatic re request when focusing on the page
- Powerful paging extensions and loading more extensions
- ?? Written entirely using Typescript, it has powerful type prompt
- Compatible with Vite
- ?? Lightweight
- ?? Out of the box

Is it powerful??
Official website link: https://www.attojs.com/
Status management pinia
Because vuex 4's support for typescript is sad, state management abandoned vuex and adopted Pinia Pinia's author is a member of Vue's core team
Youda seems to say that pinia may replace vuex, so please rest assured.
Install pinia
The difference between Pinia and Vuex:
-
id is necessary to connect the used store to devtools.
-
Creation method: new vuex Store(...) (vuex3),createStore(...)(vuex4).
-
In contrast to vuex3, state is now a function return object.
-
Without changes, don't worry. state changes are still recorded in devtools.
install
yarn add pinia@next
main. Added in TS
# introduce
import { createPinia } from "pinia"
# Create a root repository and pass it to the application
app.use(createPinia())
Add a new store folder under src folder, and then add main ts
Create a store, Mian ts :
import { defineStore } from 'pinia'

export const useMainStore = defineStore({
  id: 'mian',
  state: () =>({
    name: 'Super administrator'
  })
})
Get the store in the build:
<template>
  <div>{{mainStore.name}}</div>
</template>

<script setup lang="ts">
import { useMainStore } from "@/store/mian"

const mainStore = useMainStore()

</script>
getters usage introduction
Getters in Pinia have the same functions as getter s in Vuex and calculation properties in components
store => mian.ts
import { defineStore } from 'pinia'

export const useMainStore = defineStore({
  id: 'mian',
  state: () => ({
    name: 'Super administrator',
  }),
  // getters
  getters: {
    nameLength: (state) => state.name.length,
  }
})
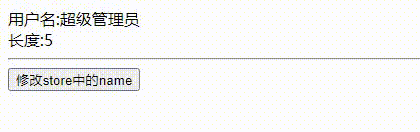
Used in components:
<template>
  <div>user name:{{ mainStore.name }}<br />length:{{ mainStore.nameLength }}</div>
  <hr/>
  <button @click="updateName">modify store Medium name</button>
</template>

<script setup lang="ts">
import { useMainStore } from '@/store/mian'

const mainStore = useMainStore()

const updateName = ()=>{
  // $patch modifies the data in the store
  mainStore.$patch({
    name: 'The name has been changed,nameLength And it changed'
  })
}
</script>
actions
This is very different from Vuex. Pinia only provides a method to define the rules of how to change the state. Giving up changes and relying only on Actions is a major change.
Pinia makes Actions more flexible:
-
It can be called through components or other action s
-
It can be invoked from other store's action.
-
Called directly on the store instance
-
Support synchronous or asynchronous
-
There are any number of parameters
-
It can contain logic about how to change the state (that is, the function of vuex's changes)
-
The status of the $patch method can be changed directly
import { defineStore } from 'pinia'
export const useMainStore = defineStore({
id: 'mian',
state: () => ({
name: 'super administrator',
}),
getters: {
nameLength: (state) => state.name.length,
},
actions: {
async insertPost(data:string){
//Can do asynchronous
// await doAjaxRequest(data);
this.name = data;
}
},
})
Environment variable configuration
vite provides two modes: development mode with development server and production mode
New project root directory: env.development :
NODE_ENV=development

VITE_APP_WEB_URL= 'YOUR WEB URL'
New project root directory: env.production :
NODE_ENV=production

VITE_APP_WEB_URL= 'YOUR WEB URL'
Used in components:
console.log(import.meta.env.VITE_APP_WEB_URL)
Configure package json:
Packaging distinguishes between development environment and production environment
"build:dev": "vite build --mode development",
"build:pro": "vite build --mode production",
Using the Naive UI of the component library
Component library selection. Here we choose Naive UI. As for why we choose it? Can I just say what you recommend?
- Official introduction:
- A Vue 3 component library
- Relatively complete, adjustable theme, using TypeScript, not too slow
- I little interesting
The introduction is still modest. Since Youda recommends it, it must have its advantages!!!
Install Naive UI
# Install component library
yarn add naive-ui
# Install fonts
yarn add vfonts
How to use
import { NButton } from "naive-ui"
<n-button>naive-ui</n-button>
Global configuration Config Provider
Global configuration sets the theme, language of internal components and the class name of DOM in which components are unloaded in other locations.
<n-config-provider :locale="zhCN" :theme="theme">
    <!-- container -->
</n-config-provider>
I really like the theme configuration function
There is no compulsion in the selection of component library. You can select the appropriate component library according to your project needs
Vite common basic configuration
Basic configuration
Run agent and packaging configuration
server: {
    host: '0.0.0.0',
    port: 3000,
    open: true,
    https: false,
    proxy: {}
},
Remove console debugger in production environment
build:{
  ...
  terserOptions: {
      compress: {
        drop_console: true,
        drop_debugger: true
      }
  }
}
Production environment generation gz file
Opening gzip can greatly compress static resources and play a significant role in the speed of page loading.
Use vite plugin compression to compress resources by gzip or brotli. This step requires the cooperation of the server, and vite can only help you package them gz file. This plug-in is easy to use. You can even import it without configuring parameters.
# install
yarn add --dev vite-plugin-compression
Add to plugins:
import viteCompression from 'vite-plugin-compression'

// gzip compressed production environment generation gz file
viteCompression({
      verbose: true,
      disable: false,
      threshold: 10240,
      algorithm: 'gzip',
      ext: '.gz',
    }),
Final vite config. ts
import { defineConfig } from 'vite'
import vue from '@vitejs/plugin-vue'
import path from 'path'
//@ts-ignore
import viteCompression from 'vite-plugin-compression'

// https://vitejs.dev/config/
export default defineConfig({
  base: './', //Packaging path
  plugins: [
    vue(),
    // gzip compressed production environment generation gz file
    viteCompression({
      verbose: true,
      disable: false,
      threshold: 10240,
      algorithm: 'gzip',
      ext: '.gz',
    }),
  ],
  // Configure alias
  resolve: {
    alias: {
      '@': path.resolve(__dirname, 'src'),
    },
  },
  css:{
    preprocessorOptions:{
      scss:{
        additionalData:'@import "@/assets/style/mian.scss";'
      }
    }
  },
  //Start service configuration
  server: {
    host: '0.0.0.0',
    port: 8000,
    open: true,
    https: false,
    proxy: {}
  },
  // Production environment packaging configuration
  //Remove the console debugger
  build: {
    terserOptions: {
      compress: {
        drop_console: true,
        drop_debugger: true,
      },
    },
  },
})
Common plug-ins
You can view official documents: https://vitejs.cn/plugins/
- @Vitejs / plugin Vue provides Vue 3 single file component support
- @Vitejs / plugin Vue JSX provides Vue 3 JSX support (through a dedicated Babel conversion plug-in)
- @Vitejs / plugin legacy provides traditional browser compatibility support for packaged files
- On demand automatic import of unplugin Vue components
- Vite plugin compression uses gzip or brotli to compress resources
- ...
Highly recommended hooks Library
Because vue3 X and react hooks are really similar, so they are called hooks
VueUse: https://vueuse.org/

At first sight of this library, I immediately thought of react's ahooks
VueUse is a collection of practical functions based on the Composition API. Generally speaking, this is a tool function package, which can help you quickly realize some common functions, so as to avoid writing and solving repeated work contents by yourself. And packaging based on Composition API. Make you more handy in vue3.
?? If you want to get started vue3, learn quickly!!!
?? Finally, let's give you the warehouse address: https://github.com/xushanpei/vite_vue3_ts
Write at the end
Official account: front-end developers love to share web front-end related technical articles, video tutorials, hot topics, etc. Click a like?? Or attention is my greatest support.
Welcome to add friends by long clicking on the picture. I will share front-end industry trends, interview resources, learning ways and so on with you for the first time.
The official account is on the front page.
- Reply to the interview questions and obtain the latest interview data of large factories.
- Reply resume and obtain 3200 resume templates.
- Reply to the actual combat of React and get the latest actual combat tutorial of React.
- Reply to the actual combat of Vue and get the latest actual combat tutorial of Vue.
- Reply ts to get the TypeAcript intensive course.
- Reply to vite for intensive courses.
- Reply to uniapp and get the intensive courses of uniapp.
- Reply to js books and get js advanced books.
- Reply to Node and get the actual combat tutorial of Nodejs+koa2.
- Reply to the data structure algorithm and get the data structure algorithm tutorial.
- Reply to the architect and get the architect learning resource tutorial.
- More tutorial resources and applications are available. Please pay attention to them