1, Quick start
1. Check the health status of the cluster
http://localhost:9200/_cat
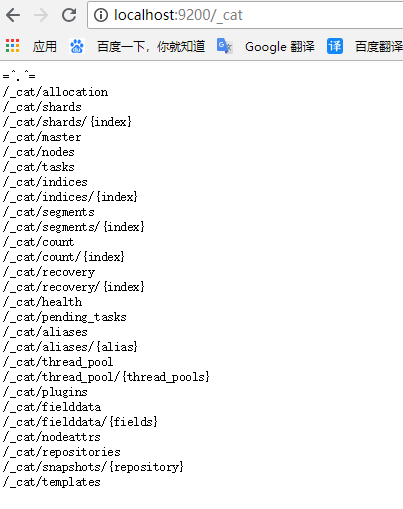
http://localhost:9200/_cat/health?v

Note: v is used to require the header to be returned in the result
Status value description
Green - everything is good (cluster is fully functional)
Yellow - all data is available but some replicas are not yet allocated (cluster is fully functional), that is, the data and cluster are available, but some cluster backups are bad
Red - some data is not available for whatever reason (cluster is partially functional)
View the nodes of the cluster
http://localhost:9200/_cat/nodes?v

2. View all indexes
http://localhost:9200/_cat/indices?v

3. Create an index
Create an index named customer. pretty requires a nice json result to be returned
PUT /customer?pretty

Check all indexes again
http://localhost:9200/_cat/indices?v

GET /_cat/indices?v

4. Index a document into the customer index
curl -X PUT "localhost:9200/customer/_doc/1?pretty" -H 'Content-Type: application/json' -d'
{
  "name": "John Doe"
}
'
5. Get the document with the specified id from the customer index
curl -X GET "localhost:9200/customer/_doc/1?pretty"
6. Query all documents
GET /customer/_search?q=*&sort=name:asc&pretty
JSON format
GET /customer/_search
{
  "query": { "match_all": {} },
  "sort": [
    {"name": "asc" }
  ]
}
2, Index management

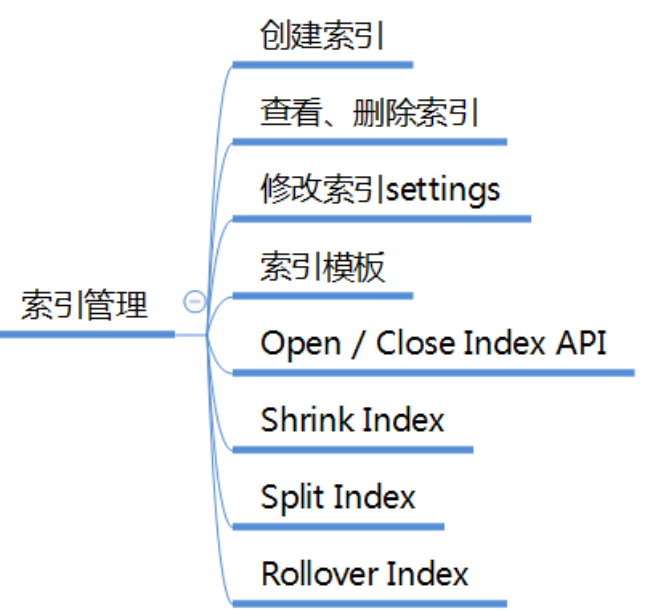
1. Create index
Create an index named twitter, set the number of slices of the index to 3 and the number of backups to 2. Note: creating an index in ES is similar to creating a database in the database (after ES6.0, it is similar to creating a table)
PUT twitter
{
    "settings" : {
        "index" : {
            "number_of_shards" : 3,
            "number_of_replicas" : 2
        }
    }
}
explain:
The default number of tiles is 5 to 1024
The default number of backups is 1
The name of the index must be lowercase and cannot be duplicated
Create result:

The created command can also be abbreviated as
PUT twitter
{
    "settings" : {
        "number_of_shards" : 3,
        "number_of_replicas" : 2
    }
}
2. Create mapping mapping
Note: creating a mapping map in ES is similar to defining the table structure in the database, that is, what fields are in the table, what types of fields are they, and the default values of fields; It is also similar to the definition of schema in solr
PUT twitter
{
    "settings" : {
        "index" : {
            "number_of_shards" : 3,
            "number_of_replicas" : 2
        }
    },
   "mappings" : {
        "type1" : {
            "properties" : {
                "field1" : { "type" : "text" }
            }
        }
    }
}
3. Add alias definition when creating index
PUT twitter
{
    "aliases" : {
        "alias_1" : {},
        "alias_2" : {
            "filter" : {
                "term" : {"user" : "kimchy" }
            },
            "routing" : "kimchy"
        }
    }
}
4. Description of the result returned when creating the index

5. Get Index view index definition information
GET /twitter, you can get multiple indexes at a time (separated by commas) to get all indexes_ All or wildcard*
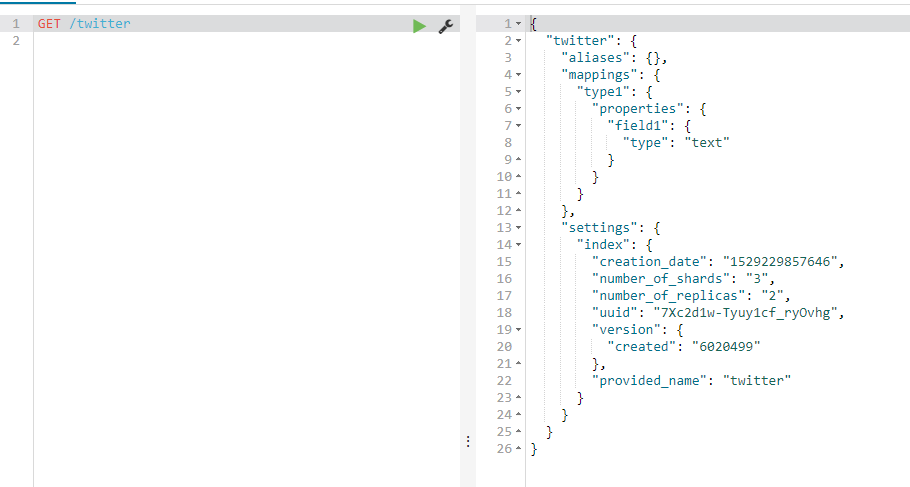
GET /twitter/_settings
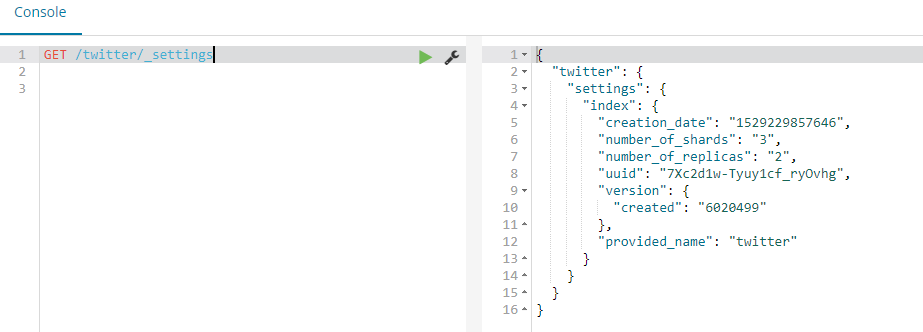
GET /twitter/_mapping

6. Delete index
DELETE /twitter
explain:
You can delete multiple indexes at once (separated by commas) and delete all indexes_ All or wildcard*
7. Judge whether the index exists
HEAD twitter

HTTP status code indicates that the result 404 does not exist and 200 does not exist
8. Modify the settings information of the index
The index setting information is divided into static information and dynamic information. Static information cannot be changed, such as the number of slices of the index. Dynamic information can be modified.
REST access endpoint:
/_ settings updates the of all indexes.
{index}/_settings updates the settings of one or more indexes.
For detailed setting items, please refer to: https://www.elastic.co/guide/en/elasticsearch/reference/current/index-modules.html#index-modules-settings
9. Modify the number of backups
PUT /twitter/_settings
{
    "index" : {
        "number_of_replicas" : 2
    }
}
10. Set back to the default value and use null
PUT /twitter/_settings
{
    "index" : {
        "refresh_interval" : null
    }
}
11. Set the reading and writing of the index
index.blocks.read_only: if set to true, the index and the metadata of the index are only readable
index.blocks.read_only_allow_delete: set to true. It can be deleted when it is read-only.
index.blocks.read: if set to true, it is not readable.
index.blocks.write: if set to true, it cannot be written.
index.blocks.metadata: if set to true, the index metadata is unreadable.
12. Index template
When creating an index, it may be tedious to write definition information for each index. ES provides the function of index template, so that you can define an index template. In the template, you can define settings, mapping and a pattern definition to match the created index.
Note: the template is only referenced when the index is created. Modifying the template will not affect the created index
12.1 add / modify the name as tempae_1, matching the index creation with the name te * or bar *:
PUT _template/template_1
{
  "index_patterns": ["te*", "bar*"],
  "settings": {
    "number_of_shards": 1
  },
  "mappings": {
    "type1": {
      "_source": {
        "enabled": false
      },
      "properties": {
        "host_name": {
          "type": "keyword"
        },
        "created_at": {
          "type": "date",
          "format": "EEE MMM dd HH:mm:ss Z YYYY"
        }
      }
    }
  }
}
12.2 view index template
GET /_template/template_1
GET /_template/temp*
GET /_template/template_1,template_2
GET /_template
12.3 delete template
DELETE /_template/template_1
13. Open/Close Index
POST /my_index/_close
POST /my_index/_open
explain:
The closed index cannot be read or written, which accounts for almost no cluster overhead.
The closed index can be opened, and the opening follows the normal recovery process.
14. Shrink Index
The number of slices of the index cannot be changed. If you want to reduce the number of slices, you can shrink it into a new index by shrinking. The number of slices of the new index must be the factor value of the original number of slices. If the original number of slices is 8, the number of slices of the new index can be 4, 2 or 1.
When do I need to shrink the index?
At first, the number of slices was set too large when creating the index. Later, it was found that so many slices could not be used. At this time, it needs to be shrunk
Shrinking process:
First, transfer all main partitions to one host;
Create a new index on this host with a small number of slices, and other settings are consistent with the original index;
Copy (or hard link) all pieces of the original index to the directory of the new index;
Open the new index and recover the fragment data;
(optional) re equalize the fragmentation of the new index to other nodes.
Preparation before contraction:
Set the original index to read-only;
Reassign a copy of each fragment of the original index to the same node and keep it in healthy green state.
PUT /my_source_index/_settings
{
  "settings": {
    <!-- Specifies the name of the node to shrink -->
    "index.routing.allocation.require._name": "shrink_node_name",
    <!-- Block write, read only -->
     "index.blocks.write": true
  }
}
Shrink:
POST my_source_index/_shrink/my_target_index
{
  "settings": {
    "index.number_of_replicas": 1,
    "index.number_of_shards": 1,
    "index.codec": "best_compression"
  }}
Monitor the shrinkage process:
GET _cat/recovery?v
GET _cluster/health
15. Split Index
When the partition capacity of the index is too large, the index can be split into a new index multiple of the number of partitions through the split operation. It can be split into several times the index specified when creating the index number_ of_ routing_ Shards is determined by the number of route segments. This number of routing fragments determines the hash space for routing documents to fragments according to the consistency hash.
Such as index number_ of_ routing_ Shards = 30. If the specified number of slices is 5, it can be split as follows:
5 → 10 → 30 (split by 2, then by 3)
5 → 15 → 30 (split by 3, then by 2)
5 → 30 (split by 6)
Why do I need to split the index?
When the number of slices of the initially set index is not enough, you need to split the index, which is opposite to compressing the index
Note: index. Is specified only when it is created number_ of_ routing_ The indexes of shards can only be split, and there will be no such restriction from ES7.
The difference between solr and solr is that solr splits a fragment, and es splits the entire index.
Splitting steps:
Prepare an index to split:
PUT my_source_index
{
    "settings": {
        "index.number_of_shards" : 1,
        <!-- You need to specify the number of route segments when creating -->
        "index.number_of_routing_shards" : 2
    }
}
Set the index read-only first:
PUT /my_source_index/_settings
{
  "settings": {
    "index.blocks.write": true
  }
}
Split:
POST my_source_index/_split/my_target_index
{
  "settings": {
    <!--The number of slices of the new index must comply with the splitting rules-->
    "index.number_of_shards": 2
  }
}
Monitor the split process:
GET _cat/recovery?v
GET _cluster/health
16. The rollover index alias scrolls to the newly created index
For time effective index data, such as logs, after a certain period of time, the old index data will be useless. We can create a table according to the time in the database to store the data of different periods. In ES, we can also build multiple indexes to store the data of different periods separately. What is more convenient than in the database is that in ES, you can scroll to the latest index through the alias, so that when you operate through the alias, you will always operate the latest index.
ES's rollover index API allows us to create a new index according to the specified conditions (time, number of documents, index size) and scroll the alias to the new index.
Note: at this time, the alias can only be the alias of one index.
Rollover Index example:
Create one with the name of logs-0000001 and the alias of logs_ Index of write:
PUT /logs-000001
{
  "aliases": {
    "logs_write": {}
  }
}
Add 1000 documents to the index logs- 00000 1, and then set the conditions for alias scrolling
POST /logs_write/_rollover
{
  "conditions": {
    "max_age":   "7d",
    "max_docs":  1000,
    "max_size":  "5gb"
  }
}
explain:
If alias logs_ If the index pointed to by write is created 7 days ago (inclusive), or the number of documents indexed > = 1000 or the size of the index > = 5GB, a new index logs-000002 will be created and the alias logs_ The writer points to the newly created logs-000002 index
Rollover Index naming rules for new indexes:
If the name of the index ends with a number, such as logs- 00000 1, the name of the new index will also be in this mode, and the value will be increased by 1.
If the name of the index does not end with a - value, specify the name of the new index when requesting the rollover api
POST /my_alias/_rollover/my_new_index_name
{
  "conditions": {
    "max_age":   "7d",
    "max_docs":  1000,
    "max_size": "5gb"
  }
}
Use Date math in the name
If you want the generated index name to contain a date, such as logstash-2016.02.03-1, you can name it with a time expression when creating the index:
# PUT /<logs-{now/d}-1> with URI encoding:
PUT /%3Clogs-%7Bnow%2Fd%7D-1%3E
{
  "aliases": {
    "logs_write": {}
  }
}

PUT logs_write/_doc/1
{
  "message": "a dummy log"
}

POST logs_write/_refresh
# Wait for a day to pass

POST /logs_write/_rollover
{
  "conditions": {
    "max_docs":   "1"
  }
}
When rolling over, you can define the new index:
PUT /logs-000001
{
  "aliases": {
    "logs_write": {}
  }
}

POST /logs_write/_rollover
{
  "conditions" : {
    "max_age": "7d",
    "max_docs": 1000,
    "max_size": "5gb"
  },
  "settings": {
    "index.number_of_shards": 2
  }
}
Dry run test whether the conditions are met before actual operation:
POST /logs_write/_rollover?dry_run
{
  "conditions" : {
    "max_age": "7d",
    "max_docs": 1000,
    "max_size": "5gb"
  }
}
explain:
The test does not create an index, but only checks whether the conditions are met
Note: the rollover is operated only when you request it, not automatically in the background. You can request it periodically.
17. Index monitoring
17.1 viewing index status information
*Official website link:*
https://www.elastic.co/guide/en/elasticsearch/reference/current/indices-stats.html
To view the status of all indexes:
GET /_stats
To view the status information of the specified index:
GET /index1,index2/_stats
17.2 viewing index segment information
*Official website link:*
https://www.elastic.co/guide/en/elasticsearch/reference/current/indices-segments.html
GET /test/_segments
GET /index1,index2/_segments
GET /_segments
17.3 viewing index recovery information
*Official website link:*
*https://www.elastic.co/guide/en/elasticsearch/reference/current/indices-recovery.html*
GET index1,index2/_recovery?human
GET /_recovery?human
17.4 viewing the storage information of index slices
Official website link:
https://www.elastic.co/guide/en/elasticsearch/reference/current/indices-shards-stores.html
# return information of only index test
GET /test/_shard_stores

# return information of only test1 and test2 indices
GET /test1,test2/_shard_stores

# return information of all indices
GET /_shard_stores
GET /_shard_stores?status=green
18. Index status management
18.1 Clear Cache clear cache
POST /twitter/_cache/clear
All caches will be cleared by default. You can specify to clear the query, fielddata or request cache
POST /kimchy,elasticsearch/_cache/clear
POST /_cache/clear
18.2 Refresh, reopen the read index
POST /kimchy,elasticsearch/_refresh

POST /_refresh
18.3 Flush: flush the index data cached in memory to persistent storage
POST twitter/_flush
18.4 Force merge
POST /kimchy/_forcemerge?only_expunge_deletes=false&max_num_segments=100&flush=true
Optional parameter description:
max_num_segments are merged into several segments. The default is 1
only_ expunge_ Whether deletes only merges segments containing deleted documents. The default is false
flush whether to refresh after merging. The default is true
POST /kimchy,elasticsearch/_forcemerge

POST /_forcemerge
3, Mapping details
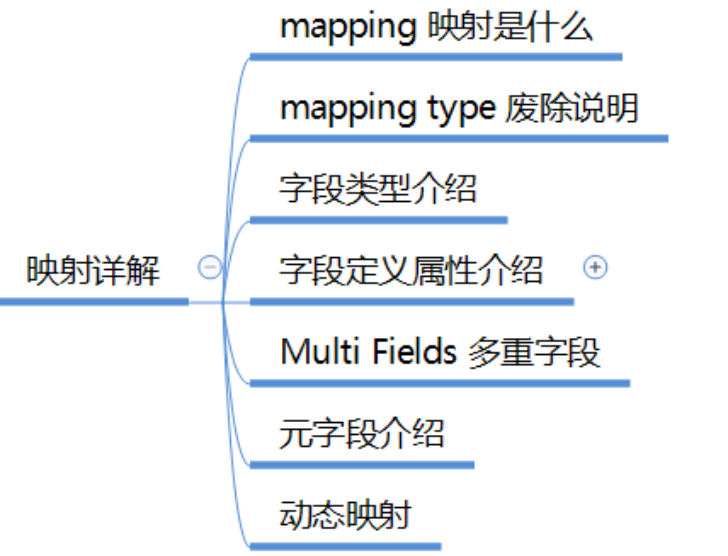
1. What is mapping
Mapping defines the structural information such as what fields and field types are in the index. It is equivalent to the table structure definition in the database or the schema in solr. Because lucene needs to know how to index the fields storing documents when indexing documents.
ES supports manual mapping and dynamic mapping.
1.1. Creating mapping for index
PUT test
{
<!--Mapping definition -->
"mappings" : {
<!--be known as type1 Mapping categories for mapping type-->
        "type1" : {
        <!-- Field definition -->
            "properties" : {
            <!-- be known as field1 Field, its field datatype by text -->
                "field1" : { "type" : "text" }
            }
        }
    }
}
Note: the mapping definition can be modified later
2. Description of Mapping type
The first design of ES is to use the index to analogy the database of relational database and mapping type to analogy the table. An index can contain multiple mapping categories. A serious problem with this analogy is that when there are fields with the same name in multiple mapping types (especially the fields with the same name are of different types), it is difficult to deal with in one index, because there is only index document structure in the search engine, and the data of different mapping categories are documents one by one (only the fields are different)
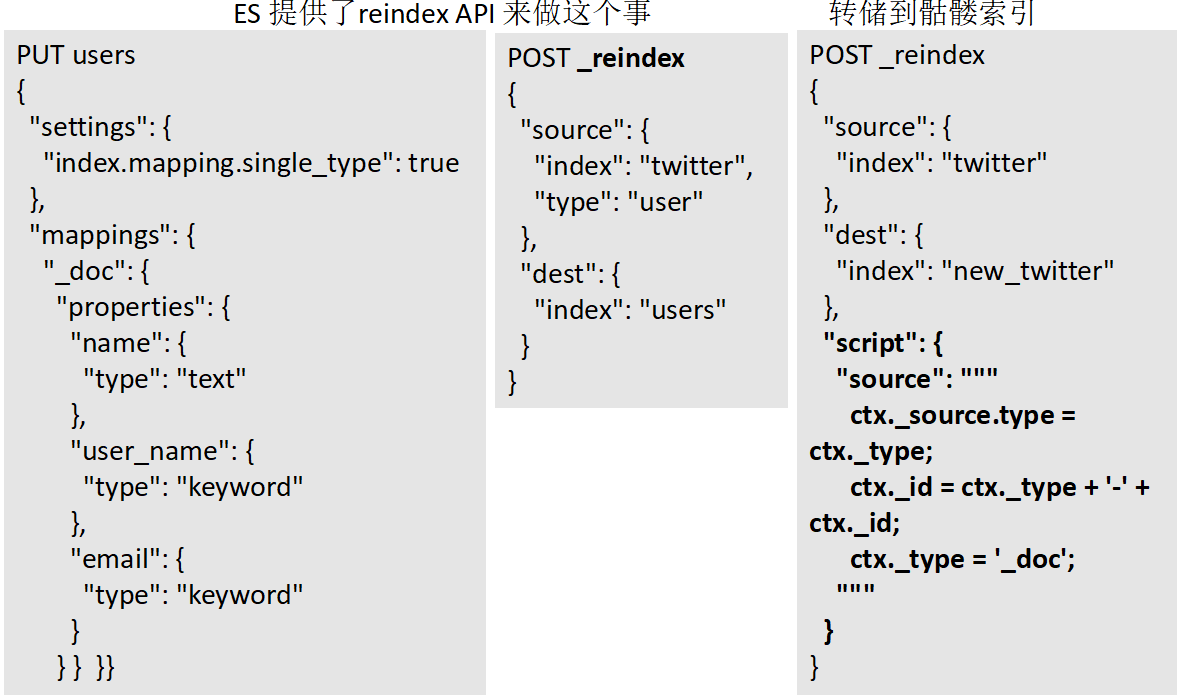
Starting from 6.0.0, it is limited to include only one mapping category definition ("index.mapping.single_type": true), which is compatible with 5.0 Multiple mapping categories in X. Starting with 7.0, the mapping category will be removed.
In order to match future plans, please define this unique mapping class alias as "_doc" now, because the request address of the index will be specified as: PUT {index}/_doc/{id} and POST {index}/_doc
Mapping example:
PUT twitter
{
  "mappings": {
    "_doc": {
      "properties": {
        "type": { "type": "keyword" },
        "name": { "type": "text" },
        "user_name": { "type": "keyword" },
        "email": { "type": "keyword" },
        "content": { "type": "text" },
        "tweeted_at": { "type": "date" }
      }
    }
  }
}
Dump multi mapping category data into independent indexes:
ES provides a reindex API to do this
3. Field types datatypes
Field types define how field values are indexed and stored. ES provides rich field type definitions. Please check the links on the official website to learn more about the characteristics of each type:
https://www.elastic.co/guide/en/elasticsearch/reference/current/mapping-types.html
3.1 Core Datatypes
string
    text and keyword
Numeric datatypes
    long, integer, short, byte, double, float, half_float, scaled_float
Date datatype
    date
Boolean datatype
    boolean
Binary datatype
    binary
Range datatypes     Range
    integer_range, float_range, long_range, double_range, date_range
3.2 Complex datatypes
Array datatype
    Arrays are multivalued and do not require special types
Object datatype
    object : Indicates that the value is a JSON object
Nested datatype
    nested: for arrays of JSON objects(Indicates that the value is JSON Object array)
3.3 Geo datatypes
Geo-point datatype
    geo_point:  for lat/lon points  (Longitude and latitude coordinate points)
Geo-Shape datatype
    geo_shape:  for complex shapes like polygons (Shape representation)
3.4 special datatypes
IP datatype
    ip:  for IPv4 and IPv6 addresses
Completion datatype
    completion:  to provide auto-complete suggestions
Token count datatype
    token_count:  to count the number of tokens in a string
mapper-murmur3
    murmur3:  to compute hashes of values at index-time and store them in the index
Percolator type
    Accepts queries from the query-dsl
join datatype
    Defines parent/child relation for documents within the same index
4. Introduction to field definition attributes
The type (Datatype) of the field defines how to index and store the field value. There are also some attributes that can be overridden or specially defined as needed. Please refer to the official website for details: https://www.elastic.co/guide/en/elasticsearch/reference/current/mapping-params.html
    analyzer   Specify word breaker
    normalizer   Specify normalizer
    boost        Specifies the weight value
    coerce      Cast type
    copy_to    Copy value to another field
    doc_values  Store docValues
    dynamic
    enabled    Is the field available
    fielddata
    eager_global_ordinals
    format    Specifies the format of the time value
    ignore_above
    ignore_malformed
    index_options
    index
    fields
    norms
    null_value
    position_increment_gap
    properties
    search_analyzer
    similarity
    store
    term_vector
Field definition properties - Example
PUT my_index
{
  "mappings": {
    "_doc": {
      "properties": {
        "date": {
          "type":   "date",
           <!--format date -->
          "format": "yyyy-MM-dd HH:mm:ss||yyyy-MM-dd||epoch_millis"
        }
      }
    }
  }
}
5. Multi Field
When we need to index a field in many different ways, we can use fields multi field definition. For example, a string field needs both text word segmentation index and keyword index to support sorting and aggregation; Or you need to use different word splitters for word segmentation index.
Example:
Define multiple fields:
Description: raw is a multi version name (custom)
PUT my_index
{
  "mappings": {
    "_doc": {
      "properties": {
        "city": {
          "type": "text",
          "fields": {
            "raw": {
              "type":  "keyword"
            }
          }
        }
      }
    }
  }
}
Add documents to multiple fields
PUT my_index/_doc/1
{
  "city": "New York"
}

PUT my_index/_doc/2
{
  "city": "York"
}
Get the value of multiple fields:
GET my_index/_search
{
  "query": {
    "match": {
      "city": "york"
    }
  },
  "sort": {
    "city.raw": "asc"
  },
  "aggs": {
    "Cities": {
      "terms": {
        "field": "city.raw"
      }
    }
  }
}
6. Meta field
Official website link:
https://www.elastic.co/guide/en/elasticsearch/reference/current/mapping-fields.html
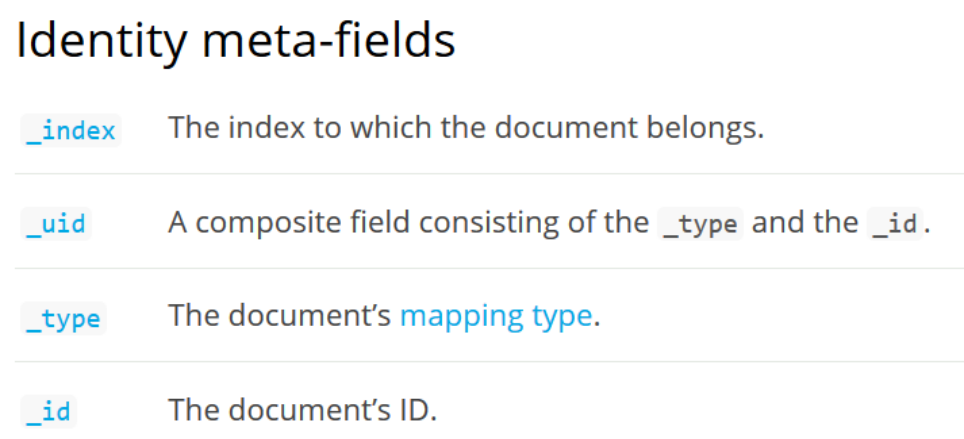
Meta fields are document fields defined in ES, which have the following categories:

7. Dynamic mapping
Dynamic mapping: an important feature provided in ES allows us to use es quickly without creating an index and defining a mapping first. If we submit documents directly to es for indexing:
PUT data/_doc/1
{ "count": 5 }
ES will automatically create data index for us_ doc mapping, field count of type long
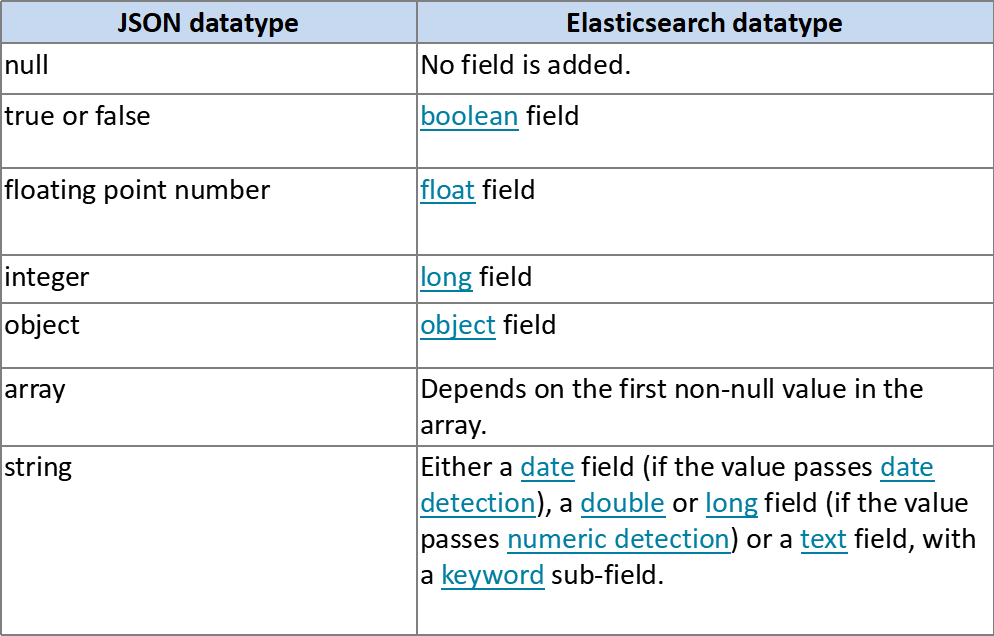
When indexing a document, when there is a new field, ES will automatically add the field to mapping according to the json data type of our field.
7.1 field dynamic mapping rules
7.2 Date detection
The so-called time detection means that when we insert data into ES, we will automatically detect whether our data is in date format. If so, it will be automatically converted to the set format
date_detection is enabled by default. The default format is dynamic_date_formats are:
[ "strict_date_optional_time","yyyy/MM/dd HH:mm:ss Z||yyyy/MM/dd Z"]
PUT my_index/_doc/1
{
  "create_date": "2015/09/02"
}

GET my_index/_mapping
Custom time format:
PUT my_index
{
  "mappings": {
    "_doc": {
      "dynamic_date_formats": ["MM/dd/yyyy"]
    }
  }
}
Disable time detection:
PUT my_index
{
  "mappings": {
    "_doc": {
      "date_detection": false
    }
  }
}
7.3 numerical detection
Enable value detection (disabled by default)
PUT my_index
{
  "mappings": {
    "_doc": {
      "numeric_detection": true
    }
  }
}

PUT my_index/_doc/1
{
  "my_float":   "1.0",
  "my_integer": "1"
}
4, Index alias
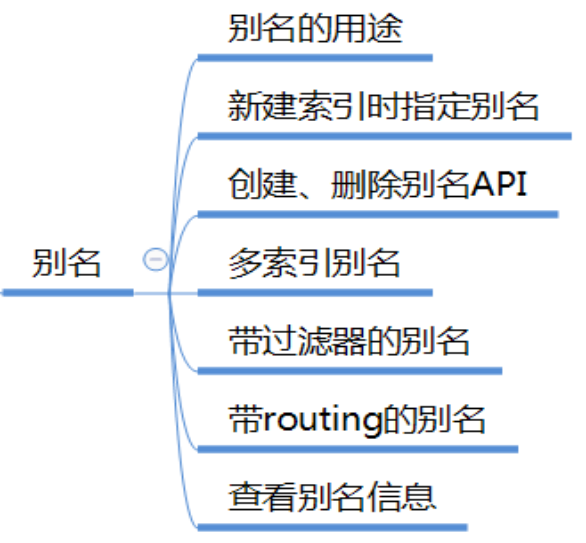
1. Use of alias
If you want to query at one time, you can query multiple indexes.
If you want to operate the index through the indexed view, just like the view in the database library.
The alias mechanism of the index allows us to operate the indexes in the cluster in the way of view. This view can be multiple indexes, or an index or part of an index.
2. Define alias when creating index
PUT /logs_20162801
{
    "mappings" : {
        "type" : {
            "properties" : {
                "year" : {"type" : "integer"}
            }
        }
    },
    <!-- Two aliases are defined -->
    "aliases" : {
        "current_day" : {},
        "2016" : {
            "filter" : {
                "term" : {"year" : 2016 }
            }
        }
    }
}
3. Create an alias/_ aliases
Create alias alias1 for index test1
POST /_aliases
{
    "actions" : [
        { "add" : { "index" : "test1", "alias" : "alias1" } }
    ]
}
4. Delete alias
POST /_aliases
{
    "actions" : [
        { "remove" : { "index" : "test1", "alias" : "alias1" } }
    ]
}
It can also be written like this
DELETE /{index}/_alias/{name}
5. Batch operation alias
Delete alias alias1 of index test1 and add alias alias1 for index test2
POST /_aliases
{
    "actions" : [
        { "remove" : { "index" : "test1", "alias" : "alias1" } },
        { "add" : { "index" : "test2", "alias" : "alias1" } }
    ]
}
6. Define the same alias for multiple indexes
Mode 1:
POST /_aliases
{
    "actions" : [
        { "add" : { "index" : "test1", "alias" : "alias1" } },
        { "add" : { "index" : "test2", "alias" : "alias1" } }
    ]
}
Mode 2:
POST /_aliases
{
    "actions" : [
        { "add" : { "indices" : ["test1", "test2"], "alias" : "alias1" } }
    ]
}
Note: you can only search through multiple index aliases, and you cannot index documents or obtain documents according to id.
Method 3: specify the index to be aliased through the wildcard * mode
POST /_aliases
{
    "actions" : [
        { "add" : { "index" : "test*", "alias" : "all_test_indices" } }
    ]
}
Note: in this case, the alias is a point time alias, which will alias all matching current indexes. It will not be updated automatically when adding / deleting new indexes matching this pattern.
7. Alias with filter
A field is required in the index
PUT /test1
{
  "mappings": {
    "type1": {
      "properties": {
        "user" : {
          "type": "keyword"
        }
      }
    }
  }
}
The filter is defined by Query DSL and will act on all Search, Count, Delete By Query and More Like This operations performed by this alias.
POST /_aliases
{
    "actions" : [
        {
            "add" : {
                 "index" : "test1",
                 "alias" : "alias2",
                 "filter" : { "term" : { "user" : "kimchy" } }
            }
        }
    ]
}
8. Alias with routing
The route value can be specified in the alias definition and can be used together with filter to limit the fragmentation of operations and avoid other unnecessary fragmentation operations.
POST /_aliases
{
    "actions" : [
        {
            "add" : {
                 "index" : "test",
                 "alias" : "alias1",
                 "routing" : "1"
            }
        }
    ]
}
Specify different routing values for search and index
POST /_aliases
{
    "actions" : [
        {
            "add" : {
                 "index" : "test",
                 "alias" : "alias2",
                 "search_routing" : "1,2",
                 "index_routing" : "2"
            }
        }
    ]
}
9. Define an alias in PUT mode
PUT /{index}/_alias/{name}
PUT /logs_201305/_alias/2013
With filter and routing
PUT /users
{
    "mappings" : {
        "user" : {
            "properties" : {
                "user_id" : {"type" : "integer"}
            }
        }
    }
}
PUT /users/_alias/user_12
{
    "routing" : "12",
    "filter" : {
        "term" : {
            "user_id" : 12
        }
    }
}
10. View alias definition information
GET /{index}/_alias/{alias}
GET /logs_20162801/_alias/*
GET /_alias/2016
GET /_alias/20*