1, Client side rendering and server side rendering
1. Client side rendering (SSR)
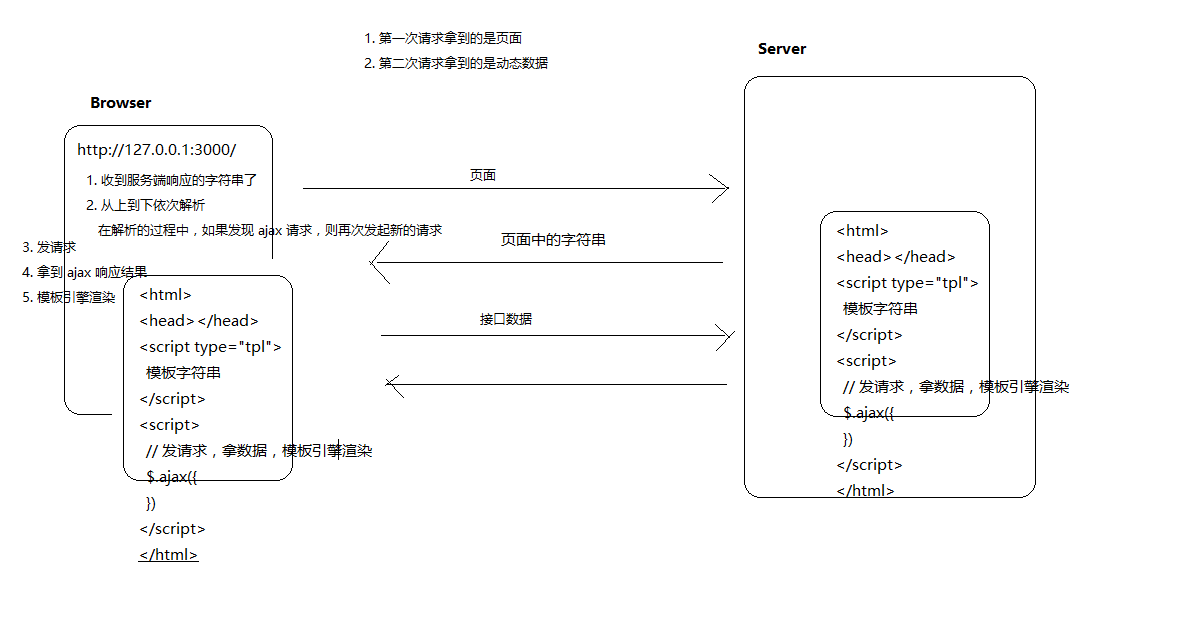
Html is only a static file. When the client requests, the server does not do any processing, and directly returns it to the client in the form of the original file. Then, according to the JavaScript on HTML, DOM is generated and html is inserted.
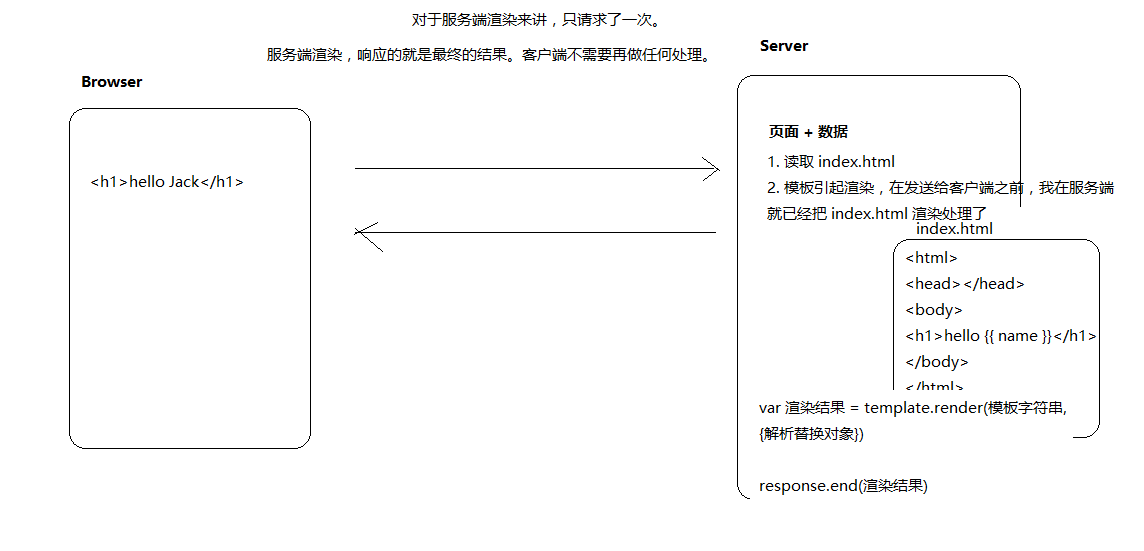
2. Service order rendering (CSR)
Before returning HTML, the server fills in the specific area and symbol with data, and then gives it to the client. The client is only responsible for parsing HTML and generating DOM tree at the server.
Note: after the browser receives the HTML response content, it should start parsing from top to bottom. In the process of parsing, if it is found that:
link
script
img
iframe
video
audio
When there are src or href (link) attribute tags (resources with external chains), the browser will automatically initiate new requests for these resources.
3. The difference between client-side rendering (SSR) and single service rendering (CSR)
3.1. Differences between server-side rendering and client-side rendering:
1. The essential difference between the two: who completes the complete splicing of html? The server-side rendering generates the DOM tree at the server-side, and the client-side rendering generates the DOM tree at the client-side.
2. Response speed: the server side rendering will speed up the response speed of the page, while the client side rendering will slow the response speed of the page.
3. SEO Optimization: because the server-side rendering is multiple pages, it is more conducive for crawlers to crawl information, and the client-side rendering is not conducive to SEO optimization.
4. Development efficiency: the separation of rendering logic at the service end is not good, which is not conducive to the separation of front and rear ends, and the development efficiency is low. The client-side rendering is developed by the separation of front and rear ends, which is more efficient, and it is also the rendering method adopted by most businesses.
Should I use server-side rendering or client-side rendering
3.2. How to select server-side rendering and client-side rendering
If it is an enterprise website whose main function is page display, it has no complex interaction and needs good SEO, we should use server-side rendering.
If it is a background management page with strong interactivity, and it does not need to consider SEO, we should use client-side rendering.
The specific rendering method is not absolute. Now many websites use the combination of server-side rendering and client-side rendering: the first screen uses server-side rendering, and other pages use client-side rendering. This can ensure the loading speed of the first screen and complete the separation of the front and rear ends.
2, Server rendering message board
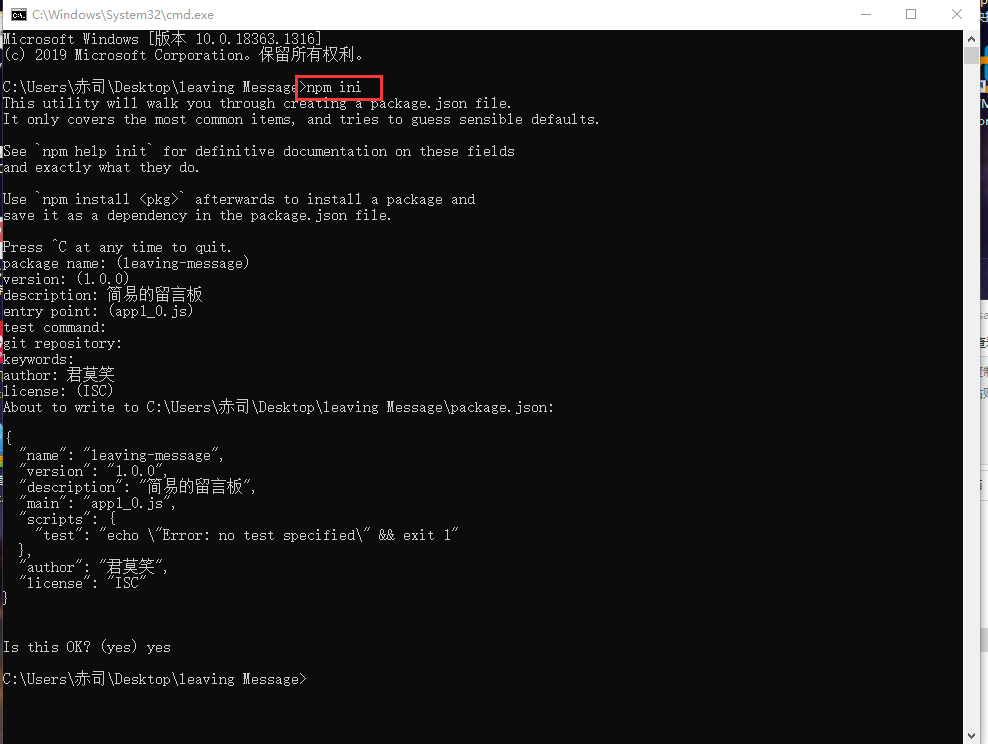
Step 1: complete the static page and render it to the server
Complete project download address , with a written static page, The tutorial address where the node installation runs
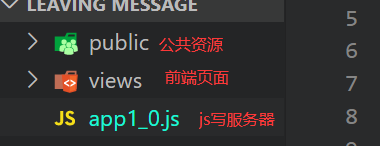
My directory is as follows:
//1. Load core modules fs and http
var fs = require('fs');
var http = require('http');

//2. Instantiate server
var server = http.createServer();

//3. Request data from the client and respond accordingly
server.on('request', function(req, res) {

    //3.1 judgment path
    var url = req.url;
    if (url === '/') {
        //3.2 read page and render
        fs.readFile('./views/index.html', function(error, data) {
            if (error) {
                //Deal with Chinese garbled code
                res.setHeader('Content-Type', 'text/plain; charset=utf8');
                return res.end("File reading error, please refresh and try again~");
            }
            //There is no need to deal with garbled code, because there is utf8 in html
            res.end(data)
        })


    } else {
        res.end("404 Not Found");
    }
})

//4. Bind the port number and start the server
server.listen(3000, function() {
    console.log("The server started successfully~");
})
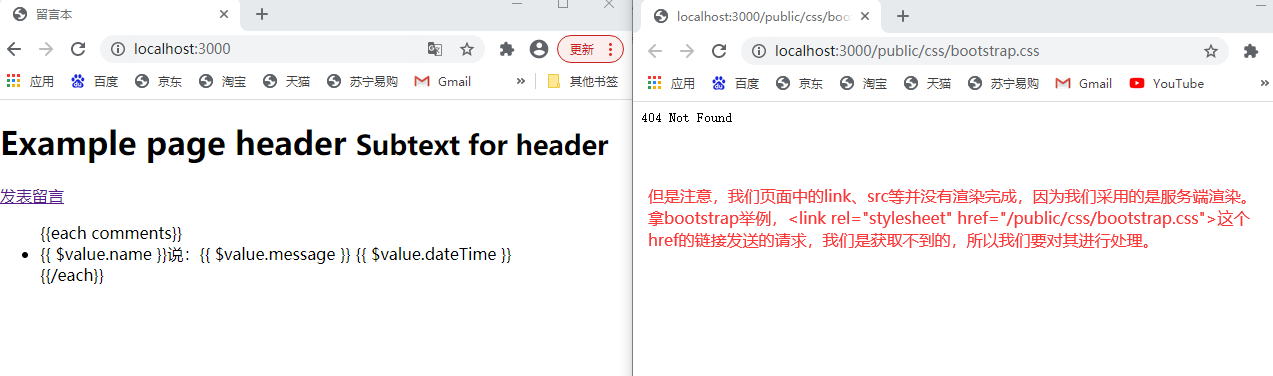
Step 2: the server renders the link, src and other resources in the static page
In order to facilitate the unified processing of these static resources, we agreed to store all static resources in the public directory. Which resources can be accessed by users and which resources cannot be accessed by users can be controlled flexibly through code.
Note: in the server, do not write relative paths in the file. Because at this time, all resources are obtained through url identification. My server has opened the / public / directory. Therefore, the request path here is written as: / public/xxx, / here means the root path of url. When the browser actually sends a request, it will eventually http://127.0.0.1:3000 Put it together. Stop thinking about file paths and think of all paths as url addresses.
The following front-end path:
<link rel="stylesheet" href="/public/css/bootstrap.css">
//Rendering on the server side, speaking of public openness
var fs = require('fs');
var http = require('http');


var server = http.createServer();

server.on('request', function(req, res) {


    var url = req.url;
    if (url === '/') {
        fs.readFile('./views/index.html', function(error, data) {
            if (error) {
                res.setHeader('Content-Type', 'text/plain; charset=utf8');
                return res.end("File reading error, please refresh and try again~");
            }

            res.end(data)
        })

        //5. Dealing with public open resources
    } else if (url.indexOf('/public/') === 0) {
        console.log(url);
       //Don't forget to add '
        fs.readFile('.' + url, function(error, data) {
            if (error) return res.end('404 Not Found.')
            res.end(data)
        })
    } else {
        res.end("404 Not Found");
    }
})

server.listen(3000, function() {
    console.log("The server started successfully~");
})
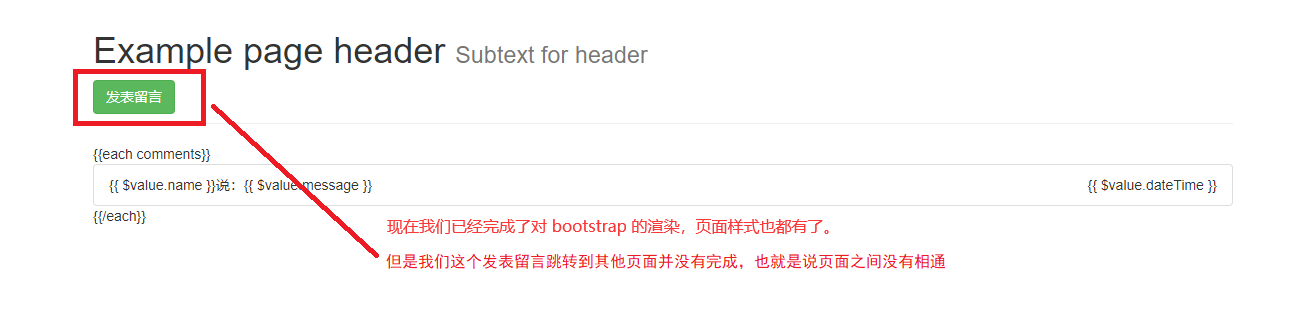
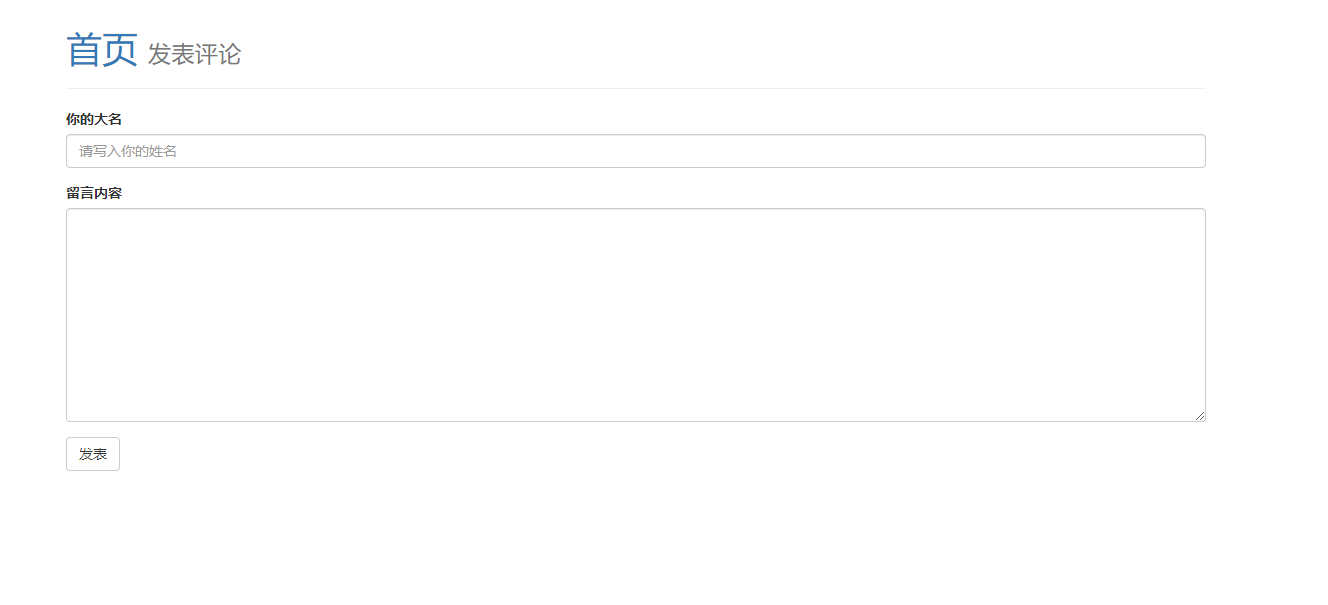
Step 3: complete the jump to the post message page, deal with other nonexistent links, and jump to page 404
First, let's deal with the href of the post message button:
<a class="btn btn-success" href="/post">Leave a message</a>
Note: the href="/post" here is not a href="/post.html". In the process of server-side rendering, the paths in href and src refer to the url rather than the path we jump to, which can beautify the page path. Our jump path is the read path of the file. Because the data of our server comes from the data of files.
var fs = require('fs');
var http = require('http');


var server = http.createServer();

server.on('request', function(req, res) {


    var url = req.url;
    if (url === '/') {
        fs.readFile('./views/index.html', function(error, data) {
            if (error) {
                res.setHeader('Content-Type', 'text/plain; charset=utf8');
                return res.end("File reading error, please refresh and try again~");
            }
            res.end(data)
        })
    } else if (url.indexOf('/public/') === 0) {
        fs.readFile('.' + url, function(error, data) {
            if (error) return res.end('404 Not Found.')
            res.end(data)
        });
        //6. Jump to the page where the message is posted, and the url should be consistent with the href in the page
    } else if (url === '/post') {
        //The address read from the file is the address we really want to jump to the page
        fs.readFile('./views/post.html', function(error, data) {
            if (error) return res.end('404 Not Found.')
            res.end(data)
        })
    } else {
        //7. When we enter other links, we process 404 pages
        fs.readFile('./views/404.html', function(error, data) {
            if (error) return res.end('404 Not Found.')
            res.end(data)
        })
    }
})

server.listen(3000, function() {
    console.log("The server started successfully~");
})
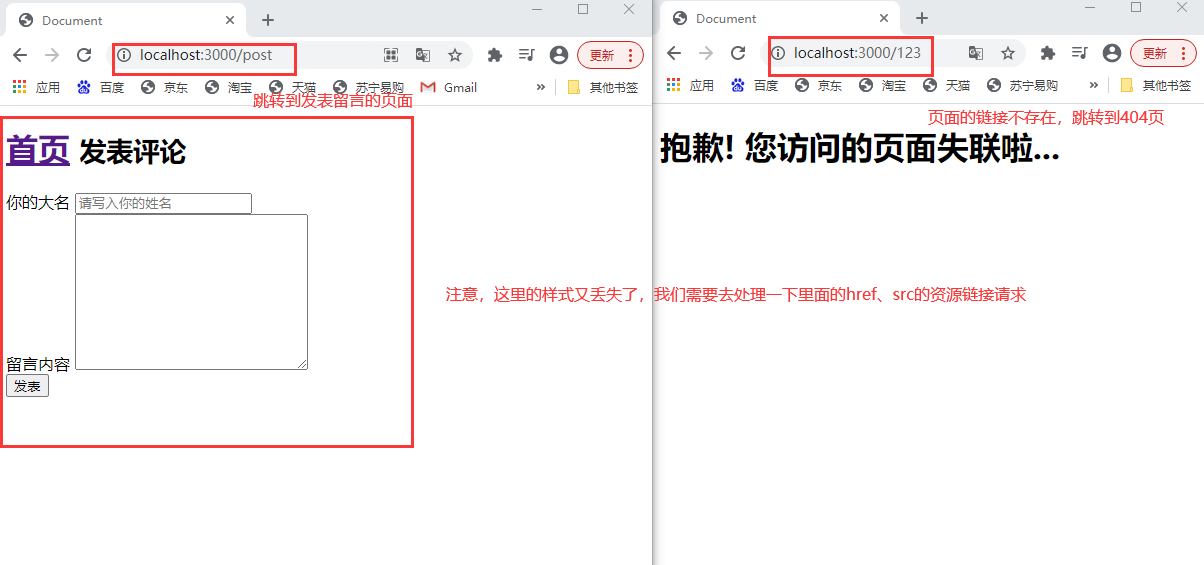
Don't worry at this time. It means that the href and src paths in the page where the message is posted are wrong. We just need to be consistent with the path in the page in step 2, because we have opened the public directory and don't need to deal with it again.
<link rel="stylesheet" href="/public/css/bootstrap.css">
Step 4: fill in the contents of the home page
4.1 installation of third-party package
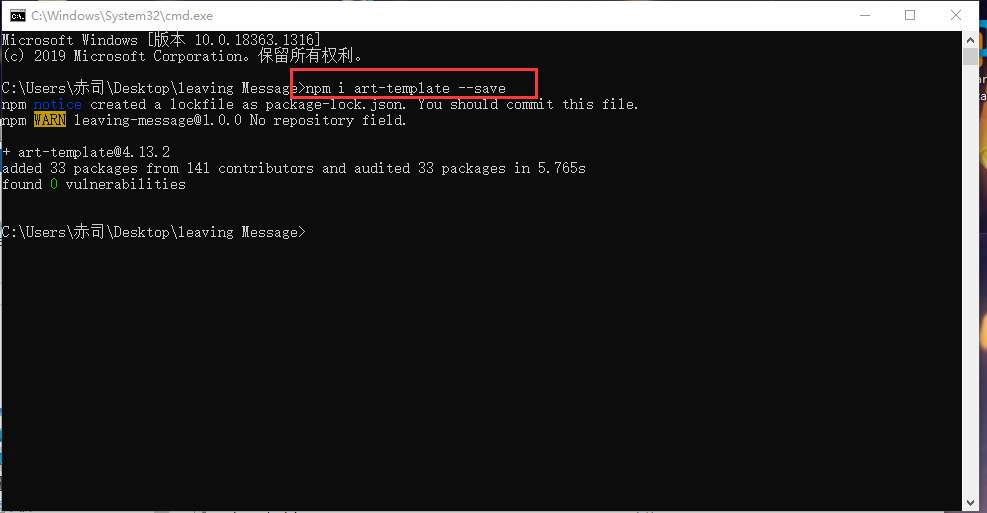
The art template template is used here to render the content of the page, so we also need to install the third-party package. The steps are as follows:, For details, see
Note: install the third-party package into the directory we wrote
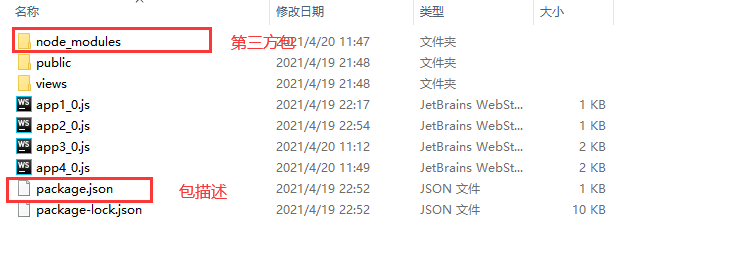
After installation, my directory is as follows:
4.2 code writing
//Write content to the page with template
//8. Load third-party modules
var fs = require('fs');
var http = require('http');
var template = require('art-template');
//9. Write out what you want to render to the page
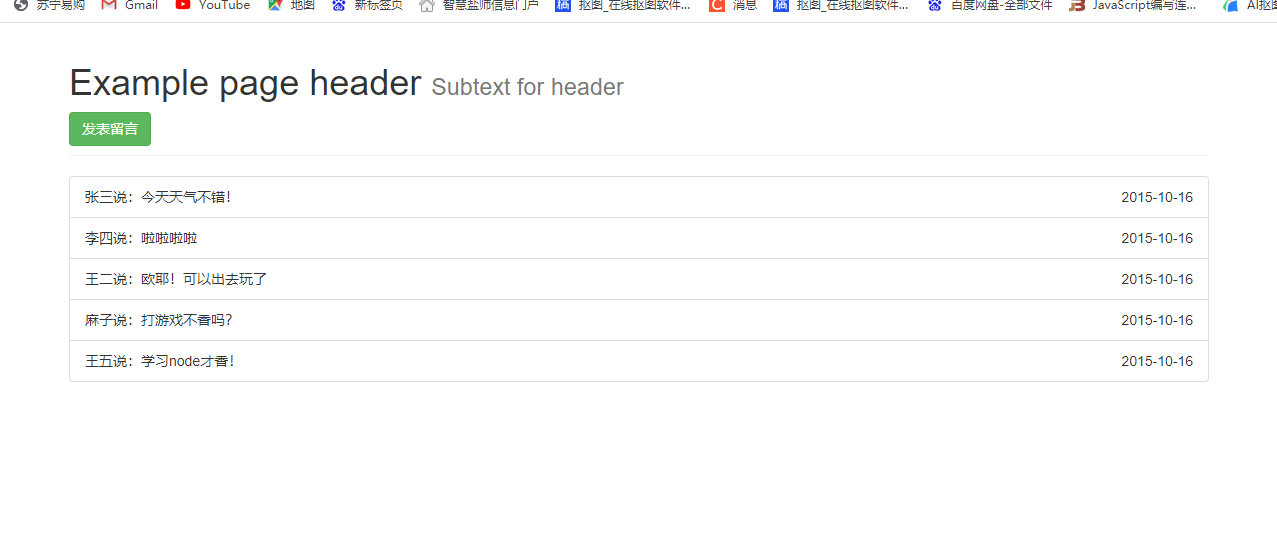
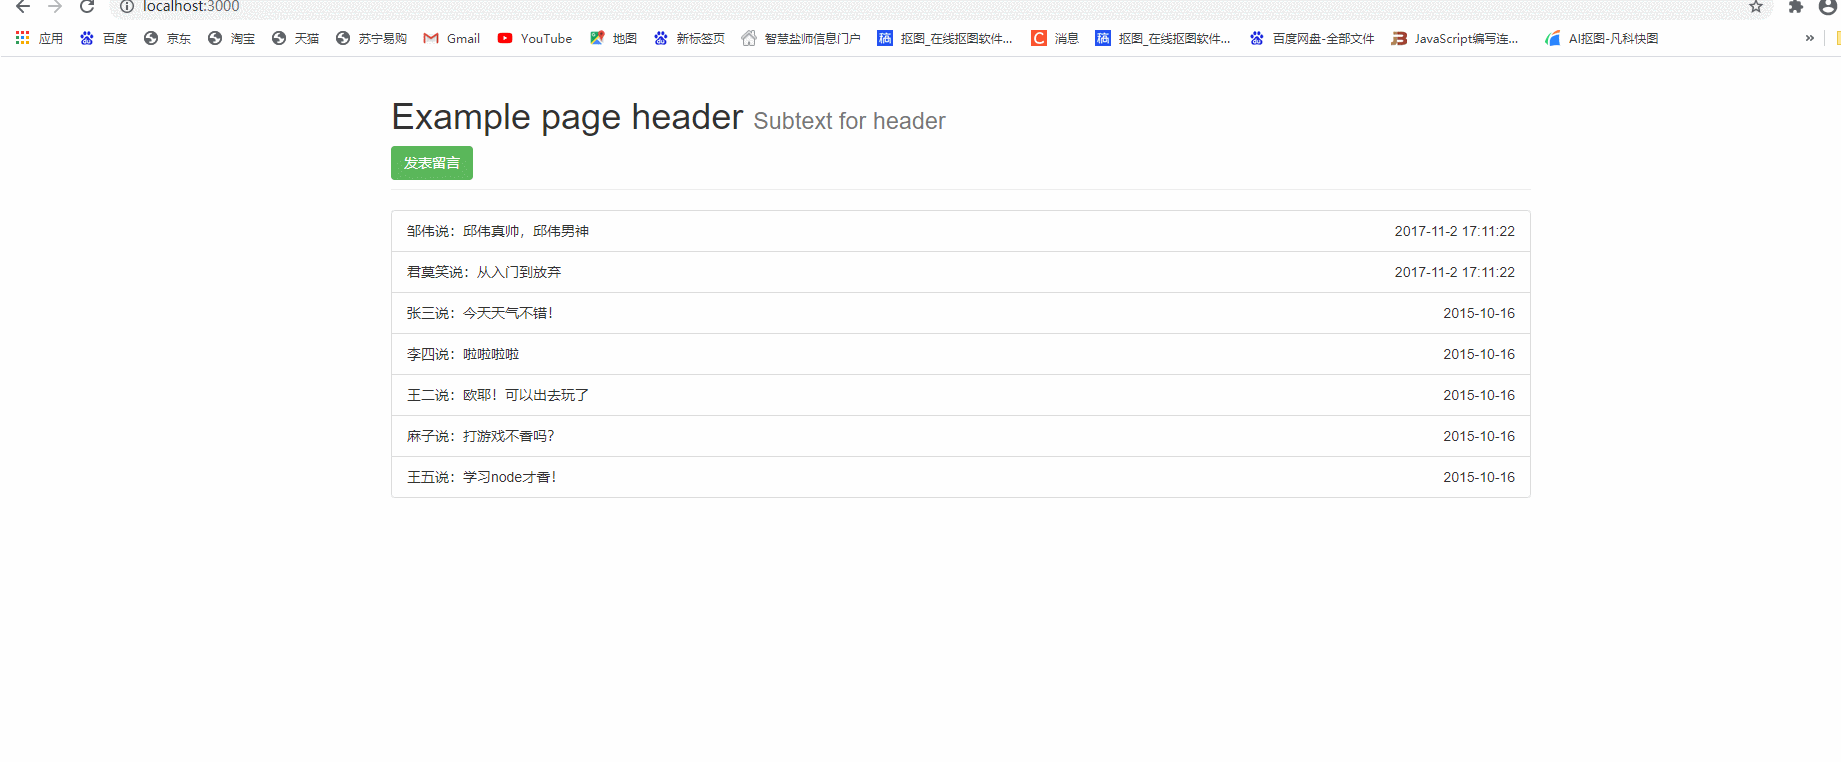
var comments = [{
name: 'Zhang San',
message: 'it's a nice day today!',
dateTime: '2015-10-16'
},
{
name: 'Li Si',
message: 'Lala Lala',
dateTime: '2015-10-16'
},
{
name: 'WangTwo ',
message: 'Ouye! You can go out and play',
dateTime: '2015-10-16'
},
{
name: 'Pockmarks',
message: 'Isn't playing games sweet?',
dateTime: '2015-10-16'
},
{
name: 'Wang Wu',
message: 'study node It smells good!',
dateTime: '2015-10-16'
}
]
var server = http.createServer();
server.on('request', function(req, res) {
var url = req.url;
if (url === '/') {
fs.readFile('./views/index.html', function(error, data) {
if (error) {
res.setHeader('Content-Type', 'text/plain; charset=utf8');
return res.end("File reading error, please refresh and try again~");
}
//10. Through the template, the content is rendered to the page
var htmlStr = template.render(data.toString(), {
comments: comments
})
res.end(htmlStr)
})
} else if (url.indexOf('/public/') === 0) {
fs.readFile('.' + url, function(error, data) {
if (error) return res.end('404 Not Found.')
res.end(data)
});
} else if (url === '/post') {
fs.readFile('./views/post.html', function(error, data) {
if (error) return res.end('404 Not Found.')
res.end(data)
})
} else {
fs.readFile('./views/404.html', function(error, data) {
if (error) return res.end('404 Not Found.')
res.end(data)
})
}
})
server.listen(3000, function() {
console.log("The server started successfully~");
})
Step 5: handle form submission – get submission is used here (low security, but suitable for novices, not recommended in actual projects)
5.1 get pure url path
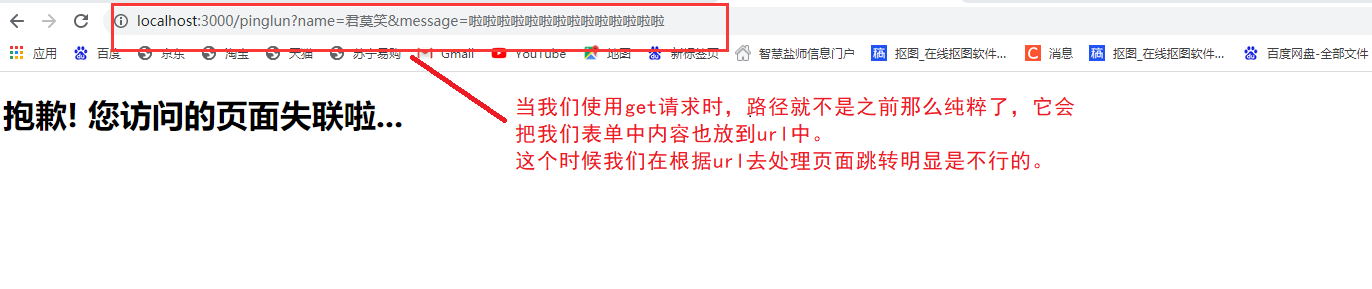
At this point, we need the URL Parse () to help handle the path
The specific use is as follows:
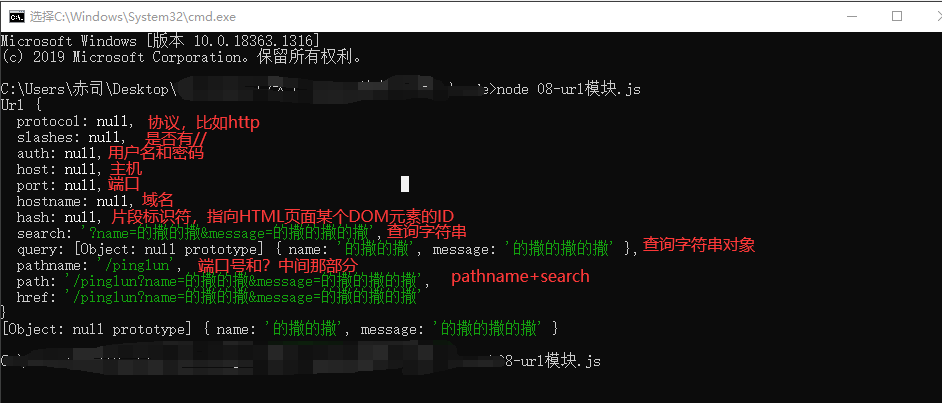
var url = require('url')

var obj = url.parse('/pinglun?name=Caesar's Caesar's Caesar&message=Caesar's Caesar's Caesar', true)

console.log(obj)
console.log(obj.query)
5.2 form redirection
How to redirect clients through the server?
- The status code is set to 302 temporary redirection
res.statusCode = 302
- In the response header, tell the client where to redirect through Location + path
//Here / is the address I want to jump to
res.setHeader('Location', '/')
If the client finds that the status code of the response received from the server is 302, it will automatically find Location in the response header, and then launch a new request for the address, so you can see that the client will jump automatically.
In addition to the status code 302, the status code 301 represents permanent orientation. That is, after a single page Jump is completed, the second time includes always directly jumping to the address after Location.
5.3 handling form submission
5.3.1 first, we need to deal with the path of the form in the post message page
<form action="/pinglun" method="get">
      <div class="form-group">
        <label for="input_name">Your name</label>
        <input type="text" class="form-control" required minlength="2" maxlength="10" id="input_name" name="name" placeholder="Please write your name">
      </div>
      <div class="form-group">
        <label for="textarea_message">Message content</label>
        <textarea class="form-control" name="message" id="textarea_message" cols="30" rows="10" required minlength="5" maxlength="20"></textarea>
      </div>
      <button type="submit" class="btn btn-default">publish</button>
    </form>
action="/pinglun" and jump to this path with url. We need url Parse () to help handle the path
5.3.2 with the help of URL Parse() to modify the path, add the information obtained from the published message to our rendered array, and redirect the form submission at the same time
Note: our path acquisition needs to be changed
This is also my final js code:
var fs = require('fs');
var http = require('http');
var template = require('art-template');

var comments = [{
        name: 'Zhang San',
        message: 'it's a nice day today!',
        dateTime: '2015-10-16'
    },
    {
        name: 'Li Si',
        message: 'Lala Lala',
        dateTime: '2015-10-16'
    },
    {
        name: 'WangTwo ',
        message: 'Ouye! You can go out and play',
        dateTime: '2015-10-16'
    },
    {
        name: 'Pockmarks',
        message: 'Isn't playing games sweet?',
        dateTime: '2015-10-16'
    },
    {
        name: 'Wang Wu',
        message: 'study node It smells good!',
        dateTime: '2015-10-16'
    }
]

var server = http.createServer();


server.on('request', function(req, res) {

    //11. Use URL Parse method parses the path into an object convenient for operation. The second parameter is true, which means that the query string is directly converted into an object (accessed through the query attribute)
    var parseObj = url.parse(req.url, true)

    //12. Separately obtain the path part that does not contain the query string (the path does not contain the content after?)
    var pathname = parseObj.pathname

    if (pathname === '/') {
        fs.readFile('./views/index.html', function(error, data) {
            if (error) {
                res.setHeader('Content-Type', 'text/plain; charset=utf8');
                return res.end("File reading error, please refresh and try again~");
            }
            var htmlStr = template.render(data.toString(), {
                comments: comments
            })
            res.end(htmlStr)
        })

    } else if (pathname.indexOf('/public/') === 0) {
        fs.readFile('.' + pathname, function(error, data) {
            if (error) return res.end('404 Not Found.')
            res.end(data)
        });
    } else if (pathname === '/post') {
        fs.readFile('./views/post.html', function(error, data) {
            if (error) return res.end('404 Not Found.')
            res.end(data)
        })
    } else if (pathname === '/pinglun') {
        //13. Add the contents of the form to the array
        var comment = parseObj.query
        comment.dateTime = '2017-11-2 17:11:22'
        comments.unshift(comment)
            //14. Complete redirection of form
        res.statusCode = 302
        res.setHeader('Location', '/')
        res.end()
    } else {
        fs.readFile('./views/404.html', function(error, data) {
            if (error) return res.end('404 Not Found.')
            res.end(data)
        })
    }
})

server.listen(3000, function() {
    console.log("The server started successfully~");
})
Step 6: project operation results and how to let others see your page
If we want others to see the web page we write, we must open our server and send the web page link (ip address + port number of our computer, such as 192.168.5.11:3000).