1, Overview of MySQL MMM cluster technology;
Overview: MMM (Master Master replication manager for mysql) is a script program that supports dual master failover and dual master daily management. MMM is developed in Perl language and is mainly used to monitor and manage mysql master master replication. It can be said to be mysql master replication manager.
Although it is called dual master replication, in business, only one master is allowed to write at the same time, and the other alternative master provides partial read services to accelerate the preheating of the alternative master at the time of master master master switching. It can be said that MMM script program realizes the function of failover on the one hand, On the other hand, its internal additional tool script can also realize the read load balancing of multiple slave s.
Mmm provides automatic and manual methods to remove the virtual ip of servers with high replication delay in a group of servers. At the same time, it can also back up data and realize data synchronization between two nodes. Because MMM cannot completely guarantee data consistency, mmm is suitable for scenarios that do not require high data consistency, but want to ensure business availability to the greatest extent.

2, Advantages and disadvantages of MySQL MMM;

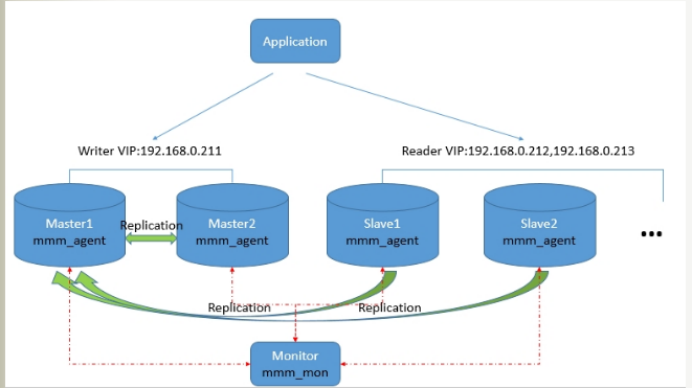
3, MySQL MMM internal working architecture;
Process type:
mmm_mond: monitor the process, take charge of all monitoring work, decide and handle all node role activities. This script needs to be run on the supervisor;
mmm_agentd: the agent process running on each mysql server (Master and Slave) to complete the monitoring probe work and execute simple remote service settings. This script needs to be run on the supervised machine;
mmm_control: a simple script that provides management mmm_ Command of Mond process;
Work structure:
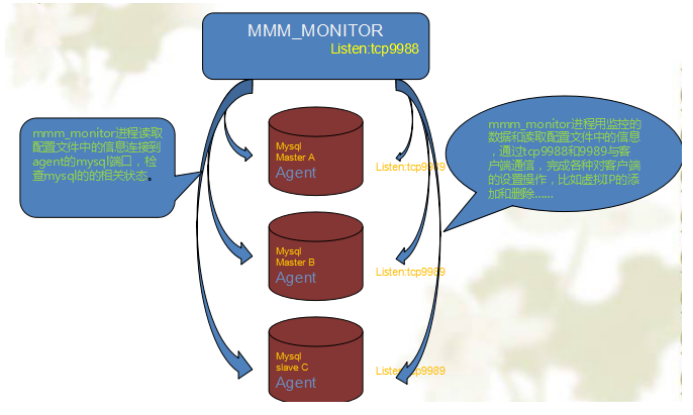
working principle:
The supervisor of MySQL MMM will provide multiple virtual IPS (VIPs), including one writable VIP and multiple readable VIPs;
Through regulatory management, these IP S will be bound to available mysql;
When a mysql goes down, the supervisor will migrate the VIP to other mysql;
4, Case: build MySQL MMM + MySQL 5.6 dual master high availability cluster;
Case environment:
| system | IP address | host name |
| Centos 7 | 192.168.100.102 | master1 |
| Centos 7 | 192.168.100.103 | Master2 |
| Centos 7 | 192.168.100.104 | Slave1 |
| Centos 7 | 192.168.100.105 | Slavee2 |
| Centos 7 | 192.168.100.106 | monitor |
| Centos 7 | 192.168.100.107 | client |
Case steps:
- Deploy ntp service and domain name resolution of master1 node;
- Configure Master 2, slave1, slave2 and monitor nodes to synchronize ntp time and domain name resolution (only master 2 single host configuration is listed here);
- Install mysql services on master1, master2, slave1 and slave2 nodes respectively (only the configuration of a single master of master1 is listed here);
- Configure master1 to realize dual master replication;
- Configure master2 to realize dual master replication;
- Configure slave1 and slave2 to realize master-slave replication (only slave1 single host configuration is listed here);
- Install the MySQL MMM software program on the four nodes of master1, master2, slave1 and slave2 respectively, and configure the agent to specify the node name of the local machine (only the configuration of a single master of master1 is listed here);
- Authorize the monitor node on the master1 node to connect to the database cluster;
- Install the MySQL MMM software program on the monitor node;
- Configure the mysql MMM configuration file on the monitor node and copy it to each mysql node;
- Start the MySQL MMM service on the four nodes of master1, master2, slave1 and slave2 (only the configuration of a single master of master1 is listed here);
- Start the MySQL MMM service on the monitor node and view the cluster status;
- Client verification test read and write data;
- Stop the mysql service of master node 1 and test the cluster status;
- Turn off the write function of slave1 and slave2 nodes to make them read-only;
- Whether the slave node can be accessed by writing;
Deploy ntp service and domain name resolution of master1 node;
[root@master1 ~]# cat <<END >>/etc/hosts

192.168.100.102 master1

192.168.100.103 master2

192.168.100.104 slave1

192.168.100.105 slave2

192.168.100.106 monitor

END

[root@master1 ~]# yum -y install ntp

[root@master1 ~]# sed -i '/^server/s/^/#/g' /etc/ntp.conf

[root@master1 ~]# cat <<END >>/etc/ntp.conf

server 127.127.1.0

fudge 127.127.1.0 stratum 8

END

[root@master1 ~]# systemctl start ntpd

[root@master1 ~]# systemctl enable ntpd

Created symlink from /etc/systemd/system/multi-user.target.wants/ntpd.service to /usr/lib/systemd/system/ntpd.service.
Configure Master 2, slave1, slave2 and monitor nodes to synchronize ntp time and domain name resolution (only master 2 single host configuration is listed here);
[root@master2 ~]# cat <<END >>/etc/hosts

192.168.100.102 master1

192.168.100.103 master2

192.168.100.104 slave1

192.168.100.105 slave2

192.168.100.106 monitor

192.168.100.107 client

END

[root@master2 ~]# yum -y install ntpdate

[root@master2 ~]# /usr/sbin/ntpdate 192.168.100.102

ech 9 Aug 18:04:38 ntpdate[1106]: adjust time server 192.168.100.102 offset 0.299673 sec

[root@master2 ~]# echo "/usr/sbin/ntpdate 192.168.100.102">>/etc/rc.local

[root@master2 ~]# chmod +x /etc/rc.local
Install mysql services on master1, master2, slave1 and slave2 nodes respectively (only the configuration of a single master of master1 is listed here);
[root@master1 ~]# yum -y install ncurses cmake

[root@master1 ~]# mount /dev/cdrom /mnt/

mount: /dev/sr0 Write protected, will mount as read-only

[root@master1 ~]# rpm -ivh /mnt/Packages/ncurses-devel-5.9-13.20130511.el7.x86_64.rpm --nodeps

[root@master1 ~]# ls

mysql-5.6.36.tar.gz

[root@master1 ~]# tar zxvf mysql-5.6.36.tar.gz -C /usr/src/

[root@master1 ~]# cd /usr/src/mysql-5.6.36/

[root@master2 mysql-5.6.36]# cmake -DCMAKE_INSTALL_PREFIX=/usr/local/mysql -DDEFAULT_CHARSET=utf8 -DDEFAULT_COLLATION=utf8_general_ci -DWITH_INNOBASE_STORAGE_ENGINE=1 -DWITH_ARCHIVE_STORAGE_ENGINE=1 -DWITH_BLACKHOLE_STORAGE_ENGINE=1 -DENABLE_DOWNLOADS=1

[root@master1 mysql-5.6.36]# make

[root@master1 mysql-5.6.36]# make install

[root@master1 mysql-5.6.36]# cd

[root@master1 ~]# cp /usr/src/mysql-5.6.36/support-files/mysql.server /etc/init.d/

[root@master1 ~]# chmod +x /etc/init.d/mysql.server

[root@master1 ~]#vim /usr/lib/systemd/system/mysqld.service

[Unit]

Description=mysqldapi

After=network.target


[Service]

Type=forking

PIDFile=/usr/local/mysql/logs/mysqld.pid

ExecStart=/etc/init.d/mysql.server start

ExecReload=/etc/init.d/mysql.server restart

ExecStop=/etc/init.d/mysql.server stop

PrivateTmp=Flase


[Install]

WantedBy=multi-user.target

[root@master1 ~]# echo "export PATH=$PATH:/usr/local/mysql/bin/" >>/etc/profile

[root@master1 ~]# source /etc/profile

[root@master1 ~]# groupadd mysql

[root@master1 ~]# useradd -g mysql mysql

[root@master1 ~]# vim /etc/my.cnf

[mysqld]

basedir = /usr/local/mysql

datadir = /usr/local/mysql/data

port = 3306

sql_mode=NO_ENGINE_SUBSTITUTION,STRICT_TRANS_TABLES

character_set_server=utf8

init_connect='SET NAMES utf8'

log-error=/usr/local/mysql/logs/mysqld.log

skip-name-resolve

pid-file=/usr/local/mysql/logs/mysqld.pid


[root@master1 ~]# mkdir /usr/local/mysql/logs

[root@master1 ~]# chown mysql:mysql /usr/local/mysql/ -R

[root@master1 ~]# /usr/local/mysql/scripts/mysql_install_db --user=mysql --basedir=/usr/local/mysql --datadir=/usr/local/mysql/data ##Initialize mysql

[root@master1 ~]# systemctl start mysqld

[root@master1 ~]# systemctl enable mysqld

Created symlink from /etc/systemd/system/multi-user.target.wants/mysqld.service to /usr/lib/systemd/system/mysqld.service.

[root@master1 ~]# netstat -utpln |grep 3306

tcp        0      0 0.0.0.0:3306            0.0.0.0:*               LISTEN      31481/mysqld

[root@master1 ~]# mysqladmin -uroot password 123123

Warning: Using a password on the command line interface can be insecure.

[root@master1 ~]# mysql -uroot -p123123

mysql> show databases;

+--------------------+

| Database           |

+--------------------+

| information_schema |

| mysql              |

| performance_schema |

| test               |

+--------------------+

mysql> exit
Configure master1 to realize dual master replication;
Vim /etc/my.cnf

server-id=1

log-bin=mysql-bin

log-slave-updates

sync_binlog=1

auto_increment_increment=2

auto_increment_offset=1

relay-log=relay1-log-bin

relay-log-index=slave-relay1-bin.index

Notes:

sync_binlog=1 ##Every time the host commits a transaction, it synchronizes the contents of the binary log to the disk, so even if the server crashes, it will write the time to the log;

auto_increment_increment=2 ##The following two parameters are used in primary replication to stagger value-added and prevent key value conflicts

restart MySQL:  systemctl restart mysqld

[root@master1 ~]# mysql -uroot -p123123


mysql> show master status;

+------------------+----------+--------------+------------------+-------------------+

| File             | Position | Binlog_Do_DB | Binlog_Ignore_DB | Executed_Gtid_Set |

+------------------+----------+--------------+------------------+-------------------+

| mysql-bin.000001 |      154 |              |                  |                   |

+------------------+----------+--------------+------------------+-------------------+

1 row in set (0.00 sec)


mysql> grant replication slave on *.* to 'master'@'192.168.100.%' identified by '123123';

Query OK, 0 rows affected, 1 warning (0.01 sec)


mysql> flush privileges;

Query OK, 0 rows affected (0.00 sec)
Configure master2 to realize dual master replication;
Vim /etc/my.cnf

server-id=2

log-bin=mysql-bin

log-slave-updates

sync_binlog=1

auto_increment_increment=2

auto_increment_offset=1

relay-log=relay2-log-bin

relay-log-index=slave-relay2-bin.index

restart MySQL: systemctl restart mysqld

mysql> change master to master_host='192.168.100.102',master_user='master',master_password='123123',master_log_file='mysql-bin.000001',master_log_pos=154;

Query OK, 0 rows affected, 2 warnings (0.01 sec)


mysql> start slave;

Query OK, 0 rows affected (0.00 sec)

mysql> show master status;

+------------------+----------+--------------+------------------+-------------------+

| File             | Position | Binlog_Do_DB | Binlog_Ignore_DB | Executed_Gtid_Set |

+------------------+----------+--------------+------------------+-------------------+

| mysql-bin.000001 |      441 |              |                  |                   |

+------------------+----------+--------------+------------------+-------------------+

1 row in set (0.00 sec)


mysql>  grant replication slave on *.* to 'master'@'192.168.100.%' identified by '123123';

Query OK, 0 rows affected (0.00 sec)


mysql>  flush privileges;

Query OK, 0 rows affected (0.00 sec)
On master1:
mysql> change master to master_host='192.168.100.103',master_user='master',master_password='123123',master_log_file='mysql-bin.000001',master_log_pos=441;

Query OK, 0 rows affected, 2 warnings (0.01 sec)


mysql> start slave;

Query OK, 0 rows affected (0.01 sec)


mysql>  show slave status\G;

*************************** 1. row ***************************

               Slave_IO_State: Waiting for master to send event

                  Master_Host: 192.168.100.103

                  Master_User: master

                  Master_Port: 3306

                Connect_Retry: 60

              Master_Log_File: mysql-bin.000001

          Read_Master_Log_Pos: 742

               Relay_Log_File: relay1-log-bin.000002

                Relay_Log_Pos: 618

        Relay_Master_Log_File: mysql-bin.000001

             Slave_IO_Running: Yes

            Slave_SQL_Running: Yes
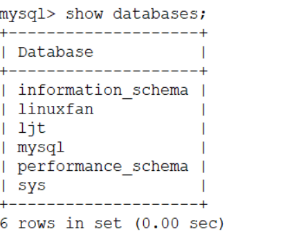
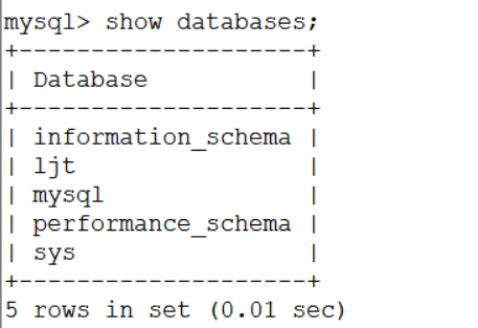
Create database validation:
Master1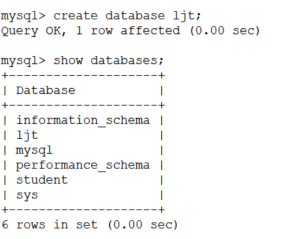
Master2
Synchronized
Configure slave1 and slave2 to realize master-slave replication (only slave1 single host configuration is listed here);
Vim /etc/my.cnf

server-id=4

relay-log=relay4-log-bin

relay-log-index=slave-relay4-bin.index

Restart: systemctl restart mysqld

 mysql -uroot -p123123

mysql> change master to master_host='192.168.100.102',master_user='master',master_password='123123',master_log_file='mysql-bin.000001',master_log_pos=154;

Query OK, 0 rows affected, 2 warnings (0.01 sec)


mysql> start slave;

Query OK, 0 rows affected (0.01 sec)


mysql> show slave status\G;

mysql> create database linuxfan;

Query OK, 1 row affected (0.00 sec)
Create database validation:
Synchronized
Install MySQL MMM software programs on the five nodes of master1, master2, slave1 and slave2 # monitor respectively, and configure the agent to specify the node name of the machine (only the configuration of a single master of master1 is listed here);
scp -r Mysql_mmm_rpm root@192.168.100.102:/root/  Configure local yum Source, upload Mysql_mmm_rpm Folder to master1 of/root lower

cat /etc/yum.repos.d/ljt.repos

[local]

name=local

baseurl=file:///mnt

enabled=1

gpgcheck=0

[Mysql_mmm_rpm]

name=Mysql_mmm_rpm

baseurl=file:///root/Mysql_mmm_rpm

enabled=1

gpgcheck=0

scp ljt.repo root@192.168.100.113:/etc/yum.repos.d/: To several other machines

Mount: mount /dev/cdrom /mnt/

 yum -y install mysql-mmm mysql-mmm-agent mysql-mmm-tools

[root@master1 ~]# vi /etc/mysql-mmm/mmm_agent.conf

include mmm_common.conf


# The 'this' variable refers to this server.  Proper operation requires

# that 'this' server (db1 by default), as well as all other servers, have the

# proper IP addresses set in mmm_common.conf.

this db1

:wq
vi /etc/mysql-mmm/mmm_agent.conf into this: change in sequence

Authorize the monitor node on the master1 node to connect to the database cluster;
[root@192 ~]# mysql -uroot -p123123

mysql> grant replication client on *.* to 'mmm_monitor'@'192.168.100.%' identified by 'monitor';

Query OK, 0 rows affected, 1 warning (0.01 sec)


mysql>  grant super,replication client,process on *.* to 'mmm_agent'@'192.168.100.%' identified by 'agent';

Query OK, 0 rows affected, 1 warning (0.00 sec)


mysql> flush privileges;

Query OK, 0 rows affected (0.01 sec)


mysql> exit

Bye
Permission notes:
replication client: permission is used to execute commands such as show master status. These commands are used to view the replication status;
replication slave: it is used to connect the master library and read binary files from the library to realize replication;
super: kill the process connected in mysql, set global variables, and reset the permissions of master-slave configuration;
process: have the permission to view the currently running sql and explain the execution plan;
Install the MySQL MMM software program on the monitor node;
[root@monitor ~]# yum -y install mysql-mmm mysql-mmm-tools mysql-mmm-monitor
Configure the mysql MMM configuration file on the monitor node and copy it to each mysql node
[root@monitor ~]# vi /etc/mysql-mmm/mmm_common.conf

active_master_role      writer ##Specify the active role as the write role

<host default>

    cluster_interface       eth0 ##Hosted network card

    pid_path                /var/run/mysql-mmm/mmm_agentd.pid

    bin_path                /usr/libexec/mysql-mmm/ ##Executable path

    replication_user        master ##mysql Cluster master-slave replication account

    replication_password    123123

    agent_user              mmm_agent ##monitor accounts connected to the cluster

    agent_password          agent

</host>

<host db1>

    ip      192.168.100.101

    mode    master

    peer    db2 ##Specify the opposite node name

</host>

<host db2>

    ip      192.168.100.102

    mode    master

    peer    db1

</host>

<host db3>

    ip      192.168.100.103

    mode    slave

</host>

<host db4>

    ip      192.168.100.104

    mode    slave

</host>

<role writer>

    hosts   db1, db2

    ips     192.168.100.250

    mode    exclusive ##A single master exists at the same time

</role>

<role reader>

    hosts   db3, db4

    ips     192.168.100.251, 192.168.100.252

    mode    balanced ##polling

</role>

[root@monitor ~]# for i in 101 102 103 104;do scp /etc/mysql-mmm/mmm_common.conf root@192.168.100.$i:/etc/mysql-mmm/; done ##Copy the configuration file to the mysql node

[root@monitor ~]# vi  /etc/mysql-mmm/mmm_mon.conf

include mmm_common.conf

<monitor>

    ip                  127.0.0.1

    pid_path            /var/run/mysql-mmm/mmm_mond.pid

    bin_path            /usr/libexec/mysql-mmm

    status_path         /var/lib/mysql-mmm/mmm_mond.status

ping_ips            192.168.100.101, 192.168.100.102, 192.168.100.103, 192.168.100.104     ##Specify the ip addresses of all nodes listening

auto_set_online     60 a##If the online time exceeds 60s, it is considered as down

   </monitor>

<host default>

    monitor_user        mmm_monitor ##Working users of monitor

    monitor_password    monitor

</host>
Start the MySQL MMM service on the four nodes of master1, master2, slave1 and slave2 (only the configuration of a single master of master1 is listed here);
[root@master1 ~]# systemctl daemon-reload

[root@master1 ~]# systemctl start mysql-mmm-agent

[root@master1 ~]# netstat -utpln |grep mmm

tcp        0      0 192.168.100.101:9989    0.0.0.0:*               LISTEN      32670/mmm_agentd
Start the MySQL MMM service on the monitor node and view the cluster status;
[root@monitor ~]# systemctl daemon-reload

[root@monitor ~]# systemctl start mysql-mmm-monitor

[root@monitor ~]# netstat -utpln |grep mmm

tcp        0      0 127.0.0.1:9988          0.0.0.0:*               LISTEN      15266/mmm_mond

[root@monitor ~]# mmm_control show

# Warning: agent on host db1 is not reachable

# Warning: agent on host db2 is not reachable

  db1(192.168.100.113) master/AWAITING_RECOVERY. Roles:

  db2(192.168.100.102) master/AWAITING_RECOVERY. Roles:

  db3(192.168.100.114) slave/AWAITING_RECOVERY. Roles:

  db4(192.168.100.115) slave/AWAITING_RECOVERY. Roles:
Client verification test read and write data;
root@master1 ~]# mysql -uroot -p123123

mysql> grant all on *.* to 'client'@'192.168.100.%' identified by '123123';

Query OK, 0 rows affected (0.00 sec)

mysql> flush privileges;

Query OK, 0 rows affected (0.00 sec)

mysql> exit


[root@client ~]# yum -y install mysql

[root@cilent ~]#  mysql -uclient -p123123 -h192.168.100.102
Stop the mysql service of master node 1 and test the cluster status;
[root@192 ~]# systemctl stop mysqld

[root@master1 ~]# systemctl stop mysqld


[root@monitor ~]# mmm_control show

# Warning: agent on host db4 is not reachable

  db1(192.168.100.101) master/HARD_OFFLINE. Roles:

  db2(192.168.100.102) master/ONLINE. Roles: writer(192.168.100.250)

  db3(192.168.100.103) slave/ONLINE. Roles: reader(192.168.100.251)

  db4(192.168.100.104) slave/ONLINE. Roles:

Notes:

ONLINE. Roles Represents an online node;

HARD_OFFLINE express ping Impassability and(perhaps)mysql Connection interruption,Will lead to hard_offline Status;

admin_offline Is the status of manual offline;


[root@monitor ~]# tail /var/log/mysql-mmm/mmm_mond.log

2018/08/10 07:44:37 FATAL State of host 'db1' changed from AWAITING_RECOVERY to ONLINE because of auto_set_online(60 seconds). It was in state AWAITING_RECOVERY for 61 seconds

2018/08/10 07:44:37 FATAL Agent on host 'db1' is reachable again

2018/08/10 07:50:28 FATAL Agent on host 'db1' is reachable again

2018/08/10 08:04:00 FATAL State of host 'db1' changed from ONLINE to HARD_OFFLINE (ping: OK, mysql: not OK)


[root@client ~]# mysql -uclient -p123123 -h192.168.100.250

MySQL [(none)]> show databases;

+--------------------+

| Database           |

+--------------------+

| information_schema |

| linuxfan           |

| mysql              |

| performance_schema |

| test               |

+--------------------+

MySQL [(none)]> exit


Øclose slave1 and slave2 Write function of node to make it in read-only state;

[root@slave1 ~]# cat <<END >>/etc/my.cnf

read_only=1

END


[root@slave2 ~]# cat <<END >>/etc/my.cnf

read_only=1

END

Notes:

read_only=1    ##Open the read-only service of the database service. Note that only ordinary users with permissions lower than super are subject to this restriction;
Client access tests whether the slave node is writable;
[root@client ~]# mysql -uclient1 -p123123 -h192.168.100.250

MySQL [(none)]> show databases;

+--------------------+

| Database           |

+--------------------+

| information_schema |

| linuxfan           |

| mysql              |

| performance_schema |

| test               |

+--------------------+

MySQL [(none)]> create database linuxfan1;

Query OK, 1 row affected (0.01 sec)

MySQL [(none)]> show databases;

+--------------------+

| Database           |

+--------------------+

| information_schema |

| linuxfan           |

| linuxfan1          |

| mysql              |

| performance_schema |

| test               |

+--------------------+

MySQL [(none)]> exit

Bye


[root@client ~]# mysql -uclient1 -p123123 -h192.168.100.251

MySQL [(none)]> show databases;

+--------------------+

| Database           |

+--------------------+

| information_schema |

| linuxfan           |

| linuxfan1          |

| mysql              |

| performance_schema |

| test               |

+--------------------+

MySQL [(none)]> create database linuxfan2;

ERROR 1290 (HY000): The MySQL server is running with the --read-only option so it cannot execute this statement

MySQL [(none)]> exit