catalogue
1, Purchase and installation of server
2, Download of required software
2.1. Final shell download and installation
3, Node JS installation and configuration
4, Installation and configuration of Git and gitee
5, Tomcat installation and configuration
6, Installation and configuration of Nginx
7, MySQL installation and configuration
8, Domain name resolution and configuration
1, Purchase and installation of server
2, Download of required software
2.1. Final shell download and installation
Introduction: FinalShell is a shell tool. Personally, I think it is easier to use than xshell. Xshell only supports win system, while FinalShell supports multiple operating systems and functions such as account login and saving.
FinalSHell official website address
2.1.1 download and installation
You can download from the official website by yourself. The installation process is the same as that of all software.
Download address for Windows
http://www.hostbuf.com/downloads/finalshell_install.exe
Mac OS download address
http://www.hostbuf.com/downloads/finalshell_install.pkg
2.1.2. Login
After installation, open the software and you will be prompted to log in. Follow the normal registration and login process. For the advanced version, you can choose whether to buy it or not according to the situation.
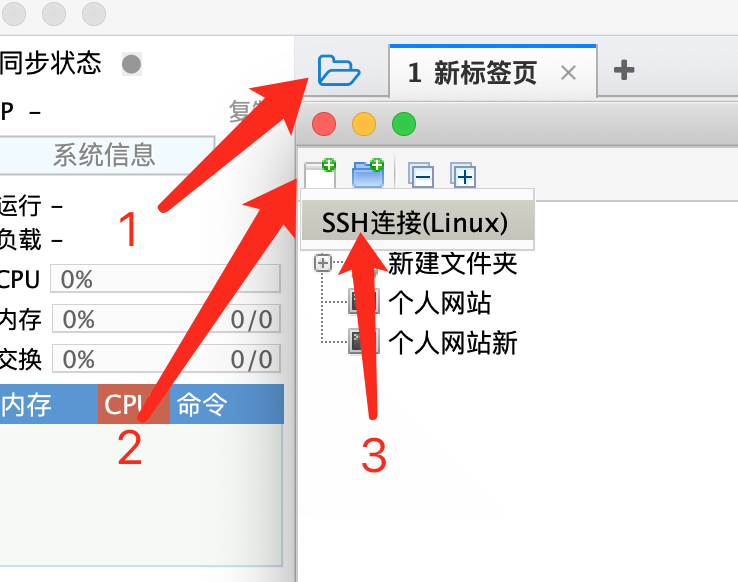
2.1.3. Connect to Alibaba cloud server
1. New connection panel
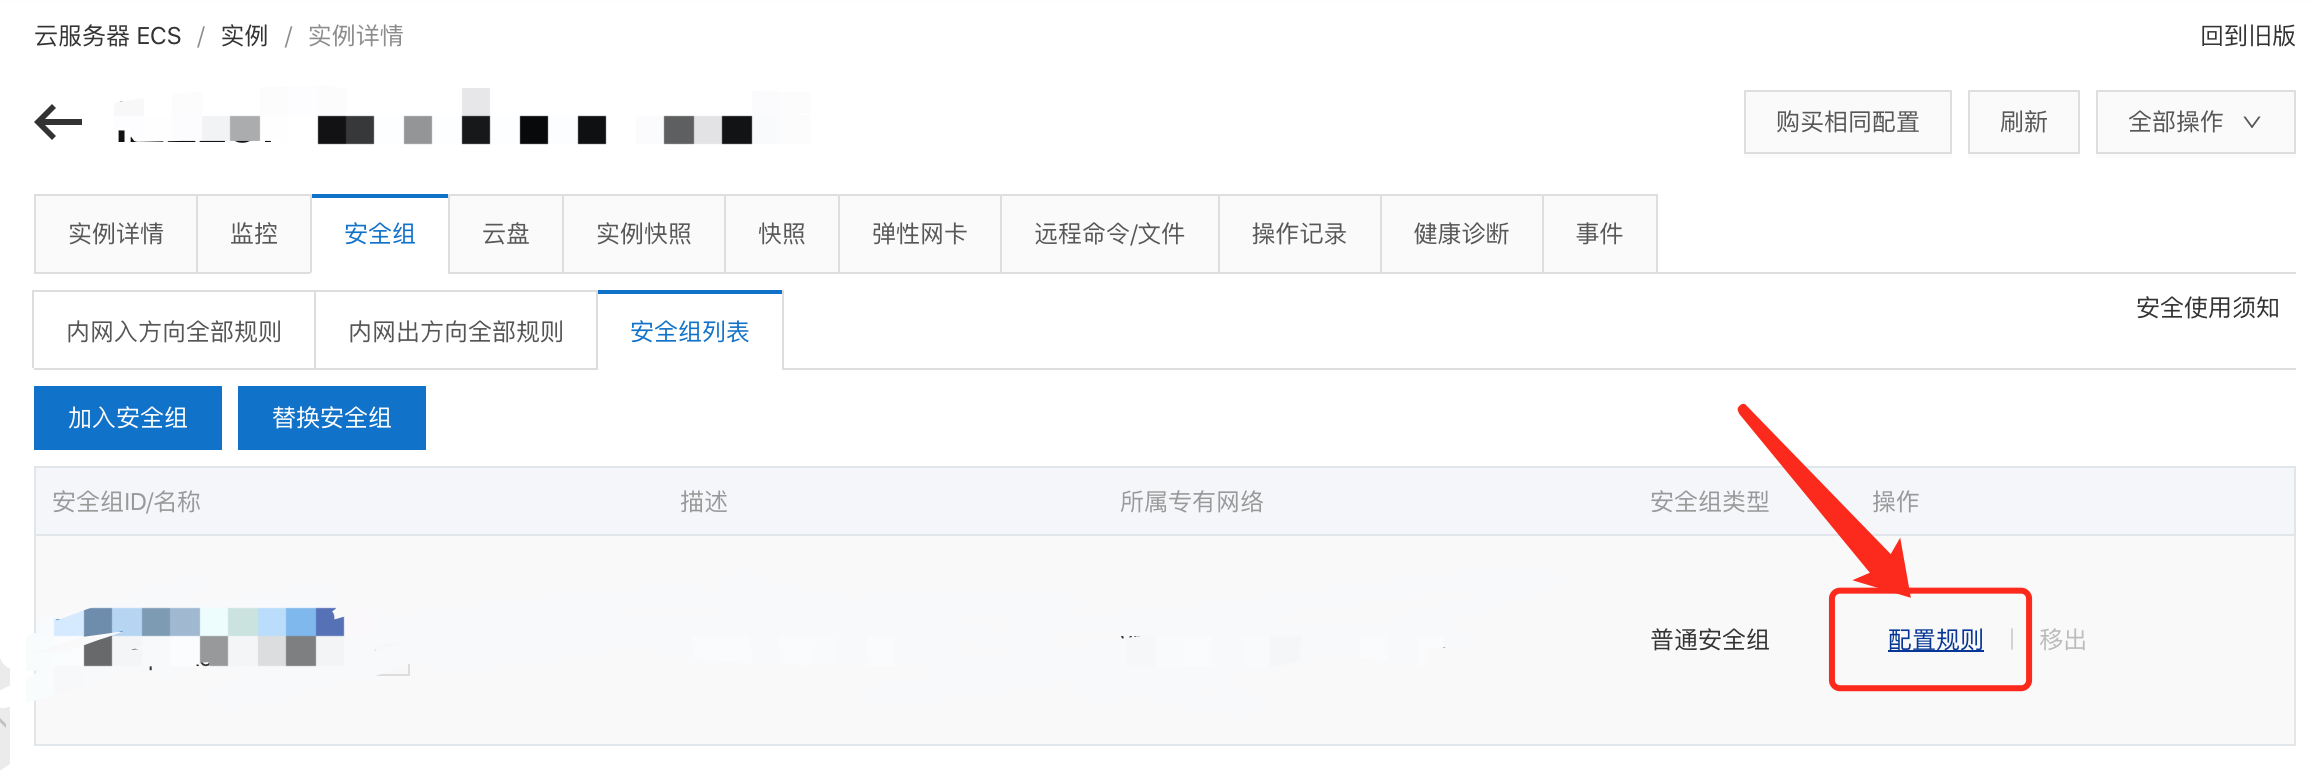
2. Find the external ip address of your server in Alibaba cloud
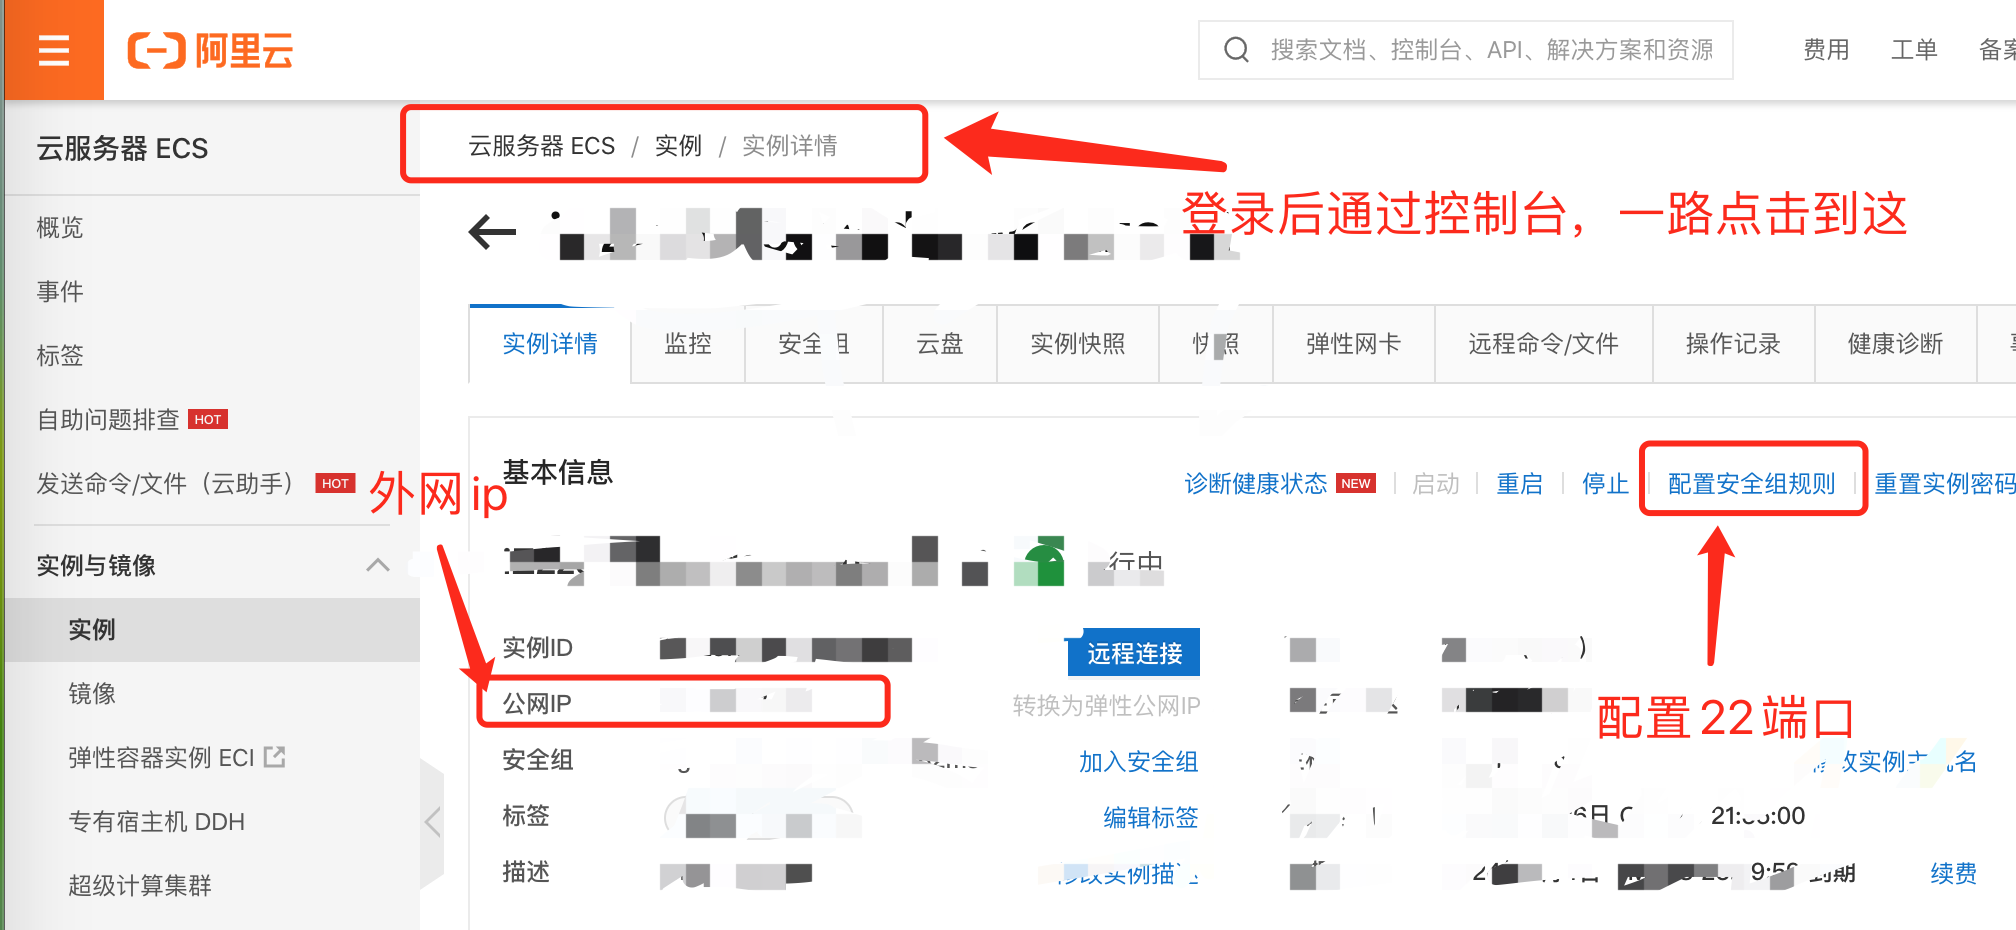
3. At the same time, configure the security group rules and open port 22


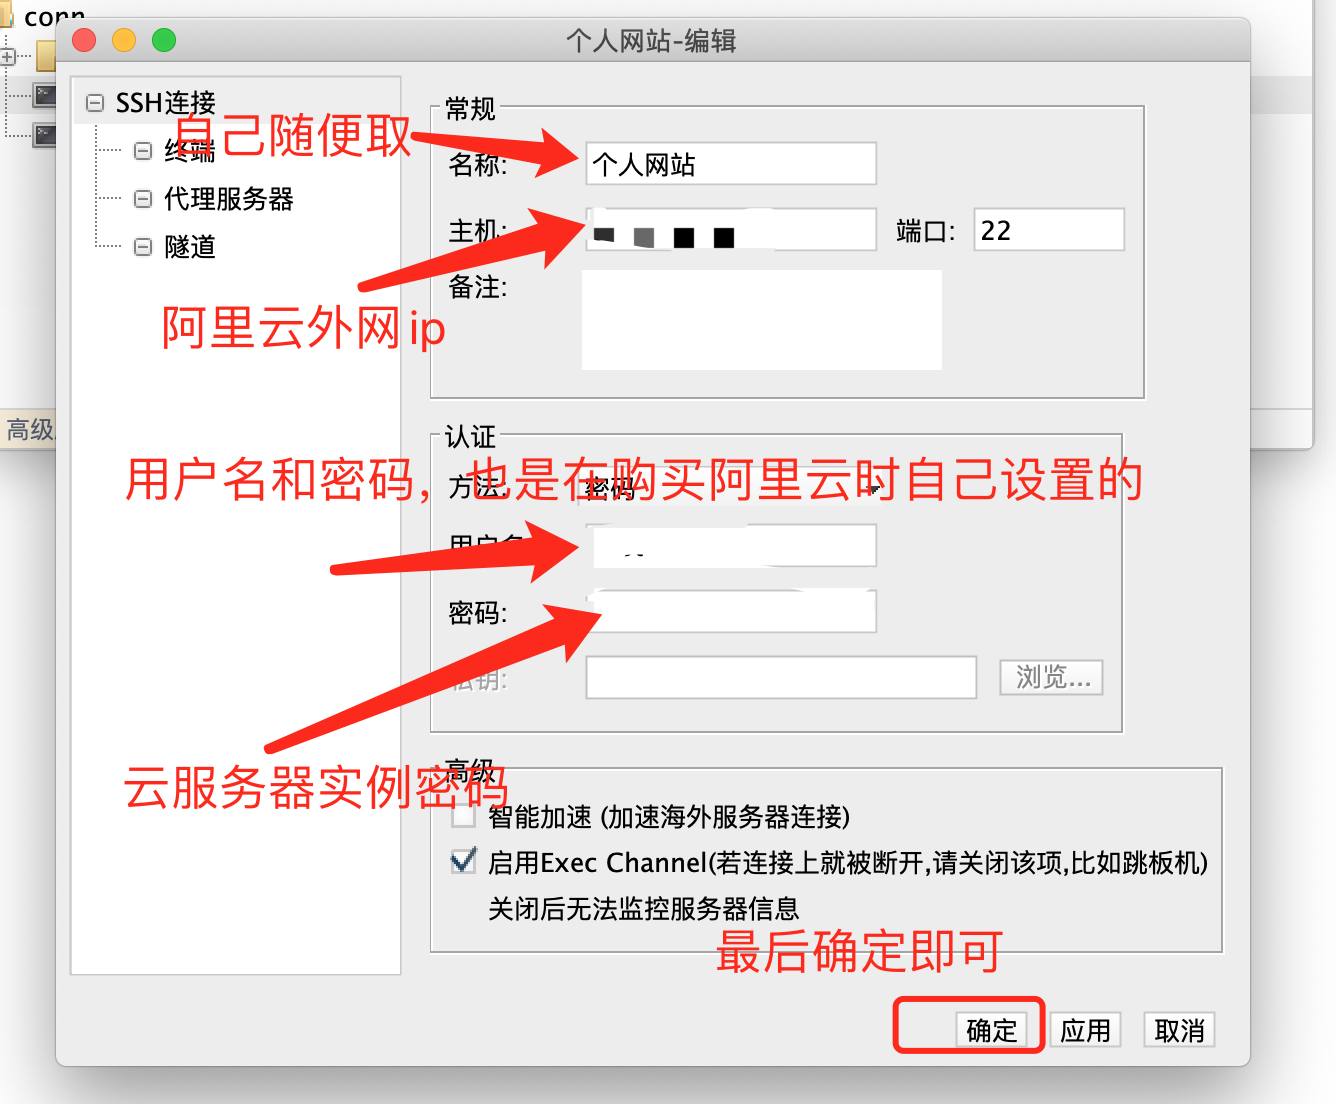
4. Next, we configure FinalShell
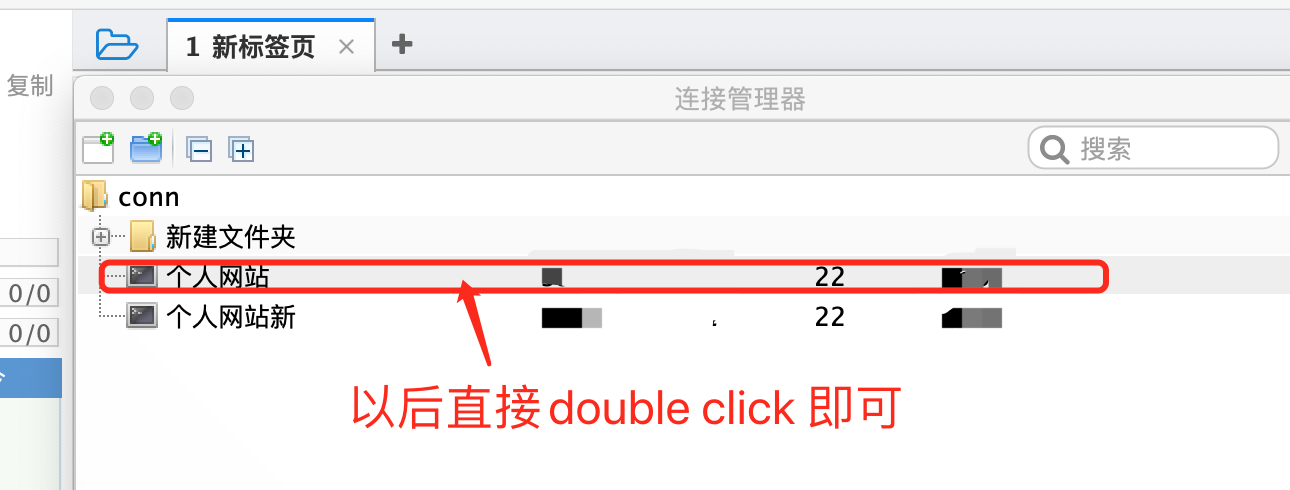
5. The exciting moment has come, and finally see the interface.
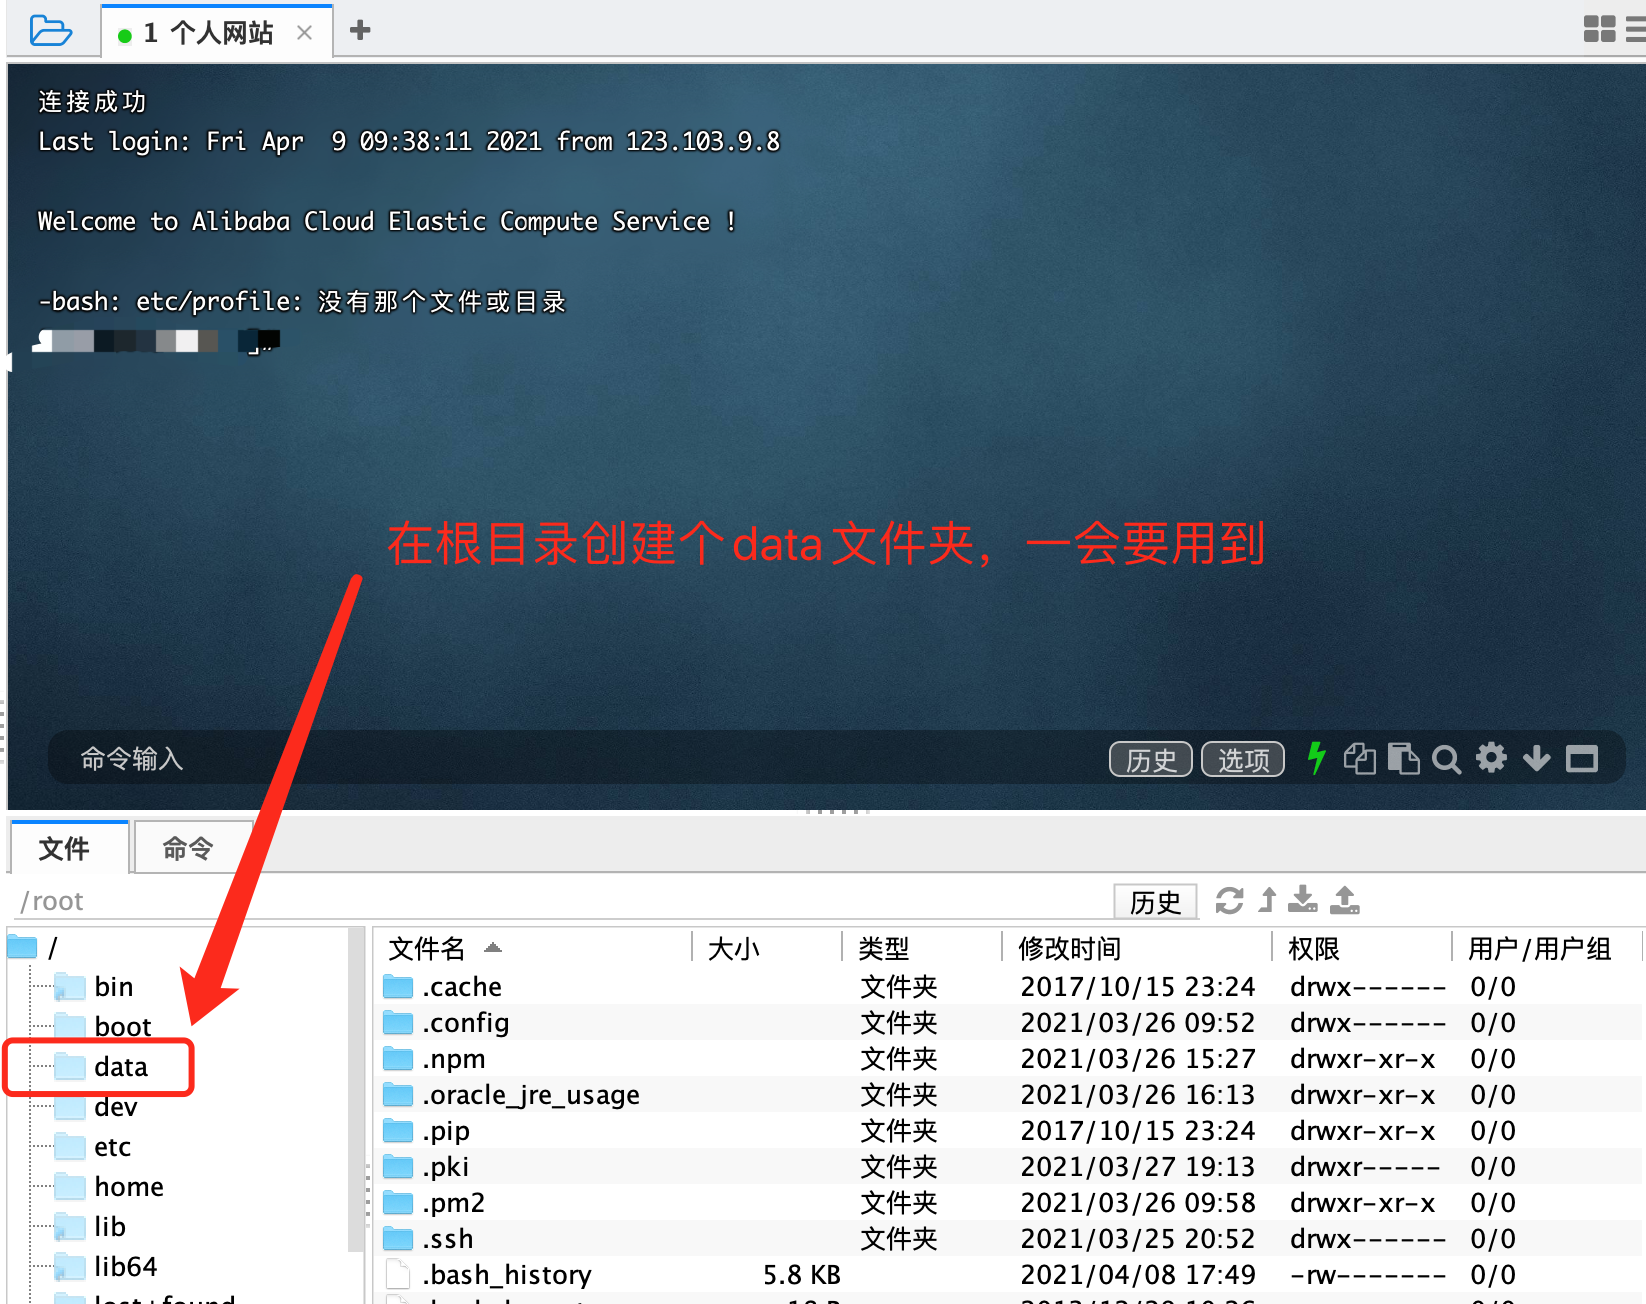
6. By the way, we create a data folder in the root directory, and we will download the software in this folder later.
2.2,Node.js
1. Open the nodejs official website and select alicloud image
nodejs official website
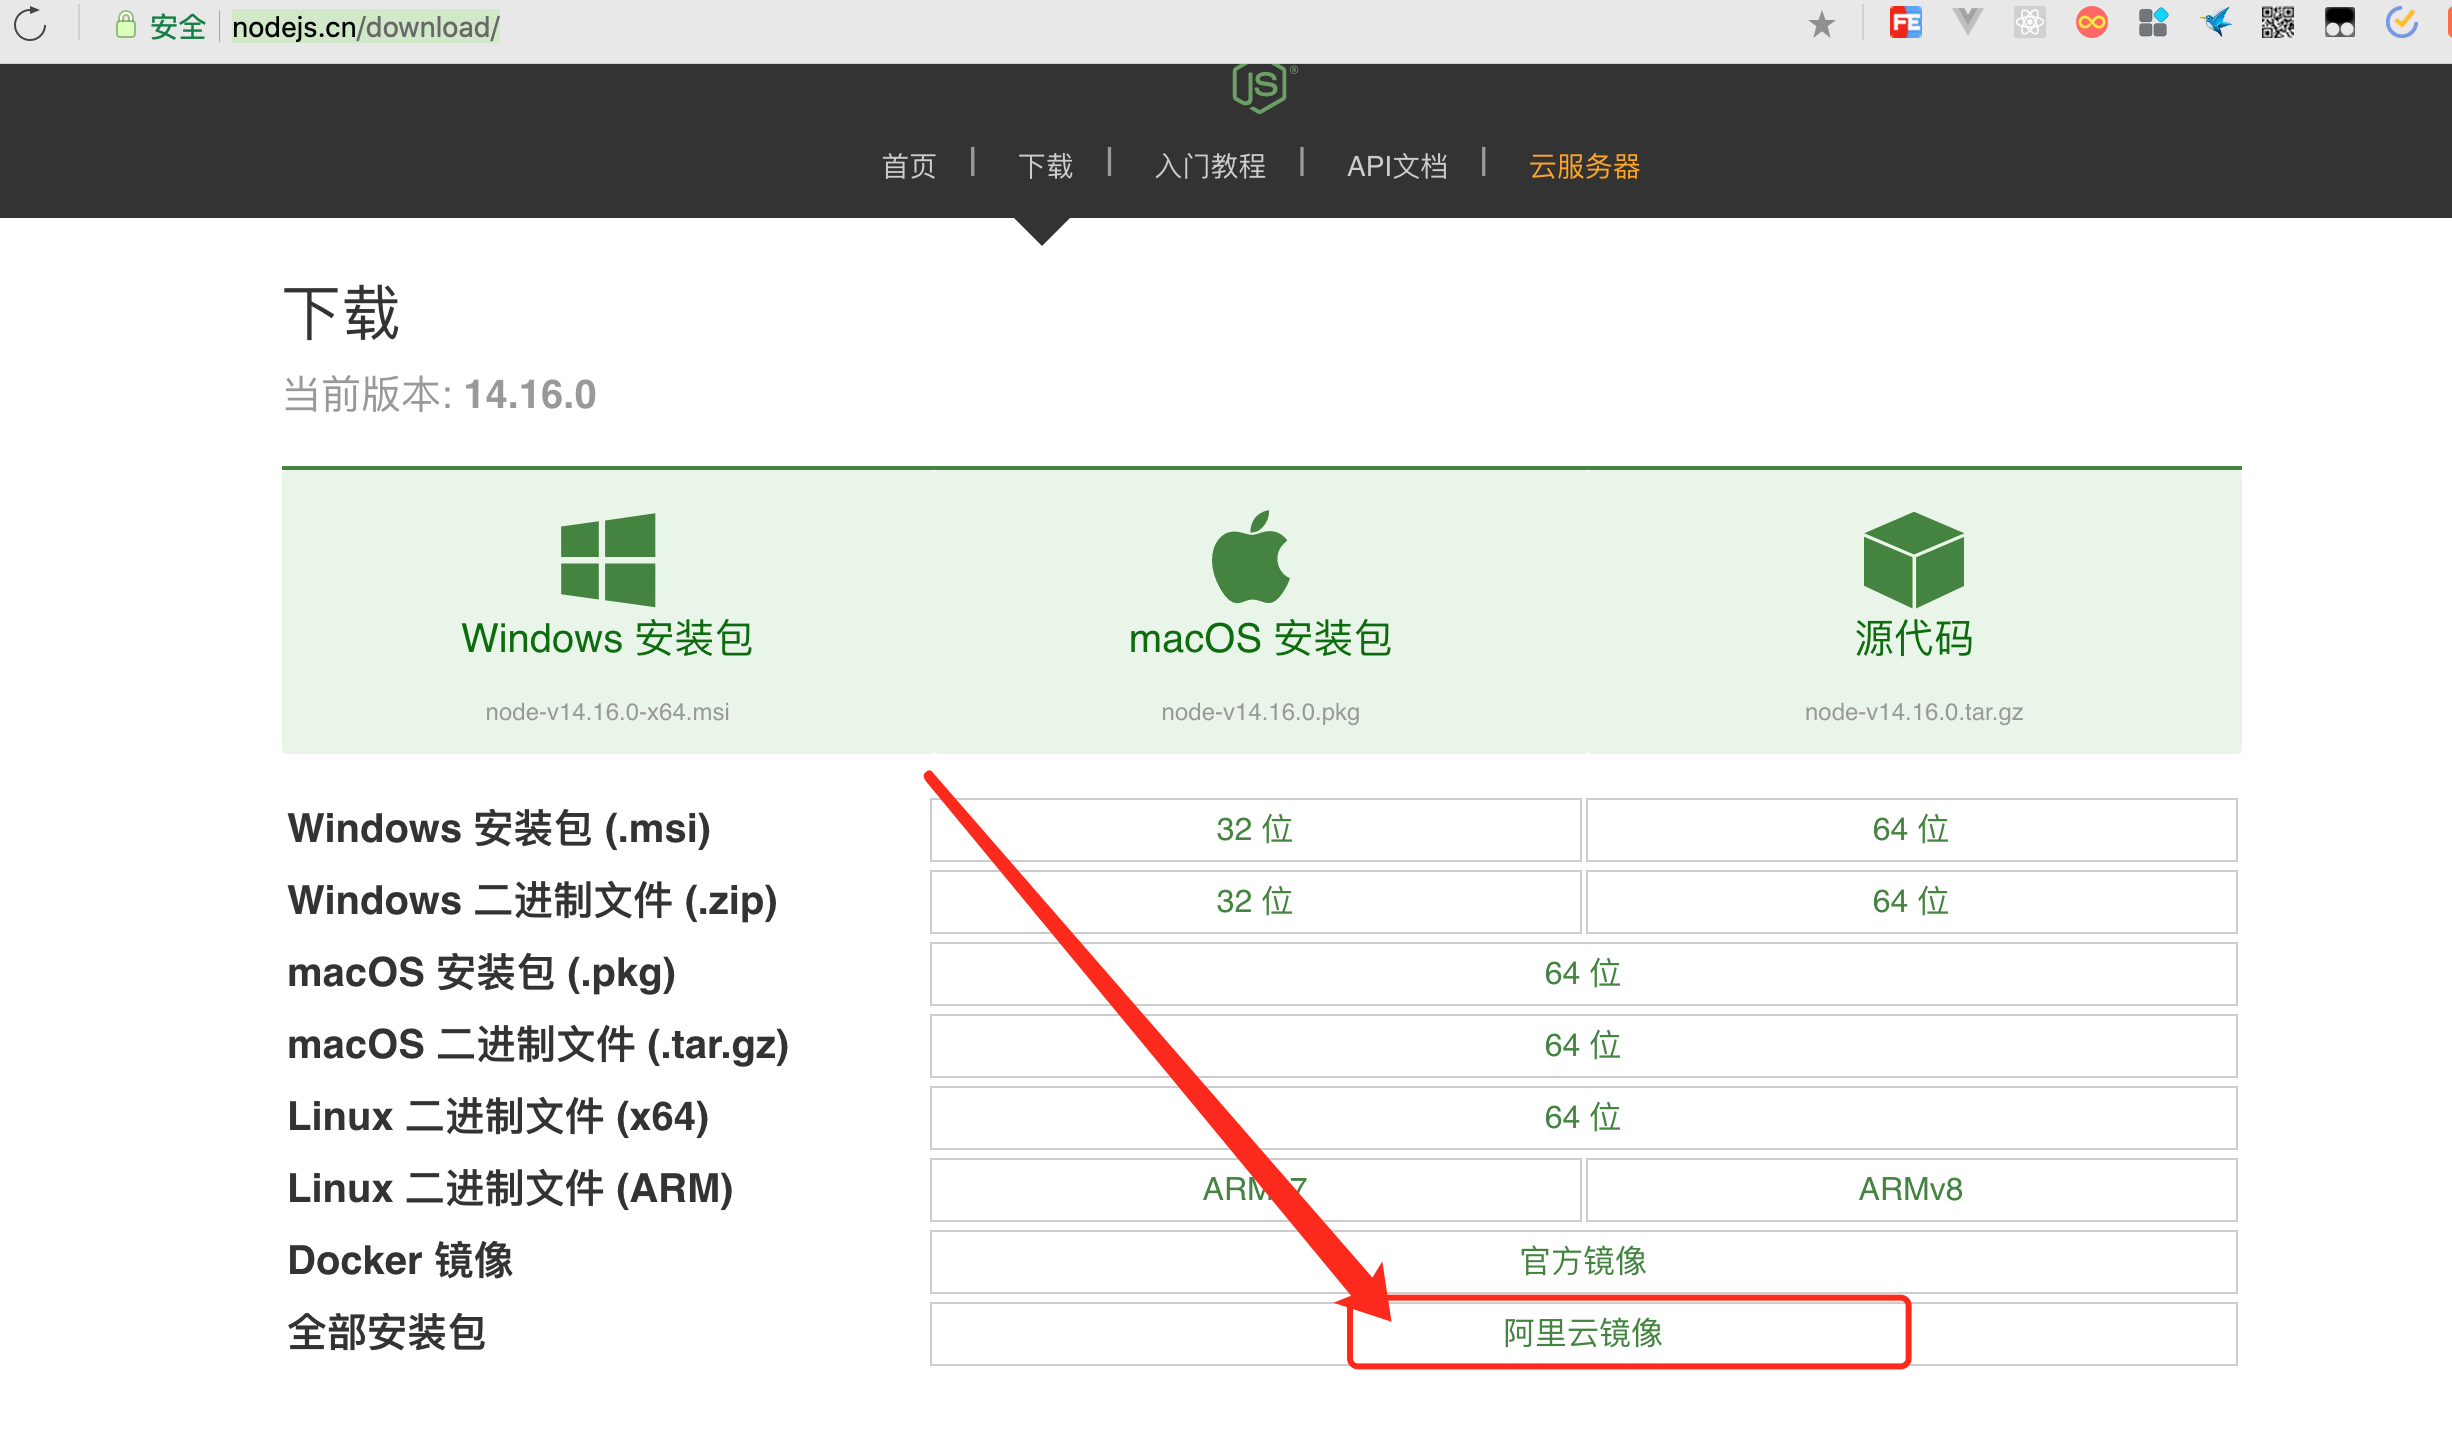
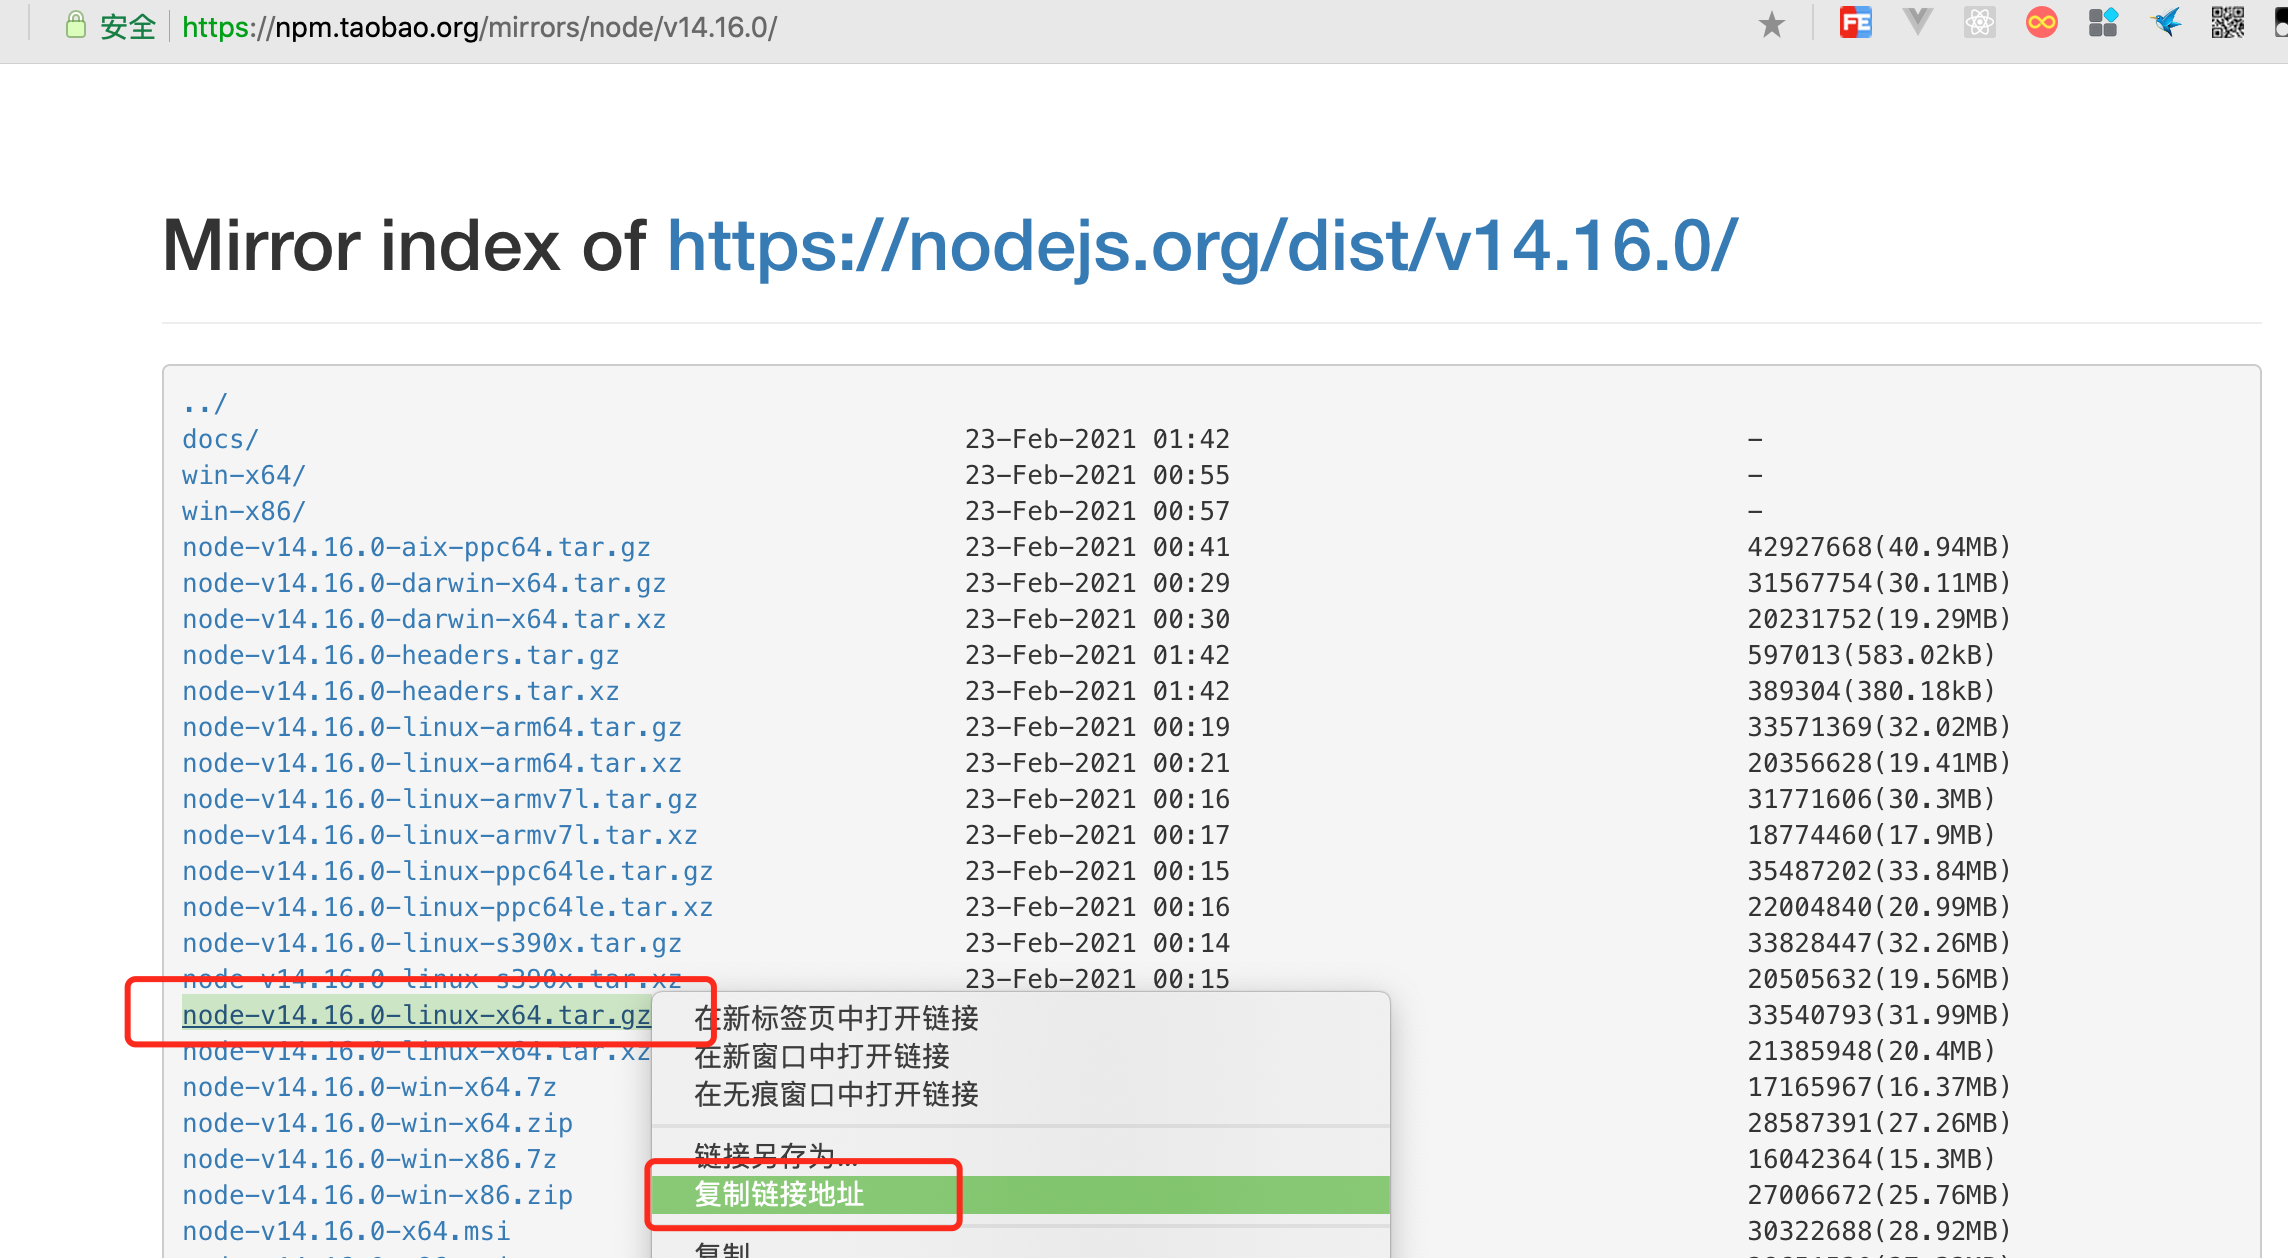
2. Select the linux version tar.gz format, we right-click to copy the link address
Link address
https://npm.taobao.org/mirrors/node/v14.16.0/node-v14.16.0-linux-x64.tar.gz
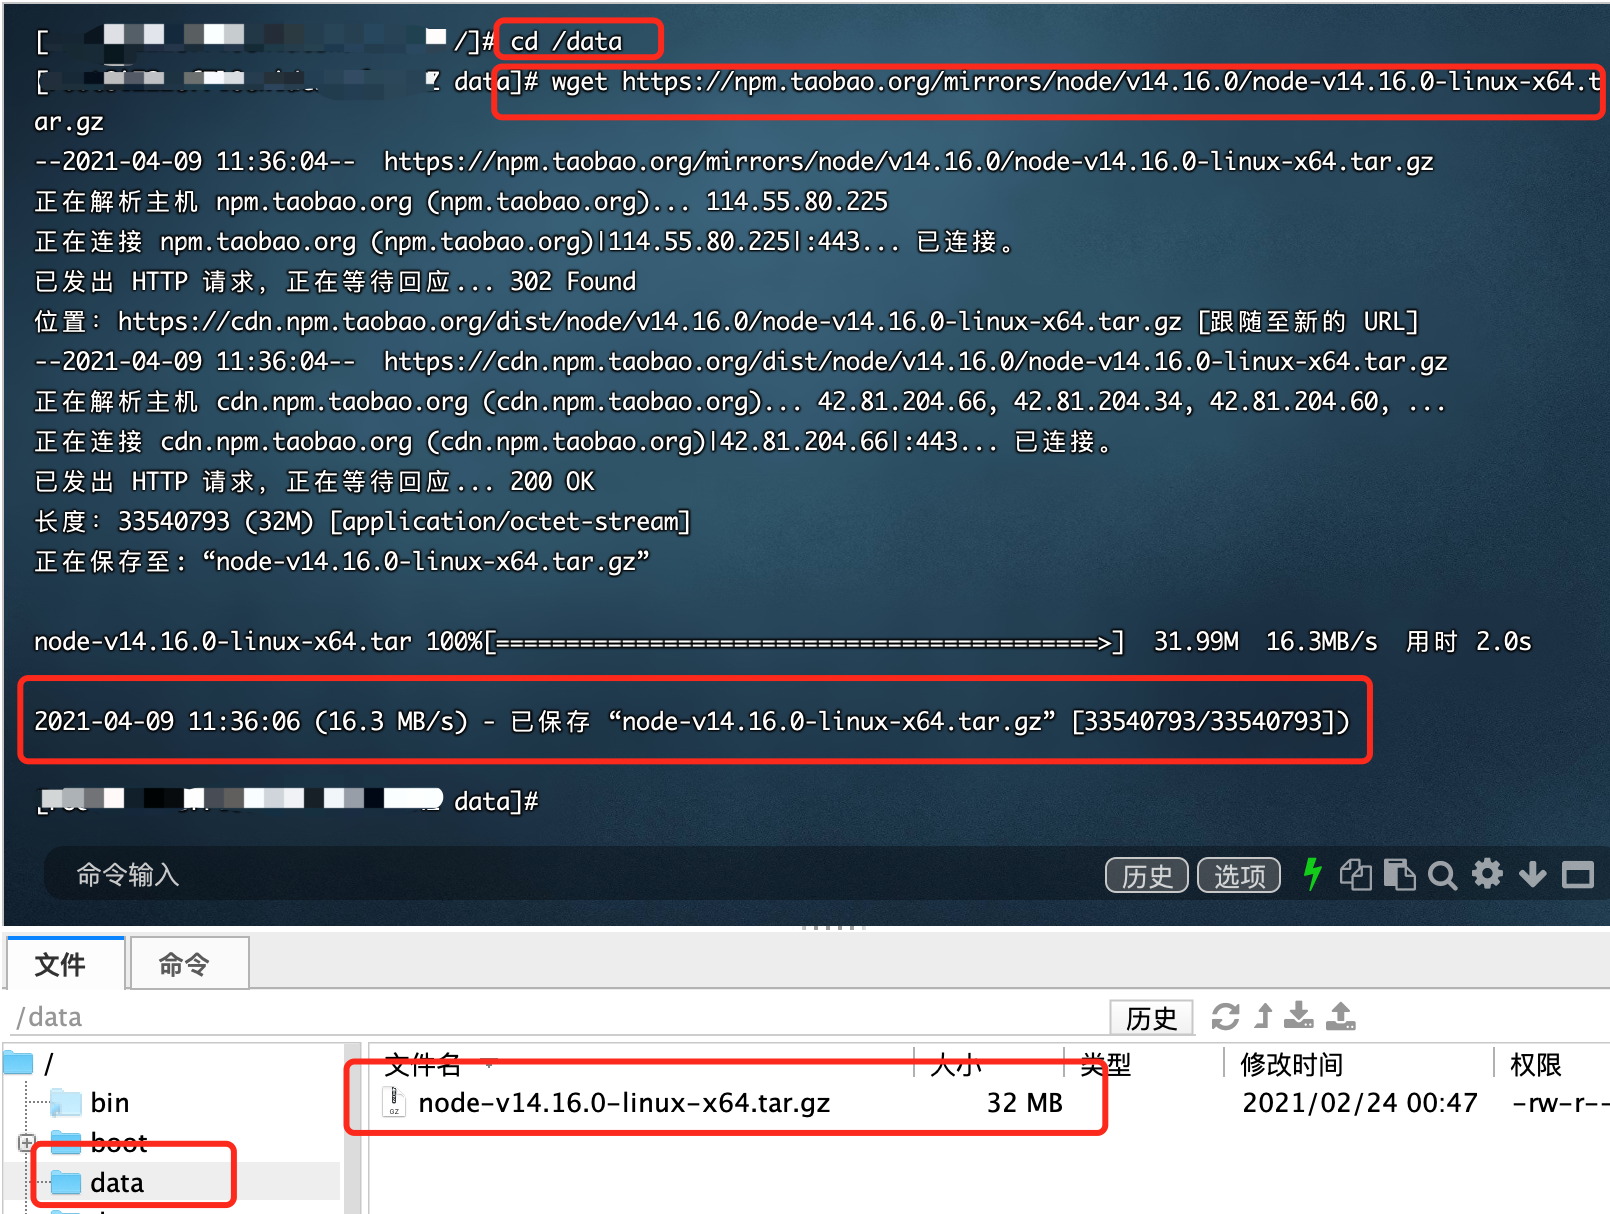
3. Switch to the data directory in the final shell and download the file
# Switch to the data directory
cd /data

# Download File
wget https://npm.taobao.org/mirrors/node/v14.16.0/node-v14.16.0-linux-x64.tar.gz
4. The download is successful, as shown in the figure. The folder at the bottom may not be refreshed in time. You can click the refresh button on the right side of [history] to complete the node download.
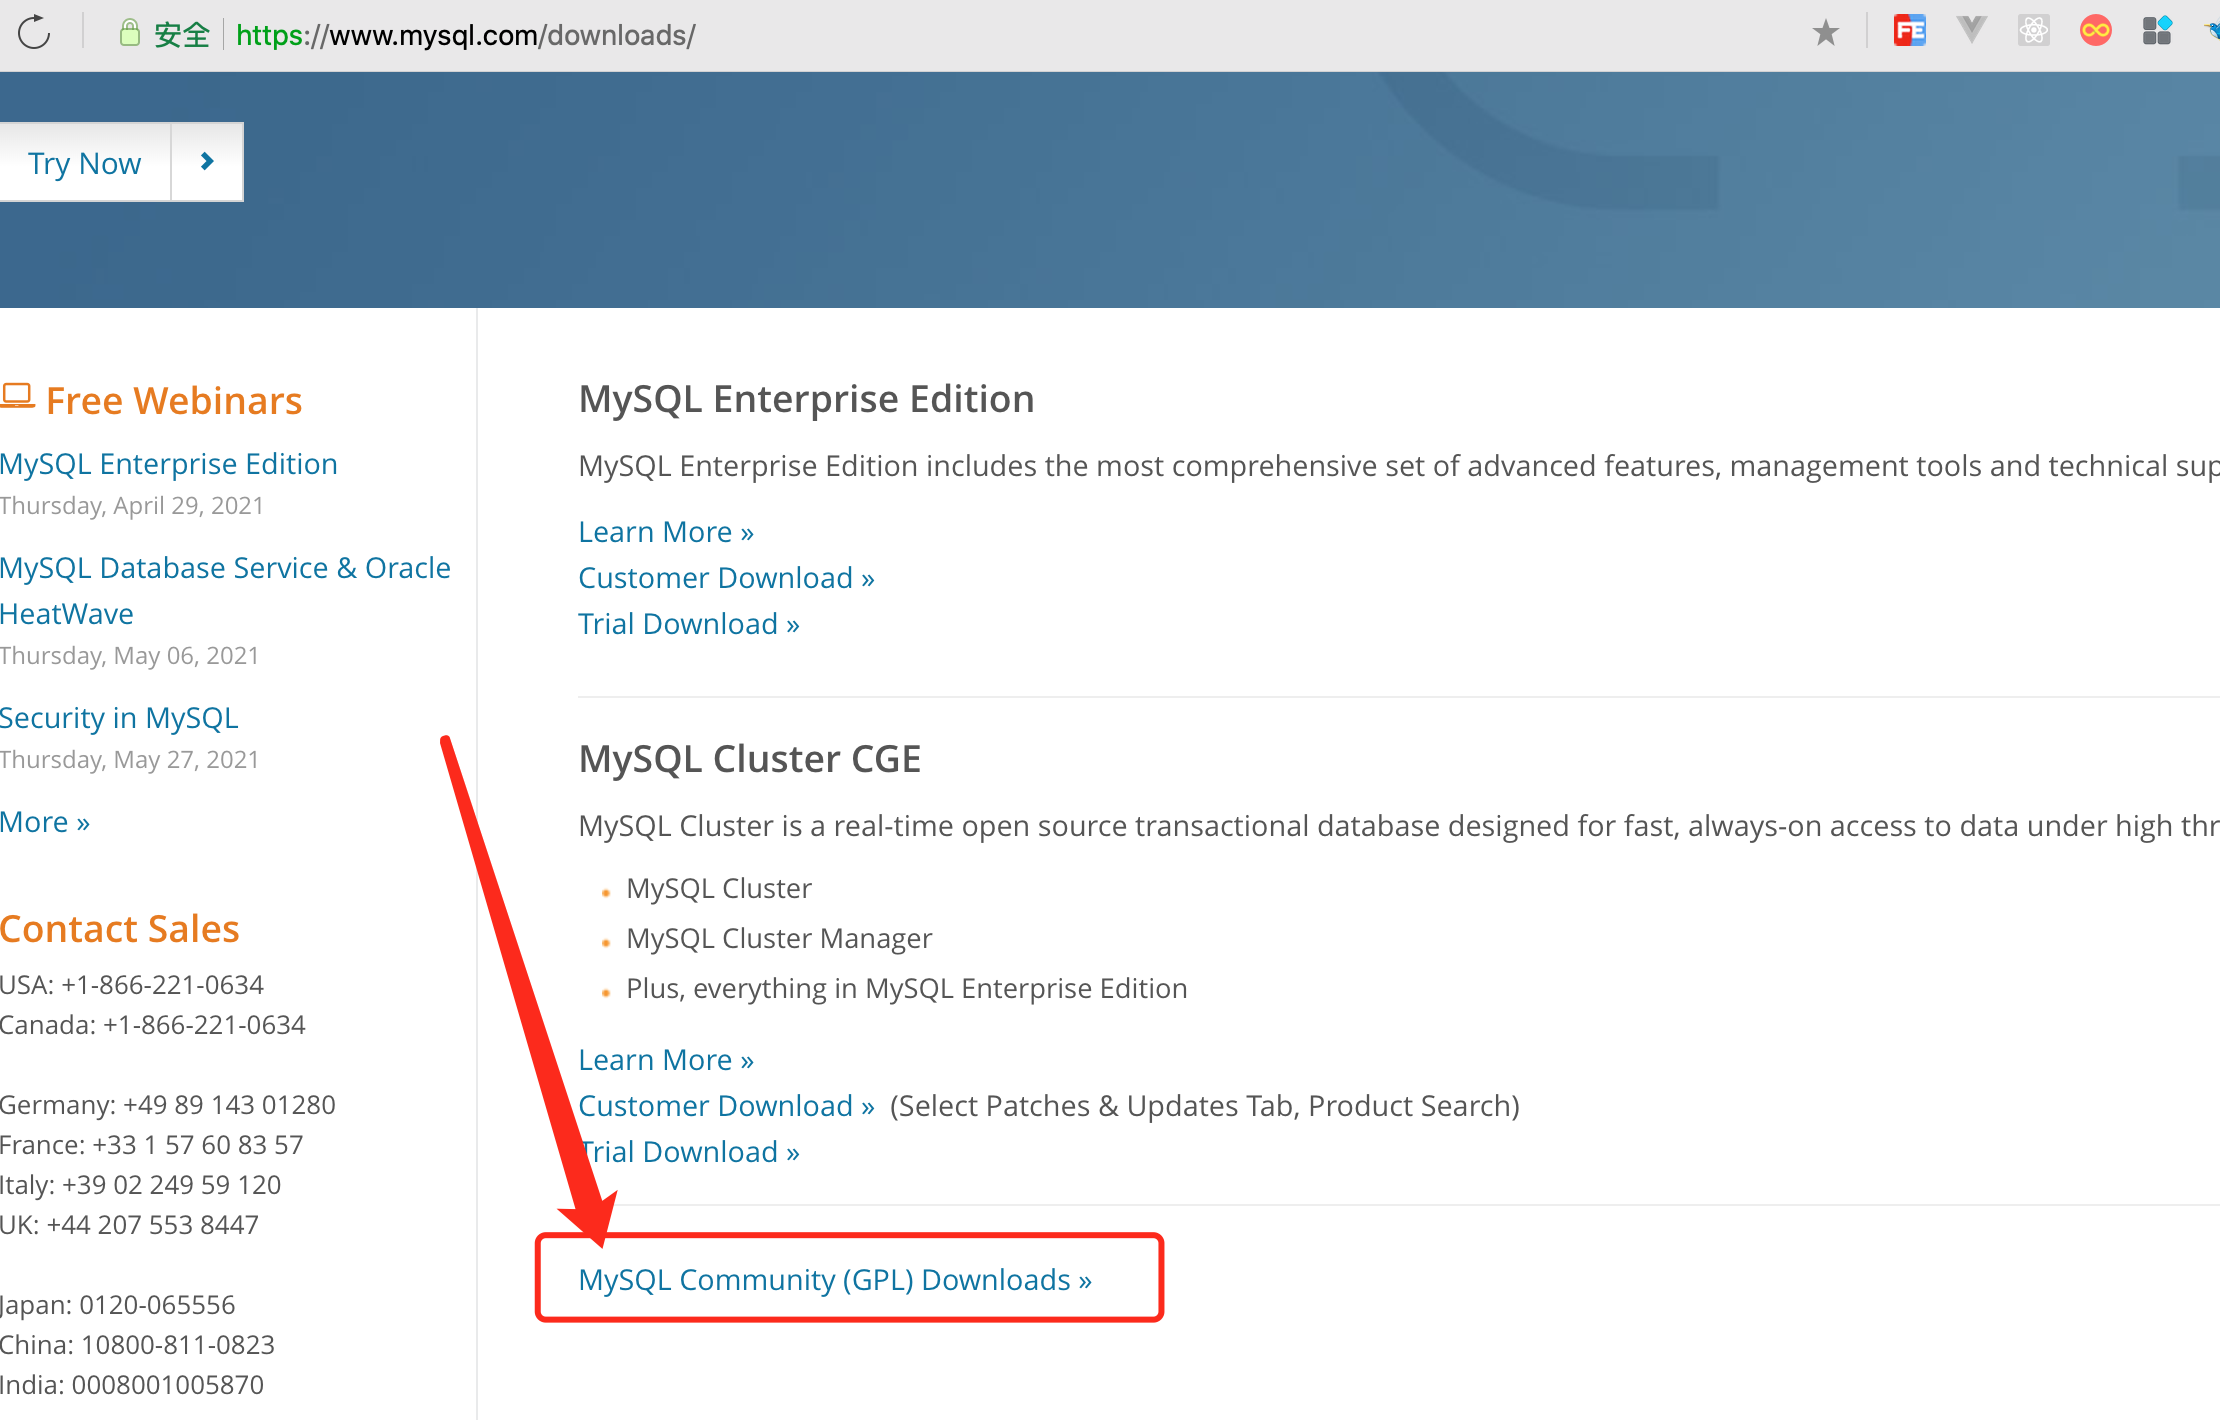
2.3,MySQL
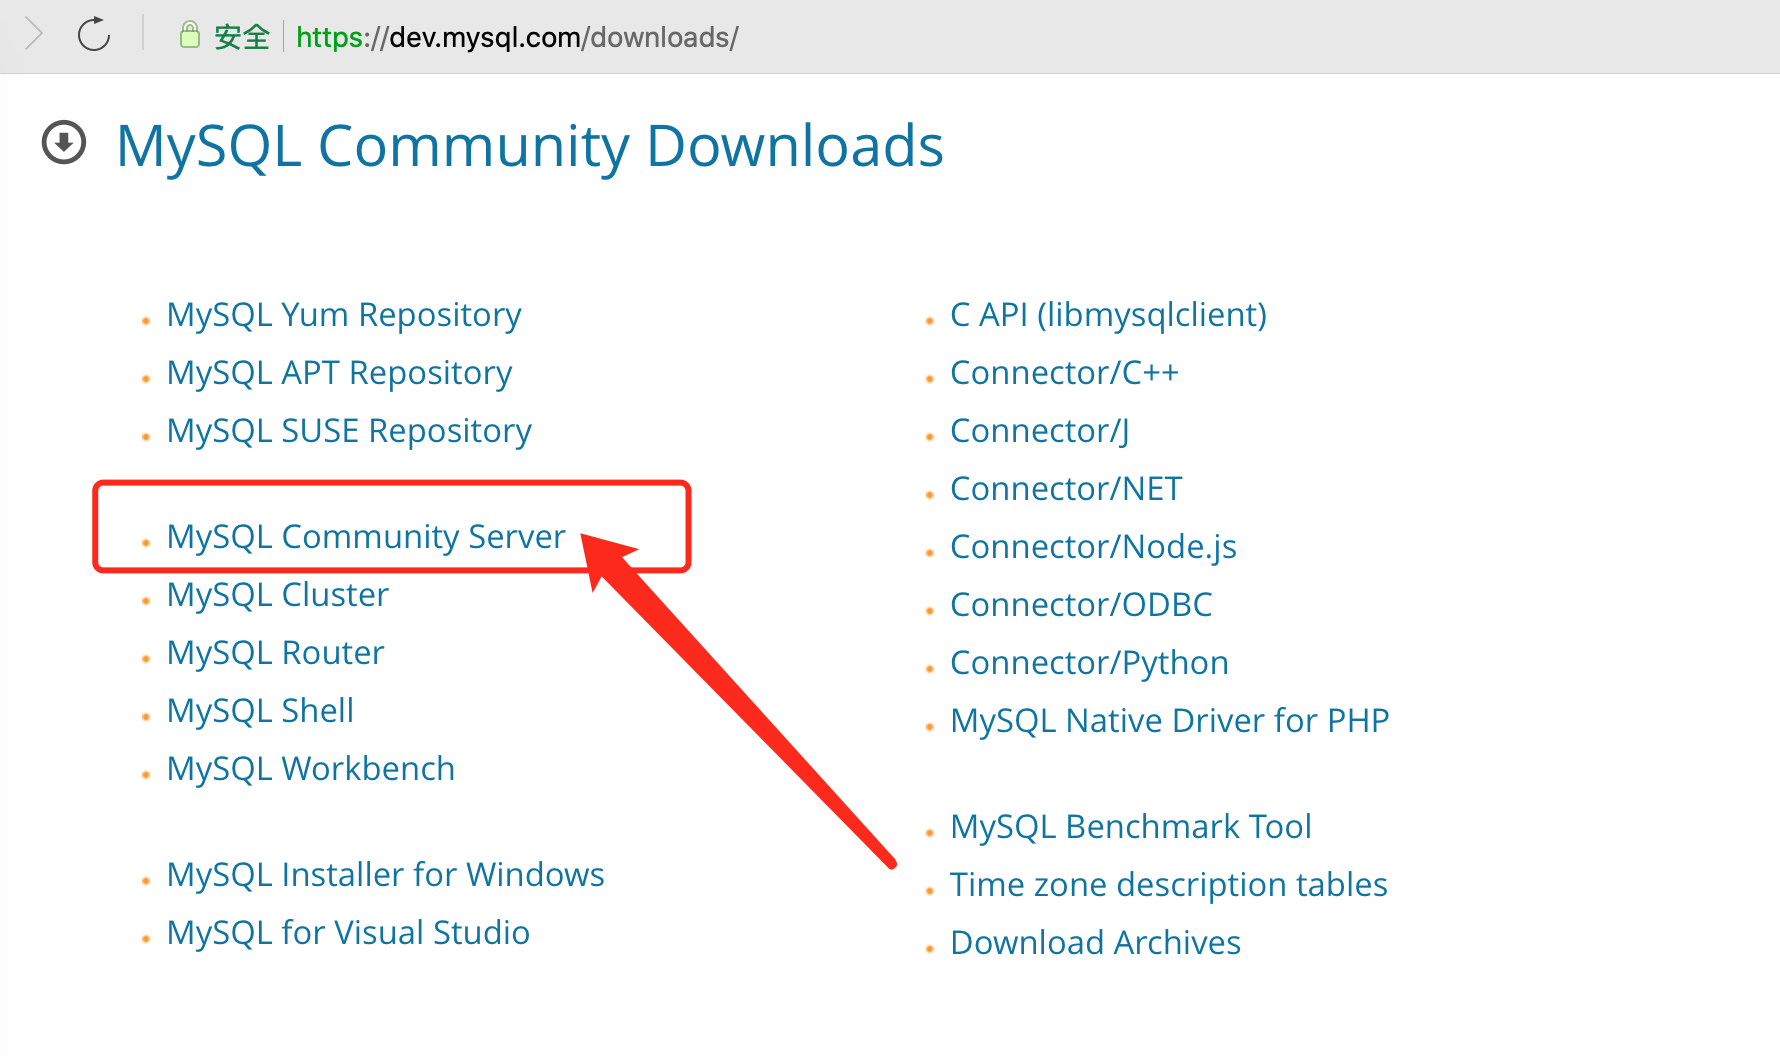
1. Open the MySQL official website, click download, and then select the lowest option, as shown in the figure
MySQL official website
https://www.mysql.com/downloads/
2. After the server is selected, as shown in the figure
3. Then select the linux version and click download, as shown in the figure
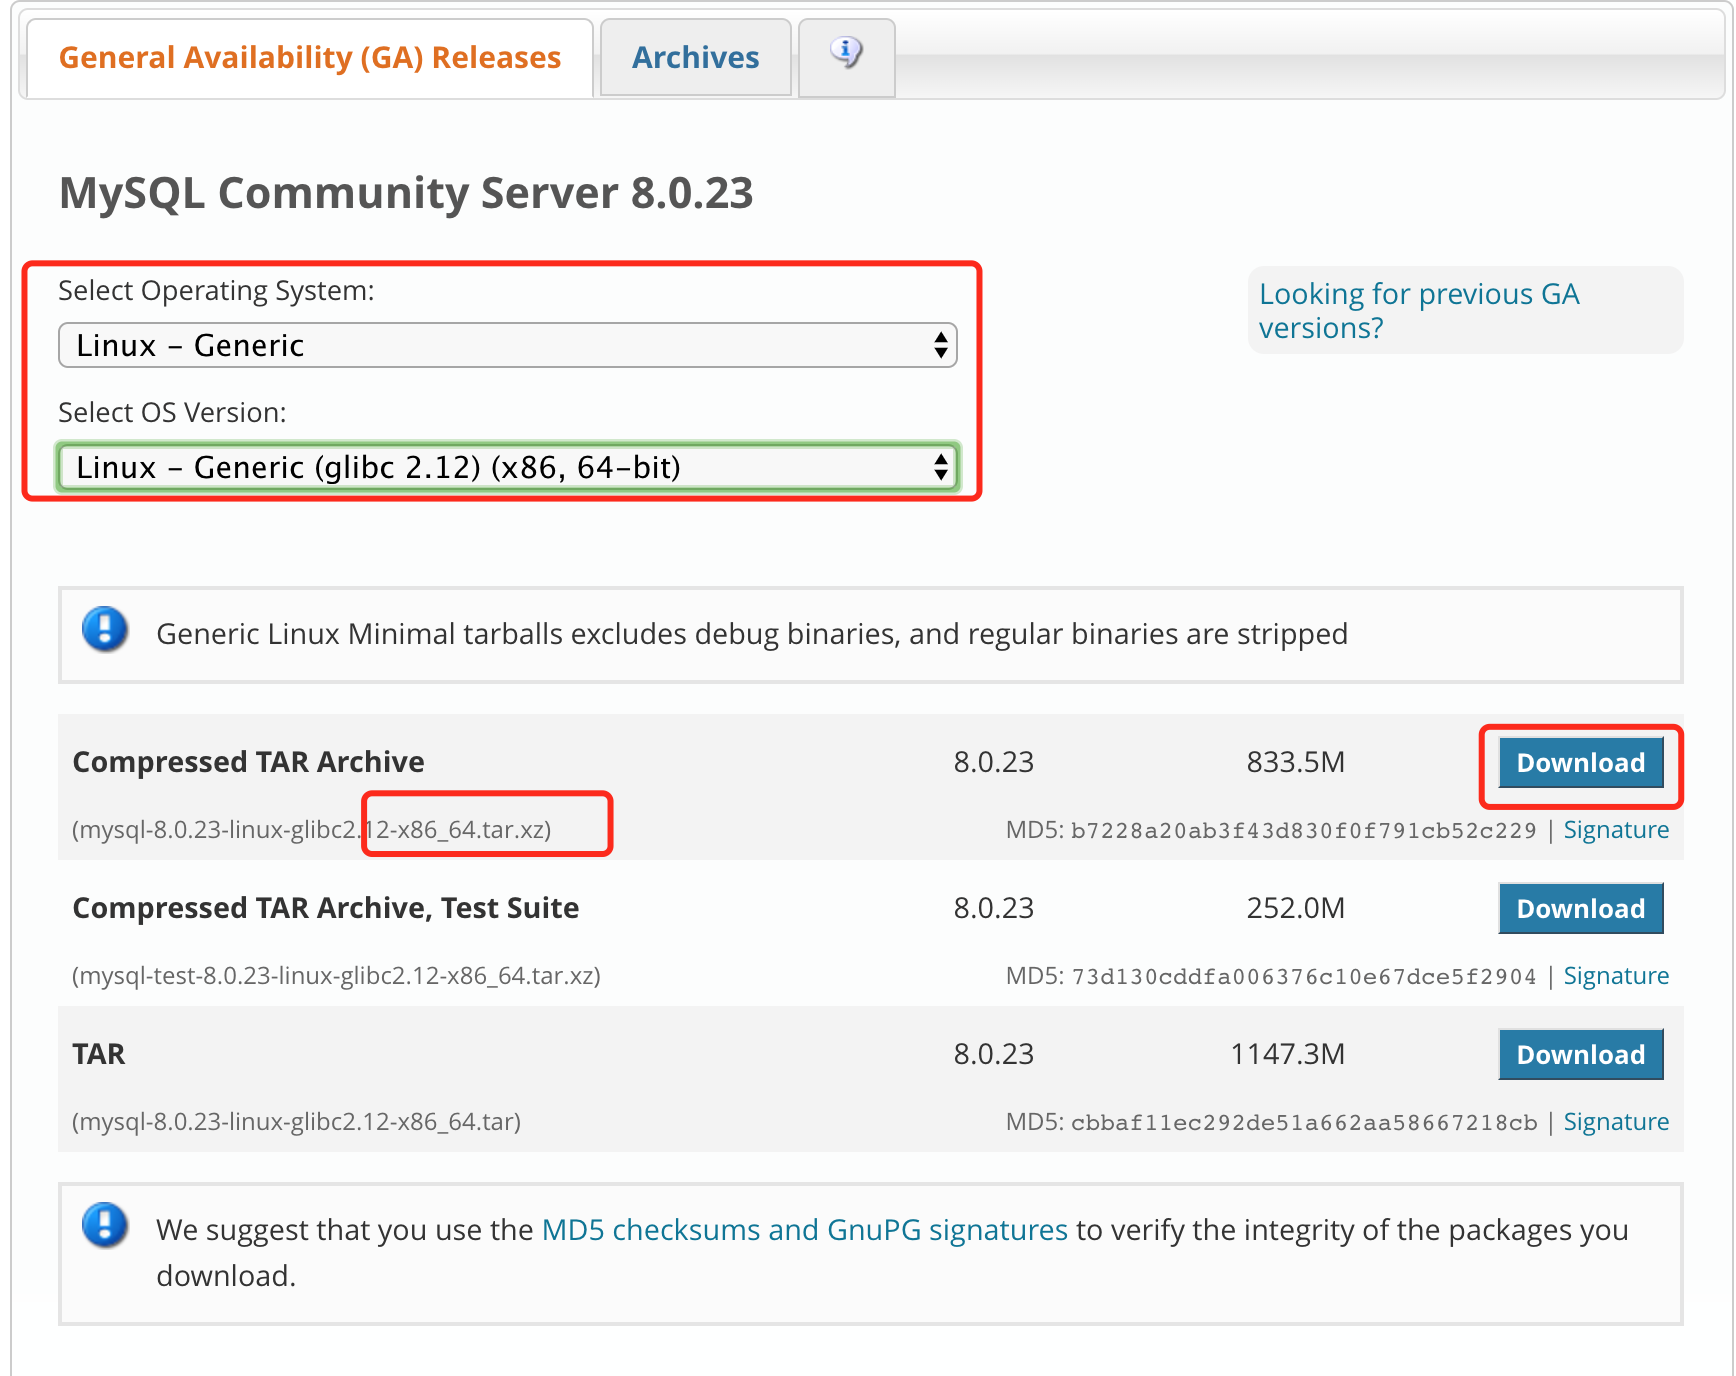
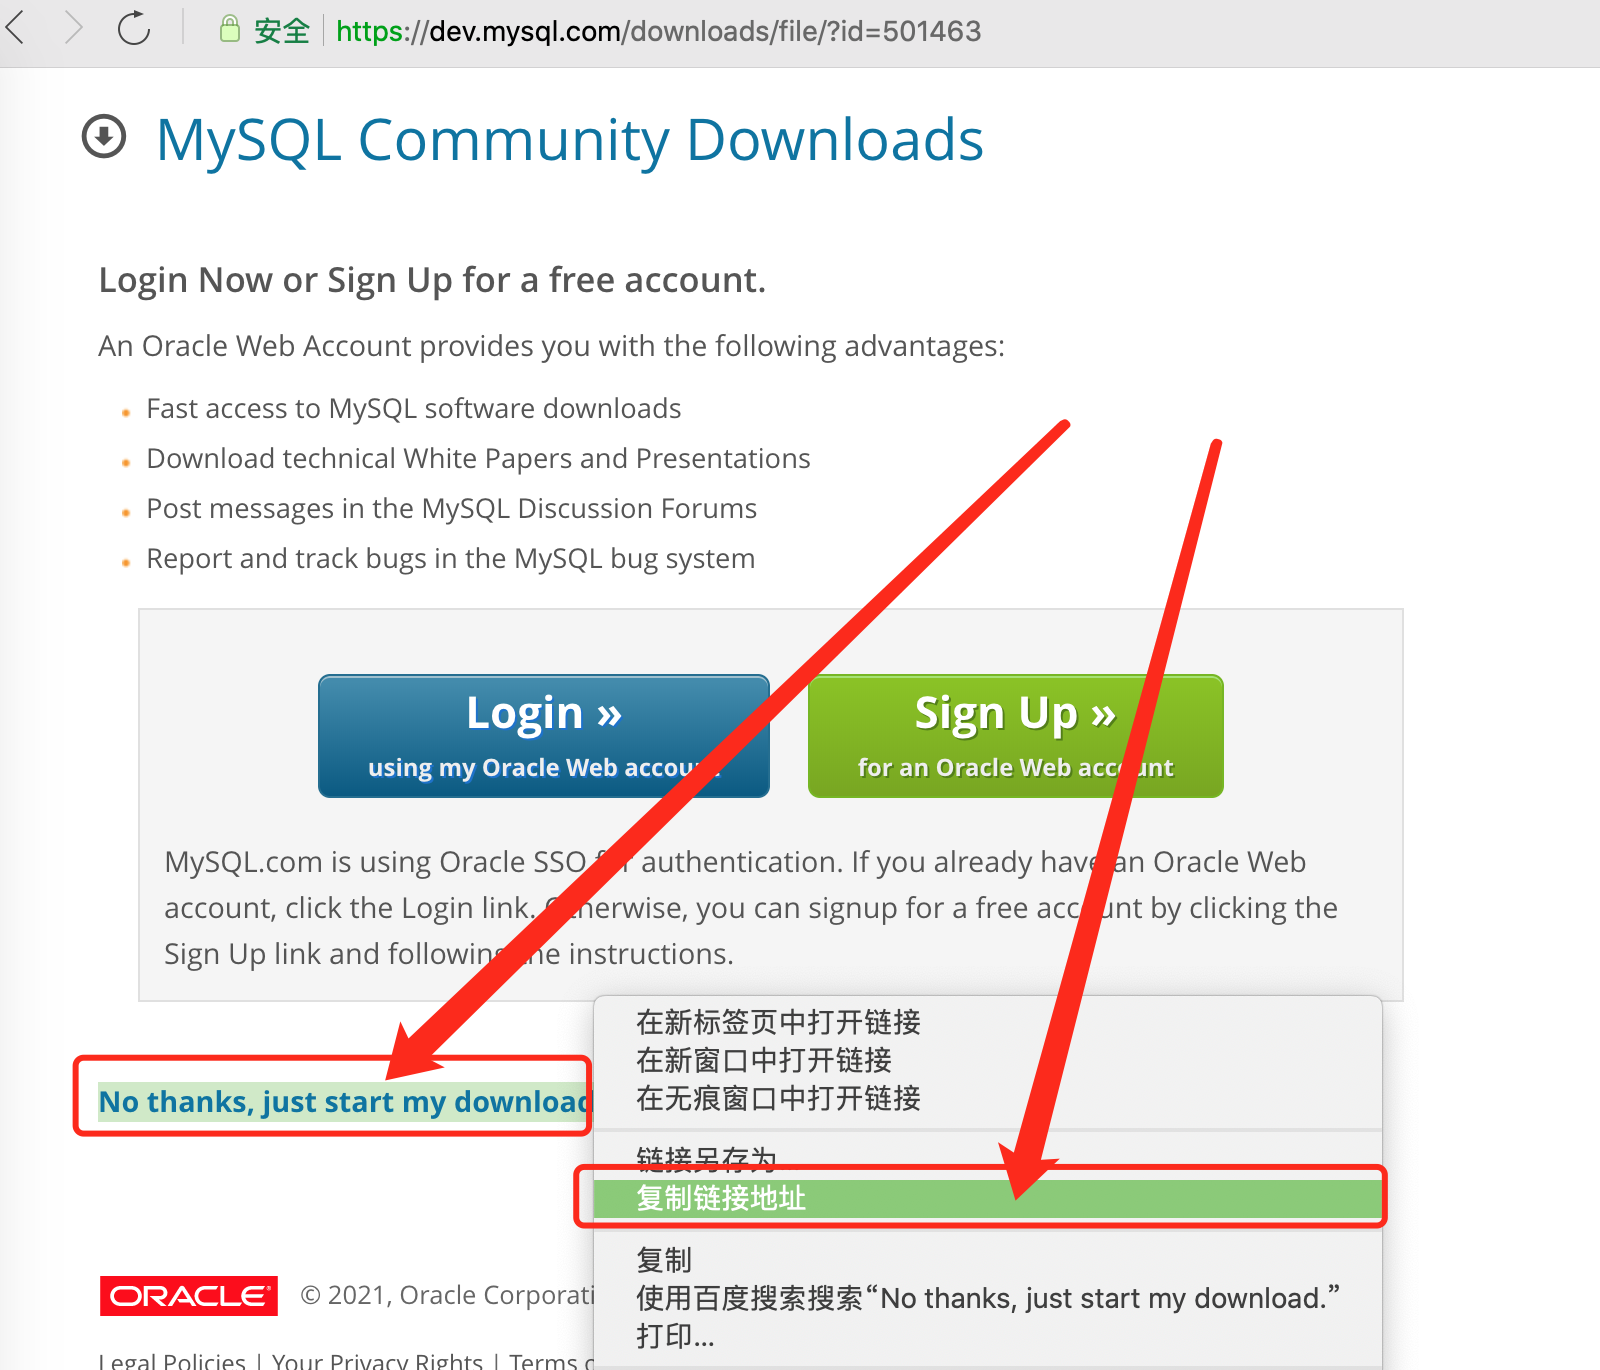
4. Right click the link at the bottom to directly start downloading and copy the address
Link address
https://dev.mysql.com/get/Downloads/MySQL-8.0/mysql-8.0.23-linux-glibc2.12-x86_64.tar.xz
5. Execute in FinalShell
# Switch to the data directory
cd /data

# Download MySQL
wget https://dev.mysql.com/get/Downloads/MySQL-8.0/mysql-8.0.23-linux-glibc2.12-x86_64.tar.xz
6. The download is successful, as shown in the figure. The bottom folder may not be refreshed in time. You can click the refresh button on the right side of [history] to complete MySQL download.

2.4,JDK
Are you curious about the sudden increase of JDK? The reason is that the operation of Tomcat depends on JDK, so we need to download these two.
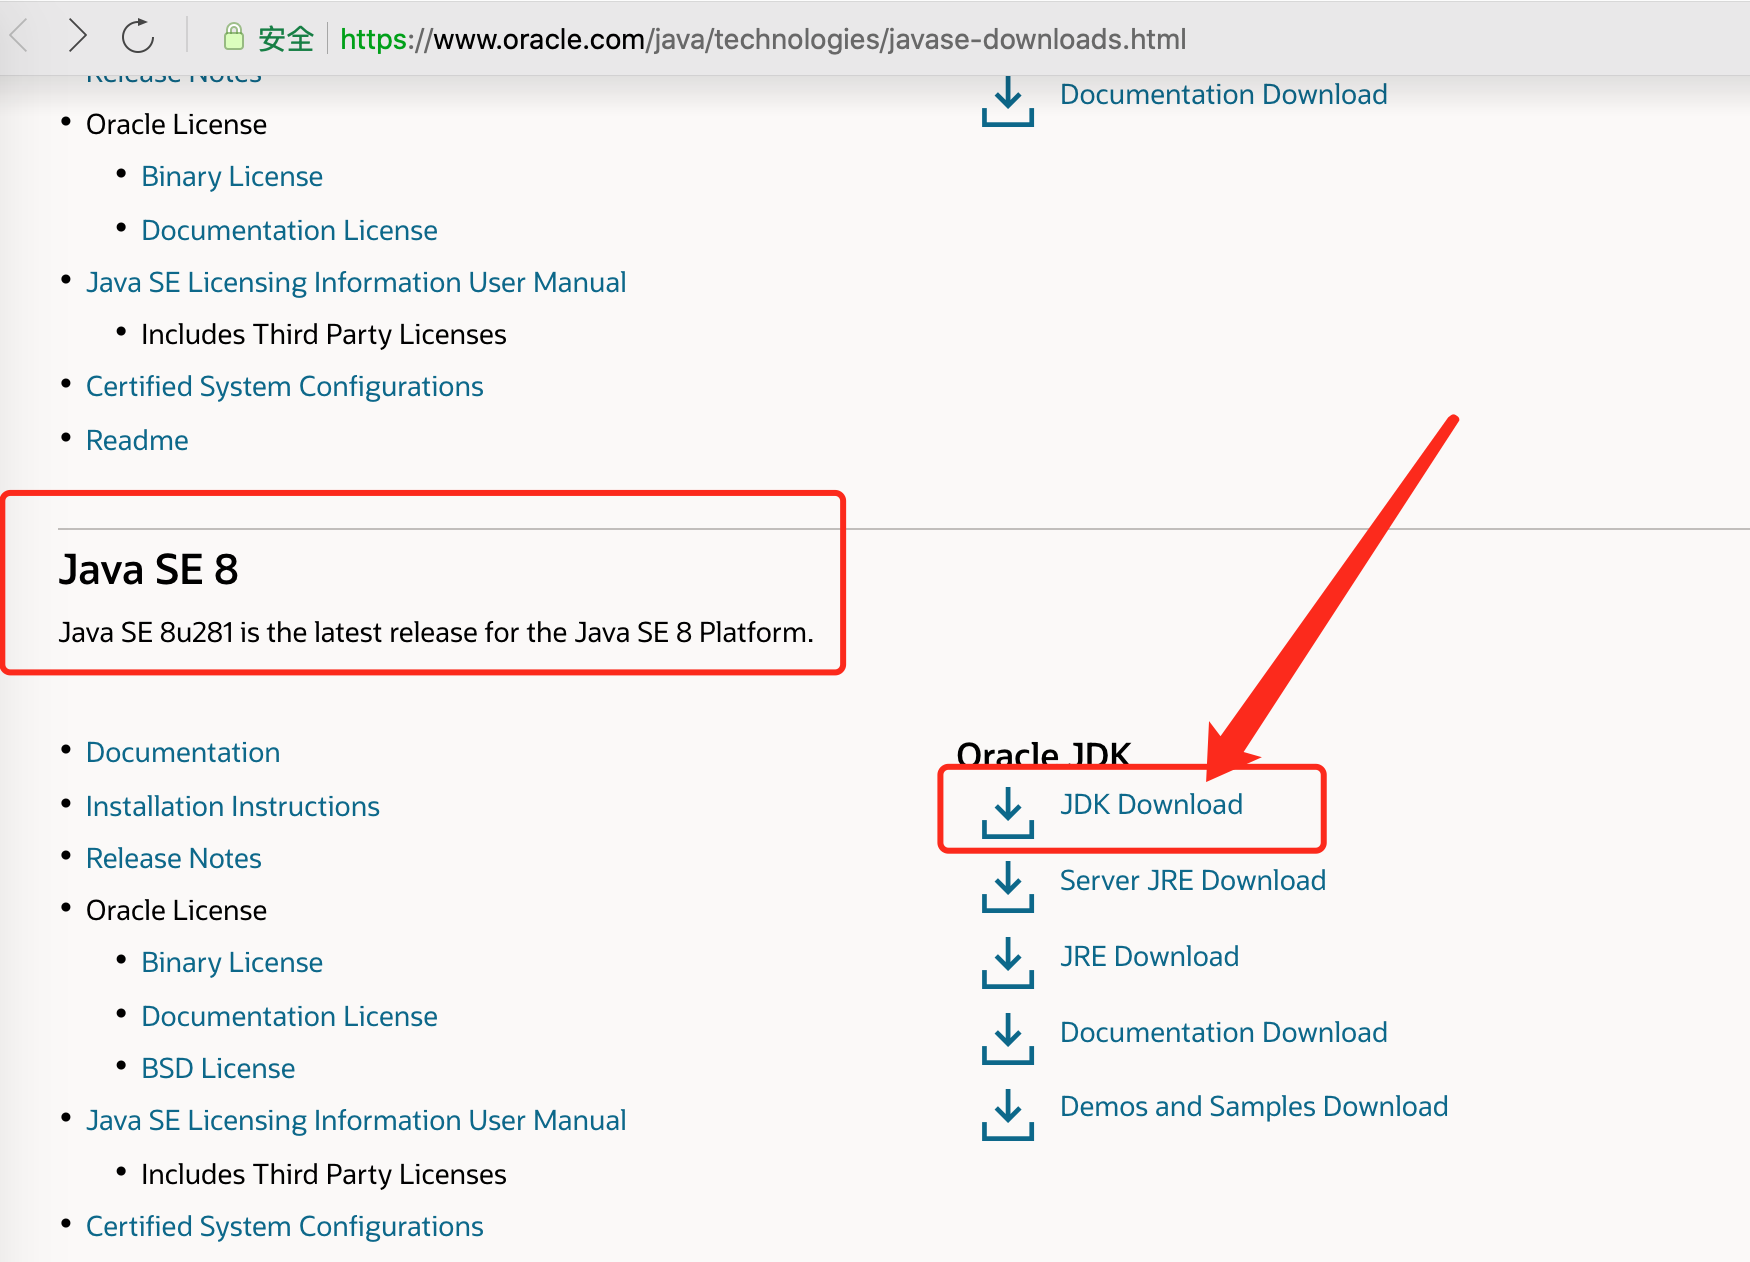
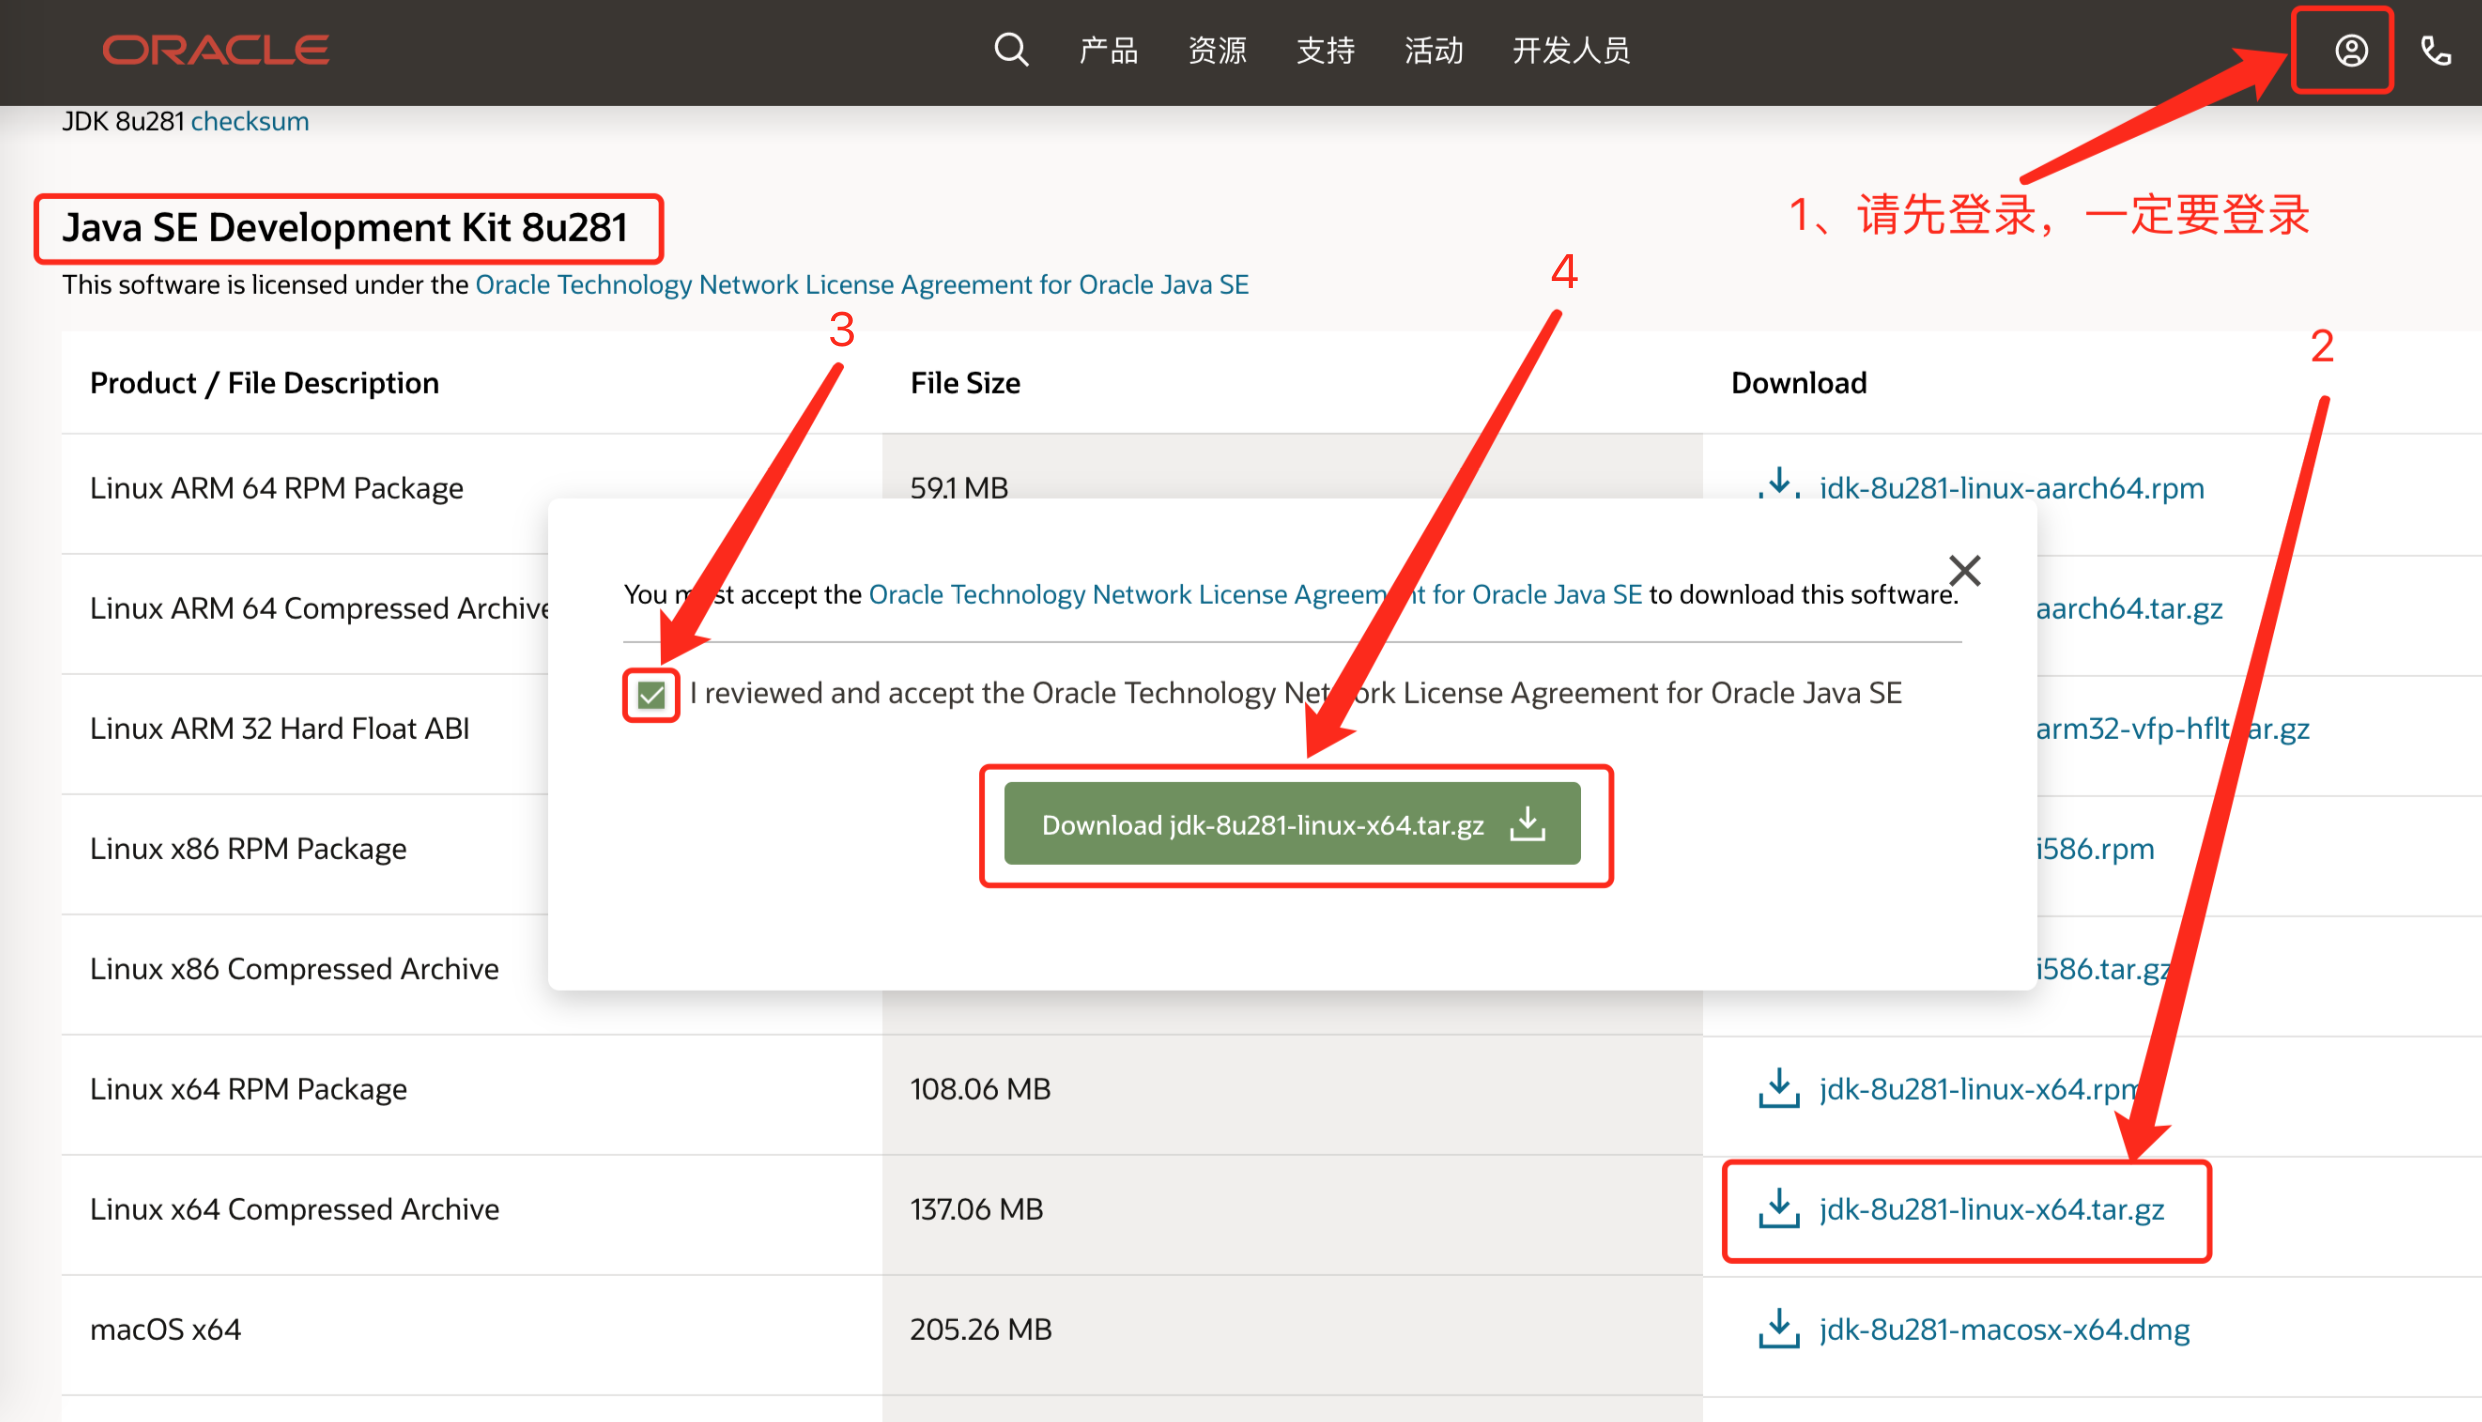
1. Open the official website of oracle (register an account and log in), find JDK, and then click the page to Java SE 8. At present, JDK8 is still the most used in the market, as shown in the figure
JDK download address
https://www.oracle.com/java/technologies/javase-downloads.html
2. [due to the limitation of oracle official website, be sure to log in first, otherwise there is a problem with the downloaded file] underline the page, and then click three times in sequence, as shown in the figure
3. Drag the downloaded files directly to the / data directory of the ECS, and the JDK is downloaded.

2.5,Tomcat
1. Open Tomcat's official website and copy the link according to the following figure
Tomcat official website
https://tomcat.apache.org/download-80.cgi

2. Execute in FinalShell
# Switch to the data directory
cd /data

# Download Tomcat
wget https://mirrors.bfsu.edu.cn/apache/tomcat/tomcat-8/v8.5.65/bin/apache-tomcat-8.5.65.tar.gz
3. The download is successful, as shown in the figure. The folder at the bottom may not be refreshed in time. You can click the refresh button on the right side of [history] to complete Tomcat download.

2.6,Nginx
1. Open the official website of Nginx and copy the link according to the following figure
Nginx official website
http://nginx.org/en/download.html

2. Execute in FinalShell
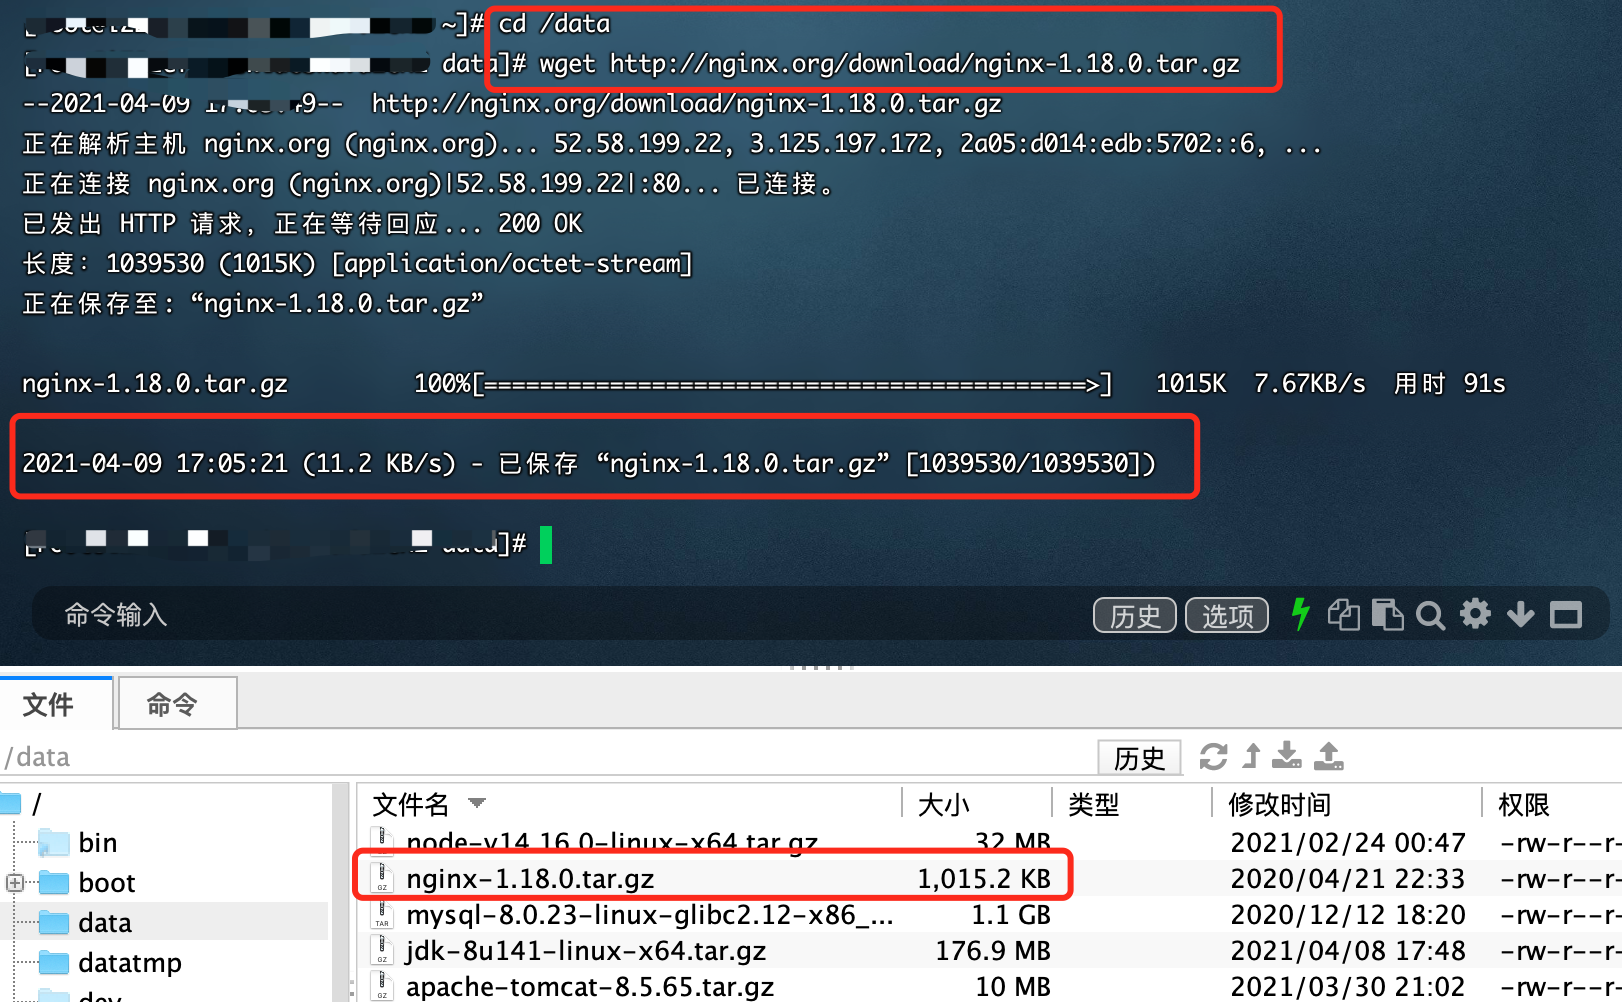
# Switch to the data directory
cd /data

# Download Nginx
wget http://nginx.org/download/nginx-1.18.0.tar.gz
3. The download is successful, as shown in the figure. The folder at the bottom may not be refreshed in time. You can click the refresh button on the right side of [history] to complete the download of Nginx.
2.7,Git
git download will be handled together with configuration later.
3, Node JS installation and configuration
1. Execute the following command
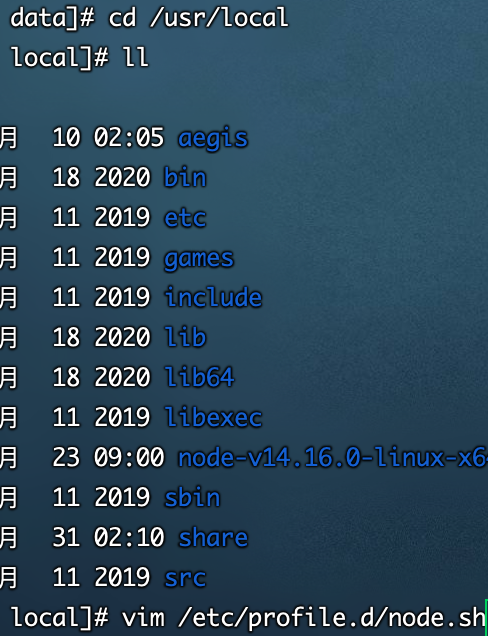
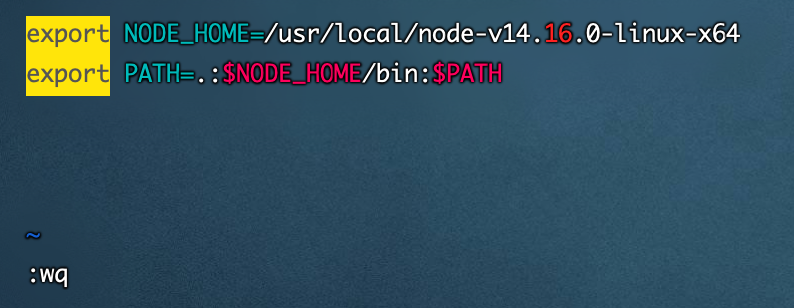
# Switch to / data directory
cd /data

# Unzip the node file
tar -zvxf node-v14.16.0-linux-x64.tar.gz

# Move node to / usr/local directory
mv /data/node-v14.16.0-linux-x64 /usr/local

# Switch to the / usr/local directory and check whether there are any previous folders in this directory
cd /usr/local
ll

# Configure environment variables and execute the following command
vim /etc/profile.d/node.sh
# Press i to start writing the following commands, press esc, and then enter: wq exit editing
export NODE_HOME=/usr/local/node-v14.16.0-linux-x64
export PATH=.:$NODE_HOME/bin:$PATH

# Compile environment variables
source /etc/profile

# Check whether the node is successfully configured
node -v
2. The effect is as follows


So far, node configuration is successful
4, Installation and configuration of Git and gitee
1. First, we register a gitee account and create a new code warehouse. Later, we will verify whether git is successfully installed and used
gitee official website address
2. We installed Git using yum, so we can do it
# Install git using yum or up2date
yum install git -y

# Check whether the installation is successful
git --version


3. Configure Git
# Set the global user name and mailbox to your own
git config --global user.name "username"
git config --global user.email "***@**.com"

# To generate the public key, please enter your email registered in gitee
ssh-keygen -trsa -C "***@**.com"

# View the public key information and copy it to gitee
cat /root/.ssh/id_rsa.pub

4. Configure gitee and add public key information
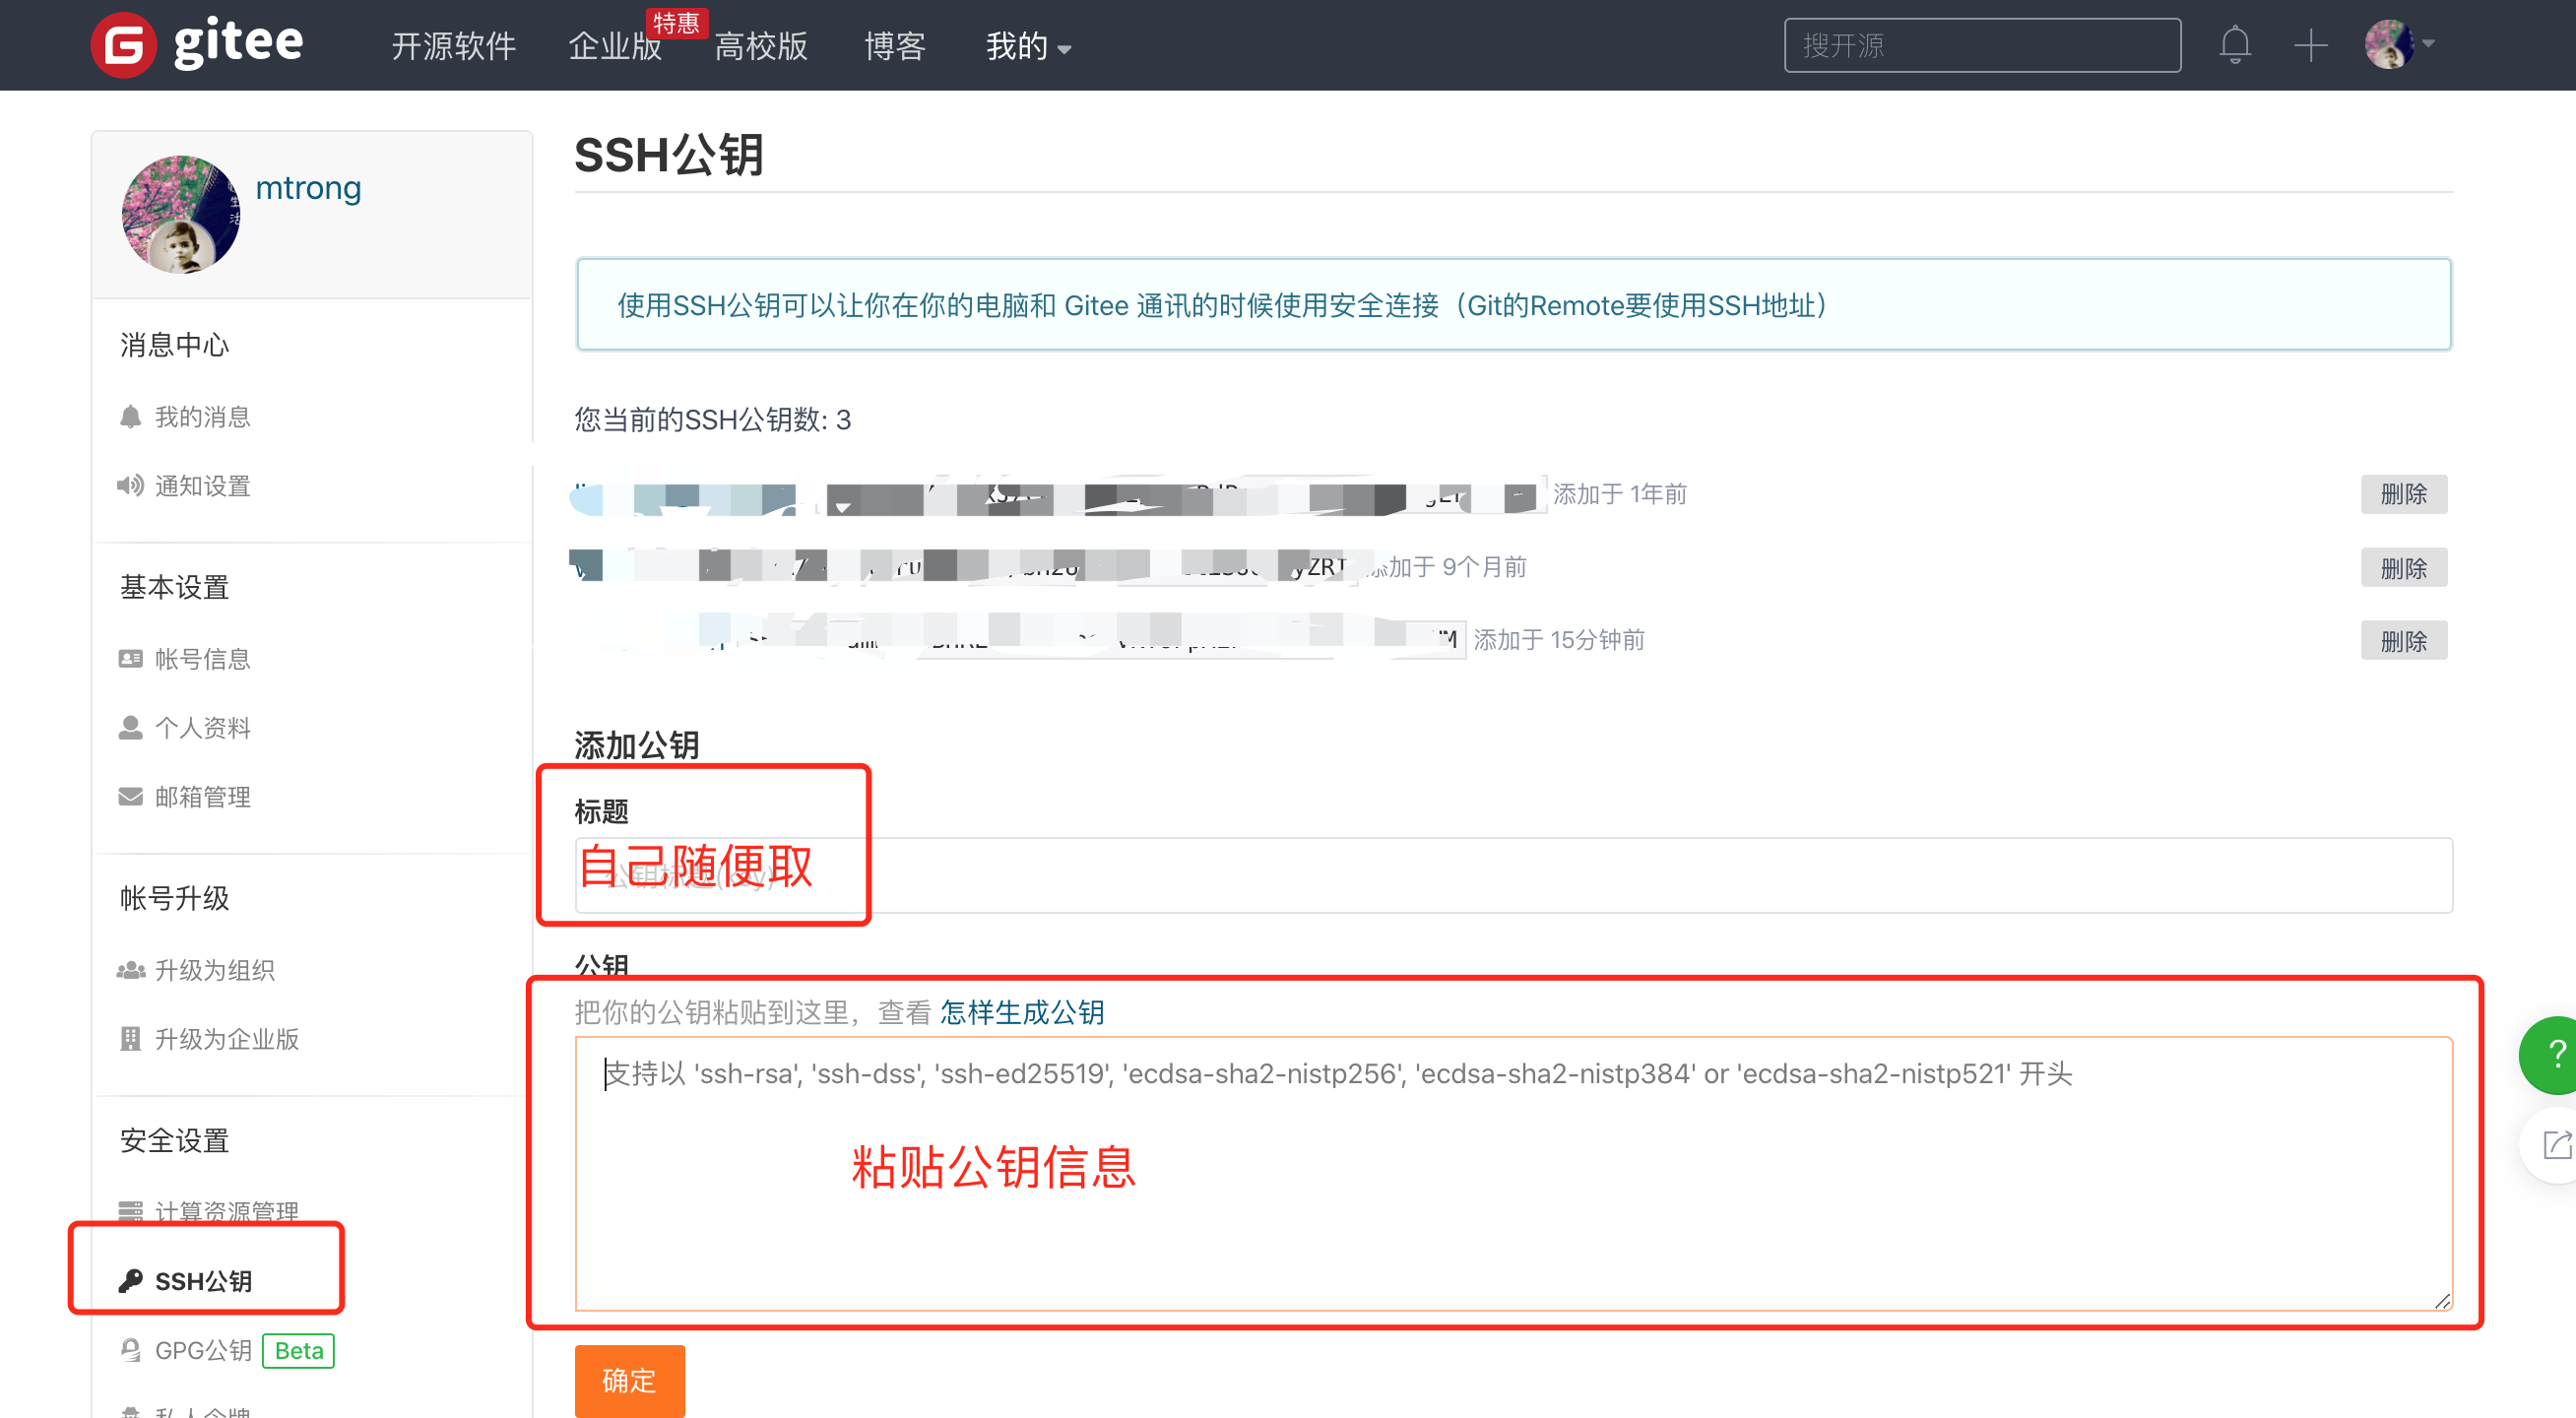
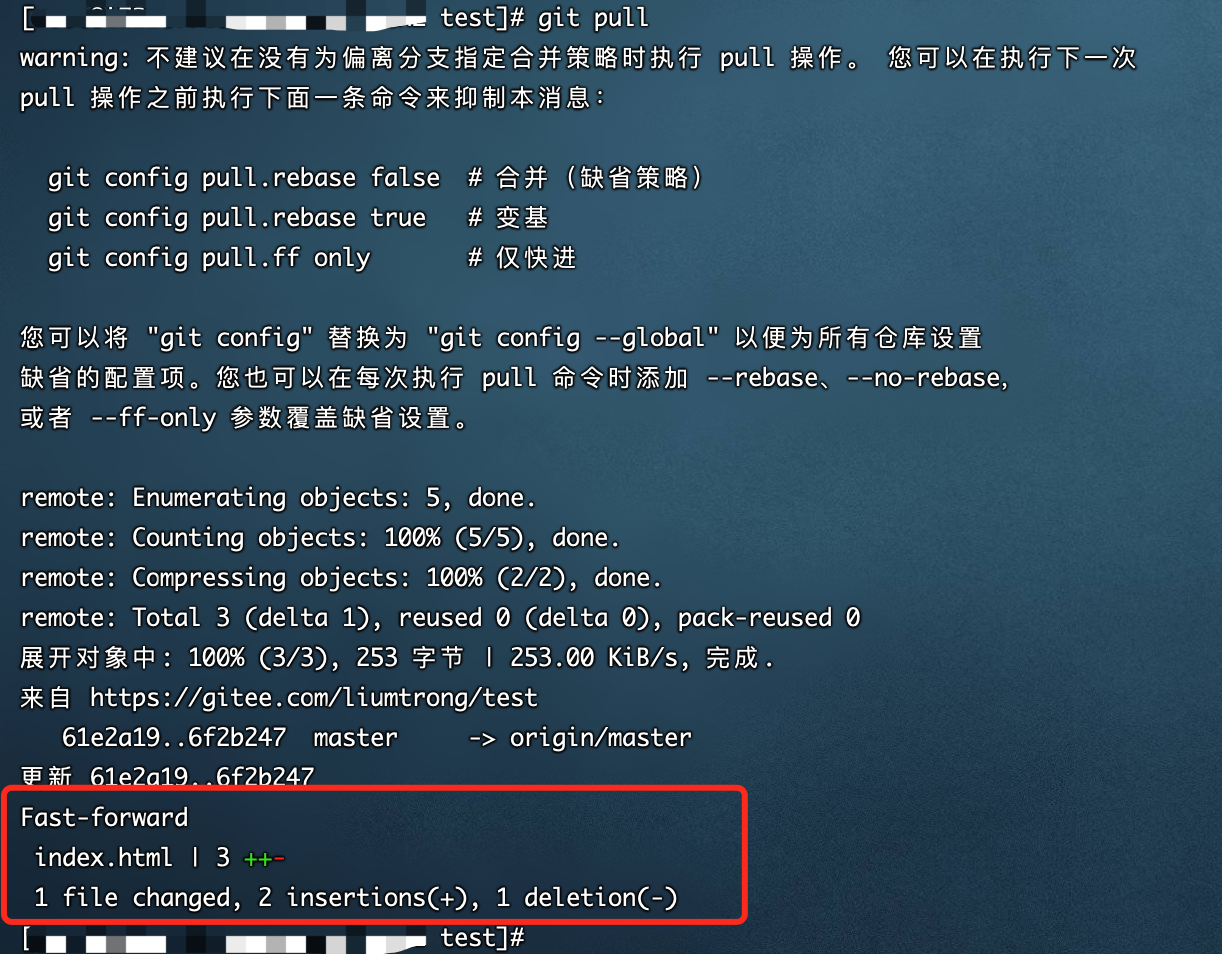
5. We can normally perform the pull and push operations. We may need to enter the gitee account and password once. After that, there will be no problem and we can use it normally.
5, Tomcat installation and configuration
1. Tomcat needs JDK to run, so let's install JDK first
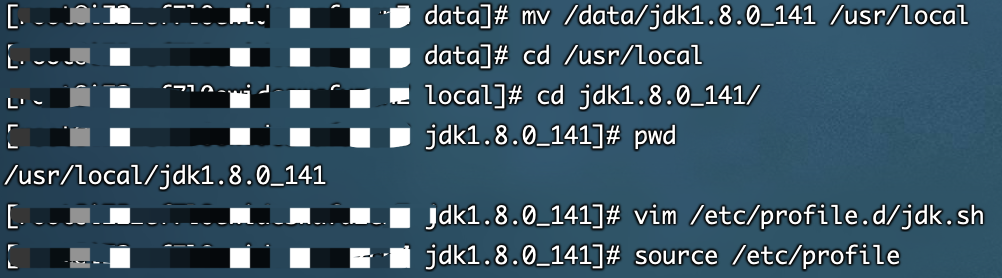
# Switch to / data directory
cd /data

# Unzip the jdk file
tar -zvxf jdk-8u141-linux-x64.tar.gz

# Move jdk to / usr/local directory
mv /data/jdk1.8.0_141 /usr/local

# Switch to the / usr/local directory and check whether there are any previous folders in this directory
cd /usr/local
ll

# Configure environment variables and execute the following command
vim /etc/profile.d/jdk.sh
# Press i to start writing the following commands, press esc, and then enter: wq exit editing
export JAVA_HOME=/usr/local/jdk1.8.0_141
export JRE_HOME=/usr/local/jdk1.8.0_141/jre
export CLASSPATH=.:$JAVA_HOME/lib/dt.jar:$JAVA_HOME/lib/tools.jar:$JRE_HOME/lib:$CLASSPATH
export PATH=$PATH:$JAVA_HOME/bin


# Compile environment variables
source /etc/profile

# Check whether the jdk is successfully configured
java -version
2. The operation is as follows


3. Install Tomcat
# Switch to / data directory
cd /data

# Unzip the tomcat file
tar -zvxf apache-tomcat-8.5.65.tar.gz

# Move tomcat to the / home directory
mv /data/apache-tomcat-8.5.65 /home

# Switch to the / home directory to see if there are any folders under this directory
cd /home
ll

# Configure tomcat permissions
groupadd tomcat
useradd -g tomcat -s /sbin/nologin tomcat
chown -R tomcat:tomcat /home/apache-tomcat-8.5.65

# start-up
cd /bin
./startup.sh

# Check whether the startup is successful
ps -ef|grep 8080
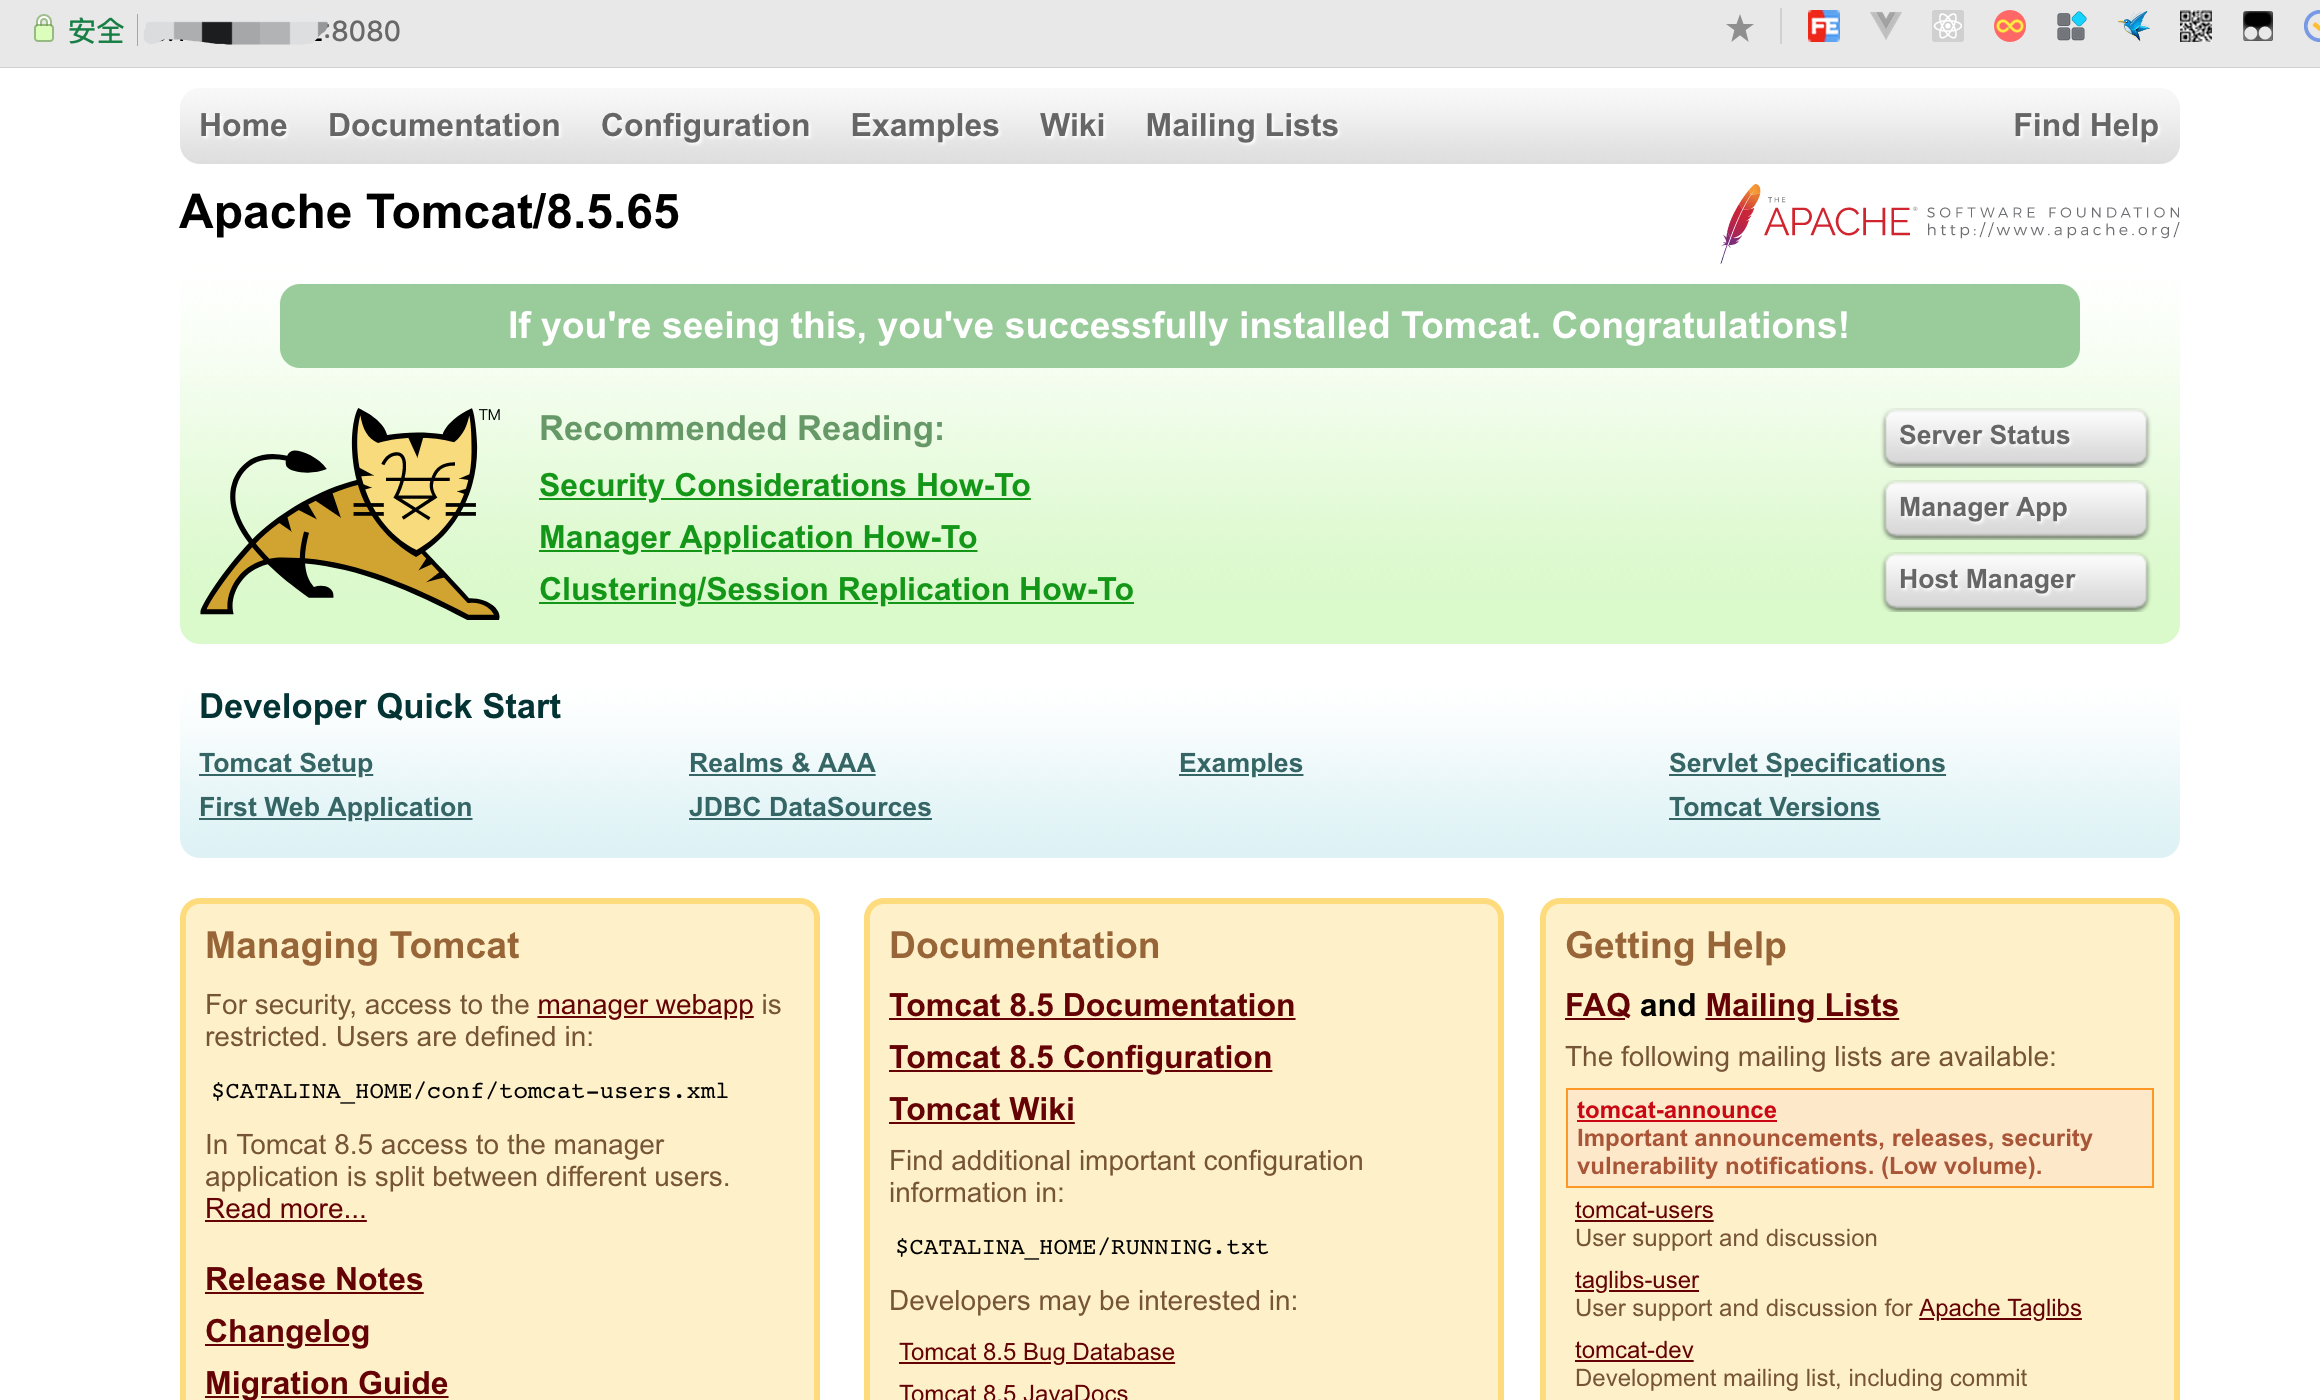
4. The installation effect is shown in the figure

5. Access through the public network ip and see the following interface, which indicates that the startup is successful
6. Set Tomcat startup self startup
# New self startup file
vim /etc/init.d/tomcat8

# Copy the following
#!/bin/bash
# tomcat8
# chkconfig: - 80 20
### BEGIN INIT INFO
# Provides: tomcat8
# Required-Start: $network $syslog
# Required-Stop: $network $syslog
# Default-Start:
# Default-Stop:
# Description: Tomcat 8
# Short-Description: start and stop tomcat
### END INIT INFO
## Source function library.
#. /etc/rc.d/init.d/functions
export JAVA_OPTS="-Dfile.encoding=UTF-8 \
  -Dnet.sf.ehcache.skipUpdateCheck=true \
  -XX:+UseConcMarkSweepGC \
  -XX:+CMSClassUnloadingEnabled \
  -XX:+UseParNewGC \
  -XX:MaxPermSize=128m \
  -Xms512m -Xmx512m"
TOMCAT_HOME=/home/apache-tomcat-8.5.65
TOMCAT_USER=tomcat
SHUTDOWN_WAIT=20

tomcat_pid() {
  echo `ps aux | grep org.apache.catalina.startup.Bootstrap | grep -v grep | awk '{ print $2 }'`
}

start() {
  pid=$(tomcat_pid)
  if [ -n "$pid" ]
  then
    echo "Tomcat is already running (pid: $pid)"
  else
    # Start tomcat
    echo "Starting tomcat"
    ulimit -n 100000
    umask 007
    /bin/su -p -s /bin/sh $TOMCAT_USER $TOMCAT_HOME/bin/startup.sh
  fi

  return 0
}

stop() {
  pid=$(tomcat_pid)
  if [ -n "$pid" ]
  then
    echo "Stoping Tomcat"
    /bin/su -p -s /bin/sh $TOMCAT_USER $TOMCAT_HOME/bin/shutdown.sh

    let kwait=$SHUTDOWN_WAIT
    count=0;
    until [ `ps -p $pid | grep -c $pid` = '0' ] || [ $count -gt $kwait ]
    do
      echo -n -e "\nwaiting for processes to exit";
      sleep 1
      let count=$count+1;
    done

    if [ $count -gt $kwait ]; then
      echo -n -e "\nkilling processes which didn't stop after $SHUTDOWN_WAIT seconds"
      kill -9 $pid
    fi
  else
    echo "Tomcat is not running"
  fi

  return 0
}

case $1 in
start)
  start
;;
stop)
  stop
;;
restart)
  stop
  start
;;
status)
  pid=$(tomcat_pid)
  if [ -n "$pid" ]
  then
    echo "Tomcat is running with pid: $pid"
  else
    echo "Tomcat is not running"
  fi
;;
esac
exit 0


# to grant authorization
chmod +x /etc/init.d/tomcat8

# Set up quick access
chkconfig --add /etc/init.d/tomcat8

# Set startup and self startup
chkconfig tomcat8 on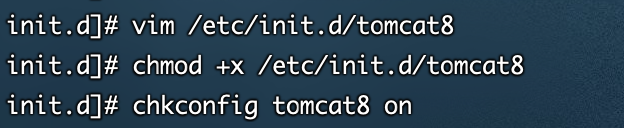
6, Installation and configuration of Nginx
1. Dependencies required for nginx installation
#gcc installation, nginx source code compilation needs
yum install gcc-c++

#When pcre PCRE devel is installed, the http module of nginx uses pcre to parse regular expressions
yum install -y pcre pcre-devel

#Zlib installation, nginx uses zlib to gzip the contents of http package
yum install -y zlib zlib-devel

#OpenSSL installation, powerful secure socket layer cipher library, nginx supports not only http protocol, but also https (that is, http is transmitted over ssl Protocol)
yum install -y openssl openssl-devel
2. Installing nginx
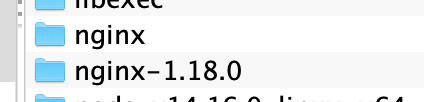
# Switch to / data directory
cd /data

# Unzip the nginx file
tar -zvxf nginx-1.18.0

# Move tomcat to / usr/local directory
mv /data/nginx-1.18.0 /usr/local

# Switch to the / usr/local directory and check whether there are any previous folders in this directory
cd /usr/local
ll

# Switch to nginx directory
cd /usr/local/nginx-1.18.0/

# Sequential execution
./configure
make
make install
3. After the above steps are successfully installed, an nginx directory will be generated under the original nginx-1.18.0 directory
4. Start
# Switch directory
cd /usr/local/nginx/sbin

# start-up
./nginx

#Stop, directly find the nginx process id, and then use the kill command to force the process to be killed
./nginx -s stop

# Exit and stop. Wait for nginx process to finish processing the task before stopping
./nginx -s quit

# Reload the configuration file and modify nginx Conf, and the new configuration will take effect
./nginx -s reload

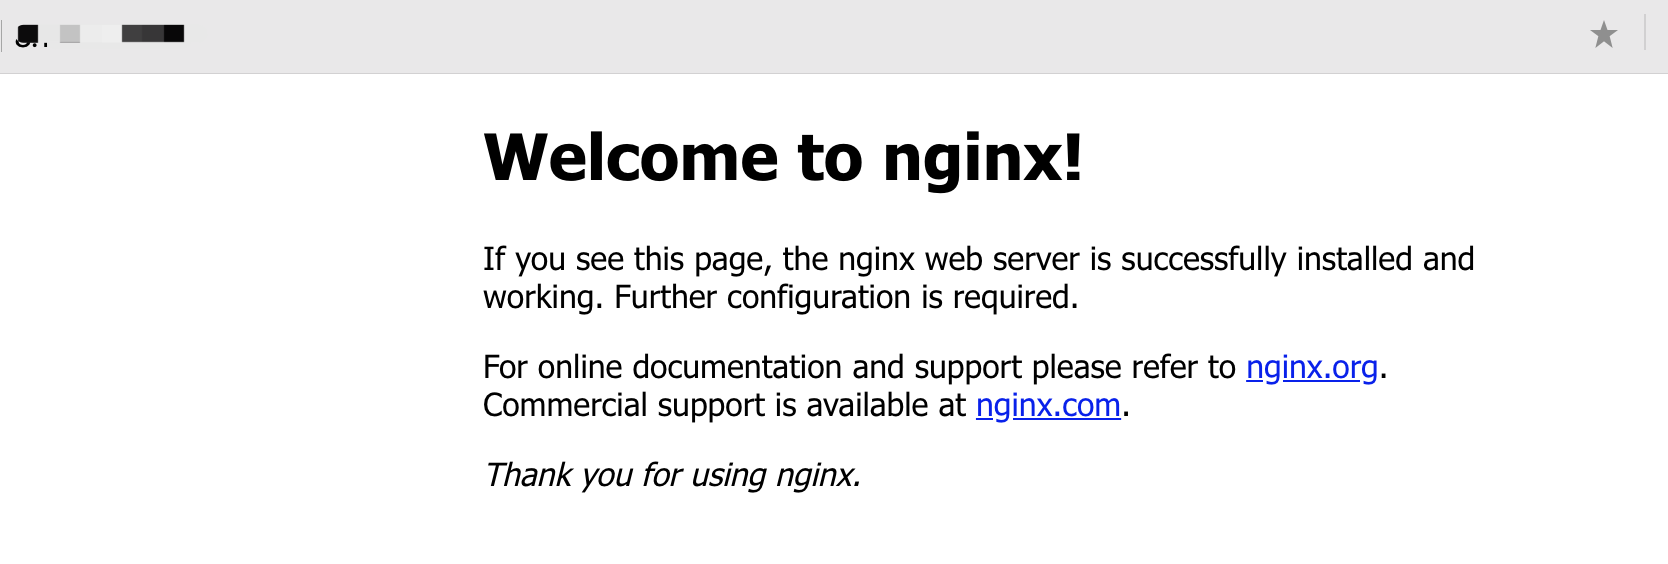
5. The browser accesses the following information to indicate success
6. Configure startup and self startup
# Create self startup file
vim /etc/init.d/nginx

# Enter the following content, and note that the following configuration path is changed to your own actual path
#!/bin/sh
#
# nginx - this script starts and stops the nginx daemon
#
# chkconfig:   - 85 15
# description:  NGINX is an HTTP(S) server, HTTP(S) reverse \
#               proxy and IMAP/POP3 proxy server
# processname: nginx
# config:      /etc/nginx/nginx.conf
# config:      /etc/sysconfig/nginx
# pidfile:     /var/run/nginx.pid

# Source function library.
. /etc/rc.d/init.d/functions

# Source networking configuration.
. /etc/sysconfig/network

# Check that networking is up.
[ "$NETWORKING" = "no" ] && exit 0

nginx="/usr/local/nginx/sbin/nginx"
prog=$(basename $nginx)
NGINX_CONF_FILE="/usr/local/nginx/conf/nginx.conf"

[ -f /etc/sysconfig/nginx ] && . /etc/sysconfig/nginx

lockfile=/var/lock/subsys/nginx

make_dirs() {
   # make required directories
   user=`$nginx -V 2>&1 | grep "configure arguments:.*--user=" | sed 's/[^*]*--user=\([^ ]*\).*/\1/g' -`
   if [ -n "$user" ]; then
      if [ -z "`grep $user /etc/passwd`" ]; then
         useradd -M -s /bin/nologin $user
      fi
      options=`$nginx -V 2>&1 | grep 'configure arguments:'`
      for opt in $options; do
          if [ `echo $opt | grep '.*-temp-path'` ]; then
              value=`echo $opt | cut -d "=" -f 2`
              if [ ! -d "$value" ]; then
                  # echo "creating" $value
                  mkdir -p $value && chown -R $user $value
              fi
          fi
       done
    fi
}

start() {
    [ -x $nginx ] || exit 5
    [ -f $NGINX_CONF_FILE ] || exit 6
    make_dirs
    echo -n $"Starting $prog: "
    daemon $nginx -c $NGINX_CONF_FILE
    retval=$?
    echo
    [ $retval -eq 0 ] && touch $lockfile
    return $retval
}

stop() {
    echo -n $"Stopping $prog: "
    killproc $prog -QUIT
    retval=$?
    echo
    [ $retval -eq 0 ] && rm -f $lockfile
    return $retval
}

restart() {
    configtest || return $?
    stop
    sleep 1
    start
}

reload() {
    configtest || return $?
    echo -n $"Reloading $prog: "
    killproc $prog -HUP
    retval=$?
    echo
}

force_reload() {
    restart
}

configtest() {
  $nginx -t -c $NGINX_CONF_FILE
}

rh_status() {
    status $prog
}

rh_status_q() {
    rh_status >/dev/null 2>&1
}

case "$1" in
    start)
        rh_status_q && exit 0
        $1
        ;;
    stop)
        rh_status_q || exit 0
        $1
        ;;
    restart|configtest)
        $1
        ;;
    reload)
        rh_status_q || exit 7
        $1
        ;;
    force-reload)
        force_reload
        ;;
    status)
        rh_status
        ;;
    condrestart|try-restart)
        rh_status_q || exit 0
            ;;
    *)
        echo $"Usage: $0 {start|stop|status|restart|condrestart|try-restart|reload|force-reload|configtest}"
        exit 2
esac
exit 0


# to grant authorization
chmod a+x /etc/init.d/nginx

# Map shortcuts
chkconfig --add /etc/init.d/nginx

# Set startup and self startup
chkconfig nginx on

# Manual start
systemctl start nginx
7, MySQL installation and configuration
1. The installation steps are as follows
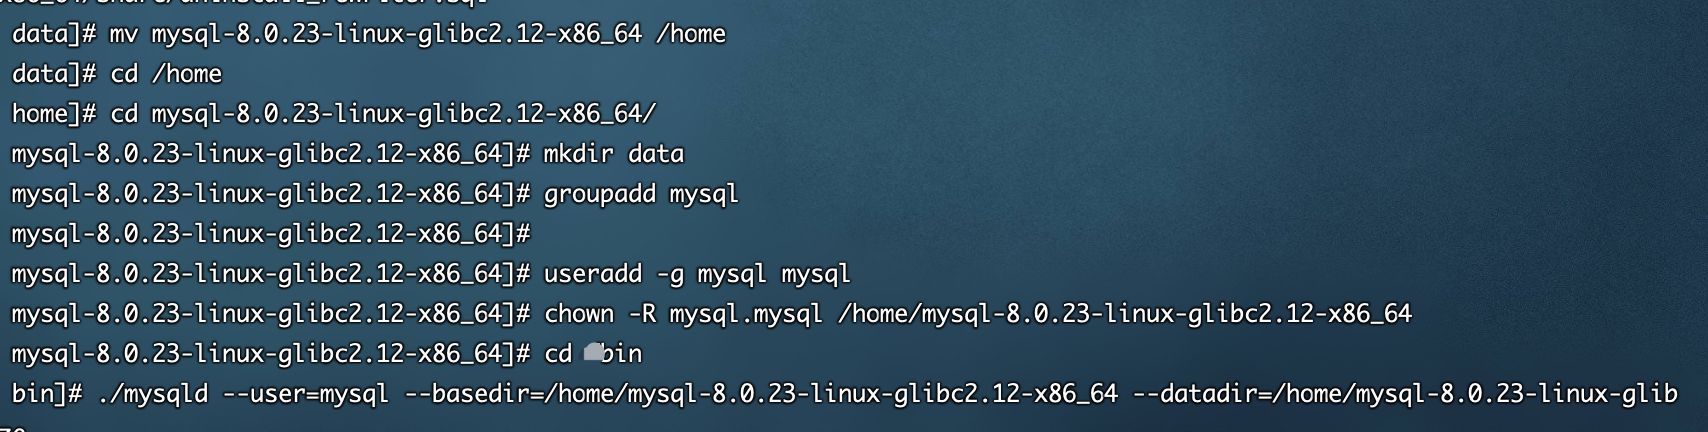
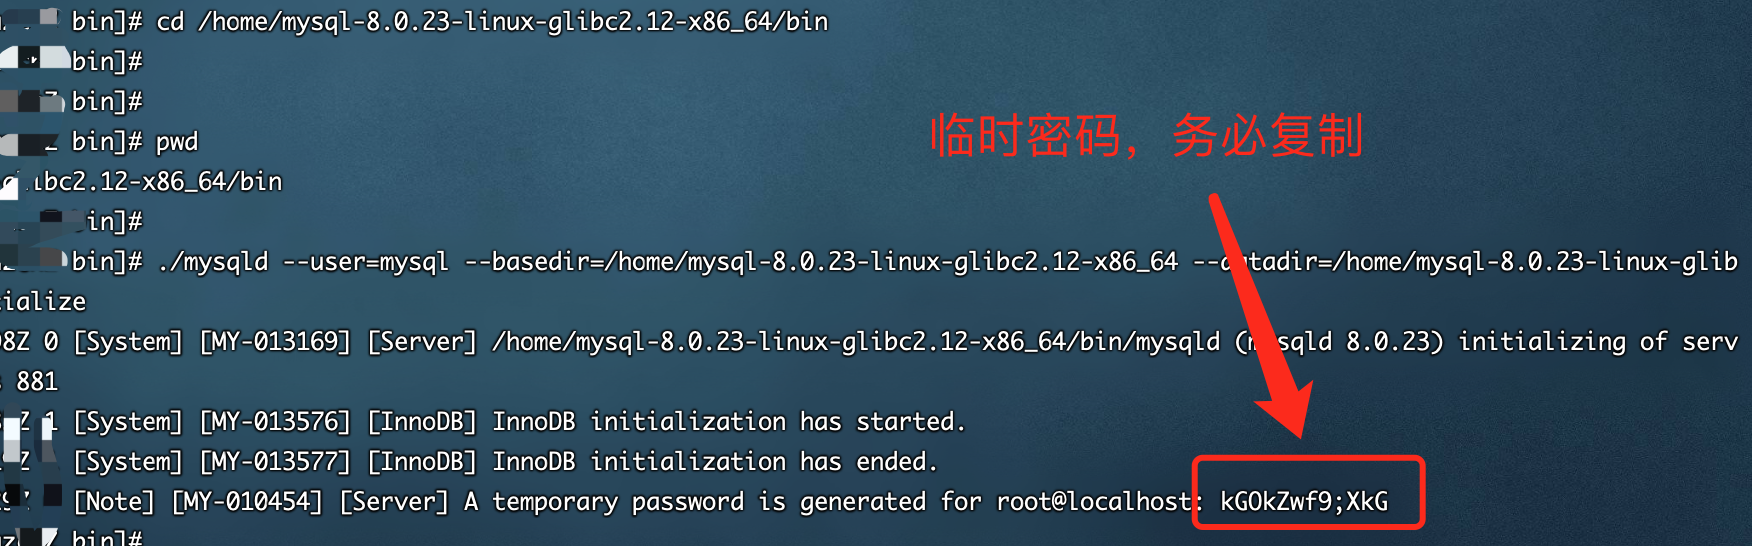
# Switch to / data directory
cd /data

# Extract MySQL files
tar -xvf mysql-8.0.23-linux-glibc2.12-x86_64.tar.xz

# Move to / home directory
mv mysql-8.0.23-linux-glibc2.12-x86_64 /home

# Enter MySQL directory
cd /home/mysql-8.0.23-linux-glibc2.12-x86_64

# Create new data and tmp folders to store data
mkdir data
mkdir tmp

# Authorization folder
chomd -R 777 tmp

# Create user groups and users and passwords
groupadd mysql
useradd -g mysql mysql

# Authorized user
chown -R mysql.mysql /home/mysql-8.0.23-linux-glibc2.12-x86_64

# Switch to bin directory
cd /home/mysql-8.0.23-linux-glibc2.12-x86_64/bin

# Initialization basic information - get temporary password
./mysqld --user=mysql --basedir=/home/mysql-8.0.23-linux-glibc2.12-x86_64 --datadir=/home/mysql-8.0.23-linux-glibc2.12-x86_64/data/ --initialize

# Copy the temporary password and find your own
2. The installation is shown in the figure

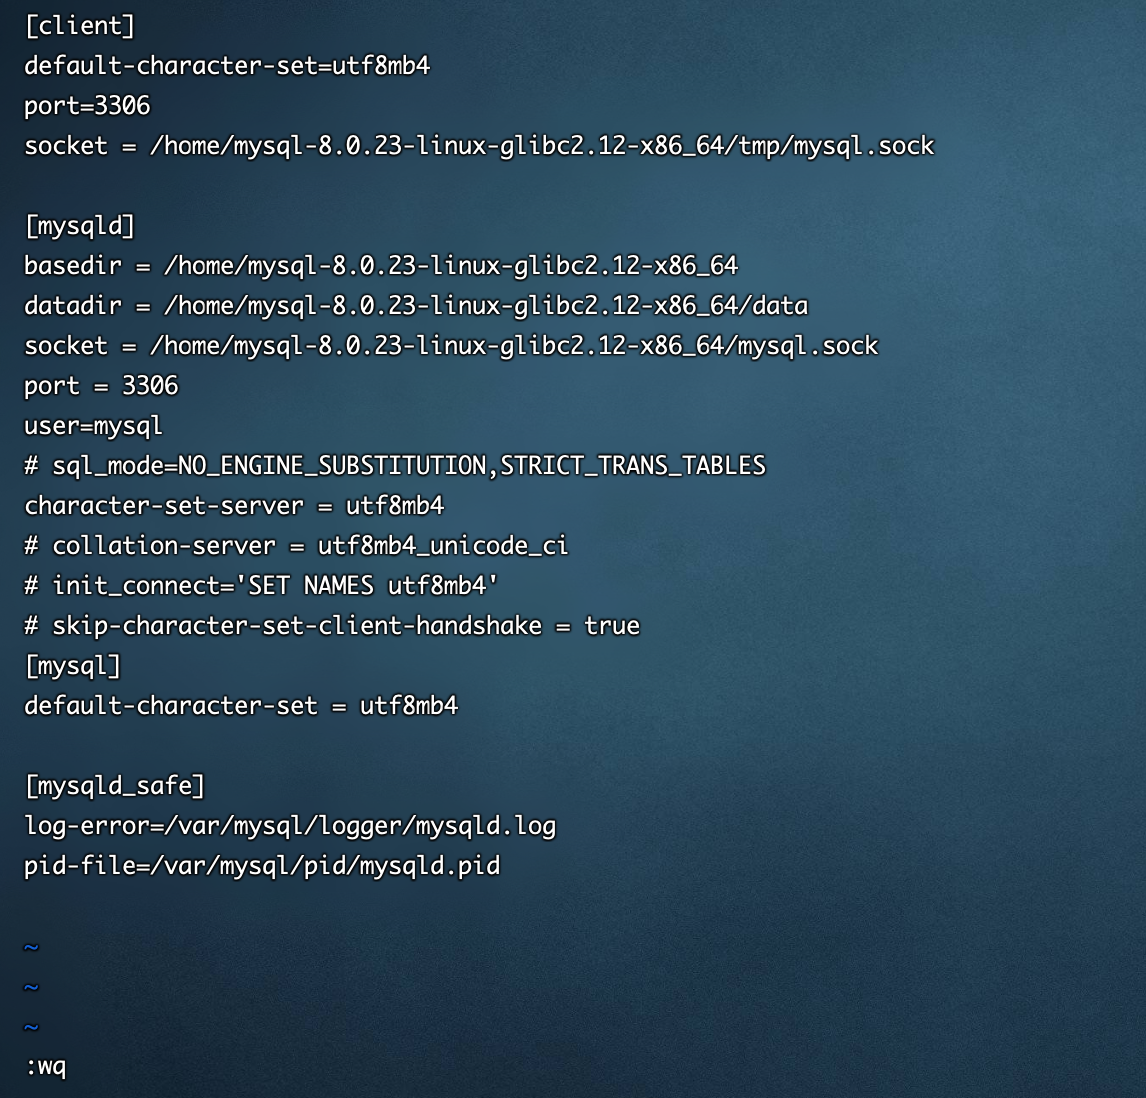
3. Configure MySQL and start
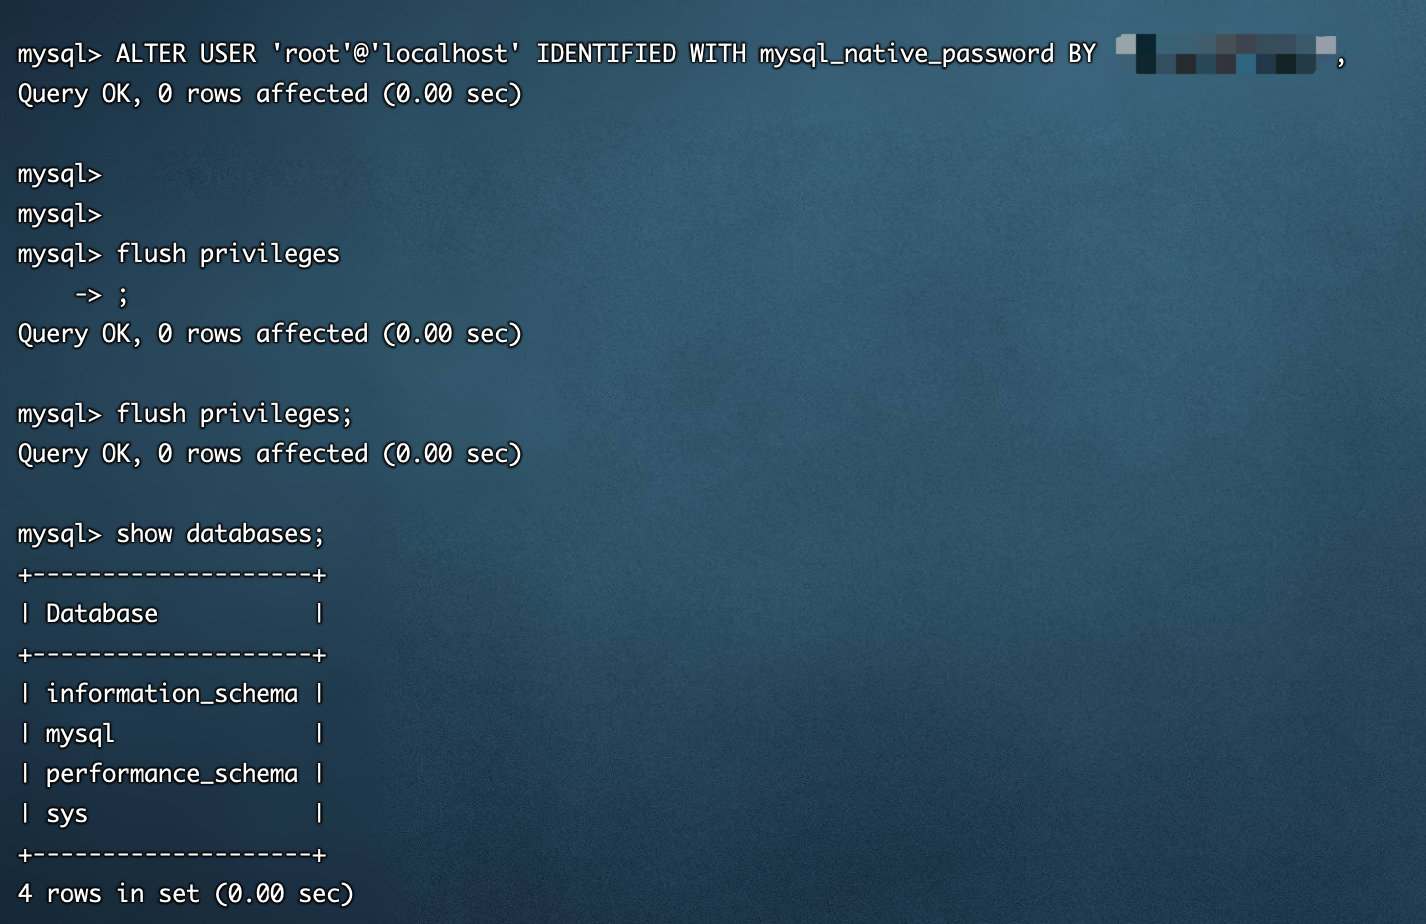
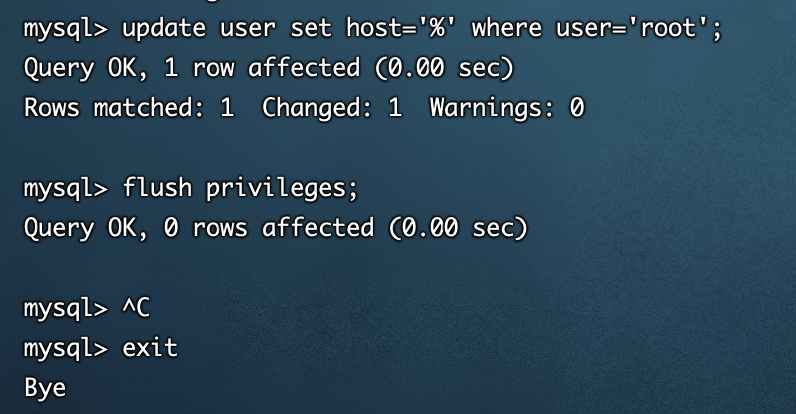
# Edit my CNF file
vim /etc/my.cnf

# Press i to enter the following command, and then press wq to exit
[client]
default-character-set=utf8mb4
port=3306
socket = /home/mysql-8.0.23-linux-glibc2.12-x86_64/tmp/mysql.sock

[mysqld]
basedir = /home/mysql-8.0.23-linux-glibc2.12-x86_64
datadir = /home/mysql-8.0.23-linux-glibc2.12-x86_64/data
socket = /home/mysql-8.0.23-linux-glibc2.12-x86_64/mysql.sock
port = 3306
user=mysql
# sql_mode=NO_ENGINE_SUBSTITUTION,STRICT_TRANS_TABLES
character-set-server = utf8mb4
# collation-server = utf8mb4_unicode_ci
# init_connect='SET NAMES utf8mb4'
# skip-character-set-client-handshake = true
[mysql]
default-character-set = utf8mb4

[mysqld_safe]
# log-error=/var/mysql/logger/mysqld.log
# pid-file=/var/mysql/pid/mysqld.pid


# Add mysqld service to the system
cp -a /home/mysql-8.0.23-linux-glibc2.12-x86_64/support-files/mysql.server /etc/init.d/mysql

# Authorizing and adding services
chmod +x /etc/init.d/mysql
chkconfig --add mysql

# Start MySQL service
service mysql start

# View startup status
service mysql status

# Add MySQL commands to the service
ln -s /home/mysql-8.0.23-linux-glibc2.12-x86_64/bin/mysql /usr/bin

# Log in to MySQL
mysql -u root -h 127.0.0.1 -p

# Passwords use passwords that were randomly generated before

# Change the root password, * * * to your own password
ALTER USER 'root'@'localhost' IDENTIFIED WITH mysql_native_password BY '******';
flush privileges;

# Select mysql database
use mysql;

# Modify remote connection and take effect
update user set host='%' where user='root';
flush privileges;
4. As shown in the figure
8, Domain name resolution and configuration
Domain names must be submitted to the Ministry of industry and information technology for filing before use, otherwise they cannot be used normally. In this case, the domain name is purchased from Alibaba cloud.
1. Find the domain name you purchased in the Alibaba cloud domain name menu and click resolve
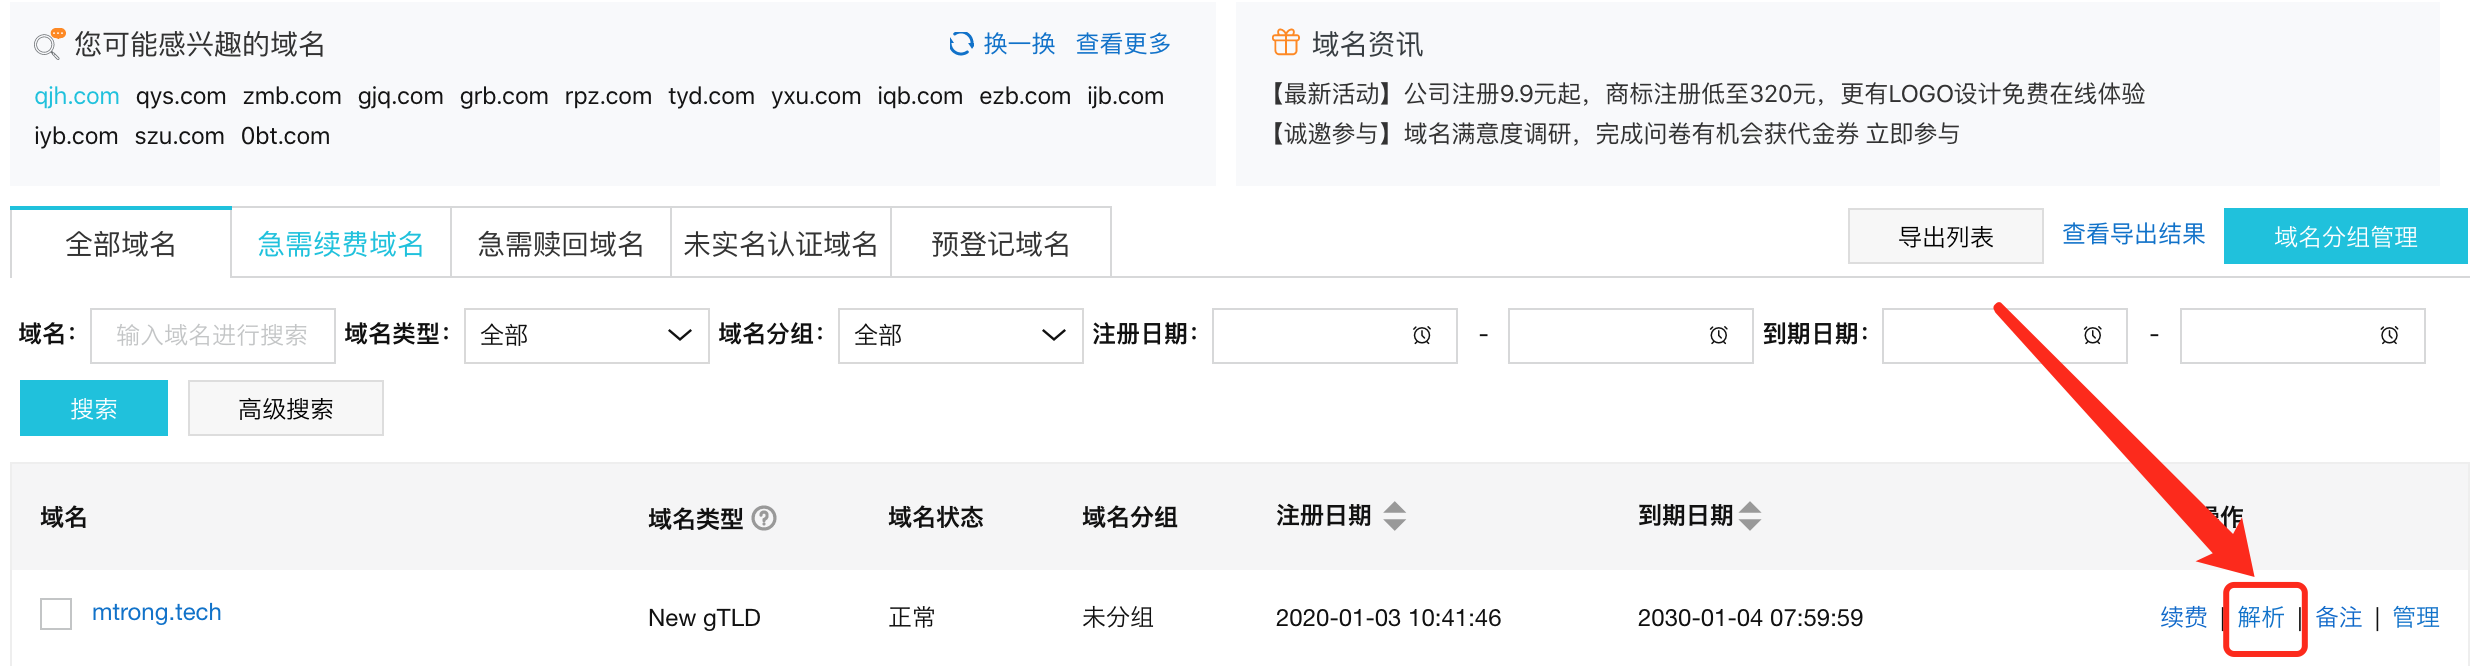
2. Add the following record
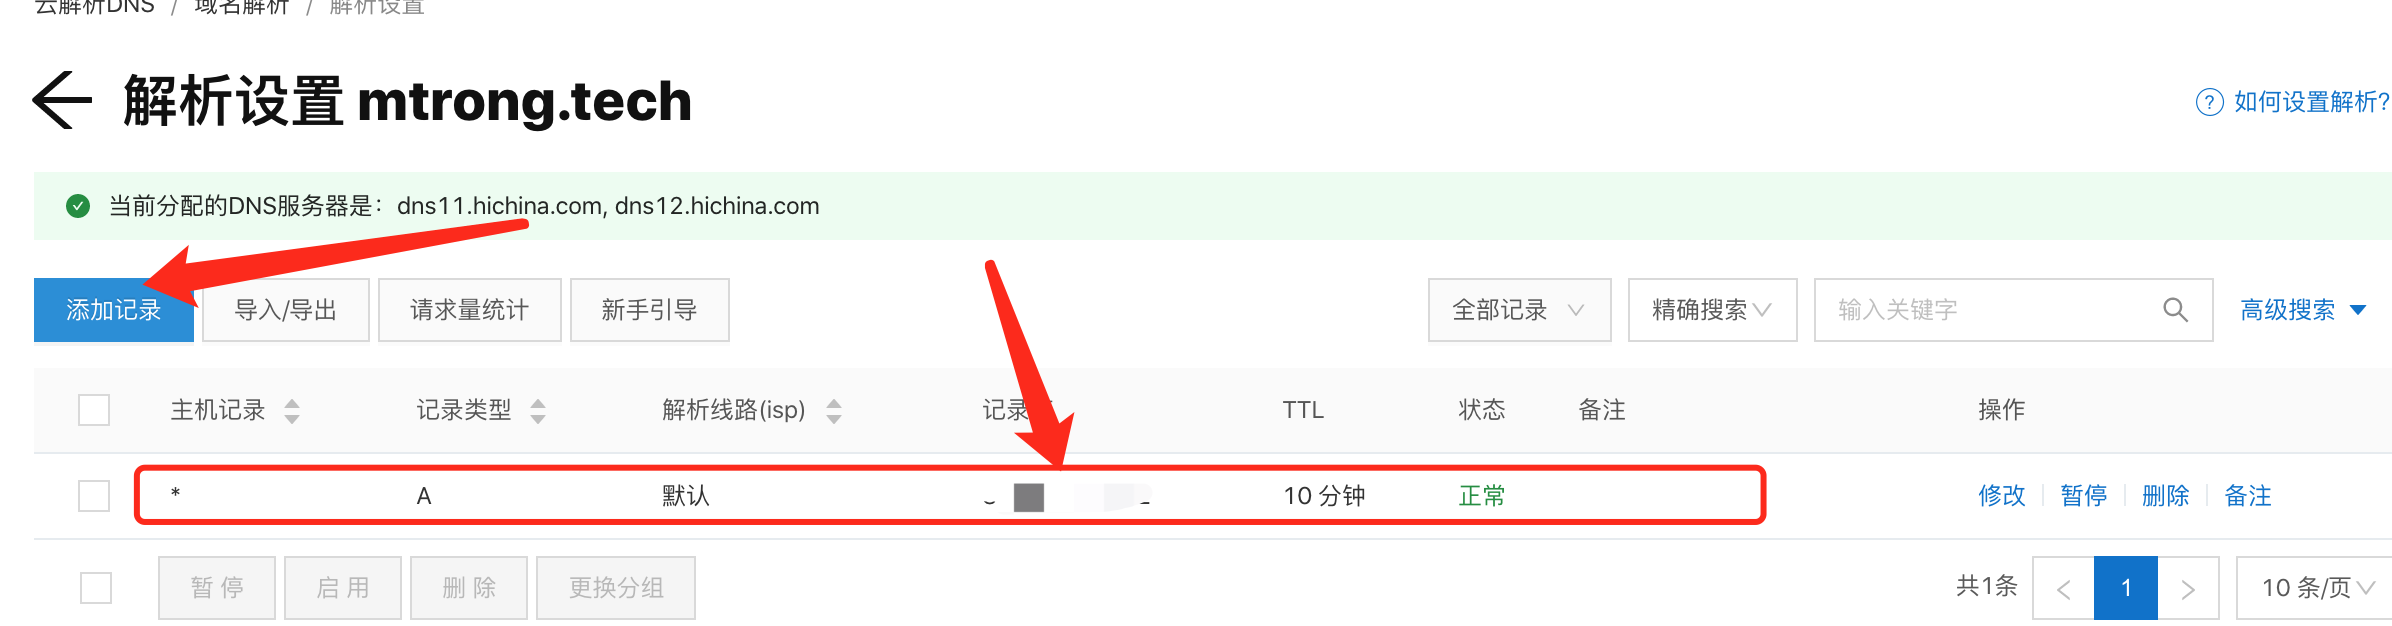
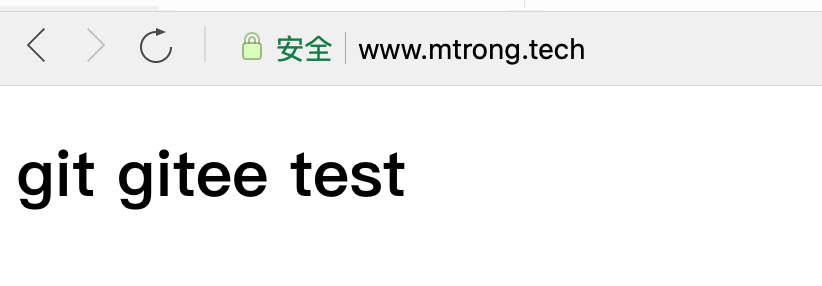
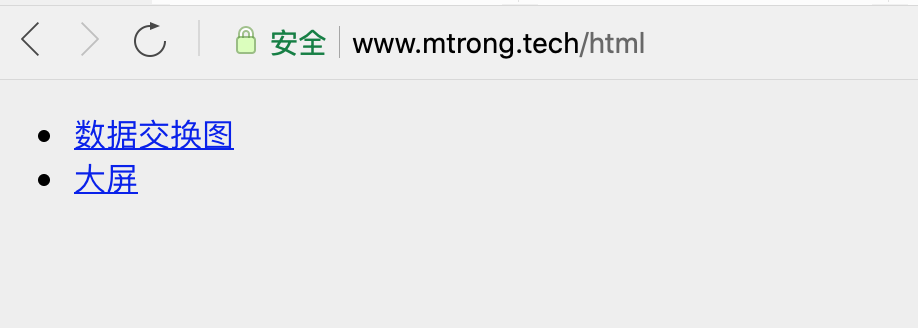
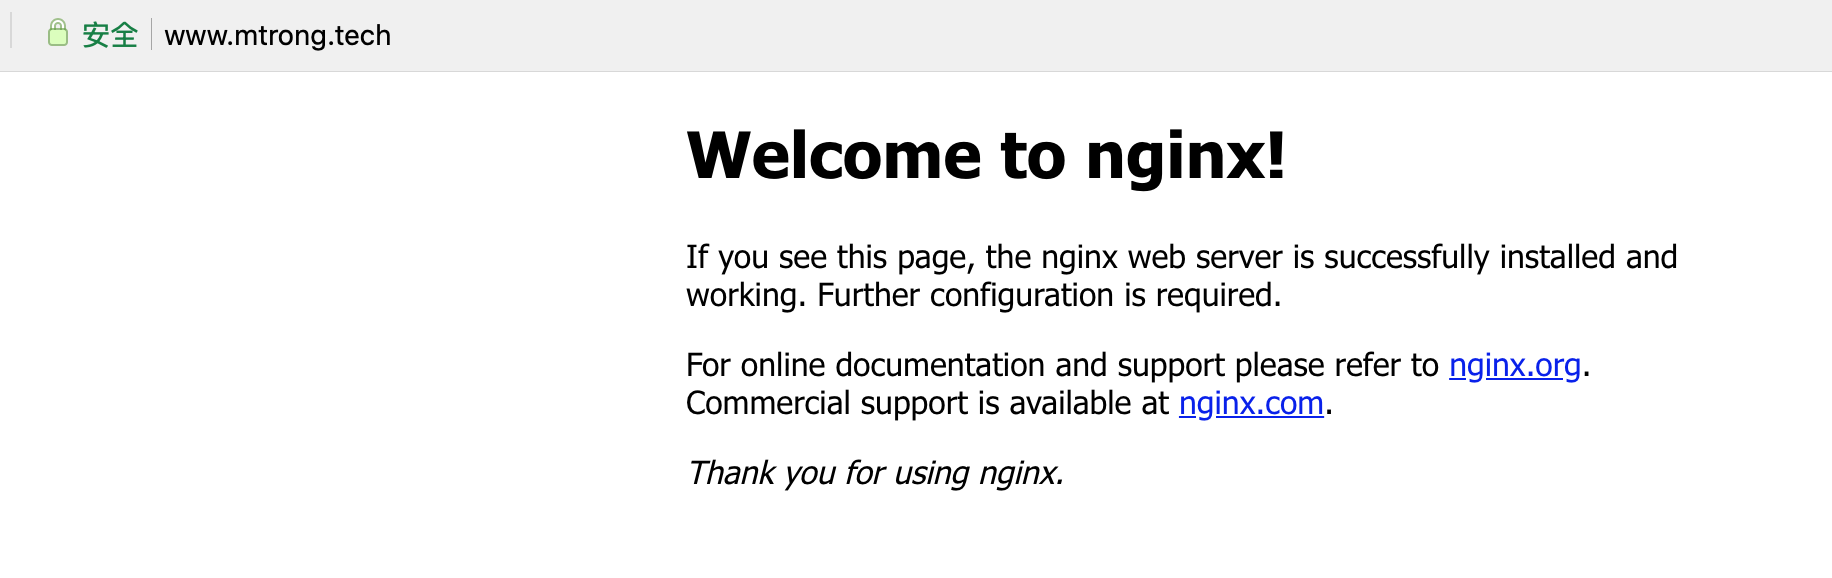
3. It can be accessed directly through the browser
4. Configure nginx domain name and proxy address
Switch to nginx configuration file. The configuration is as follows
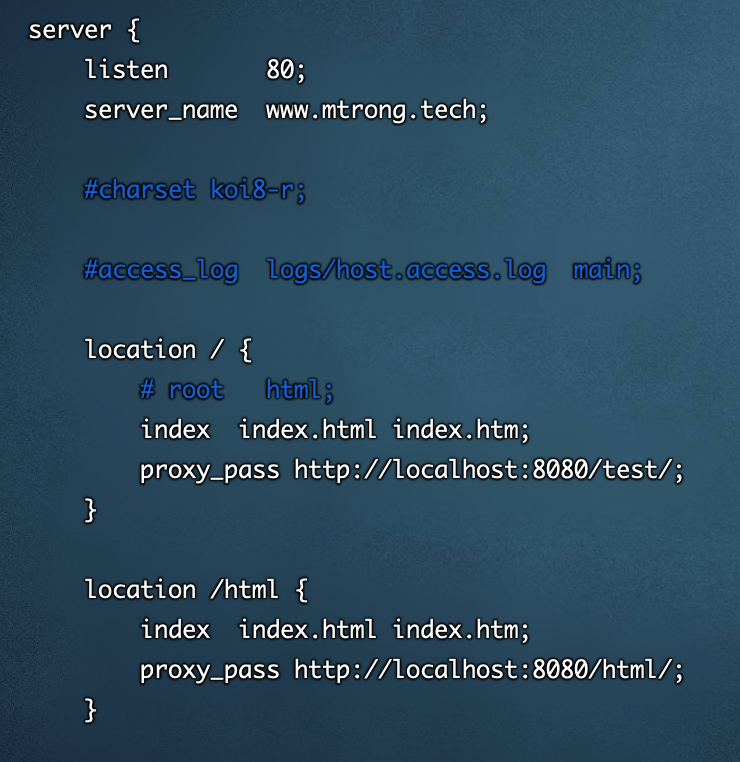
5. The effect is as follows