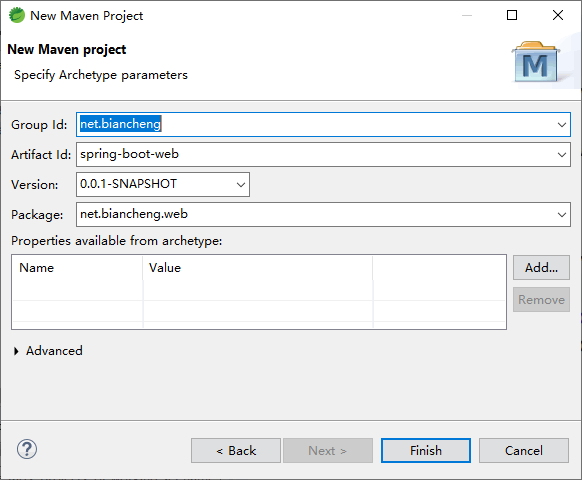
In Spring Tools 4 for Eclipse, select File - > New - > Maven Project, and then add relevant information in the interface as shown in the figure.
<parent>
    <groupId>org.springframework.boot</groupId>
    <artifactId>spring-boot-starter-parent</artifactId>
    <version>2.0.6.RELEASE</version>
</parent>

<dependencies>
    <dependency>
        <groupId>org.springframework.boot</groupId>
        <artifactId>spring-boot-starter-web</artifactId>
    </dependency>
</dependencies>
Write the startup class, and the code is as follows.
@SpringBootApplication
public class App {

    public static void main(String[] args) {
        SpringApplication.run(App.class, args);
    }
}
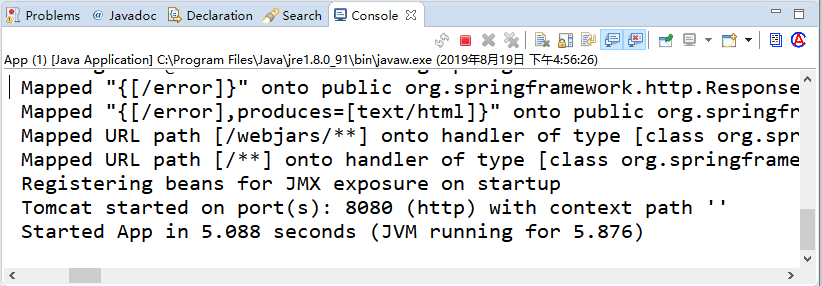
The startup class uses the @ SpringBootApplication annotation, which indicates that the class is a Spring Boot application. Directly run the App class to start. After successful startup, output information on the console. The default port is 8080, as shown in the figure.
As you can see, we are only in POM XML introduces a Web Starter, and then creates a common Java Class, a Main method can start a Web project.
Compared with the previous use, this method is much simpler. Previously, you need to configure various Spring related packages, as well as web XML file, you also need to put the project into Tomcat for execution. The process of building the project is also very error prone, and there will be various jar package conflicts. With Spring Boot, these problems are solved.
The reason why we can start a Web service through a Main method is that Tomcat is embedded in Sprig Boot, and then the service is provided through the embedded Tomcat. Of course, we can also use other containers to replace tomcat, such as Undertow or Jetty.
Spring Tools 4 for Eclipse also provides us with a more convenient way to create projects. In the file - > new option, there is the Spring Starter Project. You can directly select the version of Spring Boot and the third-party package you need to rely on to directly generate Spring Boot projects without manually configuring Maven dependencies.
This function and https://start.spring.io/ It provides the same function, which is convenient to quickly build the scaffold of Spring Boot project.
Recommended cloth typeMicro Service Mall
Write the first REST interface
This section will create a controller, write the first REST interface, and use / hello as the access address. The code is as follows.
@RestController
public class HelloController {

    @GetMapping("/hello")
    public String hello() {
        return "hello";
    }
}
@RestController Yes @Controller Combined annotation with @ ResponseBody can directly return data in Json format.
@GetMapping is actually @ RequestMapping (method=RequestMethod.GET), which can be accessed through http://localhost:8080/hello You can see the output result "hello".
Read configuration file
In previous projects, we mainly configured the framework in the XML file, and the business related configuration will be placed in the attribute file, and then read the configuration information through an attribute reading tool class.
In Spring Boot, we no longer need to use this method to read data. The configuration in Spring Boot is usually placed in application In properties, it is very convenient to read configuration information. There are three ways in total.
1)Environment
You can get the desired configuration information through the getProperty method of Environment. The code is as follows.
@RestController
public class HelloController {

    // Injection object
    @Autowired
    private Environment env;

    @GetMapping("/hello")
    public String hello() {
        // Read configuration
        String port = env.getProperty("server.port");
        return port;
    }
}
2)@Value
Specific configuration information can be injected. The code is as follows.
@RestController
public class HelloController {

    // Injection configuration
    @Value("${server.port}")
    private String port;

    @GetMapping("/hello")
    public String hello() {
        return port;
    }
}
3) Custom configuration class
Prefix defines the prefix of the configuration. The code is as follows.
@ConfigurationProperties(prefix = "net.biancheng")
@Component
public class MyConfig {

    private String name;

    public String getName() {
        return name;
    }

    public void setName(String name) {
        this.name = name;
    }

}
The method code for reading the configuration is shown below.
@RestController
public class HelloController {

    @Autowired
    private MyConfig myConfig;

    @GetMapping("/hello")
    public String hello() {
        return myConfig.getName();
    }
}
Define and configure application Properties are as follows:
net.biancheng.name=zhangsanprofiles multi environment configuration
In normal development, the project will be deployed to the test environment and production environment, but the database address and other configuration information of each environment are different. Activating configuration files in different environments through profile can solve the problem of different configuration information. In Spring Boot, you can use spring profiles. Active = dev to activate configurations in different environments.
Multiple configuration files can be defined. Each configuration file corresponds to an environment in the format of application environment properties, as shown in Table 1.
Table 1 profile multi environment configuration
| application.properties | General configuration, regardless of environment |
| application-dev.properties | development environment |
| application-test.properties | testing environment |
| application-prod.properties | production environment |
In the development environment, you can modify the application Spring. In properties profiles. Active value to activate the configuration of the corresponding environment. During deployment, you can use java – jar XXX jar--spring.profiles.active = dev to specify the corresponding configuration.
Hot deployment
The code is often changed in the development process. At this time, if you want to see the effect, you have to stop the project and restart it.
For the Spring Boot project, the startup time is very fast. Under the micro service architecture, each service only focuses on its own business, and the amount of code is very small. This startup time is tolerable.
For those bloated single old projects, the start-up time is a waste of life. Although Spring Boot starts quickly, we still have to restart it ourselves. Can it be changed, and it will quietly reload the changed places by itself? The answer is yes, which can be achieved through Spring Boot devtools.
Just add the dependency of spring boot devtools to realize the hot deployment function. The code is as follows.
<dependency>
    <groupId>org.springframework.boot</groupId>
    <artifactId>spring-boot-devtools</artifactId>
</dependency>
Actor monitoring
Spring Boot provides a module for monitoring and managing its own application information, which is Spring Boot starter actuator. The module is very simple to use. You only need to add dependencies. The code is as follows.
<dependency>
    <groupId>org.springframework.boot</groupId>
    <artifactId>spring-boot-starter-actuator</artifactId>
</dependency>
Starting the project, we will find that the information shown in Figure 4 is added to the output of the console.
The information shown in the figure below is the endpoint information provided by the Actuator module, as shown in Table 2. We can get a lot of monitoring information by accessing these endpoints.
For example, we can get the following information by visiting / Actor / health:
{
"status": "UP"
}
Table 2 Actuator endpoint information
| Http method | route | describe | Http default exposure |
|---|---|---|---|
| GET | /actuator/conflgprops | View the configuration properties, including the default configuration | false |
| GET | /actuator/beans | View a list of bean s and their relationships | false |
| GET | /actuator/heapdump | Print thread stack | false |
| GET | /actuator/env | View all environment variables | false |
| GET | /actuator/env/ {name} | View specific variable values | true |
| GET | /actuator/health | Health application indicator view | true |
| GET | /actuator/info | View application information | false |
| GET | /actuator/mappings | View all URL mappings | false |
| GET | /actuator/metrics | View application basic indicators | false |
| GET | /actuator/metrics/{name} | View specific indicators | false |
| POST | /actuator/shutdown | Close app | false |
| GET | /actuator/httptrace | View basic tracking information | false |
| GET | /actuator/loggers | Displays the loggers configuration in the application | false |
| GET | /actuator/scheduledtasks | Show scheduled tasks | false |
UP indicates that the current application is in a healthy state. If DOWN indicates that the current application is not healthy. Add the following configuration to display the details of some health information:
management.endpoint.health.show-details=ALWAYSVisit / Actor / health again to get the details of health status:
{
    "status": "UP",
    "diskSpace": {
        "status": "UP",
        "total": 491270434816,
        "free": 383870214144,
        "threshold": 10485760
    }
}
Most endpoints are not exposed by default. We can manually configure the endpoints that need to be exposed. Separate multiple endpoints with commas, as shown below:
management.endpoints.web.exposure.include=configprops,beansIf you want all endpoints to be exposed, you can directly configure them in the following way:
management.endpoints.web.exposure.include=*The information about these monitoring will not be repeated, and you can understand it by yourself. Later, we will introduce how to use Spring Boot Admin to more intuitively display this information on the page. At present, all data are in Json format, which is inconvenient to view.
Custom actor endpoint
In many scenarios, we need to customize some rules to judge whether the application state is healthy. We can customize endpoints to meet the needs of diversity. If we just need to add some data of other dimensions to the health status of the application, we can implement our own business logic by inheriting AbstractHealthIndicator. The code is shown below.
@Component
public class UserHealthIndicator extends AbstractHealthIndicator {
    @Override
    protected void doHealthCheck(Builder builder) throws Exception {
        builder.up().withDetail("status", true);
        // builder.down().withDetail("status", false);
    }
}
The up method specifies that the status of the application is healthy, and the down method specifies that the status of the application is unhealthy. The withDetail method is used to add some details. Visit / Actor / health to get details of our customized health status:
{
    "status": "UP",
    "details": {
        "user": {
            "status": "UP",
            "details": {
                "status": true
            }
        },
        "diskSpace": {
            "status": "UP",
            "details": {
                "total":
                249795969024,
                "free": 7575375872,
                "threshold": 10485760
            }
        }
    }
}
The above is an extension of the health Endpoint provided by the framework. Another requirement is to fully develop a new Endpoint, such as the Endpoint for viewing the currently logged in user information. Customizing the new Endpoint is very simple, which can be realized through @ Endpoint annotation. The code is shown below.
@Component
@Endpoint(id = "user")
public class UserEndpoint {

    @ReadOperation
    public List<Map<String, Object>> health() {
        List<Map<String, Object>> list = new ArrayList<>();
        Map<String, Object> map = new HashMap<>();
        map.put("userId", 1001);
        map.put("userName", "zhangsan");
        list.add(map);
        return list;
    }
}
Visit / Actor / user to see the returned user information as follows:
[
    {
        "userName": "zhangsan",
        "userId": 1001
    }
]
Unified exception handling
For the definition of interfaces, we usually have a fixed format, such as:
{
    "status": true,
    "code": 200,
    "message": null,
    "data": [
        {
            "id": "101",
            "name": "jack"
        },
        {
            "id": "102",
            "name": "jason"
        }
    ]
}
However, if the caller writes the interface address wrong when requesting our API, it will get a 404 error:
{
    "timestamp": 1492063521109,
    "status": 404,
    "error": "Not Found",
    "message": "No message available",
    "path": "/rest11/auth"
}
The back-end service will tell us which address was not found. In fact, it is very friendly. However, because the data format customized above is inconsistent with that below, it is unrecognizable when the user gets this return, the most obvious of which is the status field.
We customize the boolean type to indicate whether the request is successful or not. What is returned here is the status code of Http. Therefore, we need to return the customized format when this system error occurs. Then we need to define an exception handling class (the code is shown below). Through this class, we can return a unified format, You can also record exception logs uniformly.
@ControllerAdvice
public class GlobalExceptionHandler {
    private Logger logger = LoggerFactory.getLogger(GlobalExceptionHandler.class);

    @ExceptionHandler(value = Exception.class)
    @ResponseBody
    public ResponseData defaultErrorHandler(HttpServletRequest req, Exception e) throws Exception {
        logger.error("", e);
        ResponseData r = new ResponseData();
        r.setMessage(e.getMessage());
        if (e instanceof org.springframework.web.servlet.NoHandlerFoundException) {
            r.setCode(404);
        } else {
            r.setCode(500);
        }
        r.setData(null);
        r.setStatus(false);
        return r;
    }
}
ResponseData is the entity class of our return format. When an error occurs, it will also be captured, encapsulated and returned to the caller. The last key step is to add the configuration shown in the following code to the configuration file of Spring Boot.
# When an error occurs, an exception is thrown directly
spring.mvc.throw-exception-if-no-handler-found=true
# Do not map the resource files in our project
spring.resources.add-mappings=false
Then, when we call a nonexistent interface, the returned error message is in the format we defined:
{
    "status": false, "code": 404,
    "message": "No handler found for GET /rest11/auth", "data": null
}
Finally, paste the definition of ResponseData, and the code is as follows.
public class ResponseData {
    private Boolean status = true;
    private int code = 200;
    private String message;
    private Object data;
    // get set ...
}
Asynchronous execution
Asynchronous call is to execute the following logic without waiting for the return of the result; Synchronous call needs to wait for the result before executing the following logic.
Usually, when we use asynchronous operation, we will create a thread to execute a piece of logic, and then throw the thread into the thread pool for execution. The code is as follows.
ExecutorService executorService = Executors.newFixedThreadPool(10);
executorService.execute(() -> {
    try {
        // Business logic
    } catch (Exception e) {
        e.printStackTrace();
    } finally {
    }
});
Although this method uses Java's Lambda, it doesn't look so elegant. In Spring, there is a simpler way to perform asynchronous operations. You only need an @ Async annotation. The code is as follows.
@Async
public void saveLog() {
    System.err.println(Thread.currentThread().getName());
}
We can call this business method directly in Controller, which is executed asynchronously and executes in the default thread pool. It should be noted that this method must be called in an external class. If it is called in this class, it will not work, such as this saveLog(). Finally, start the execution of asynchronous tasks on the startup class and add @ EnableAsync.
In addition, we can also customize the thread pool for executing asynchronous tasks. First, we define a thread pool configuration class to configure some parameters. The specific code is as follows.
@Configuration
@ConfigurationProperties(prefix = "spring.task.pool")
public class TaskThreadPoolConfig {
    // Number of core threads
    private int corePoolSize = 5;

    // Maximum number of threads
    private int maxPoolSize = 50;

    // The thread pool maintains the idle time allowed by threads
    private int keepAliveSeconds = 60;

    // queue length
    private int queueCapacity = 10000;

    // Thread name prefix
    private String threadNamePrefix = "FSH-AsyncTask-";
    // get set ...
}
Then we redefine the configuration of thread pool. The code is as follows.
@Configuration
public class AsyncTaskExecutePool implements AsyncConfigurer {
    private Logger logger = LoggerFactory.getLogger(AsyncTaskExecutePool.class);
    @Autowired
    private TaskThreadPoolConfig config;

    @Override
    public Executor getAsyncExecutor() {
        ThreadPoolTaskExecutor executor = new ThreadPoolTaskExecutor();
        executor.setCorePoolSize(config.getCorePoolSize());
        executor.setMaxPoolSize(config.getMaxPoolSize());
        executor.setQueueCapacity(config.getQueueCapacity());
        executor.setKeepAliveSeconds(config.getKeepAliveSeconds());
        executor.setThreadNamePrefix(config.getThreadNamePrefix());
        executor.setRejectedExecutionHandler(new ThreadPoolExecutor.CallerRunsPolicy());
        executor.initia lize();
        return executor;
    }

    @Override
    public AsyncUncaughtExceptionHandler getAsyncUncaughtExceptionHandler() {
        // Exception handling in asynchronous tasks
        return new AsyncUncaughtExceptionHandler() {
            @Override
            public void handleUncaughtException(Throwable arg0, Method arg1, Object... arg2) {

                logger.error("==========================" + arg0.getMessage() + "=======================", arg0);
                logger.error("exception method:" + arg1.getName());
            }
        };
    }
}
After configuration, the thread pool of our asynchronous task execution is customized. We can configure the size of thread pool and other information in the property file, or use the default configuration:
spring.task.pool.maxPoolSize=100Finally, let's talk about the rejection strategy of thread pool configuration. When the number of our threads is higher than the processing speed of the thread pool, the task will be cached in the local queue. The queue also has a size. If it exceeds this size, there needs to be a rejection policy, otherwise there will be memory overflow. At present, two rejection strategies are supported:
- AbortPolicy: directly throw Java util. concurrent. Rejectedexecutionexception exception.
- CallerRunsPolicy: the main thread directly executes the task. After execution, it tries to add the next task to the thread pool, which can effectively reduce the speed of adding tasks to the thread pool.
It is recommended that you use the CallerRunsPolicy policy policy, because when the task in the queue is full, if you throw an exception directly, the task will be discarded. If it is a CallerRunsPolicy policy, it will be executed by the main thread, that is, synchronously, so that at least the task will not be discarded.
Random port
In the actual development process, the ports of each project are set through server Port can specify the port.
When a service wants to start multiple instances, it needs to change the port, especially later Spring Cloud When learning, the service will be registered in the registry. In order to make the service can be expanded at any time, it is best to randomly generate a usable port when the service is started.
In Spring Boot, you can generate random numbers through ${random}. We can use it as follows:
server.port=${random.int[2000,8000]}
Through random Int method, specify the access of random numbers, and generate a number between 2000 and 8000, so that the port is different every time it is started.
In fact, although the above method can achieve the expected effect, there will be some problems: if this port is already in use, the startup will inevitably report an error. Therefore, we can randomly generate a port through code, and then detect whether it is used, so as to generate a port that is not used.
Write a startup parameter setting class, and the code is as follows.
public class StartCommand {
    private Logger logger = LoggerFactory.getLogger(StartCommand.class);

    public StartCommand(String[] args) {
        Boolean isServerPort = false;
        String serverPort = "";
        if (args != null) {
            for (String arg : args) {
                if (StringUtils.hasText(arg) && arg.startsWith("--server.port")) {
                    isServerPort = true;
                    serverPort = arg;
                    break;
                }
            }
        }
        // If no port is specified, an available port is randomly generated
        if (!isServerPort) {
            int port = ServerPortUtils.getAvailablePort();
            logger.info("current server.port=" + port);
            System.setProperty("server.port", String.valueOf(port));
        } else {
            logger.info("current server.port=" + serverPort.split("=")[1]);
            System.setProperty("server.port", serverPort.split("=")[1]);
        }
    }
}
By traversing and judging the startup parameters, if there is a specified startup port, the subsequent will not be automatically generated; If it is not specified, get a usable port through ServerPortUtils and set it to the environment variable. In application Get the port in the following way in properties:
server.port=${server.port}
The code for obtaining available ports is as follows.
public static int getAvailablePort() {
    int max = 65535;
    int min = 2000;
    Random random = new Random();
    int port = random.nextInt(max)%(max-min+1) + min;
    boolean using = NetUtils.isLoclePortUsing(port);
    if (using) {
        return getAvailablePort();
    } else {
        return port;
    }
}
The main logic of obtaining available ports is to specify a range, then generate random numbers, and finally check whether the ports are available through NetUtils. If the available port is obtained, it will be returned directly. If the available port is not obtained, the callback logic will be executed to obtain it again. Detecting whether a port is available mainly uses Socket to judge whether the port can be linked.
Finally, you can use the call port in the startup class. The code is shown below.
public class FshHouseServiceApplication {
    public static void main(String[] args) {
        // Start parameter settings, such as automatic port generation
        new StartCommand(args);
        SpringApplication.run(FshHouseServiceApplication.class, args);
    }
}
Compilation and packaging
When a traditional Web project is deployed, a war package is compiled and placed in the webapps directory of Tomcat. In the Web project built by Spring Boot, this traditional deployment method is broken. It uses a simpler built-in container to deploy the application. It only needs to compile and package the application into a jar package, and the application can be started directly through the java – jar command.
In the POM of the project Add a packaged Maven plug-in to XML. The code is as follows.
<build>
    <plugins>
        <!-- Package plug-in -->
        <plugin>
            <groupId>org.springframework.boot</groupId>
            <artifactId>spring-boot-maven-plugin</artifactId>
            <configuration>
                <executable>true</executable>
                <mainClass>net.biancheng.spring_boot_example.App</mainClass>
            </configuration>
        </plugin>

        <!-- Compiling plug-ins, appoint JDK edition -->
        <plugin>
            <groupId>org.apache.maven.plugins</groupId>
            <artifactId>maven-compiler-plugin</artifactId>
            <configuration>
                <source>1.8</source>
                <target>1.8</target>
            </configuration>
        </plugin>
    </plugins>
</build>
mainClass configures our startup entry class. After configuration, you can compile and package through Maven's mvn clean package command. After compilation, the corresponding jar package will be generated in the target directory, and java – jar XX will be called directly during deployment Jar to start the application.