0. Front
The previous article recorded the Shell operation and Java API operation of HBase, but the operation process is still cumbersome
[track of HBase] (2) use HBase command and Java API to operate HBase (including complex query - filter and HBase tool class)
It would be nice if you could write SQL operation database like MySQL, and Phoenix provides such support
This article will record the installation and configuration process of Phoenix. Shell uses SpringBoot+MyBatis to integrate Phoenix
Some common errors in the configuration process have been pointed out in the article, such as Phoenix unable to start, lack of dependency, Command line too long, how to map entity classes, etc
Avoid the detours the author has gone through. If you still find new problems, please leave a message
1. Introduction to Apache Phoenix
Apache Phoenix is an SQL Engine for HBase, which expands the functions of HBase by providing Jar package
It supports the operation of HBase with SQL statements. The bottom layer is to convert SQL language into HBase native statements (such as scan get put, etc.)
At the same time, it also supports secondary index. The underlying HBase based coprocessor can improve the query efficiency of HBase
As a data source, Phoenix can be used in Java projects like MySQL. It can be connected with JDBC or integrated with MyBatis framework, operating like a normal relational database
2. Download configuration and startup
① Download installation package
First, go to the official download page: https://phoenix.apache.org/download.html
Select the Phoenix version corresponding to the HBase version to download
The Hbase version of this article is 2.3.7, so the following is selected:
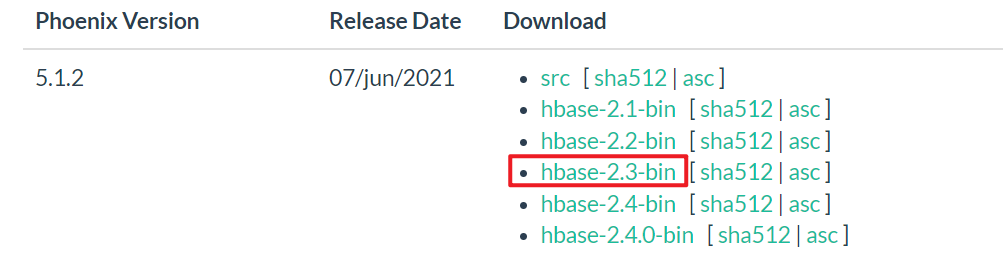
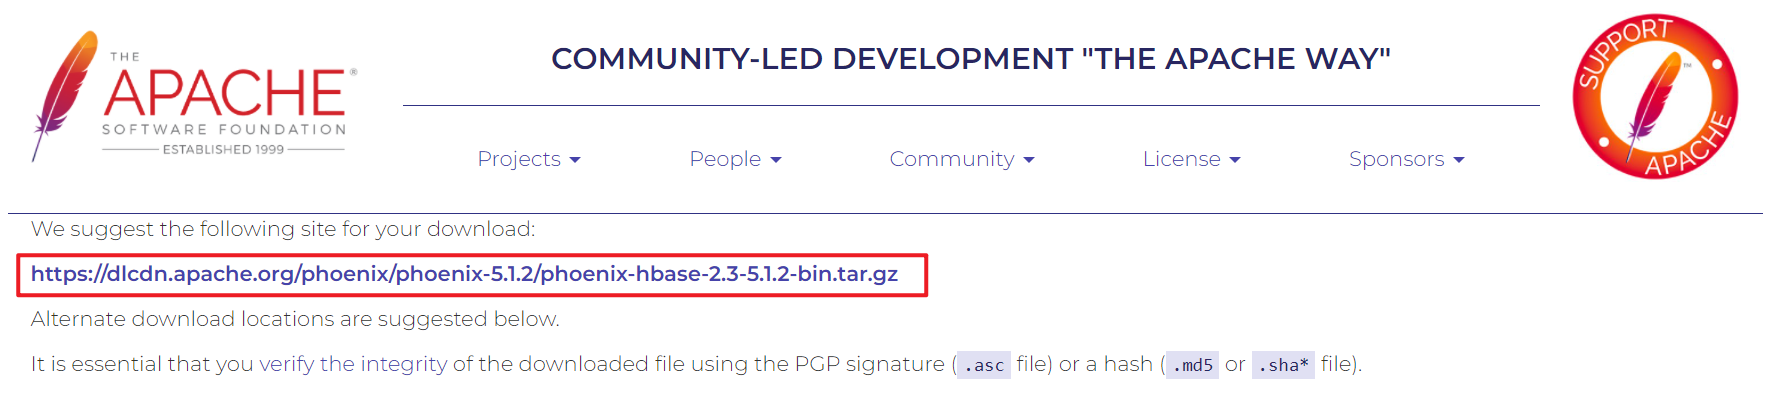
Click the first connection to download the installation package, and then upload it to the server with xftp
Or use WGet directly on the server https://... Download
② Copy the jar package of Phoenix to the HBase lib directory
Because Phoenix is only an extension of HBase, not a separate program
Therefore, you only need to copy a series of downloaded jar packages to the lib directory of HBase, and then simply configure them for use
After extracting the installation package, you can first copy it to a server and then distribute it
▲ note: only Phoenix server hbase-2.3-5.1.2 is copied here Jar and phoenix-pherf-5.1.2 Two jars are enough. Copying the client into it may cause a big problem (I was fucked up, damn it)
cp phoenix-server-hbase-2.3-5.1.2.jar /.../hbase-2.3.7/lib
cp phoenix-pherf-5.1.2.jar /.../hbase-2.3.7/lib
xsync /.../hbase-2.3.7/lib
③ Configure Phoenix for HBase
Modify HBase site XML configuration file, plus the following configurations
<!-- support HBase Namespace mapping -->
<property>
    <name>phoenix.schema.isNamespaceMappingEnabled</name>
    <value>true</value>
</property>

<!-- Support index pre write log encoding -->
<property>
	<name>hbase.regionserver.wal.codec</name>
	<value>org.apache.hadoop.hbase.regionserver.wal.IndexedWALEditCodec</value>
</property>
Then distribute to each server
If you build a cluster with docker, you can't distribute it directly, because the port settings of each container are different, such as 16100, 16101, 16102, etc., which needs to be modified one by one
| ▲ also very important It is not only necessary to modify HBase site XML file You also need to modify HBase site. Under Phoenix bin directory XML file In the original configuration file under Phoenix directory, there is only HBase regionserver. wal. Codec a configuration You also need to add another configuration as above. In short, ensure Phoenix's own HBase site The XML file also needs the above two configurations Consequences of forgetting to add: Start Phoenix sqlline Py client, stuck and unresponsive The final result is Phoenix startup timeout, and all three hregionservers of HBase hang up Check the Region log under HBase logs to find the error: org.apache.phoenix.coprocessor.MetaDataEndpointImpl cannot be cast to com.google.protobuf.Service |
After configuration, restart HBase (stop + start)
④ Start Phoenix
Enter the bin directory under the Phoenix installation directory and execute the following steps
# Example:/ sqlline.py hadoop001:2181
./sqlline.py <master The server IP address>:<Zookeeper port>
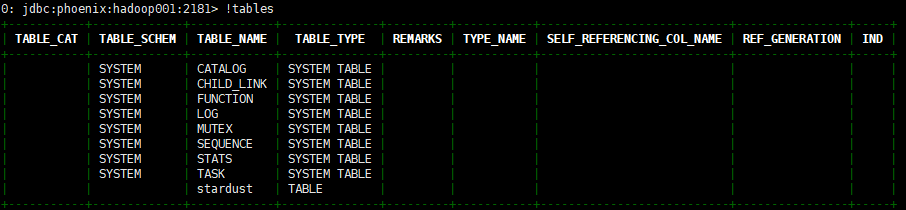
You will enter the following interface. Use it first! Table view table
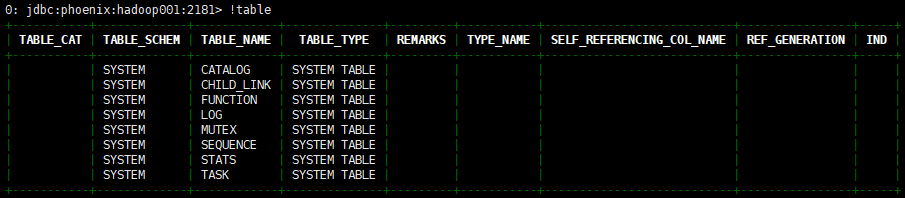
The above tables are created automatically by Phoenix. If you can see them, it means that the startup is successful
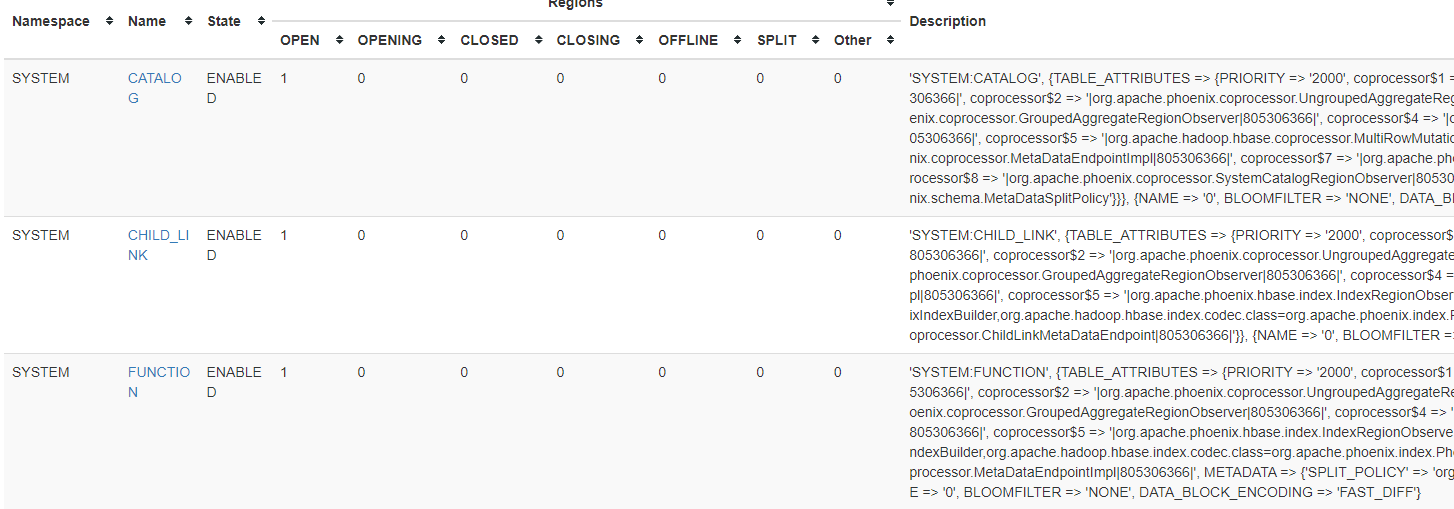
At the same time, you can also see on the Web side:
3. Phoenix command line
① Addition, deletion, modification and query of DDL table
(1) - create table
▲ note: the table in the original HBase will not be automatically mapped to Phoenix and will not be displayed in Phoenix
But in Phoenix, as like as two peas, the original table data is imported into the corresponding column in the table (the column name is exactly the same), and the original data can be seen.
One of them must be set as PRIMARY KEY, which means that the item is used as ROWKEY
And in Phoenix, all names will be automatically converted to uppercase. If you need to keep lowercase, you need to add double quotes
The syntax is as follows:
CREATE TABLE IF NOT EXISTS Table name (
	ROWKEY Name data type  PRIMARY KEY,
	Family name.Column name data type  NOT NULL,
	Family name.Column name data type,
	...
);
# The following are optional settings, which can be added directly to the back
CONPRESSION='xxx'(You can specify the data compression method, such as GZ)
SPLIT ON ('5', '10', '15') (Pre partition setting method 1, for rowkey Use direct division)
SALT_BUCKETS=10  (Pre partition setting method 2, direct setting n Each pre partition, here are 10)
Table creation example (run directly from the client command line)
CREATE TABLE IF NOT EXISTS "stardust" (
    "id"            VARCHAR PRIMARY KEY,
    "info"."name"   VARCHAR(20),
    "info"."kind"   VARCHAR(20),
    "info"."belong" VARCHAR(20),
    "info"."x"      VARCHAR(20),
    "info"."y"      VARCHAR(20),
    "info"."width"  VARCHAR(20),
    "info"."height" VARCHAR(20),
    "info"."store"  VARCHAR(255),
    "info"."modify" VARCHAR(255),
    "info"."check"  VARCHAR(255),
    "info"."clock"  VARCHAR(255)
)
CONPRESSION='GZ', SALT_BUCKETS=10;
Check the table again! Table. It is found that the creation is successful and the table name is lowercase
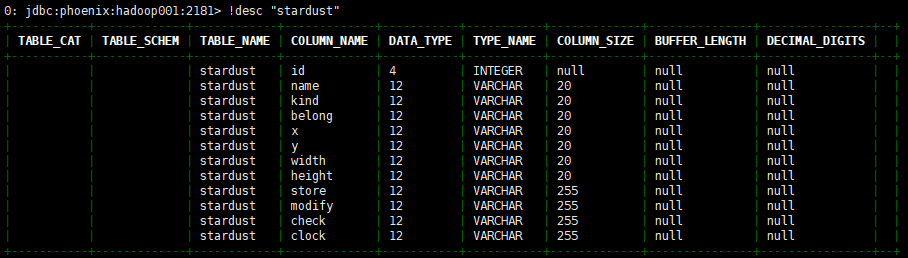
(2) - view table structure
!desc <Table name>
use! Desc "starrust" (note that double quotation marks should be added for lowercase), and the results are as follows:
(3) - delete table
drop table if exists "stardust";
② Addition, deletion, modification and query of DML table data
(1) - change table data
In HBase, put is used to add data and update data
In Phoenix, we all use upsert (insert + update)
▲ note:
If you want to assign a string, you need to use single quotation marks instead of double quotation marks. Double quotation marks are specially used for table names and field names
And every time you change the data, you must bring the primary key, otherwise you will not report an error
upsert into Table name(Row family.Listing, ...) values(value, ...)
Example: upsert into "stardust"("id", "info"."name") values('1001', 'test')
(2) - delete table data
Deleting data is the same as standard sql
delete from "stardust" where "info"."name" = 'test'
(3) - query table data
The query statement is the same as standard sql. The full table is as follows:
select * from "stardust";

+------+------+------+--------+---+---+-------+--------+-------+--------+-------+-------+
|  id  | name | kind | belong | x | y | width | height | store | modify | check | clock |
+------+------+------+--------+---+---+-------+--------+-------+--------+-------+-------+
| 1001 | test |      |        |   |   |       |        |       |        |       |       |
+------+------+------+--------+---+---+-------+--------+-------+--------+-------+-------+

But notice here that, Phoenix Inserted data
 And native HBase The corresponding relationship is different. This problem will be discussed later

stay hbase shell Data found by the client:
 \x80\x00\x03\xE9	column=info:\x00\x00\x00\x00, timestamp=2022-02-25T16:06:42.472, value=x
 \x80\x00\x03\xE9	column=info:\x80\x0B, timestamp=2022-02-25T16:06:42.472, value=test

stay Java Data found in:
info:     => x
info:� => test
# Paging query
select * from "stardust" limit <Number per page> offset <Offset>
③ Use of views
As mentioned above, the original data of HBase will not be automatically displayed in Phoenix
So how can the original data be mapped to Phoenix to participate in the operation? Here we need to use the view
(1) - create view
You can create views for tables in the original HBase or for tables in Phoenix
The requirement for creating is that the table name and column name must correspond to each other one by one. The syntax is as follows:
create view if not exists <Namespace>.<Table name> (
	ROWKEY Name data type  PRIMARY KEY,
	Family name.Column name data type  NOT NULL,
	Family name.Column name data type,
	...
);
If the name is lowercase, it also needs to be enclosed in double quotation marks
Once created successfully, you can manipulate the view using Phoenix syntax
The operation method is exactly the same as the DML above
4. Integration and use of Phoenix + springboot + mybatis
As mentioned in the previous introduction, Phoenix exists as a data source in Java, and JDBC can be used for connection and operation
Here, you can directly use SpringBoot+MyBatis for integration, which is similar to the steps of integrating MySQL, but you need to do more operations (and some pits)
① Required dependencies
The HBase and Phoenix versions used here should correspond to those on the server
| ▲ pit stepping point 1: incomplete dependence Moreover, some dependencies on maven may not be found because the Phoenix version is too new Therefore, when only Phoenix core is imported, there will be an error message that some classes do not exist, resulting in startup failure. Phoenix HBase compat needs to be added If the reader is another lower version, try importing Phoenix core only |
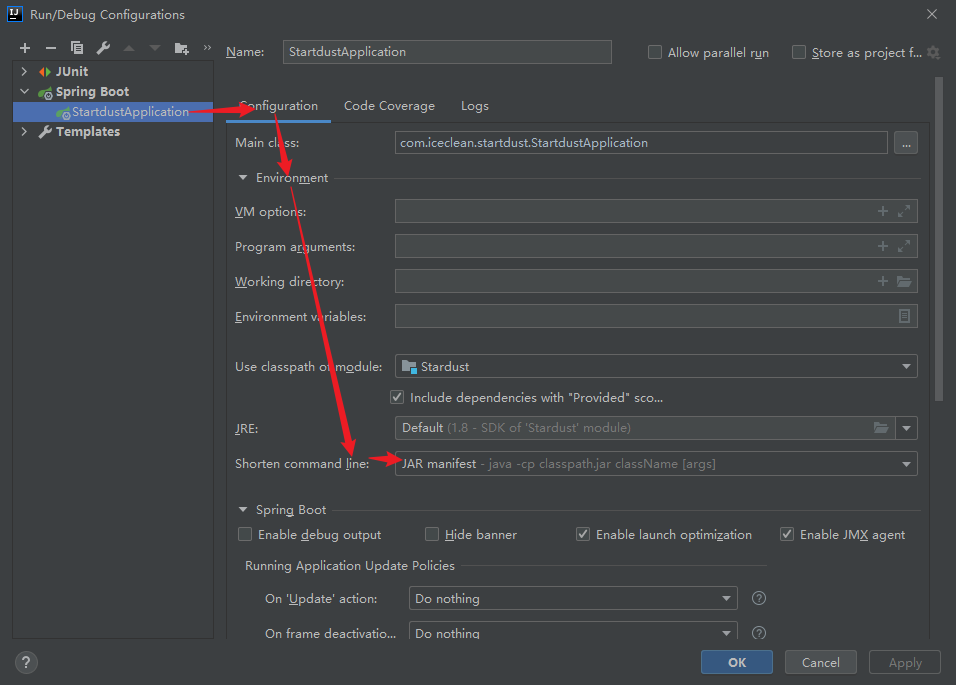
| ▲ pit stepping point 2: start failure There is another problem here (it may also be a pot with too new Phoenix version) After Phoenix dependency is introduced, Command line is too long will be prompted when starting the project, resulting in the project being unable to start At first, I thought it was a configuration error. Later, I found that it was just that the startup command was too long. It was OK to modify the configuration of IDEA Configuration location: Run → Edit Configurations → Configuration → Environment → Short command line Check the value of JAR manifest to solve this problem |
All dependencies:
<!-- HBase -->
<dependency>
    <groupId>org.apache.hbase</groupId>
    <artifactId>hbase-client</artifactId>
    <version>2.3.7</version>
    <exclusions>
        <exclusion>
            <groupId>org.slf4j</groupId>
            <artifactId>slf4j-log4j12</artifactId>
        </exclusion>
        <exclusion>
            <groupId>log4j</groupId>
            <artifactId>log4j</artifactId>
        </exclusion>
        <exclusion>
            <groupId>javax.servlet</groupId>
            <artifactId>servlet-api</artifactId>
        </exclusion>
    </exclusions>
</dependency>

<!-- phoenix -->
<dependency>
    <groupId>org.apache.phoenix</groupId>
    <artifactId>phoenix-core</artifactId>
    <version>5.1.2</version>
    <exclusions>
        <exclusion>
            <groupId>org.glassfish</groupId>
            <artifactId>javax.el</artifactId>
        </exclusion>
    </exclusions>
</dependency>

<!-- phoenix-hbase-compat -->
<dependency>
    <groupId>org.apache.phoenix</groupId>
    <artifactId>phoenix-hbase-compat-2.4.1</artifactId>
    <version>5.1.2</version>
</dependency>
② Join HBase site XML configuration
This configuration is very important. It must be available where Phoenix is used
At the beginning, I forgot the configuration, which led to inexplicable errors. Finally, when I saw the error that isNamespaceMappingEnabled was not set to true, I realized that there was a missing configuration file (in fact, this problem should also be paid attention to when the upper shell uses phoenix, that is, hbase-site.xml under the phoenix directory must be maintained)
The configuration file is named HBase site XML, placed in the resource directory of the project:
<?xml version="1.0"?>
<?xml-stylesheet type="text/xsl" href="configuration.xsl"?>
<configuration>
    <property>
        <name>hbase.regionserver.wal.codec</name>
        <value>org.apache.hadoop.hbase.regionserver.wal.IndexedWALEditCodec</value>
    </property>

    <!-- support HBase Namespace mapping -->
    <property>
        <name>phoenix.schema.isNamespaceMappingEnabled</name>
        <value>true</value>
    </property>
</configuration>
③ Integrate SpringBoot configuration
In application MyBatis and Phoenix configurations need to be added to the YML configuration file, as follows:
The url format of Phoenix is jdbc:phoenix:zookeeper. Zookeeper needs to fill in the server IP and the corresponding port number
If there are multiple zookeeper servers, you only need to write one port (the following shows the case of multiple servers)
Finally, Phoenix's username and password are blank by default and can be left blank
# Hump naming, optional
mybatis:
  configuration:
    map-underscore-to-camel-case: true

# Phoenix configuration, required
spring:
  datasource:
    driver-class-name: org.apache.phoenix.jdbc.PhoenixDriver
    url: jdbc:phoenix:hadoop001,hadoop002,hadoop003:2181
    username:
    password:
④ Simple use
After configuration, you can view Phoenix as MySQL. The operation below is the same as that of integrating MySQL
Create Mapper interface
Query and insert operations are demonstrated here. Other operations are the same as the sql operations mentioned above
It still needs to be noted that if the table name is lowercase, double quotation marks need to be added, and here itself is in double quotation marks, so escape characters need to be added
@Mapper
public interface PhoenixMapper {
    @Select("select * from \"stardust\" limit 1 offset 1")
    Phoenix getAll();

    @Insert("upsert into \"stardust\"(\"id\", \"info\".\"name\") values('1001', 'test')")
    boolean insert();
}
| ▲ special attention for inquiry When creating an entity class for Phoenix table, when multiple column families are found, the entity class field cannot be mapped with the field in the table The main reason is that I don't know how to represent the column family in the entity class. The solution is given below: When using SQL statement to query Phoenix table, if there is only one column family Then select * can query all columns with data without displaying the column family name. The following is the query result of selectAll {"name": "test", "id": "1001"} you can see that the two column values are found during insertion, but the column without insertion is not displayed However, if it is a multi column family, it will be found that only id can be queried. When we want to query, we must use the full name of the field, such as: select "info". "name", "struct". "X" from "starrust" (assuming that there is a column struct:x), the query result is as follows: {"name": "test", "x": "200px"} it can be found that the column family name is not displayed Therefore, if you want to receive as an entity class, you only need to write name and x for the attribute name, and you don't need to add the family name! Of course, if there are columns with the same name under different column families, there is no way to rename the queried columns, such as: select "info"."name" as infoName, "struct"."name" as structName from "stardust" In this way, infoName and structName can be used in the entity class to receive and pull~ |
Class creation entity:
You can see that the column family name is omitted from the entity class here, because the field name in the query result does not have a column family name, so there is no need to write the column family name here
@Data
@AllArgsConstructor
@NoArgsConstructor
@Builder
public class Phoenix {
    private String id;
    private String name;
    private String kind;
    private String belong;
    private String x;
    private String y;
    private String width;
    private String height;
    private String store;
    private String modify;
    private String check;
    private String clock;
}
Then it can be used in other places. A simple example:
@Autowired
PhoenixMapper phoenixMapper;

@GetMapping("/getAll")
public Object getAll() {
    System.out.println("Insert data:" + phoenixMapper.insert());
    return phoenixMapper.getAll();
}
5. Phoenix index
By default, Phoenix's rowkey already has an index, but you can also add indexes to other columns, that is, secondary indexes
Phoenix's secondary indexes include: global index, local index, overlay index and functional index
① Global index
- The essence of creating a global index is to create an index table in HBase, and a global index means that these tables are distributed in various regions of HBase and have no direct relationship with the location of the data
- It is suitable for businesses with more reads and less writes, because when writing, it is necessary to maintain the index table of each Region of each server, which is expensive. When reading, Phoenix can quickly query the data by selecting the required index table
- Note: if other non indexed columns are referenced in the select statement, the index will be invalidated
- Generally, the global index will be used together with the overlay index, and the columns to be queried will be put into the index to ensure the effectiveness of the index, but the writing efficiency will be affected
CREATE INDEX <Index name> ON <Table name> (Column name 1, Column name 2, Listing 3...)
② Local index
- The difference between the local index and the global index is that the local index does not create the index table, but directly creates the index in the original data table, which will make the query more efficient, because it is not necessary to continue to query the required data in other regions after finding the rowkey
- However, when creating a local index, you can no longer use the native HBase API to query the data. Because Phoenix has modified the table (called the shadow index), the original data cannot be displayed directly and can only be queried through the Phoenix API
- Of course, if the local index is deleted, the HBase API can query the original data again
- Note: when using salt_ When a bucket creates a table, the local index is invalidated
- Note: even if a non indexed field is referenced in the select statement, the index will take effect (different from the global index)
CREATE local INDEX <Index name> ON <Table name> (Column name 1, Column name 2, Listing 3...)
③ Overlay index
Overlay index is not a separate index, but refers to binding the fields to be queried to other indexes (such as global index and local index), so that when using index to query data, the required data can be queried without returning to the table
CREATE INDEX <Index name> ON <Table name> (Column name 1, Column name 2, Listing 3...) INCLUDE(Column name 4, Listing 5...)
④ Functional index
Functional index refers to the index created based on any expression. I won't say much here if I don't know much about it > ·<
CREATE INDEX <Index name> ON <Table name> (<Function name>())
6. Rear
A little thought:
In fact, before learning Phoenix, I'm looking forward to how it introduces the feature of dynamically adding columns in HBase into sql statements and how to receive dynamic columns using entity classes. At the beginning, I thought a lot. It may be that the entity class is received with something like a Map (after all, each row of data can be written as a large Map with key as String, Value as Map, column name as key, and column name and Value stored in a small Map as the Value of the large Map)
But the actual situation is that after using Phoenix, the feature of HBase dynamically adding columns is gone. Although it can still support dynamic columns, the cost is too high, which is a little disappointed (at first, a large part of the interest in HBase came from its dynamically adding columns)
Although Phoenix has many advantages in general, the official website also said a lot. But it is true that after using Phoenix, many operations become somewhat inconvenient. For example, you can't visually view the data in the table like MySQL, you can't directly modify the data in the IDEA, there may be problems in the transformation of data between HBase and Phoenix, etc. it may be that the author hasn't learned deeply enough, but it seems that it is still a chicken's rib at present
The next one is the general collection, which will re sort out the working principle and underlying architecture of HBase, and then integrate these articles according to the sequence
Deep red and green bushes, full of blue marks, that's ice clean