| preface | ❤️ The gentle sunset is always mixed with poetry and distance ❤️ |
|---|
1, PC side web page effects
(1) Element offset offset series
1.1 offset overview
Offset translates to offset. We can dynamically get the position (offset) and size of the element by using the relevant attributes of offset series.
- Obtain the position of the element distance with the positioning parent element;
- Obtain the size (width and height) of the element itself;
- Note: all returned values do not have units;
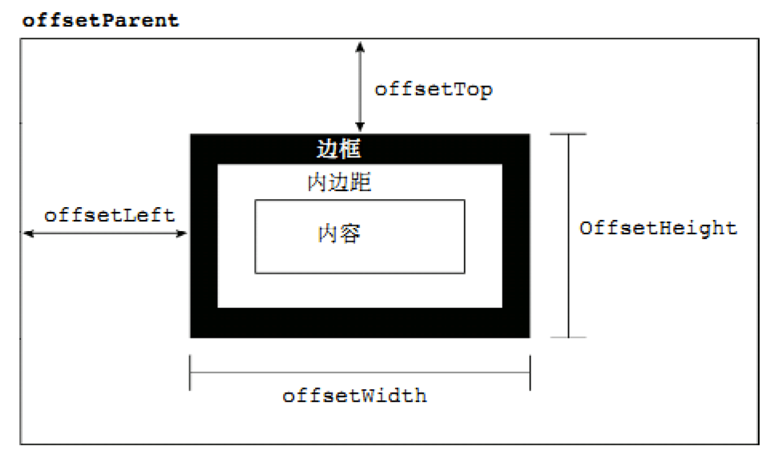
Common attributes of offset series:
| offset series properties | explain |
|---|---|
| element.offsetParent | Returns the parent element with positioning as the element. If none of the parents is positioned, the body is returned |
| element.offsetTop | Returns the offset of the element above the parent element with positioning |
| element.offsetLeft | Returns the offset of the element relative to the left border with the parent element positioned |
| element.offsetWidth | Return itself, including padding, border, width of content area, and return value without unit |
| element.offsetHeight | Return itself, including padding, border, height of content area, and return value without unit |
The complete code is demonstrated as follows:
<!DOCTYPE html>
<html lang="en">

<head>
    <meta charset="UTF-8">
    <meta name="viewport" content="width=device-width, initial-scale=1.0">
    <meta http-equiv="X-UA-Compatible" content="ie=edge">
    <title>Document</title>
    <style>
        * {
            margin: 0;
            padding: 0;
        }

        .father {
            /* position: relative; */
            width: 200px;
            height: 200px;
            background-color: pink;
            margin: 150px;
        }

        .son {
            width: 100px;
            height: 100px;
            background-color: purple;
            margin-left: 45px;
        }

        .w {
            height: 200px;
            background-color: skyblue;
            margin: 0 auto 200px;
            padding: 10px;
            border: 15px solid red;
        }
    </style>
</head>

<body>
    <div class="father">
        <div class="son"></div>
    </div>
    <div class="w"></div>
    <script>
        // offset series
        var father = document.querySelector('.father');
        var son = document.querySelector('.son');
        // 1. You can get the value without unit returned by the offset position of the element
        console.log(father.offsetTop);
        console.log(father.offsetLeft);
        // It is subject to the father with positioning. If there is no father or the father has no positioning, it is subject to the body
        console.log(son.offsetLeft);
        var w = document.querySelector('.w');
        // 2. You can get the size, width and height of the element, including padding + border + width
        console.log(w.offsetWidth);
        console.log(w.offsetHeight);
        // 3. Return the father with location, otherwise return the body
        console.log(son.offsetParent); // Return the father with location, otherwise return the body
        console.log(son.parentNode); // Returning to the father is the closest father. No matter whether the father has a position or not
    </script>
</body>

</html>
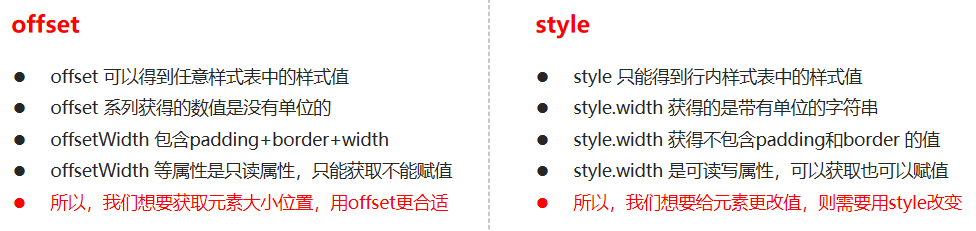
1.2 difference between offset and style
The complete code is demonstrated as follows:
<!DOCTYPE html>
<html lang="en">

<head>
    <meta charset="UTF-8">
    <meta name="viewport" content="width=device-width, initial-scale=1.0">
    <meta http-equiv="X-UA-Compatible" content="ie=edge">
    <title>Document</title>
    <style>
        .box {
            width: 200px;
            height: 200px;
            background-color: pink;
            padding: 10px;
        }
    </style>
</head>

<body>
    <div class="box" style="width: 200px;"></div>
    <script>
        // The difference between offset and style
        var box = document.querySelector('.box');
        console.log(box.offsetWidth);
        console.log(box.style.width);
        // box.offsetWidth = '300px';
        box.style.width = '300px';
    </script>
</body>

</html>
1.3 case 1: obtain the coordinates of the mouse in the box
Case study:
- We click in the box to get the distance from the mouse to the left and right of the box;
- First, get the coordinates of the mouse in the page (e.pageX, e.pageY);
- Secondly, get the distance of the box in the page (box.offsetLeft, box.offsetTop);
- Subtract the distance of the box in the page from the coordinates of the mouse from the page to obtain the coordinates of the mouse in the box;
- If you want to move the mouse once, you need to obtain the latest coordinates and use the mouse to move the event mousemove;
The complete code is demonstrated as follows:
<!DOCTYPE html>
<html lang="en">

<head>
    <meta charset="UTF-8">
    <meta name="viewport" content="width=device-width, initial-scale=1.0">
    <meta http-equiv="X-UA-Compatible" content="ie=edge">
    <title>Document</title>
    <style>
        .box {
            width: 300px;
            height: 300px;
            background-color: pink;
            margin: 200px;
        }
    </style>
</head>

<body>
    <div class="box"></div>
    <script>
        var box = document.querySelector('.box');
        box.addEventListener('mousemove', function(e) {
            var x = e.pageX - this.offsetLeft;
            var y = e.pageY - this.offsetTop;
            this.innerHTML = 'x The coordinates are' + x + ' y The coordinates are' + y;
        })
    </script>
</body>

</html>
1.4 case 2: mode box dragging
Requirement: pop up box, also known as modal box.
- Click the pop-up layer, the modal box will pop up, and the gray translucent shielding layer will be displayed;
- Click the close button to close the modal box and close the gray translucent shielding layer at the same time;
- Place the mouse on the top row of the modal box, and press and hold the mouse to drag the modal box to move in the page;
- Release the mouse to stop dragging the mode box;
Case study:
- Click the pop-up layer, and the modal box and occlusion layer will display display:block;
- Click the close button, and the modal box and occlusion layer will be hidden. display:none;
- The principle of dragging in the page: press and move the mouse, and then release the mouse;
- The trigger event is that the mouse presses mousedown, the mouse moves mousemove, and the mouse releases mouseup;
- Drag process: in the process of moving the mouse, obtain the latest values assigned to the left and top values of the modal box, so that the modal box can follow the mouse;
- The event source triggered by pressing the mouse is the top line, that is, the id is title;
- The coordinate of the mouse minus the coordinate of the mouse in the box is the real position of the modal box;
- Click the mouse, we want to get the coordinates of the mouse in the box;
- When you move the mouse, set the coordinates of the modal box to: subtract the box coordinates from the mouse coordinates. Note that the movement event is written into the press event;
- When you release the mouse, you can stop dragging, that is, you can release the mouse movement event;
The complete code is demonstrated as follows:
<!DOCTYPE html>
<html>

<head lang="en">
    <meta charset="UTF-8">
    <meta name="viewport" content="width=device-width, initial-scale=1.0">
    <meta http-equiv="X-UA-Compatible" content="ie=edge">
    <title></title>
    <style>
        .login-header {
            width: 100%;
            text-align: center;
            height: 30px;
            font-size: 24px;
            line-height: 30px;
        }

        ul,
        li,
        ol,
        dl,
        dt,
        dd,
        div,
        p,
        span,
        h1,
        h2,
        h3,
        h4,
        h5,
        h6,
        a {
            padding: 0px;
            margin: 0px;
        }

        .login {
            display: none;
            width: 512px;
            height: 280px;
            position: fixed;
            border: #ebebeb solid 1px;
            left: 50%;
            top: 50%;
            background: #ffffff;
            box-shadow: 0px 0px 20px #ddd;
            z-index: 9999;
            transform: translate(-50%, -50%);
        }

        .login-title {
            width: 100%;
            margin: 10px 0px 0px 0px;
            text-align: center;
            line-height: 40px;
            height: 40px;
            font-size: 18px;
            position: relative;
            cursor: move;
        }

        .login-input-content {
            margin-top: 20px;
        }

        .login-button {
            width: 50%;
            margin: 30px auto 0px auto;
            line-height: 40px;
            font-size: 14px;
            border: #ebebeb 1px solid;
            text-align: center;
        }

        .login-bg {
            display: none;
            width: 100%;
            height: 100%;
            position: fixed;
            top: 0px;
            left: 0px;
            background: rgba(0, 0, 0, .3);
        }

        a {
            text-decoration: none;
            color: #000000;
        }

        .login-button a {
            display: block;
        }

        .login-input input.list-input {
            float: left;
            line-height: 35px;
            height: 35px;
            width: 350px;
            border: #ebebeb 1px solid;
            text-indent: 5px;
        }

        .login-input {
            overflow: hidden;
            margin: 0px 0px 20px 0px;
        }

        .login-input label {
            float: left;
            width: 90px;
            padding-right: 10px;
            text-align: right;
            line-height: 35px;
            height: 35px;
            font-size: 14px;
        }

        .login-title span {
            position: absolute;
            font-size: 12px;
            right: -20px;
            top: -30px;
            background: #ffffff;
            border: #ebebeb solid 1px;
            width: 40px;
            height: 40px;
            border-radius: 20px;
        }
    </style>
</head>

<body>
    <div class="login-header"><a id="link" href="javascript:;">Click to pop up the login box</a></div>
    <div id="login" class="login">
        <div id="title" class="login-title">Login member
            <span><a id="closeBtn" href="javascript:void(0);" class="close-login">close</a></span>
        </div>
        <div class="login-input-content">
            <div class="login-input">
                <label>user name:</label>
                <input type="text" placeholder="enter one user name" name="info[username]" id="username" class="list-input">
            </div>
            <div class="login-input">
                <label>Login password:</label>
                <input type="password" placeholder="Please enter the login password" name="info[password]" id="password" class="list-input">
            </div>
        </div>
        <div id="loginBtn" class="login-button"><a href="javascript:void(0);" id="login-button-submit">Login member</a></div>
    </div>
    <!-- Covering layer -->
    <div id="bg" class="login-bg"></div>
    <script>
        // 1. Get element
        var login = document.querySelector('.login');
        var mask = document.querySelector('.login-bg');
        var link = document.querySelector('#link');
        var closeBtn = document.querySelector('#closeBtn');
        var title = document.querySelector('#title');
        // 2. Click the pop-up layer link to display the mask and login
        link.addEventListener('click', function () {
            mask.style.display = 'block';
            login.style.display = 'block';
        })
        // 3. Click closeBtn to hide mask and login
        closeBtn.addEventListener('click', function () {
            mask.style.display = 'none';
            login.style.display = 'none';
        })
        // 4. Start dragging
        // (1) When we press the mouse, we get the coordinates of the mouse in the box
        title.addEventListener('mousedown', function (e) {
            var x = e.pageX - login.offsetLeft;
            var y = e.pageY - login.offsetTop;
            // (2) When the mouse moves, subtract the coordinates of the mouse in the box from the coordinates of the mouse in the page to obtain the left and top values of the modal box
            document.addEventListener('mousemove', move)
            function move(e) {
                login.style.left = e.pageX - x + 'px';
                login.style.top = e.pageY - y + 'px';
            }
            // (3) When the mouse pops up, the mouse movement event is removed
            document.addEventListener('mouseup', function () {
                document.removeEventListener('mousemove', move);
            })
        })
    </script>
</body>

</html>
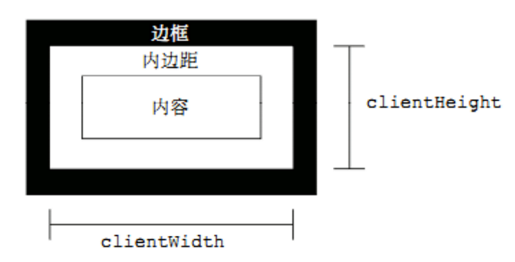
(2) Element viewable area client series
Client is translated as the client. We use the relevant attributes of the client series to obtain the relevant information of the element visual area. The border size and element size of the element can be dynamically obtained through the relevant attributes of the client series.
| client series properties | effect |
|---|---|
| element.clientTop | Returns the size of the top border of an element |
| element.clientLeft | Returns the size of the left border of an element |
| element.clientWidth | Returns the width of the content area, including padding, without borders, and returns a value without units |
| element.clientHeight | Returns the width of the content area, including padding, without borders, and returns a value without units |
2.1 case: Taobao flexible JS source code analysis
one ️⃣ Execute the function immediately (function() {}) () or (function() {} ()). Main function: create a separate scope. Avoid naming conflicts;
two ️⃣ The following three cases will refresh the page and trigger the load event.
- a hyperlink to tag
- F5 or refresh button (forced refresh)
- Forward and backward buttons
However, there is a feature in Firefox. There is a "round-trip cache". This cache not only saves page data, but also saves the state of DOM and JavaScript; In fact, the whole page is saved in memory. Therefore, the back button cannot refresh the page at this time.
three ️⃣ At this point, you can use the pageshow event to trigger. This event is triggered when the page is displayed, whether or not the page is from the cache. In the reload page, pageshow will be triggered after the load event is triggered; Judge whether it is the pageshow event triggered by the page in the cache according to the persisted in the event object. Note that this event is added to the window.
The complete code is demonstrated as follows:
(function flexible(window, document) {
    // Gets the root element of the html
    var docEl = document.documentElement
    // dpr physical pixel ratio
    var dpr = window.devicePixelRatio || 1

    // adjust body font size sets the font size of our body
    function setBodyFontSize() {
        // If there is a body element in the page, set the font size of the body
        if (document.body) {
            document.body.style.fontSize = (12 * dpr) + 'px'
        } else {
            // If there is no body element in the page, wait until the main DOM elements of our page are loaded, and then set the font size of the body
            document.addEventListener('DOMContentLoaded', setBodyFontSize)
        }
    }
    setBodyFontSize();

    // set 1rem = viewWidth / 10 set the text size of our html elements
    function setRemUnit() {
        var rem = docEl.clientWidth / 10
        docEl.style.fontSize = rem + 'px'
    }

    setRemUnit()

    // The size of the page will be reset when we reset the size of the page
    window.addEventListener('resize', setRemUnit)
    // pageshow is the event triggered when we reload the page
    window.addEventListener('pageshow', function (e) {
        // e. Persistent returns true, which means that if the page is taken from the cache, you also need to recalculate the size of rem
        if (e.persisted) {
            setRemUnit()
        }
    })

    // detect 0.5px supports some mobile browsers do not support 0.5 pixel writing
    if (dpr >= 2) {
        var fakeBody = document.createElement('body')
        var testElement = document.createElement('div')
        testElement.style.border = '.5px solid transparent'
        fakeBody.appendChild(testElement)
        docEl.appendChild(fakeBody)
        if (testElement.offsetHeight === 1) {
            docEl.classList.add('hairlines')
        }
        docEl.removeChild(fakeBody)
    }
}(window, document))
(3) Element scroll series
3.1 element scroll series attributes
Scroll translates to scrolling. We can dynamically get the size and scrolling distance of the element by using the relevant attributes of the scroll series.
| scroll series properties | effect |
|---|---|
| element.scrollTop | Returns the distance of the upper side being rolled away, and returns the value without unit |
| element.scrollLeft | Returns the distance to the left that has been rolled away, and returns the value without unit |
| element.scrollWidth | Returns the actual width of itself, without borders, and the returned value without units |
| element.scrollHeight | Returns the actual width of itself, without borders, and the returned value without units |
3.2 the header of the page being rolled away
If the height (or width) of the browser is not enough to display the whole page, the scroll bar will appear automatically. When the scroll bar scrolls down, the height of the hidden top of the page is called the head of the page. The onscroll event is triggered when the scroll bar scrolls.
3.2.1 case: imitation Taobao fixed right sidebar
requirement:
- The original sidebar was absolute positioning;
- When the page scrolls to a certain position, the sidebar changes to fixed positioning;
- If the page continues to scroll, it will be displayed at the top;
Case study:
- You need to use the page scrolling event scroll. Because it is page scrolling, the event source is document;
- Scrolling to a certain position is to judge the upper value of the page being rolled up;
- The header of the page being rolled out: you can use window Pageyoffset obtains the left window if it is rolled out pageXOffset;
- Note that the head of the element rolled away is element Scrolltop, if it is the header of the page being rolled out, it is window pageYOffset;
- In fact, this value can be obtained through the offsetTop of the box. If it is greater than or equal to this value, the box can be fixed and positioned;
The complete code is demonstrated as follows:
<!DOCTYPE html>
<html lang="en">

<head>
    <meta charset="UTF-8">
    <meta name="viewport" content="width=device-width, initial-scale=1.0">
    <meta http-equiv="X-UA-Compatible" content="ie=edge">
    <title>Document</title>
    <style>
        .slider-bar {
            position: absolute;
            left: 50%;
            top: 300px;
            margin-left: 600px;
            width: 45px;
            height: 130px;
            background-color: pink;
        }

        .w {
            width: 1200px;
            margin: 10px auto;
        }

        .header {
            height: 150px;
            background-color: purple;
        }

        .banner {
            height: 250px;
            background-color: skyblue;
        }

        .main {
            height: 1000px;
            background-color: yellowgreen;
        }

        span {
            display: none;
            position: absolute;
            bottom: 0;
        }
    </style>
</head>

<body>
    <div class="slider-bar">
        <span class="goBack">Back to top</span>
    </div>
    <div class="header w">Head area</div>
    <div class="banner w">banner region</div>
    <div class="main w">Main part</div>
    <script>
        //1. Get element
        var sliderbar = document.querySelector('.slider-bar');
        var banner = document.querySelector('.banner');
        // banner.offestTop is the size of the rolled head, which must be written outside the scroll
        var bannerTop = banner.offsetTop
        // The value that should change when we fix the positioning of the sidebar
        var sliderbarTop = sliderbar.offsetTop - bannerTop;
        // Get main body element
        var main = document.querySelector('.main');
        var goBack = document.querySelector('.goBack');
        var mainTop = main.offsetTop;
        // 2. Page scrolling event scroll
        document.addEventListener('scroll', function () {
            // window.pageYOffset the header of the page being rolled out
            // console.log(window.pageYOffset);
            // 3 . When the header of our page is greater than or equal to 172, the sidebar will be changed to fixed positioning
            if (window.pageYOffset >= bannerTop) {
                sliderbar.style.position = 'fixed';
                sliderbar.style.top = sliderbarTop + 'px';
            } else {
                sliderbar.style.position = 'absolute';
                sliderbar.style.top = '300px';
            }
            // 4. When our page scrolls to the main box, the goback module is displayed
            if (window.pageYOffset >= mainTop) {
                goBack.style.display = 'block';
            } else {
                goBack.style.display = 'none';
            }
        })
    </script>
</body>

</html>
3.3 header compatibility solution for pages being rolled up
It should be noted that there is a compatibility problem with the rolled head of the page. Therefore, the rolled head is usually written in the following ways:
- DTD is declared, using document documentElement. scrollTop;
- If DTD is not declared, use document body. scrollTop;
- New method window Pageyoffset and window Pagexoffset, supported by IE9;
The code is shown as follows:
function getScroll() {
	return {
    	left: window.pageXOffset || document.documentElement.scrollLeft || document.body.scrollLeft||0,
        top: window.pageYOffset || document.documentElement.scrollTop || document.body.scrollTop || 0
    };
}
When using  getScroll().left
3.4 summary of three series
| Size comparison of three series | effect |
|---|---|
| element.offsetWidth | Return itself, including padding, border, width of content area, and return value without unit |
| element.clientWidth | Returns the width of the content area, including padding, without borders, and returns a value without units |
| element.scrollWidth | Returns the actual width of itself, without borders, and the returned value without units |
😆 Main usage 😆:
- offset series is often used to obtain the element position offsetLeft offsetTop;
- client is often used to obtain the element size clientWidth clientHeight;
- Scroll is often used to obtain the scroll distance scrollTop scrollLeft;
- Notice how far the page scrolls through the window Get xpageoffset;
3.5 difference between mouseenter and mouseover
one ️⃣ When the mouse moves over the element, the mouseenter event will be triggered, similar to mouseover;
two ️⃣ The difference between the two is that the mouseover mouse will trigger when it passes through its own box and when it passes through a sub box. mouseenter will only be triggered through its own box;
(4) Animation function encapsulation
4.1 realization principle of animation
Core principle: continuously move the box position through the timer setInterval().
Implementation steps:
- Obtain the current position of the box;
- Add 1 movement distance to the current position of the box;
- Use the timer to repeat this operation continuously;
- Add a condition to end the timer;
- Note that this element needs to add positioning before you can use element style. left;
The complete code is demonstrated as follows:
<!DOCTYPE html>
<html lang="en">

<head>
    <meta charset="UTF-8">
    <meta name="viewport" content="width=device-width, initial-scale=1.0">
    <meta http-equiv="X-UA-Compatible" content="ie=edge">
    <title>Document</title>
    <style>
        div {
            position: absolute;
            left: 0;
            width: 100px;
            height: 100px;
            background-color: pink;
        }
    </style>
</head>

<body>
    <div></div>
    <script>
        var div = document.querySelector('div');
        var timer = setInterval(function() {
            if (div.offsetLeft >= 400) {
                // The essence of stopping animation is to stop the timer
                clearInterval(timer);
            }
            div.style.left = div.offsetLeft + 1 + 'px';
        }, 30);
    </script>
</body>

</html>
4.2 simple encapsulation of animation functions
Note that the function needs to pass two parameters, the animated object and the distance to move.
The complete code is demonstrated as follows:
<!DOCTYPE html>
<html lang="en">

<head>
    <meta charset="UTF-8">
    <meta name="viewport" content="width=device-width, initial-scale=1.0">
    <meta http-equiv="X-UA-Compatible" content="ie=edge">
    <title>Document</title>
    <style>
        div {
            position: absolute;
            left: 0;
            width: 100px;
            height: 100px;
            background-color: pink;
        }

        span {
            position: absolute;
            left: 0;
            top: 200px;
            display: block;
            width: 150px;
            height: 150px;
            background-color: purple;
        }
    </style>
</head>

<body>
    <div></div>
    <span>Welcome to my blog</span>
    <script>
        // Simple animation function encapsulates obj target object target position
        function animate(obj, target) {
            var timer = setInterval(function() {
                if (obj.offsetLeft >= target) {
                    // The essence of stopping animation is to stop the timer
                    clearInterval(timer);
                }
                obj.style.left = obj.offsetLeft + 1 + 'px';
            }, 30);
        }
        var div = document.querySelector('div');
        var span = document.querySelector('span');
        // Call function
        animate(div, 300);
        animate(span, 200);
    </script>
</body>

</html>
4.3 the animation function records different timers for different elements
one ️⃣ If multiple elements use this animation function, var should declare the timer every time. We can use different timers for different elements (we use our own timers).
two ️⃣ Core principle: JS is a dynamic language, which can easily add attributes to the current object.
The complete code is demonstrated as follows:
<!DOCTYPE html>
<html lang="en">

<head>
    <meta charset="UTF-8">
    <meta name="viewport" content="width=device-width, initial-scale=1.0">
    <meta http-equiv="X-UA-Compatible" content="ie=edge">
    <title>Document</title>
    <style>
        div {
            position: absolute;
            left: 0;
            width: 100px;
            height: 100px;
            background-color: pink;
        }

        span {
            position: absolute;
            left: 0;
            top: 200px;
            display: block;
            width: 150px;
            height: 150px;
            background-color: purple;
        }
    </style>
</head>

<body>
    <button>Click me to go</button>
    <div></div>
    <span>Welcome to my blog</span>
    <script>
        // Simple animation function encapsulates obj target object target position
        // Different timers are assigned to different elements
        function animate(obj, target) {
            // When we keep clicking on the button, the speed of this element will be faster and faster, because too many timers are turned on
            // The solution is to let our element have only one timer to execute
            // First clear the previous timer and only keep the current timer for execution
            clearInterval(obj.timer);
            obj.timer = setInterval(function() {
                if (obj.offsetLeft >= target) {
                    // The essence of stopping animation is to stop the timer
                    clearInterval(obj.timer);
                }
                obj.style.left = obj.offsetLeft + 1 + 'px';
            }, 30);
        }
        var div = document.querySelector('div');
        var span = document.querySelector('span');
        var btn = document.querySelector('button');
        // Call function
        animate(div, 300);
        btn.addEventListener('click', function() {
            animate(span, 200);
        })
    </script>
</body>

</html>
4.4 principle of retarding effect
Slow motion animation is to change the movement speed of elements. The most common is to stop the speed slowly;
😆 thinking 😆:
- Let the distance of each movement of the box slowly decrease, and the speed will slowly fall down;
- Core algorithm: (target value - current position) / 10 as the distance step of each movement;
- The stop condition is: stop the timer when the current box position is equal to the target position;
- Note that the step value needs to be rounded;
The complete code is demonstrated as follows:
<!DOCTYPE html>
<html lang="en">

<head>
    <meta charset="UTF-8">
    <meta name="viewport" content="width=device-width, initial-scale=1.0">
    <meta http-equiv="X-UA-Compatible" content="ie=edge">
    <title>Document</title>
    <style>
        span {
            position: absolute;
            left: 0;
            top: 100px;
            display: block;
            width: 150px;
            height: 150px;
            background-color: purple;
        }
    </style>
</head>

<body>
    <button>Click me to go</button>
    <span>Welcome to my blog</span>
    <script>
        // Jog animation function encapsulates obj target object target position
        // Idea:
        // 1. Let the distance of each movement of the box slowly decrease, and the speed will slowly fall down.
        // 2. Core algorithm: (target value - current position) / 10 as the distance step of each movement
        // 3. Stop condition: stop the timer when the current box position is equal to the target position
        function animate(obj, target) {
            // First clear the previous timer and only keep the current timer for execution
            clearInterval(obj.timer);
            obj.timer = setInterval(function() {
                // The step value is written into the timer
                var step = (target - obj.offsetLeft) / 10;
                if (obj.offsetLeft == target) {
                    // The essence of stopping animation is to stop the timer
                    clearInterval(obj.timer);
                }
                // Change the step value of adding 1 each time to a slowly decreasing value step formula: (target value - current position) / 10
                obj.style.left = obj.offsetLeft + step + 'px';

            }, 15);
        }
        var span = document.querySelector('span');
        var btn = document.querySelector('button');
        btn.addEventListener('click', function() {
                // Call function
                animate(span, 500);
            })
            // Uniform animation means that the box is the current position + a fixed value of 10
            // Jog animation is the current position of the box + the changed value (target value - current position) / 10)
    </script>
</body>

</html>
4.5 animation function moves between multiple target values
You can move the animation function from 800 to 500;
When we click the button, we judge whether the step size is positive or negative
- If it is a positive value, the step size is rounded to the larger one;
- If it is negative, the step size is rounded down;
The complete code is demonstrated as follows:
<!DOCTYPE html>
<html lang="en">

<head>
    <meta charset="UTF-8">
    <meta name="viewport" content="width=device-width, initial-scale=1.0">
    <meta http-equiv="X-UA-Compatible" content="ie=edge">
    <title>Document</title>
    <style>
        span {
            position: absolute;
            left: 0;
            top: 100px;
            display: block;
            width: 150px;
            height: 150px;
            background-color: purple;
        }
    </style>
</head>

<body>
    <button class="btn500">Click me to 500</button>
    <button class="btn800">Click me to 800</button>
    <span>Welcome to my blog</span>
    <script>
        // Jog animation function encapsulates obj target object target position
        // Idea:
        // 1. Let the distance of each movement of the box slowly decrease, and the speed will slowly fall down.
        // 2. Core algorithm: (target value - current position) / 10 as the distance step of each movement
        // 3. Stop condition: stop the timer when the current box position is equal to the target position
        function animate(obj, target) {
            // First clear the previous timer and only keep the current timer for execution
            clearInterval(obj.timer);
            obj.timer = setInterval(function() {
                // The step value is written into the timer
                // Let's change the step value to an integer to avoid the problem of decimals
                // var step = Math.ceil((target - obj.offsetLeft) / 10);
                var step = (target - obj.offsetLeft) / 10;
                step = step > 0 ? Math.ceil(step) : Math.floor(step);
                if (obj.offsetLeft == target) {
                    // The essence of stopping animation is to stop the timer
                    clearInterval(obj.timer);
                }
                // Change the step value of adding 1 each time to a slowly decreasing value step formula: (target value - current position) / 10
                obj.style.left = obj.offsetLeft + step + 'px';

            }, 15);
        }
        var span = document.querySelector('span');
        var btn500 = document.querySelector('.btn500');
        var btn800 = document.querySelector('.btn800');

        btn500.addEventListener('click', function() {
            // Call function
            animate(span, 500);
        })
        btn800.addEventListener('click', function() {
                // Call function
                animate(span, 800);
        })
            // Uniform animation means that the box is the current position + a fixed value of 10
            // Jog animation is the current position of the box + the changed value (target value - current position) / 10)
    </script>
</body>

</html>
4.6 adding callback function to animation function
one ️⃣ Callback function principle: function can be used as a parameter. Pass this function as a parameter to another function. When that function is executed, execute the passed function. This process is called callback.
two ️⃣ Write position of callback function: the position where the timer ends.
The complete code is demonstrated as follows:
<!DOCTYPE html>
<html lang="en">

<head>
    <meta charset="UTF-8">
    <meta name="viewport" content="width=device-width, initial-scale=1.0">
    <meta http-equiv="X-UA-Compatible" content="ie=edge">
    <title>Document</title>
    <style>
        span {
            position: absolute;
            left: 0;
            top: 100px;
            display: block;
            width: 150px;
            height: 150px;
            background-color: purple;
        }
    </style>
</head>

<body>
    <button class="btn500">Click me to 500</button>
    <button class="btn800">Click me to 800</button>
    <span>Welcome to my blog</span>
    <script>
        // Jog animation function encapsulates obj target object target position
        // Idea:
        // 1. Let the distance of each movement of the box slowly decrease, and the speed will slowly fall down.
        // 2. Core algorithm: (target value - current position) / 10 as the distance step of each movement
        // 3. Stop condition: stop the timer when the current box position is equal to the target position
        function animate(obj, target, callback) {
            // console. log(callback);   Callback = callback() when function() {} is called
            // First clear the previous timer and only keep the current timer for execution
            clearInterval(obj.timer);
            obj.timer = setInterval(function() {
                // The step value is written into the timer
                // Let's change the step value to an integer to avoid the problem of decimals
                // var step = Math.ceil((target - obj.offsetLeft) / 10);
                var step = (target - obj.offsetLeft) / 10;
                step = step > 0 ? Math.ceil(step) : Math.floor(step);
                if (obj.offsetLeft == target) {
                    // The essence of stopping animation is to stop the timer
                    clearInterval(obj.timer);
                    // The callback function is written to the end of the timer
                    if (callback) {
                        // Call function
                        callback();
                    }
                }
                // Change the step value of adding 1 each time to a slowly decreasing value step formula: (target value - current position) / 10
                obj.style.left = obj.offsetLeft + step + 'px';
            }, 15);
        }
        var span = document.querySelector('span');
        var btn500 = document.querySelector('.btn500');
        var btn800 = document.querySelector('.btn800');
        btn500.addEventListener('click', function() {
            // Call function
            animate(span, 500);
        })
        btn800.addEventListener('click', function() {
                // Call function
                animate(span, 800, function() {
                    span.style.backgroundColor = 'red';
                });
        })
            // Uniform animation means that the box is the current position + a fixed value of 10
            // Jog animation is the current position of the box + the changed value (target value - current position) / 10)
    </script>
</body>

</html>
2, Mobile web effects
(1) Touch screen events
1.1 overview of touch screen events
one ️⃣ The mobile browser has good compatibility. We don't need to consider the compatibility of previous JS. We can safely use the native JS writing effect, but the mobile terminal also has its own unique features. For example, touch (also known as touch event), Android and IOS have both.
two ️⃣ The touch object represents a touch point. The touch point may be a finger or a stylus. Touch screen events can respond to the user's finger (or stylus) operation on the screen or touchpad.
| Touch screen touch event | explain |
|---|---|
| touchstact | Triggered when a finger touches a DOM element |
| touchmove | Triggered when a finger slides over a DOM element |
| touchend | Triggered when a finger moves away from a DOM element |
The complete code is demonstrated as follows:
<!DOCTYPE html>
<html lang="en">

<head>
    <meta charset="UTF-8">
    <meta name="viewport" content="width=device-width, initial-scale=1.0">
    <meta http-equiv="X-UA-Compatible" content="ie=edge">
    <title>Document</title>
    <style>
        div {
            width: 100px;
            height: 100px;
            background-color: pink;
        }
    </style>
</head>

<body>
    <div></div>
    <script>
        // 1. Get element
        // 2. Event of finger touching DOM element
        var div = document.querySelector('div');
        div.addEventListener('touchstart', function() {
            console.log('I touched you');
        });
        // 3. Finger movement event on DOM element
        div.addEventListener('touchmove', function() {
            console.log('I keep touching');
        });
        // 4. Event of finger leaving DOM element
        div.addEventListener('touchend', function() {
            console.log('Gently I left');
        });
    </script>
</body>

</html>
1.2 TouchEvent object
one ️⃣ TouchEvent is a kind of event that describes the state change of fingers on the touch plane (touch screen, touch pad, etc.). Such events are used to describe one or more contacts, so that developers can detect the movement of contacts, the increase and decrease of contacts, etc;
two ️⃣ touchstart, touchmove and touchend all have their own event objects;
Touch the event object. Let's focus on three common object lists:
| Touch list | explain |
|---|---|
| touches | A list of all fingers that are touching the screen |
| targetTouches | A list of fingers touching the current DOM element |
| changedTouches | A list of finger states that have changed, from nothing to something, from something to nothing |
😆 Warm reminder 😆: Because we usually register touch events for elements, we should remember targetTocuhes;
1.3 drag elements at mobile end
one ️⃣ touchstart, touchmove and touchend can drag elements;
two ️⃣ However, dragging elements requires the coordinate value of the current finger. We can use pageX and pageY in targetTouches[0];
three ️⃣ Principle of moving end dragging: during finger movement, calculate the distance of finger movement. Then use the original position of the box + the distance moved by your fingers;
four ️⃣ Distance of finger movement: the position of finger sliding minus the position where the finger just starts to touch;
Drag element Trilogy:
- Touch element touchstart: obtain the initial coordinates of the finger and the original position of the box at the same time;
- Move the finger touchmove: calculate the sliding distance of the finger and move the box;
- Leave your finger touchend:;
😆 Warm reminder 😆: Finger movement will also trigger screen scrolling, so here we want to prevent the default screen scrolling e.preventDefault();
The complete code is demonstrated as follows:
<!DOCTYPE html>
<html lang="en">

<head>
    <meta charset="UTF-8">
    <meta name="viewport" content="width=device-width, initial-scale=1.0">
    <meta http-equiv="X-UA-Compatible" content="ie=edge">
    <title>Document</title>
    <style>
        div {
            position: absolute;
            left: 0;
            width: 100px;
            height: 100px;
            background-color: pink;
        }
    </style>
</head>

<body>
    <div></div>
    <script>
        // (1) Touch element touchstart: obtain the initial coordinates of the finger and the original position of the box at the same time
        // (2) Move the finger touchmove: calculate the sliding distance of the finger and move the box
        // (3) Leave finger touchend:
        var div = document.querySelector('div');
        var startX = 0; //Get the initial coordinates of the finger
        var startY = 0;
        var x = 0; //Get the original position of the box
        var y = 0;
        div.addEventListener('touchstart', function(e) {
            //  Get the initial coordinates of the finger
            startX = e.targetTouches[0].pageX;
            startY = e.targetTouches[0].pageY;
            x = this.offsetLeft;
            y = this.offsetTop;
        });

        div.addEventListener('touchmove', function(e) {
            //  Calculate the moving distance of the finger: subtract the initial coordinates of the finger from the coordinates after the finger moves
            var moveX = e.targetTouches[0].pageX - startX;
            var moveY = e.targetTouches[0].pageY - startY;
            // Move our box the original position of the box + the distance the fingers move
            this.style.left = x + moveX + 'px';
            this.style.top = y + moveY + 'px';
            e.preventDefault(); // Default behavior to prevent screen scrolling
        });
    </script>
</body>

</html>
(2) Supplementary knowledge
2.1 classList attribute
The classList attribute is a new attribute in HTML5, which returns the class name of the element. However, ie10 and above support.
This attribute is used to add, remove and switch CSS classes in the element. There are the following methods:
- Add class: element classList. Add ('class name ');
focus.classList.add('current');
- Remove class: element classList. Remove ('class name ');
focus.classList.remove('current');
- Switching class: element classList. Toggle ('class name ');
focus.classList.toggle('current');
😆 Warm reminder 😆: In the above methods, all class names do not have dots;
The complete code is demonstrated as follows:
<!DOCTYPE html>
<html lang="en">

<head>
    <meta charset="UTF-8">
    <meta name="viewport" content="width=device-width, initial-scale=1.0">
    <meta http-equiv="X-UA-Compatible" content="ie=edge">
    <title>Document</title>
    <style>
        .bg {
            background-color: black;
        }
    </style>
</head>

<body>
    <div class="one two"></div>
    <button> Switch light</button>
    <script>
        // classList returns the class name of the element
        var div = document.querySelector('div');
        // console.log(div.classList[1]);
        // 1. Adding a class name is to add a class name after it. It will not overwrite the previous class name. Note that it is not necessary to add a class name before it
        div.classList.add('three');
        // 2. Delete class name
        div.classList.remove('one');
        // 3. Switching class
        var btn = document.querySelector('button');
        btn.addEventListener('click', function() {
            document.body.classList.toggle('bg');
        })
    </script>
</body>

</html>
2.2 click delay solution
The click event on the mobile terminal will have a delay of 300ms because double tap to zoom the page will be caused by double clicking on the mobile terminal screen.
😆 Solution 😆:
- Disable scaling. The browser disables the default double-click zoom behavior and removes the 300ms click delay;
<meta name="viewport" content="user-scalable=no">
- Use the touch event to encapsulate this event to solve the 300ms delay. The principle is as follows:
one ️⃣ When we touch the screen with our fingers, record the current touch time;
two ️⃣ When our fingers leave the screen, we subtract the time of touching from the time of leaving;
three ️⃣ If the time is less than 150ms and the screen has not been slid, we define it as clicking;
//Encapsulate tap to solve click 300ms delay
function tap (obj, callback) {
	var isMove = false;
    var startTime = 0; // Record the time variable when touching
    obj.addEventListener('touchstart', function (e) {
    	startTime = Date.now(); // Record touch time
    });
    obj.addEventListener('touchmove', function (e) {
        isMove = true;  // See if there is sliding. Sliding counts as dragging, not clicking
    });
    obj.addEventListener('touchend', function (e) {
    	if (!isMove && (Date.now() - startTime) < 150) {  // If the touch and click time is less than 150ms
        	 callback && callback(); // Execute callback function
        }
        isMove = false;  //  Reverse reset
        startTime = 0;
    });
}
//call
tap(div, function(){  // Execution code});
- Use plug-ins. The fastclick plug-in solves the 300ms delay.
❗ ️ ❗ GitHub official website address: https://github.com/ftlabs/fastclick/blob/main/lib/fastclick.js
3, Local storage
(1) Local storage
With the rapid development of the Internet, web-based applications become more and more common, but also become more and more complex. In order to meet a variety of needs, a large amount of data will be stored locally. HTML5 specification puts forward relevant solutions.
Local storage characteristics:
- The data is stored in the user browser;
- It is not convenient to read, refresh or even lose data;
- Large capacity, with sessionStorage of about 5M and localStorage of about 20M;
- Only strings can be stored, and the object can be JSON Store after encoding with stringify();
(2)window.sessionStorage
- The life cycle is to close the browser window;
- Data can be shared in the same window (page);
- Store and use in the form of key value pairs;
one ️⃣ Stored data: sessionstorage setItem(key, value)
two ️⃣ Get data: sessionstorage getItem(key)
three ️⃣ Delete data: sessionstorage removeItem(key)
four ️⃣ Delete all data: sessionstorage clear()
The complete code is demonstrated as follows:
<!DOCTYPE html>
<html lang="en">

<head>
    <meta charset="UTF-8">
    <meta name="viewport" content="width=device-width, initial-scale=1.0">
    <meta http-equiv="X-UA-Compatible" content="ie=edge">
    <title>Document</title>
</head>

<body>
    <input type="text">
    <button class="set">Store data</button>
    <button class="get">get data</button>
    <button class="remove">Delete data</button>
    <button class="del">Clear all data</button>
    <script>
        console.log(localStorage.getItem('username'));

        var ipt = document.querySelector('input');
        var set = document.querySelector('.set');
        var get = document.querySelector('.get');
        var remove = document.querySelector('.remove');
        var del = document.querySelector('.del');
        set.addEventListener('click', function() {
            // When we click, we can store the values in the form
            var val = ipt.value;
            sessionStorage.setItem('uname', val);
            sessionStorage.setItem('pwd', val);
        });
        get.addEventListener('click', function() {
            // When we click, we can get the values in the form
            console.log(sessionStorage.getItem('uname'));
        });
        remove.addEventListener('click', function() {
            sessionStorage.removeItem('uname');
        });
        del.addEventListener('click', function() {
            // When we click, clear all
            sessionStorage.clear();
        });
    </script>
</body>

</html>
(3)window.localStorage
- The declaration cycle takes effect permanently. Unless it is manually deleted, the closed page will also exist;
- Multiple windows (pages) can be shared (the same browser can be shared);
- Store and use in the form of key value pairs;
one ️⃣ Storage data: localstorage setItem(key, value)
two ️⃣ Get data: localstorage getItem(key)
three ️⃣ Delete data: localstorage removeItem(key)
four ️⃣ Delete all data: localstorage clear()
The complete code is demonstrated as follows:
<!DOCTYPE html>
<html lang="en">

<head>
    <meta charset="UTF-8">
    <meta name="viewport" content="width=device-width, initial-scale=1.0">
    <meta http-equiv="X-UA-Compatible" content="ie=edge">
    <title>Document</title>
</head>

<body>
    <input type="text">
    <button class="set">Store data</button>
    <button class="get">get data</button>
    <button class="remove">Delete data</button>
    <button class="del">Clear all data</button>
    <script>
        var ipt = document.querySelector('input');
        var set = document.querySelector('.set');
        var get = document.querySelector('.get');
        var remove = document.querySelector('.remove');
        var del = document.querySelector('.del');
        set.addEventListener('click', function() {
            var val = ipt.value;
            localStorage.setItem('username', val);
        })
        get.addEventListener('click', function() {
            console.log(localStorage.getItem('username'));
        })
        remove.addEventListener('click', function() {
            localStorage.removeItem('username');
        })
        del.addEventListener('click', function() {
            localStorage.clear();
        })
    </script>
</body>

</html>
(4) Case: remember user name
Requirements: if you check remember user name, the last login user name will be automatically displayed in the text box the next time the user opens the browser;
Case study:
- Save the data and use it for local storage;
- The user name can also be displayed when the page is closed, so localStorage is used;
- Open the page and first judge whether there is this user name. If so, display the user name in the form and check the check box;
- change event when the check box changes;
- If checked, it will be stored, otherwise it will be removed;
The complete code is demonstrated as follows:
<!DOCTYPE html>
<html lang="en">

<head>
    <meta charset="UTF-8">
    <meta name="viewport" content="width=device-width, initial-scale=1.0">
    <meta http-equiv="X-UA-Compatible" content="ie=edge">
    <title>Document</title>
</head>

<body>
    <input type="text" id="username"> <input type="checkbox" name="" id="remember"> Remember user name
    <script>
        var username = document.querySelector('#username');
        var remember = document.querySelector('#remember');
        if (localStorage.getItem('username')) {
            username.value = localStorage.getItem('username');
            remember.checked = true;
        }
        remember.addEventListener('change', function() {
            if (this.checked) {
                localStorage.setItem('username', username.value)
            } else {
                localStorage.removeItem('username');
            }
        })
    </script>
</body>
4, Summary
😝 Because there are many contents, I decided to write separately. I will keep updating! Like friends, remember to praise! 😝