Introduction:
In previous chapters, we used form to submit requests. In this chapter, we will learn a new way to submit requests: Ajax. It is a new way to interact with the back end. Let's learn about it!
Ajax
1, What is Ajax
AJAX (Asynchronous Javascript And XML) is translated into Chinese as "Asynchronous Javascript And XML". That is, use Javascript language to interact asynchronously with the server, and the transmitted data is XML (of course, the transmitted data is not only XML, but now more json data is used).
Synchronous interaction: after the client sends a request, it needs to wait for the server to respond before sending the second request;
Asynchronous interaction: after the client sends a request, it can send a second request without waiting for the end of the server response.
In addition to the asynchronous features of AJAX, there is another one: local refresh of browser pages; (this feature gives users the feeling that they complete the request and response process unconsciously)
For example:

We didn't click the button to submit, because Ajax will automatically submit the data we entered to the back end for matching in the database after we click other places after we input, and then get the matching results and return to the front end.
Advantages of Ajax:
- AJAX uses Javascript technology to send asynchronous requests to the server
- AJAX does not need to refresh the entire page
2, Implementation of Ajax based on jQuery
At present, Ajax is generally not written in native JavaScript, because the compatibility of different browsers needs to be considered. We implement it here through jQuery, which is simpler and does not need to consider the compatibility problems caused by different browsers.
Process: we send an Ajax request to a URL at the front end to let the back end process the request and return the data to Ajax to receive.
First configure the route in Django
from django.contrib import admin
from django.urls import path
from app01 import views

urlpatterns = [
    path('admin/', admin.site.urls),
    path('index/', views.index),
    path('sum/', views.sums) # ajax will submit a request to this route and execute the susm view function
]
Note: it must be in settings Comment a line of Middleware in the PY configuration file
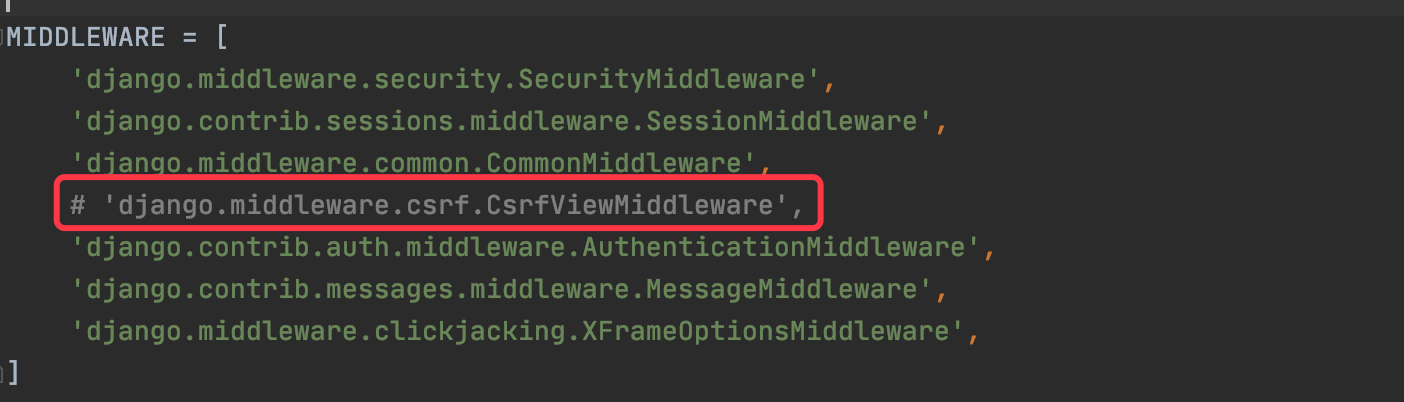
The function of this line of code will be explained later. At present, comment it out first, otherwise the request will not be submitted successfully!
views.py process request
from django.shortcuts import render,HttpResponse

# Create your views here.

def index(request): # Return to an index page
    return render(request,'index.html')

def sums(request): # Handling ajax requests
    num1 = int(request.POST.get('num1'))
    num2 = int(request.POST.get('num2')) # Get the data carried in the post request and perform type conversion

    return HttpResponse(num1+num2) # Returns the calculated value
index.html file, which defines the interaction between Ajax and the back end
<!DOCTYPE html>
<html lang="en">
<head>
    <meta charset="UTF-8">
    <title>index</title>
    <script src="https://cdn.bootcdn.net/ajax/libs/jquery/3.4.1/jquery.min.js"></script>
    <script src="https://cdn.bootcdn.net/ajax/libs/twitter-bootstrap/3.4.1/js/bootstrap.min.js"></script>
    <link href="https://cdn.bootcdn.net/ajax/libs/twitter-bootstrap/3.4.1/css/bootstrap.min.css" rel="stylesheet">
</head>
<body>
<input type="text" id="num1" placeholder="Number 1">+
<input type="text" id="num2" placeholder="Number 2">=
<input type="text" id="num3" placeholder="the sum">
<button id="btn">calculation</button>

<script>
    $('#btn').click(function() {/ / an anonymous function is triggered when a button is clicked
        var num1 = $('#num1').val() / / click the button to get the value of id attribute num1
        var num2 = $('#num2').val() / / click the button to get the value with the id attribute value of num2
        $.ajax({ // Define ajax send request
            url: '/sum/', // Address to send the request
            method: 'post', // How the request is sent
            data: {'num1': num1, 'num2': num2}, // Requested data
            success: function (data) { // Wait asynchronously. When the back-end response succeeds, it will call back to execute the anonymous function and pass the data to the data parameter
                $('#num3').val(data) / / set the data to the text box whose id attribute value is Num3
            }
        })
    })
</script>
</body>
</html>
We have written a simple small case, which sends a request to the back end through Ajax, the back end processes the data response to Ajax, and then uses the obtained data on the page, so as to achieve the effect of locally updating the page. In order to achieve this effect, the form needs to update the data globally and use reorientation.
Final effect:

3, Problems needing attention in using Ajax
1. Ajax should not be submitted at the same time as the form
-
If the button button is written in the form form or the input is of submit type, clicking it will trigger the submission of the form.
-
If clicking the button triggers both Ajax submission and form submission, two requests will be sent, resulting in the problem that the page data may be disordered or not displayed.
-
If it is inevitable to use ajax to submit the form control under the form form at the same time, please use the button type for the input button in the form. In this way, if the button is bound to the Ajax request, it will only submit the Ajax request, not the form
<!-- This type of button cannot be triggered form Submission of forms -->
<input type="button" value="Submit">

<!-- If button stay form Within, it will be triggered form Submission of forms -->
<button>Submit</button>
2. Back end response format problem
-
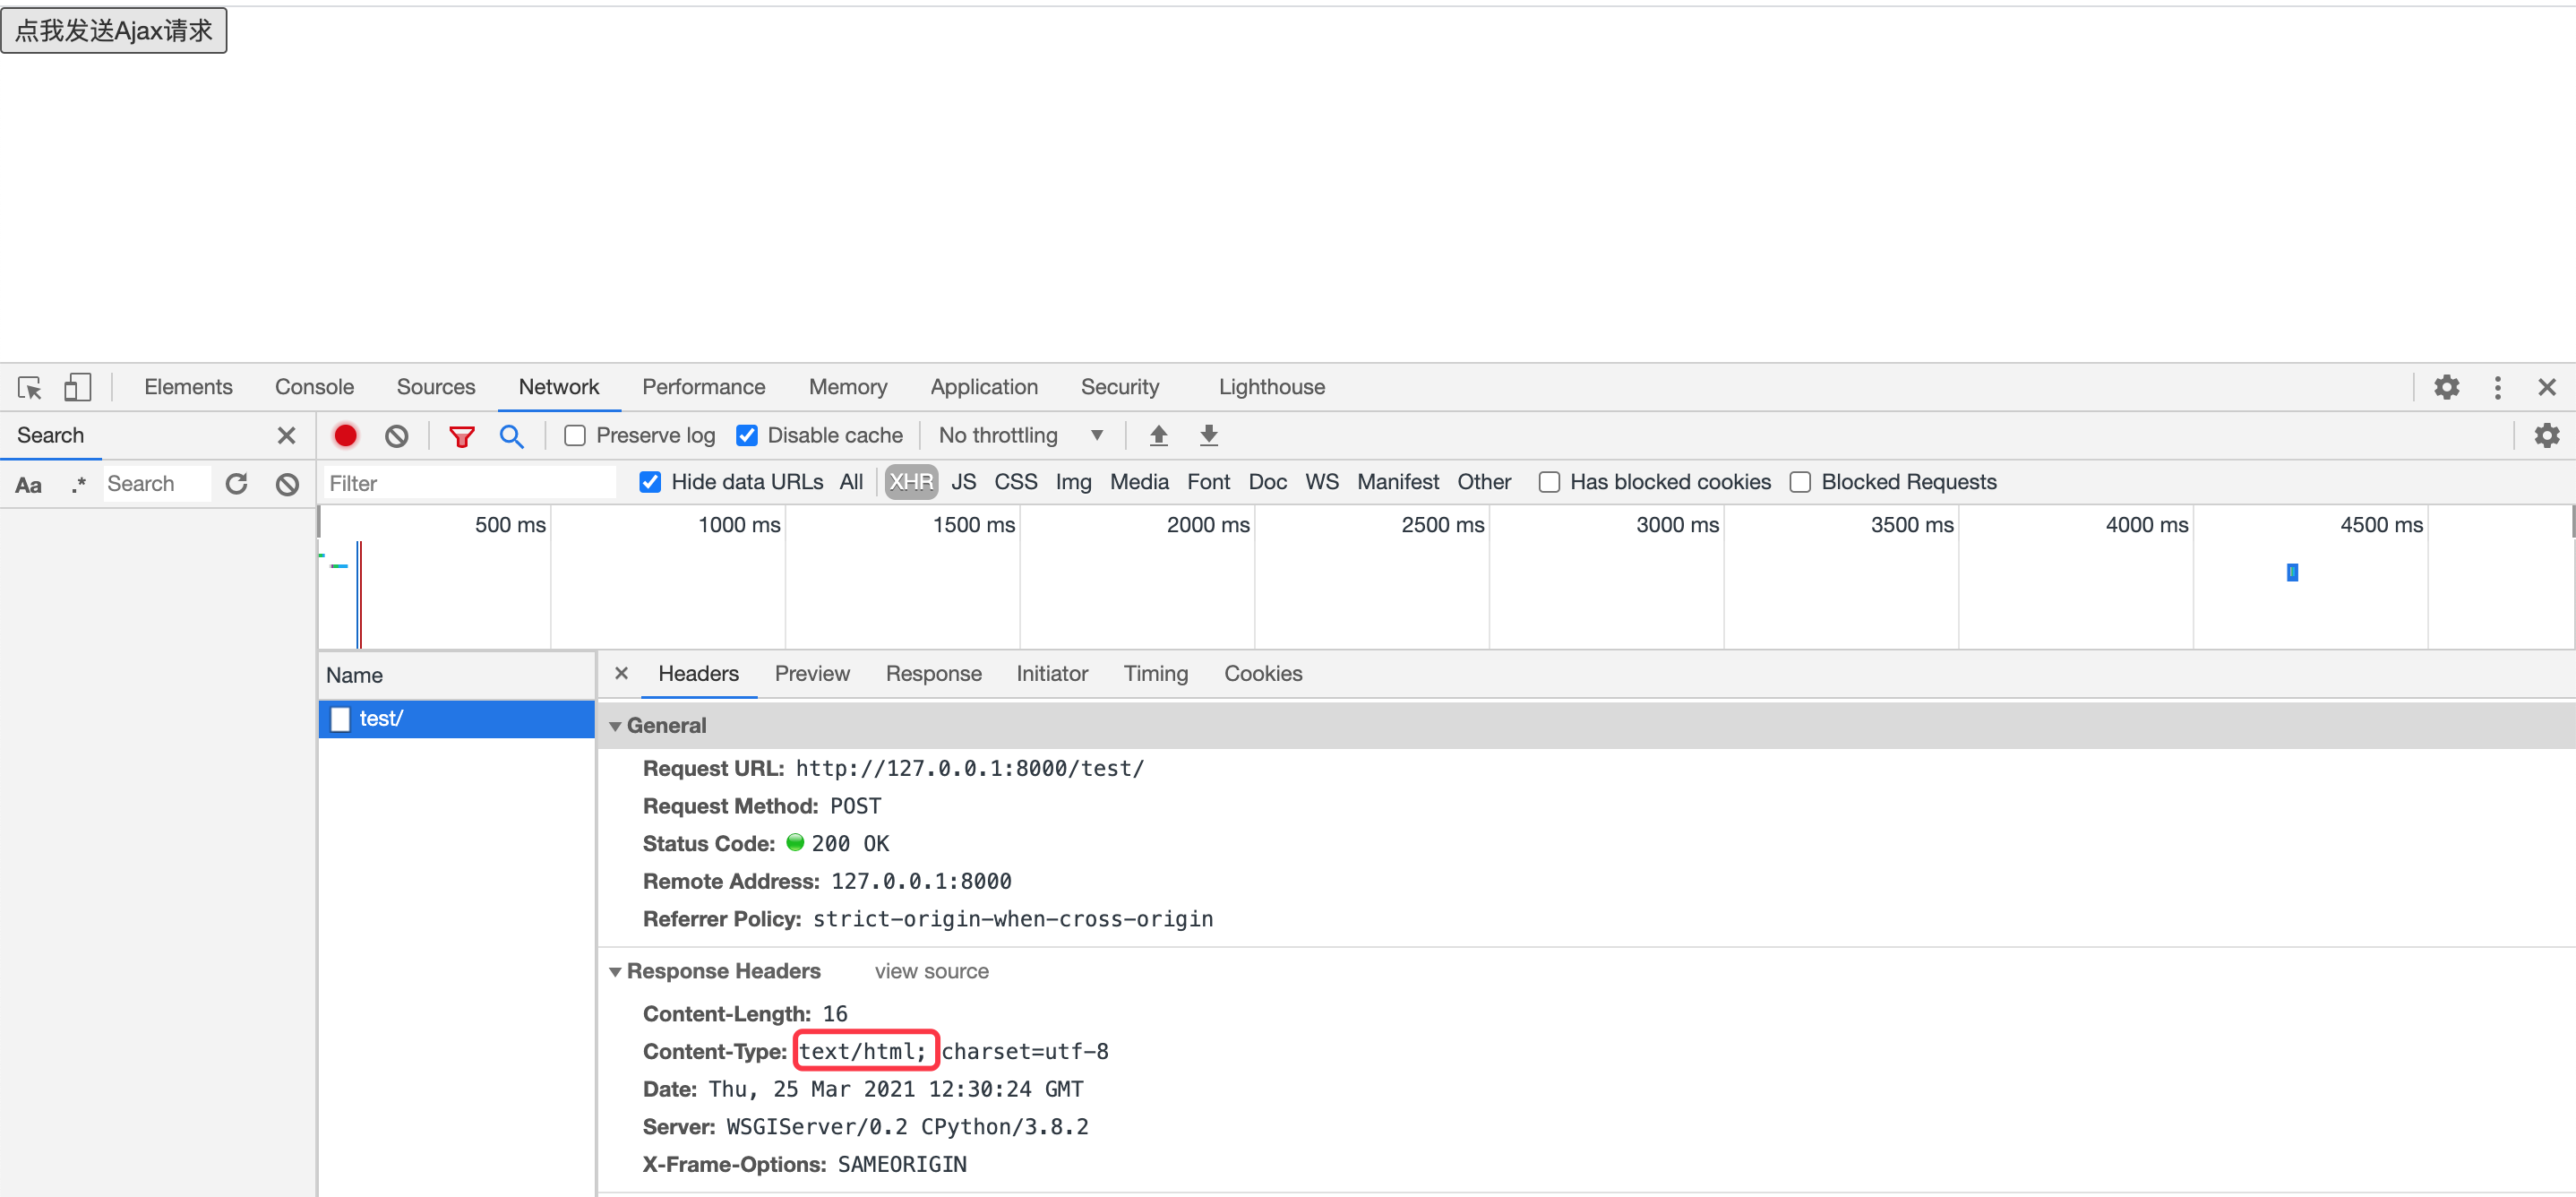
If the back-end returns a value through a non JsonResponse, the response format is text/html. After the front-end obtains the data, it needs to be manually converted into the form of an object.
    if request.is_ajax(): # Determine whether the request is Ajax
        import json
        dic = {'name':'jack'}
        dic_json = json.dumps(dic,ensure_ascii=False)
        return HttpResponse(dic_json)
Even if we have converted the dictionary into Json format on the back end, after returning through HttpResponse, it still becomes a pile of strings to the front end, and the response format is text/html.
<script>
    $('#btn').click(function () {
        $.ajax({
            url: '/test/',
            method: 'post',
            data: {'name': 'tom'},
            success: function (data) {
                console.log(data)
                console.log(data.name) // If Jason is returned, it can be printed
            }
        })
    })
</script>
To view the data format of the back-end response:
Console effect: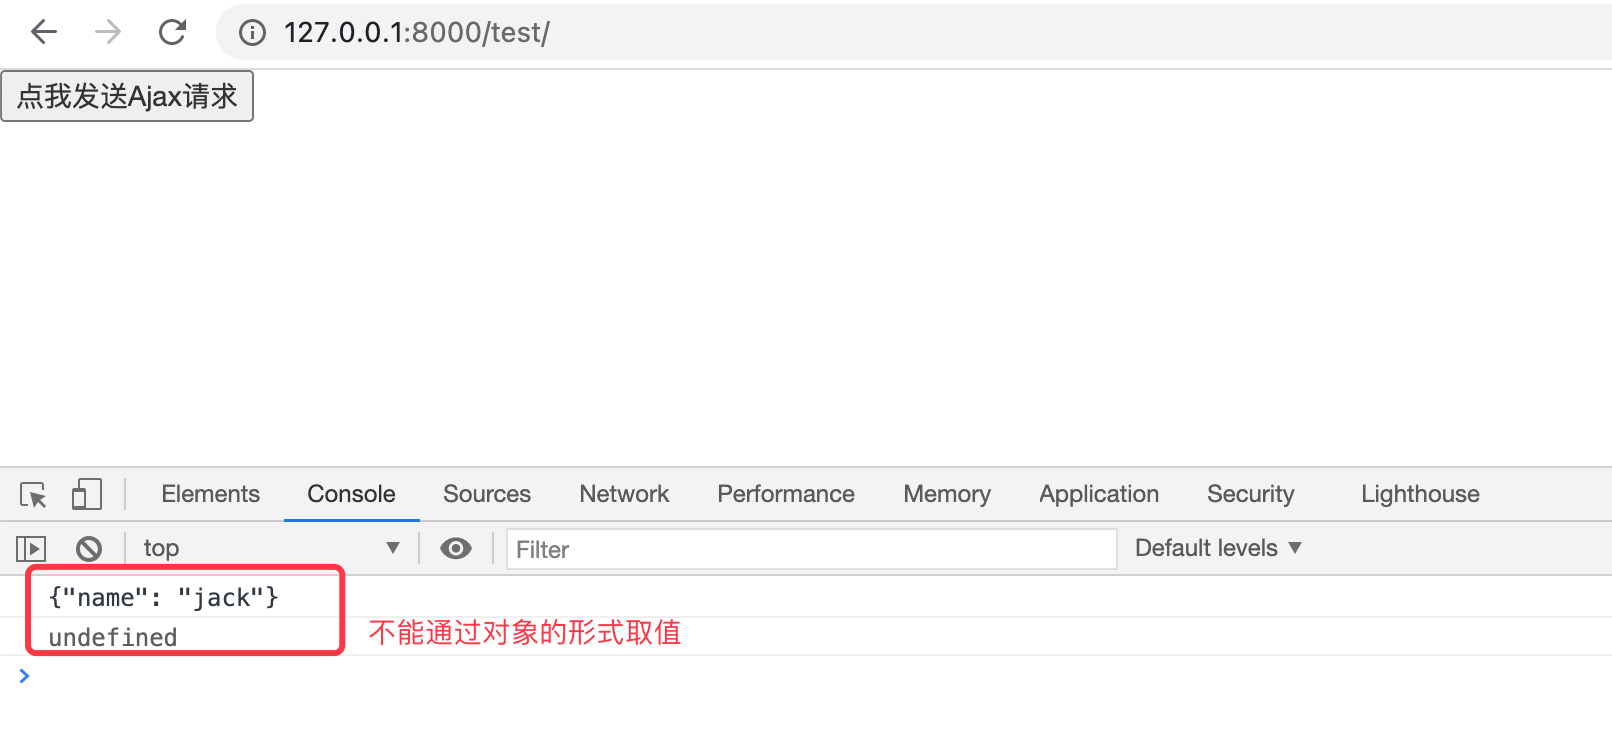
If you need to manually convert the data to JSON format at the front end, you will first convert the data to JSON and then print it next timesuccess: function (data) { data = JSON.parse(data) console.log(data) console.log(data.name) } -
If we return through JsonResponse, the response status code will be application/json, and the data received in Ajax will also be in JSON format
from django.http import JsonResponse

def test(request):
    if request.is_ajax():
        dic = {'name':'jack'}
        return JsonResponse(dic)
    return render(request,'test.html')
There is no need to manually convert it to JSON format after it is received in AJax
success: function (data) {
    console.log(data)
    console.log(data.name)
}
View response header encoding format

Console printing effect:
3. Ajax is used as a post request note
-
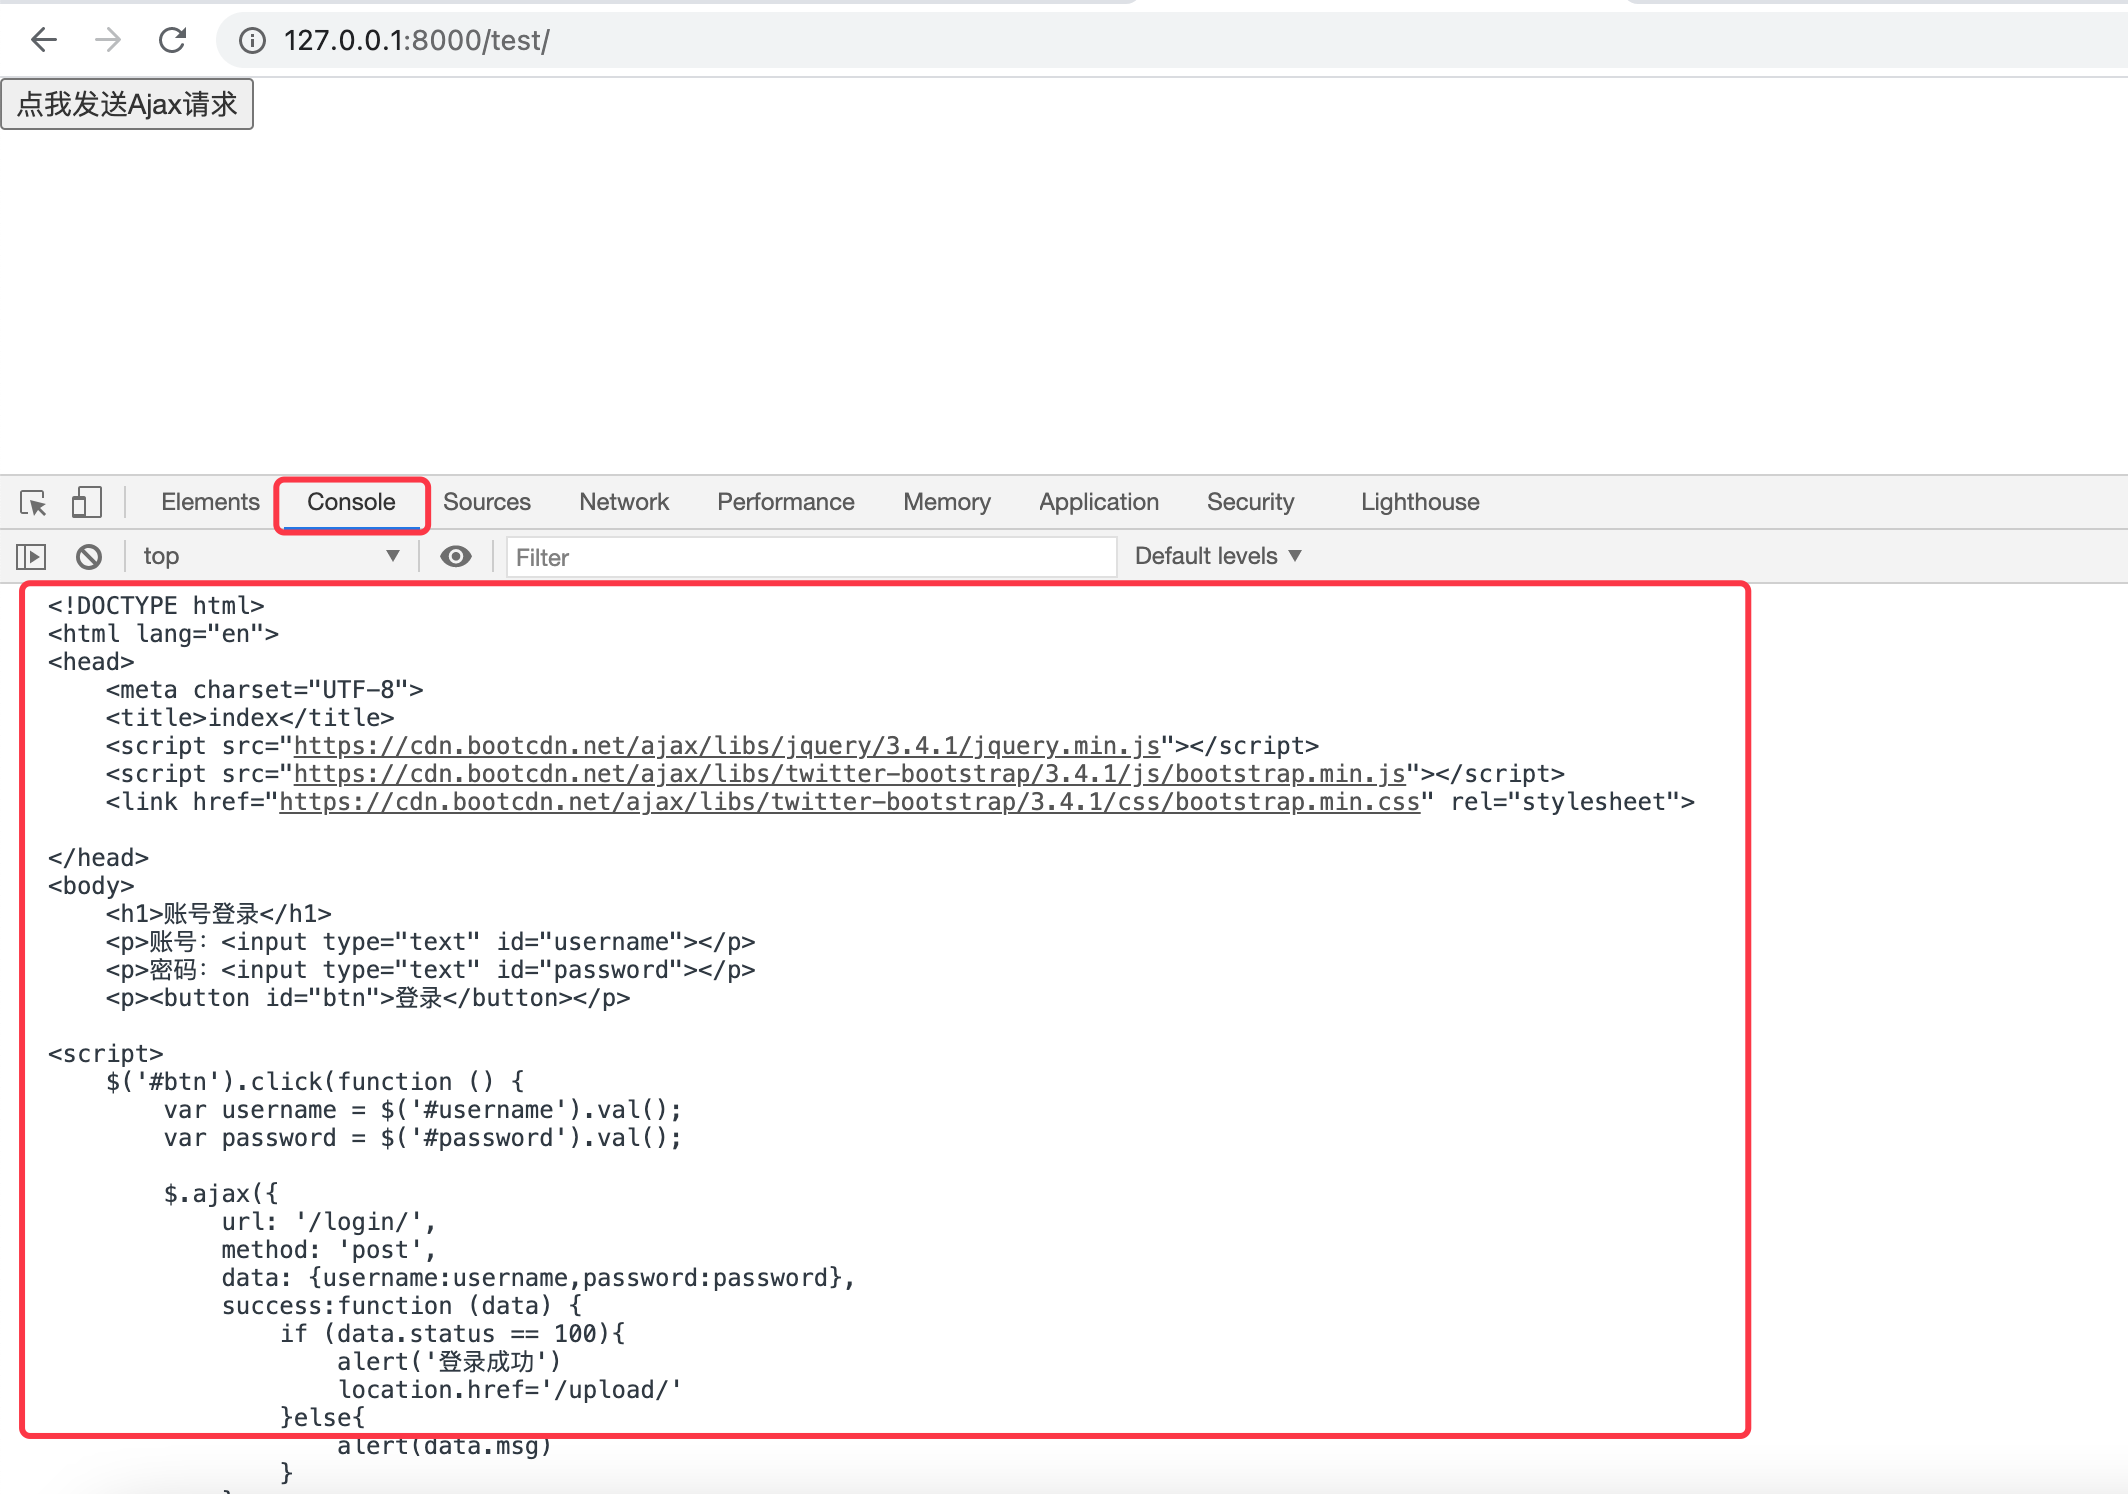
The backend should not return render, redirect or HttpResponse. Because these contents will be returned to Ajax as a string
def test(request):
    if request.is_ajax():
        return render(request,'login.html')

    return render(request,'test.html')
Console printing effect:
Summary: after AJax is used as the request, it is recommended to use JsonResponse to return data. Although it is finally returned to the web through HttpResponse, the response format is converted inside JsonResponse

This is different from returning JSON format data directly through HttpResponse. AJax will only process according to the response code
4, Ajax upload file
In the form form, we can upload the file to the back end only by specifying the encoding format. Through Ajax, we will no longer use the form form to achieve this effect
file_upload.html
<!DOCTYPE html>
<html lang="en">
<head>
    <meta charset="UTF-8">
    <title>file_upload</title>
    <script src="https://cdn.bootcdn.net/ajax/libs/jquery/3.4.1/jquery.min.js"></script>
    <script src="https://cdn.bootcdn.net/ajax/libs/twitter-bootstrap/3.4.1/js/bootstrap.min.js"></script>
    <link href="https://cdn.bootcdn.net/ajax/libs/twitter-bootstrap/3.4.1/css/bootstrap.min.css" rel="stylesheet">
</head>
<body>

<h2>be based on Ajax Upload file</h2>

<p>
    <input type="file" id="myfils">

</p>

<p>
    <button id="btn">File upload</button>

</p>

<script>
    $("#btn").click(function () {

        var form_data = new FormData() // Instantiate an object. The FormData object is used to save the data of the key/value structure. It is usually used to transfer data from the form

        var file = $('#myfils')[0].files[0] // $('#myfils')[0] get native JS, $(' #myfils')[0] Files get all files uploaded by the user, $('#myfils')[0] Files [0] get the first file uploaded by the user
        form_data.append('myfile',file) // Define a value name for the file. The first parameter is user defined, and the second parameter is value
        $.ajax({
            url: '/upload/',
            method:'post',
            processData: false, // Do not preprocess data
            contentType: false, //No encoding format is specified. The default encoding of the formdata object is formdata format, which supports file transfer
            data: form_data,
            success:function (data) {
                console.log(data.msg)
            }
        })
    })
</script>
</body>
</html>
Back end views Py, it is recommended to create a media folder under the app to store the files uploaded by users
def upload_file(request):
    if request.is_ajax():
        file = request.FILES.get('myfile')

        import os
        DIR_PATH = os.path.dirname(__file__)

        with open(DIR_PATH + '/media/' + file.name, 'wb') as f:
            for i in file:
                f.write(i)

        return JsonResponse({'status':100,'msg':'Upload successful'})

    return render(request, 'file_upload.html')
Final effect:

If we want to upload multiple files, we can make some changes:
file_upload.html
<!DOCTYPE html>
<html lang="en">
<head>
    <meta charset="UTF-8">
    <title>file_upload</title>
    <script src="https://cdn.bootcdn.net/ajax/libs/jquery/3.4.1/jquery.min.js"></script>
    <script src="https://cdn.bootcdn.net/ajax/libs/twitter-bootstrap/3.4.1/js/bootstrap.min.js"></script>
    <link href="https://cdn.bootcdn.net/ajax/libs/twitter-bootstrap/3.4.1/css/bootstrap.min.css" rel="stylesheet">
</head>
<body>
<h2>be based on Ajax Upload file</h2>

<p>
    <input type="file" id="myfils" multiple> <!-- Allow uploading multiple files  -->
</p>

<p>
    <button id="btn">File upload</button>
</p>

<script>
    $("#btn").click(function () {

        var form_data = new FormData() // Instantiate an object. The FormData object is used to save the data of the key/value structure. It is usually used to transfer data from the form

        var file = $('#myfils')[0].files / / get all the files that need to be uploaded and get them in the form of a list

        for(var i = 0;i < file.length;i++) { // Traverse according to the number of uploaded files
            form_data.append(file[i].name, file[i]) // Append the name of each file as a key and the file as a value to the FormData object
        }

        $.ajax({
            url: '/upload/',
            method:'post',
            processData: false, // Do not preprocess data
            contentType: false, //No encoding format is specified. The default encoding of the formdata object is formdata format, which supports file transfer
            data: form_data,
            success:function (data) {
                console.log(data)
            }
        })
    })
</script>
</body>
</html>
Python backend views py
def upload_file(request):
    if request.is_ajax():
        import os
        DIR_PATH = os.path.dirname(__file__)
        file = request.FILES

        for k in file:
            fl = file.get(k)
            with open(DIR_PATH + '/media/' + fl.name, 'wb') as f:
                for i in fl:
                    f.write(i)

        return JsonResponse({'status':100,'msg':'Upload successful'})

    return render(request, 'file_upload.html')
Execution result:

5, Ajax upload JSON format
By specifying the encoding format in Ajax, and then converting the data type of JS into JSON format, the data is uploaded to the back end
test.html
<!DOCTYPE html>
<html lang="en">
<head>
    <meta charset="UTF-8">
    <title>Title</title>
    <script src="https://cdn.bootcdn.net/ajax/libs/jquery/3.4.1/jquery.min.js"></script>
</head>
<body>

<h1>ajax Submit json format</h1>


<p>user name: <input type="text" id="id_name"></p>
<p>password: <input type="password" id="id_password"></p>
<button id="id_button">Submit</button>
</body>

<script>
    $('#id_button').click(function () {
        var username = $('#id_name').val()
        var password = $('#id_password').val()
        $.ajax({
            url: '/ajax_json/',
            method: 'post',
            contentType: 'application/json',  // Specifies the encoding format of the upload
            data: JSON.stringify({name: username, password: password}), // Pass the object through JSON Convert stringify to JSON format
            success: function (data) {
                console.log(data)
            }
        })
    })
</script>
</html>
Back end views Py: the data in the request cannot be processed with each other
def ajax_json(request):
if request.is_ajax():
# json format, which cannot be retrieved from POST
name = request.POST.get('name')
print(type(request.POST)) # Print < class' Django http. request. QueryDict'>
print(name) # Print: None
# The JSON format data uploaded by Ajax is in request Body, and it is of type bytes
print(request.body) # b'{"name":"123","password":"123"}'
request.data = json.loads(request.body) # In Python 3 After 6, loads can convert the data in bytes into JSON format if any
name = request.data.get('name')
password = request.data.get('password')
print(name) # 123
print(password) # 123
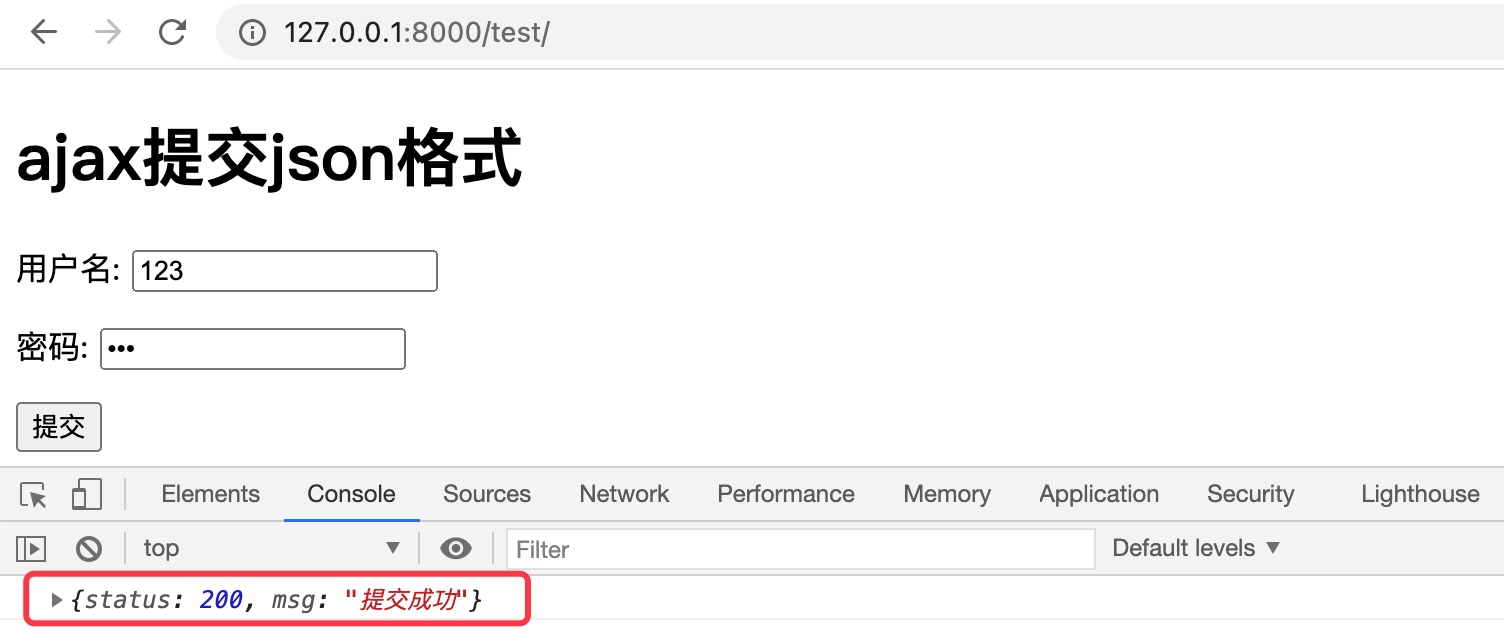
return JsonResponse({'status':200,'msg':'Submitted successfully'})
return render(request, 'test.html')
Final effect:
Pager
Here we will use a paging module provided by Django to help our page achieve a paging effect
1. Construction of experimental environment
We first establish a model class to store data, because a certain amount of data is required to realize paging.
models.py; It is recommended to connect to MySQL database for experiment
class UserInfo(models.Model):
    name = models.CharField(max_length=10)
    age = models.CharField(max_length=10)
    address = models.CharField(max_length=30)
Remember to execute the database migration commands first: make migrations and migrate
urls.py
from django.contrib import admin
from django.urls import path
from app01 import views

urlpatterns = [
    path('admin/', admin.site.urls),
    path('info/',views.info)
]
tests.py creates the data that we will page later and writes it into the database
import os

if __name__ == '__main__':
    os.environ.setdefault("DJANGO_SETTINGS_MODULE", "Day06.settings")
    import django

    django.setup()

    from app01 import models
    from faker import Faker  # Generate added data
    import random  # Used to create random ages

    obj_lis = []

    for i in range(100): # Create 100 pieces of virtual data
        fake = Faker(locale='zh-CN') # Select region

        name = fake.name()  # Generate random name
        age = random.randint(15, 45)  # Generate random age
        address = fake.address()  # Generate random address

        obj = models.UserInfo(name=name,age=age,address=address,birthday=birthday) # Generate user objects one by one

        obj_lis.append(obj)

    models.UserInfo.objects.bulk_create(obj_lis) # Write one object into the database and save it. One object corresponds to one record
views.py: first, build a simple model to see the data effect on the web
def info(request):

    data = models.UserInfo.objects.all()

    return render(request,'info.html',locals())
info.html
<!DOCTYPE html>
<html lang="en">
<head>
    <meta charset="UTF-8">
    <title>info</title>
    <script src="https://cdn.bootcdn.net/ajax/libs/jquery/3.4.1/jquery.min.js"></script>
    <script src="https://cdn.bootcdn.net/ajax/libs/twitter-bootstrap/3.4.1/js/bootstrap.min.js"></script>
    <link href="https://cdn.bootcdn.net/ajax/libs/twitter-bootstrap/3.4.1/css/bootstrap.min.css" rel="stylesheet">
</head>
<body>
<div class="container">
    <div class="row">
        <div class="col-md-2"></div>
        <div class="col-md-8">
            <table class="table table-striped">
                <thead>
                <tr>
                    <th class="text-center">ID</th>
                    <th class="text-center">full name</th>
                    <th class="text-center">Age</th>
                    <th class="text-center">address</th>
                </tr>
                </thead>

                <tbody>
                {% for obj in data %}
                    <tr class="text-center">
                        <td>{{ obj.id }}</td>
                        <td>{{ obj.name }}</td>
                        <td>{{ obj.age }}</td>
                        <td>{{ obj.address }}</td>
                    </tr>
                {% endfor %}

                </tbody>

            </table>
        </div>
    </div>
</div>
</body>
</html>
Overall effect of final page:
2. Paging implementation
2.1 introduction to pager
We need to page the data first, and then we will return the corresponding page according to which page of data the user needs.
There is a module in Django that can help us realize paging. Let's learn how to use it:
from django.core.paginator import Paginator # Module for paging

def info(request):
    user_list = models.Books.objects.all() # Get all data objects
    paginator = Paginator(user_list,10) # Split data into 10 items per page

    # Properties of Paginator object
    print(paginator.count) # Total number of data
    print(paginator.num_pages) # PageCount
    print(paginator.per_page) # Number of items displayed per page
    print(paginator.page_range) # Display the current number of pages in the form of iteration: range(1, 101)

    # Properties and methods of Page object
    page = paginator.page(2) # Get all the data of the second page
    print(page.has_next())
    print(page.next_page_number())
    print(page.has_previous())
    print(page.previous_page_number())
    print(page.object_list)
    print(page.number)

	# has_ Does next have a next page
    # next_page_number next page
    # has_previous whether there is a previous page
    # previous_page_number previous page
    # object_list the data list of the current page
    # Number current page number
2.2 paging effect
According to the usage of the upper order pager, we can edit the view function
from django.core.paginator import Paginator

def info(request):

    data_list = models.UserInfo.objects.all()

    paginator = Paginator(data_list,10) # Display 10 pieces of data per page

    nums = paginator.num_pages # Get total pages

    page = request.GET.get('page',1) # Get the page number entered on the page. If the user does not enter it, the number 1 is obtained by default

    try:
        data = paginator.page(page) # Get the data of the specified page according to the page number
    except: # Avoid the browser entering the wrong URL and missing the page

        page = 1
        data = paginator.page(page) # Get the data of the first page


    return render(request,'info.html',locals())
info.html; Follow the page prompts to understand the meaning of the code
<!DOCTYPE html>
<html lang="en">
<head>
<meta charset="UTF-8">
<title>info</title>
<script src="https://cdn.bootcdn.net/ajax/libs/jquery/3.4.1/jquery.min.js"></script>
<script src="https://cdn.bootcdn.net/ajax/libs/twitter-bootstrap/3.4.1/js/bootstrap.min.js"></script>
<link href="https://cdn.bootcdn.net/ajax/libs/twitter-bootstrap/3.4.1/css/bootstrap.min.css" rel="stylesheet">
</head>
<body>
<div class="container">
<div class="row">
<div class="col-md-2"></div>
<div class="col-md-8">
<table class="table table-striped">
<thead>
<tr>
<th class="text-center">ID</th>
<th class="text-center">full name</th>
<th class="text-center">Age</th>
<th class="text-center">address</th>
</tr>
</thead>
<tbody>
{% for obj in data %} <!-- Get the data of the current page -->
<tr class="text-center">
<td>{{ obj.id }}</td>
<td>{{ obj.name }}</td>
<td>{{ obj.age }}</td>
<td>{{ obj.address }}</td>
</tr>
{% endfor %}
</tbody>
</table>
</div>
</div>
</div>
<nav aria-label="Page navigation" class="text-center">
<ul class="pagination">
{% if data.has_previous %} <!-- Determine whether there is a previous page -->
<li>
<a href="?page={{ data.previous_page_number }}" aria-label="Previous"> <!-- Get previous page number -->
<span aria-hidden="true">«</span>
</a>
</li>
{% endif %}
<li class="active"><a href="#"> {{data. Number}} < / a > < / Li > <! -- current page -- >
{% if data.has_next %} <!-- Determine whether there is a next page -->
<li>
<a href="?page={{ data.next_page_number }}" aria-label="Next">
<span aria-hidden="true">»</span>
</a>
</li>
{% endif %}
</ul>
</nav>
</body>
</html>
Then the page achieves the following effect:

When we click the next page, we will first obtain the page number of the next page, and then send it to the back end. The back end will take out the following number according to the page keyword and get the data of the corresponding page.
But at this time, we can click only three buttons. If we want to click to n pages, we need to make a jump to the number of buttons displayed, but it must be done by the back end.
views.py
def info(request):

    data_list = models.UserInfo.objects.all()

    paginator = Paginator(data_list,10) # Display 10 pieces of data per page

    nums = paginator.num_pages # Get total pages

    page = request.GET.get('page',1) # Get the page number entered by the user, if there is no number 1, get the default page number

    try:
        data = paginator.page(page) # Get the data of the specified page according to the page number
    except: # Avoid the browser entering the wrong URL and missing the page
        page = 1
        data = paginator.page(page) # Get the data of the first page

    page = int(page) # Convert the data type


    if paginator.num_pages > 7: # Judge whether the total number of pages is greater than the specified number
        if page - 5 < 1:
            page_range = range(1, 7) # Return to the front end to print the number of paging buttons (according to different judgment, the number of paging buttons will also be different)
        elif page + 5 > paginator.num_pages:
            page_range = range(paginator.num_pages - 6, paginator.num_pages + 1)
        else:
            page_range = range(page - 3, page + 5)
    else:
        page_range = paginator.page_range

    return render(request,'info.html',locals())
info.html
<!DOCTYPE html>
<html lang="en">
<head>
<meta charset="UTF-8">
<title>info</title>
<script src="https://cdn.bootcdn.net/ajax/libs/jquery/3.4.1/jquery.min.js"></script>
<script src="https://cdn.bootcdn.net/ajax/libs/twitter-bootstrap/3.4.1/js/bootstrap.min.js"></script>
<link href="https://cdn.bootcdn.net/ajax/libs/twitter-bootstrap/3.4.1/css/bootstrap.min.css" rel="stylesheet">
</head>
<body>
<div class="container">
<div class="row">
<div class="col-md-2"></div>
<div class="col-md-8">
<table class="table table-striped">
<thead>
<tr>
<th class="text-center">ID</th>
<th class="text-center">full name</th>
<th class="text-center">Age</th>
<th class="text-center">address</th>
</tr>
</thead>
<tbody>
{% for obj in data %}
<tr class="text-center">
<td>{{ obj.id }}</td>
<td>{{ obj.name }}</td>
<td>{{ obj.age }}</td>
<td>{{ obj.address }}</td>
</tr>
{% endfor %}
</tbody>
</table>
</div>
</div>
</div>
<nav aria-label="Page navigation" class="text-center">
<ul class="pagination">
{% if data.has_previous %} <!-- Determine whether there is a previous page -->
<li>
<a href="?page={{ data.previous_page_number }}" aria-label="Previous"> <!-- Get previous page number -->
<span aria-hidden="true">«</span>
</a>
</li>
{% endif %}
{% for foo in page_range %} <!-- The number of buttons that can be displayed on the current page, in the form of numbers -->
{% if foo == data.number %} <!-- If you match the same number as the current page number while traversing the Create button, it is the current page and change its color -->
<li class="active"><a href="#"> {{foo} < / a > < / Li > <! -- current page -- >
{% else %}
<li><a href="?page={{ foo }}">{{ foo }}</a></li> <!-- Buttons to other pages -->
{% endif %}
{% endfor %}
{% if data.has_next %} <!-- Determine whether there is a next page -->
<li>
<a href="?page={{ data.next_page_number }}" aria-label="Next">
<span aria-hidden="true">»</span>
</a>
</li>
{% endif %}
</ul>
</nav>
</body>
</html>
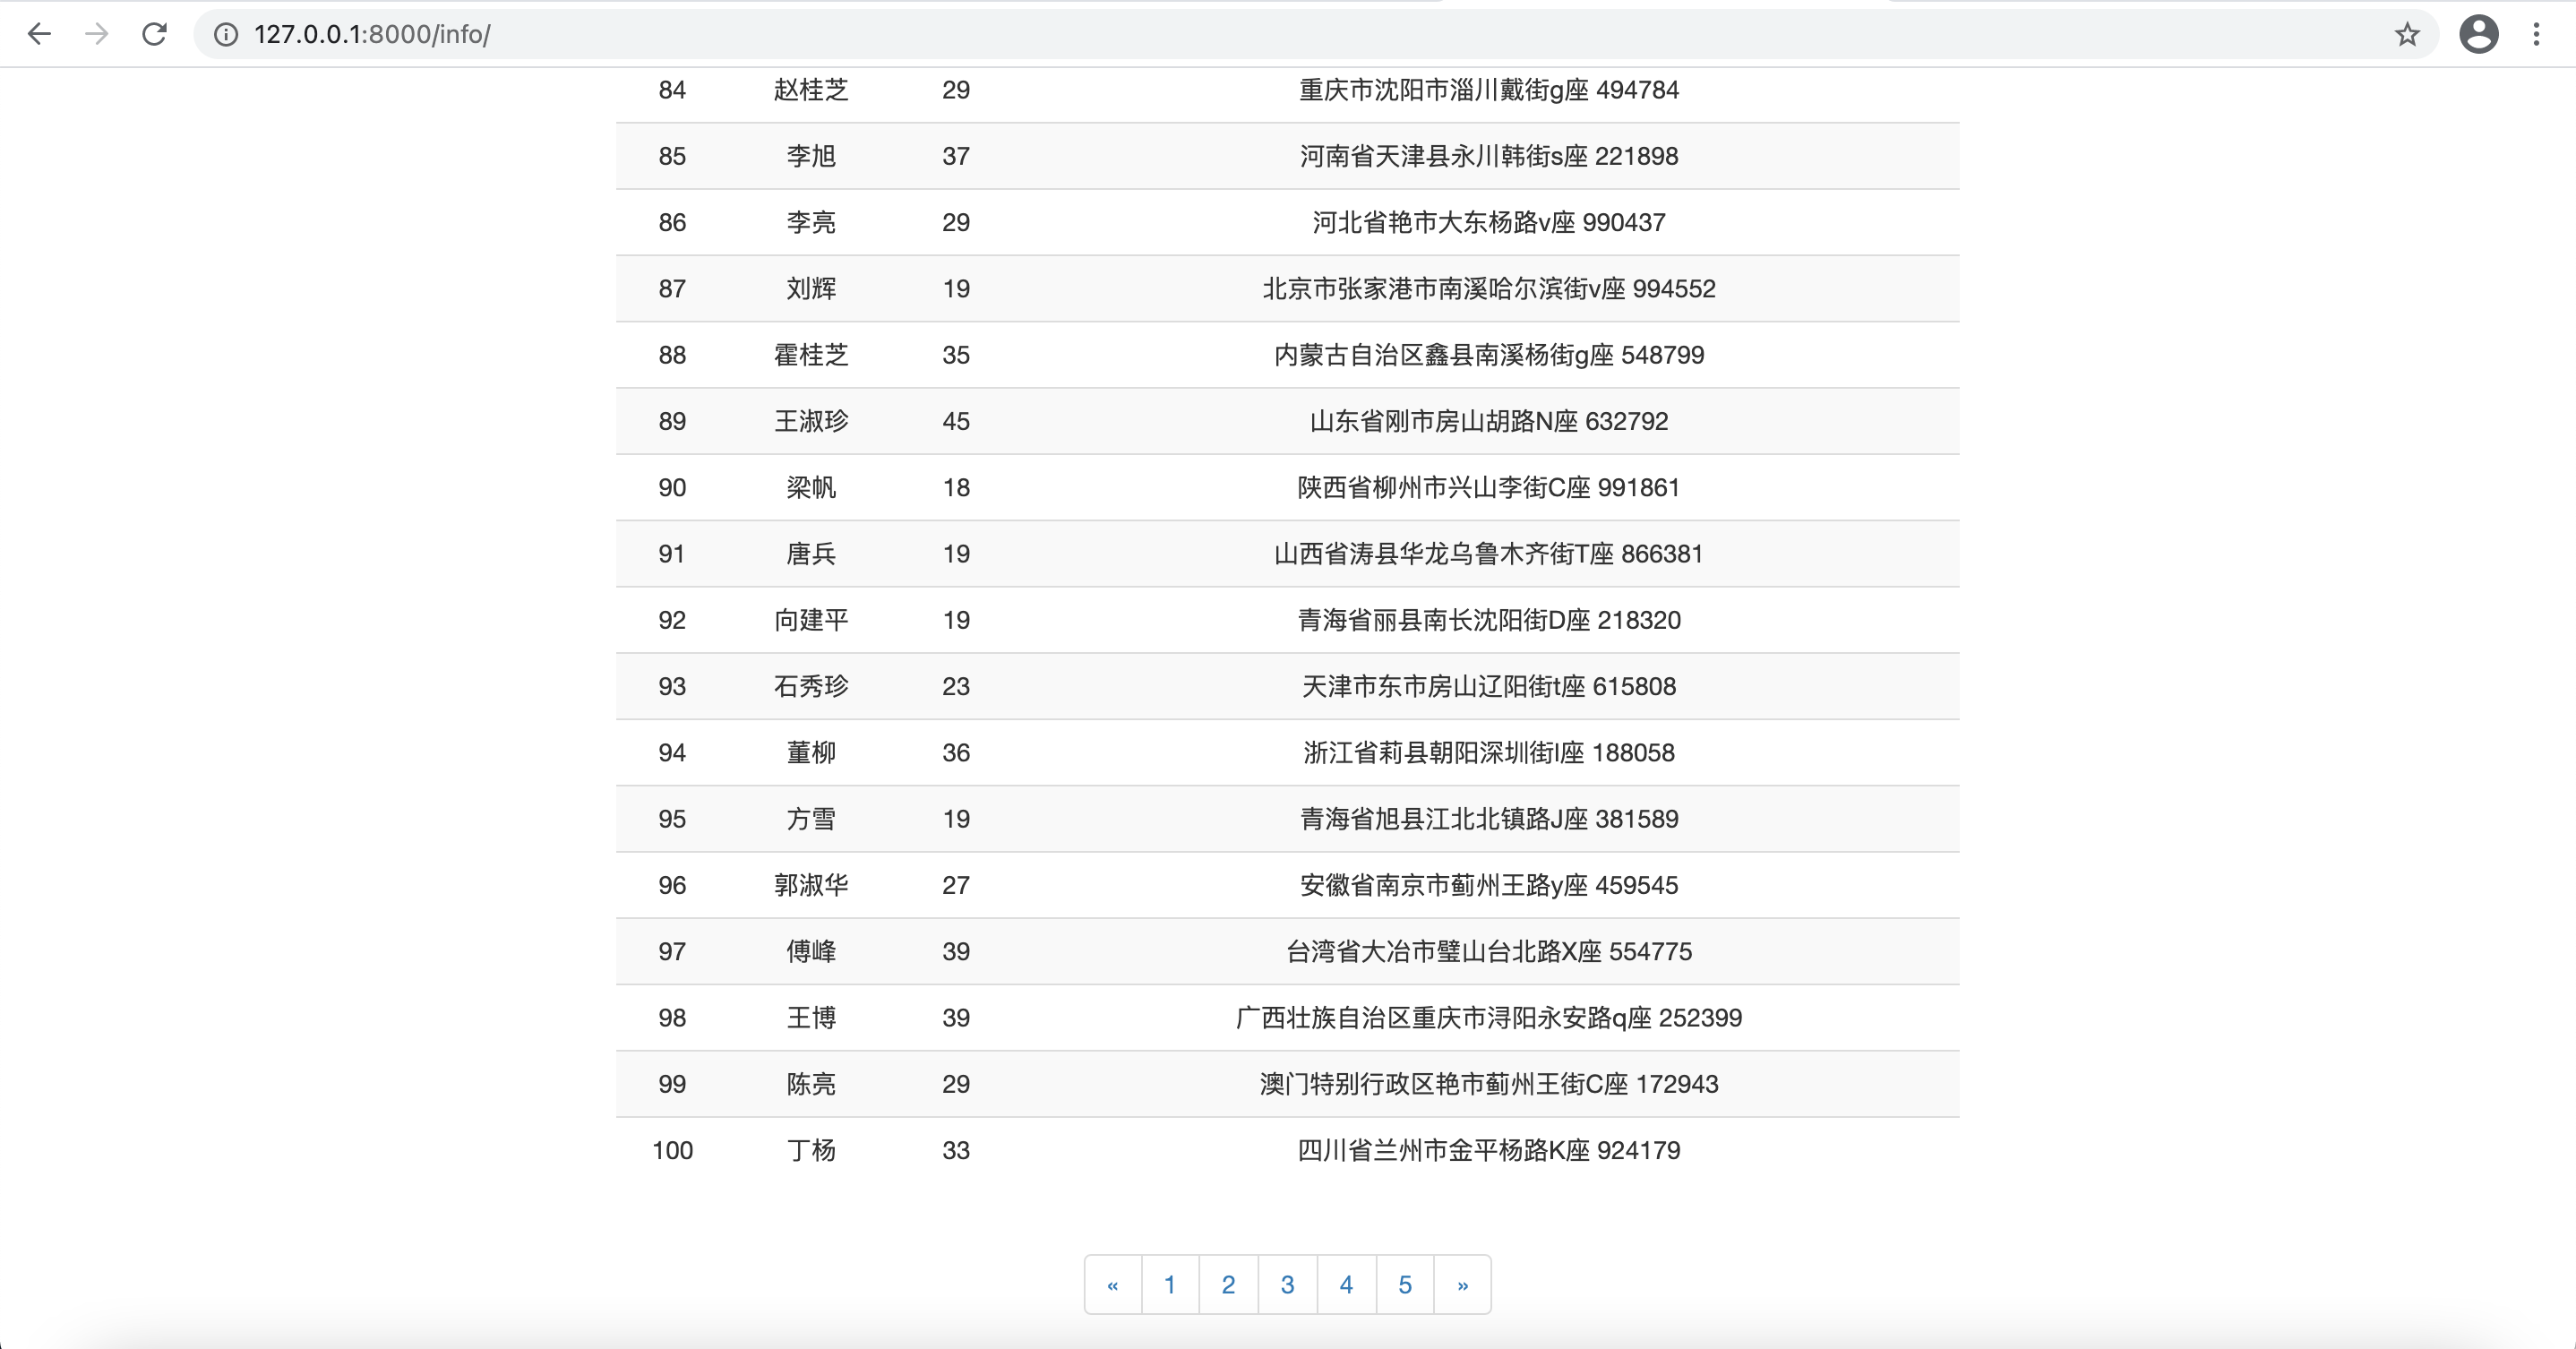
At this time, the effect of the page is that the number of buttons available for users to choose to reach the page becomes more considerable, as shown in the figure:

At this point, our page can achieve the effect of paging. The number of page buttons depends on the judgment of the back end. Usually, an iterative type is returned to the front end, such as range(1,5). Specify the number of loop creation buttons
form component
1. Introducing form components
Django Form component is used to initialize the page and generate HTML tags. In addition, it can verify the data submitted by the user (display error information).
Generally, the data submitted by the user will be checked at the back end to see whether it is qualified, such as account length, password length, whether it is empty, etc. If these are written in the front-end JS, they can be changed or deleted manually, and then the unqualified data will be submitted to the back-end, causing great potential data security problems.
Generally, a py file will be created to store our forms components, which will be called when verifying user data.
Next, we create an application named: my_form.py
from django import forms
from django.core.exceptions import ValidationError


class UserForm(forms.Form):  # Component for verifying user information
    name = forms.CharField(max_length=8, min_length=4, label='user name', error_messages={
        'max_length': 'The user name cannot exceed 8 characters',
        'min_length': 'The user name cannot be less than 4 digits',
        'required': 'User name cannot be empty'})

    password = forms.CharField(max_length=8, min_length=4, label='password', error_messages={
        'max_length': 'The password cannot exceed 8 digits',
        'min_length': 'The password cannot be less than 4 digits',
        'required': 'Password cannot be empty'})

    re_password = forms.CharField(max_length=8, min_length=4, label='Confirm password', error_messages={
        'max_length': 'The password cannot exceed 8 digits',
        'min_length': 'The password cannot be less than 4 digits',
        'required': 'Confirm password cannot be empty'})

    email = forms.EmailField(label='mailbox', error_messages={'required': 'Mailbox cannot be empty'})
forms is defined in a way similar to the model. Let's introduce the meaning of its field parameters:
- label: text information in front of the input box
- max_length: Specifies the maximum length of the contents of the input box
- min_length: Specifies the minimum length of the contents of the input box
- error_message: customize the error message displayed. The attribute value is a dictionary, where required is the key of the error message displayed when the setting cannot be empty.
views.py
def myform(request):
    form = UserForm(request.POST)

    return render(request,'myform.html',locals())
myform.html
<!DOCTYPE html>
<html lang="en">
<head>
    <meta charset="UTF-8">
    <title>myform</title>
    <script src="https://cdn.bootcdn.net/ajax/libs/jquery/3.4.1/jquery.min.js"></script>
    <script src="https://cdn.bootcdn.net/ajax/libs/twitter-bootstrap/3.4.1/js/bootstrap.min.js"></script>
    <link href="https://cdn.bootcdn.net/ajax/libs/twitter-bootstrap/3.4.1/css/bootstrap.min.css" rel="stylesheet">
</head>
<body>
<h2>adopt form Component automatic rendering</h2>
<form action="" method="post">
    <p>user name:{{ form.name }}</p>
    <p>password:{{ form.password }}</p>
    <p>Confirm password:{{ form.re_password }}</p>
    <p>Email:{{ form.email }}</p>
    <input type="submit" value="Submit">
</form>
</body>
</html>
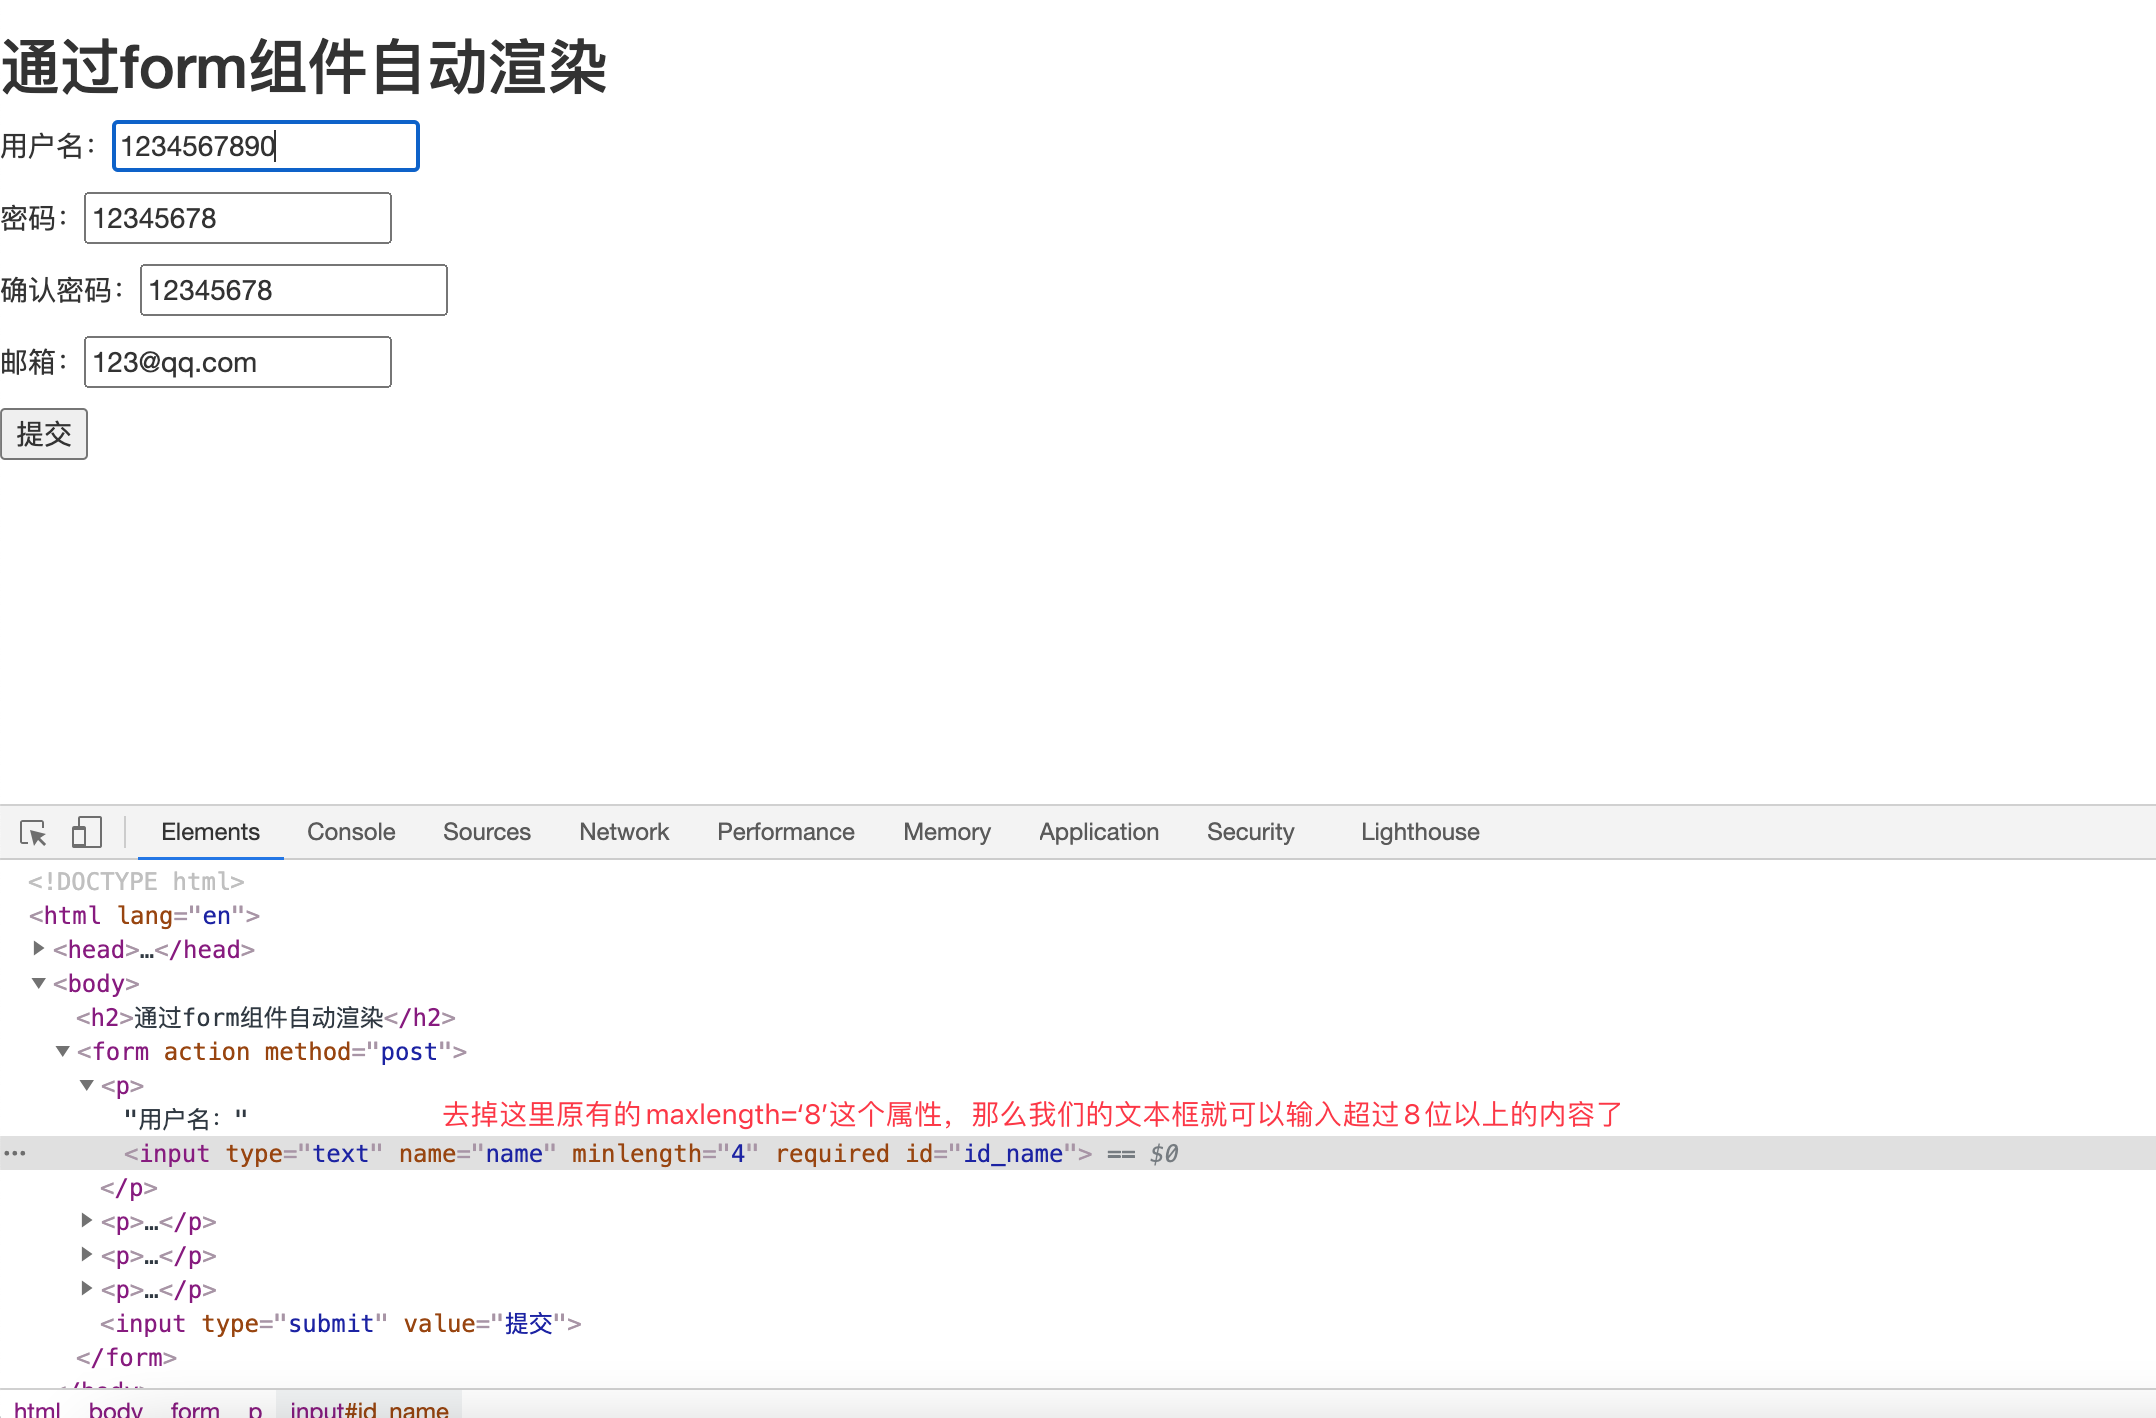
Page effect: the text box generated by the form component, and carries some restriction attributes and id attribute values

2. How the form component renders the page
The above is only the first rendering method. Let's introduce two form s component rendering methods
Method 2: recommendation, recommendation, recommendation
<!-- ellipsis html At the beginning, readers must remember to add that the following code should be included in body in -->
<h2>adopt form Component automatic rendering</h2>
<form action="" method="post">
    {% for item in form %}
        <p>{{ item.label }}: {{ item }}</p>
    {% endfor %}
    <input type="submit" value="Submit">
</form>
Page effect:

Mode 3:
<!-- ellipsis html At the beginning, readers must remember to add that the following code should be included in body in -->
<h2>adopt form Component automatic rendering</h2>
<form action="" method="post">
    {{ form.as_p }}
    <input type="submit" value="Submit">
</form>
Page effect: this method is very poor for page expansion. We can't add other tags, and the error information is directly displayed.

Summary: Based on the above three methods, the second method is most commonly used to automatically render templates through form components
3. form component rendering error message
view
def myform(request):
    if request.POST:
        form = UserForm(request.POST)
        if form.is_valid(): # Judge whether the content input by the front end is qualified
            print(form.cleaned_data) # All clean fields and corresponding values, that is, what the user enters conforms to the rule defined by our component: qualified data
        else:
            print(form.cleaned_data)
            print(form.errors) # # ErrorDict: {field of verification error: ["error message",]}

        return render(request,'myform.html',locals())

    form = UserForm()

    return render(request,'myform.html',locals())
myform.html
<!-- Please put the following code body Inside label -->
<h2>adopt form Component automatic rendering</h2>
<form action="" method="post">
    {% for item in form %}
        <p>{{ item.label }}: {{ item }} <span style="color: red">{{ item.errors.0 }}</span><!-- Display error message --></p>
    {% endfor %}
    <input type="submit" value="Submit">
</form>
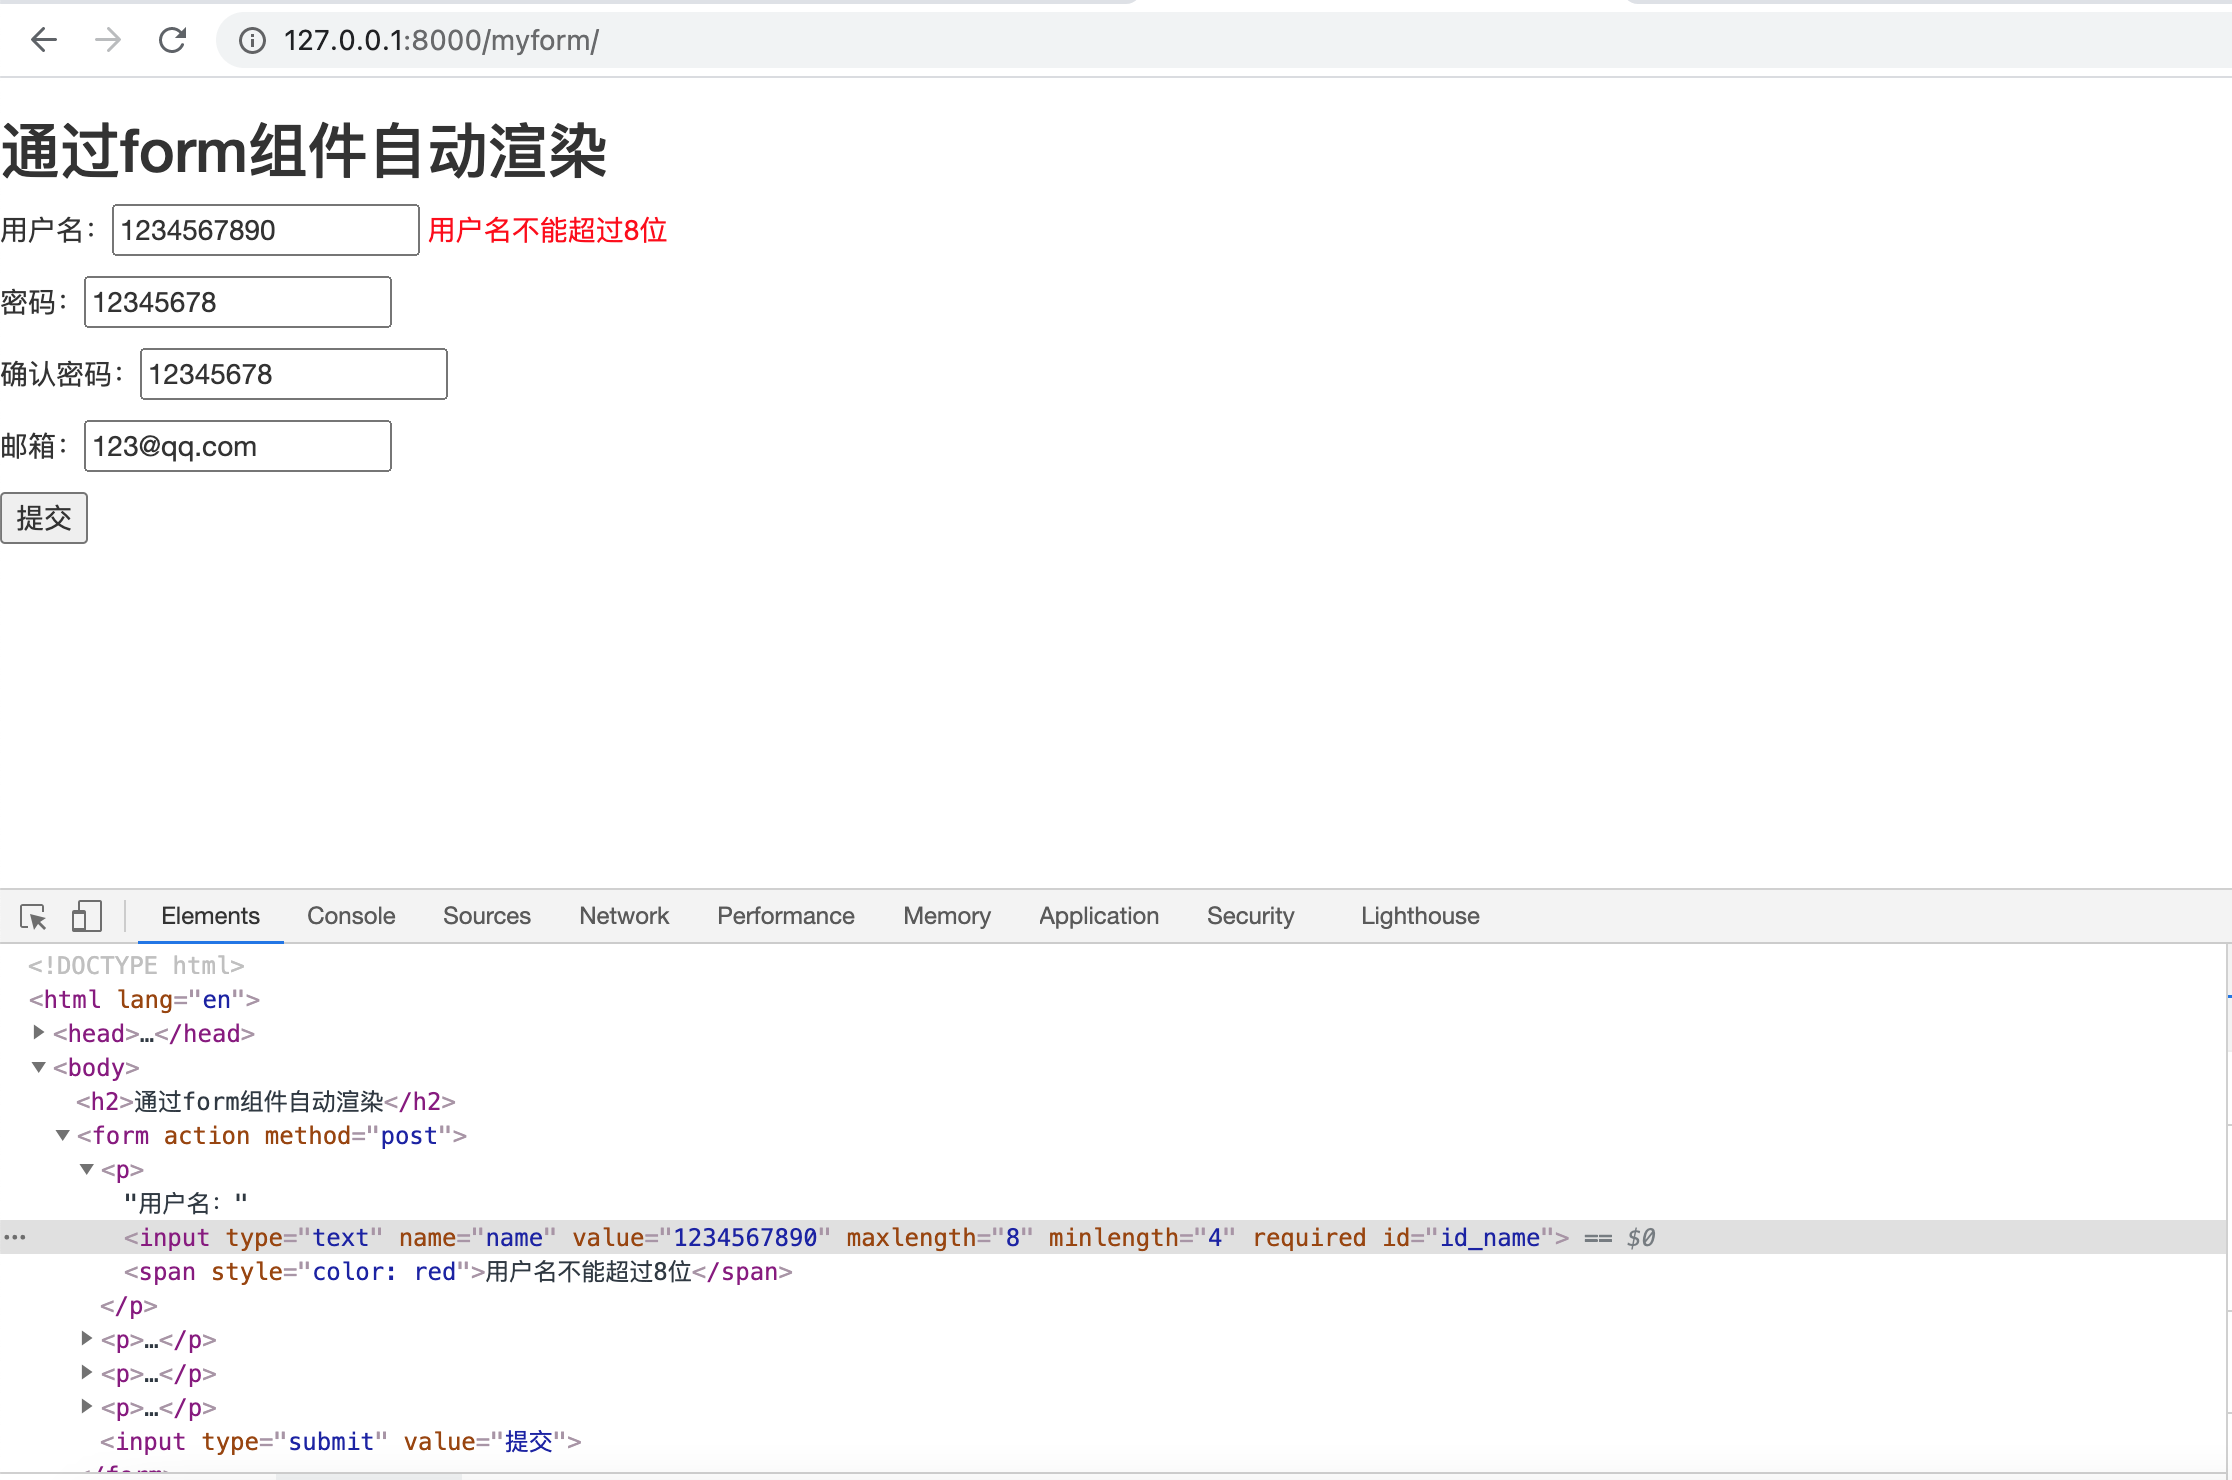
Step 1: This is a demonstration of submitting irregular data to the backend
Part II: the back end will return error prompt information to the page that does not meet the text box
5. Parameter configuration of form component
form. Charfeed creates a text type input box by default. Based on it, we can directly convert its type and add some additional attributes.
from django import forms
from django.forms import widgets # Import module

class UserForm(forms.Form):  # Component for verifying user information
    name = forms.CharField(max_length=8, min_length=4, label='user name', error_messages={
        'max_length': 'The user name cannot exceed 8 characters',
        'min_length': 'The user name cannot be less than 4 digits',
        'required': 'User name cannot be empty'},
        widget=widgets.TextInput(attrs={'class':'form-control'})) # Display the input box of text type and add the class='from-control 'attribute


    password = forms.CharField(max_length=8, min_length=4, label='password', error_messages={
        'max_length': 'The password cannot exceed 8 digits',
        'min_length': 'The password cannot be less than 4 digits',
        'required': 'Password cannot be empty'},
        widget=widgets.PasswordInput(attrs={'class':'form-control'})) # Display the input box of password type and add the class='from-control 'attribute
6. Local hook
If the above operations can not meet our complete verification of a field, then using local hooks can perform additional verification on a field, and finally make the value of this field meet our expectations.
In my_ form. Increase in PY
# Local hook for name field
def clean_name(self):
    name = self.cleaned_data.get('name') # Get name field data

    if name.startswith('sb'): # name field data cannot start with sb
        raise ValidationError('Can't take sb start') # If the verification fails, an exception is thrown

    else: # If the verification is passed, the value corresponding to name will be returned.
        return name
The local hook is implemented through the function clean_ Field name to help us verify the data of a field again.
Page effect:

You can only get the value of the corresponding field in the current local hook
7. Global hook
In the global hook: we can get the values of any field, verify these values as a whole, and then return.
my_form.py.py
# Global hooks for all fields
def clean(self):
    password = self.cleaned_data.get('password')
    re_password = self.cleaned_data.get('re_password')

    if password == re_password: # Verify whether the passwords entered by the user twice are consistent
        return self.cleaned_data # Because it is a global hook, you need to return all data if it is consistent, otherwise some fields will not receive values.
    else:
        raise ValidationError('The two passwords are inconsistent')
Based on the following integration, we will demonstrate the effects of global hooks and local hooks
8. Integrated use
We will use the fomr component and set local and global hooks internally to verify the data for many times, and finally store the verified data into our database. The following are all the codes of the front and rear end
my_form.py component
from django import forms
from django.core.exceptions import ValidationError
from django.forms import widgets


class UserForm(forms.Form):  # Component for verifying user information
    name = forms.CharField(max_length=8, min_length=4, label='user name', error_messages={
        'max_length': 'The user name cannot exceed 8 characters',
        'min_length': 'The user name cannot be less than 4 digits',
        'required': 'User name cannot be empty'},
                           widget=widgets.TextInput(attrs={'class': 'from-control'})
                           )

    password = forms.CharField(max_length=8, min_length=4, label='password', error_messages={
        'max_length': 'The password cannot exceed 8 digits',
        'min_length': 'The password cannot be less than 4 digits',
        'required': 'Password cannot be empty'},
                               widget=widgets.PasswordInput(attrs={'class': 'from-control'})
                               )

    re_password = forms.CharField(max_length=8, min_length=4, label='Confirm password', error_messages={
        'max_length': 'The password cannot exceed 8 digits',
        'min_length': 'The password cannot be less than 4 digits',
        'required': 'Confirm password cannot be empty'},
                                  widget=widgets.PasswordInput(attrs={'class': 'from-control'})

                                  )

    email = forms.EmailField(label='mailbox', error_messages={'required': 'Mailbox cannot be empty'})

    # Local hook for name field
    def clean_name(self):
        name = self.cleaned_data.get('name')  # Get name field data
        if name.startswith('sb'):  # name field data cannot start with sb
            raise ValidationError('Can't take sb start')  # If the verification fails, an exception is thrown

        else:  # If the verification is passed, the value corresponding to name will be returned.
            return name

    # Global hooks for all fields
    def clean(self):
        password = self.cleaned_data.get('password')
        re_password = self.cleaned_data.get('re_password')

        if password == re_password: # Verify whether the passwords entered by the user twice are consistent
            return self.cleaned_data # Because it is a global hook, you need to return all data if it is consistent, otherwise some fields will not receive values.
        else:
            raise ValidationError('The two passwords are inconsistent')
view
from django.shortcuts import render, HttpResponse
from app01.my_form import UserForm
from app01 import models


def myform(request):
    if request.POST:
        form = UserForm(request.POST)
        if form.is_valid(): # Whether the front-end input is qualified
            form.cleaned_data.pop('re_password')
            models.userinfo.objects.create(**form.cleaned_data) # cleaned_data itself is a dictionary. We break it up into the form of keyword = data by * * to add values to the database.

            return HttpResponse('Account registration succeeded')

       	try:
           	error = form.errors.get('__all__')[0] # Get the error information of the global hook
        except Exception as e:
       		error = '' # Avoid error reporting due to no error information returned by the global hook

        return render(request,'myform.html',locals())

    form = UserForm()

    return render(request,'myform.html',locals())
Front end: myform html
<!DOCTYPE html>
<html lang="en">
<head>
    <meta charset="UTF-8">
    <title>myform</title>
    <script src="https://cdn.bootcdn.net/ajax/libs/jquery/3.4.1/jquery.min.js"></script>
    <script src="https://cdn.bootcdn.net/ajax/libs/twitter-bootstrap/3.4.1/js/bootstrap.min.js"></script>
    <link href="https://cdn.bootcdn.net/ajax/libs/twitter-bootstrap/3.4.1/css/bootstrap.min.css" rel="stylesheet">
</head>
<body>
<h2>Registration page</h2>
<form action="" method="post">
    {% for item in form %}
        <p>{{ item.label }}: {{ item }} <span style="color: red">{{ item.errors.0 }}</span></p>
    {% endfor %}
    <input type="submit" value="Submit"> {{ error }}
</form>
</body>
</html>
Page effect:

As for the layout and typesetting of the page, CSS or JS can be used to realize it.
So the above is how to use the form component. Let's understand the implementation principle of the form component
form component source code analysis
When we use form components to verify the field data, we must call the class of the form component to instantiate an object, and then call the is_ of the object. Only valid () method can be used for verification. This method will only return two values: True and False
Therefore, if we want to analyze the form source code, the entry is is_valid() method
Click in is_ The following code is found after valid (), which tells us that if the form component of this method does not return an error, it will return True, otherwise it will return False
def is_valid(self):
    """Return True if the form has no errors, or False otherwise."""
    return self.is_bound and not self.errors
Let's click self Errors, I found a method encapsulated into class attributes, self_ The default value of errors is None, so self. Is executed full_ Clean() method
@property
def errors(self):
    """Return an ErrorDict for the data provided for the form."""
    if self._errors is None:
        self.full_clean()
    return self._errors
For this method, we only need to focus on the following two methods, which are the focus of our form component
def full_clean(self):
    self._clean_fields() # Local hook implementation
    self._clean_form() # Global hook implementation
1. Local hook source code
self._clean_fields() is the implementation of local hooks
def _clean_fields(self):
	'''
		this self Is that we are based on form Object instantiated by component class
		self.fields.items()Get us form The type attribute and value under the component class are valued in the same way as the dictionary.
		name Is the attribute name field namely: CharField Other content objects
	'''
    for name, field in self.fields.items():
        if field.disabled:
			# Get the form data, and the value is equal to the value submitted in our input box
            value = self.get_initial_for_field(field, name)
        else:
            value = field.widget.value_from_datadict(self.data, self.files, self.add_prefix(name))
        try:
        	# Judge whether the object is of FileField type. Obviously, we haven't defined this type at present, so skip
            if isinstance(field, FileField):
                initial = self.get_initial_for_field(field, name)
                value = field.clean(value, initial)
            else:
                value = field.clean(value) # Call some verification functions of the object itself (defined by ourselves)
            # Through the verification of the object itself, the data is saved in cleared_ In the data dictionary, name is the attribute name and value is the value submitted in our input box.
            self.cleaned_data[name] = value

			# Judge whether there are local hooks in the form component class we write through reflection
            if hasattr(self, 'clean_%s' % name):

				# If you call this local hook, you will find the value returned by this local hook (now you know why you want to return the value of the local hook verification field)
                value = getattr(self, 'clean_%s' % name)()
                self.cleaned_data[name] = value # Save this value in the dictionary again. Here, the data of the name field is equivalent to the secondary verification

        # The code within try threw an exception of ValidationError type (the exception we defined manually)
        except ValidationError as e:
            self.add_error(name, e) # The exception information is added to a dictionary according to the field name, but the values of this dictionary are a list, and the error information is saved in the list. It means that sometimes there may be more than one error
2. Global hook source code
self._clean_form() is the implementation method of the global hook.
The implementation of global hook is simpler than local hook, because it is triggered after its own object verification and local hook verification.
def _clean_form(self):
    try:
    	# Call the clean method in our form component class (this is why we return self.cleaned_data, because all the verified data is saved in it)
        cleaned_data = self.clean()
    except ValidationError as e:
        self.add_error(None, e)
    else:
        if cleaned_data is not None: # If we don't get a None, it means that we have returned the value
            self.cleaned_data = cleaned_data
            # self. cleaned_ data = self. The value returned by the clean () method (that is, the clean method must return self.cleaned_data)
If the clean method is not written in our form component class, the clean method in the form source code will be called
def clean(self):
    """
    Hook for doing any extra form-wide cleaning after Field.clean() has been
    called on every field. Any ValidationError raised by this method will
    not be associated with a particular field; it will have a special-case
    association with the field named '__all__'.
    """
    return self.cleaned_data
The clean method in the source code does nothing but returns data. Therefore, when we need to use the global hook, we can rewrite this method. Because the global hook is executed after the verification of the field itself and the local hook, it can get all the field data.
If this article is helpful to you, don't forget to click three times. Your support is the author's greatest encouragement. Thank you for reading!
Updating!!!
Technical Xiaobai records the learning process. Please point out the mistakes or puzzles. If this article is helpful to you, please like Collection + pay attention to midnight. We look forward to your attention. Thank you for your support!