Continued: Detailed explanation of a beautiful 3D Earth production process based on ThreeJS (Part I)
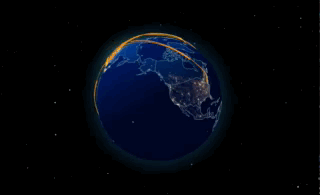
3D Earth achievement display
github warehouse address: https://github.com/RainManGO/3d-earth
npm: https://www.npmjs.com/package/3d-earth
Support vue/react/html, easy to embed.
Implementation process
Decomposition implementation steps:
- ThreeJS environment initialization
- Starry background
- Add textured earth
- World map contour boundary drawing
- Earth halo
- Add earth clouds
- City Location annotation and ripple effect
- Add Flyline B-spline
- Earth rotation and zoom animation
The last part starts from the seventh step
Tool function
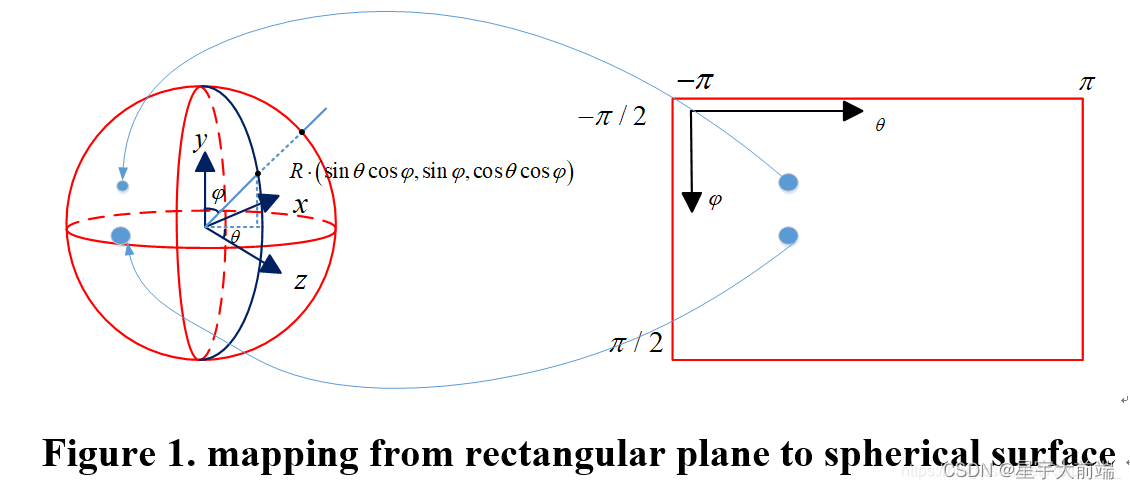
Each city is accurately added to the map through coordinates, which involves the transformation of longitude and latitude to spherical xyz coordinates.
In fact, it is the longitude and latitude to xyz coordinate system. This picture can be seen clearly.
Tool function code:
export const lon2xyz = (
radius: number,
longitude: number,
latitude: number
) => {
var lon = (longitude * Math.PI) / 180; //Radian value
var lat = (latitude * Math.PI) / 180; //Radian value
lon = -lon; // three. The z axis of JS coordinate system corresponds to longitude - 90 degrees, not 90 degrees
// Calculation formula of longitude and latitude coordinates to spherical coordinates
var x = radius * Math.cos(lat) * Math.cos(lon);
var y = radius * Math.sin(lat);
var z = radius * Math.cos(lat) * Math.sin(lon);
// Return spherical coordinates
return {
x: x,
y: y,
z: z,
};
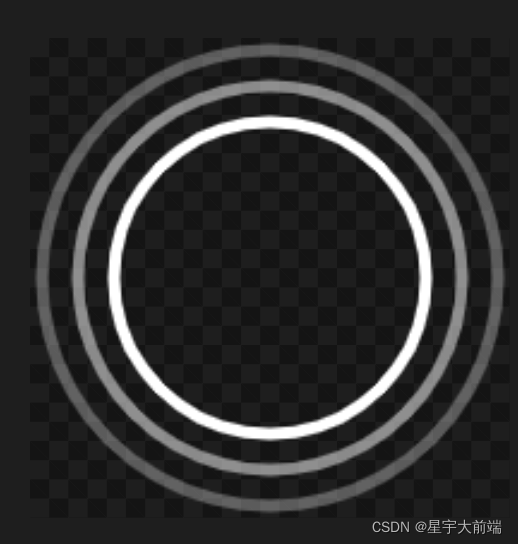
};City Location annotation and ripple effect
City Location labels adding
Here, the city position is added to the earth by two rectangular geometries, and the posture needs to be adjusted.
A map is a ripple underlay that can change color:
- Convert the obtained longitude and latitude data into xyz coordinates
- Add two textured geometry to the earth
var cityGeometry = new PlaneBufferGeometry(1, 1); //Default on XOY plane
    var textureLoader = new TextureLoader(); // TextureLoader creates a texture loader object
    var texture = textureLoader.load(wavePng);

    // If the transparency, color and other attributes of different mesh materials are different at the same time, the materials cannot be shared
    var cityWaveMaterial = new MeshBasicMaterial({
      color: 0x22ffcc,
      map: texture,
      transparent: true, //Use the png map with transparent background, and pay attention to turn on transparent calculation
      opacity: 1.0,
      side: DoubleSide, //Visible on both sides
      depthWrite: false, //Prohibit writing depth buffer data
    });

    //City point addition
    var pointTexture = textureLoader.load(pointPng);
    var cityPointMaterial = new MeshBasicMaterial({
      color:0xffc300,
      map: pointTexture,
      transparent: true, //Use the png map with transparent background, and pay attention to turn on transparent calculation
      depthWrite:false,//Prohibit writing depth buffer data
    });

    var cityWaveMesh = new Mesh(cityGeometry, cityWaveMaterial);
The next step is to adjust to the earth posture and fit the sphere:
var size = earthRadius * 0.12; //Dimension of rectangular plane Mesh
    (cityWaveMesh as any).size = size; //An attribute representing the static size of mesh
    cityWaveMesh.scale.set(size, size, size); //Set mesh size
    (cityWaveMesh as any)._s = Math.random() * 1.0 + 1.0; //Custom properties_ s represents the magnification of mesh based on the original size, and the aperture is in the original mesh 1 ~ 2 times based on size

    cityWaveMesh.position.set(cityXyz.x, cityXyz.y, cityXyz.z);
    cityMesh.position.set(cityXyz.x, cityXyz.y, cityXyz.z)

    // mesh pose settings
    // The normal direction of mesh on the spherical surface (the direction vector composed of the spherical center and spherical coordinates)
    var coordVec3 = new Vector3(cityXyz.x, cityXyz.y, cityXyz.z).normalize();
    // mesh is on the XOY plane by default, and the normal direction is new three along the z axis Vector3(0, 0, 1)
    var meshNormal = new Vector3(0, 0, 1);
    // quaternion attribute quaternion indicates the angular state of mesh
    //.setFromUnitVectors(); Calculate the quaternion value formed between two vectors
    cityWaveMesh.quaternion.setFromUnitVectors(meshNormal, coordVec3);
    cityMesh.quaternion.setFromUnitVectors(meshNormal, coordVec3);
Ripple effect animation

In fact, this animation is to scale the geometry size and change the transparency. The specific algorithm code is as follows:
export const cityWaveAnimate = (WaveMeshArr: Mesh[]) => {
  // All fluctuating apertures have their own transparency and size state
  // A fluctuating aperture transparency change process is: 0 ~ 1 ~ 0 repeated cycle
  WaveMeshArr.forEach(function (mesh:any) {
    mesh._s += 0.007;
    mesh.scale.set(
      mesh.size * mesh._s,
      mesh.size * mesh._s,
      mesh.size * mesh._s
    );
    if (mesh._s <= 1.5) {
      mesh.material.opacity = (mesh._s - 1) * 2; //The transparency is guaranteed to vary between 0-1.5 / (1-2), which is equal to 1
    } else if (mesh._s > 1.5 && mesh._s <= 2) {
      mesh.material.opacity = 1 - (mesh._s - 1.5) * 2; //2 equals 1/(2.0-1.5) mesh scaling 2 times corresponds to 0 scaling 1.5 corresponds to 1
    } else {
      mesh._s = 1.0;
    }
  });
};
Fly line addition and animation
There are three main ways to fly the line
- Bessel curve
- Arc arc
- B-spline
After trying, I found that the B-spline is more beautiful. After using this, other curves will decompose later
Main ideas:
- Take point
- CatmullRomCurve3 composite curve
- flyLine animation library completes animation
The code is as follows:
import { FlyData, City } from "../types/index";
import { InitFlyLine } from "../tools/flyLine";
import { lon2xyz } from "../tools/index";
import { earthRadius } from "../config/index";
import { Vector3, CatmullRomCurve3, Object3D } from "three";
import pointPng from "../img/point.png";

export const earthAddFlyLine = (
  earth: Object3D,
  flyLineData: FlyData[],
  cityList: Record<string, City>
) => {
  let flyManager: InitFlyLine = null;

  if (flyManager == null) {
    flyManager = new InitFlyLine({
      texture: pointPng,
    });
  }

  for (var i = 0; i < flyLineData.length; i++) {
    var flyLine = flyLineData[i];
    for (var j = 0; j < flyLine.to.length; j++) {
      randomAddFlyLine(
        earth,
        flyManager,
        cityList[flyLine.from],
        cityList[flyLine.to[j]],
        flyLine.color
      );
    }
  }

  return flyManager;
};

// Add the connection after a random time interval (to avoid adding the connection at the same time and the display effect is rigid)
const randomAddFlyLine = (
  earth: Object3D,
  flyManager: InitFlyLine,
  fromCity: City,
  toCity: City,
  color: string
) => {
  setTimeout(function () {
    addFlyLine(earth, flyManager,fromCity, toCity, color);
  }, Math.ceil(Math.random() * 15000));
};

// Increase flying lines between cities
const addFlyLine = (
  earth: Object3D,
  flyManager: InitFlyLine,
  fromCity: City,
  toCity: City,
  color: string
) => {
  var coefficient = 1;
  var curvePoints = new Array();
  var fromXyz = lon2xyz(earthRadius, fromCity.longitude, fromCity.latitude);
  var toXyz = lon2xyz(earthRadius, toCity.longitude, toCity.latitude);
  curvePoints.push(new Vector3(fromXyz.x, fromXyz.y, fromXyz.z));

  //Take different points according to the distance between cities
  var distanceDivRadius =
    Math.sqrt(
      (fromXyz.x - toXyz.x) * (fromXyz.x - toXyz.x) +
        (fromXyz.y - toXyz.y) * (fromXyz.y - toXyz.y) +
        (fromXyz.z - toXyz.z) * (fromXyz.z - toXyz.z)
    ) / earthRadius;
  var partCount = 3 + Math.ceil(distanceDivRadius * 3);
  for (var i = 0; i < partCount; i++) {
    var partCoefficient =
      coefficient + (partCount - Math.abs((partCount - 1) / 2 - i)) * 0.01;
    var partTopXyz = getPartTopPoint(
      {
        x:
          (fromXyz.x * (partCount - i)) / partCount +
          (toXyz.x * (i + 1)) / partCount,
        y:
          (fromXyz.y * (partCount - i)) / partCount +
          (toXyz.y * (i + 1)) / partCount,
        z:
          (fromXyz.z * (partCount - i)) / partCount +
          (toXyz.z * (i + 1)) / partCount,
      },
      earthRadius,
      partCoefficient
    );
    curvePoints.push(new Vector3(partTopXyz.x, partTopXyz.y, partTopXyz.z));
  }
  curvePoints.push(new Vector3(toXyz.x, toXyz.y, toXyz.z));

  //Use B-spline to fit these points into a curve (Bessel curve is not used here, because the fitted points must be around the earth and cannot pass through the earth)
  var curve = new CatmullRomCurve3(curvePoints, false);

  //Get points from B-spline
  var pointCount = Math.ceil(500 * partCount);
  var allPoints = curve.getPoints(pointCount);

  //Making Flywire animation
  // @ts-ignore
  var flyMesh = flyManager.addFly({
    curve: allPoints, //The flying line is actually composed of N points
    color: color, //Point color
    width: 0.3, //Radius of point
    length: Math.ceil((allPoints.length * 3) / 5), //Length of flying line (number of points)
    speed: partCount + 10, //Flying line speed
    repeat: Infinity, //Number of cycles
  });

  earth.add(flyMesh);
};

const getPartTopPoint = (
  innerPoint: { x: number; y: number; z: number },
  earthRadius: number,
  partCoefficient: number
) => {
  var fromPartLen = Math.sqrt(
    innerPoint.x * innerPoint.x +
      innerPoint.y * innerPoint.y +
      innerPoint.z * innerPoint.z
  );
  return {
    x: (innerPoint.x * partCoefficient * earthRadius) / fromPartLen,
    y: (innerPoint.y * partCoefficient * earthRadius) / fromPartLen,
    z: (innerPoint.z * partCoefficient * earthRadius) / fromPartLen,
  };
};
Rotate animation
The principle of rotation animation is to use the tweet animation, and then update the zoom of the earth position and orbit controller.
- The tweet animation controls rotation and scaling
- Zoom when rotating to China
The specific codes are as follows:
//Rotating earth animation
    var rotateEarthStep = new TWEEN.Tween({
      rotateY: startRotateY,
      zoom: startZoom,
    })
      .to({ rotateY: endRotateY, zoom: endZoom }, 36000) //.to({rotateY: endRotateY, zoom: endZoom}, 10000)
      .easing(TWEEN.Easing.Quadratic.Out)
      .onUpdate(function (object: any) {
        if (that.earth3dObj) {
          that.earth3dObj.rotation.set(0, object.rotateY, 0);
        }
        (that.orbitControl as any).zoom0 = object.zoom < 1 ? 1 : object.zoom;
        that.orbitControl.reset();
      });

    var rotateEarthStepBack = new TWEEN.Tween({
      rotateY: endRotateY,
      zoom: endZoom,
    })
      .to({ rotateY: 3.15 * Math.PI * 2, zoom: startZoom }, 36000) //.to({rotateY: endRotateY, zoom: endZoom}, 10000)
      .easing(TWEEN.Easing.Quadratic.Out)
      .onUpdate(function (object: any) {
        if (that.earth3dObj) {
          that.earth3dObj.rotation.set(0, object.rotateY, 0);
        }
        (that.orbitControl as any).zoom0 = object.zoom < 1 ? 1 : object.zoom;
        that.orbitControl.reset();
      });

    rotateEarthStep.chain(rotateEarthStepBack);
    rotateEarthStepBack.chain(rotateEarthStep);

    rotateEarthStep.start();
  }
In this way, a beautiful earth has been completed, and it took half a month to complete the research results. Happy, hope to keep coding and love sharing.