Service concept
Online coupon m.fenfaw cnKubernetes Service defines such an abstraction: a logical set of pods, a policy that can access them - commonly known as microservices.
Service s usually provide access to the outside world through Label Selector, that is, services match a group of pods through label selection.
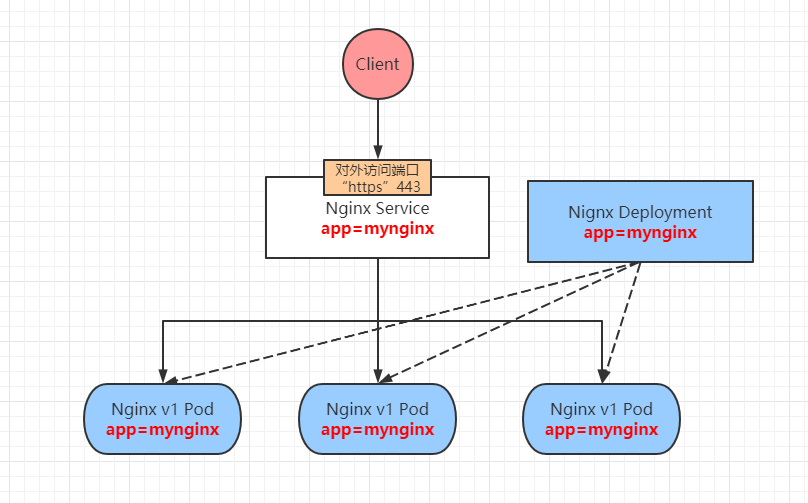
Explain the specific implementation process in the figure above:
First, define an Nginx Deployment and create three pods. Each Pod has a corresponding label mynginx.
Second, define an Nginx Service with the tag mynginx. The Service will match the back-end Pod tag according to its own tag, so as to add them to the queue to provide external services. Of course, multiple tags can be defined.
Third, when our Client accesses the Nginx Service, the Service will provide services externally with a polling access policy.
Fourth, when our back-end Pod hangs up, Nginx Deployment will re create a new Pod to meet the expectations, and the Service will automatically add the new Pod to the load balancing queue.
The ability of Service to provide load balancing is limited by:
Service only provides 4-tier load balancing capabilities, and does not have 7-tier functions. In other words, it can only forward based on IP address and port to achieve load balancing.
The 7-tier load balancing capability needs to be provided, which can be realized through the Ingress load balancing scheme. It will be introduced in the following articles. Welcome to pay attention to me.
Service type explanation
There are four types of Service:
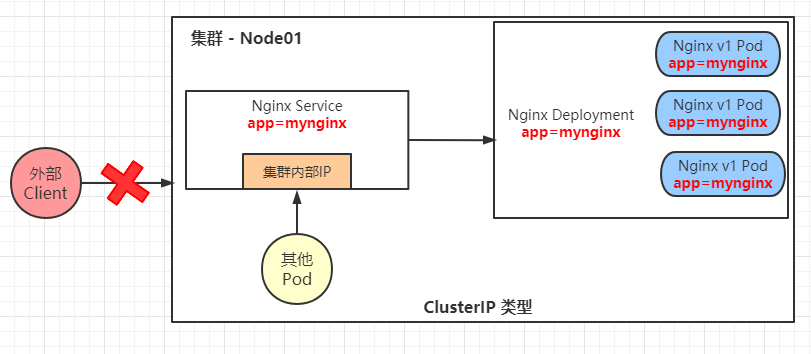
ClusterIP: the default type. It automatically assigns a virtual IP address inside the cluster, which can only be accessed inside the cluster. (common)
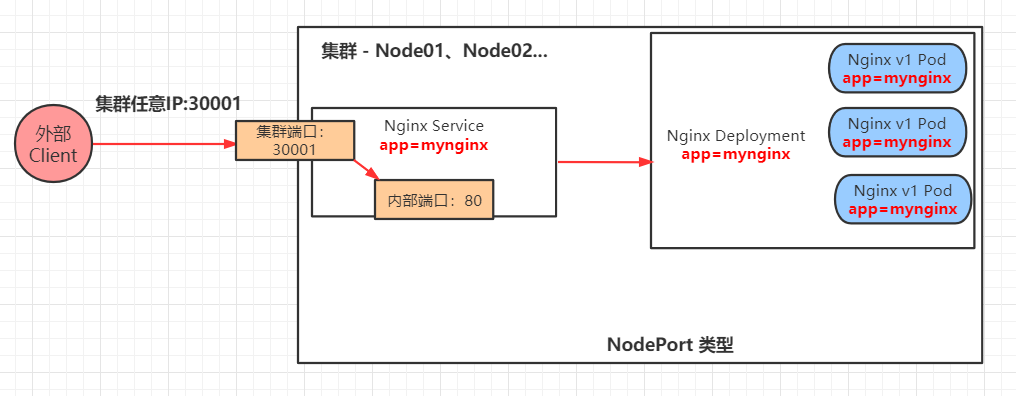
NodePort: expose services through the IP and static port (NodePort) on each node to provide external access. In other words, we can access the post Pod application through the IP address and port of any node in the cluster. (common)
LoadBalancer: use the load balancer of the cloud provider to expose services to the outside. The external load balancer can route traffic to the automatically created NodePort service and ClusterIP service. (from the official)
ExternalName: introduce services outside the cluster into the cluster and use them directly inside the cluster.
That is to say, suppose there is a database cluster outside, the Service inside the cluster only needs to write the IP address information outside the cluster, and the Pod inside the cluster can be accessed.
If the IP address of the external cluster changes one day, you only need to update the Service information inside the cluster, and the internal Pod can still access the external database cluster normally.
VIP and Service agents
In the Kubernetes cluster, each Node runs a Kube proxy process. Kube proxy is responsible for implementing a form of VIP (virtual IP) for the Service, rather than the form of ExternalName.
In kubernetes v1 Version 0, the agent is completely in userspace. In kubernetes v1 In version 1, iptables agent is added, but it is not the default running agent mode.
From kubernetes v1 2. The default proxy mode is iptables; In kubernetes v1 8.0-beta. 0, added IPVS agent.
Then from kubernetes v1 From version 14, IPVS proxy mode is used by default.
userspace proxy mode
When the Client needs to access the Pod, it needs to access iptables first, then Kube proxy from the firewall, and then the corresponding Pod from Kube proxy.
No matter whether the Client accesses the local Pod or the Pod of other nodes, it needs to proxy through Kube proxy. apiserver will also monitor Kube proxy for service update and other operations, which will lead to great pressure on Kube proxy.
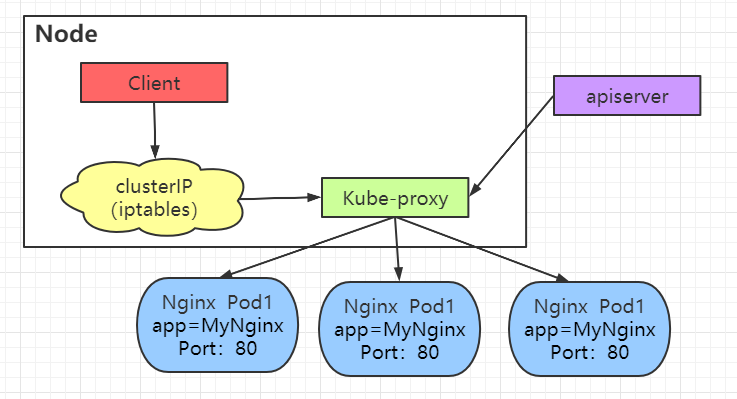
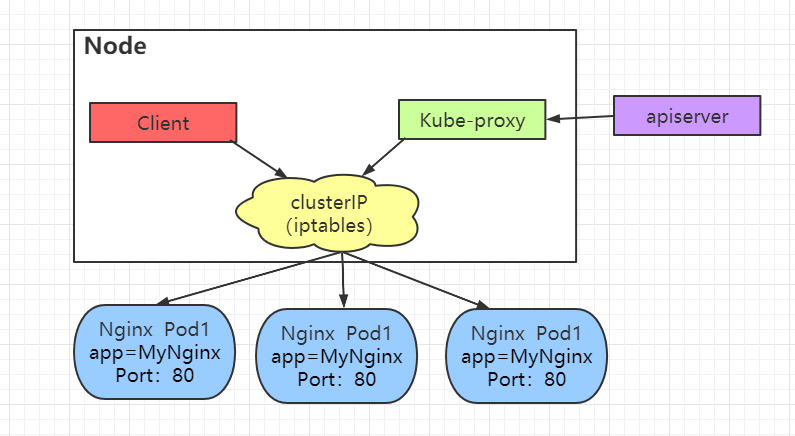
iptables proxy mode
As can be seen from the figure below, all accesses are completed through iptables without scheduling through Kube proxy. In this way, the access speed will be accelerated, the Kube proxy pressure will be reduced, and the stability will be improved.
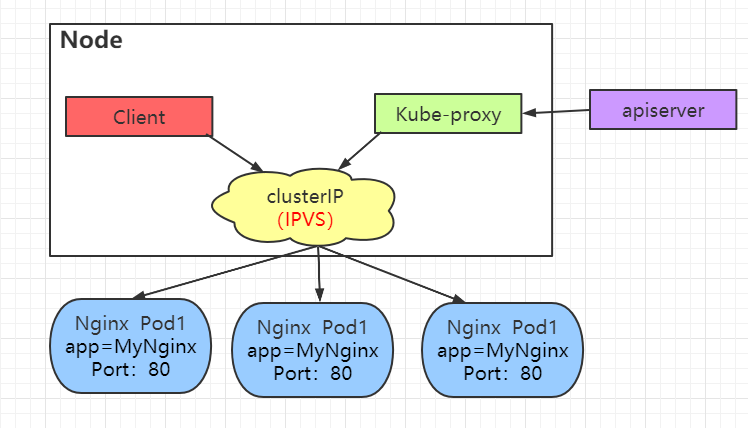
IPVS proxy mode
The difference between IPVS proxy mode and iptables proxy mode is that iptables is changed into IPVS, while others remain unchanged. IPVS works in kernel space, which means shorter communication delay and better performance. If the IPVS module is not installed, Kube proxy will return to running in iptables proxy mode.
Service experiment demonstration
ClusterIP type
First create the Deployment, my nginx Yaml file is as follows:
apiVersion: apps/v1
kind: Deployment
metadata:
  name: my-nginx
spec:
  selector:
    matchLabels:
      run: my-nginx   # Label matching
  replicas: 3
  template:
    metadata:
      labels:
        run: my-nginx # Define label
    spec:
      containers:
      - name: my-nginx
        image: hub.test.com/library/mynginx:v1
        ports:
        - containerPort: 80
Create Deployment and view status information
[root@k8s-master01 ~]# kubectl apply -f my-nginx.yaml
deployment.apps/my-nginx created
[root@k8s-master01 ~]# kubectl get deploy
NAME       READY   UP-TO-DATE   AVAILABLE   AGE
my-nginx   3/3     3            3           8s
[root@k8s-master01 ~]# kubectl get pod
NAME                       READY   STATUS    RESTARTS   AGE
my-nginx-94fb9fc7c-2xjqc   1/1     Running   0          11s
my-nginx-94fb9fc7c-rmwtr   1/1     Running   0          11s
my-nginx-94fb9fc7c-x969q   1/1     Running   0          11s
At this time, each Pod can be accessed. In order to prevent the creation of a new Pod after the backend Pod hangs up, the IP address will also change, so the reliability should be guaranteed through Service discovery.
Next, create the Service, my nginx SVC Yaml configuration file is as follows
apiVersion: v1
kind: Service
metadata:
  name: my-nginx-service  # Service name
spec:
  type: ClusterIP   # Service type
  selector:
    run: my-nginx   # Tag matching backend Pod
  ports:
      # By default, 'targetPort' is set to the same value as the 'port' field for convenience.
    - port: 80
      targetPort: 80
Create Service and view status
[root@k8s-master01 ~]# kubectl apply -f my-nginx-svc.yaml
service/my-nginx-service created
[root@k8s-master01 ~]# kubectl get svc
NAME               TYPE        CLUSTER-IP    EXTERNAL-IP   PORT(S)   AGE
kubernetes         ClusterIP   10.96.0.1     <none>        443/TCP   22d
my-nginx-service   ClusterIP   10.100.13.4   <none>        80/TCP    7s
When viewing the detailed Service events, you can see that the back-end IP address corresponds to each Pod.
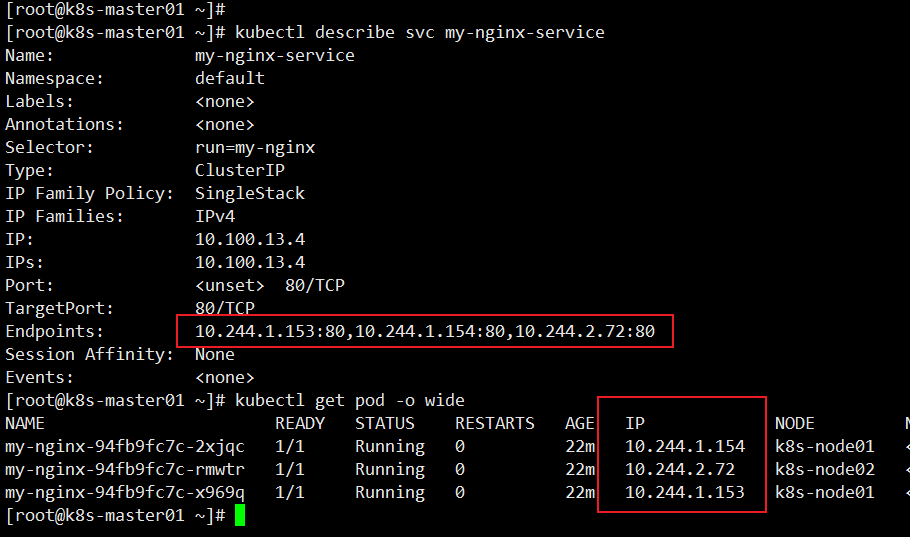
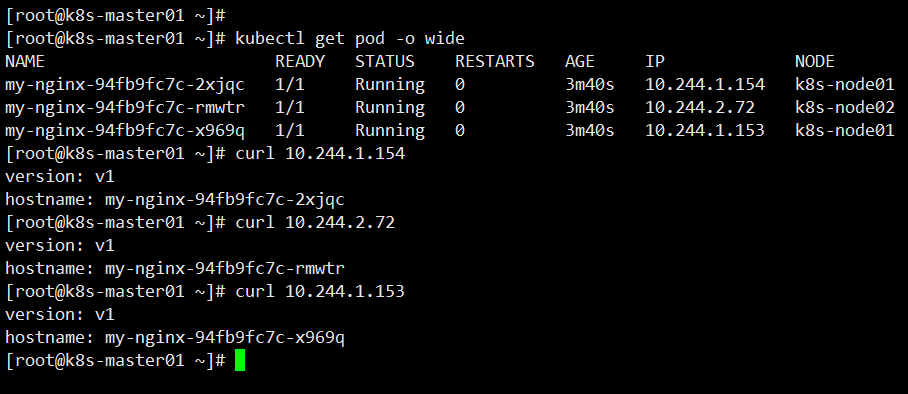
Accessing the Service IP address is actually accessing the back-end Pod. The Service makes a polling access policy.
[root@k8s-master01 ~]# curl 10.100.13.4
version: v1
hostname: my-nginx-94fb9fc7c-2xjqc
[root@k8s-master01 ~]# curl 10.100.13.4
version: v1
hostname: my-nginx-94fb9fc7c-x969q
[root@k8s-master01 ~]# curl 10.100.13.4
version: v1
hostname: my-nginx-94fb9fc7c-rmwtr
NodePort type
Using the newly created Deployment, you only need to modify the Service file and recreate it. my-nginx-svc.yaml file is as follows
apiVersion: v1
kind: Service
metadata:
  name: my-nginx-service  # Service name
spec:
  type: NodePort   # Service type
  selector:
    run: my-nginx   # Tag matching backend Pod
  ports:
      # By default, 'targetPort' is set to the same value as the 'port' field for convenience.
    - port: 80
      targetPort: 80
      # By default, for convenience, the Kubernetes control plane assigns a port number from a range (default: 30000-32767)
      nodePort: 30001
Create Service and view status
[root@k8s-master01 ~]# kubectl apply -f my-nginx-svc.yaml
service/my-nginx-service created
[root@k8s-master01 ~]# kubectl get svc
NAME               TYPE        CLUSTER-IP     EXTERNAL-IP   PORT(S)        AGE
kubernetes         ClusterIP   10.96.0.1      <none>        443/TCP        22d
my-nginx-service   NodePort    10.104.50.48   <none>        80:30001/TCP   6s
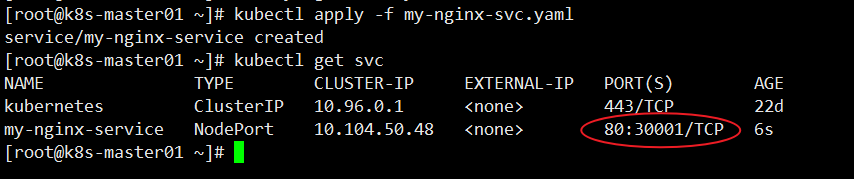
External access port 30001, the IP address of any node in the cluster plus port access.
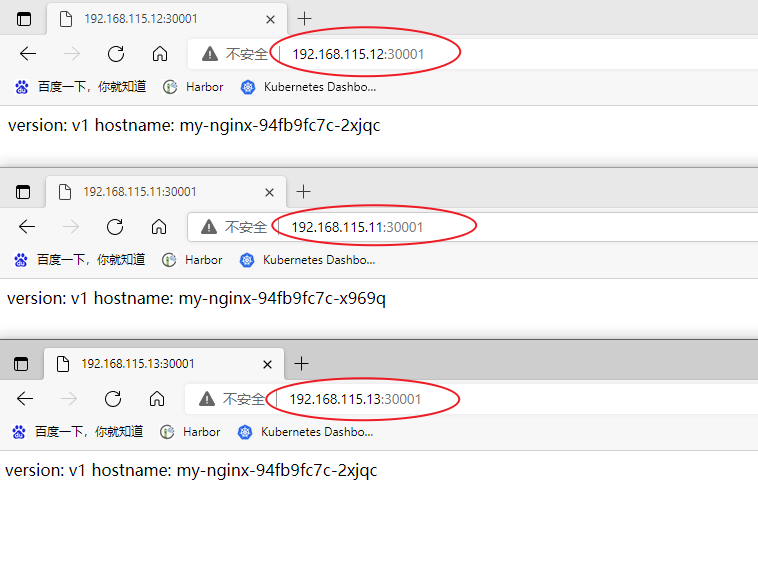
Due to the experimental environment, there is no experimental demonstration for LoadBalancer type and ExternalName type. The next chapter updates the learning notes of the basic concept and function demonstration of progress. Please pay attention to me.